maintenance DODGE NEON 1999 Service Owner's Manual
[x] Cancel search | Manufacturer: DODGE, Model Year: 1999, Model line: NEON, Model: DODGE NEON 1999Pages: 1200, PDF Size: 35.29 MB
Page 119 of 1200
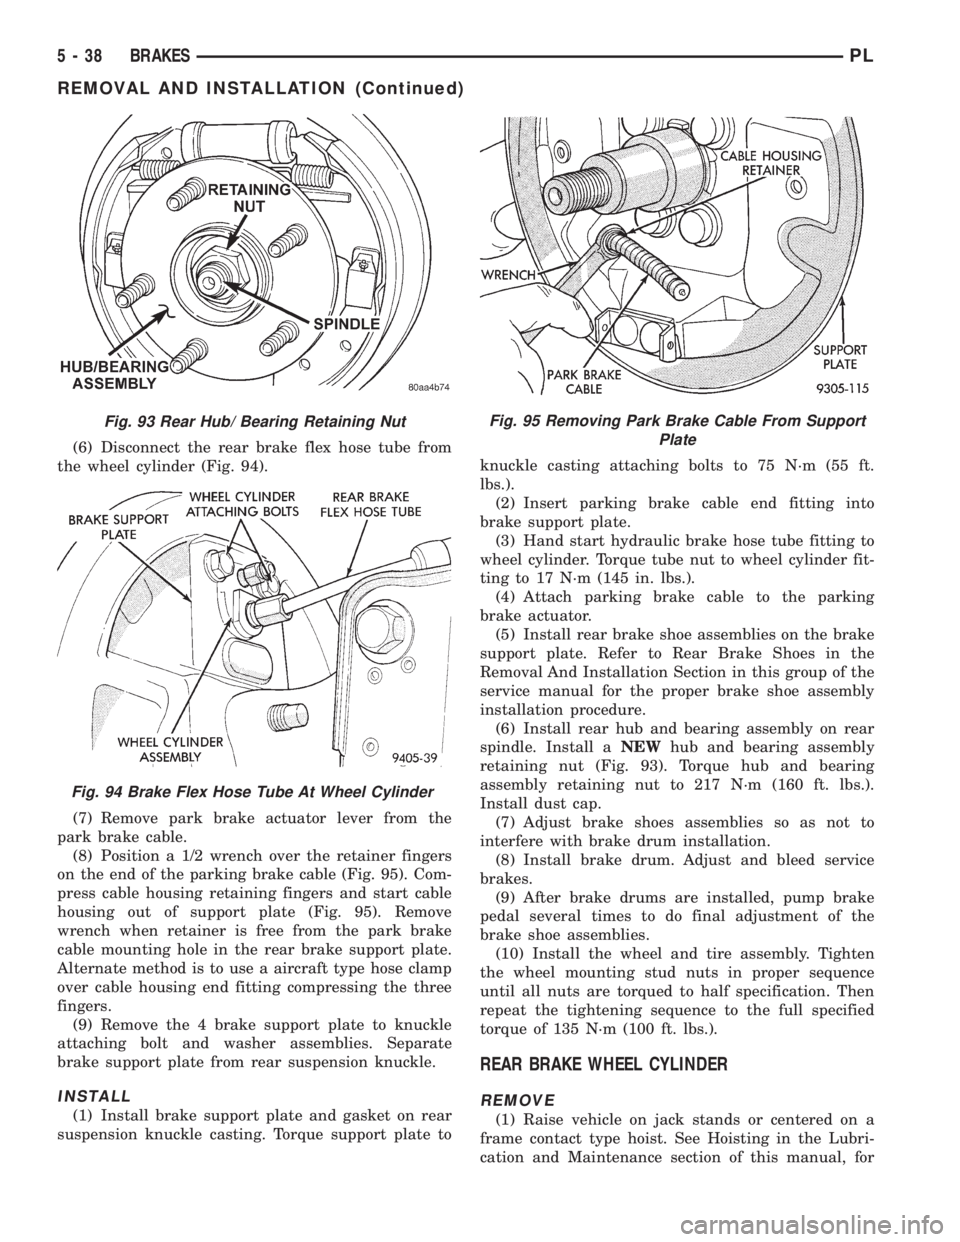
(6) Disconnect the rear brake flex hose tube from
the wheel cylinder (Fig. 94).
(7) Remove park brake actuator lever from the
park brake cable.
(8) Position a 1/2 wrench over the retainer fingers
on the end of the parking brake cable (Fig. 95). Com-
press cable housing retaining fingers and start cable
housing out of support plate (Fig. 95). Remove
wrench when retainer is free from the park brake
cable mounting hole in the rear brake support plate.
Alternate method is to use a aircraft type hose clamp
over cable housing end fitting compressing the three
fingers.
(9) Remove the 4 brake support plate to knuckle
attaching bolt and washer assemblies. Separate
brake support plate from rear suspension knuckle.
INSTALL
(1) Install brake support plate and gasket on rear
suspension knuckle casting. Torque support plate toknuckle casting attaching bolts to 75 N´m (55 ft.
lbs.).
(2) Insert parking brake cable end fitting into
brake support plate.
(3) Hand start hydraulic brake hose tube fitting to
wheel cylinder. Torque tube nut to wheel cylinder fit-
ting to 17 N´m (145 in. lbs.).
(4) Attach parking brake cable to the parking
brake actuator.
(5) Install rear brake shoe assemblies on the brake
support plate. Refer to Rear Brake Shoes in the
Removal And Installation Section in this group of the
service manual for the proper brake shoe assembly
installation procedure.
(6) Install rear hub and bearing assembly on rear
spindle. Install aNEWhub and bearing assembly
retaining nut (Fig. 93). Torque hub and bearing
assembly retaining nut to 217 N´m (160 ft. lbs.).
Install dust cap.
(7) Adjust brake shoes assemblies so as not to
interfere with brake drum installation.
(8) Install brake drum. Adjust and bleed service
brakes.
(9) After brake drums are installed, pump brake
pedal several times to do final adjustment of the
brake shoe assemblies.
(10) Install the wheel and tire assembly. Tighten
the wheel mounting stud nuts in proper sequence
until all nuts are torqued to half specification. Then
repeat the tightening sequence to the full specified
torque of 135 N´m (100 ft. lbs.).
REAR BRAKE WHEEL CYLINDER
REMOVE
(1) Raise vehicle on jack stands or centered on a
frame contact type hoist. See Hoisting in the Lubri-
cation and Maintenance section of this manual, for
Fig. 93 Rear Hub/ Bearing Retaining Nut
Fig. 94 Brake Flex Hose Tube At Wheel Cylinder
Fig. 95 Removing Park Brake Cable From Support
Plate
5 - 38 BRAKESPL
REMOVAL AND INSTALLATION (Continued)
Page 120 of 1200
the required lifting procedure to be used for this
vehicle.
(2) Remove the tire and wheel assembly from the
vehicle.
(3) Remove rear brake drum.
(4) Remove rear brake shoe assemblies from the
brake support plate. Refer to Rear Brake Shoes in
the Removal And Installation Section in this group of
the service manual for the proper brake shoe assem-
bly removal procedure.
(5) If brake shoes are wet with grease or brake
fluid, remove and replace.
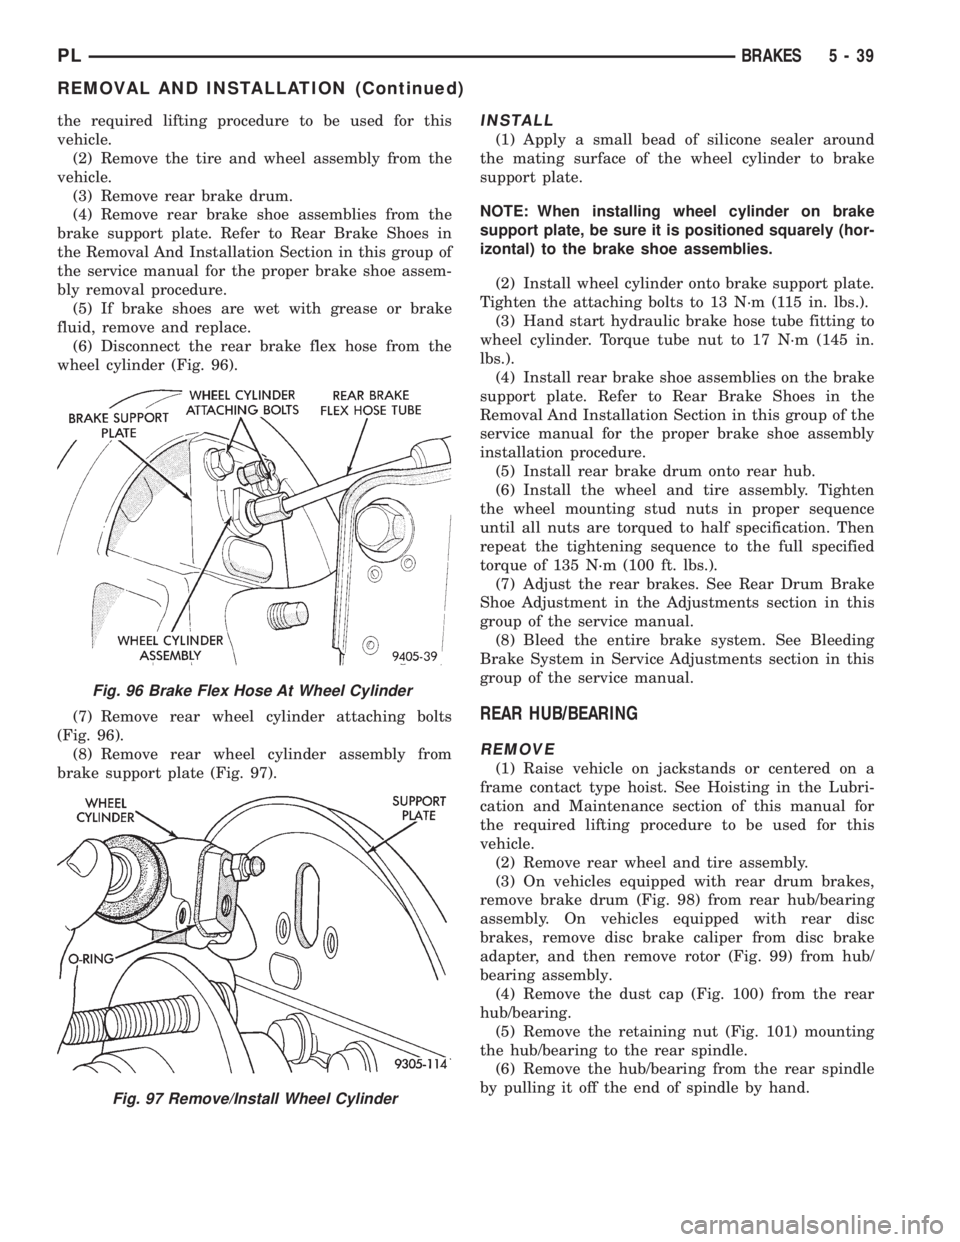
(6) Disconnect the rear brake flex hose from the
wheel cylinder (Fig. 96).
(7) Remove rear wheel cylinder attaching bolts
(Fig. 96).
(8) Remove rear wheel cylinder assembly from
brake support plate (Fig. 97).INSTALL
(1) Apply a small bead of silicone sealer around
the mating surface of the wheel cylinder to brake
support plate.
NOTE: When installing wheel cylinder on brake
support plate, be sure it is positioned squarely (hor-
izontal) to the brake shoe assemblies.
(2) Install wheel cylinder onto brake support plate.
Tighten the attaching bolts to 13 N´m (115 in. lbs.).
(3) Hand start hydraulic brake hose tube fitting to
wheel cylinder. Torque tube nut to 17 N´m (145 in.
lbs.).
(4) Install rear brake shoe assemblies on the brake
support plate. Refer to Rear Brake Shoes in the
Removal And Installation Section in this group of the
service manual for the proper brake shoe assembly
installation procedure.
(5) Install rear brake drum onto rear hub.
(6) Install the wheel and tire assembly. Tighten
the wheel mounting stud nuts in proper sequence
until all nuts are torqued to half specification. Then
repeat the tightening sequence to the full specified
torque of 135 N´m (100 ft. lbs.).
(7) Adjust the rear brakes. See Rear Drum Brake
Shoe Adjustment in the Adjustments section in this
group of the service manual.
(8) Bleed the entire brake system. See Bleeding
Brake System in Service Adjustments section in this
group of the service manual.
REAR HUB/BEARING
REMOVE
(1) Raise vehicle on jackstands or centered on a
frame contact type hoist. See Hoisting in the Lubri-
cation and Maintenance section of this manual for
the required lifting procedure to be used for this
vehicle.
(2) Remove rear wheel and tire assembly.
(3) On vehicles equipped with rear drum brakes,
remove brake drum (Fig. 98) from rear hub/bearing
assembly. On vehicles equipped with rear disc
brakes, remove disc brake caliper from disc brake
adapter, and then remove rotor (Fig. 99) from hub/
bearing assembly.
(4) Remove the dust cap (Fig. 100) from the rear
hub/bearing.
(5) Remove the retaining nut (Fig. 101) mounting
the hub/bearing to the rear spindle.
(6) Remove the hub/bearing from the rear spindle
by pulling it off the end of spindle by hand.
Fig. 96 Brake Flex Hose At Wheel Cylinder
Fig. 97 Remove/Install Wheel Cylinder
PLBRAKES 5 - 39
REMOVAL AND INSTALLATION (Continued)
Page 132 of 1200
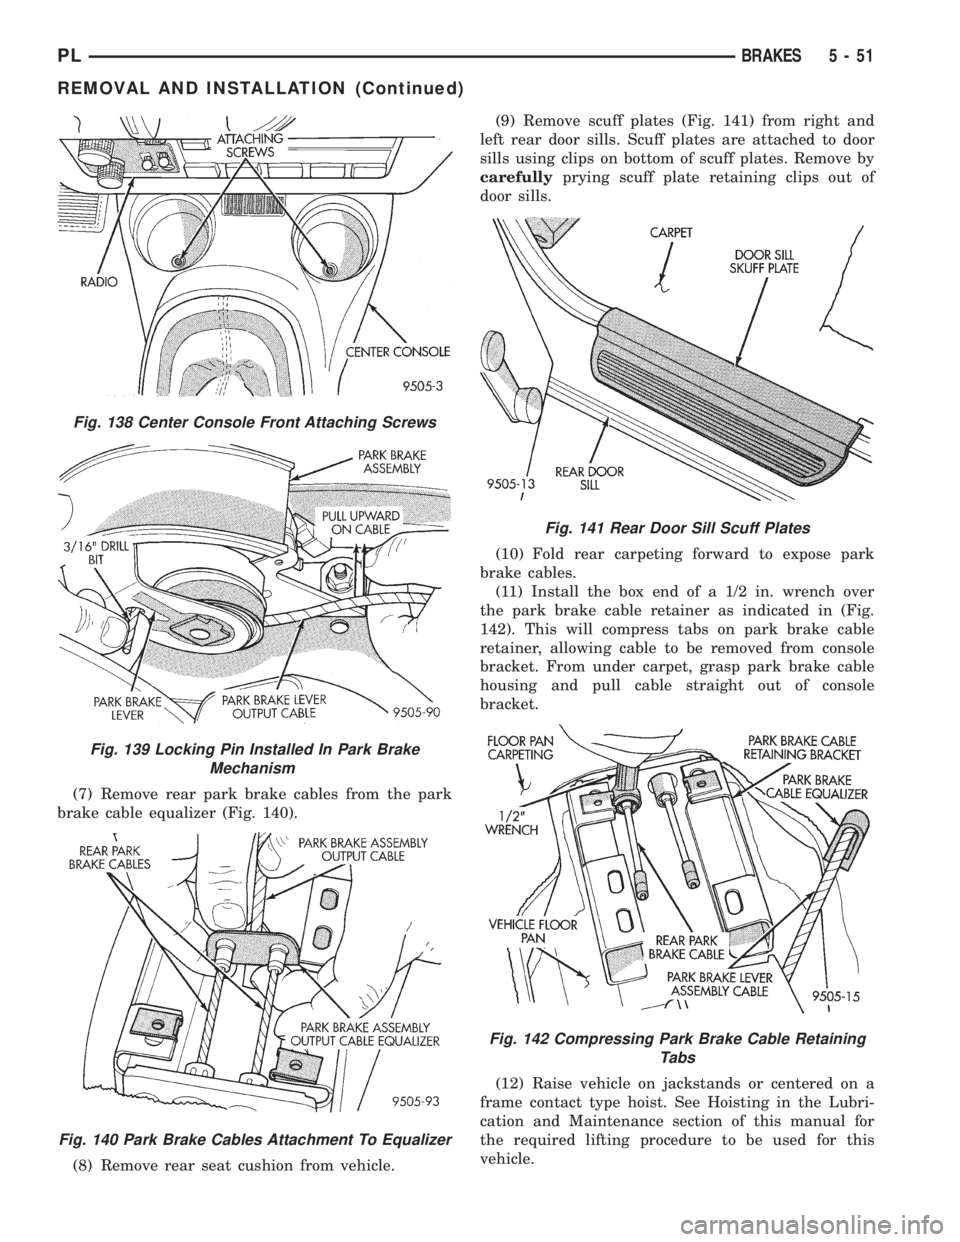
(7) Remove rear park brake cables from the park
brake cable equalizer (Fig. 140).
(8) Remove rear seat cushion from vehicle.(9) Remove scuff plates (Fig. 141) from right and
left rear door sills. Scuff plates are attached to door
sills using clips on bottom of scuff plates. Remove by
carefullyprying scuff plate retaining clips out of
door sills.
(10) Fold rear carpeting forward to expose park
brake cables.
(11) Install the box end of a 1/2 in. wrench over
the park brake cable retainer as indicated in (Fig.
142). This will compress tabs on park brake cable
retainer, allowing cable to be removed from console
bracket. From under carpet, grasp park brake cable
housing and pull cable straight out of console
bracket.
(12) Raise vehicle on jackstands or centered on a
frame contact type hoist. See Hoisting in the Lubri-
cation and Maintenance section of this manual for
the required lifting procedure to be used for this
vehicle.
Fig. 138 Center Console Front Attaching Screws
Fig. 139 Locking Pin Installed In Park Brake
Mechanism
Fig. 140 Park Brake Cables Attachment To Equalizer
Fig. 141 Rear Door Sill Scuff Plates
Fig. 142 Compressing Park Brake Cable Retaining
Tabs
PLBRAKES 5 - 51
REMOVAL AND INSTALLATION (Continued)
Page 146 of 1200
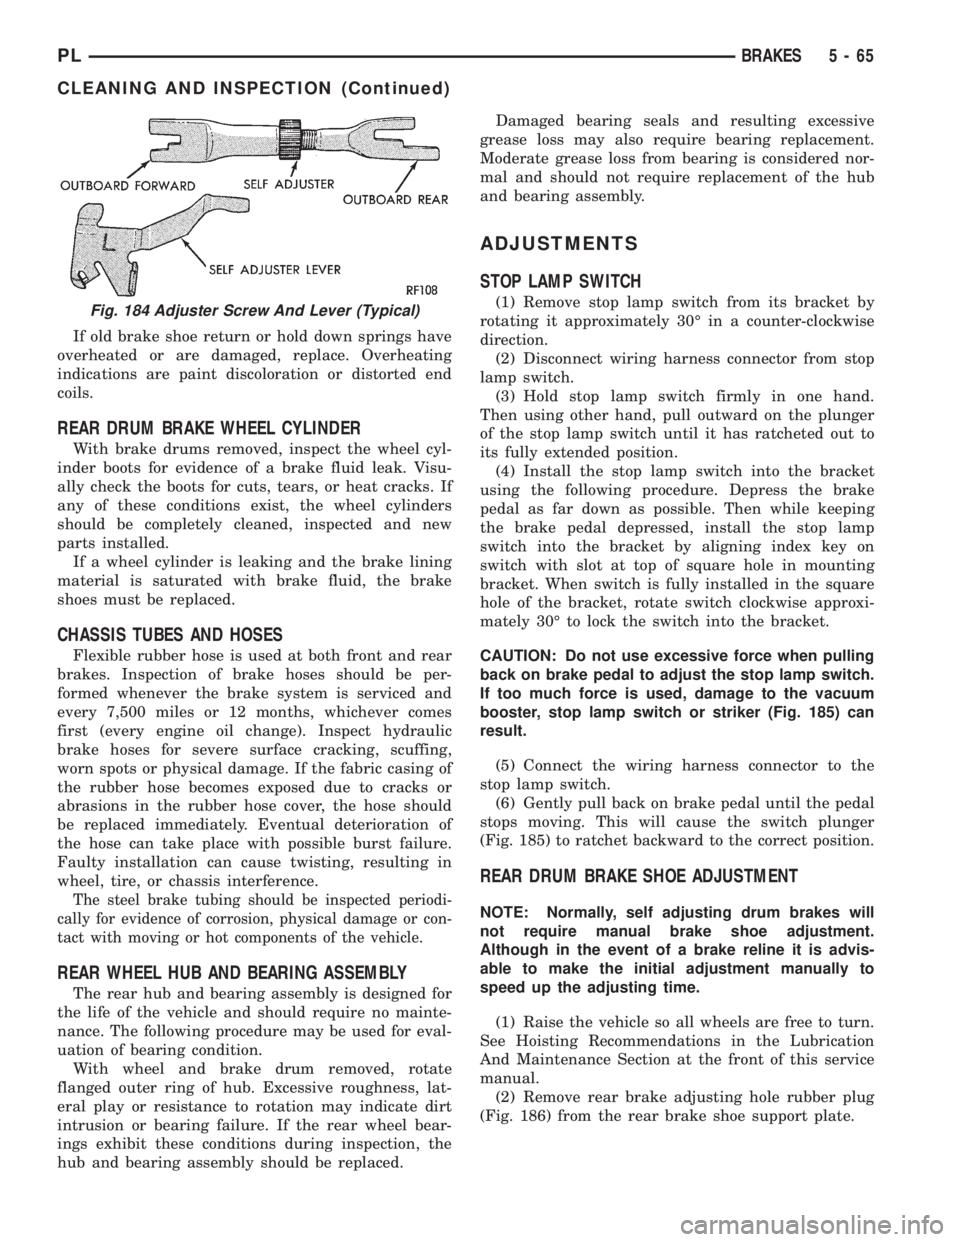
If old brake shoe return or hold down springs have
overheated or are damaged, replace. Overheating
indications are paint discoloration or distorted end
coils.
REAR DRUM BRAKE WHEEL CYLINDER
With brake drums removed, inspect the wheel cyl-
inder boots for evidence of a brake fluid leak. Visu-
ally check the boots for cuts, tears, or heat cracks. If
any of these conditions exist, the wheel cylinders
should be completely cleaned, inspected and new
parts installed.
If a wheel cylinder is leaking and the brake lining
material is saturated with brake fluid, the brake
shoes must be replaced.
CHASSIS TUBES AND HOSES
Flexible rubber hose is used at both front and rear
brakes. Inspection of brake hoses should be per-
formed whenever the brake system is serviced and
every 7,500 miles or 12 months, whichever comes
first (every engine oil change). Inspect hydraulic
brake hoses for severe surface cracking, scuffing,
worn spots or physical damage. If the fabric casing of
the rubber hose becomes exposed due to cracks or
abrasions in the rubber hose cover, the hose should
be replaced immediately. Eventual deterioration of
the hose can take place with possible burst failure.
Faulty installation can cause twisting, resulting in
wheel, tire, or chassis interference.
The steel brake tubing should be inspected periodi-
cally for evidence of corrosion, physical damage or con-
tact with moving or hot components of the vehicle.
REAR WHEEL HUB AND BEARING ASSEMBLY
The rear hub and bearing assembly is designed for
the life of the vehicle and should require no mainte-
nance. The following procedure may be used for eval-
uation of bearing condition.
With wheel and brake drum removed, rotate
flanged outer ring of hub. Excessive roughness, lat-
eral play or resistance to rotation may indicate dirt
intrusion or bearing failure. If the rear wheel bear-
ings exhibit these conditions during inspection, the
hub and bearing assembly should be replaced.Damaged bearing seals and resulting excessive
grease loss may also require bearing replacement.
Moderate grease loss from bearing is considered nor-
mal and should not require replacement of the hub
and bearing assembly.
ADJUSTMENTS
STOP LAMP SWITCH
(1) Remove stop lamp switch from its bracket by
rotating it approximately 30É in a counter-clockwise
direction.
(2) Disconnect wiring harness connector from stop
lamp switch.
(3) Hold stop lamp switch firmly in one hand.
Then using other hand, pull outward on the plunger
of the stop lamp switch until it has ratcheted out to
its fully extended position.
(4) Install the stop lamp switch into the bracket
using the following procedure. Depress the brake
pedal as far down as possible. Then while keeping
the brake pedal depressed, install the stop lamp
switch into the bracket by aligning index key on
switch with slot at top of square hole in mounting
bracket. When switch is fully installed in the square
hole of the bracket, rotate switch clockwise approxi-
mately 30É to lock the switch into the bracket.
CAUTION: Do not use excessive force when pulling
back on brake pedal to adjust the stop lamp switch.
If too much force is used, damage to the vacuum
booster, stop lamp switch or striker (Fig. 185) can
result.
(5) Connect the wiring harness connector to the
stop lamp switch.
(6) Gently pull back on brake pedal until the pedal
stops moving. This will cause the switch plunger
(Fig. 185) to ratchet backward to the correct position.
REAR DRUM BRAKE SHOE ADJUSTMENT
NOTE: Normally, self adjusting drum brakes will
not require manual brake shoe adjustment.
Although in the event of a brake reline it is advis-
able to make the initial adjustment manually to
speed up the adjusting time.
(1) Raise the vehicle so all wheels are free to turn.
See Hoisting Recommendations in the Lubrication
And Maintenance Section at the front of this service
manual.
(2) Remove rear brake adjusting hole rubber plug
(Fig. 186) from the rear brake shoe support plate.
Fig. 184 Adjuster Screw And Lever (Typical)
PLBRAKES 5 - 65
CLEANING AND INSPECTION (Continued)
Page 147 of 1200
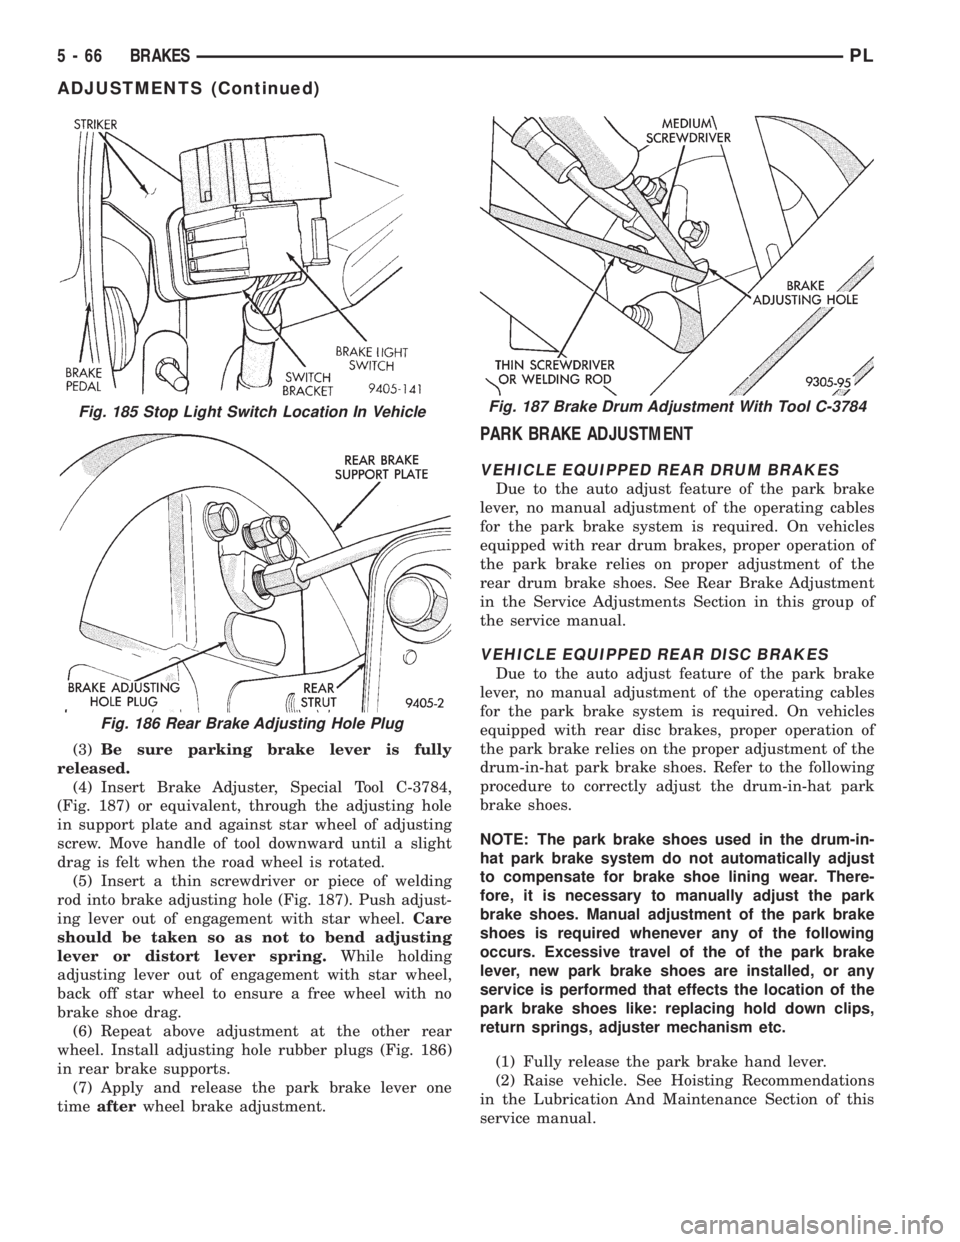
(3)Be sure parking brake lever is fully
released.
(4) Insert Brake Adjuster, Special Tool C-3784,
(Fig. 187) or equivalent, through the adjusting hole
in support plate and against star wheel of adjusting
screw. Move handle of tool downward until a slight
drag is felt when the road wheel is rotated.
(5) Insert a thin screwdriver or piece of welding
rod into brake adjusting hole (Fig. 187). Push adjust-
ing lever out of engagement with star wheel.Care
should be taken so as not to bend adjusting
lever or distort lever spring.While holding
adjusting lever out of engagement with star wheel,
back off star wheel to ensure a free wheel with no
brake shoe drag.
(6) Repeat above adjustment at the other rear
wheel. Install adjusting hole rubber plugs (Fig. 186)
in rear brake supports.
(7) Apply and release the park brake lever one
timeafterwheel brake adjustment.
PARK BRAKE ADJUSTMENT
VEHICLE EQUIPPED REAR DRUM BRAKES
Due to the auto adjust feature of the park brake
lever, no manual adjustment of the operating cables
for the park brake system is required. On vehicles
equipped with rear drum brakes, proper operation of
the park brake relies on proper adjustment of the
rear drum brake shoes. See Rear Brake Adjustment
in the Service Adjustments Section in this group of
the service manual.
VEHICLE EQUIPPED REAR DISC BRAKES
Due to the auto adjust feature of the park brake
lever, no manual adjustment of the operating cables
for the park brake system is required. On vehicles
equipped with rear disc brakes, proper operation of
the park brake relies on the proper adjustment of the
drum-in-hat park brake shoes. Refer to the following
procedure to correctly adjust the drum-in-hat park
brake shoes.
NOTE: The park brake shoes used in the drum-in-
hat park brake system do not automatically adjust
to compensate for brake shoe lining wear. There-
fore, it is necessary to manually adjust the park
brake shoes. Manual adjustment of the park brake
shoes is required whenever any of the following
occurs. Excessive travel of the of the park brake
lever, new park brake shoes are installed, or any
service is performed that effects the location of the
park brake shoes like: replacing hold down clips,
return springs, adjuster mechanism etc.
(1) Fully release the park brake hand lever.
(2) Raise vehicle. See Hoisting Recommendations
in the Lubrication And Maintenance Section of this
service manual.
Fig. 185 Stop Light Switch Location In Vehicle
Fig. 186 Rear Brake Adjusting Hole Plug
Fig. 187 Brake Drum Adjustment With Tool C-3784
5 - 66 BRAKESPL
ADJUSTMENTS (Continued)
Page 168 of 1200
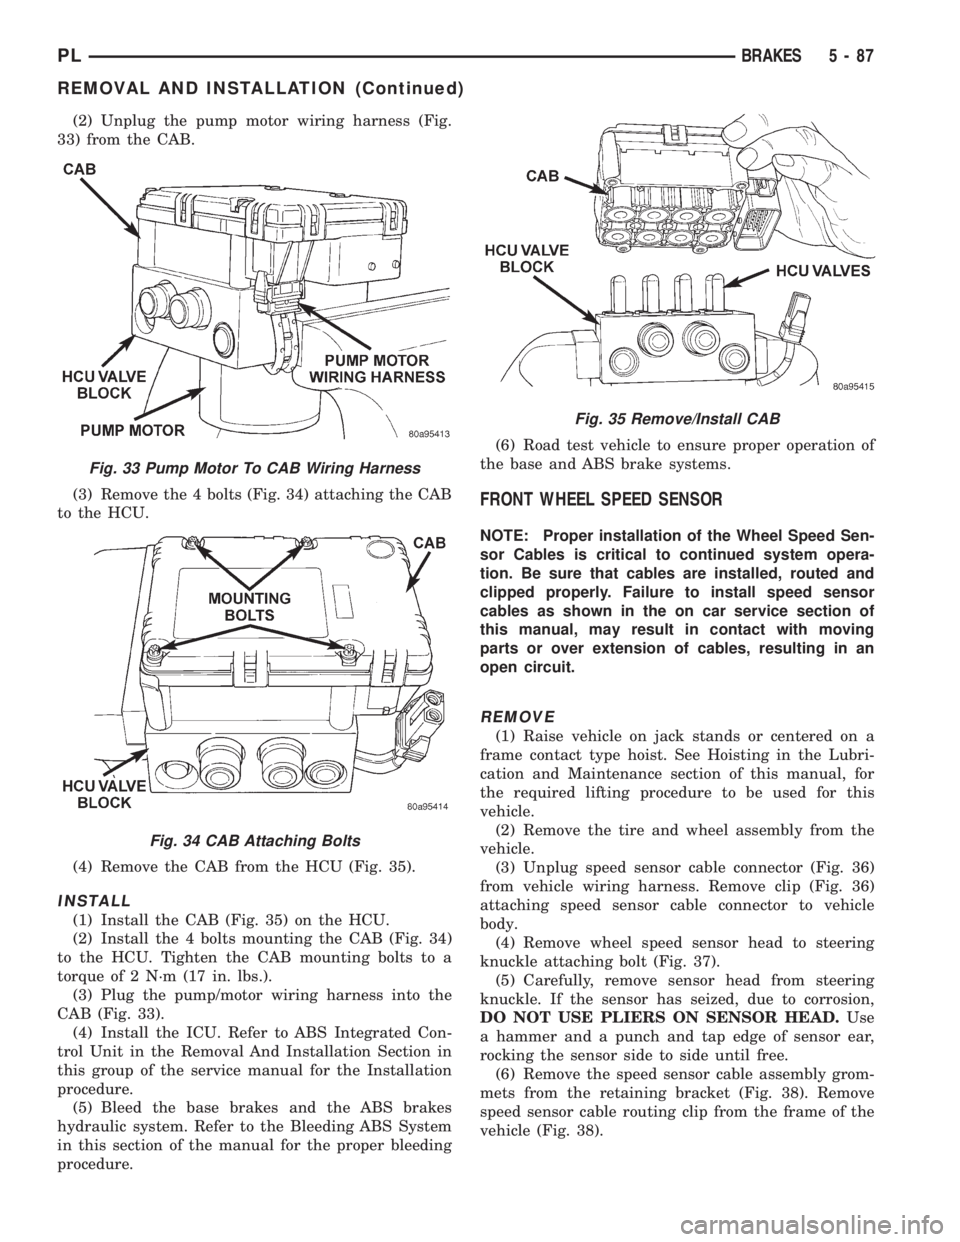
(2) Unplug the pump motor wiring harness (Fig.
33) from the CAB.
(3) Remove the 4 bolts (Fig. 34) attaching the CAB
to the HCU.
(4) Remove the CAB from the HCU (Fig. 35).
INSTALL
(1) Install the CAB (Fig. 35) on the HCU.
(2) Install the 4 bolts mounting the CAB (Fig. 34)
to the HCU. Tighten the CAB mounting bolts to a
torque of 2 N´m (17 in. lbs.).
(3) Plug the pump/motor wiring harness into the
CAB (Fig. 33).
(4) Install the ICU. Refer to ABS Integrated Con-
trol Unit in the Removal And Installation Section in
this group of the service manual for the Installation
procedure.
(5) Bleed the base brakes and the ABS brakes
hydraulic system. Refer to the Bleeding ABS System
in this section of the manual for the proper bleeding
procedure.(6) Road test vehicle to ensure proper operation of
the base and ABS brake systems.
FRONT WHEEL SPEED SENSOR
NOTE: Proper installation of the Wheel Speed Sen-
sor Cables is critical to continued system opera-
tion. Be sure that cables are installed, routed and
clipped properly. Failure to install speed sensor
cables as shown in the on car service section of
this manual, may result in contact with moving
parts or over extension of cables, resulting in an
open circuit.
REMOVE
(1) Raise vehicle on jack stands or centered on a
frame contact type hoist. See Hoisting in the Lubri-
cation and Maintenance section of this manual, for
the required lifting procedure to be used for this
vehicle.
(2) Remove the tire and wheel assembly from the
vehicle.
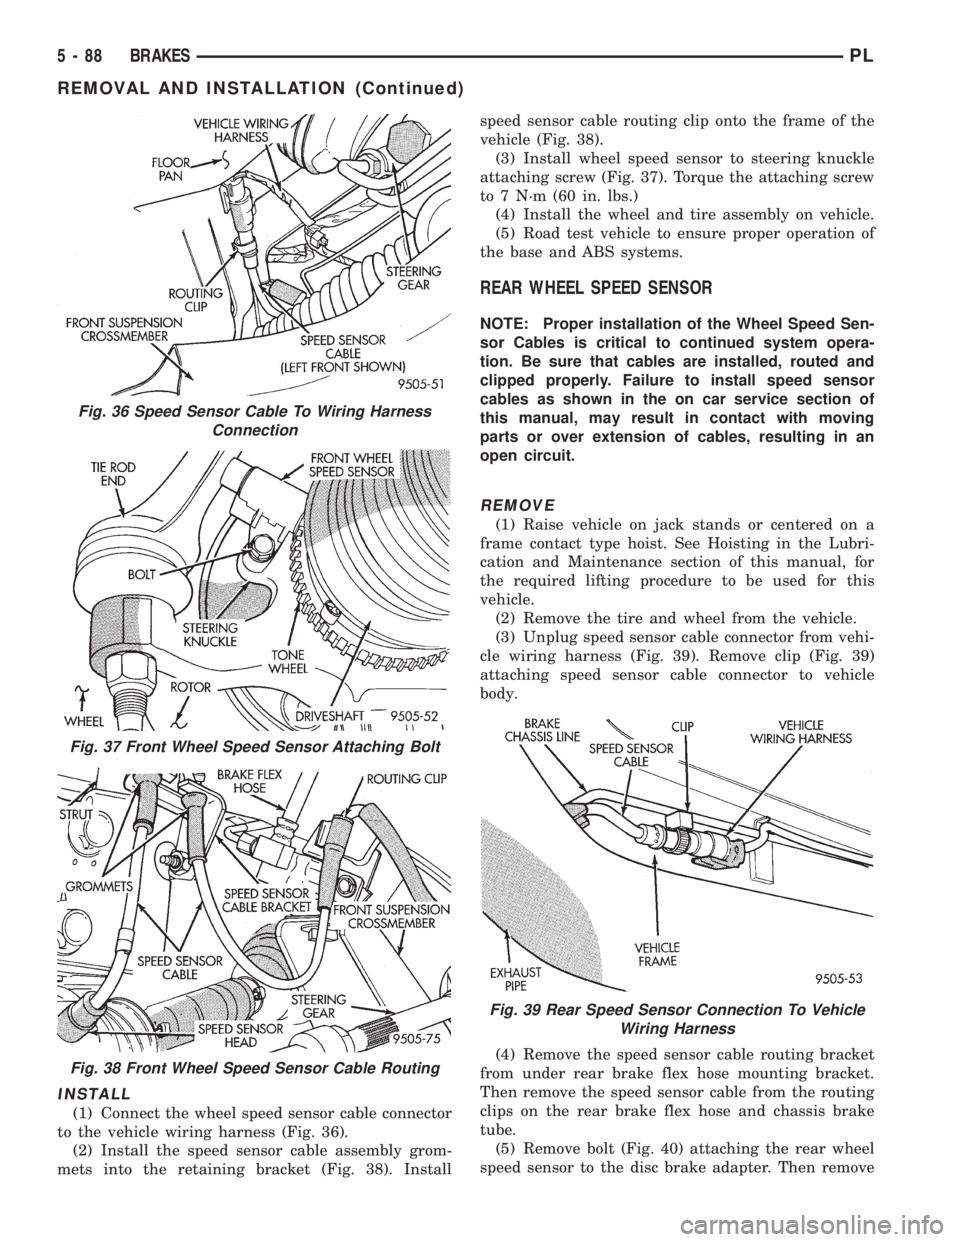
(3) Unplug speed sensor cable connector (Fig. 36)
from vehicle wiring harness. Remove clip (Fig. 36)
attaching speed sensor cable connector to vehicle
body.
(4) Remove wheel speed sensor head to steering
knuckle attaching bolt (Fig. 37).
(5) Carefully, remove sensor head from steering
knuckle. If the sensor has seized, due to corrosion,
DO NOT USE PLIERS ON SENSOR HEAD.Use
a hammer and a punch and tap edge of sensor ear,
rocking the sensor side to side until free.
(6) Remove the speed sensor cable assembly grom-
mets from the retaining bracket (Fig. 38). Remove
speed sensor cable routing clip from the frame of the
vehicle (Fig. 38).
Fig. 33 Pump Motor To CAB Wiring Harness
Fig. 34 CAB Attaching Bolts
Fig. 35 Remove/Install CAB
PLBRAKES 5 - 87
REMOVAL AND INSTALLATION (Continued)
Page 169 of 1200
INSTALL
(1) Connect the wheel speed sensor cable connector
to the vehicle wiring harness (Fig. 36).
(2) Install the speed sensor cable assembly grom-
mets into the retaining bracket (Fig. 38). Installspeed sensor cable routing clip onto the frame of the
vehicle (Fig. 38).
(3) Install wheel speed sensor to steering knuckle
attaching screw (Fig. 37). Torque the attaching screw
to 7 N´m (60 in. lbs.)
(4) Install the wheel and tire assembly on vehicle.
(5) Road test vehicle to ensure proper operation of
the base and ABS systems.
REAR WHEEL SPEED SENSOR
NOTE: Proper installation of the Wheel Speed Sen-
sor Cables is critical to continued system opera-
tion. Be sure that cables are installed, routed and
clipped properly. Failure to install speed sensor
cables as shown in the on car service section of
this manual, may result in contact with moving
parts or over extension of cables, resulting in an
open circuit.
REMOVE
(1) Raise vehicle on jack stands or centered on a
frame contact type hoist. See Hoisting in the Lubri-
cation and Maintenance section of this manual, for
the required lifting procedure to be used for this
vehicle.
(2) Remove the tire and wheel from the vehicle.
(3) Unplug speed sensor cable connector from vehi-
cle wiring harness (Fig. 39). Remove clip (Fig. 39)
attaching speed sensor cable connector to vehicle
body.
(4) Remove the speed sensor cable routing bracket
from under rear brake flex hose mounting bracket.
Then remove the speed sensor cable from the routing
clips on the rear brake flex hose and chassis brake
tube.
(5) Remove bolt (Fig. 40) attaching the rear wheel
speed sensor to the disc brake adapter. Then remove
Fig. 36 Speed Sensor Cable To Wiring Harness
Connection
Fig. 37 Front Wheel Speed Sensor Attaching Bolt
Fig. 38 Front Wheel Speed Sensor Cable Routing
Fig. 39 Rear Speed Sensor Connection To Vehicle
Wiring Harness
5 - 88 BRAKESPL
REMOVAL AND INSTALLATION (Continued)
Page 173 of 1200
The clutch cable has a unique self-adjuster mecha-
nism built into the cable which compensates for
clutch disc wear. The cable requires no maintenance
or lubrication. There are no serviceable components
on the cable assembly.
The clutch pedal is connected to the cable through
a plastic spacer. The upper end of the clutch pedal
pivots in the pedal bracket on two nylon bushings
and a shaft. These bushings are greased at assembly
and do not require periodic lubrication.
CLUTCH DISC AND COVER APPLICATION
The 2.0 single overhead cam engine uses a 216 mm
(8.5 in.) clutch disc. The manual transaxle is avail-
able only with the 2.0 liter engine.
CLUTCH REPLACEMENT
The transaxle must be removed to service the
clutch disc, pressure plate, flywheel/drive plate,
and/or clutch release bearing and lever.
DESCRIPTION AND OPERATION
CLUTCH CABLE
The manual transaxle clutch release system has a
unique self-adjusting mechanism to compensate for
clutch disc wear. This adjuster mechanism is located
within the clutch cable assembly. The preload spring
maintains tension on the cable. This tension keeps
the clutch release bearing continuously loaded
against the fingers of the clutch cover assembly.
CLUTCH PEDAL POSITION SWITCH
The clutch pedal position switch functions as a
safety interlock device. It prevents possible engine
cranking with the clutch engaged.
The clutch pedal position switch is wired in series
between the starter relay coil and the ignition
switch.
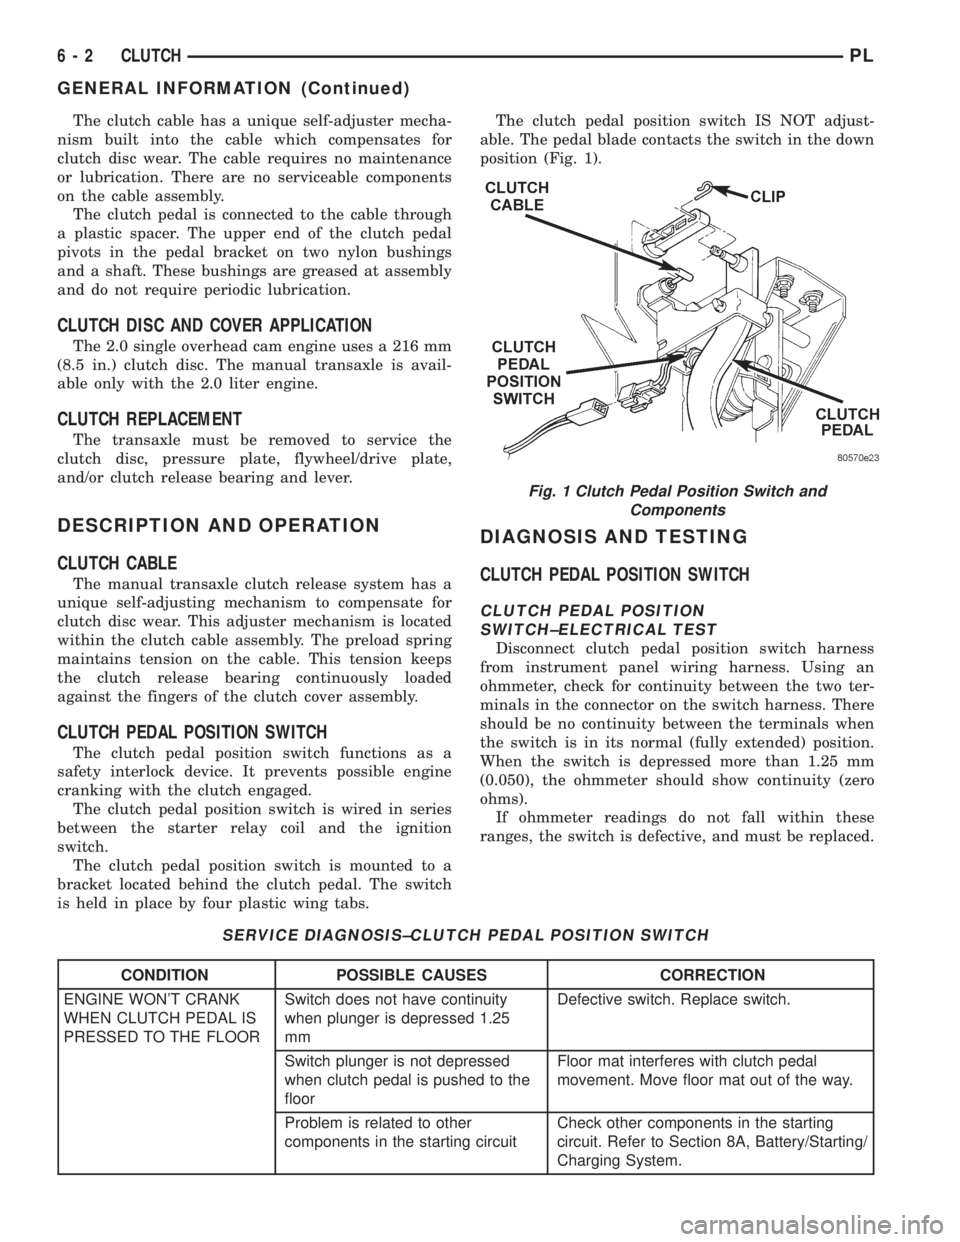
The clutch pedal position switch is mounted to a
bracket located behind the clutch pedal. The switch
is held in place by four plastic wing tabs.The clutch pedal position switch IS NOT adjust-
able. The pedal blade contacts the switch in the down
position (Fig. 1).
DIAGNOSIS AND TESTING
CLUTCH PEDAL POSITION SWITCH
CLUTCH PEDAL POSITION
SWITCH±ELECTRICAL TEST
Disconnect clutch pedal position switch harness
from instrument panel wiring harness. Using an
ohmmeter, check for continuity between the two ter-
minals in the connector on the switch harness. There
should be no continuity between the terminals when
the switch is in its normal (fully extended) position.
When the switch is depressed more than 1.25 mm
(0.050), the ohmmeter should show continuity (zero
ohms).
If ohmmeter readings do not fall within these
ranges, the switch is defective, and must be replaced.
SERVICE DIAGNOSIS±CLUTCH PEDAL POSITION SWITCH
CONDITION POSSIBLE CAUSES CORRECTION
ENGINE WON'T CRANK
WHEN CLUTCH PEDAL IS
PRESSED TO THE FLOORSwitch does not have continuity
when plunger is depressed 1.25
mmDefective switch. Replace switch.
Switch plunger is not depressed
when clutch pedal is pushed to the
floorFloor mat interferes with clutch pedal
movement. Move floor mat out of the way.
Problem is related to other
components in the starting circuitCheck other components in the starting
circuit. Refer to Section 8A, Battery/Starting/
Charging System.
Fig. 1 Clutch Pedal Position Switch and
Components
6 - 2 CLUTCHPL
GENERAL INFORMATION (Continued)
Page 184 of 1200
CLUTCH
CONTENTS
page page
GENERAL INFORMATION
CLUTCH COMPONENTS Ð RIGHT HAND
DRIVE (RHD)........................ 1
CLUTCH DISC AND COVER APPLICATION Ð
RIGHT HAND DRIVE (RHD)............. 1
CLUTCH REPLACEMENT Ð RIGHT HAND
DRIVE (RHD)........................ 1
DESCRIPTION AND OPERATION
CLUTCH PEDAL POSITION SWITCH Ð RIGHT
HAND DRIVE (RHD)................... 2
HYDRAULIC CLUTCH SYSTEM Ð RIGHT
HAND DRIVE (RHD)................... 2
DIAGNOSIS AND TESTING
CLASH±INTO±REVERSE COMPLAINTS...... 6CLUTCH DIAGNOSIS Ð RIGHT HAND DRIVE
(RHD).............................. 2
REMOVAL AND INSTALLATION
CLUTCH ASSEMBLY Ð RIGHT HAND DRIVE
(RHD).............................. 8
CLUTCH MASTER CYLINDER Ð RIGHT HAND
DRIVE (RHD)........................ 6
CLUTCH PEDAL POSITION SWITCH Ð RIGHT
HAND DRIVE (RHD)................... 8
HYDRAULIC SLAVE CYLINDER Ð RIGHT
HAND DRIVE (RHD)................... 7
SPECIFICATIONS
NV T350 (A-578) CLUTCH TIGHTENING
REFERENCE.......................... 9
GENERAL INFORMATION
CLUTCH COMPONENTS Ð RIGHT HAND DRIVE
(RHD)
The modular clutch assembly used in this vehicle
consists of a single, dry-type clutch disc and a dia-
phragm style clutch cover.
The clutch disc has cushion springs riveted to the
disc hub assembly. The clutch disc facings are riveted
to the cushion springs. The facings are made from a
non-asbestos material.
The clutch cover pressure plate assembly is a dia-
phragm type unit with a one-piece diaphragm spring
with multiple release fingers. The pressure plate
release fingers are preset during manufacture and
are not adjustable.
A sleeve-type release bearing is used to engage and
disengage the clutch cover pressure plate. The bear-
ing is prelubed during manufacture and is a sealed
unit.
The release bearing is operated by a pivoting
release fork in the clutch housing. The fork pivots on
a ball stud within the housing. The release fork is
actuated by a hydraulic clutch system.
The hydraulic clutch automatically adjusts for any
slack in the mechanism. This compensates for clutch
disc wear. The system requires no maintenance or
lubrication.
The clutch pedal is connected to the clutch master
cylinder through a plastic bushing. The upper end of
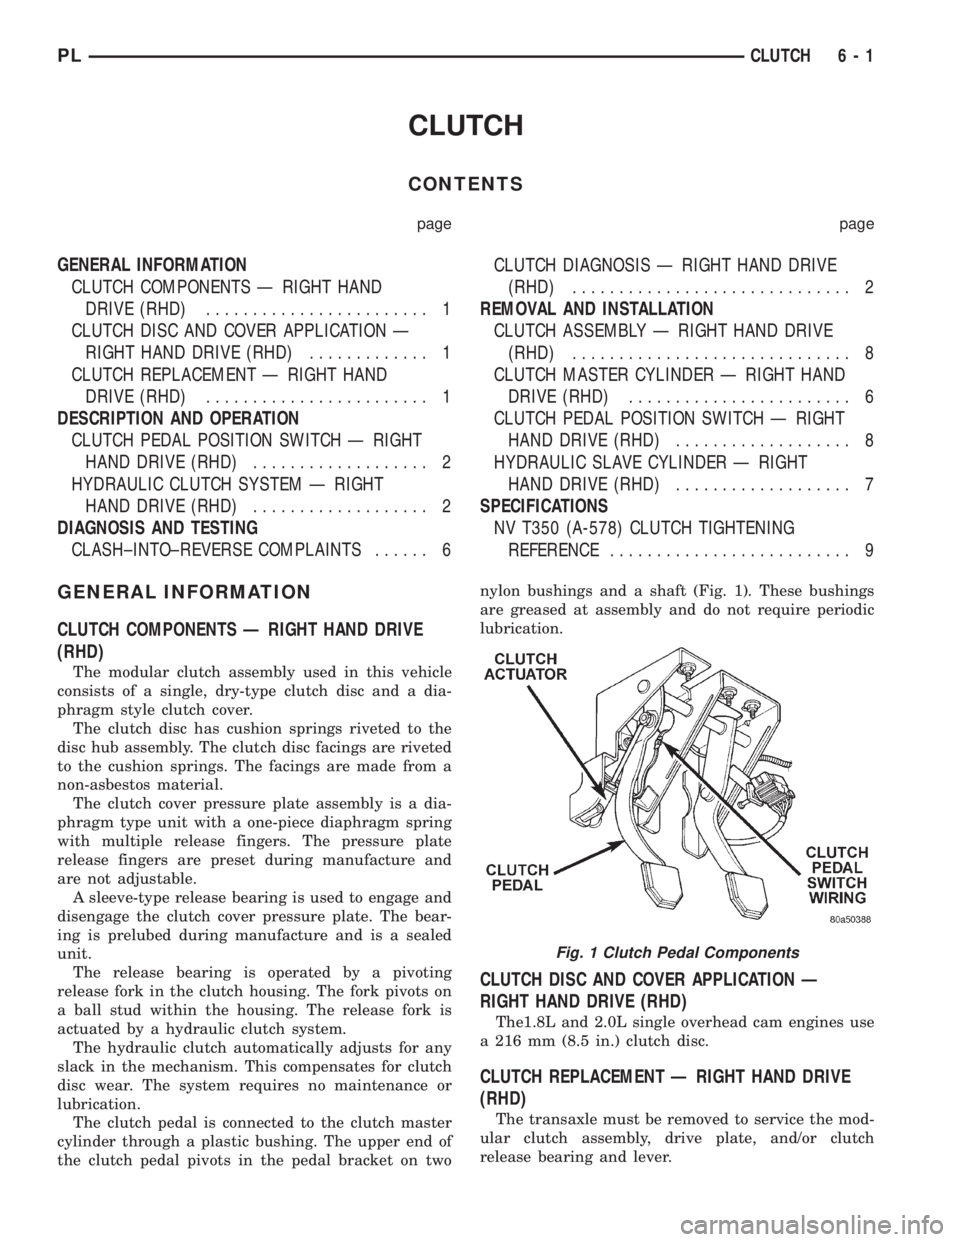
the clutch pedal pivots in the pedal bracket on twonylon bushings and a shaft (Fig. 1). These bushings
are greased at assembly and do not require periodic
lubrication.
CLUTCH DISC AND COVER APPLICATION Ð
RIGHT HAND DRIVE (RHD)
The1.8L and 2.0L single overhead cam engines use
a 216 mm (8.5 in.) clutch disc.
CLUTCH REPLACEMENT Ð RIGHT HAND DRIVE
(RHD)
The transaxle must be removed to service the mod-
ular clutch assembly, drive plate, and/or clutch
release bearing and lever.
Fig. 1 Clutch Pedal Components
PLCLUTCH 6 - 1
Page 196 of 1200
ENGINE THERMOSTAT
The engine thermostat is located on the front of
the engine (radiator side) in the thermostat housing/
engine outlet connector. The thermostat has an air
bleed (vent) located in the flange and a O-ring for
sealing incorporate on it. There is a relief in the ther-
mostat housing/outlet connector for the O-ring.
WATER PUMP
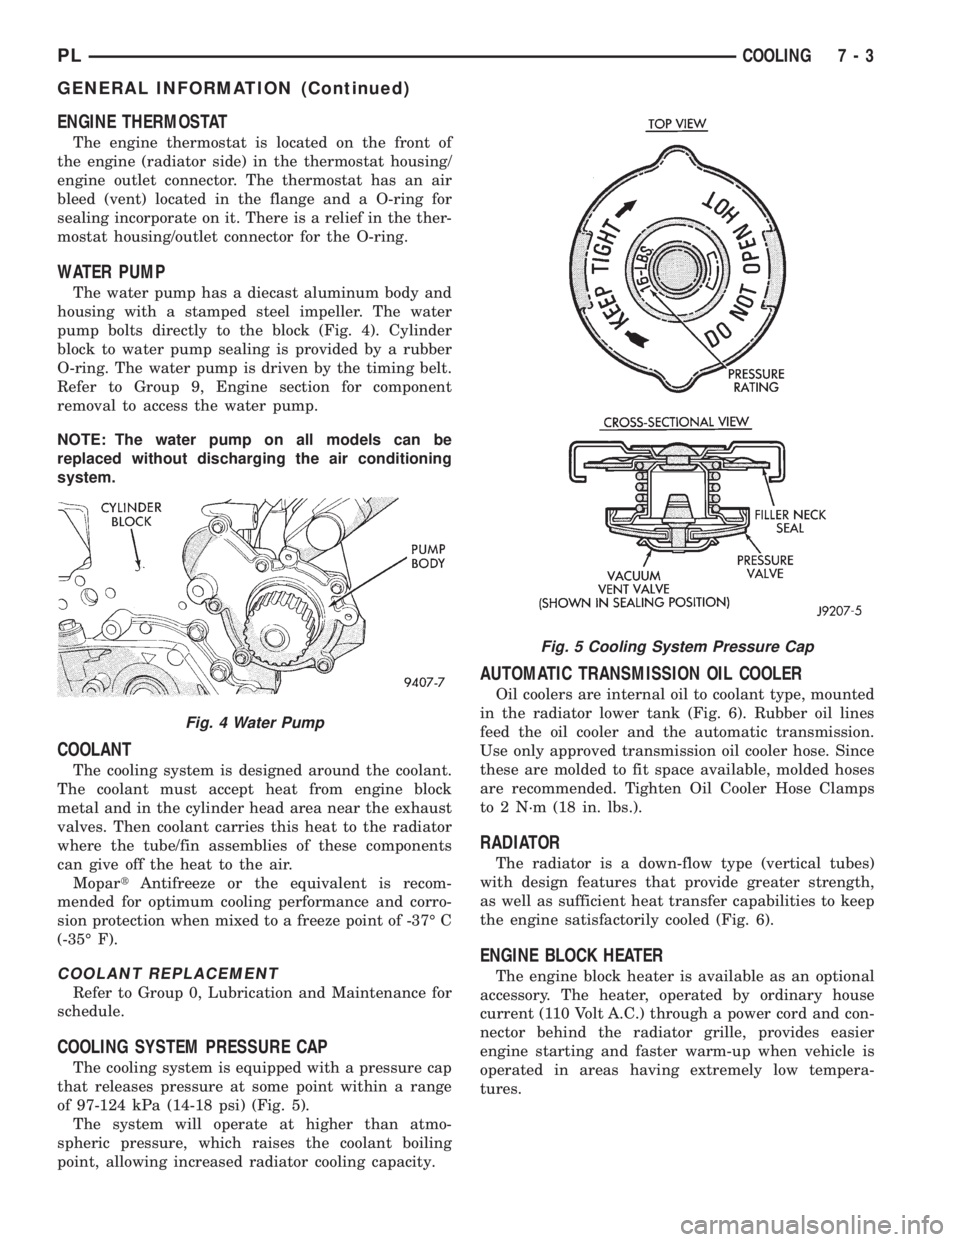
The water pump has a diecast aluminum body and
housing with a stamped steel impeller. The water
pump bolts directly to the block (Fig. 4). Cylinder
block to water pump sealing is provided by a rubber
O-ring. The water pump is driven by the timing belt.
Refer to Group 9, Engine section for component
removal to access the water pump.
NOTE: The water pump on all models can be
replaced without discharging the air conditioning
system.
COOLANT
The cooling system is designed around the coolant.
The coolant must accept heat from engine block
metal and in the cylinder head area near the exhaust
valves. Then coolant carries this heat to the radiator
where the tube/fin assemblies of these components
can give off the heat to the air.
MopartAntifreeze or the equivalent is recom-
mended for optimum cooling performance and corro-
sion protection when mixed to a freeze point of -37É C
(-35É F).
COOLANT REPLACEMENT
Refer to Group 0, Lubrication and Maintenance for
schedule.
COOLING SYSTEM PRESSURE CAP
The cooling system is equipped with a pressure cap
that releases pressure at some point within a range
of 97-124 kPa (14-18 psi) (Fig. 5).
The system will operate at higher than atmo-
spheric pressure, which raises the coolant boiling
point, allowing increased radiator cooling capacity.
AUTOMATIC TRANSMISSION OIL COOLER
Oil coolers are internal oil to coolant type, mounted
in the radiator lower tank (Fig. 6). Rubber oil lines
feed the oil cooler and the automatic transmission.
Use only approved transmission oil cooler hose. Since
these are molded to fit space available, molded hoses
are recommended. Tighten Oil Cooler Hose Clamps
to 2 N´m (18 in. lbs.).
RADIATOR
The radiator is a down-flow type (vertical tubes)
with design features that provide greater strength,
as well as sufficient heat transfer capabilities to keep
the engine satisfactorily cooled (Fig. 6).
ENGINE BLOCK HEATER
The engine block heater is available as an optional
accessory. The heater, operated by ordinary house
current (110 Volt A.C.) through a power cord and con-
nector behind the radiator grille, provides easier
engine starting and faster warm-up when vehicle is
operated in areas having extremely low tempera-
tures.
Fig. 4 Water Pump
Fig. 5 Cooling System Pressure Cap
PLCOOLING 7 - 3
GENERAL INFORMATION (Continued)