length DODGE NEON 2000 Service Owner's Manual
[x] Cancel search | Manufacturer: DODGE, Model Year: 2000, Model line: NEON, Model: DODGE NEON 2000Pages: 1285, PDF Size: 29.42 MB
Page 786 of 1285
a 0.762 mm (0.030 in.) spacer under the valve spring
seat to bring spring height back within specification.
(5) Install rocker arm shafts as previously
described in this section.
(6) Checking dry lash. Dry lash is the amount of
clearance that exists between the base circle of an
installed cam and the rocker arm roller when the
adjuster is drained of oil and completely collapsed.
Specified dry lash is 1.17 mm (0.046 in.) for intake
and 1.28 mm (0.050 in.) for exhaust. After performing
dry lash check, refill adjuster with oil and allow 10
minutes for adjuster(s) to bleed down before rotating
cam.
CLEANING AND INSPECTION
INTAKE MANIFOLD
CLEAN AND INSPECT
Check for:
²Inspect manifold for cracks or distortions.
²Check for torn or missing O-rings at the mating
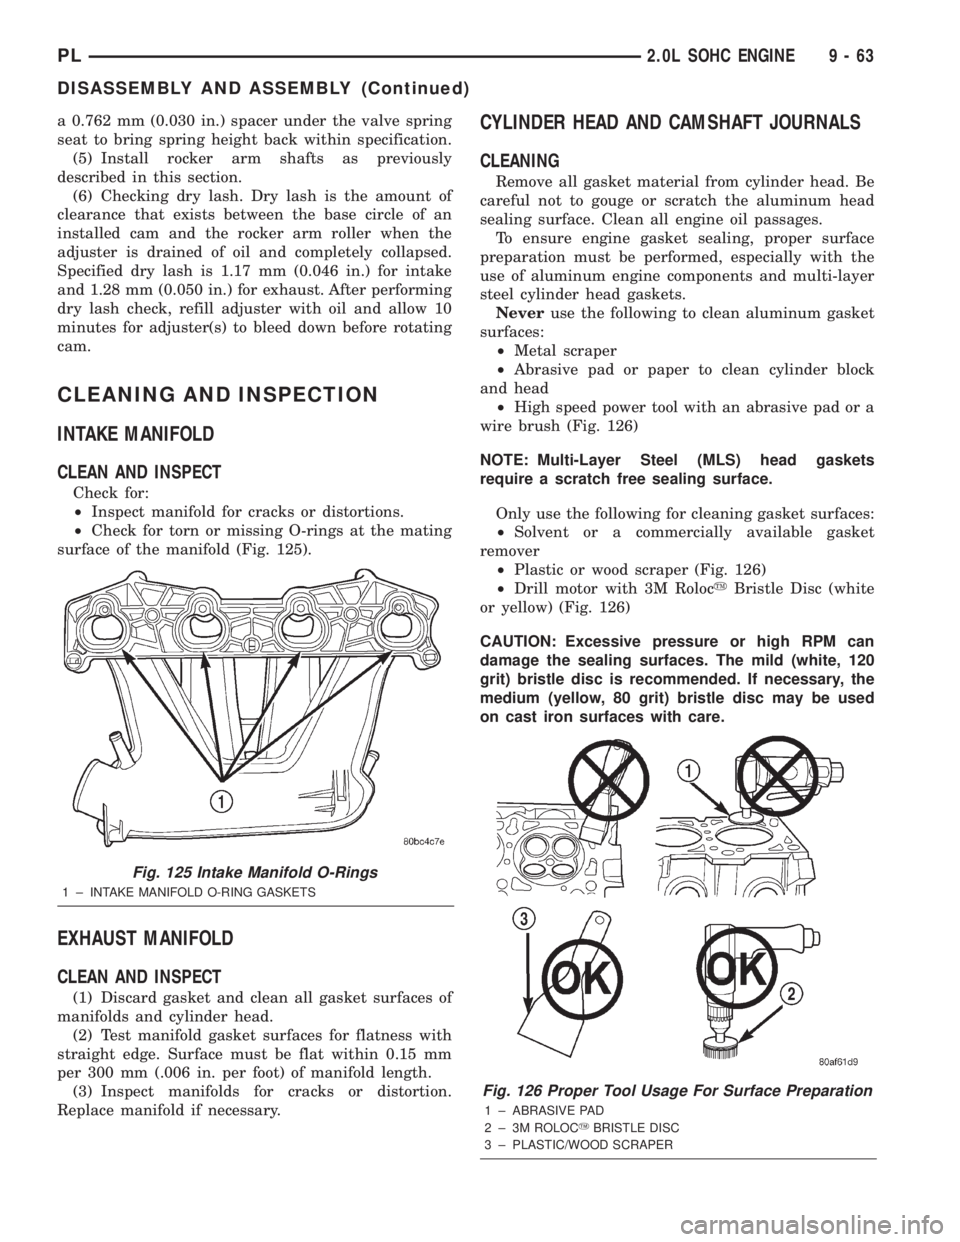
surface of the manifold (Fig. 125).
EXHAUST MANIFOLD
CLEAN AND INSPECT
(1) Discard gasket and clean all gasket surfaces of
manifolds and cylinder head.
(2) Test manifold gasket surfaces for flatness with
straight edge. Surface must be flat within 0.15 mm
per 300 mm (.006 in. per foot) of manifold length.
(3) Inspect manifolds for cracks or distortion.
Replace manifold if necessary.
CYLINDER HEAD AND CAMSHAFT JOURNALS
CLEANING
Remove all gasket material from cylinder head. Be
careful not to gouge or scratch the aluminum head
sealing surface. Clean all engine oil passages.
To ensure engine gasket sealing, proper surface
preparation must be performed, especially with the
use of aluminum engine components and multi-layer
steel cylinder head gaskets.
Neveruse the following to clean aluminum gasket
surfaces:
²Metal scraper
²Abrasive pad or paper to clean cylinder block
and head
²High speed power tool with an abrasive pad or a
wire brush (Fig. 126)
NOTE: Multi-Layer Steel (MLS) head gaskets
require a scratch free sealing surface.
Only use the following for cleaning gasket surfaces:
²Solvent or a commercially available gasket
remover
²Plastic or wood scraper (Fig. 126)
²Drill motor with 3M RolocyBristle Disc (white
or yellow) (Fig. 126)
CAUTION: Excessive pressure or high RPM can
damage the sealing surfaces. The mild (white, 120
grit) bristle disc is recommended. If necessary, the
medium (yellow, 80 grit) bristle disc may be used
on cast iron surfaces with care.
Fig. 125 Intake Manifold O-Rings
1 ± INTAKE MANIFOLD O-RING GASKETS
Fig. 126 Proper Tool Usage For Surface Preparation
1 ± ABRASIVE PAD
2 ± 3M ROLOCYBRISTLE DISC
3 ± PLASTIC/WOOD SCRAPER
PL2.0L SOHC ENGINE 9 - 63
DISASSEMBLY AND ASSEMBLY (Continued)
Page 788 of 1285
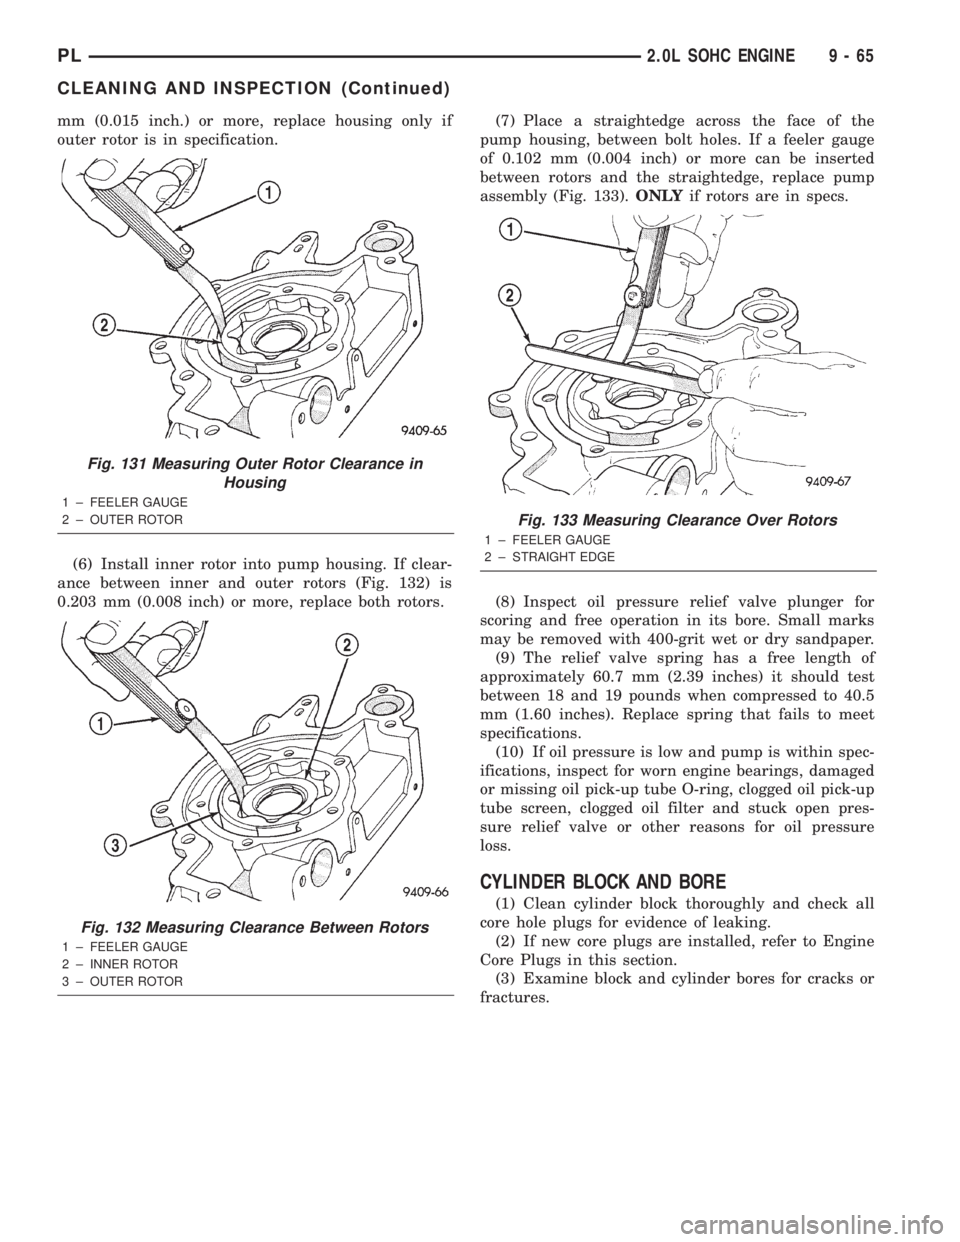
mm (0.015 inch.) or more, replace housing only if
outer rotor is in specification.
(6) Install inner rotor into pump housing. If clear-
ance between inner and outer rotors (Fig. 132) is
0.203 mm (0.008 inch) or more, replace both rotors.(7) Place a straightedge across the face of the
pump housing, between bolt holes. If a feeler gauge
of 0.102 mm (0.004 inch) or more can be inserted
between rotors and the straightedge, replace pump
assembly (Fig. 133).ONLYif rotors are in specs.
(8) Inspect oil pressure relief valve plunger for
scoring and free operation in its bore. Small marks
may be removed with 400-grit wet or dry sandpaper.
(9) The relief valve spring has a free length of
approximately 60.7 mm (2.39 inches) it should test
between 18 and 19 pounds when compressed to 40.5
mm (1.60 inches). Replace spring that fails to meet
specifications.
(10) If oil pressure is low and pump is within spec-
ifications, inspect for worn engine bearings, damaged
or missing oil pick-up tube O-ring, clogged oil pick-up
tube screen, clogged oil filter and stuck open pres-
sure relief valve or other reasons for oil pressure
loss.
CYLINDER BLOCK AND BORE
(1) Clean cylinder block thoroughly and check all
core hole plugs for evidence of leaking.
(2) If new core plugs are installed, refer to Engine
Core Plugs in this section.
(3) Examine block and cylinder bores for cracks or
fractures.
Fig. 131 Measuring Outer Rotor Clearance in
Housing
1 ± FEELER GAUGE
2 ± OUTER ROTOR
Fig. 132 Measuring Clearance Between Rotors
1 ± FEELER GAUGE
2 ± INNER ROTOR
3 ± OUTER ROTOR
Fig. 133 Measuring Clearance Over Rotors
1 ± FEELER GAUGE
2 ± STRAIGHT EDGE
PL2.0L SOHC ENGINE 9 - 65
CLEANING AND INSPECTION (Continued)
Page 791 of 1285
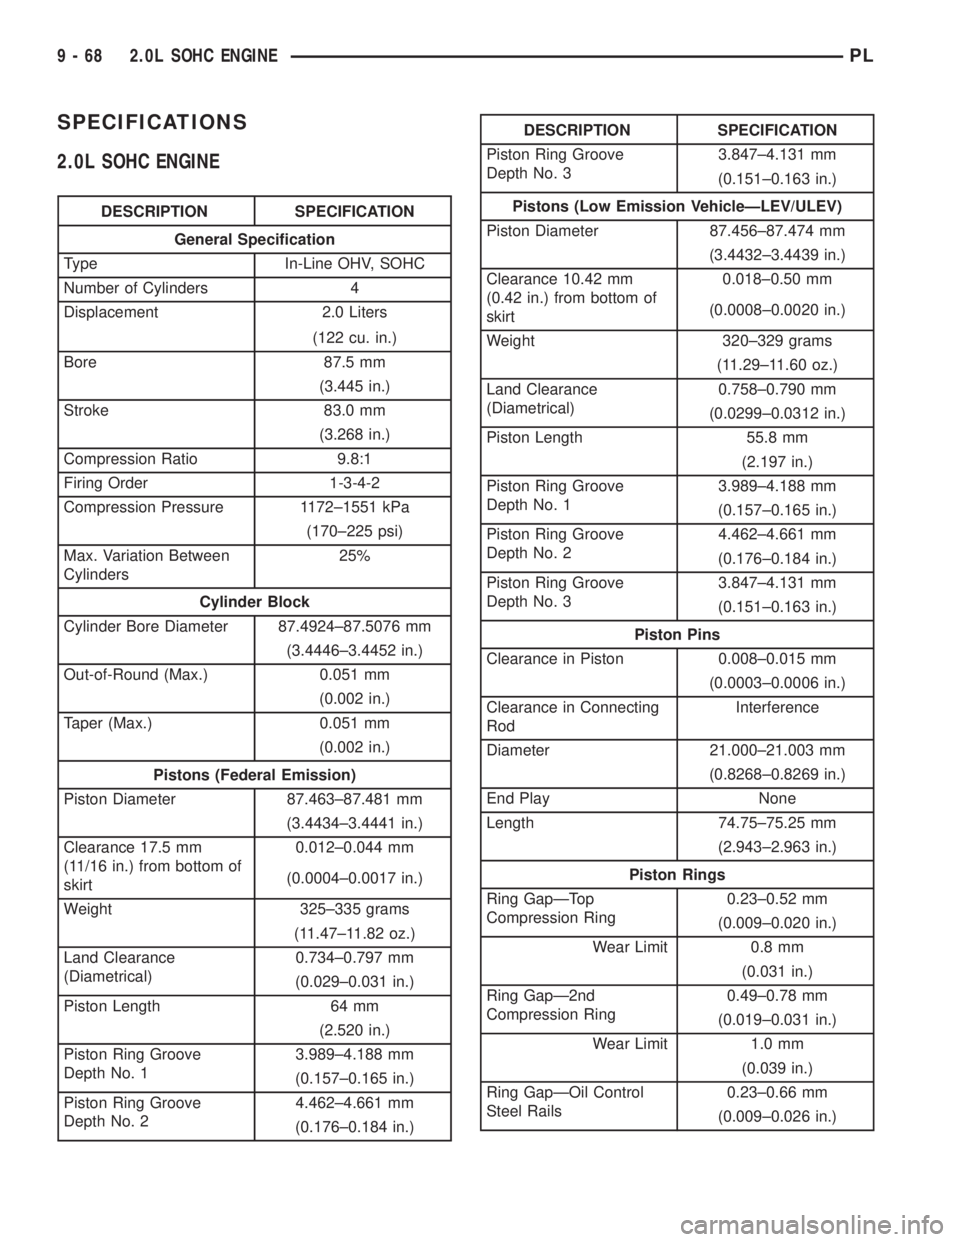
SPECIFICATIONS
2.0L SOHC ENGINE
DESCRIPTION SPECIFICATION
General Specification
Type In-Line OHV, SOHC
Number of Cylinders 4
Displacement 2.0 Liters
(122 cu. in.)
Bore 87.5 mm
(3.445 in.)
Stroke 83.0 mm
(3.268 in.)
Compression Ratio 9.8:1
Firing Order 1-3-4-2
Compression Pressure 1172±1551 kPa
(170±225 psi)
Max. Variation Between
Cylinders25%
Cylinder Block
Cylinder Bore Diameter 87.4924±87.5076 mm
(3.4446±3.4452 in.)
Out-of-Round (Max.) 0.051 mm
(0.002 in.)
Taper (Max.) 0.051 mm
(0.002 in.)
Pistons (Federal Emission)
Piston Diameter 87.463±87.481 mm
(3.4434±3.4441 in.)
Clearance 17.5 mm
(11/16 in.) from bottom of
skirt0.012±0.044 mm
(0.0004±0.0017 in.)
Weight 325±335 grams
(11.47±11.82 oz.)
Land Clearance
(Diametrical)0.734±0.797 mm
(0.029±0.031 in.)
Piston Length 64 mm
(2.520 in.)
Piston Ring Groove
Depth No. 13.989±4.188 mm
(0.157±0.165 in.)
Piston Ring Groove
Depth No. 24.462±4.661 mm
(0.176±0.184 in.)
DESCRIPTION SPECIFICATION
Piston Ring Groove
Depth No. 33.847±4.131 mm
(0.151±0.163 in.)
Pistons (Low Emission VehicleÐLEV/ULEV)
Piston Diameter 87.456±87.474 mm
(3.4432±3.4439 in.)
Clearance 10.42 mm
(0.42 in.) from bottom of
skirt0.018±0.50 mm
(0.0008±0.0020 in.)
Weight 320±329 grams
(11.29±11.60 oz.)
Land Clearance
(Diametrical)0.758±0.790 mm
(0.0299±0.0312 in.)
Piston Length 55.8 mm
(2.197 in.)
Piston Ring Groove
Depth No. 13.989±4.188 mm
(0.157±0.165 in.)
Piston Ring Groove
Depth No. 24.462±4.661 mm
(0.176±0.184 in.)
Piston Ring Groove
Depth No. 33.847±4.131 mm
(0.151±0.163 in.)
Piston Pins
Clearance in Piston 0.008±0.015 mm
(0.0003±0.0006 in.)
Clearance in Connecting
RodInterference
Diameter 21.000±21.003 mm
(0.8268±0.8269 in.)
End Play None
Length 74.75±75.25 mm
(2.943±2.963 in.)
Piston Rings
Ring GapÐTop
Compression Ring0.23±0.52 mm
(0.009±0.020 in.)
Wear Limit 0.8 mm
(0.031 in.)
Ring GapÐ2nd
Compression Ring0.49±0.78 mm
(0.019±0.031 in.)
Wear Limit 1.0 mm
(0.039 in.)
Ring GapÐOil Control
Steel Rails0.23±0.66 mm
(0.009±0.026 in.)
9 - 68 2.0L SOHC ENGINEPL
Page 793 of 1285
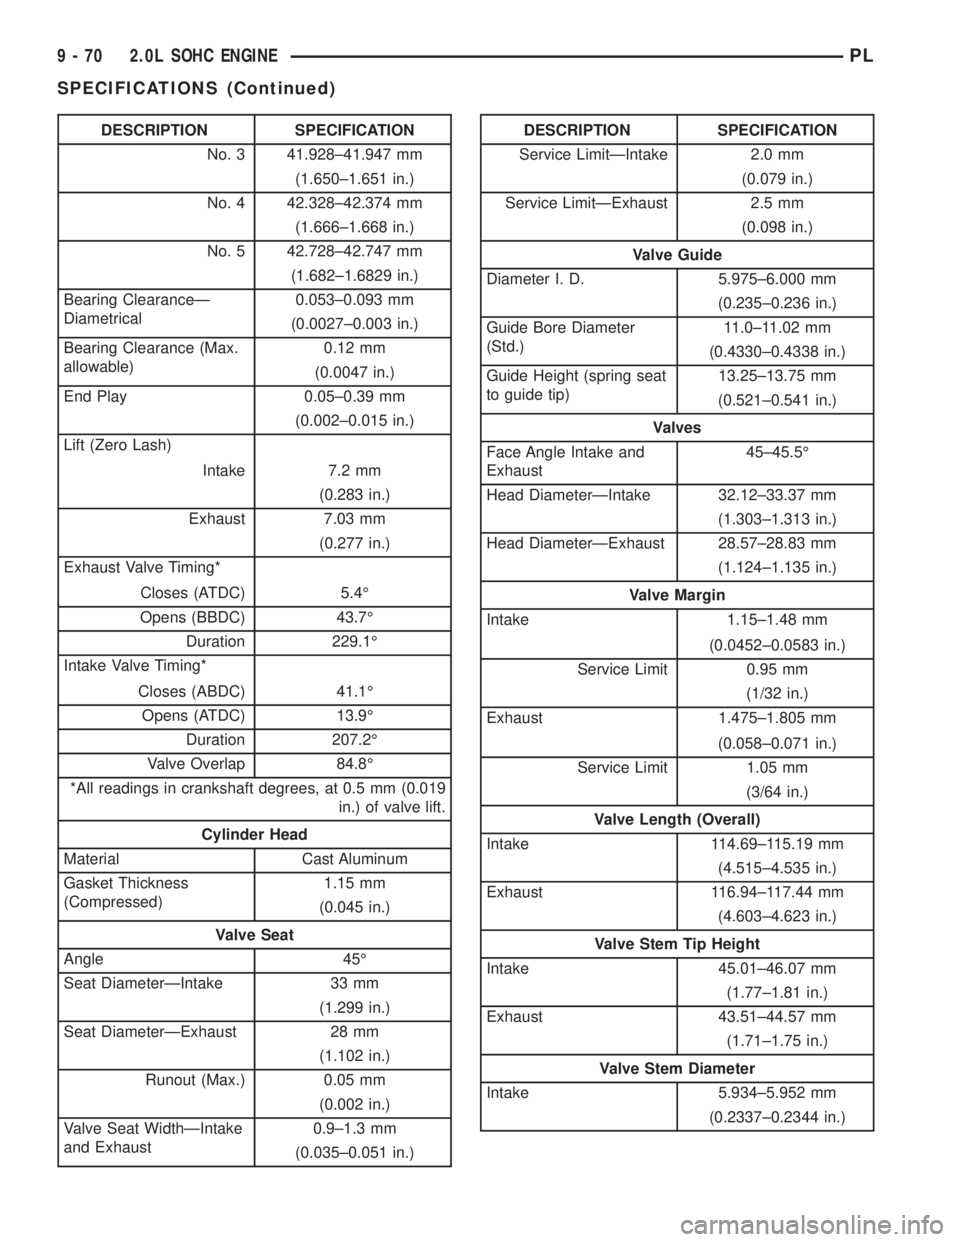
DESCRIPTION SPECIFICATION
No. 3 41.928±41.947 mm
(1.650±1.651 in.)
No. 4 42.328±42.374 mm
(1.666±1.668 in.)
No. 5 42.728±42.747 mm
(1.682±1.6829 in.)
Bearing ClearanceÐ
Diametrical0.053±0.093 mm
(0.0027±0.003 in.)
Bearing Clearance (Max.
allowable)0.12 mm
(0.0047 in.)
End Play 0.05±0.39 mm
(0.002±0.015 in.)
Lift (Zero Lash)
Intake 7.2 mm
(0.283 in.)
Exhaust 7.03 mm
(0.277 in.)
Exhaust Valve Timing*
Closes (ATDC) 5.4É
Opens (BBDC) 43.7É
Duration 229.1É
Intake Valve Timing*
Closes (ABDC) 41.1É
Opens (ATDC) 13.9É
Duration 207.2É
Valve Overlap 84.8É
*All readings in crankshaft degrees, at 0.5 mm (0.019
in.) of valve lift.
Cylinder Head
Material Cast Aluminum
Gasket Thickness
(Compressed)1.15 mm
(0.045 in.)
Valve Seat
Angle 45É
Seat DiameterÐIntake 33 mm
(1.299 in.)
Seat DiameterÐExhaust 28 mm
(1.102 in.)
Runout (Max.) 0.05 mm
(0.002 in.)
Valve Seat WidthÐIntake
and Exhaust0.9±1.3 mm
(0.035±0.051 in.)DESCRIPTION SPECIFICATION
Service LimitÐIntake 2.0 mm
(0.079 in.)
Service LimitÐExhaust 2.5 mm
(0.098 in.)
Valve Guide
Diameter I. D. 5.975±6.000 mm
(0.235±0.236 in.)
Guide Bore Diameter
(Std.)11.0±11.02 mm
(0.4330±0.4338 in.)
Guide Height (spring seat
to guide tip)13.25±13.75 mm
(0.521±0.541 in.)
Valves
Face Angle Intake and
Exhaust45±45.5É
Head DiameterÐIntake 32.12±33.37 mm
(1.303±1.313 in.)
Head DiameterÐExhaust 28.57±28.83 mm
(1.124±1.135 in.)
Valve Margin
Intake 1.15±1.48 mm
(0.0452±0.0583 in.)
Service Limit 0.95 mm
(1/32 in.)
Exhaust 1.475±1.805 mm
(0.058±0.071 in.)
Service Limit 1.05 mm
(3/64 in.)
Valve Length (Overall)
Intake 114.69±115.19 mm
(4.515±4.535 in.)
Exhaust 116.94±117.44 mm
(4.603±4.623 in.)
Valve Stem Tip Height
Intake 45.01±46.07 mm
(1.77±1.81 in.)
Exhaust 43.51±44.57 mm
(1.71±1.75 in.)
Valve Stem Diameter
Intake 5.934±5.952 mm
(0.2337±0.2344 in.)
9 - 70 2.0L SOHC ENGINEPL
SPECIFICATIONS (Continued)
Page 794 of 1285
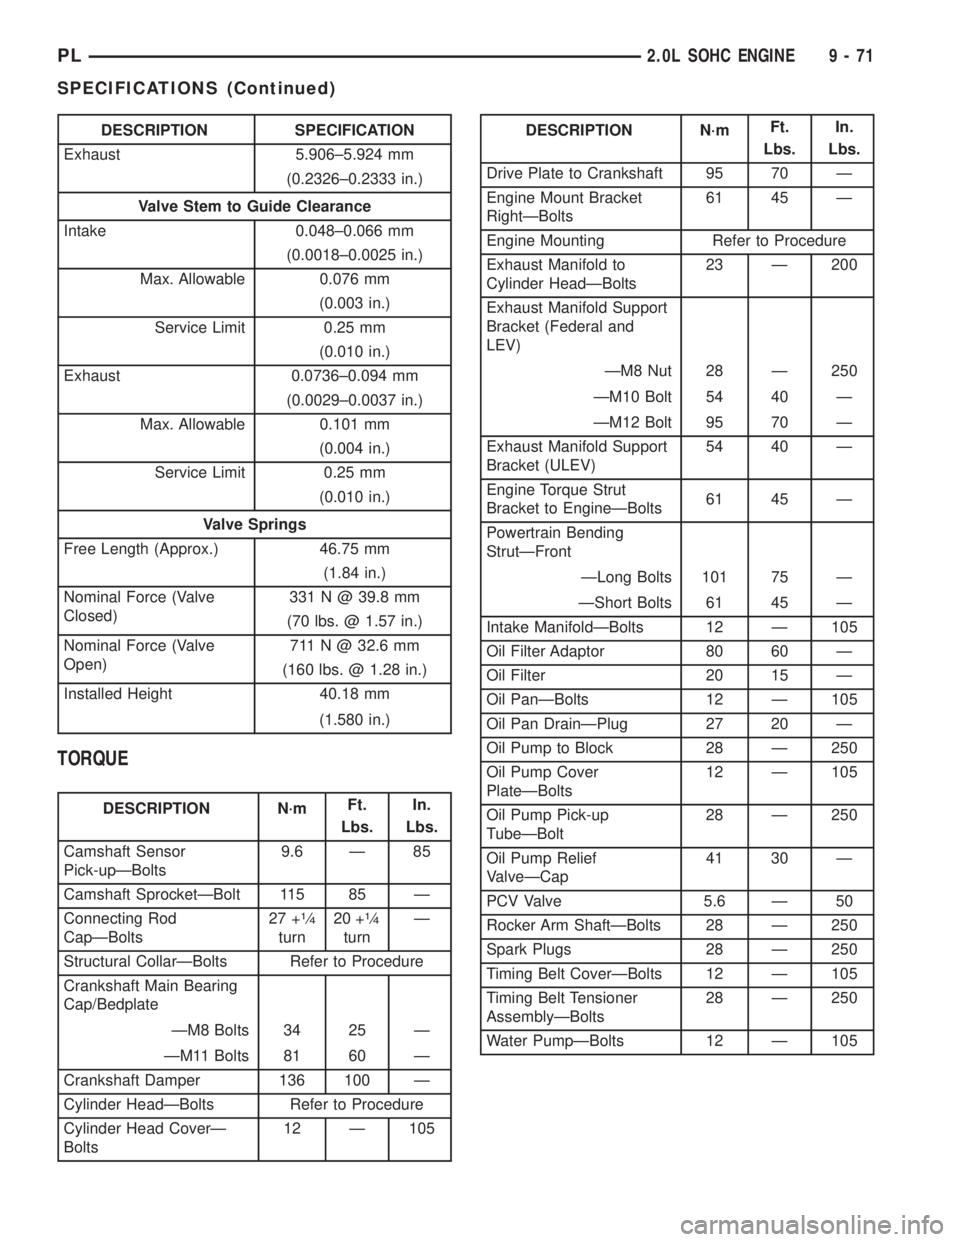
DESCRIPTION SPECIFICATION
Exhaust 5.906±5.924 mm
(0.2326±0.2333 in.)
Valve Stem to Guide Clearance
Intake 0.048±0.066 mm
(0.0018±0.0025 in.)
Max. Allowable 0.076 mm
(0.003 in.)
Service Limit 0.25 mm
(0.010 in.)
Exhaust 0.0736±0.094 mm
(0.0029±0.0037 in.)
Max. Allowable 0.101 mm
(0.004 in.)
Service Limit 0.25 mm
(0.010 in.)
Valve Springs
Free Length (Approx.) 46.75 mm
(1.84 in.)
Nominal Force (Valve
Closed)331 N @ 39.8 mm
(70 lbs. @ 1.57 in.)
Nominal Force (Valve
Open)711 N @ 32.6 mm
(160 lbs. @ 1.28 in.)
Installed Height 40.18 mm
(1.580 in.)
TORQUE
DESCRIPTION N´mFt.
Lbs.In.
Lbs.
Camshaft Sensor
Pick-upÐBolts9.6 Ð 85
Camshaft SprocketÐBolt 115 85 Ð
Connecting Rod
CapÐBolts27 +
1¤4
turn20 +
1¤4
turnÐ
Structural CollarÐBolts Refer to Procedure
Crankshaft Main Bearing
Cap/Bedplate
ÐM8 Bolts 34 25 Ð
ÐM11 Bolts 81 60 Ð
Crankshaft Damper 136 100 Ð
Cylinder HeadÐBolts Refer to Procedure
Cylinder Head CoverÐ
Bolts12 Ð 105
DESCRIPTION N´mFt.
Lbs.In.
Lbs.
Drive Plate to Crankshaft 95 70 Ð
Engine Mount Bracket
RightÐBolts61 45 Ð
Engine Mounting Refer to Procedure
Exhaust Manifold to
Cylinder HeadÐBolts23 Ð 200
Exhaust Manifold Support
Bracket (Federal and
LEV)
ÐM8 Nut 28 Ð 250
ÐM10 Bolt 54 40 Ð
ÐM12 Bolt 95 70 Ð
Exhaust Manifold Support
Bracket (ULEV)54 40 Ð
Engine Torque Strut
Bracket to EngineÐBolts61 45 Ð
Powertrain Bending
StrutÐFront
ÐLong Bolts 101 75 Ð
ÐShort Bolts 61 45 Ð
Intake ManifoldÐBolts 12 Ð 105
Oil Filter Adaptor 80 60 Ð
Oil Filter 20 15 Ð
Oil PanÐBolts 12 Ð 105
Oil Pan DrainÐPlug 27 20 Ð
Oil Pump to Block 28 Ð 250
Oil Pump Cover
PlateÐBolts12 Ð 105
Oil Pump Pick-up
TubeÐBolt28 Ð 250
Oil Pump Relief
ValveÐCap41 30 Ð
PCV Valve 5.6 Ð 50
Rocker Arm ShaftÐBolts 28 Ð 250
Spark Plugs 28 Ð 250
Timing Belt CoverÐBolts 12 Ð 105
Timing Belt Tensioner
AssemblyÐBolts28 Ð 250
Water PumpÐBolts 12 Ð 105
PL2.0L SOHC ENGINE 9 - 71
SPECIFICATIONS (Continued)
Page 843 of 1285
DESCRIPTION AND OPERATION
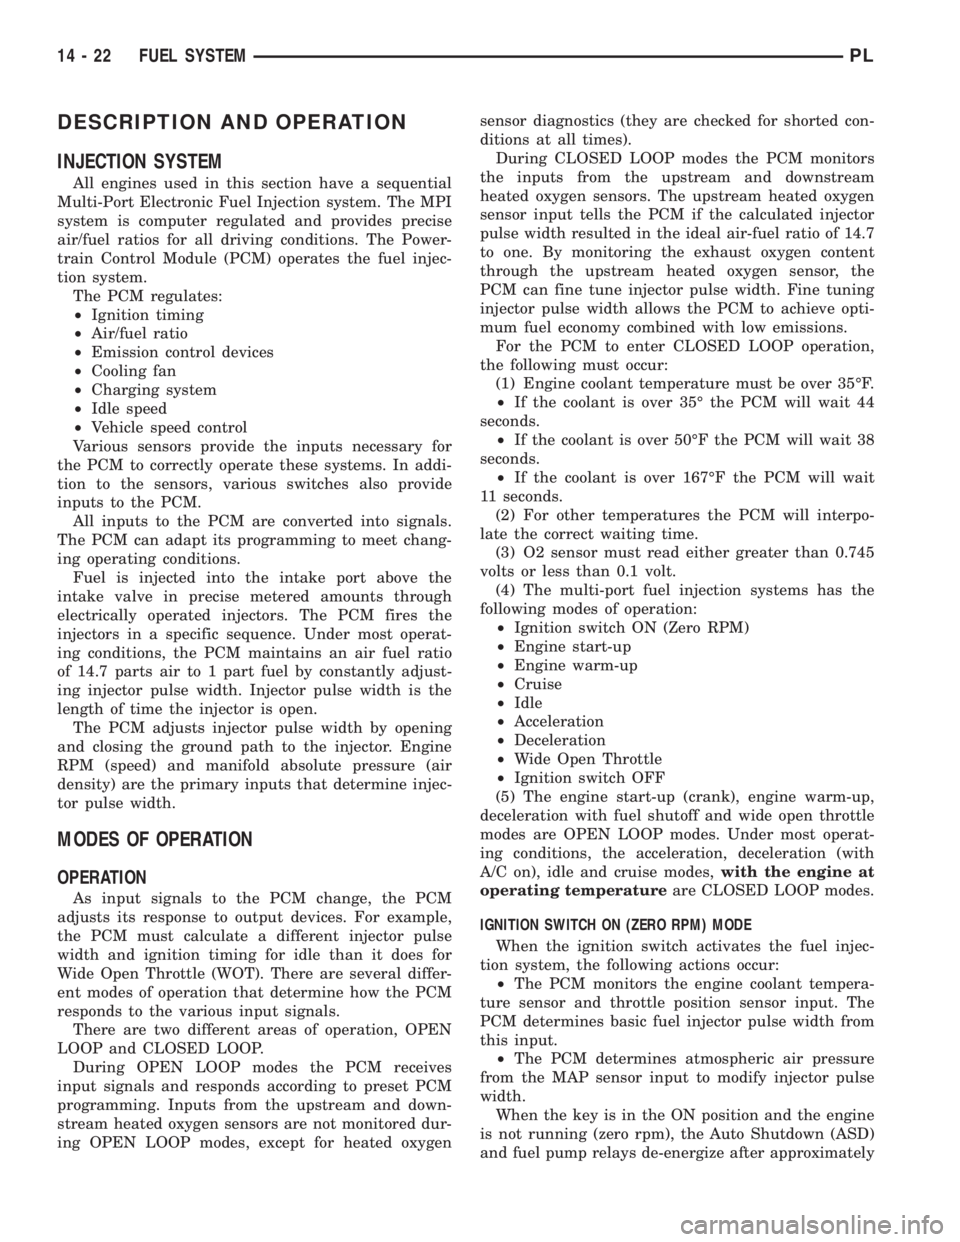
INJECTION SYSTEM
All engines used in this section have a sequential
Multi-Port Electronic Fuel Injection system. The MPI
system is computer regulated and provides precise
air/fuel ratios for all driving conditions. The Power-
train Control Module (PCM) operates the fuel injec-
tion system.
The PCM regulates:
²Ignition timing
²Air/fuel ratio
²Emission control devices
²Cooling fan
²Charging system
²Idle speed
²Vehicle speed control
Various sensors provide the inputs necessary for
the PCM to correctly operate these systems. In addi-
tion to the sensors, various switches also provide
inputs to the PCM.
All inputs to the PCM are converted into signals.
The PCM can adapt its programming to meet chang-
ing operating conditions.
Fuel is injected into the intake port above the
intake valve in precise metered amounts through
electrically operated injectors. The PCM fires the
injectors in a specific sequence. Under most operat-
ing conditions, the PCM maintains an air fuel ratio
of 14.7 parts air to 1 part fuel by constantly adjust-
ing injector pulse width. Injector pulse width is the
length of time the injector is open.
The PCM adjusts injector pulse width by opening
and closing the ground path to the injector. Engine
RPM (speed) and manifold absolute pressure (air
density) are the primary inputs that determine injec-
tor pulse width.
MODES OF OPERATION
OPERATION
As input signals to the PCM change, the PCM
adjusts its response to output devices. For example,
the PCM must calculate a different injector pulse
width and ignition timing for idle than it does for
Wide Open Throttle (WOT). There are several differ-
ent modes of operation that determine how the PCM
responds to the various input signals.
There are two different areas of operation, OPEN
LOOP and CLOSED LOOP.
During OPEN LOOP modes the PCM receives
input signals and responds according to preset PCM
programming. Inputs from the upstream and down-
stream heated oxygen sensors are not monitored dur-
ing OPEN LOOP modes, except for heated oxygensensor diagnostics (they are checked for shorted con-
ditions at all times).
During CLOSED LOOP modes the PCM monitors
the inputs from the upstream and downstream
heated oxygen sensors. The upstream heated oxygen
sensor input tells the PCM if the calculated injector
pulse width resulted in the ideal air-fuel ratio of 14.7
to one. By monitoring the exhaust oxygen content
through the upstream heated oxygen sensor, the
PCM can fine tune injector pulse width. Fine tuning
injector pulse width allows the PCM to achieve opti-
mum fuel economy combined with low emissions.
For the PCM to enter CLOSED LOOP operation,
the following must occur:
(1) Engine coolant temperature must be over 35ÉF.
²If the coolant is over 35É the PCM will wait 44
seconds.
²If the coolant is over 50ÉF the PCM will wait 38
seconds.
²If the coolant is over 167ÉF the PCM will wait
11 seconds.
(2) For other temperatures the PCM will interpo-
late the correct waiting time.
(3) O2 sensor must read either greater than 0.745
volts or less than 0.1 volt.
(4) The multi-port fuel injection systems has the
following modes of operation:
²Ignition switch ON (Zero RPM)
²Engine start-up
²Engine warm-up
²Cruise
²Idle
²Acceleration
²Deceleration
²Wide Open Throttle
²Ignition switch OFF
(5) The engine start-up (crank), engine warm-up,
deceleration with fuel shutoff and wide open throttle
modes are OPEN LOOP modes. Under most operat-
ing conditions, the acceleration, deceleration (with
A/C on), idle and cruise modes,with the engine at
operating temperatureare CLOSED LOOP modes.
IGNITION SWITCH ON (ZERO RPM) MODE
When the ignition switch activates the fuel injec-
tion system, the following actions occur:
²The PCM monitors the engine coolant tempera-
ture sensor and throttle position sensor input. The
PCM determines basic fuel injector pulse width from
this input.
²The PCM determines atmospheric air pressure
from the MAP sensor input to modify injector pulse
width.
When the key is in the ON position and the engine
is not running (zero rpm), the Auto Shutdown (ASD)
and fuel pump relays de-energize after approximately
14 - 22 FUEL SYSTEMPL
Page 1105 of 1285
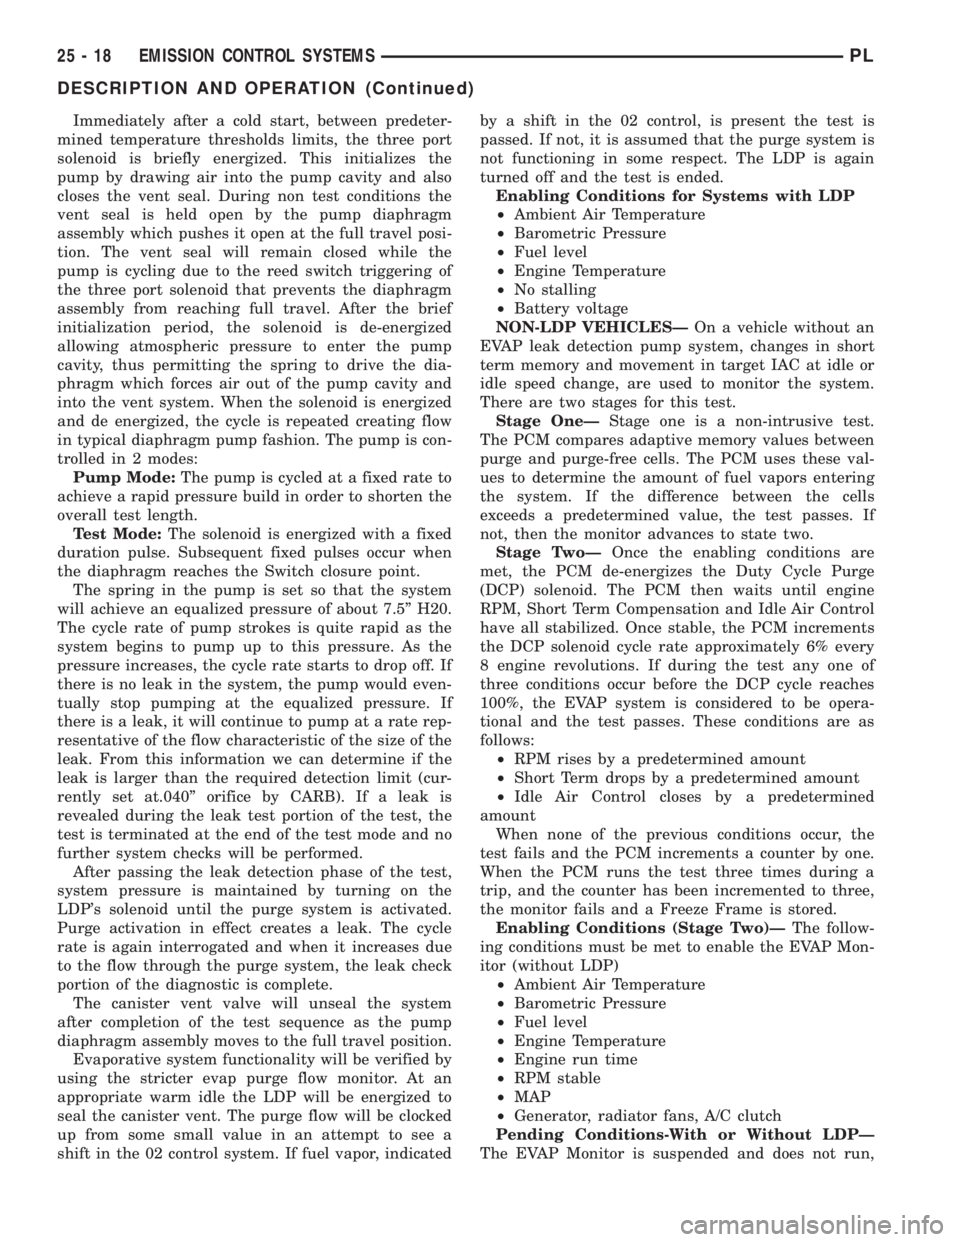
Immediately after a cold start, between predeter-
mined temperature thresholds limits, the three port
solenoid is briefly energized. This initializes the
pump by drawing air into the pump cavity and also
closes the vent seal. During non test conditions the
vent seal is held open by the pump diaphragm
assembly which pushes it open at the full travel posi-
tion. The vent seal will remain closed while the
pump is cycling due to the reed switch triggering of
the three port solenoid that prevents the diaphragm
assembly from reaching full travel. After the brief
initialization period, the solenoid is de-energized
allowing atmospheric pressure to enter the pump
cavity, thus permitting the spring to drive the dia-
phragm which forces air out of the pump cavity and
into the vent system. When the solenoid is energized
and de energized, the cycle is repeated creating flow
in typical diaphragm pump fashion. The pump is con-
trolled in 2 modes:
Pump Mode:The pump is cycled at a fixed rate to
achieve a rapid pressure build in order to shorten the
overall test length.
Test Mode:The solenoid is energized with a fixed
duration pulse. Subsequent fixed pulses occur when
the diaphragm reaches the Switch closure point.
The spring in the pump is set so that the system
will achieve an equalized pressure of about 7.5º H20.
The cycle rate of pump strokes is quite rapid as the
system begins to pump up to this pressure. As the
pressure increases, the cycle rate starts to drop off. If
there is no leak in the system, the pump would even-
tually stop pumping at the equalized pressure. If
there is a leak, it will continue to pump at a rate rep-
resentative of the flow characteristic of the size of the
leak. From this information we can determine if the
leak is larger than the required detection limit (cur-
rently set at.040º orifice by CARB). If a leak is
revealed during the leak test portion of the test, the
test is terminated at the end of the test mode and no
further system checks will be performed.
After passing the leak detection phase of the test,
system pressure is maintained by turning on the
LDP's solenoid until the purge system is activated.
Purge activation in effect creates a leak. The cycle
rate is again interrogated and when it increases due
to the flow through the purge system, the leak check
portion of the diagnostic is complete.
The canister vent valve will unseal the system
after completion of the test sequence as the pump
diaphragm assembly moves to the full travel position.
Evaporative system functionality will be verified by
using the stricter evap purge flow monitor. At an
appropriate warm idle the LDP will be energized to
seal the canister vent. The purge flow will be clocked
up from some small value in an attempt to see a
shift in the 02 control system. If fuel vapor, indicatedby a shift in the 02 control, is present the test is
passed. If not, it is assumed that the purge system is
not functioning in some respect. The LDP is again
turned off and the test is ended.
Enabling Conditions for Systems with LDP
²Ambient Air Temperature
²Barometric Pressure
²Fuel level
²Engine Temperature
²No stalling
²Battery voltage
NON-LDP VEHICLESÐOn a vehicle without an
EVAP leak detection pump system, changes in short
term memory and movement in target IAC at idle or
idle speed change, are used to monitor the system.
There are two stages for this test.
Stage OneÐStage one is a non-intrusive test.
The PCM compares adaptive memory values between
purge and purge-free cells. The PCM uses these val-
ues to determine the amount of fuel vapors entering
the system. If the difference between the cells
exceeds a predetermined value, the test passes. If
not, then the monitor advances to state two.
Stage TwoÐOnce the enabling conditions are
met, the PCM de-energizes the Duty Cycle Purge
(DCP) solenoid. The PCM then waits until engine
RPM, Short Term Compensation and Idle Air Control
have all stabilized. Once stable, the PCM increments
the DCP solenoid cycle rate approximately 6% every
8 engine revolutions. If during the test any one of
three conditions occur before the DCP cycle reaches
100%, the EVAP system is considered to be opera-
tional and the test passes. These conditions are as
follows:
²RPM rises by a predetermined amount
²Short Term drops by a predetermined amount
²Idle Air Control closes by a predetermined
amount
When none of the previous conditions occur, the
test fails and the PCM increments a counter by one.
When the PCM runs the test three times during a
trip, and the counter has been incremented to three,
the monitor fails and a Freeze Frame is stored.
Enabling Conditions (Stage Two)ÐThe follow-
ing conditions must be met to enable the EVAP Mon-
itor (without LDP)
²Ambient Air Temperature
²Barometric Pressure
²Fuel level
²Engine Temperature
²Engine run time
²RPM stable
²MAP
²Generator, radiator fans, A/C clutch
Pending Conditions-With or Without LDPÐ
The EVAP Monitor is suspended and does not run,
25 - 18 EMISSION CONTROL SYSTEMSPL
DESCRIPTION AND OPERATION (Continued)
Page 1123 of 1285
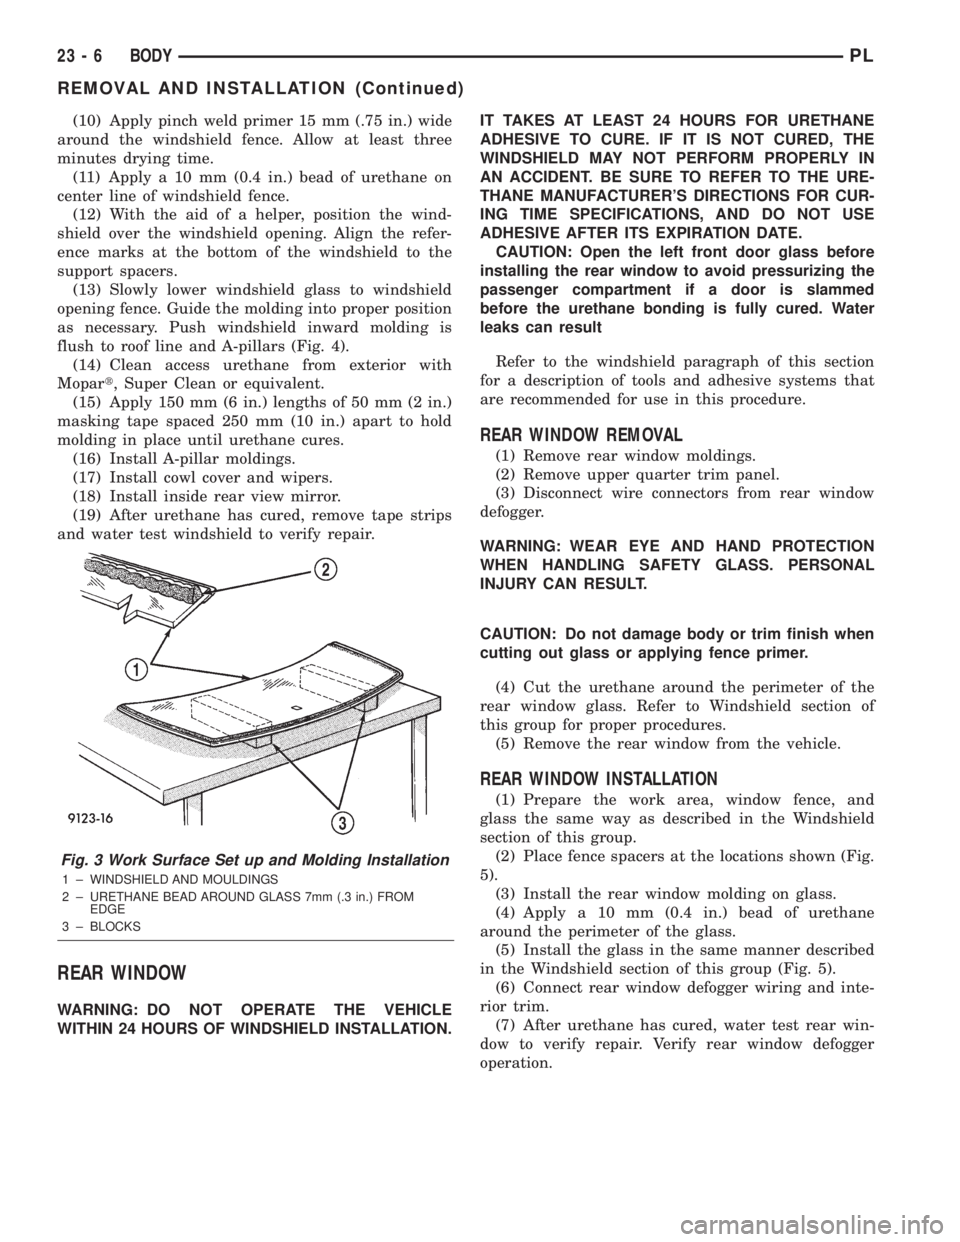
(10) Apply pinch weld primer 15 mm (.75 in.) wide
around the windshield fence. Allow at least three
minutes drying time.
(11) Apply a 10 mm (0.4 in.) bead of urethane on
center line of windshield fence.
(12) With the aid of a helper, position the wind-
shield over the windshield opening. Align the refer-
ence marks at the bottom of the windshield to the
support spacers.
(13) Slowly lower windshield glass to windshield
opening fence. Guide the molding into proper position
as necessary. Push windshield inward molding is
flush to roof line and A-pillars (Fig. 4).
(14) Clean access urethane from exterior with
Mopart, Super Clean or equivalent.
(15) Apply 150 mm (6 in.) lengths of 50 mm (2 in.)
masking tape spaced 250 mm (10 in.) apart to hold
molding in place until urethane cures.
(16) Install A-pillar moldings.
(17) Install cowl cover and wipers.
(18) Install inside rear view mirror.
(19) After urethane has cured, remove tape strips
and water test windshield to verify repair.
REAR WINDOW
WARNING: DO NOT OPERATE THE VEHICLE
WITHIN 24 HOURS OF WINDSHIELD INSTALLATION.IT TAKES AT LEAST 24 HOURS FOR URETHANE
ADHESIVE TO CURE. IF IT IS NOT CURED, THE
WINDSHIELD MAY NOT PERFORM PROPERLY IN
AN ACCIDENT. BE SURE TO REFER TO THE URE-
THANE MANUFACTURER'S DIRECTIONS FOR CUR-
ING TIME SPECIFICATIONS, AND DO NOT USE
ADHESIVE AFTER ITS EXPIRATION DATE.
CAUTION: Open the left front door glass before
installing the rear window to avoid pressurizing the
passenger compartment if a door is slammed
before the urethane bonding is fully cured. Water
leaks can result
Refer to the windshield paragraph of this section
for a description of tools and adhesive systems that
are recommended for use in this procedure.
REAR WINDOW REMOVAL
(1) Remove rear window moldings.
(2) Remove upper quarter trim panel.
(3) Disconnect wire connectors from rear window
defogger.
WARNING: WEAR EYE AND HAND PROTECTION
WHEN HANDLING SAFETY GLASS. PERSONAL
INJURY CAN RESULT.
CAUTION: Do not damage body or trim finish when
cutting out glass or applying fence primer.
(4) Cut the urethane around the perimeter of the
rear window glass. Refer to Windshield section of
this group for proper procedures.
(5) Remove the rear window from the vehicle.
REAR WINDOW INSTALLATION
(1) Prepare the work area, window fence, and
glass the same way as described in the Windshield
section of this group.
(2) Place fence spacers at the locations shown (Fig.
5).
(3) Install the rear window molding on glass.
(4) Apply a 10 mm (0.4 in.) bead of urethane
around the perimeter of the glass.
(5) Install the glass in the same manner described
in the Windshield section of this group (Fig. 5).
(6) Connect rear window defogger wiring and inte-
rior trim.
(7) After urethane has cured, water test rear win-
dow to verify repair. Verify rear window defogger
operation.
Fig. 3 Work Surface Set up and Molding Installation
1 ± WINDSHIELD AND MOULDINGS
2 ± URETHANE BEAD AROUND GLASS 7mm (.3 in.) FROM
EDGE
3 ± BLOCKS
23 - 6 BODYPL
REMOVAL AND INSTALLATION (Continued)
Page 1135 of 1285
DIAGNOSIS AND TESTING
WATER LEAKS
Water leaks can be caused by poor sealing,
improper body component alignment, body seam
porosity, missing plugs, or blocked drain holes. Cen-
trifugal and gravitational force can cause water to
drip from a location away from the actual leak point,
making leak detection difficult. All body sealing
points should be water tight in normal wet-driving
conditions. Water flowing downward from the front of
the vehicle should not enter the passenger or luggage
compartment. Moving sealing surfaces will not
always seal water tight under all conditions. At
times, side glass or door seals will allow water to
enter the passenger compartment during high pres-
sure washing or hard driving rain (severe) condi-
tions. Overcompensating on door or glass
adjustments to stop a water leak that occurs under
severe conditions can cause premature seal wear and
excessive closing or latching effort. After completing
a repair, water-test vehicle to verify leak has stopped
before returning vehicle to use.
VISUAL INSPECTION BEFORE WATER LEAK TESTS
Verify that floor and body plugs are in place, body
drains are clear, and body components are properly
aligned and sealed. If component alignment or seal-
ing is necessary, refer to the appropriate section of
this group for proper procedures.
WATER LEAK TESTS
WARNING: DO NOT USE ELECTRIC SHOP LIGHTS
OR TOOLS IN WATER TEST AREA. PERSONAL
INJURY CAN RESULT.
When the conditions causing a water leak have
been determined, simulate the conditions as closely
as possible.
²If a leak occurs with the vehicle parked in a
steady light rain, flood the leak area with an open-
ended garden hose.
²If a leak occurs while driving at highway speeds
in a steady rain, test the leak area with a reasonable
velocity stream or fan spray of water. Direct the
spray in a direction comparable to actual conditions.
²If a leak occurs when the vehicle is parked on an
incline, hoist the end or side of the vehicle to simu-
late this condition. This method can be used when
the leak occurs when the vehicle accelerates, stops or
turns. If the leak occurs on acceleration, hoist the
front of the vehicle. If the leak occurs when braking,
hoist the back of the vehicle. If the leak occurs on left
turns, hoist the left side of the vehicle. If the leak
occurs on right turns, hoist the right side of the vehi-cle. For hoisting recommendations refer to Group 0,
Lubrication and Maintenance, General Information
section.
WATER LEAK DETECTION
To detect a water leak point-of-entry, do a water
test and watch for water tracks or droplets forming
on the inside of the vehicle. If necessary, remove inte-
rior trim covers or panels to gain visual access to the
leak area. If the hose cannot be positioned without
being held, have someone help do the water test.
Some water leaks must be tested for a considerable
length of time to become apparent. When a leak
appears, find the lowest point of the water track or
drop. After leak point has been found, repair the leak
and water test to verify that the leak has stopped.
Locating the entry point of water that is leaking
into a cavity between panels can be difficult. The
trapped water may splash or run from the cavity,
often at a distance from the entry point. Most water
leaks of this type become apparent after accelerating,
stopping, turning, or when on an incline.
MIRROR INSPECTION METHOD
When a leak point area is visually obstructed, use
a suitable mirror to gain visual access. A mirror can
also be used to deflect light to a limited-access area
to assist in locating a leak point.
BRIGHT LIGHT LEAK TEST METHOD
Some water leaks in the luggage compartment can
be detected without water testing. Position the vehi-
cle in a brightly lit area. From inside the darkened
luggage compartment inspect around seals and body
seams. If necessary, have a helper direct a drop light
over the suspected leak areas around the luggage
compartment. If light is visible through a normally
sealed location, water could enter through the open-
ing.
PRESSURIZED LEAK TEST METHOD
When a water leak into the passenger compart-
ment cannot be detected by water testing, pressurize
the passenger compartment and soap test exterior of
the vehicle. To pressurize the passenger compart-
ment, close all doors and windows, start engine, and
set heater control to high blower in HEAT position. If
engine can not be started, connect a charger to the
battery to ensure adequate voltage to the blower.
With interior pressurized, apply dish detergent solu-
tion to suspected leak area on the exterior of the
vehicle. Apply detergent solution with spray device or
soft bristle brush. If soap bubbles occur at a body
seam, joint, seal or gasket, the leak entry point could
be at that location.
23 - 18 BODYPL
Page 1136 of 1285

WIND NOISE
Wind noise is the result of most air leaks. Air leaks
can be caused by poor sealing, improper body compo-
nent alignment, body seam porosity, or missing plugs
in the engine compartment or door hinge pillar areas.
All body sealing points should be airtight in normal
driving conditions. Moving sealing surfaces will not
always seal airtight under all conditions. At times,
side glass or door seals will allow wind noise to be
noticed in the passenger compartment during high
cross winds. Over compensating on door or glass
adjustments to stop wind noise that occurs under
severe conditions can cause premature seal wear and
excessive closing or latching effort. After a repair pro-
cedure has been performed, test vehicle to verify
noise has stopped before returning vehicle to use.
Wind noise can also be caused by improperly fitted
exterior moldings or body ornamentation. Loose
moldings can flutter, creating a buzzing or chattering
noise. An open cavity or protruding edge can create a
whistling or howling noise. Inspect the exterior of the
vehicle to verify that these conditions do not exist.
VISUAL INSPECTION BEFORE TESTS
Verify that floor and body plugs are in place and
body components are aligned and sealed. If compo-
nent alignment or sealing is necessary, refer to the
appropriate section of this group for proper proce-
dures.
ROAD TESTING WIND NOISE
(1) Drive the vehicle to verify the general location
of the wind noise.
(2) Apply 50 mm (2 in.) masking tape in 150 mm
(6 in.) lengths along weatherstrips, weld seams or
moldings. After each length is applied, drive the vehi-
cle. If noise goes away after a piece of tape is applied,
remove tape, locate, and repair defect.
POSSIBLE CAUSE OF WIND NOISE
²Moldings standing away from body surface can
catch wind and whistle.
²Gaps in sealed areas behind overhanging body
flanges can cause wind-rushing sounds.
²Misaligned movable components.
²Missing or improperly installed plugs in pillars.
²Weld burn through holes.
SERVICE PROCEDURES
HEAT STAKING
(1) Remove trim panel.
(2) Bend or move the trim panel components at
the heat staked joints. Observe the heat staked loca-
tions and/or component seams for looseness.(3) Heat stake the components.
(a) If the heat staked or component seam loca-
tion is loose, hold the two components tightly
together and using a soldering gun with a flat tip,
melt the material securing the components
together. Do not over heat the affected area, dam-
age to the exterior of the trim panel may occur.
(b) If the heat staked material is broken or miss-
ing, use a hot glue gun to apply new material to
the area to be repaired. The panels that are being
heat staked must be held together while the apply-
ing the glue. Once the new material is in place, it
may be necessary to use a soldering gun to melt
the newly applied material. Do not over heat the
affected area, damage to the exterior of the trim
panel may occur.
(4) Allow the repaired area to cool and verify the
repair.
(5) Install trim panel.
PLASTIC BODY PANEL REPAIR
DESCRIPTION OPERATION
Resin Transfer Molded (RTM) body panels are rein-
forced with a continuous fiberglass mesh. Epoxy
resin is injected into a gel-coated and fiberglass-lined
mold to form a body panel. Sheet molded compound
(SMC) body panels are constructed with fiberglass
strands usually 1 inch or shorter, epoxy resin formed
into sheet stock and pressed in mold flowing material
to form a sheet molded compound (SMC) body panel.
RTM and SMC body panels can be repaired with
epoxy adhesive after market products. Refer to
instructions provided by the manufacturer of prod-
ucts being used to repair RTM or SMC. Daimler-
Chrysler Corporation recommends that a trained
automotive body technician perform body panel
repair procedures (Fig. 1).
Fig. 1 Panel Repair
PLBODY 23 - 19
DIAGNOSIS AND TESTING (Continued)