length DODGE NEON 2000 Service User Guide
[x] Cancel search | Manufacturer: DODGE, Model Year: 2000, Model line: NEON, Model: DODGE NEON 2000Pages: 1285, PDF Size: 29.42 MB
Page 203 of 1285
(2) Connect recovery hose to water outlet connec-
tor/thermostat housing (Fig. 29).
(3) Fill container to proper level. Refer to Cooling
System Refilling in this section.
ENGINE BLOCK HEATER
REMOVAL
(1) Drain coolant from radiator and cylinder block.
Refer to Cooling System Draining in this section for
procedure.
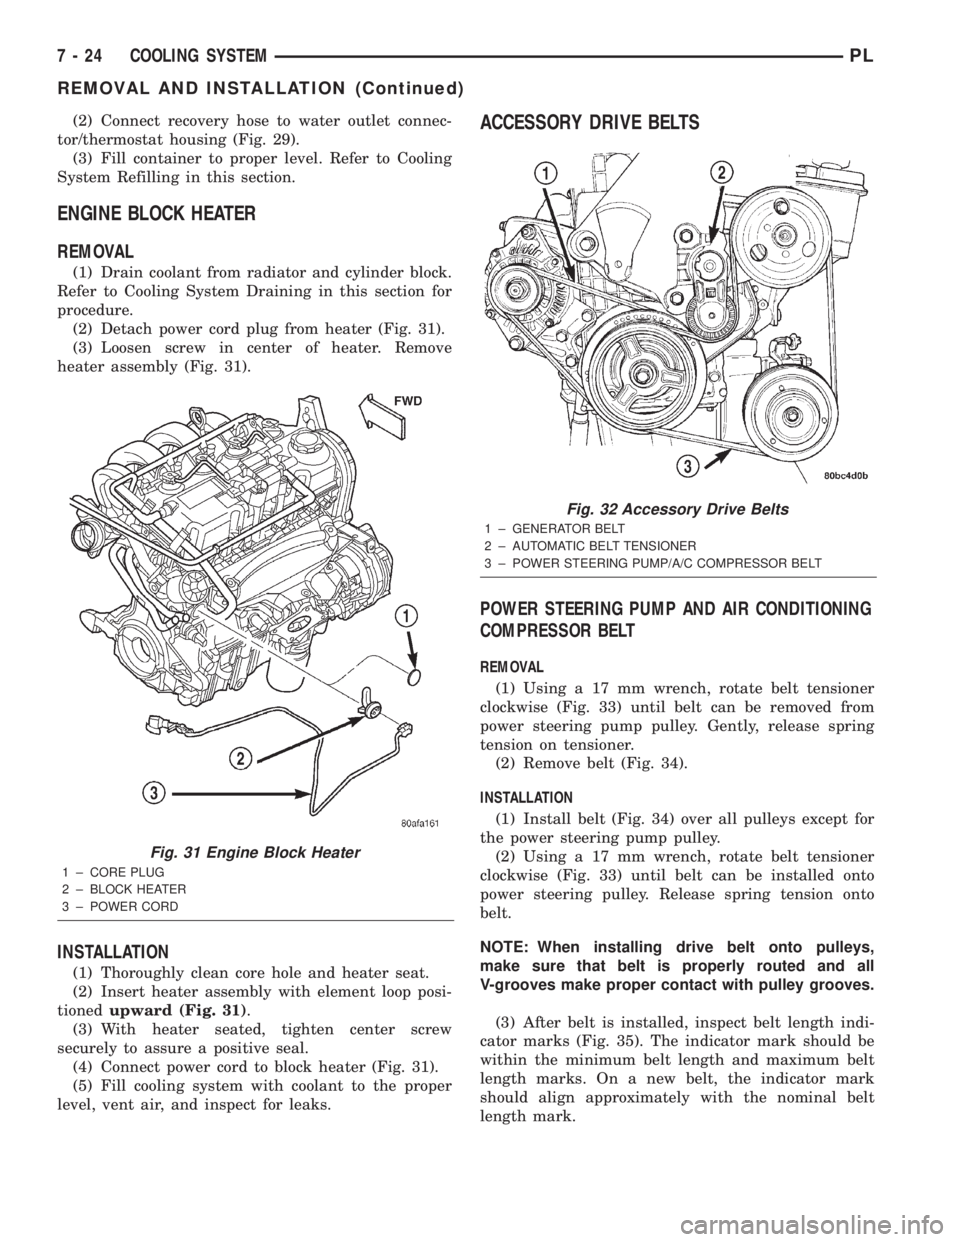
(2) Detach power cord plug from heater (Fig. 31).
(3) Loosen screw in center of heater. Remove
heater assembly (Fig. 31).
INSTALLATION
(1) Thoroughly clean core hole and heater seat.
(2) Insert heater assembly with element loop posi-
tionedupward (Fig. 31).
(3) With heater seated, tighten center screw
securely to assure a positive seal.
(4) Connect power cord to block heater (Fig. 31).
(5) Fill cooling system with coolant to the proper
level, vent air, and inspect for leaks.
ACCESSORY DRIVE BELTS
POWER STEERING PUMP AND AIR CONDITIONING
COMPRESSOR BELT
REMOVAL
(1) Using a 17 mm wrench, rotate belt tensioner
clockwise (Fig. 33) until belt can be removed from
power steering pump pulley. Gently, release spring
tension on tensioner.
(2) Remove belt (Fig. 34).
INSTALLATION
(1) Install belt (Fig. 34) over all pulleys except for
the power steering pump pulley.
(2) Using a 17 mm wrench, rotate belt tensioner
clockwise (Fig. 33) until belt can be installed onto
power steering pulley. Release spring tension onto
belt.
NOTE: When installing drive belt onto pulleys,
make sure that belt is properly routed and all
V-grooves make proper contact with pulley grooves.
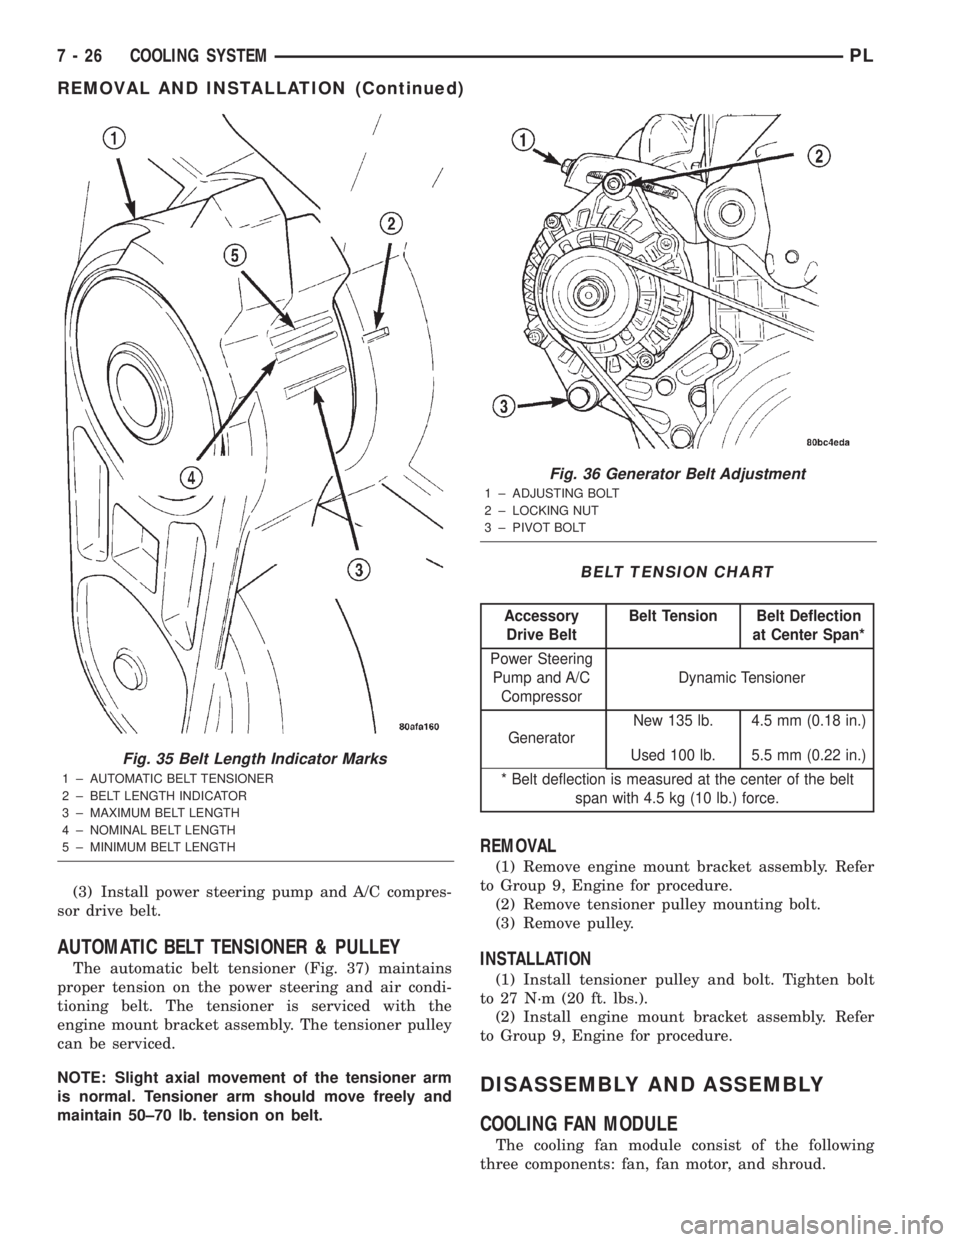
(3) After belt is installed, inspect belt length indi-
cator marks (Fig. 35). The indicator mark should be
within the minimum belt length and maximum belt
length marks. On a new belt, the indicator mark
should align approximately with the nominal belt
length mark.
Fig. 31 Engine Block Heater
1 ± CORE PLUG
2 ± BLOCK HEATER
3 ± POWER CORD
Fig. 32 Accessory Drive Belts
1 ± GENERATOR BELT
2 ± AUTOMATIC BELT TENSIONER
3 ± POWER STEERING PUMP/A/C COMPRESSOR BELT
7 - 24 COOLING SYSTEMPL
REMOVAL AND INSTALLATION (Continued)
Page 205 of 1285
(3) Install power steering pump and A/C compres-
sor drive belt.
AUTOMATIC BELT TENSIONER & PULLEY
The automatic belt tensioner (Fig. 37) maintains
proper tension on the power steering and air condi-
tioning belt. The tensioner is serviced with the
engine mount bracket assembly. The tensioner pulley
can be serviced.
NOTE: Slight axial movement of the tensioner arm
is normal. Tensioner arm should move freely and
maintain 50±70 lb. tension on belt.
REMOVAL
(1) Remove engine mount bracket assembly. Refer
to Group 9, Engine for procedure.
(2) Remove tensioner pulley mounting bolt.
(3) Remove pulley.
INSTALLATION
(1) Install tensioner pulley and bolt. Tighten bolt
to 27 N´m (20 ft. lbs.).
(2) Install engine mount bracket assembly. Refer
to Group 9, Engine for procedure.
DISASSEMBLY AND ASSEMBLY
COOLING FAN MODULE
The cooling fan module consist of the following
three components: fan, fan motor, and shroud.
Fig. 35 Belt Length Indicator Marks
1 ± AUTOMATIC BELT TENSIONER
2 ± BELT LENGTH INDICATOR
3 ± MAXIMUM BELT LENGTH
4 ± NOMINAL BELT LENGTH
5 ± MINIMUM BELT LENGTH
Fig. 36 Generator Belt Adjustment
1 ± ADJUSTING BOLT
2 ± LOCKING NUT
3 ± PIVOT BOLT
BELT TENSION CHART
Accessory
Drive BeltBelt Tension Belt Deflection
at Center Span*
Power Steering
Pump and A/C
CompressorDynamic Tensioner
GeneratorNew 135 lb. 4.5 mm (0.18 in.)
Used 100 lb. 5.5 mm (0.22 in.)
* Belt deflection is measured at the center of the belt
span with 4.5 kg (10 lb.) force.
7 - 26 COOLING SYSTEMPL
REMOVAL AND INSTALLATION (Continued)
Page 220 of 1285
(4) Remove the thermowrap from vehicle.
INSTALLATION
For installation, reverse the above procedures.
BATTERY TRAY
REMOVAL
(1) Remove battery. Refer to Battery Removal and
Installation in this section.
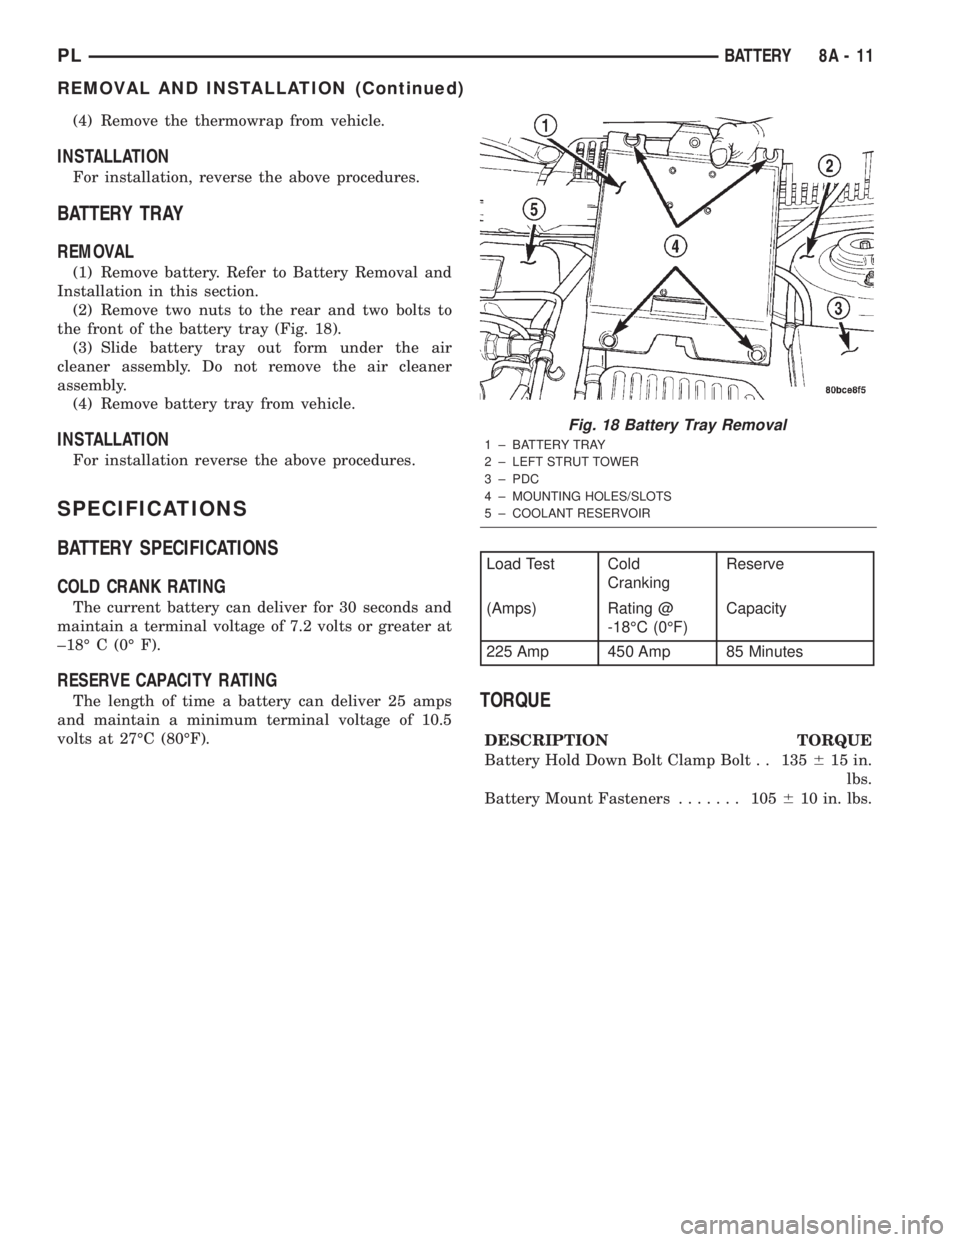
(2) Remove two nuts to the rear and two bolts to
the front of the battery tray (Fig. 18).
(3) Slide battery tray out form under the air
cleaner assembly. Do not remove the air cleaner
assembly.
(4) Remove battery tray from vehicle.
INSTALLATION
For installation reverse the above procedures.
SPECIFICATIONS
BATTERY SPECIFICATIONS
COLD CRANK RATING
The current battery can deliver for 30 seconds and
maintain a terminal voltage of 7.2 volts or greater at
±18É C (0É F).
RESERVE CAPACITY RATING
The length of time a battery can deliver 25 amps
and maintain a minimum terminal voltage of 10.5
volts at 27ÉC (80ÉF).TORQUE
DESCRIPTION TORQUE
Battery Hold Down Bolt Clamp Bolt . . 135615 in.
lbs.
Battery Mount Fasteners....... 105610 in. lbs.
Fig. 18 Battery Tray Removal
1 ± BATTERY TRAY
2 ± LEFT STRUT TOWER
3 ± PDC
4 ± MOUNTING HOLES/SLOTS
5 ± COOLANT RESERVOIR
Load Test Cold
CrankingReserve
(Amps) Rating @
-18ÉC (0ÉF)Capacity
225 Amp 450 Amp 85 Minutes
PLBATTERY 8A - 11
REMOVAL AND INSTALLATION (Continued)
Page 276 of 1285
(3) Continuity should be observed between the
ground shell of the connector and the mounting hard-
ware on the vehicle antenna. The wheel well splash
shield must be removed for access to the antenna
that is mounted on load beam.
BENCH TEST FOR ANTENNA MALFUNCTION
It is also possible to check short or open circuits
with an ohmmeter or continuity light once the
antenna has been removed from the vehicle.
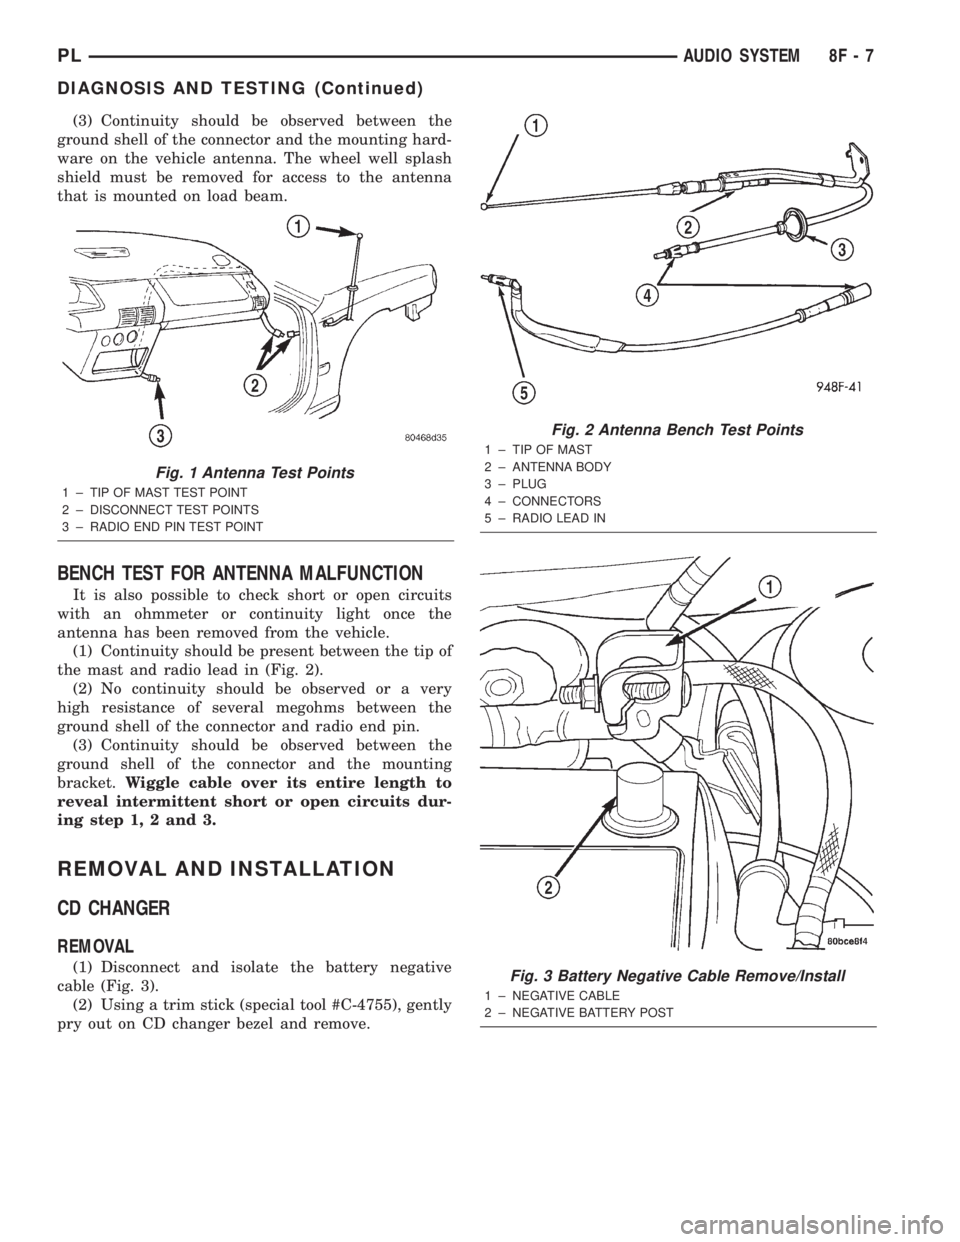
(1) Continuity should be present between the tip of
the mast and radio lead in (Fig. 2).
(2) No continuity should be observed or a very
high resistance of several megohms between the
ground shell of the connector and radio end pin.
(3) Continuity should be observed between the
ground shell of the connector and the mounting
bracket.Wiggle cable over its entire length to
reveal intermittent short or open circuits dur-
ing step 1, 2 and 3.
REMOVAL AND INSTALLATION
CD CHANGER
REMOVAL
(1) Disconnect and isolate the battery negative
cable (Fig. 3).
(2) Using a trim stick (special tool #C-4755), gently
pry out on CD changer bezel and remove.
Fig. 1 Antenna Test Points
1 ± TIP OF MAST TEST POINT
2 ± DISCONNECT TEST POINTS
3 ± RADIO END PIN TEST POINT
Fig. 2 Antenna Bench Test Points
1 ± TIP OF MAST
2 ± ANTENNA BODY
3 ± PLUG
4 ± CONNECTORS
5 ± RADIO LEAD IN
Fig. 3 Battery Negative Cable Remove/Install
1 ± NEGATIVE CABLE
2 ± NEGATIVE BATTERY POST
PLAUDIO SYSTEM 8F - 7
DIAGNOSIS AND TESTING (Continued)
Page 298 of 1285
WINDSHIELD WIPER and WASHER SYSTEMS
TABLE OF CONTENTS
page page
WINDSHIELD WIPER SYSTEM................ 1WINDSHIELD WASHER SYSTEM.............. 8
WINDSHIELD WIPER SYSTEM
TABLE OF CONTENTS
page page
GENERAL INFORMATION
INTRODUCTION..........................1
DESCRIPTION AND OPERATION
WIPER BLADES...........................1
DIAGNOSIS AND TESTING
WINDSHIELD WIPER CONDITIONS............2
WINDSHIELD WIPER MOTOR................3
WINDSHIELD WIPER/WASHER SWITCH........5
REMOVAL AND INSTALLATION
WINDSHIELD WIPER ARM(S)................5WINDSHIELD WIPER BLADE(S)..............5
WINDSHIELD WIPER BLADE ELEMENT........5
WINDSHIELD WIPER LINKAGE...............5
WINDSHIELD WIPER MODULE...............6
WINDSHIELD WIPER MOTOR................6
WINDSHIELD WIPER/WASHER SWITCH........6
CLEANING AND INSPECTION
WINDSHIELD WIPER BLADE(S)..............6
ADJUSTMENTS
WINDSHIELD WIPER ARM(S)................6
GENERAL INFORMATION
INTRODUCTION
WARNING: ON VEHICLES EQUIPPED WITH AIR-
BAGS, REFER TO GROUP 8M, PASSIVE
RESTRAINT SYSTEMS FOR STEERING WHEEL
REMOVAL AND INSTALLATION.
The windshield wipers will only operate with the
ignition switch in the ACCESSORY or IGNITION
RUN position. The wiper circuit is protected against
over loads by a fuse in the fuse block and a circuit
breaker within the wiper motor. This protects the cir-
cuitry of the wiper system and the vehicle. The wiper
motor has permanent magnet fields.
The intermittent wiper system, in addition to low
and high speed, has a delay mode and a pulse wipe
mode. The delay mode has a range of 1 to 15 seconds.
Pulse wipe is accomplished by momentarily moving
the stalk lever into the WASH position while the
wiper switch is in either OFF or DELAY position.
The wiper blades then sweep once or twice and
return to the previous wiper switch mode, OFF or
DELAY.The intermittent wiper function is integral to the
wiper switch. All electronics and relay are inside the
switch assembly.
The wiper system completes the wipe cycle when
the switch is turned OFF. The blades park in the
lowest portion of the wipe pattern.
The wiper switch also includes the MIST feature
which provides a single wipe when actuated.
DESCRIPTION AND OPERATION
WIPER BLADES
Wiper blades, exposed to the weather for a long
period of time, tend to lose their wiping effectiveness.
Periodic cleaning of the wiper blade is suggested to
remove the accumulation of salt and road film. The
wiper blades, arms, and windshield should be
cleaned with a sponge or cloth and a mild detergent
or nonabrasive cleaner. If the blades continue to
streak or smear, they should be replaced. The right
and left wipers are different blade lengths. The
driver side length is 550 mm and the passenger side
length is 475 mm. The blades should not be inter-
changed.
PLWINDSHIELD WIPER and WASHER SYSTEMS 8K - 1
Page 406 of 1285
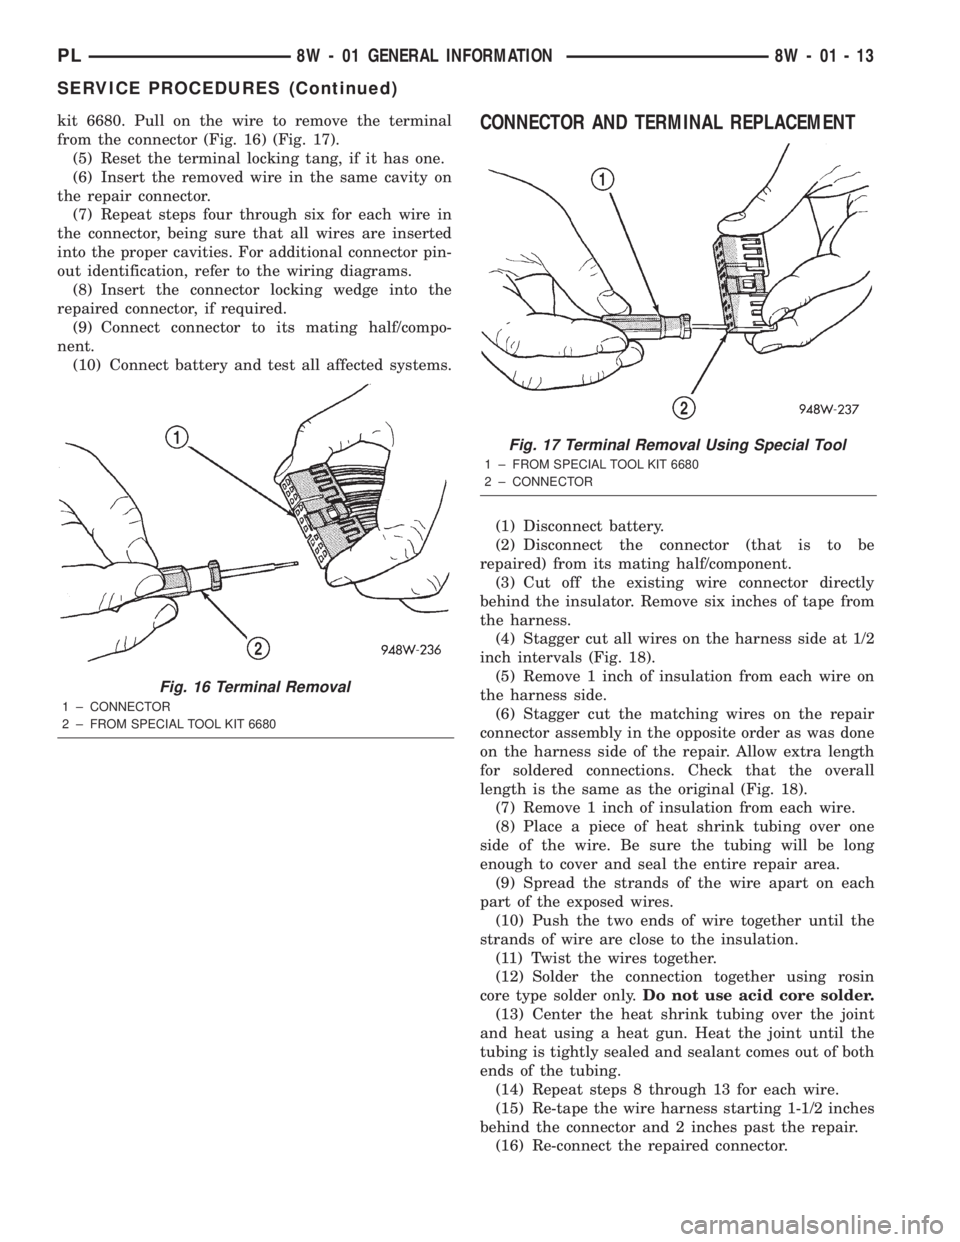
kit 6680. Pull on the wire to remove the terminal
from the connector (Fig. 16) (Fig. 17).
(5) Reset the terminal locking tang, if it has one.
(6) Insert the removed wire in the same cavity on
the repair connector.
(7) Repeat steps four through six for each wire in
the connector, being sure that all wires are inserted
into the proper cavities. For additional connector pin-
out identification, refer to the wiring diagrams.
(8) Insert the connector locking wedge into the
repaired connector, if required.
(9) Connect connector to its mating half/compo-
nent.
(10) Connect battery and test all affected systems.CONNECTOR AND TERMINAL REPLACEMENT
(1) Disconnect battery.
(2) Disconnect the connector (that is to be
repaired) from its mating half/component.
(3) Cut off the existing wire connector directly
behind the insulator. Remove six inches of tape from
the harness.
(4) Stagger cut all wires on the harness side at 1/2
inch intervals (Fig. 18).
(5) Remove 1 inch of insulation from each wire on
the harness side.
(6) Stagger cut the matching wires on the repair
connector assembly in the opposite order as was done
on the harness side of the repair. Allow extra length
for soldered connections. Check that the overall
length is the same as the original (Fig. 18).
(7) Remove 1 inch of insulation from each wire.
(8) Place a piece of heat shrink tubing over one
side of the wire. Be sure the tubing will be long
enough to cover and seal the entire repair area.
(9) Spread the strands of the wire apart on each
part of the exposed wires.
(10) Push the two ends of wire together until the
strands of wire are close to the insulation.
(11) Twist the wires together.
(12) Solder the connection together using rosin
core type solder only.Do not use acid core solder.
(13) Center the heat shrink tubing over the joint
and heat using a heat gun. Heat the joint until the
tubing is tightly sealed and sealant comes out of both
ends of the tubing.
(14) Repeat steps 8 through 13 for each wire.
(15) Re-tape the wire harness starting 1-1/2 inches
behind the connector and 2 inches past the repair.
(16) Re-connect the repaired connector.
Fig. 16 Terminal Removal
1 ± CONNECTOR
2 ± FROM SPECIAL TOOL KIT 6680
Fig. 17 Terminal Removal Using Special Tool
1 ± FROM SPECIAL TOOL KIT 6680
2 ± CONNECTOR
PL8W - 01 GENERAL INFORMATION 8W - 01 - 13
SERVICE PROCEDURES (Continued)
Page 407 of 1285
(17) Connect the battery, and test all affected sys-
tems.
TERMINAL REPLACEMENT
(1) Disconnect battery.
(2) Disconnect the connector being repaired from
its mating half. Remove connector locking wedge, if
required (Fig. 19).
(3) Remove connector locking wedge, if required
(Fig. 19).
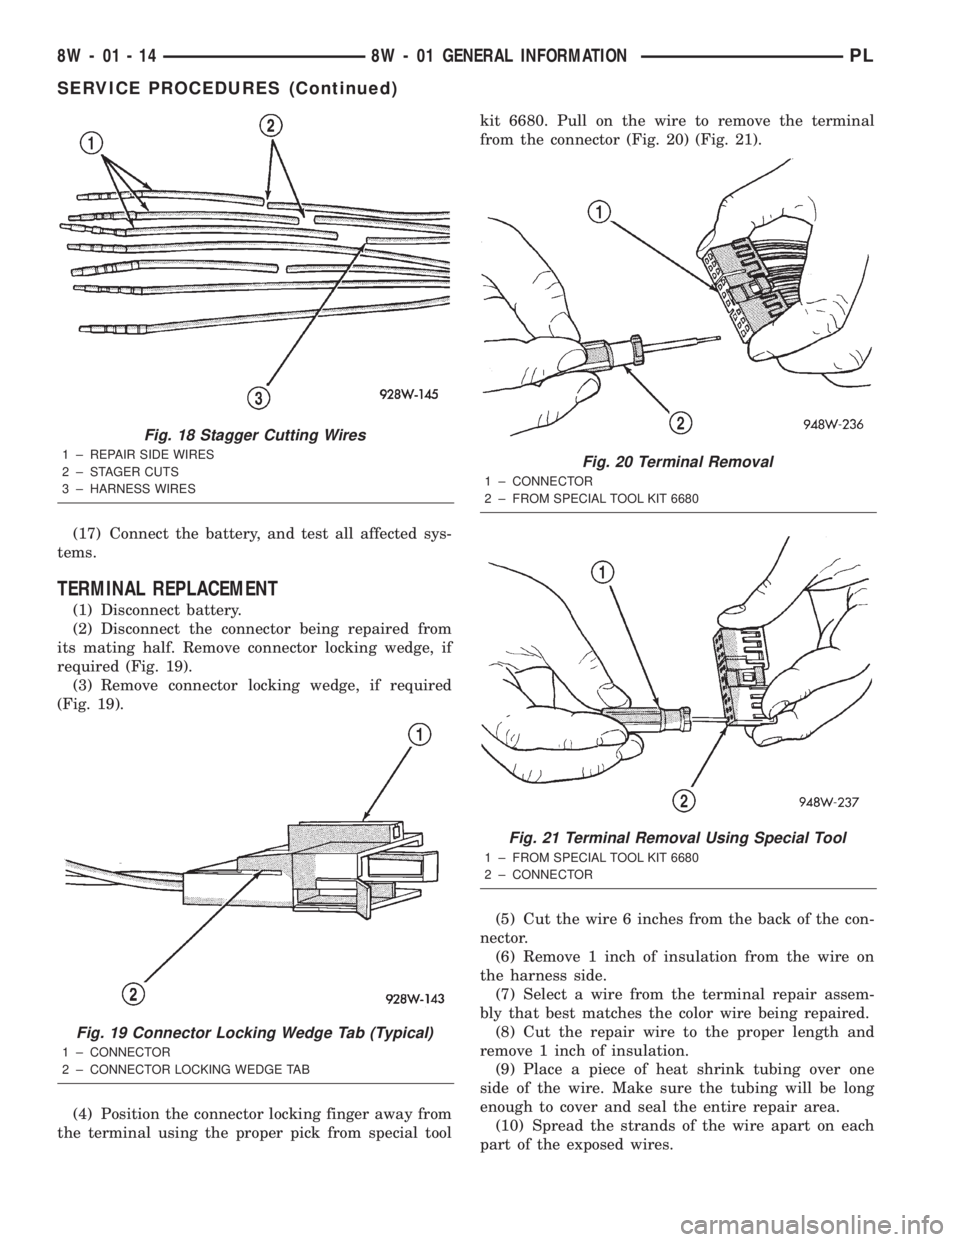
(4) Position the connector locking finger away from
the terminal using the proper pick from special toolkit 6680. Pull on the wire to remove the terminal
from the connector (Fig. 20) (Fig. 21).
(5) Cut the wire 6 inches from the back of the con-
nector.
(6) Remove 1 inch of insulation from the wire on
the harness side.
(7) Select a wire from the terminal repair assem-
bly that best matches the color wire being repaired.
(8) Cut the repair wire to the proper length and
remove 1 inch of insulation.
(9) Place a piece of heat shrink tubing over one
side of the wire. Make sure the tubing will be long
enough to cover and seal the entire repair area.
(10) Spread the strands of the wire apart on each
part of the exposed wires.
Fig. 18 Stagger Cutting Wires
1 ± REPAIR SIDE WIRES
2 ± STAGER CUTS
3 ± HARNESS WIRES
Fig. 19 Connector Locking Wedge Tab (Typical)
1 ± CONNECTOR
2 ± CONNECTOR LOCKING WEDGE TAB
Fig. 20 Terminal Removal
1 ± CONNECTOR
2 ± FROM SPECIAL TOOL KIT 6680
Fig. 21 Terminal Removal Using Special Tool
1 ± FROM SPECIAL TOOL KIT 6680
2 ± CONNECTOR
8W - 01 - 14 8W - 01 GENERAL INFORMATIONPL
SERVICE PROCEDURES (Continued)
Page 740 of 1285
ENGINE LUBRICATION SYSTEM
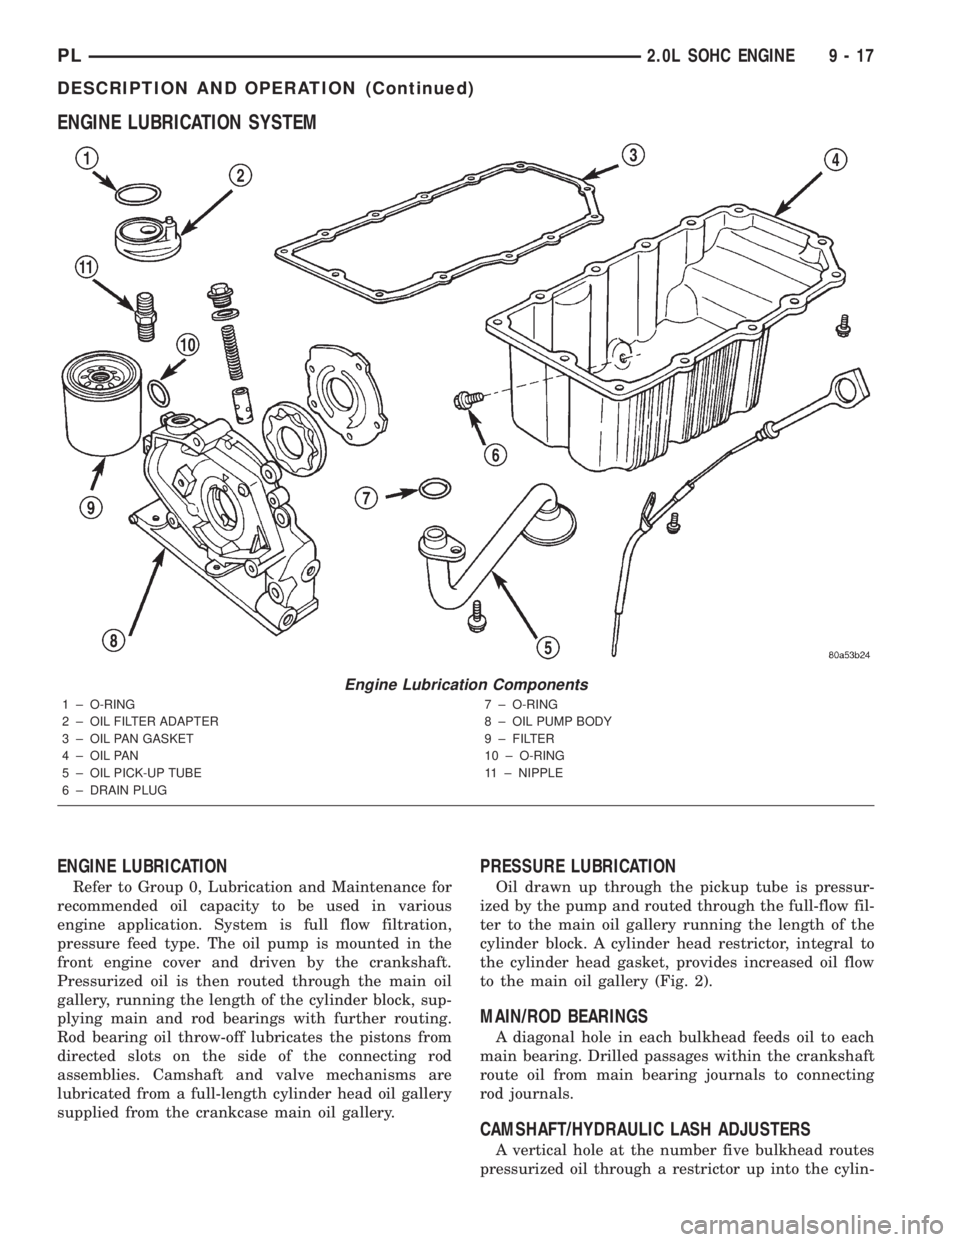
ENGINE LUBRICATION
Refer to Group 0, Lubrication and Maintenance for
recommended oil capacity to be used in various
engine application. System is full flow filtration,
pressure feed type. The oil pump is mounted in the
front engine cover and driven by the crankshaft.
Pressurized oil is then routed through the main oil
gallery, running the length of the cylinder block, sup-
plying main and rod bearings with further routing.
Rod bearing oil throw-off lubricates the pistons from
directed slots on the side of the connecting rod
assemblies. Camshaft and valve mechanisms are
lubricated from a full-length cylinder head oil gallery
supplied from the crankcase main oil gallery.
PRESSURE LUBRICATION
Oil drawn up through the pickup tube is pressur-
ized by the pump and routed through the full-flow fil-
ter to the main oil gallery running the length of the
cylinder block. A cylinder head restrictor, integral to
the cylinder head gasket, provides increased oil flow
to the main oil gallery (Fig. 2).
MAIN/ROD BEARINGS
A diagonal hole in each bulkhead feeds oil to each
main bearing. Drilled passages within the crankshaft
route oil from main bearing journals to connecting
rod journals.
CAMSHAFT/HYDRAULIC LASH ADJUSTERS
A vertical hole at the number five bulkhead routes
pressurized oil through a restrictor up into the cylin-
Engine Lubrication Components
1 ± O-RING
2 ± OIL FILTER ADAPTER
3 ± OIL PAN GASKET
4 ± OIL PAN
5 ± OIL PICK-UP TUBE
6 ± DRAIN PLUG7 ± O-RING
8 ± OIL PUMP BODY
9 ± FILTER
10 ± O-RING
11 ± NIPPLE
PL2.0L SOHC ENGINE 9 - 17
DESCRIPTION AND OPERATION (Continued)
Page 783 of 1285
(10) Install connecting rod lower bearing half and
cap. InstallNewbolts and tighten to 27 N´m (20 ft.
lbs.) plus 1/4 turn.
(11) Install cylinder head and oil pan. Refer to pro-
cedures in this section.
DISASSEMBLY AND ASSEMBLY
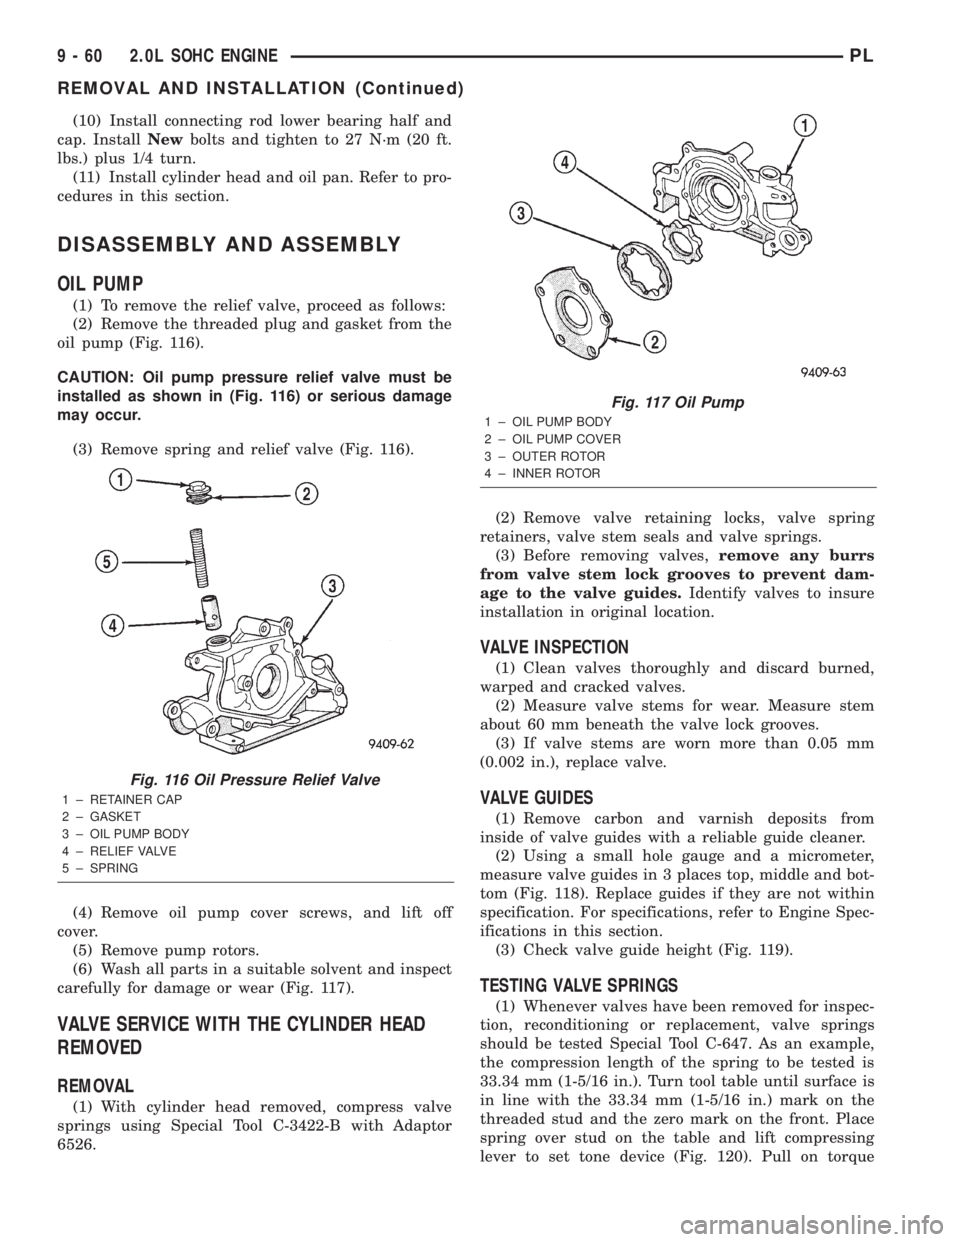
OIL PUMP
(1) To remove the relief valve, proceed as follows:
(2) Remove the threaded plug and gasket from the
oil pump (Fig. 116).
CAUTION: Oil pump pressure relief valve must be
installed as shown in (Fig. 116) or serious damage
may occur.
(3) Remove spring and relief valve (Fig. 116).
(4) Remove oil pump cover screws, and lift off
cover.
(5) Remove pump rotors.
(6) Wash all parts in a suitable solvent and inspect
carefully for damage or wear (Fig. 117).
VALVE SERVICE WITH THE CYLINDER HEAD
REMOVED
REMOVAL
(1) With cylinder head removed, compress valve
springs using Special Tool C-3422-B with Adaptor
6526.(2) Remove valve retaining locks, valve spring
retainers, valve stem seals and valve springs.
(3) Before removing valves,remove any burrs
from valve stem lock grooves to prevent dam-
age to the valve guides.Identify valves to insure
installation in original location.
VALVE INSPECTION
(1) Clean valves thoroughly and discard burned,
warped and cracked valves.
(2) Measure valve stems for wear. Measure stem
about 60 mm beneath the valve lock grooves.
(3) If valve stems are worn more than 0.05 mm
(0.002 in.), replace valve.
VALVE GUIDES
(1) Remove carbon and varnish deposits from
inside of valve guides with a reliable guide cleaner.
(2) Using a small hole gauge and a micrometer,
measure valve guides in 3 places top, middle and bot-
tom (Fig. 118). Replace guides if they are not within
specification. For specifications, refer to Engine Spec-
ifications in this section.
(3) Check valve guide height (Fig. 119).
TESTING VALVE SPRINGS
(1) Whenever valves have been removed for inspec-
tion, reconditioning or replacement, valve springs
should be tested Special Tool C-647. As an example,
the compression length of the spring to be tested is
33.34 mm (1-5/16 in.). Turn tool table until surface is
in line with the 33.34 mm (1-5/16 in.) mark on the
threaded stud and the zero mark on the front. Place
spring over stud on the table and lift compressing
lever to set tone device (Fig. 120). Pull on torque
Fig. 116 Oil Pressure Relief Valve
1 ± RETAINER CAP
2 ± GASKET
3 ± OIL PUMP BODY
4 ± RELIEF VALVE
5 ± SPRING
Fig. 117 Oil Pump
1 ± OIL PUMP BODY
2 ± OIL PUMP COVER
3 ± OUTER ROTOR
4 ± INNER ROTOR
9 - 60 2.0L SOHC ENGINEPL
REMOVAL AND INSTALLATION (Continued)
Page 784 of 1285
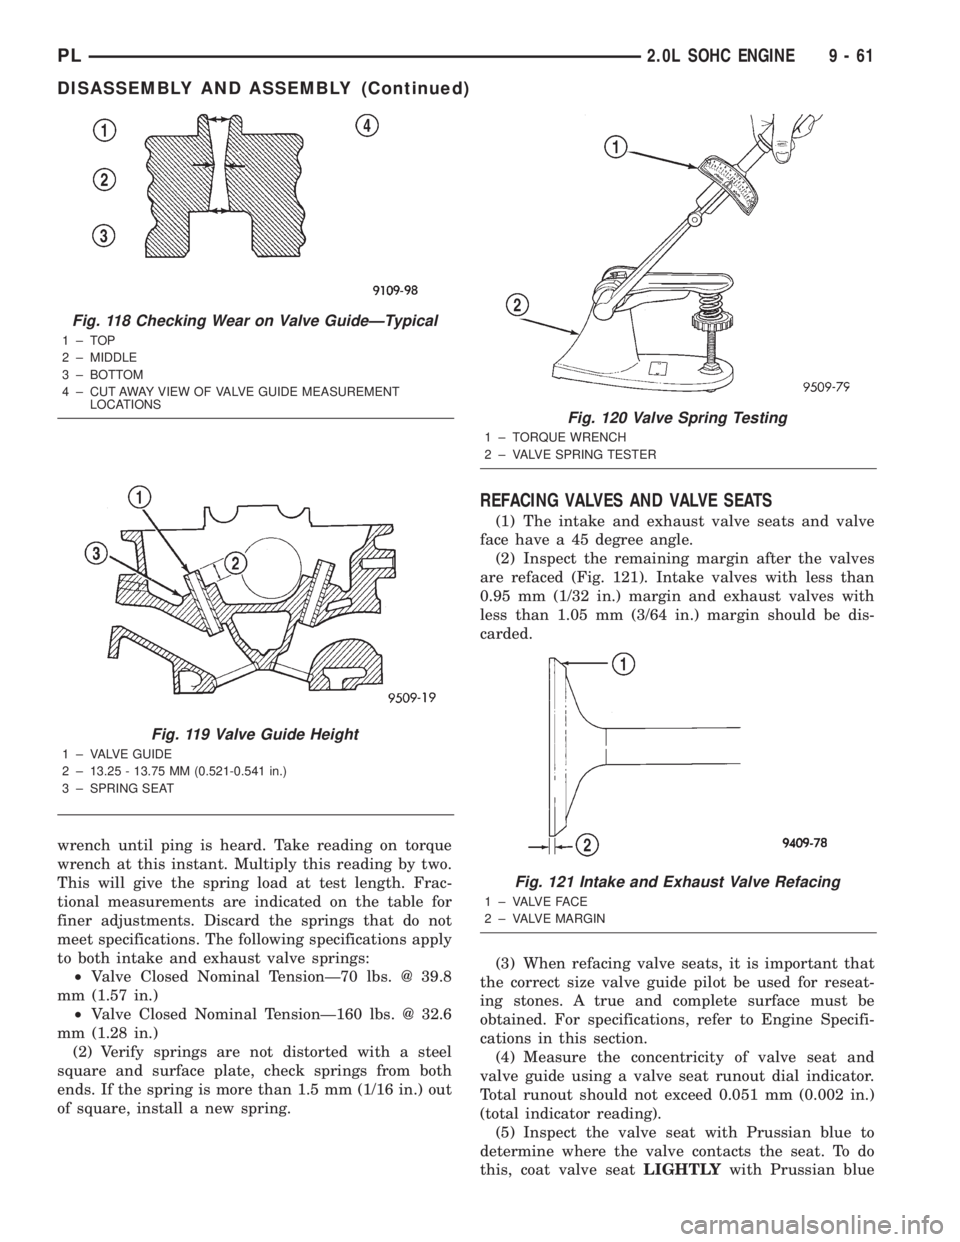
wrench until ping is heard. Take reading on torque
wrench at this instant. Multiply this reading by two.
This will give the spring load at test length. Frac-
tional measurements are indicated on the table for
finer adjustments. Discard the springs that do not
meet specifications. The following specifications apply
to both intake and exhaust valve springs:
²Valve Closed Nominal TensionÐ70 lbs. @ 39.8
mm (1.57 in.)
²Valve Closed Nominal TensionÐ160 lbs. @ 32.6
mm (1.28 in.)
(2) Verify springs are not distorted with a steel
square and surface plate, check springs from both
ends. If the spring is more than 1.5 mm (1/16 in.) out
of square, install a new spring.
REFACING VALVES AND VALVE SEATS
(1) The intake and exhaust valve seats and valve
face have a 45 degree angle.
(2) Inspect the remaining margin after the valves
are refaced (Fig. 121). Intake valves with less than
0.95 mm (1/32 in.) margin and exhaust valves with
less than 1.05 mm (3/64 in.) margin should be dis-
carded.
(3) When refacing valve seats, it is important that
the correct size valve guide pilot be used for reseat-
ing stones. A true and complete surface must be
obtained. For specifications, refer to Engine Specifi-
cations in this section.
(4) Measure the concentricity of valve seat and
valve guide using a valve seat runout dial indicator.
Total runout should not exceed 0.051 mm (0.002 in.)
(total indicator reading).
(5) Inspect the valve seat with Prussian blue to
determine where the valve contacts the seat. To do
this, coat valve seatLIGHTLYwith Prussian blue
Fig. 118 Checking Wear on Valve GuideÐTypical
1±TOP
2 ± MIDDLE
3 ± BOTTOM
4 ± CUT AWAY VIEW OF VALVE GUIDE MEASUREMENT
LOCATIONS
Fig. 119 Valve Guide Height
1 ± VALVE GUIDE
2 ± 13.25 - 13.75 MM (0.521-0.541 in.)
3 ± SPRING SEAT
Fig. 120 Valve Spring Testing
1 ± TORQUE WRENCH
2 ± VALVE SPRING TESTER
Fig. 121 Intake and Exhaust Valve Refacing
1 ± VALVE FACE
2 ± VALVE MARGIN
PL2.0L SOHC ENGINE 9 - 61
DISASSEMBLY AND ASSEMBLY (Continued)