lock DODGE NEON 2000 Service Repair Manual
[x] Cancel search | Manufacturer: DODGE, Model Year: 2000, Model line: NEON, Model: DODGE NEON 2000Pages: 1285, PDF Size: 29.42 MB
Page 1004 of 1285
ASSEMBLY
When rebuilding, reverse the above procedure.
VALVE BODY
NOTE: Tighten all valve body screws to 5 N´m (40
in. lbs.)CAUTION: Do not clamp any portion of valve body
or transfer plate in a vise. Any slight distortion of
the aluminum body or transfer plate will result in
sticking valves, excessive leakage, or both. When
removing or installing valves or plugs, slide them in
or out carefully. Do not use force.
NOTE: TAG ALL SPRINGS AS THEY ARE
REMOVED FOR REASSEMBLY IDENTIFICATION.
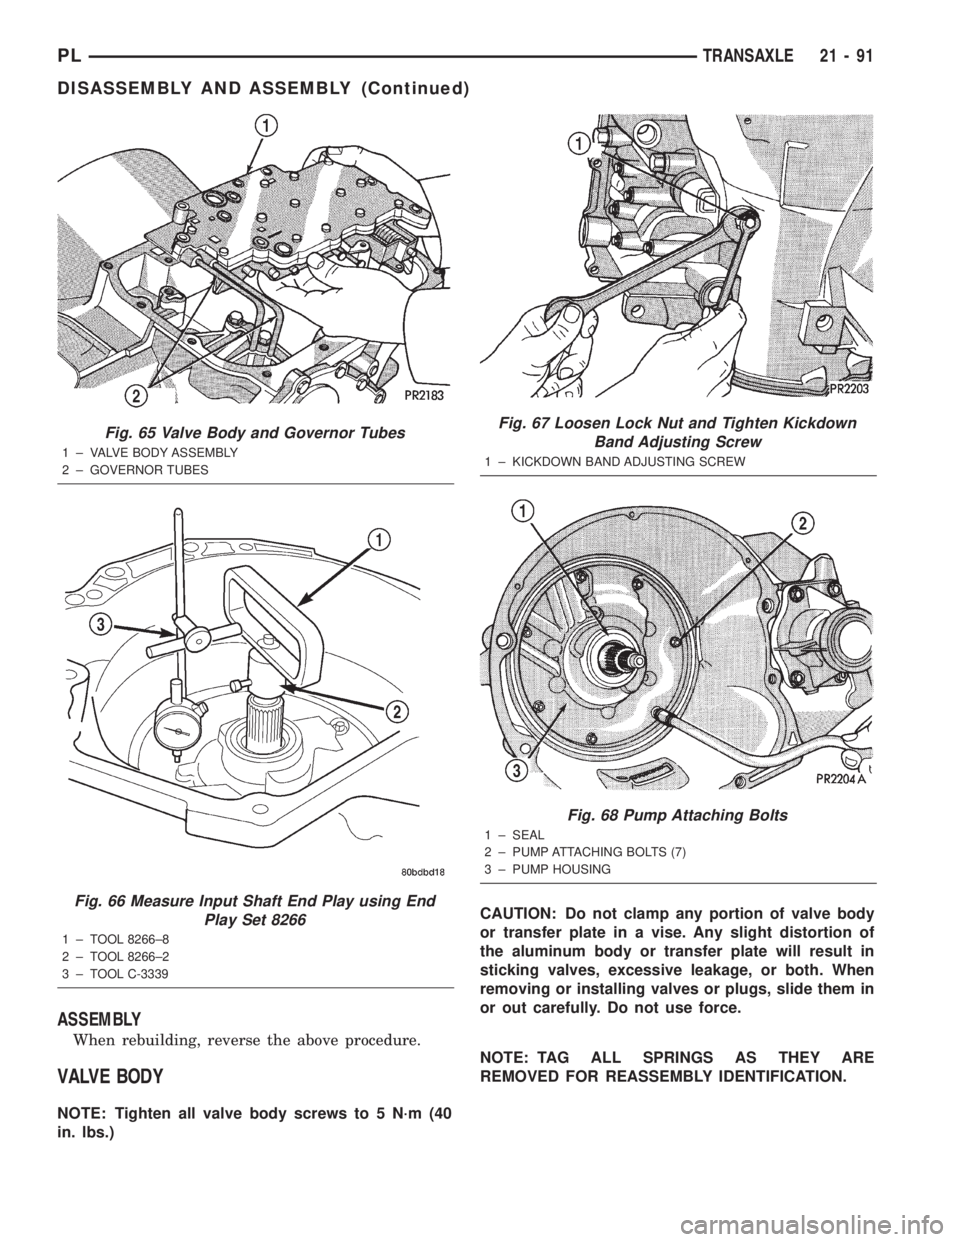
Fig. 65 Valve Body and Governor Tubes
1 ± VALVE BODY ASSEMBLY
2 ± GOVERNOR TUBES
Fig. 66 Measure Input Shaft End Play using End
Play Set 8266
1 ± TOOL 8266±8
2 ± TOOL 8266±2
3 ± TOOL C-3339
Fig. 67 Loosen Lock Nut and Tighten Kickdown
Band Adjusting Screw
1 ± KICKDOWN BAND ADJUSTING SCREW
Fig. 68 Pump Attaching Bolts
1 ± SEAL
2 ± PUMP ATTACHING BOLTS (7)
3 ± PUMP HOUSING
PLTRANSAXLE 21 - 91
DISASSEMBLY AND ASSEMBLY (Continued)
Page 1009 of 1285
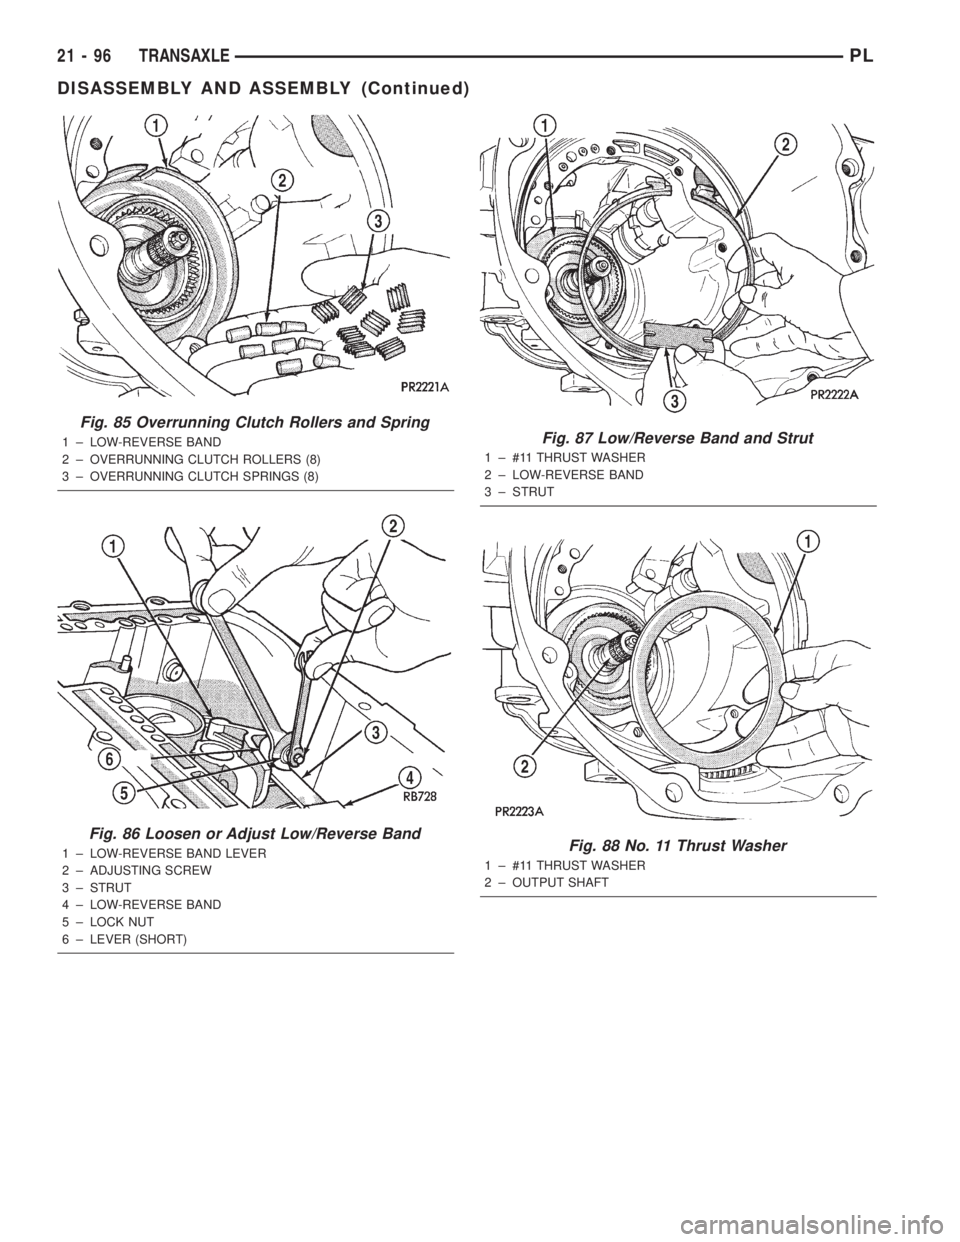
Fig. 85 Overrunning Clutch Rollers and Spring
1 ± LOW-REVERSE BAND
2 ± OVERRUNNING CLUTCH ROLLERS (8)
3 ± OVERRUNNING CLUTCH SPRINGS (8)
Fig. 86 Loosen or Adjust Low/Reverse Band
1 ± LOW-REVERSE BAND LEVER
2 ± ADJUSTING SCREW
3 ± STRUT
4 ± LOW-REVERSE BAND
5 ± LOCK NUT
6 ± LEVER (SHORT)
Fig. 87 Low/Reverse Band and Strut
1 ± #11 THRUST WASHER
2 ± LOW-REVERSE BAND
3 ± STRUT
Fig. 88 No. 11 Thrust Washer
1 ± #11 THRUST WASHER
2 ± OUTPUT SHAFT
21 - 96 TRANSAXLEPL
DISASSEMBLY AND ASSEMBLY (Continued)
Page 1033 of 1285
DETERMINING SHIM THICKNESS
Shim thickness need be determined only if any of
the following parts are replaced:
²Transaxle case
²Transfer shaft
²Transfer shaft gear
²Transfer shaft bearings
²Governor support retainer
²Transfer shaft bearing retainer
²Retainer snap ring
²Governor support
Refer to Bearing Adjustment Procedure in rear of
this section to determine proper shim thickness.
STIRRUP AND STRAP INSTALLATION
Once bearing shim selection has been adjusted,
install stirrup and strap assembly onto transfer gear.
NOTE: Once the stirrup assembly is positioned
onto the transfer gear, it is necessary to ªclockº the
stirrup against the flats of the transfer gear retain-
ing nut.
(1) Position the stirrup on the transfer gear.
(2) Position strap.
(3) Install retaining bolts into transfer gear. Fin-
ger±tighten bolts.
(4) Turn stirrup clockwise against the flats of the
transfer gear retaining nut.
(5) Tighten retaining bolts to 23 N´m (200 in. lbs.).(6) Bend tabs of strap up against ªflatsºof retain-
ing bolts.
ASSEMBLY
To install transfer shaft, reverse the above proce-
dure.
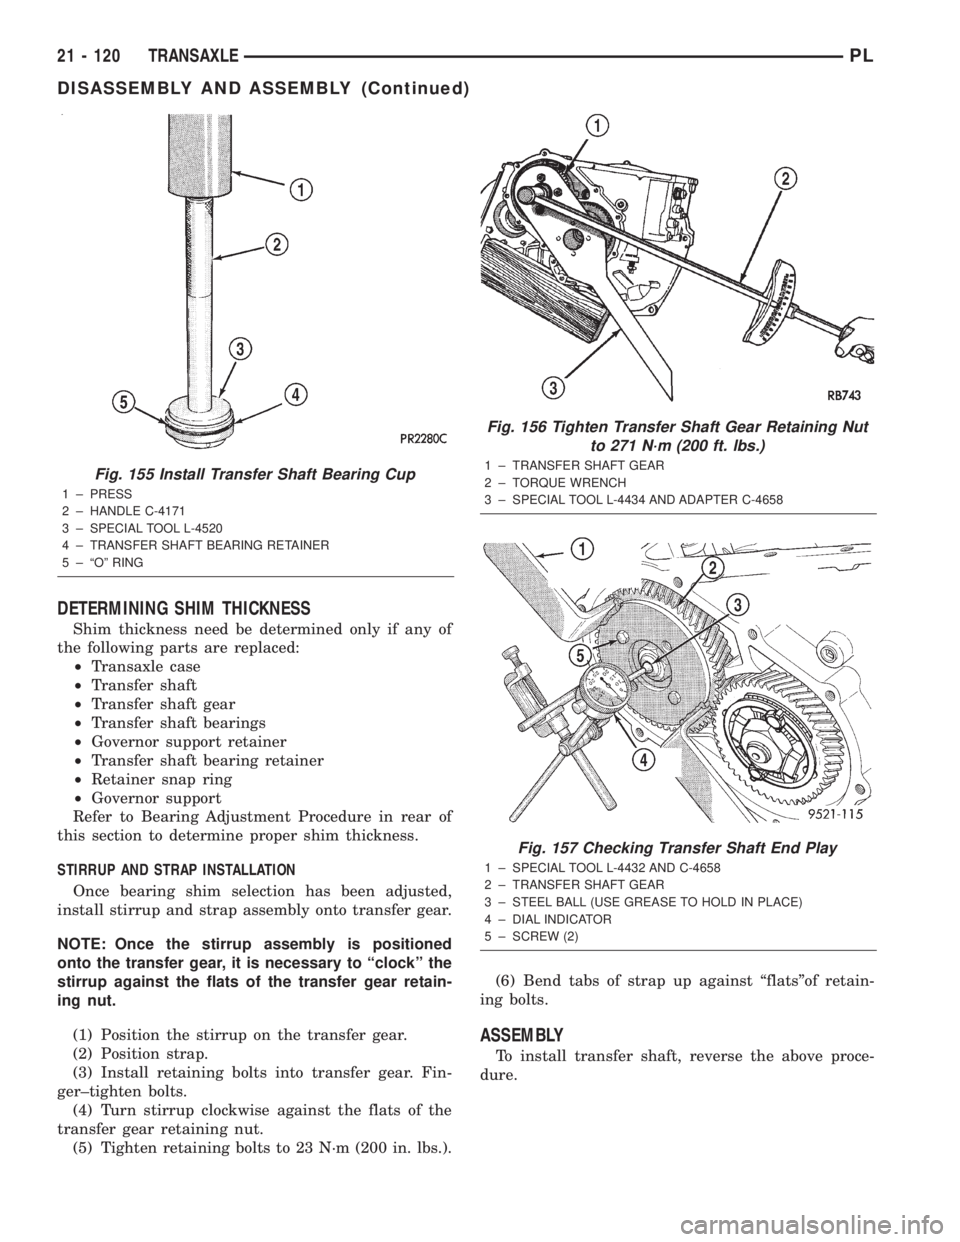
Fig. 155 Install Transfer Shaft Bearing Cup
1 ± PRESS
2 ± HANDLE C-4171
3 ± SPECIAL TOOL L-4520
4 ± TRANSFER SHAFT BEARING RETAINER
5 ± ªOº RING
Fig. 156 Tighten Transfer Shaft Gear Retaining Nut
to 271 N´m (200 ft. lbs.)
1 ± TRANSFER SHAFT GEAR
2 ± TORQUE WRENCH
3 ± SPECIAL TOOL L-4434 AND ADAPTER C-4658
Fig. 157 Checking Transfer Shaft End Play
1 ± SPECIAL TOOL L-4432 AND C-4658
2 ± TRANSFER SHAFT GEAR
3 ± STEEL BALL (USE GREASE TO HOLD IN PLACE)
4 ± DIAL INDICATOR
5 ± SCREW (2)
21 - 120 TRANSAXLEPL
DISASSEMBLY AND ASSEMBLY (Continued)
Page 1041 of 1285
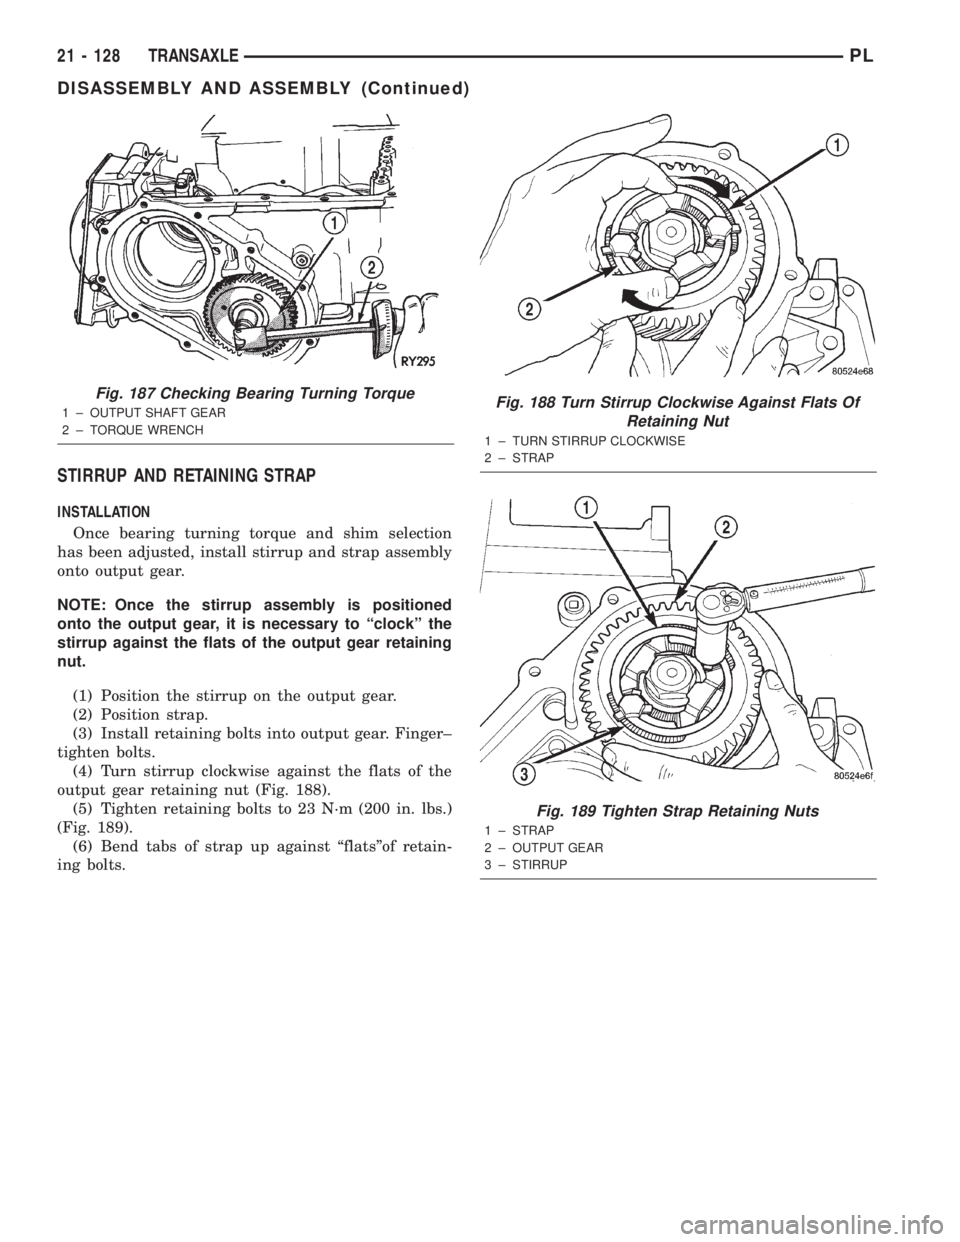
STIRRUP AND RETAINING STRAP
INSTALLATION
Once bearing turning torque and shim selection
has been adjusted, install stirrup and strap assembly
onto output gear.
NOTE: Once the stirrup assembly is positioned
onto the output gear, it is necessary to ªclockº the
stirrup against the flats of the output gear retaining
nut.
(1) Position the stirrup on the output gear.
(2) Position strap.
(3) Install retaining bolts into output gear. Finger±
tighten bolts.
(4) Turn stirrup clockwise against the flats of the
output gear retaining nut (Fig. 188).
(5) Tighten retaining bolts to 23 N´m (200 in. lbs.)
(Fig. 189).
(6) Bend tabs of strap up against ªflatsºof retain-
ing bolts.
Fig. 187 Checking Bearing Turning Torque
1 ± OUTPUT SHAFT GEAR
2 ± TORQUE WRENCHFig. 188 Turn Stirrup Clockwise Against Flats Of
Retaining Nut
1 ± TURN STIRRUP CLOCKWISE
2 ± STRAP
Fig. 189 Tighten Strap Retaining Nuts
1 ± STRAP
2 ± OUTPUT GEAR
3 ± STIRRUP
21 - 128 TRANSAXLEPL
DISASSEMBLY AND ASSEMBLY (Continued)
Page 1049 of 1285
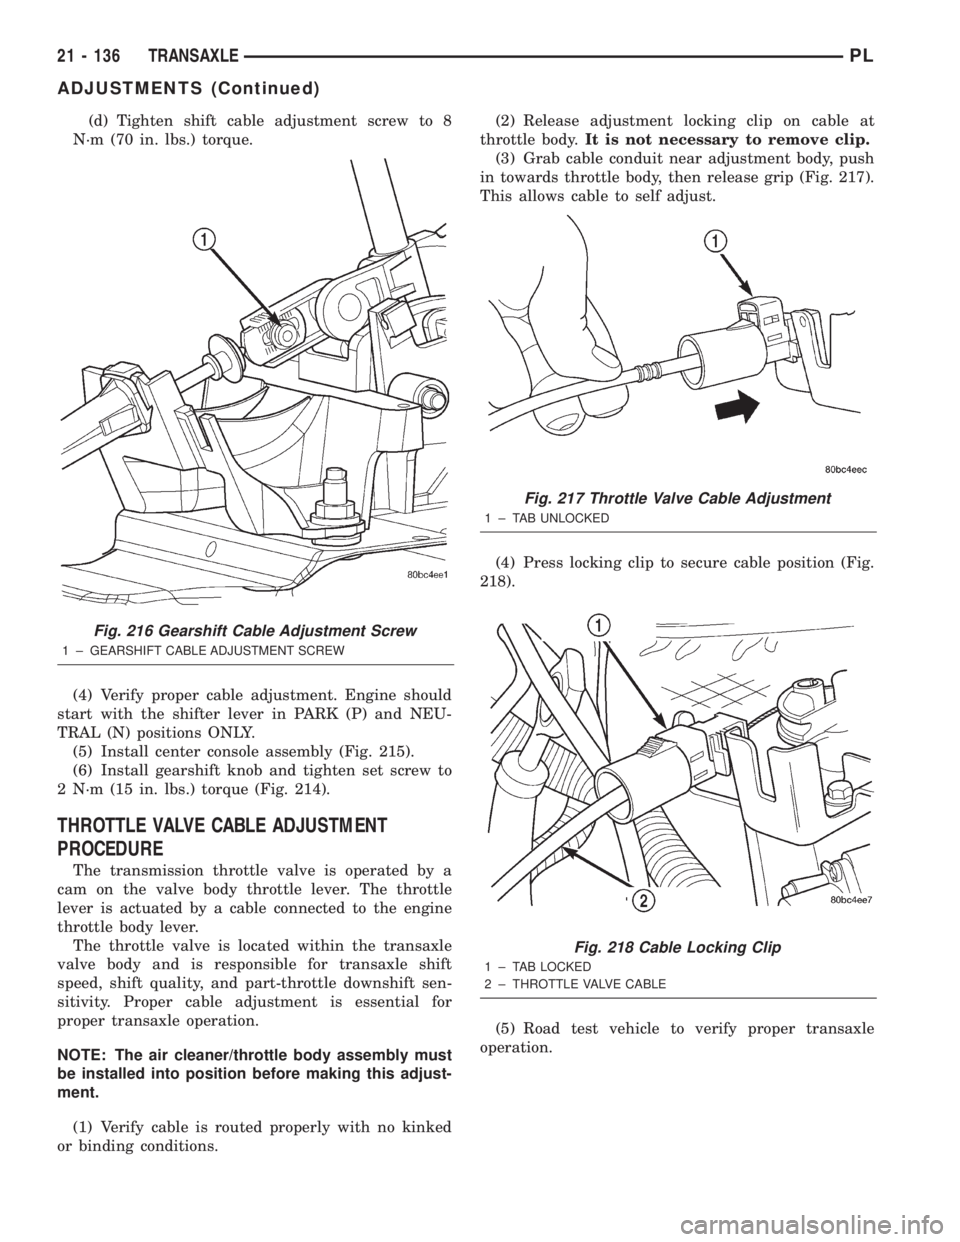
(d) Tighten shift cable adjustment screw to 8
N´m (70 in. lbs.) torque.
(4) Verify proper cable adjustment. Engine should
start with the shifter lever in PARK (P) and NEU-
TRAL (N) positions ONLY.
(5) Install center console assembly (Fig. 215).
(6) Install gearshift knob and tighten set screw to
2 N´m (15 in. lbs.) torque (Fig. 214).
THROTTLE VALVE CABLE ADJUSTMENT
PROCEDURE
The transmission throttle valve is operated by a
cam on the valve body throttle lever. The throttle
lever is actuated by a cable connected to the engine
throttle body lever.
The throttle valve is located within the transaxle
valve body and is responsible for transaxle shift
speed, shift quality, and part-throttle downshift sen-
sitivity. Proper cable adjustment is essential for
proper transaxle operation.
NOTE: The air cleaner/throttle body assembly must
be installed into position before making this adjust-
ment.
(1) Verify cable is routed properly with no kinked
or binding conditions.(2) Release adjustment locking clip on cable at
throttle body.It is not necessary to remove clip.
(3) Grab cable conduit near adjustment body, push
in towards throttle body, then release grip (Fig. 217).
This allows cable to self adjust.
(4) Press locking clip to secure cable position (Fig.
218).
(5) Road test vehicle to verify proper transaxle
operation.
Fig. 216 Gearshift Cable Adjustment Screw
1 ± GEARSHIFT CABLE ADJUSTMENT SCREW
Fig. 217 Throttle Valve Cable Adjustment
1 ± TAB UNLOCKED
Fig. 218 Cable Locking Clip
1 ± TAB LOCKED
2 ± THROTTLE VALVE CABLE
21 - 136 TRANSAXLEPL
ADJUSTMENTS (Continued)
Page 1050 of 1285
BRAKE TRANSMISSION SHIFT INTERLOCK
SYSTEM
VERIFICATION
The following chart describes the normal operation
of the Brake Transmission Shift Interlock (BTSI) sys-
tem. If the ªexpected responseº differs from the vehi-
cle's response, then system repair and/or adjustment
is necessary.
ADJUSTMENT
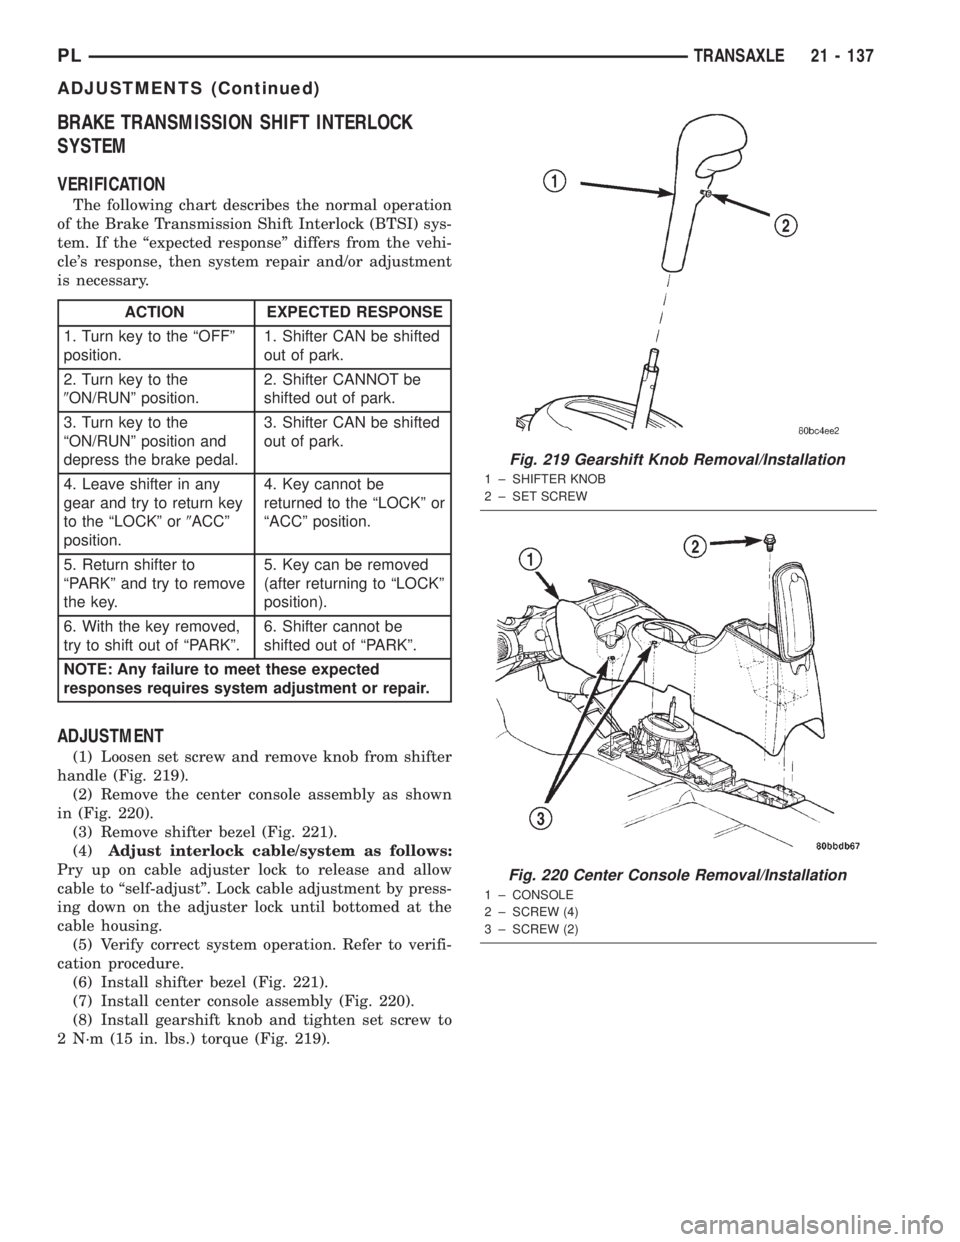
(1) Loosen set screw and remove knob from shifter
handle (Fig. 219).
(2) Remove the center console assembly as shown
in (Fig. 220).
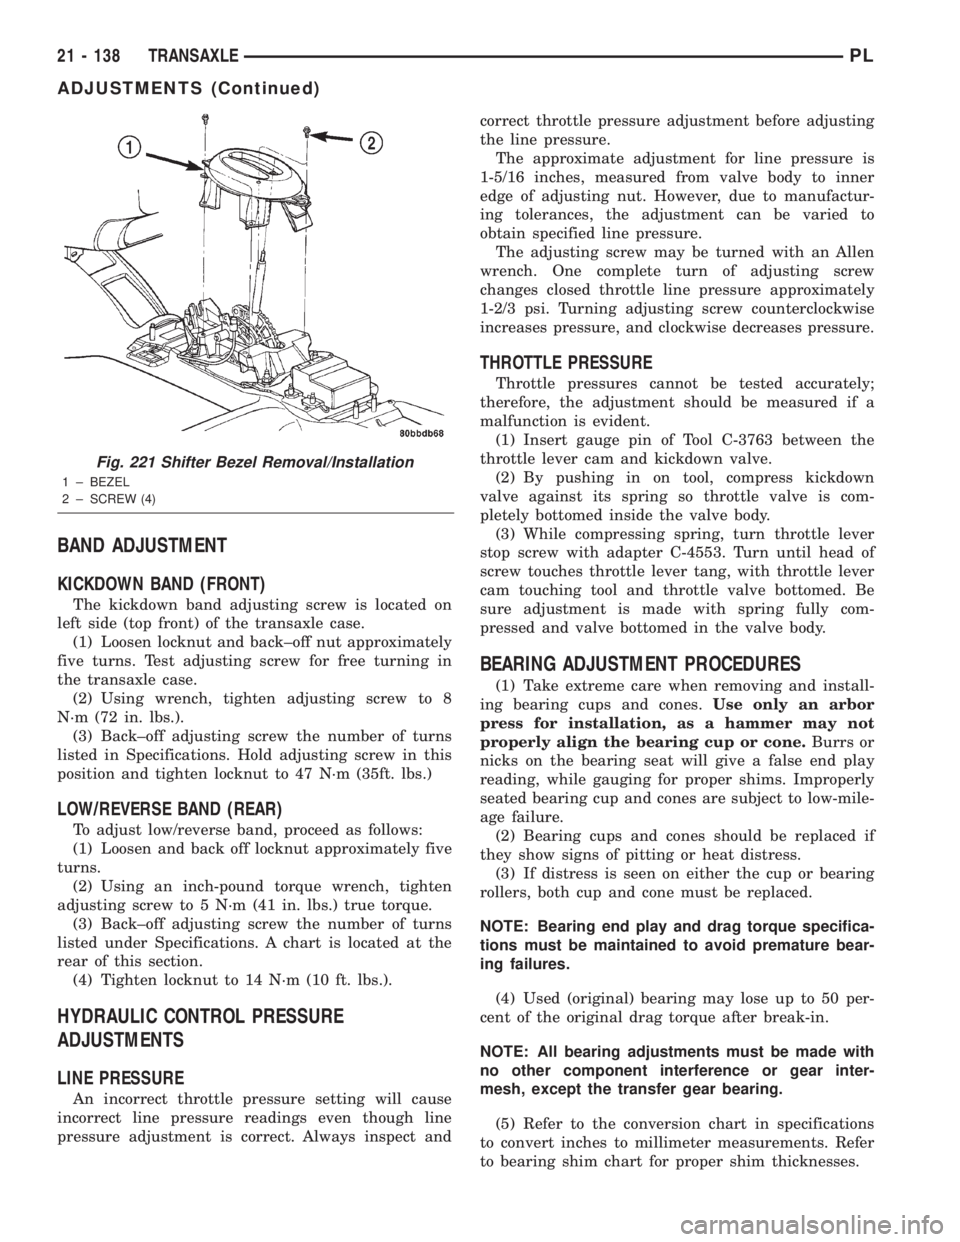
(3) Remove shifter bezel (Fig. 221).
(4)Adjust interlock cable/system as follows:
Pry up on cable adjuster lock to release and allow
cable to ªself-adjustº. Lock cable adjustment by press-
ing down on the adjuster lock until bottomed at the
cable housing.
(5) Verify correct system operation. Refer to verifi-
cation procedure.
(6) Install shifter bezel (Fig. 221).
(7) Install center console assembly (Fig. 220).
(8) Install gearshift knob and tighten set screw to
2 N´m (15 in. lbs.) torque (Fig. 219).
ACTION EXPECTED RESPONSE
1. Turn key to the ªOFFº
position.1. Shifter CAN be shifted
out of park.
2. Turn key to the
9ON/RUNº position.2. Shifter CANNOT be
shifted out of park.
3. Turn key to the
ªON/RUNº position and
depress the brake pedal.3. Shifter CAN be shifted
out of park.
4. Leave shifter in any
gear and try to return key
to the ªLOCKº or9ACCº
position.4. Key cannot be
returned to the ªLOCKº or
ªACCº position.
5. Return shifter to
ªPARKº and try to remove
the key.5. Key can be removed
(after returning to ªLOCKº
position).
6. With the key removed,
try to shift out of ªPARKº.6. Shifter cannot be
shifted out of ªPARKº.
NOTE: Any failure to meet these expected
responses requires system adjustment or repair.
Fig. 219 Gearshift Knob Removal/Installation
1 ± SHIFTER KNOB
2 ± SET SCREW
Fig. 220 Center Console Removal/Installation
1 ± CONSOLE
2 ± SCREW (4)
3 ± SCREW (2)
PLTRANSAXLE 21 - 137
ADJUSTMENTS (Continued)
Page 1051 of 1285
BAND ADJUSTMENT
KICKDOWN BAND (FRONT)
The kickdown band adjusting screw is located on
left side (top front) of the transaxle case.
(1) Loosen locknut and back±off nut approximately
five turns. Test adjusting screw for free turning in
the transaxle case.
(2) Using wrench, tighten adjusting screw to 8
N´m (72 in. lbs.).
(3) Back±off adjusting screw the number of turns
listed in Specifications. Hold adjusting screw in this
position and tighten locknut to 47 N´m (35ft. lbs.)
LOW/REVERSE BAND (REAR)
To adjust low/reverse band, proceed as follows:
(1) Loosen and back off locknut approximately five
turns.
(2) Using an inch-pound torque wrench, tighten
adjusting screw to 5 N´m (41 in. lbs.) true torque.
(3) Back±off adjusting screw the number of turns
listed under Specifications. A chart is located at the
rear of this section.
(4) Tighten locknut to 14 N´m (10 ft. lbs.).
HYDRAULIC CONTROL PRESSURE
ADJUSTMENTS
LINE PRESSURE
An incorrect throttle pressure setting will cause
incorrect line pressure readings even though line
pressure adjustment is correct. Always inspect andcorrect throttle pressure adjustment before adjusting
the line pressure.
The approximate adjustment for line pressure is
1-5/16 inches, measured from valve body to inner
edge of adjusting nut. However, due to manufactur-
ing tolerances, the adjustment can be varied to
obtain specified line pressure.
The adjusting screw may be turned with an Allen
wrench. One complete turn of adjusting screw
changes closed throttle line pressure approximately
1-2/3 psi. Turning adjusting screw counterclockwise
increases pressure, and clockwise decreases pressure.
THROTTLE PRESSURE
Throttle pressures cannot be tested accurately;
therefore, the adjustment should be measured if a
malfunction is evident.
(1) Insert gauge pin of Tool C-3763 between the
throttle lever cam and kickdown valve.
(2) By pushing in on tool, compress kickdown
valve against its spring so throttle valve is com-
pletely bottomed inside the valve body.
(3) While compressing spring, turn throttle lever
stop screw with adapter C-4553. Turn until head of
screw touches throttle lever tang, with throttle lever
cam touching tool and throttle valve bottomed. Be
sure adjustment is made with spring fully com-
pressed and valve bottomed in the valve body.
BEARING ADJUSTMENT PROCEDURES
(1) Take extreme care when removing and install-
ing bearing cups and cones.Use only an arbor
press for installation, as a hammer may not
properly align the bearing cup or cone.Burrs or
nicks on the bearing seat will give a false end play
reading, while gauging for proper shims. Improperly
seated bearing cup and cones are subject to low-mile-
age failure.
(2) Bearing cups and cones should be replaced if
they show signs of pitting or heat distress.
(3) If distress is seen on either the cup or bearing
rollers, both cup and cone must be replaced.
NOTE: Bearing end play and drag torque specifica-
tions must be maintained to avoid premature bear-
ing failures.
(4) Used (original) bearing may lose up to 50 per-
cent of the original drag torque after break-in.
NOTE: All bearing adjustments must be made with
no other component interference or gear inter-
mesh, except the transfer gear bearing.
(5) Refer to the conversion chart in specifications
to convert inches to millimeter measurements. Refer
to bearing shim chart for proper shim thicknesses.
Fig. 221 Shifter Bezel Removal/Installation
1 ± BEZEL
2 ± SCREW (4)
21 - 138 TRANSAXLEPL
ADJUSTMENTS (Continued)
Page 1063 of 1285
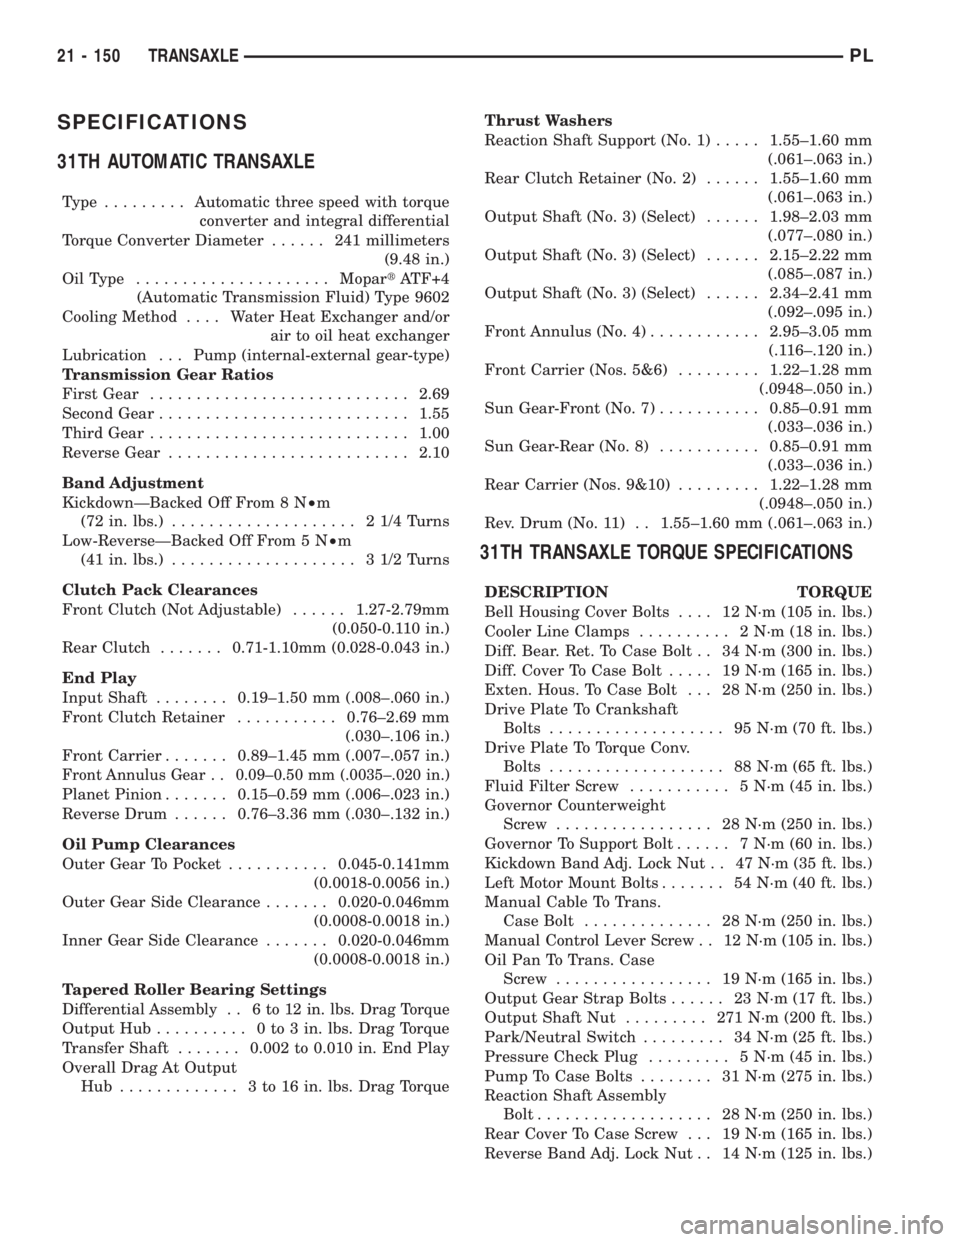
SPECIFICATIONS
31TH AUTOMATIC TRANSAXLE
Type .........Automatic three speed with torque
converter and integral differential
Torque Converter Diameter...... 241millimeters
(9.48 in.)
OilType .....................MopartATF+4
(Automatic Transmission Fluid) Type 9602
Cooling Method.... Water Heat Exchanger and/or
air to oil heat exchanger
Lubrication . . . Pump (internal-external gear-type)
Transmission Gear Ratios
First Gear............................2.69
Second Gear...........................1.55
Third Gear............................1.00
Reverse Gear..........................2.10
Band Adjustment
KickdownÐBacked Off From 8 N²m
(72 in. lbs.).................... 21/4Turns
Low-ReverseÐBacked Off From 5 N²m
(41 in. lbs.).................... 31/2Turns
Clutch Pack Clearances
Front Clutch (Not Adjustable)......1.27-2.79mm
(0.050-0.110 in.)
Rear Clutch.......0.71-1.10mm (0.028-0.043 in.)
End Play
Input Shaft........0.19±1.50 mm (.008±.060 in.)
Front Clutch Retainer...........0.76±2.69 mm
(.030±.106 in.)
Front Carrier.......0.89±1.45 mm (.007±.057 in.)
Front Annulus Gear . . 0.09±0.50 mm (.0035±.020 in.)
Planet Pinion.......0.15±0.59 mm (.006±.023 in.)
Reverse Drum......0.76±3.36 mm (.030±.132 in.)
Oil Pump Clearances
Outer Gear To Pocket...........0.045-0.141mm
(0.0018-0.0056 in.)
Outer Gear Side Clearance.......0.020-0.046mm
(0.0008-0.0018 in.)
Inner Gear Side Clearance.......0.020-0.046mm
(0.0008-0.0018 in.)
Tapered Roller Bearing Settings
Differential Assembly . . 6 to 12 in. lbs. Drag Torque
Output Hub.......... 0to3in.lbs. Drag Torque
Transfer Shaft.......0.002 to 0.010 in. End Play
Overall Drag At Output
Hub ............. 3to16in.lbs. Drag TorqueThrust Washers
Reaction Shaft Support (No. 1).....1.55±1.60 mm
(.061±.063 in.)
Rear Clutch Retainer (No. 2)......1.55±1.60 mm
(.061±.063 in.)
Output Shaft (No. 3) (Select)......1.98±2.03 mm
(.077±.080 in.)
Output Shaft (No. 3) (Select)......2.15±2.22 mm
(.085±.087 in.)
Output Shaft (No. 3) (Select)......2.34±2.41 mm
(.092±.095 in.)
Front Annulus (No. 4)............2.95±3.05 mm
(.116±.120 in.)
Front Carrier (Nos. 5&6).........1.22±1.28 mm
(.0948±.050 in.)
Sun Gear-Front (No. 7)...........0.85±0.91 mm
(.033±.036 in.)
Sun Gear-Rear (No. 8)...........0.85±0.91 mm
(.033±.036 in.)
Rear Carrier (Nos. 9&10).........1.22±1.28 mm
(.0948±.050 in.)
Rev. Drum (No. 11) . . 1.55±1.60 mm (.061±.063 in.)
31TH TRANSAXLE TORQUE SPECIFICATIONS
DESCRIPTION TORQUE
Bell Housing Cover Bolts.... 12N´m(105 in. lbs.)
Cooler Line Clamps.......... 2N´m(18in.lbs.)
Diff. Bear. Ret. To Case Bolt . . 34 N´m (300 in. lbs.)
Diff. Cover To Case Bolt..... 19N´m(165 in. lbs.)
Exten. Hous. To Case Bolt . . . 28 N´m (250 in. lbs.)
Drive Plate To Crankshaft
Bolts................... 95N´m(70ft.lbs.)
Drive Plate To Torque Conv.
Bolts................... 88N´m(65ft.lbs.)
Fluid Filter Screw........... 5N´m(45in.lbs.)
Governor Counterweight
Screw................. 28N´m(250 in. lbs.)
Governor To Support Bolt...... 7N´m(60in.lbs.)
Kickdown Band Adj. Lock Nut . . 47 N´m (35 ft. lbs.)
Left Motor Mount Bolts....... 54N´m(40ft.lbs.)
Manual Cable To Trans.
Case Bolt.............. 28N´m(250 in. lbs.)
Manual Control Lever Screw . . 12 N´m (105 in. lbs.)
Oil Pan To Trans. Case
Screw................. 19N´m(165 in. lbs.)
Output Gear Strap Bolts...... 23N´m(17ft.lbs.)
Output Shaft Nut......... 271N´m(200 ft. lbs.)
Park/Neutral Switch......... 34N´m(25ft.lbs.)
Pressure Check Plug......... 5N´m(45in.lbs.)
Pump To Case Bolts........ 31N´m(275 in. lbs.)
Reaction Shaft Assembly
Bolt................... 28N´m(250 in. lbs.)
Rear Cover To Case Screw . . . 19 N´m (165 in. lbs.)
Reverse Band Adj. Lock Nut . . 14 N´m (125 in. lbs.)
21 - 150 TRANSAXLEPL
Page 1064 of 1285
DESCRIPTION TORQUE
Reverse Band Shaft Plug...... 7N´m(60in.lbs.)
Ring Gear Screw............ 95N´m(70ft.lbs.)
Speedo. To Ext. Hous. Screw . . . 7 N´m (60 in. lbs.)
Sprag Ret. To Transfer Case
Bolt................... 28N´m(250 in. lbs.)
Starter To Trans. Bell Bolts . . . 54 N´m (40 ft. lbs.)
Stirrup Strap Ret. Bolts..... 23N´m(200 in. lbs.)
Trans. To Cyl. Block Bolt...... 95N´m(70ft.lbs.)
Transfer Shaft Nut........ 271N´m(200 ft. lbs.)
Transfer Gear Strap Bolts..... 23N´m(17ft.lbs.)
Valve Body Assy. To Case
Bolts.................. 12N´m(105 in. lbs.)
Valve Body Screw............ 5N´m(45in.lbs.)
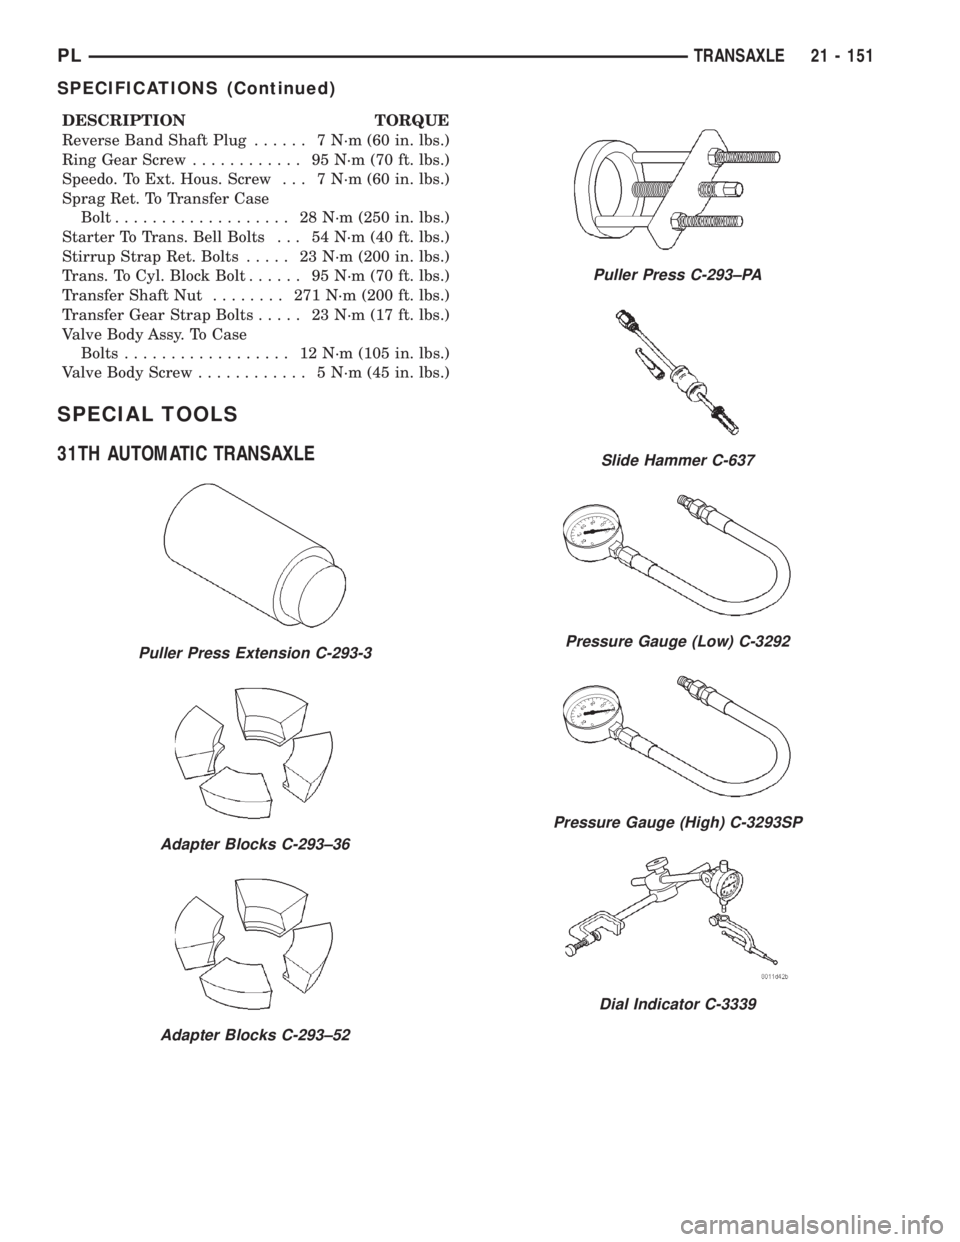
SPECIAL TOOLS
31TH AUTOMATIC TRANSAXLE
Puller Press Extension C-293-3
Adapter Blocks C-293±36
Adapter Blocks C-293±52
Puller Press C-293±PA
Slide Hammer C-637
Pressure Gauge (Low) C-3292
Pressure Gauge (High) C-3293SP
Dial Indicator C-3339
PLTRANSAXLE 21 - 151
SPECIFICATIONS (Continued)
Page 1072 of 1285
signals when the vehicle is equipped with Anti-Lock
Brakes.
The use of tires from different manufactures on the
same vehicle is NOT recommended. The proper tire
pressure should be maintained on all four tires.
SPARE TIRE±TEMPORARY
The temporary spare tire is designed for emer-
gency use only. The original tire should be repaired
or replaced at the first opportunity, then reinstalled.
Do not exceed speeds of 50 M. P. H. when using the
temporary spare tire. Refer to Owner's Manual for
complete details.
REPLACEMENT TIRES
The original equipment tires provide a proper bal-
ance of many characteristics such as:
²Ride
²Noise
²Handling
²Durability
²Tread life
²Traction
²Rolling resistance
²Speed capabilityIt is recommend that tires equivalent to the origi-
nal equipment tires be used when replacement is
needed.
Failure to use equivalent replacement tires may
adversely affect the safety and handling of the vehi-
cle.
The use of oversize tires may cause interference
with vehicle components. Under extremes of suspen-
sion and steering travel, interference with vehicle
components may cause tire damage.
WARNING: FAILURE TO EQUIP THE VEHICLE WITH
TIRES HAVING ADEQUATE SPEED CAPABILITY
CAN RESULT IN SUDDEN TIRE FAILURE.
DIAGNOSIS AND TESTING
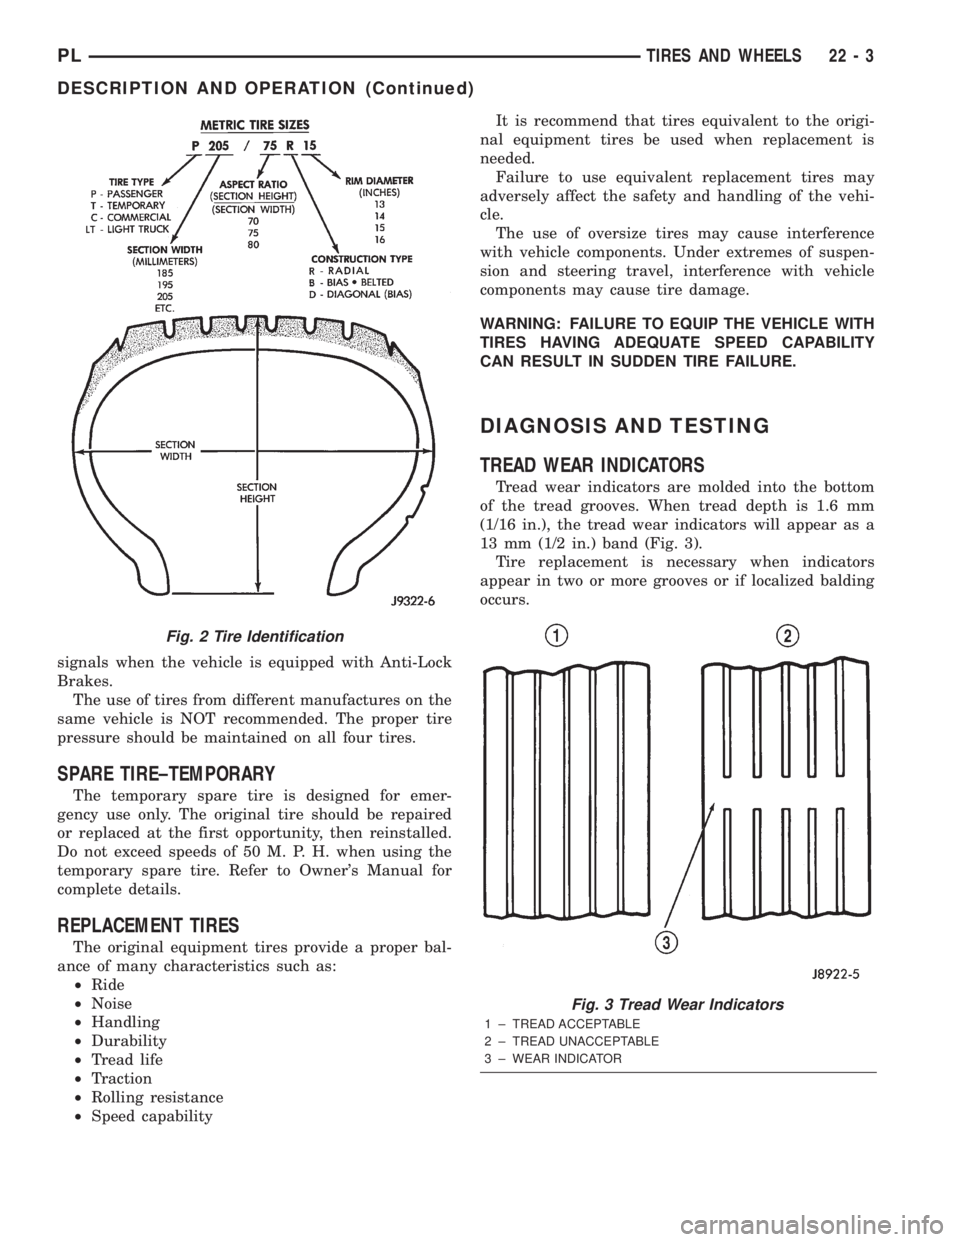
TREAD WEAR INDICATORS
Tread wear indicators are molded into the bottom
of the tread grooves. When tread depth is 1.6 mm
(1/16 in.), the tread wear indicators will appear as a
13 mm (1/2 in.) band (Fig. 3).
Tire replacement is necessary when indicators
appear in two or more grooves or if localized balding
occurs.
Fig. 2 Tire Identification
Fig. 3 Tread Wear Indicators
1 ± TREAD ACCEPTABLE
2 ± TREAD UNACCEPTABLE
3 ± WEAR INDICATOR
PLTIRES AND WHEELS 22 - 3
DESCRIPTION AND OPERATION (Continued)