window DODGE NEON 2000 Service Repair Manual
[x] Cancel search | Manufacturer: DODGE, Model Year: 2000, Model line: NEON, Model: DODGE NEON 2000Pages: 1285, PDF Size: 29.42 MB
Page 1 of 1285
GROUP TAB LOCATORINIntroductionINaIntroduction0Lubrication and Maintenance2Suspension3Differential and Driveline5Brakes6Clutch7Cooling8ABattery8BStarting8CCharging System8DIgnition System8EInstrument Panel and Systems8EaInstrument Panel and Systems8FAudio System8GHorns8HVehicle Speed Control System8JTurn Signal and Flashers8KWindshield Wipers and Washers8LLamps8LaLamps8MRestraint System8NElectrically Heated Systems8OPower Distribution Systems8PPower Door Locks8QImmobilizer System8SPower Windows8TPower Mirrors8TaPower Mirrors8UChime Warning/Reminder System8WWiring Diagrams - LHD and RHD9Engine11Exhaust System13Frame and Bumpers14Fuel System19Steering21Transaxle22Tires and Wheels23Body24Heating and Air Conditioning24aHeating and Air Conditioning25Emission Control Systems
Page 248 of 1285
INSTRUMENT PANEL SYSTEMS
TABLE OF CONTENTS
page page
GENERAL INFORMATION
INTRODUCTION..........................1
DESCRIPTION AND OPERATION
HEADLAMP SWITCH......................2
INSTRUMENT CLUSTER....................2
WARNING AND INDICATOR LAMPS..........2
DIAGNOSIS AND TESTING
AIRBAG WARNING SYSTEM................2
BRAKE SYSTEM WARNING LAMP TEST.......2
INSTRUMENT CLUSTER LAMPS.............2
LOW OIL PRESSURE WARNING LAMP TEST...3
MULTIPLE/INDIVIDUAL GAUGES
INOPERATIVE..........................4
SERVICE PROCEDURES
INSTRUMENT CLUSTER SELF-DIAGNOSTICS...4
REMOVAL AND INSTALLATION
ACCESSORY SWITCH/POWER OUTLET
BEZEL................................4CENTER CONSOLE FLOOD LAMP............5
CIGAR LIGHTER / POWER OUTLET
ASSEMBLY.............................5
GLOVE BOX DOOR/BIN....................6
GLOVE BOX DOOR/BIN....................6
GLOVE BOX SWITCH/LAMP.................6
INSTRUMENT CLUSTER....................6
INSTRUMENT CLUSTER BEZEL..............6
INSTRUMENT CLUSTER LAMPS.............7
INSTRUMENT PANEL ASSEMBLY............7
INSTRUMENT PANEL CENTER BEZEL........10
INSTRUMENT PANEL END CAPS............10
INSTRUMENT PANEL TOP COVER...........10
LOWER INSTRUMENT PANEL COVER........10
LOWER STORAGE BIN....................10
STEERING COLUMN SHROUDS.............11
GENERAL INFORMATION
INTRODUCTION
The purpose of the dash gauges and indicator
lamps is to keep the driver informed about the oper-
ating condition of the vehicle. If an abnormal condi-
tion occurs, the driver is informed by indicator lamp.
The driver can seek service before damage occurs.
Indicator lamps use ON/OFF switch functions for
operation, while gauges use a sending unit or sensor.
The Instrument Panel can be removed as an
assembly after a few part are removed to allow
access to the retaining bolts. There is one self-align-
ing bulkhead connector on the left underside of the
instrument panel replacing most of the main harness
connectors. Once removed, the instrument panel can
be serviced for replacement. Most of the parts of the
instrument panel can be replaced individually with-
out removing the complete instrument panel assem-
bly.
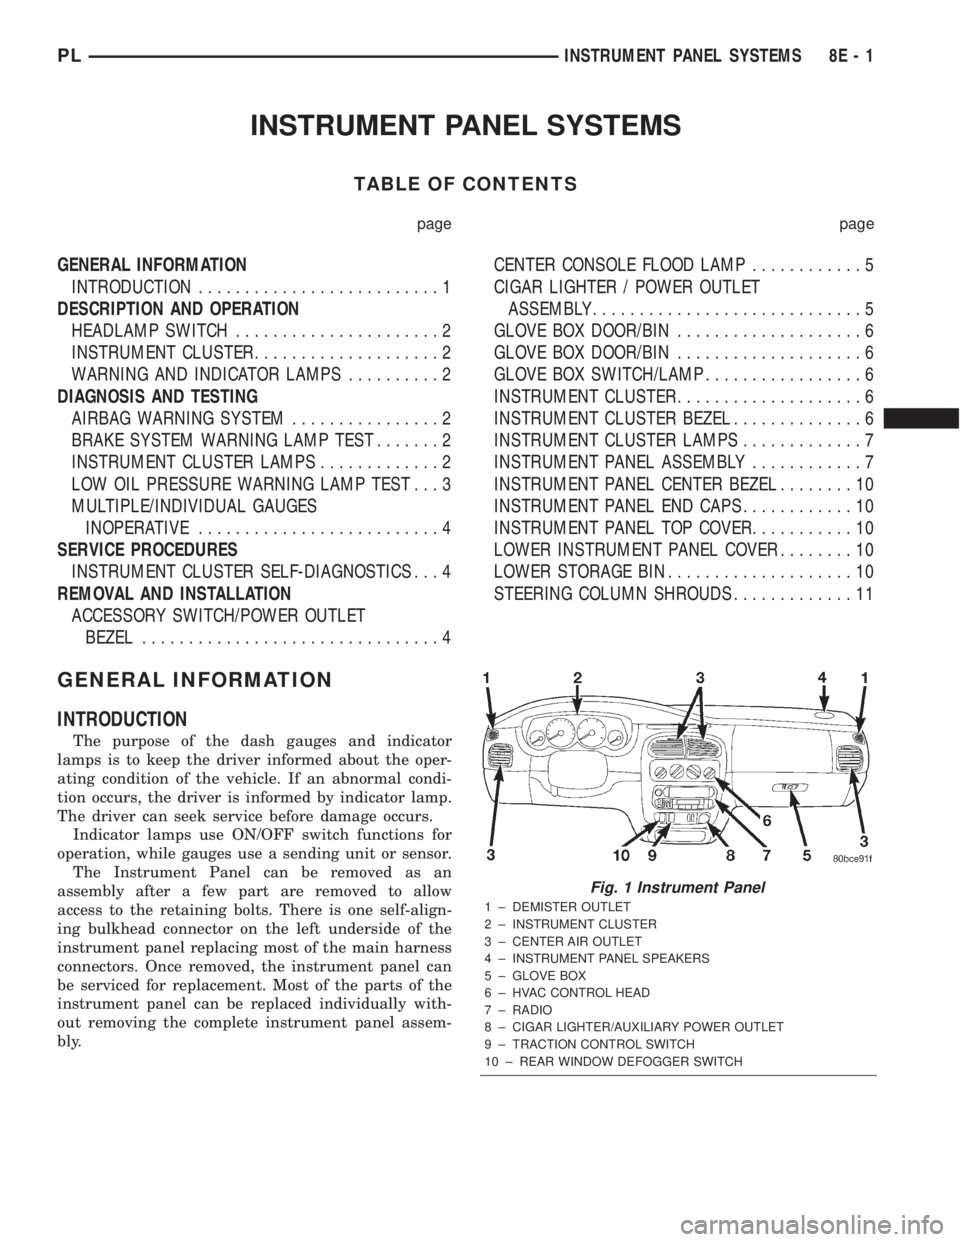
Fig. 1 Instrument Panel
1 ± DEMISTER OUTLET
2 ± INSTRUMENT CLUSTER
3 ± CENTER AIR OUTLET
4 ± INSTRUMENT PANEL SPEAKERS
5 ± GLOVE BOX
6 ± HVAC CONTROL HEAD
7 ± RADIO
8 ± CIGAR LIGHTER/AUXILIARY POWER OUTLET
9 ± TRACTION CONTROL SWITCH
10 ± REAR WINDOW DEFOGGER SWITCH
PLINSTRUMENT PANEL SYSTEMS 8E - 1
Page 251 of 1285
MULTIPLE/INDIVIDUAL GAUGES INOPERATIVE
Test speedometer, tachometer and other gauges for
malfunction:
(1) Remove the cluster. Refer to Cluster Removal
and Installation.
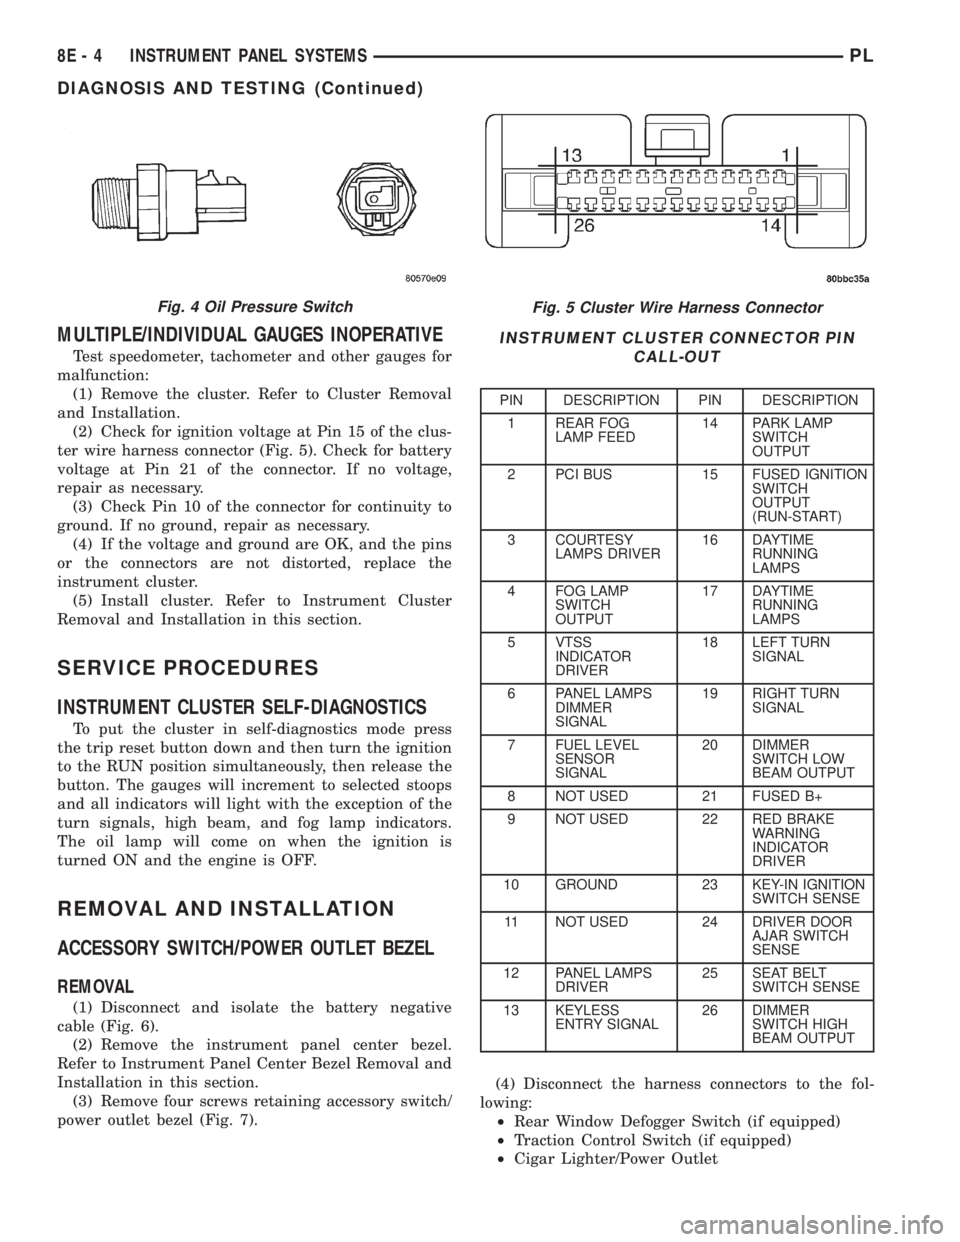
(2) Check for ignition voltage at Pin 15 of the clus-
ter wire harness connector (Fig. 5). Check for battery
voltage at Pin 21 of the connector. If no voltage,
repair as necessary.
(3) Check Pin 10 of the connector for continuity to
ground. If no ground, repair as necessary.
(4) If the voltage and ground are OK, and the pins
or the connectors are not distorted, replace the
instrument cluster.
(5) Install cluster. Refer to Instrument Cluster
Removal and Installation in this section.
SERVICE PROCEDURES
INSTRUMENT CLUSTER SELF-DIAGNOSTICS
To put the cluster in self-diagnostics mode press
the trip reset button down and then turn the ignition
to the RUN position simultaneously, then release the
button. The gauges will increment to selected stoops
and all indicators will light with the exception of the
turn signals, high beam, and fog lamp indicators.
The oil lamp will come on when the ignition is
turned ON and the engine is OFF.
REMOVAL AND INSTALLATION
ACCESSORY SWITCH/POWER OUTLET BEZEL
REMOVAL
(1) Disconnect and isolate the battery negative
cable (Fig. 6).
(2) Remove the instrument panel center bezel.
Refer to Instrument Panel Center Bezel Removal and
Installation in this section.
(3) Remove four screws retaining accessory switch/
power outlet bezel (Fig. 7).(4) Disconnect the harness connectors to the fol-
lowing:
²Rear Window Defogger Switch (if equipped)
²Traction Control Switch (if equipped)
²Cigar Lighter/Power Outlet
Fig. 5 Cluster Wire Harness Connector
INSTRUMENT CLUSTER CONNECTOR PIN
CALL-OUT
PIN DESCRIPTION PIN DESCRIPTION
1 REAR FOG
LAMP FEED14 PARK LAMP
SWITCH
OUTPUT
2 PCI BUS 15 FUSED IGNITION
SWITCH
OUTPUT
(RUN-START)
3 COURTESY
LAMPS DRIVER16 DAYTIME
RUNNING
LAMPS
4 FOG LAMP
SWITCH
OUTPUT17 DAYTIME
RUNNING
LAMPS
5 VTSS
INDICATOR
DRIVER18 LEFT TURN
SIGNAL
6 PANEL LAMPS
DIMMER
SIGNAL19 RIGHT TURN
SIGNAL
7 FUEL LEVEL
SENSOR
SIGNAL20 DIMMER
SWITCH LOW
BEAM OUTPUT
8 NOT USED 21 FUSED B+
9 NOT USED 22 RED BRAKE
WARNING
INDICATOR
DRIVER
10 GROUND 23 KEY-IN IGNITION
SWITCH SENSE
11 NOT USED 24 DRIVER DOOR
AJAR SWITCH
SENSE
12 PANEL LAMPS
DRIVER25 SEAT BELT
SWITCH SENSE
13 KEYLESS
ENTRY SIGNAL26 DIMMER
SWITCH HIGH
BEAM OUTPUT
Fig. 4 Oil Pressure Switch
8E - 4 INSTRUMENT PANEL SYSTEMSPL
DIAGNOSIS AND TESTING (Continued)
Page 252 of 1285
The accessory switches are not serviced separately,
but the cigar lighter/power outlet is and must be
transferred to the new bezel. Refer to Cigar Lighter/
Power Outlet Removal and Installation in this sec-
tion.
INSTALLATION
For installation reverse the above procedures.
CENTER CONSOLE FLOOD LAMP
REMOVAL
(1) Insert a small screwdriver into notch by lens
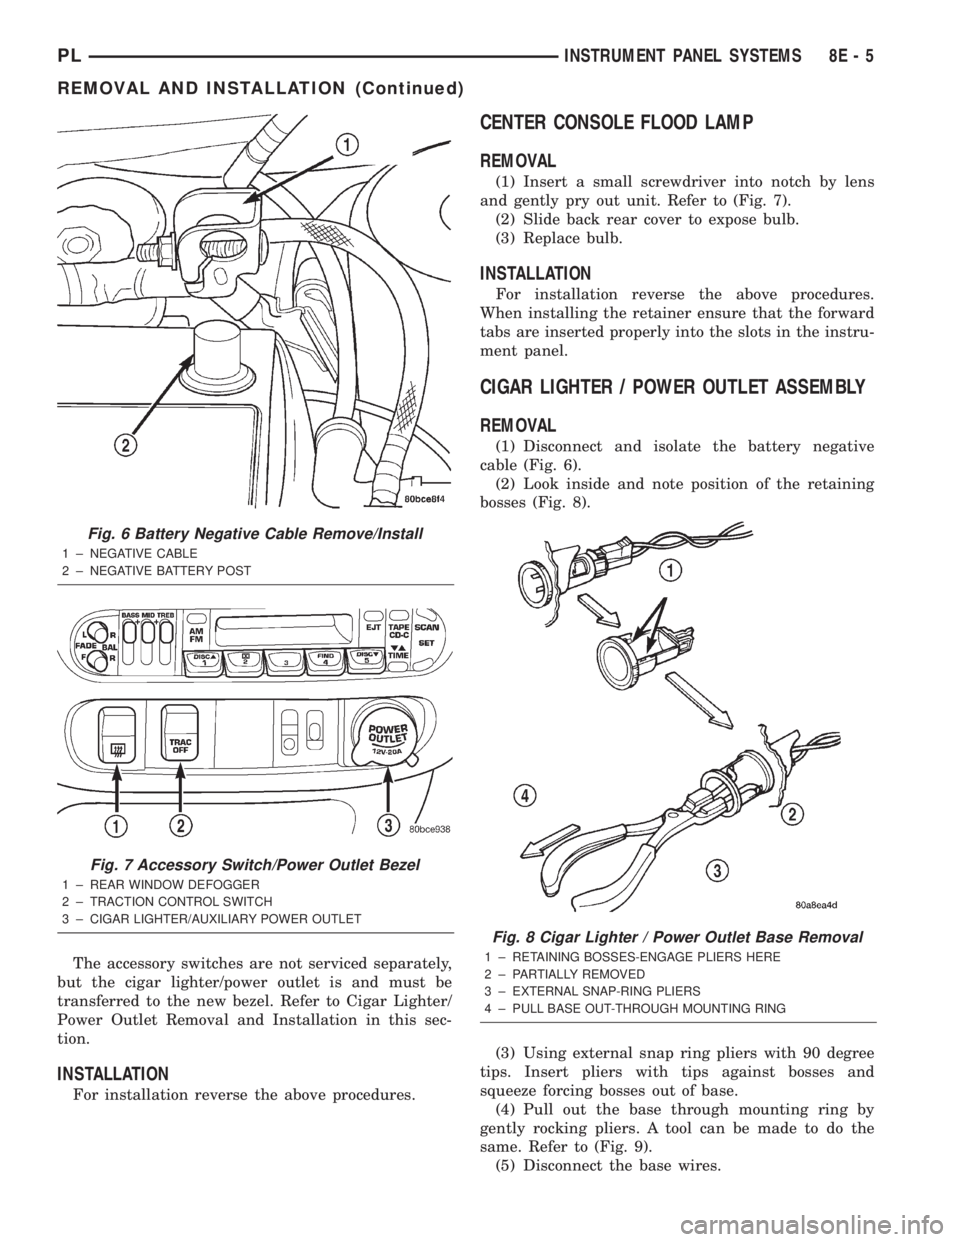
and gently pry out unit. Refer to (Fig. 7).
(2) Slide back rear cover to expose bulb.
(3) Replace bulb.
INSTALLATION
For installation reverse the above procedures.
When installing the retainer ensure that the forward
tabs are inserted properly into the slots in the instru-
ment panel.
CIGAR LIGHTER / POWER OUTLET ASSEMBLY
REMOVAL
(1) Disconnect and isolate the battery negative
cable (Fig. 6).
(2) Look inside and note position of the retaining
bosses (Fig. 8).
(3) Using external snap ring pliers with 90 degree
tips. Insert pliers with tips against bosses and
squeeze forcing bosses out of base.
(4) Pull out the base through mounting ring by
gently rocking pliers. A tool can be made to do the
same. Refer to (Fig. 9).
(5) Disconnect the base wires.
Fig. 6 Battery Negative Cable Remove/Install
1 ± NEGATIVE CABLE
2 ± NEGATIVE BATTERY POST
Fig. 7 Accessory Switch/Power Outlet Bezel
1 ± REAR WINDOW DEFOGGER
2 ± TRACTION CONTROL SWITCH
3 ± CIGAR LIGHTER/AUXILIARY POWER OUTLET
Fig. 8 Cigar Lighter / Power Outlet Base Removal
1 ± RETAINING BOSSES-ENGAGE PLIERS HERE
2 ± PARTIALLY REMOVED
3 ± EXTERNAL SNAP-RING PLIERS
4 ± PULL BASE OUT-THROUGH MOUNTING RING
PLINSTRUMENT PANEL SYSTEMS 8E - 5
REMOVAL AND INSTALLATION (Continued)
Page 301 of 1285
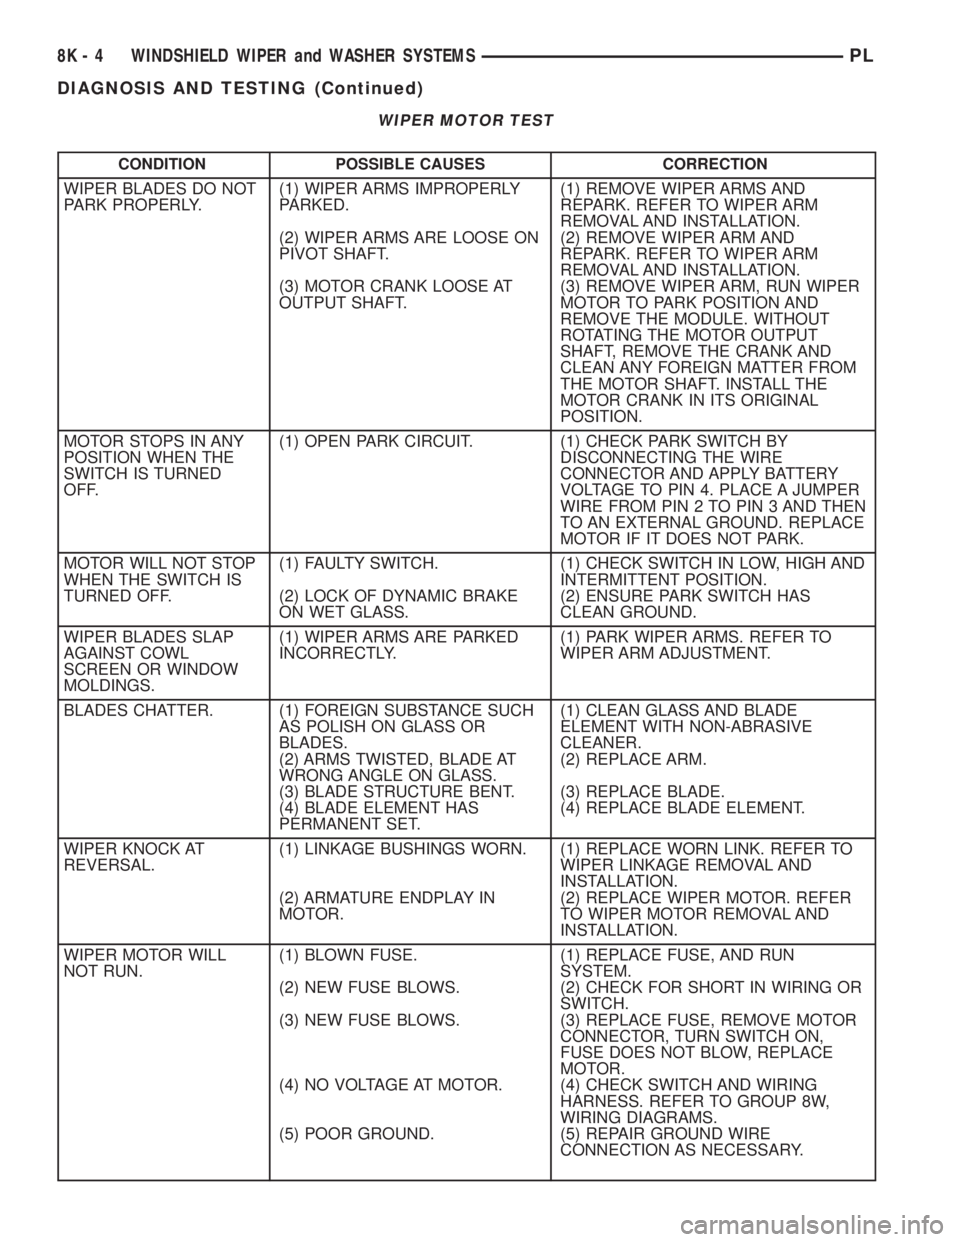
WIPER MOTOR TEST
CONDITION POSSIBLE CAUSES CORRECTION
WIPER BLADES DO NOT
PARK PROPERLY.(1) WIPER ARMS IMPROPERLY
PARKED.
(2) WIPER ARMS ARE LOOSE ON
PIVOT SHAFT.
(3) MOTOR CRANK LOOSE AT
OUTPUT SHAFT.(1) REMOVE WIPER ARMS AND
REPARK. REFER TO WIPER ARM
REMOVAL AND INSTALLATION.
(2) REMOVE WIPER ARM AND
REPARK. REFER TO WIPER ARM
REMOVAL AND INSTALLATION.
(3) REMOVE WIPER ARM, RUN WIPER
MOTOR TO PARK POSITION AND
REMOVE THE MODULE. WITHOUT
ROTATING THE MOTOR OUTPUT
SHAFT, REMOVE THE CRANK AND
CLEAN ANY FOREIGN MATTER FROM
THE MOTOR SHAFT. INSTALL THE
MOTOR CRANK IN ITS ORIGINAL
POSITION.
MOTOR STOPS IN ANY
POSITION WHEN THE
SWITCH IS TURNED
OFF.(1) OPEN PARK CIRCUIT. (1) CHECK PARK SWITCH BY
DISCONNECTING THE WIRE
CONNECTOR AND APPLY BATTERY
VOLTAGE TO PIN 4. PLACE A JUMPER
WIRE FROM PIN 2 TO PIN 3 AND THEN
TO AN EXTERNAL GROUND. REPLACE
MOTOR IF IT DOES NOT PARK.
MOTOR WILL NOT STOP
WHEN THE SWITCH IS
TURNED OFF.(1) FAULTY SWITCH.
(2) LOCK OF DYNAMIC BRAKE
ON WET GLASS.(1) CHECK SWITCH IN LOW, HIGH AND
INTERMITTENT POSITION.
(2) ENSURE PARK SWITCH HAS
CLEAN GROUND.
WIPER BLADES SLAP
AGAINST COWL
SCREEN OR WINDOW
MOLDINGS.(1) WIPER ARMS ARE PARKED
INCORRECTLY.(1) PARK WIPER ARMS. REFER TO
WIPER ARM ADJUSTMENT.
BLADES CHATTER. (1) FOREIGN SUBSTANCE SUCH
AS POLISH ON GLASS OR
BLADES.
(2) ARMS TWISTED, BLADE AT
WRONG ANGLE ON GLASS.
(3) BLADE STRUCTURE BENT.
(4) BLADE ELEMENT HAS
PERMANENT SET.(1) CLEAN GLASS AND BLADE
ELEMENT WITH NON-ABRASIVE
CLEANER.
(2) REPLACE ARM.
(3) REPLACE BLADE.
(4) REPLACE BLADE ELEMENT.
WIPER KNOCK AT
REVERSAL.(1) LINKAGE BUSHINGS WORN.
(2) ARMATURE ENDPLAY IN
MOTOR.(1) REPLACE WORN LINK. REFER TO
WIPER LINKAGE REMOVAL AND
INSTALLATION.
(2) REPLACE WIPER MOTOR. REFER
TO WIPER MOTOR REMOVAL AND
INSTALLATION.
WIPER MOTOR WILL
NOT RUN.(1) BLOWN FUSE.
(2) NEW FUSE BLOWS.
(3) NEW FUSE BLOWS.
(4) NO VOLTAGE AT MOTOR.
(5) POOR GROUND.(1) REPLACE FUSE, AND RUN
SYSTEM.
(2) CHECK FOR SHORT IN WIRING OR
SWITCH.
(3) REPLACE FUSE, REMOVE MOTOR
CONNECTOR, TURN SWITCH ON,
FUSE DOES NOT BLOW, REPLACE
MOTOR.
(4) CHECK SWITCH AND WIRING
HARNESS. REFER TO GROUP 8W,
WIRING DIAGRAMS.
(5) REPAIR GROUND WIRE
CONNECTION AS NECESSARY.
8K - 4 WINDSHIELD WIPER and WASHER SYSTEMSPL
DIAGNOSIS AND TESTING (Continued)
Page 356 of 1285
ELECTRICALLY HEATED SYSTEMS
TABLE OF CONTENTS
page page
DESCRIPTION AND OPERATION
REAR WINDOW DEFOGGER SYSTEM.........1
REAR WINDOW DEFOGGER SWITCH.........1
DIAGNOSIS AND TESTING
GRID LINES.............................2
REAR WINDOW DEFOGGER SWITCH.........2REAR WINDOW DEFOGGER SYSTEM.........2
SERVICE PROCEDURES
GRID LINE AND TERMINAL REPAIR..........3
REMOVAL AND INSTALLATION
REAR WINDOW DEFOGGER SWITCH.........4
DESCRIPTION AND OPERATION
REAR WINDOW DEFOGGER SYSTEM
For proper operation of the Rear Window Defogger
system refer to the Owner's Manual.
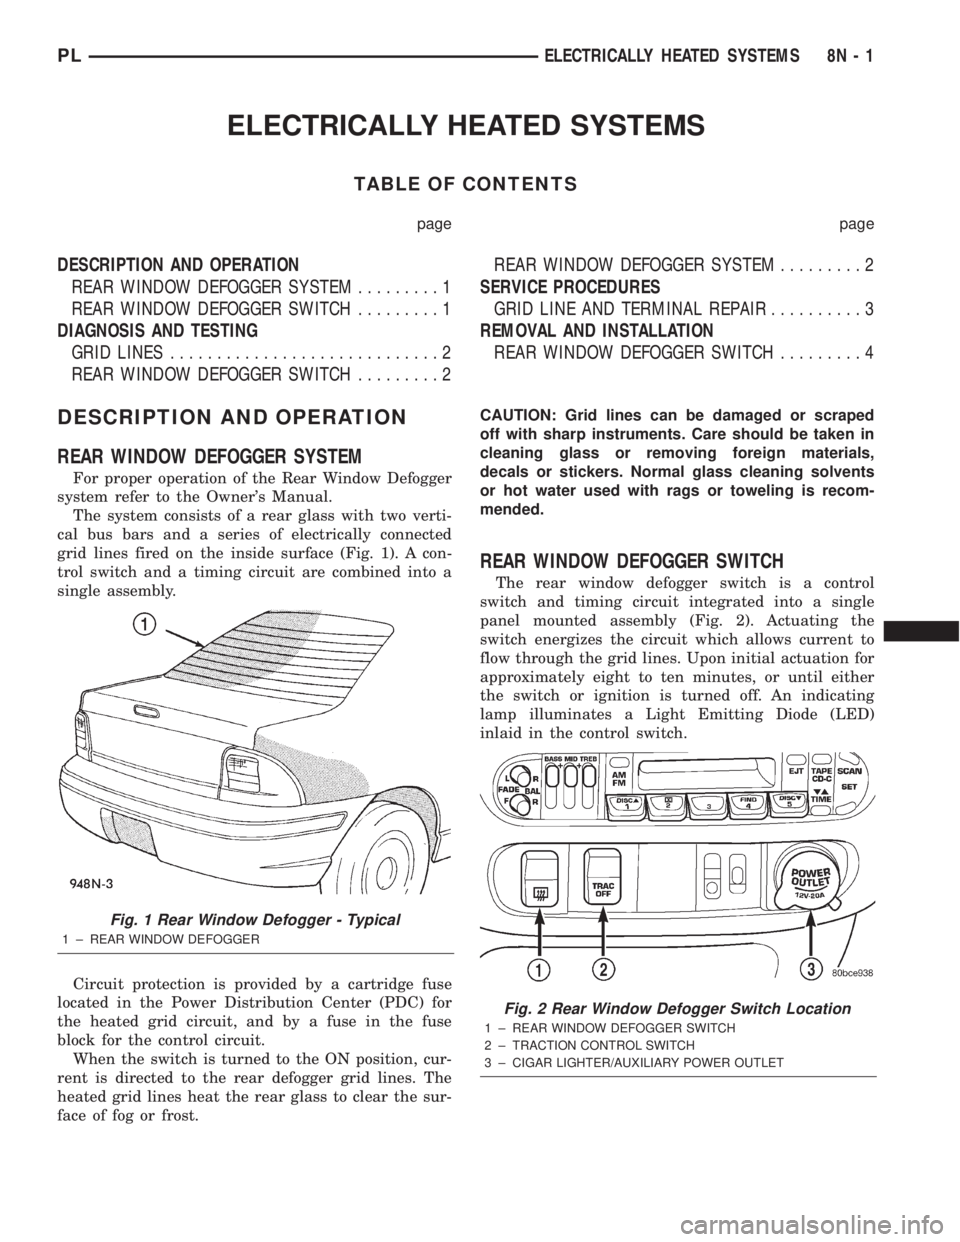
The system consists of a rear glass with two verti-
cal bus bars and a series of electrically connected
grid lines fired on the inside surface (Fig. 1). A con-
trol switch and a timing circuit are combined into a
single assembly.
Circuit protection is provided by a cartridge fuse
located in the Power Distribution Center (PDC) for
the heated grid circuit, and by a fuse in the fuse
block for the control circuit.
When the switch is turned to the ON position, cur-
rent is directed to the rear defogger grid lines. The
heated grid lines heat the rear glass to clear the sur-
face of fog or frost.CAUTION: Grid lines can be damaged or scraped
off with sharp instruments. Care should be taken in
cleaning glass or removing foreign materials,
decals or stickers. Normal glass cleaning solvents
or hot water used with rags or toweling is recom-
mended.
REAR WINDOW DEFOGGER SWITCH
The rear window defogger switch is a control
switch and timing circuit integrated into a single
panel mounted assembly (Fig. 2). Actuating the
switch energizes the circuit which allows current to
flow through the grid lines. Upon initial actuation for
approximately eight to ten minutes, or until either
the switch or ignition is turned off. An indicating
lamp illuminates a Light Emitting Diode (LED)
inlaid in the control switch.
Fig. 1 Rear Window Defogger - Typical
1 ± REAR WINDOW DEFOGGER
Fig. 2 Rear Window Defogger Switch Location
1 ± REAR WINDOW DEFOGGER SWITCH
2 ± TRACTION CONTROL SWITCH
3 ± CIGAR LIGHTER/AUXILIARY POWER OUTLET
PLELECTRICALLY HEATED SYSTEMS 8N - 1
Page 357 of 1285
DIAGNOSIS AND TESTING
GRID LINES
The horizontal grid lines and vertical bus bar lines
printed and fired on the inside surface of rear win-
dow glass (Fig. 5) comprise an electrical parallel cir-
cuit. The electrically conductive lines are composed of
a silver-ceramic material which when fired on glass
becomes bonded to the glass and is highly resistant
to abrasion. It is possible however, that a break may
occur in an individual grid line resulting in no cur-
rent flow through the line. To detect breaks in grid
lines the following procedure is required:
(1) Turn ignition ON and turn control switch to
ON. The LED should come on.
(2) Using a DC voltmeter with 0-15 volt range,
contact terminal (B) with the negative lead of the
voltmeter. With the positive lead of the voltmeter,
contact terminal (A) (Fig. 5). The voltmeter should
read 10-14 volts. A lower voltage reading indicates a
poor connection in the feed or the ground circuit.
(3) With the negative lead of the voltmeter, contact
a good body ground point. The voltage reading should
not change.
(4) Connect the negative lead of the voltmeter to
terminal (B) and touch each grid line at Mid-Point
with the positive lead. A reading of:
²Approximately 6 volts indicates the line is OK.
²0 volts indicates a break in line between Mid-
Point (C) and terminal (A).
²10-14 volts indicates a break between Mid-Point
(C) and terminal (B).
Move the lead toward the break and voltage will
change as soon as the break is crossed. Refer to (Fig.
5).
REAR WINDOW DEFOGGER SWITCH
The rear window defogger switch may be tested in
the vehicle or out of the vehicle, on the bench.
IN-VEHICLE TESTING
(1) Remove the switch from the instrument panel
but leave the switch connected, refer to Group 8E-In-
strument Panel and Systems, Auxiliary Switch Bezel
Removal and Installation.
(2) Turn the ignition switch ON.
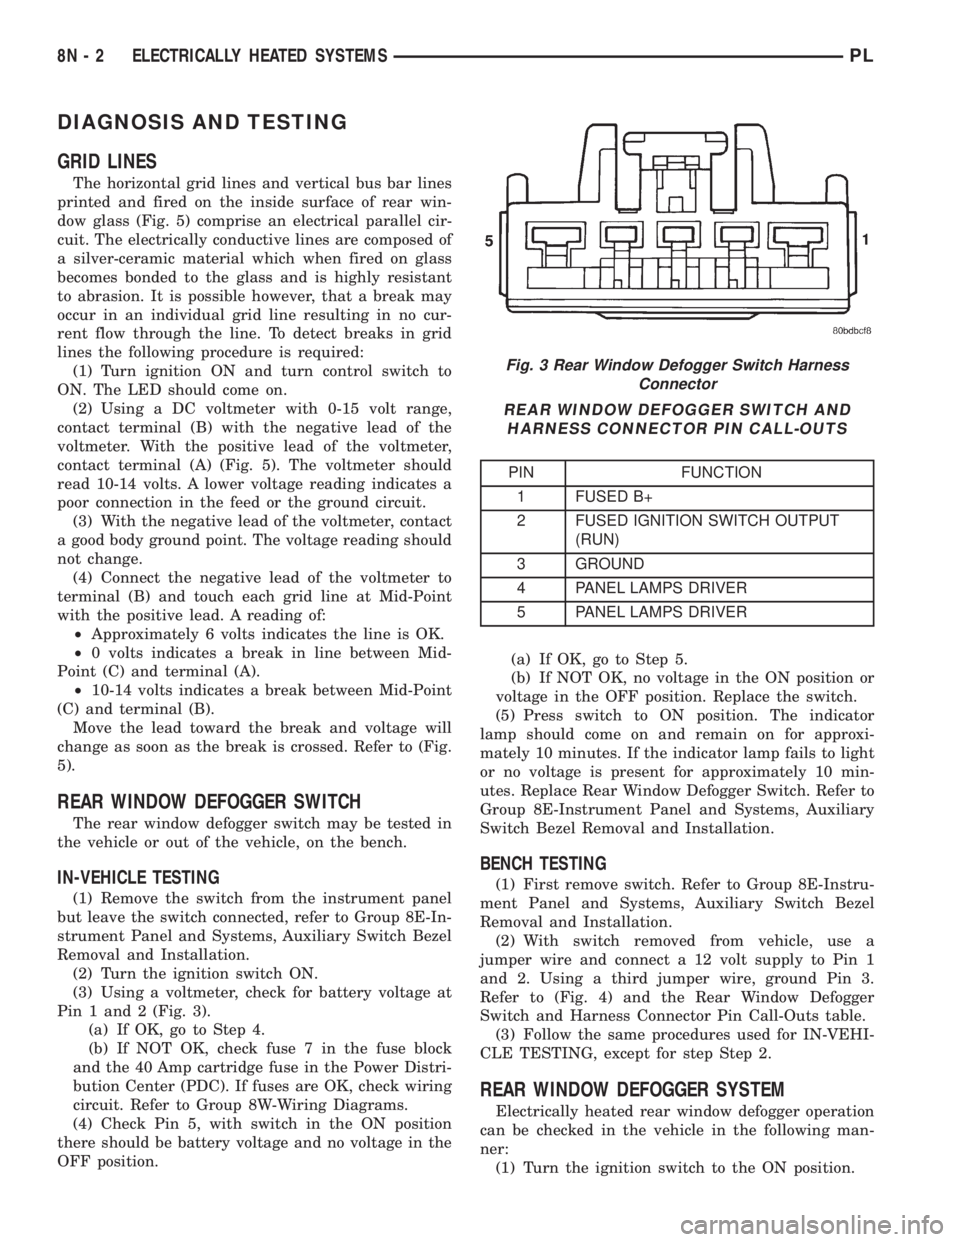
(3) Using a voltmeter, check for battery voltage at
Pin 1 and 2 (Fig. 3).
(a) If OK, go to Step 4.
(b) If NOT OK, check fuse 7 in the fuse block
and the 40 Amp cartridge fuse in the Power Distri-
bution Center (PDC). If fuses are OK, check wiring
circuit. Refer to Group 8W-Wiring Diagrams.
(4) Check Pin 5, with switch in the ON position
there should be battery voltage and no voltage in the
OFF position.(a) If OK, go to Step 5.
(b) If NOT OK, no voltage in the ON position or
voltage in the OFF position. Replace the switch.
(5) Press switch to ON position. The indicator
lamp should come on and remain on for approxi-
mately 10 minutes. If the indicator lamp fails to light
or no voltage is present for approximately 10 min-
utes. Replace Rear Window Defogger Switch. Refer to
Group 8E-Instrument Panel and Systems, Auxiliary
Switch Bezel Removal and Installation.
BENCH TESTING
(1) First remove switch. Refer to Group 8E-Instru-
ment Panel and Systems, Auxiliary Switch Bezel
Removal and Installation.
(2) With switch removed from vehicle, use a
jumper wire and connect a 12 volt supply to Pin 1
and 2. Using a third jumper wire, ground Pin 3.
Refer to (Fig. 4) and the Rear Window Defogger
Switch and Harness Connector Pin Call-Outs table.
(3) Follow the same procedures used for IN-VEHI-
CLE TESTING, except for step Step 2.
REAR WINDOW DEFOGGER SYSTEM
Electrically heated rear window defogger operation
can be checked in the vehicle in the following man-
ner:
(1) Turn the ignition switch to the ON position.
Fig. 3 Rear Window Defogger Switch Harness
Connector
REAR WINDOW DEFOGGER SWITCH AND
HARNESS CONNECTOR PIN CALL-OUTS
PIN FUNCTION
1 FUSED B+
2 FUSED IGNITION SWITCH OUTPUT
(RUN)
3 GROUND
4 PANEL LAMPS DRIVER
5 PANEL LAMPS DRIVER
8N - 2 ELECTRICALLY HEATED SYSTEMSPL
Page 358 of 1285
(2) Connect an ammeter in series with the battery.
Push the rear window defogger switch to the ON
position (Fig. 2). A distinct increase in amperage
draw should be noted.
(3) The rear window defogger operation can be
checked by feeling the glass. A distinct difference in
temperature between the grid lines and adjacent
clear glass can be detected in three to four minutes
of operation.
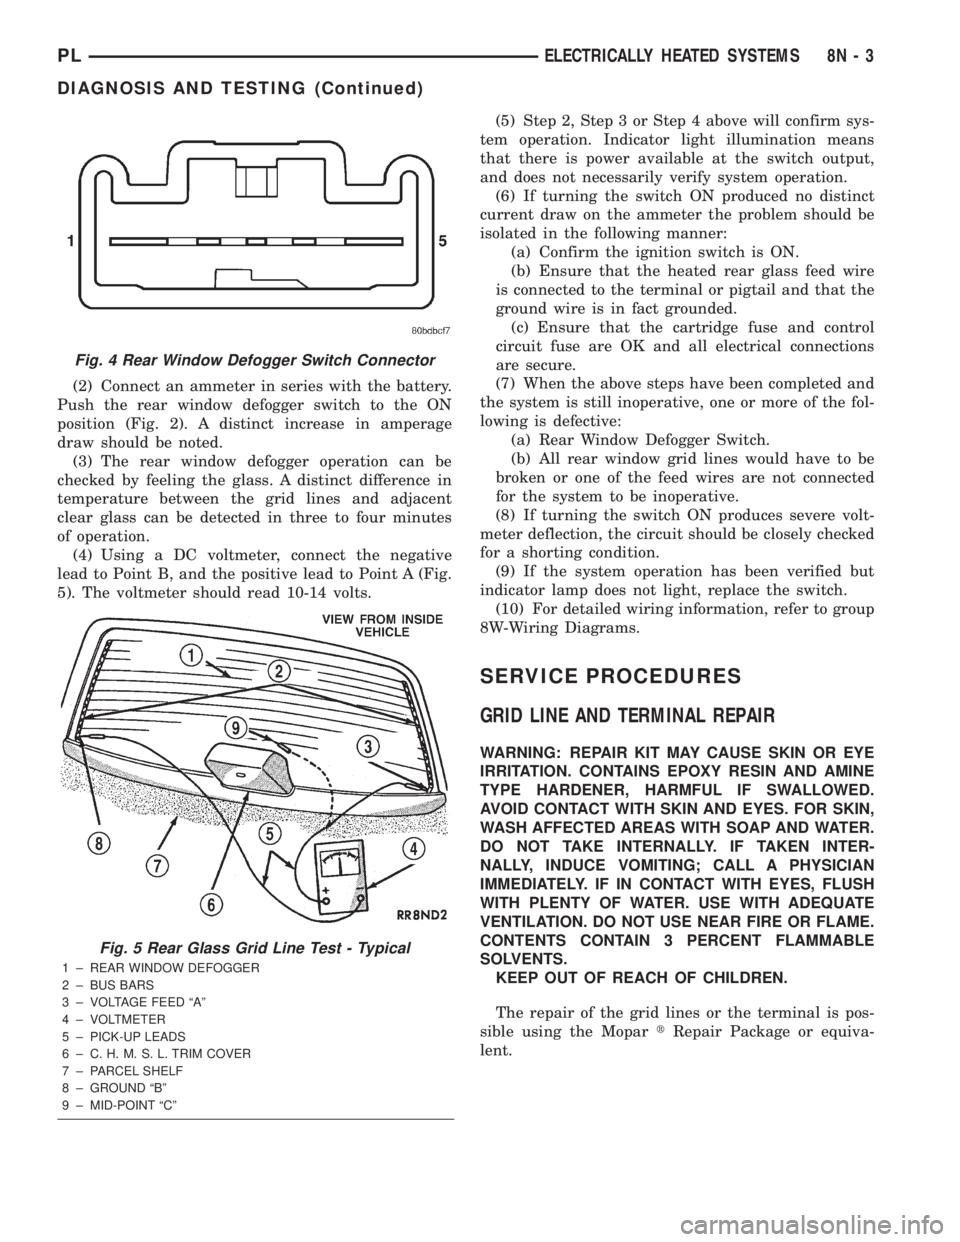
(4) Using a DC voltmeter, connect the negative
lead to Point B, and the positive lead to Point A (Fig.
5). The voltmeter should read 10-14 volts.(5) Step 2, Step 3 or Step 4 above will confirm sys-
tem operation. Indicator light illumination means
that there is power available at the switch output,
and does not necessarily verify system operation.
(6) If turning the switch ON produced no distinct
current draw on the ammeter the problem should be
isolated in the following manner:
(a) Confirm the ignition switch is ON.
(b) Ensure that the heated rear glass feed wire
is connected to the terminal or pigtail and that the
ground wire is in fact grounded.
(c) Ensure that the cartridge fuse and control
circuit fuse are OK and all electrical connections
are secure.
(7) When the above steps have been completed and
the system is still inoperative, one or more of the fol-
lowing is defective:
(a) Rear Window Defogger Switch.
(b) All rear window grid lines would have to be
broken or one of the feed wires are not connected
for the system to be inoperative.
(8) If turning the switch ON produces severe volt-
meter deflection, the circuit should be closely checked
for a shorting condition.
(9) If the system operation has been verified but
indicator lamp does not light, replace the switch.
(10) For detailed wiring information, refer to group
8W-Wiring Diagrams.
SERVICE PROCEDURES
GRID LINE AND TERMINAL REPAIR
WARNING: REPAIR KIT MAY CAUSE SKIN OR EYE
IRRITATION. CONTAINS EPOXY RESIN AND AMINE
TYPE HARDENER, HARMFUL IF SWALLOWED.
AVOID CONTACT WITH SKIN AND EYES. FOR SKIN,
WASH AFFECTED AREAS WITH SOAP AND WATER.
DO NOT TAKE INTERNALLY. IF TAKEN INTER-
NALLY, INDUCE VOMITING; CALL A PHYSICIAN
IMMEDIATELY. IF IN CONTACT WITH EYES, FLUSH
WITH PLENTY OF WATER. USE WITH ADEQUATE
VENTILATION. DO NOT USE NEAR FIRE OR FLAME.
CONTENTS CONTAIN 3 PERCENT FLAMMABLE
SOLVENTS.
KEEP OUT OF REACH OF CHILDREN.
The repair of the grid lines or the terminal is pos-
sible using the MopartRepair Package or equiva-
lent.
Fig. 4 Rear Window Defogger Switch Connector
Fig. 5 Rear Glass Grid Line Test - Typical
1 ± REAR WINDOW DEFOGGER
2 ± BUS BARS
3 ± VOLTAGE FEED ªAº
4 ± VOLTMETER
5 ± PICK-UP LEADS
6 ± C. H. M. S. L. TRIM COVER
7 ± PARCEL SHELF
8 ± GROUND ªBº
9 ± MID-POINT ªCº
PLELECTRICALLY HEATED SYSTEMS 8N - 3
DIAGNOSIS AND TESTING (Continued)
Page 359 of 1285
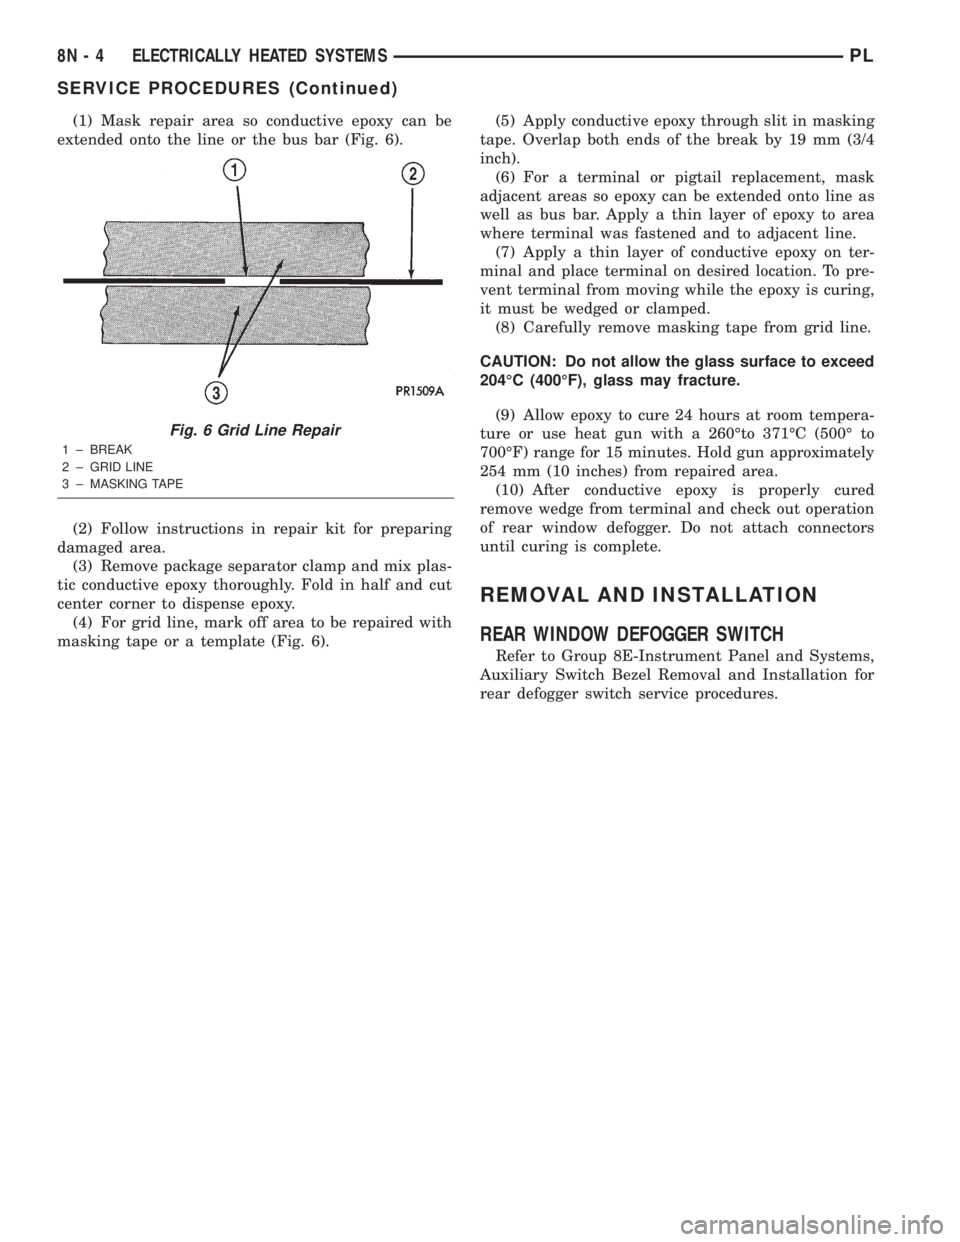
(1) Mask repair area so conductive epoxy can be
extended onto the line or the bus bar (Fig. 6).
(2) Follow instructions in repair kit for preparing
damaged area.
(3) Remove package separator clamp and mix plas-
tic conductive epoxy thoroughly. Fold in half and cut
center corner to dispense epoxy.
(4) For grid line, mark off area to be repaired with
masking tape or a template (Fig. 6).(5) Apply conductive epoxy through slit in masking
tape. Overlap both ends of the break by 19 mm (3/4
inch).
(6) For a terminal or pigtail replacement, mask
adjacent areas so epoxy can be extended onto line as
well as bus bar. Apply a thin layer of epoxy to area
where terminal was fastened and to adjacent line.
(7) Apply a thin layer of conductive epoxy on ter-
minal and place terminal on desired location. To pre-
vent terminal from moving while the epoxy is curing,
it must be wedged or clamped.
(8) Carefully remove masking tape from grid line.
CAUTION: Do not allow the glass surface to exceed
204ÉC (400ÉF), glass may fracture.
(9) Allow epoxy to cure 24 hours at room tempera-
ture or use heat gun with a 260Éto 371ÉC (500É to
700ÉF) range for 15 minutes. Hold gun approximately
254 mm (10 inches) from repaired area.
(10) After conductive epoxy is properly cured
remove wedge from terminal and check out operation
of rear window defogger. Do not attach connectors
until curing is complete.
REMOVAL AND INSTALLATION
REAR WINDOW DEFOGGER SWITCH
Refer to Group 8E-Instrument Panel and Systems,
Auxiliary Switch Bezel Removal and Installation for
rear defogger switch service procedures.
Fig. 6 Grid Line Repair
1 ± BREAK
2 ± GRID LINE
3 ± MASKING TAPE
8N - 4 ELECTRICALLY HEATED SYSTEMSPL
SERVICE PROCEDURES (Continued)
Page 380 of 1285
POWER WINDOWS
TABLE OF CONTENTS
page page
DESCRIPTION AND OPERATION
INTRODUCTION..........................1
DIAGNOSIS AND TESTING
WIRING TEST............................1
WINDOW SWITCH........................1WINDOW MOTOR.........................1
REMOVAL AND INSTALLATION
WINDOW SWITCH........................2
WINDOW MOTOR.........................2
DESCRIPTION AND OPERATION
INTRODUCTION
The window lift motors are of the permanent mag-
net type. A battery positive and negative connection
to either of the two motor terminals will cause the
motor to rotate in one direction. Reversing current
through these same two connections will cause the
motor to rotate in the opposite direction.
Each individual motor is grounded through the
master switch.
DIAGNOSIS AND TESTING
WIRING TEST
The following wiring test determines whether or
not voltage is continuous through the body harness
to the power window switches.
Remove switch for testing. Connect a voltmeter
positive lead to Pin 4 and negative lead to Pin 3 of
the switch harness connector. Turn ignition switch to
the ON position. Voltmeter should read battery volt-
age. If OK, go to Window Switch Diagnosis and Test-
ing. If not OK, check the 30 amp circuit breaker in
the fuse block or for a broken wire. Refer to Group
8W-Wiring Diagrams, for Connector Pin-Outs and
circuit descriptions.
WINDOW SWITCH
Remove the switch from its mounting, refer to Win-
dow Switch Removal and Installation in this section.
Using an ohmmeter, test the window switch for con-
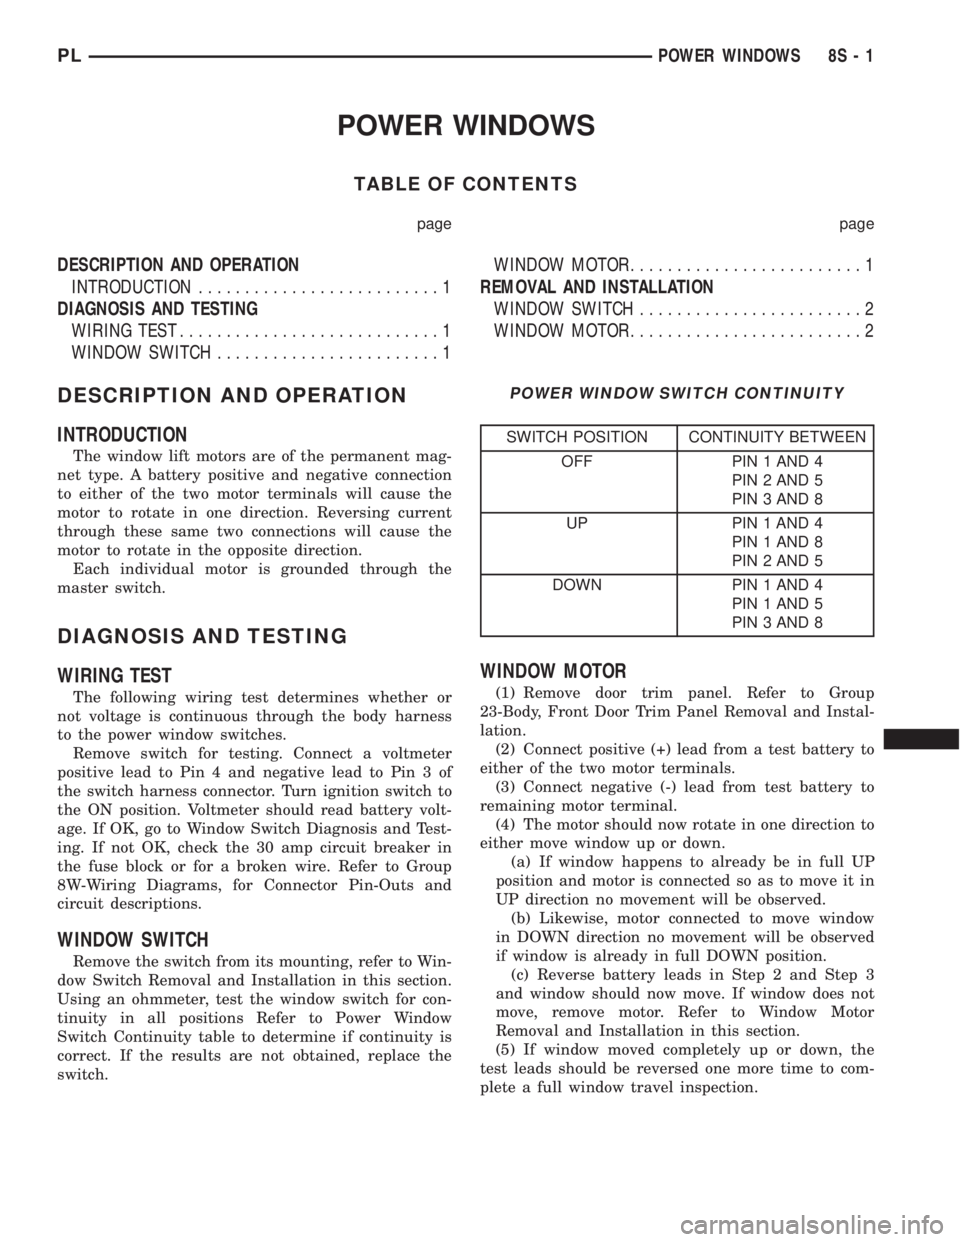
tinuity in all positions Refer to Power Window
Switch Continuity table to determine if continuity is
correct. If the results are not obtained, replace the
switch.
WINDOW MOTOR
(1) Remove door trim panel. Refer to Group
23-Body, Front Door Trim Panel Removal and Instal-
lation.
(2) Connect positive (+) lead from a test battery to
either of the two motor terminals.
(3) Connect negative (-) lead from test battery to
remaining motor terminal.
(4) The motor should now rotate in one direction to
either move window up or down.
(a) If window happens to already be in full UP
position and motor is connected so as to move it in
UP direction no movement will be observed.
(b) Likewise, motor connected to move window
in DOWN direction no movement will be observed
if window is already in full DOWN position.
(c) Reverse battery leads in Step 2 and Step 3
and window should now move. If window does not
move, remove motor. Refer to Window Motor
Removal and Installation in this section.
(5) If window moved completely up or down, the
test leads should be reversed one more time to com-
plete a full window travel inspection.
POWER WINDOW SWITCH CONTINUITY
SWITCH POSITION CONTINUITY BETWEEN
OFF PIN 1 AND 4
PIN 2 AND 5
PIN 3 AND 8
UP PIN 1 AND 4
PIN 1 AND 8
PIN 2 AND 5
DOWN PIN 1 AND 4
PIN 1 AND 5
PIN 3 AND 8
PLPOWER WINDOWS 8S - 1