engine DODGE POWER WAGON 2007 2.G Owner's Manual
[x] Cancel search | Manufacturer: DODGE, Model Year: 2007, Model line: POWER WAGON, Model: DODGE POWER WAGON 2007 2.GPages: 492, PDF Size: 8.25 MB
Page 129 of 492
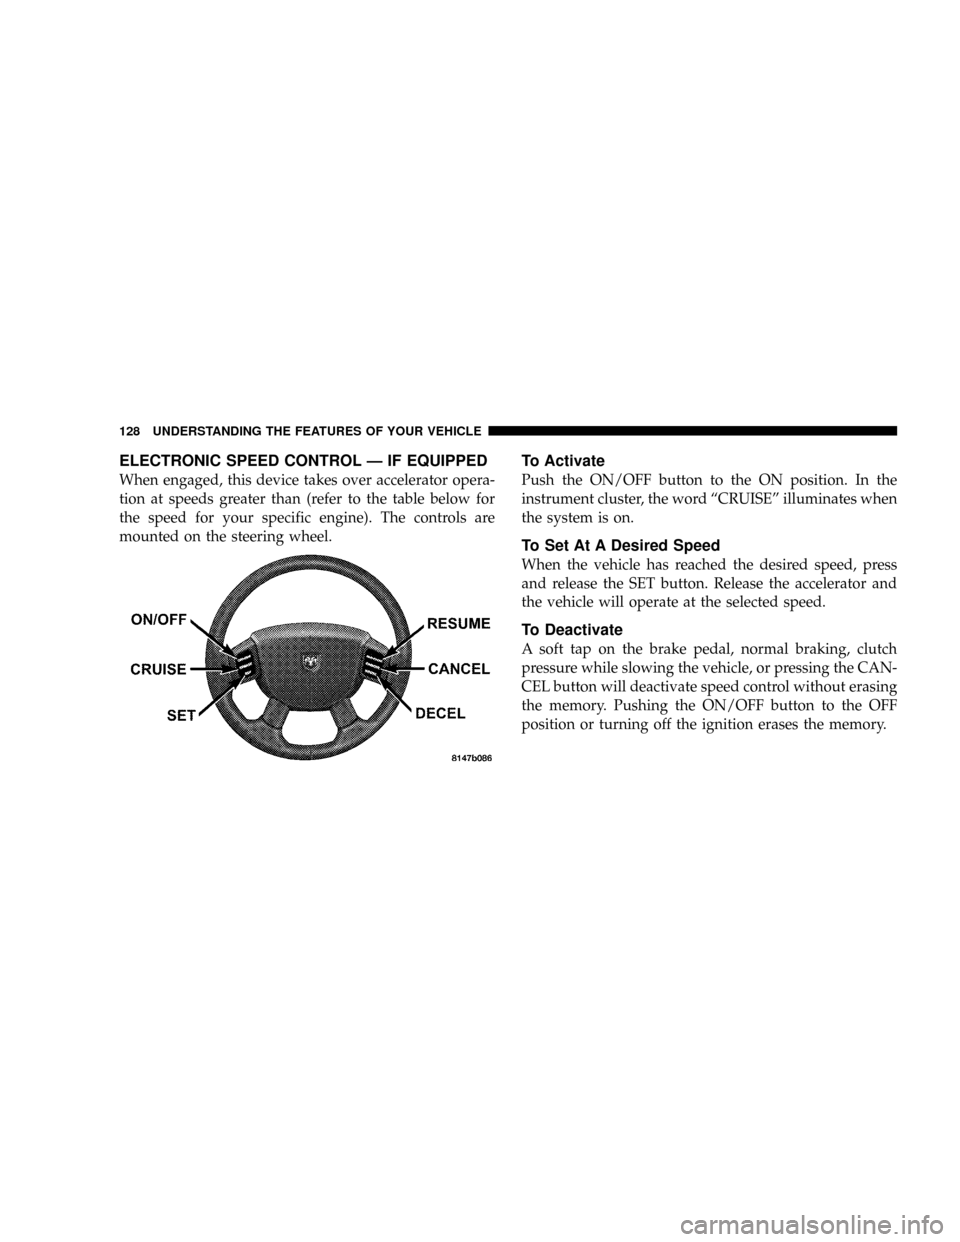
ELECTRONIC SPEED CONTROL Ð IF EQUIPPED
When engaged, this device takes over accelerator opera-
tion at speeds greater than (refer to the table below for
the speed for your specific engine). The controls are
mounted on the steering wheel.
To Activate
Push the ON/OFF button to the ON position. In the
instrument cluster, the word ªCRUISEº illuminates when
the system is on.
To Set At A Desired Speed
When the vehicle has reached the desired speed, press
and release the SET button. Release the accelerator and
the vehicle will operate at the selected speed.
To Deactivate
A soft tap on the brake pedal, normal braking, clutch
pressure while slowing the vehicle, or pressing the CAN-
CEL button will deactivate speed control without erasing
the memory. Pushing the ON/OFF button to the OFF
position or turning off the ignition erases the memory.
128 UNDERSTANDING THE FEATURES OF YOUR VEHICLE
Page 130 of 492
WARNING!
Leaving the Speed Control ON when not in use is
dangerous. You could accidentally set the system to
cause it to go faster than you want. You could lose
control and have an accident. Always leave the
system OFF when you aren't using it.
To Resume Speed
To resume a previously set speed, push and release the
RESUME button. Resume can be used at any speed above
(refer to the table below for the speed for your specific
engine).
To Vary The Speed Setting
When the speed control is on, speed can be increased by
pressing and holding the ACCEL button. When the
button is released, a new set speed will be established.Tapping the ACCEL button once will result in a speed
increase (refer to the table below for the speed for your
specific engine). Each time the button is tapped, speed
increases so that tapping the button three times will
increase speed by three increments.
Tapping the DECEL button once will result in a speed
decrease (refer to the table below for the speed for your
specific engine). Each time the button is tapped, speed
will decrease. For example, tapping the button 3 times
will decrease the speed by 3 times the speed listed in the
table below (refer to the table below for the speed for
your specific engine).
To decrease speed while the speed control is on, press
and hold the DECEL button. Release the button when the
desired speed is reached, and the new speed will be set.
UNDERSTANDING THE FEATURES OF YOUR VEHICLE 129
3
Page 131 of 492
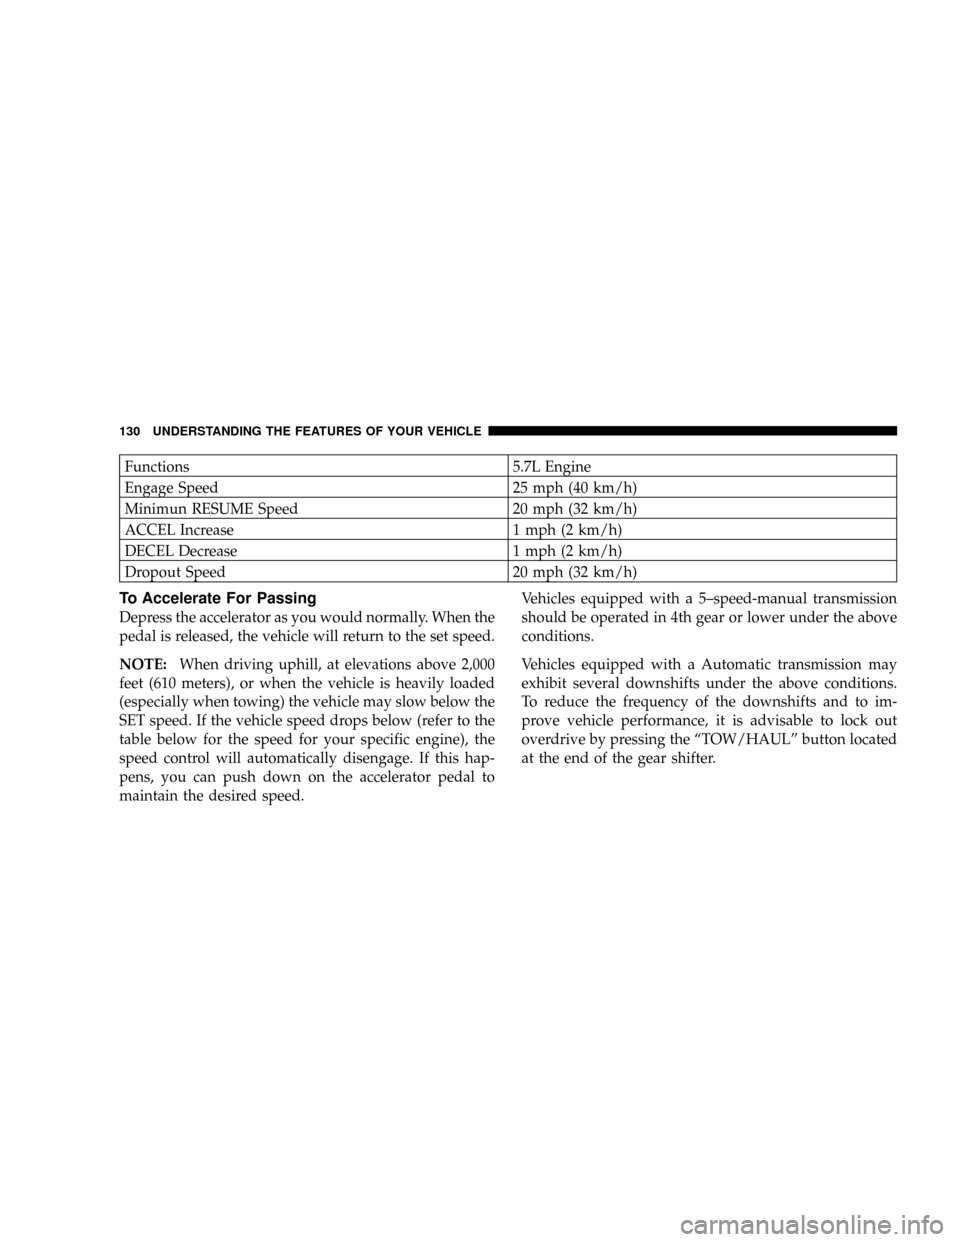
Functions 5.7L Engine
Engage Speed 25 mph (40 km/h)
Minimun RESUME Speed 20 mph (32 km/h)
ACCEL Increase 1 mph (2 km/h)
DECEL Decrease 1 mph (2 km/h)
Dropout Speed 20 mph (32 km/h)
To Accelerate For Passing
Depress the accelerator as you would normally. When the
pedal is released, the vehicle will return to the set speed.
NOTE:When driving uphill, at elevations above 2,000
feet (610 meters), or when the vehicle is heavily loaded
(especially when towing) the vehicle may slow below the
SET speed. If the vehicle speed drops below (refer to the
table below for the speed for your specific engine), the
speed control will automatically disengage. If this hap-
pens, you can push down on the accelerator pedal to
maintain the desired speed.Vehicles equipped with a 5±speed-manual transmission
should be operated in 4th gear or lower under the above
conditions.
Vehicles equipped with a Automatic transmission may
exhibit several downshifts under the above conditions.
To reduce the frequency of the downshifts and to im-
prove vehicle performance, it is advisable to lock out
overdrive by pressing the ªTOW/HAULº button located
at the end of the gear shifter.
130 UNDERSTANDING THE FEATURES OF YOUR VEHICLE
Page 139 of 492
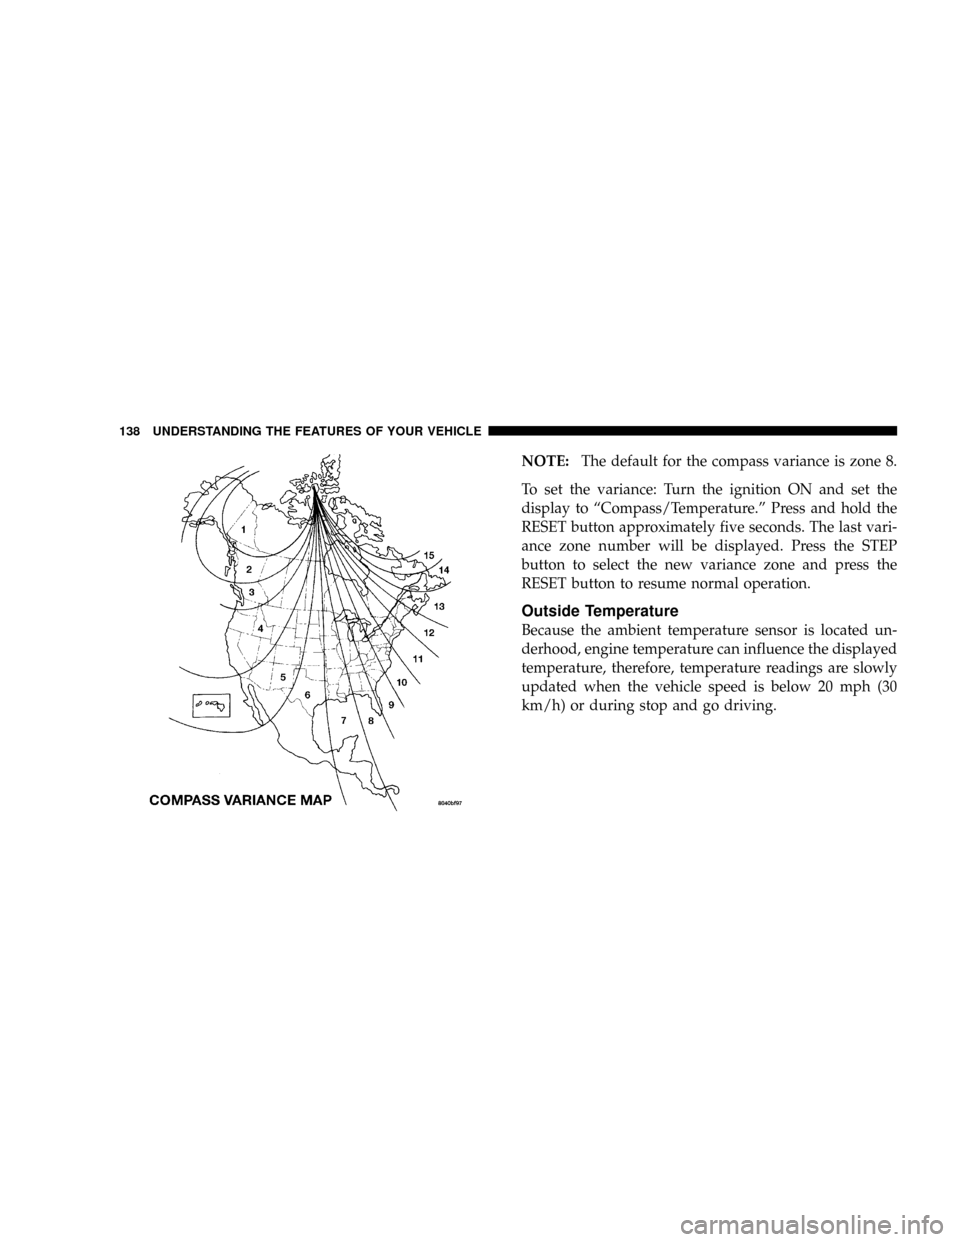
NOTE:The default for the compass variance is zone 8.
To set the variance: Turn the ignition ON and set the
display to ªCompass/Temperature.º Press and hold the
RESET button approximately five seconds. The last vari-
ance zone number will be displayed. Press the STEP
button to select the new variance zone and press the
RESET button to resume normal operation.
Outside Temperature
Because the ambient temperature sensor is located un-
derhood, engine temperature can influence the displayed
temperature, therefore, temperature readings are slowly
updated when the vehicle speed is below 20 mph (30
km/h) or during stop and go driving.
138 UNDERSTANDING THE FEATURES OF YOUR VEHICLE
Page 150 of 492
All accessories connected to this/these outlet(s) should
be removed or turned OFF when the vehicle is not in use
to protect the battery against discharge.
NOTE:If desired, all of the power outlets can be
converted by your authorized dealer to provide power
with the ignition switch in the ON position only.CAUTION!
Electrical Outlet Use With Engine Off
²Many accessories that can be plugged in draw
power from the vehicle's battery, even when not
in use (i.e. cellular phones, etc.). Eventually, if
plugged in long enough, the vehicle's battery will
discharge sufficiently to degrade battery life
and/or prevent engine starting.
²Accessories that draw higher power (i.e. coolers,
vacuum cleaners, lights, etc.), will discharge the
battery even more quickly. Only use these inter-
mittently and with greater caution.
²After the use of high power draw accessories, or
long periods of the vehicle not being started (with
accessories still plugged in), the vehicle must be
driven a sufficient length of time to allow the
generator to recharge the vehicle's battery.
UNDERSTANDING THE FEATURES OF YOUR VEHICLE 149
3
Page 164 of 492
Exhaust Gas
WARNING!
Exhaust gases contain carbon monoxide, a poten-
tially toxic gas that by itself is colorless and odorless.
To avoid inhaling these gases, the following precau-
tions should be observed:
²Do not run the engine in a closed garage or in confined
areas any longer than needed to move your vehicle in
or out of the area.
²If it is necessary to sit in a parked vehicle with the
engine running for more than a short period, adjust
your climate control system to force outside air into
the vehicle. Set the blower at high speed and the
controls in any position except OFF or MAX A/C.
²The best protection against carbon monoxide entry
into the vehicle body is a properly maintained engine
exhaust system.
Be aware of changes in the sound of the exhaust system;
exhaust fumes detected inside the vehicle; or damage to
the underside or rear of the vehicle. Have a competent
mechanic inspect the complete exhaust system and adja-
cent body areas for broken, damaged, deteriorated or
mispositioned parts. Open seams or loose connections
could permit exhaust fumes to seep into the passenger
compartment. In addition, inspect the exhaust system
each time the vehicle is raised for lubrication or oil
change. Replace or adjust as required.
Safety Checks You Should Make Inside The
Vehicle
Heater Defroster Ducts
Inspect the heater defroster ducts for proper operation.
Check for proper air flow through all defroster ducts. If
UNDERSTANDING THE FEATURES OF YOUR VEHICLE 163
3
Page 174 of 492
INSTRUMENT CLUSTER DESCRIPTION
1. Check Gages
This light illuminates when the Voltmeter, Engine
Oil Pressure or Engine Coolant Temperature
gages indicate a reading either too high or too low.
Examine the gages carefully, and follow the instructions
above for each indicated problem.
NOTE:When the ignition switch is turned to OFF, the
Fuel Gage, Voltmeter, Oil Pressure and Engine Coolant
Temperature gages may not show accurate readings.
When the engine is not running, turn the ignition switch
to ON to obtain accurate readings.
2. Voltage Gauge
When the engine is running, the gauge indicates
the electrical system voltage. The pointer should
stay within the normal range if the battery is charged. Ifthe pointer moves to either extreme left or right and
remains there during normal driving, the electrical sys-
tem should be serviced.
NOTE:If the gauge pointer moves to either extreme of
the gauge, the ªCheck Gagesº indicator will illuminate
and a single chime will sound. The ªCheck Gagesº
indicator may also illuminate prior to the voltage gauge
moving out of normal range. In either case, see you local
authorized Dealer for system service.
3. Turn Signal Indicators
Lights in instrument cluster flash when outside turn
signals are operating.
4. Tachometer
The tachometer indicates engine speed in revolutions per
minute.
UNDERSTANDING YOUR INSTRUMENT PANEL 173
4
Page 175 of 492
CAUTION!
Do not operate the engine with the tachometer
pointer at high rpm for extended periods. Engine
damage may occur.
5. Airbag Indicator Light
The indicator lights and remains lit for 6 to 8 seconds
when the ignition is first turned on. If the light stays on,
flickers or comes on while driving, have the airbag
system checked by an authorized dealer.
6. High Beam Indicator
This indicator shows that headlights are on high
beam.
7. Seat Belt Reminder Light
When the ignition switch is first turned ON, this
light will turn on for 5 to 8 seconds as a bulb check.
During the bulb check, if the driver's seat belt isunbuckled, a chime will sound. After the bulb check or
when driving, if the driver seat belt remains unbuckled,
the Seat Belt Warning Light will flash or remain on
continuously. Refer to9Enhanced Driver Seat Belt Re-
minder System (BeltAlertŸ)9in the Occupant Restraints
section for more information. (See page 43 for more
information.)
8. Speedometer
The speedometer shows the vehicle speed in miles per
hour and/or kilometers per hour.
9. Oil Pressure Gauge
The pointer should always indicate some oil pres-
sure when the engine is running. A continuous
high or low reading, under normal driving conditions,
may indicate a lubrication system malfunction. Immedi-
ate service should be obtained. (See page 389 for more
information.)
174 UNDERSTANDING YOUR INSTRUMENT PANEL
Page 176 of 492
NOTE:If the gauge pointer moves to either extreme of
the gauge, the ªCheck Gagesº indicator will illuminate
and a single chime will sound.
10. Transfer Case Position
(See page 258 for more information.)
11 .TOW HAUL
The TOW HAUL button is located at the end of the gear
shift lever. This light will illuminate when the TOW
HAUL OD/OFF button is pushed once. (See page 254 for
more information.)
12.OD/OFF
the OD/OFF button is located at the end of the gear shift
lever. This light will illuminate when the TOW HAUL
OD/OFF button is pushed twice. (See page 254 for more
information.)13. Temperature Gauge
The temperature gauge indicates engine coolant
temperature. Any reading within the normal
range indicates that the cooling system is operat-
ing satisfactorily. The gauge needle will likely indicate a
higher temperature when driving in hot weather, up
mountain grades, in heavy traffic, or when towing a
trailer. If the needle rises to the ª245ÉFº mark, stop the
vehicle, shift into N (Neutral), and increase the engine
idle speed for 2 to 3 minutes. If the temperature reading
does not return to normal, shut your engine OFF and
allow it to cool. Seek authorized service immediately. See
Cooling System information in the section on ªMaintain-
ing Your Vehicle.º
UNDERSTANDING YOUR INSTRUMENT PANEL 175
4
Page 177 of 492
CAUTION!
Do not leave your vehicle unattended with the
engine running as you would not be able to react to
the temperature indicator if the engine overheats.
NOTE:Engine idle speed will automatically increase to
1000 rpm at elevated coolant temperatures to improve
engine cooling.
NOTE:If the gauge pointer moves to either extreme of
the gauge, the ªCheck Gagesº indicator will illuminate
and a single chime will sound.
14. Security
The light will flash rapidly for approximately 16 seconds
when the vehicle theft alarm is arming. The light will
flash at a slower rate after the alarm is set. The security
light will also come on for about two seconds when the
ignition is first turned ON.15. Transmission Range Indicator (Automatic
Tranmissions Only)
When the gear selector lever is moved, this indicator
shows the automatic transmission gear range selected.
16. Odometer/Trip Odometer
The odometer shows the total distance the vehicle has
been driven.
If the odometer reading is changed during repair or
replacement, be sure to keep a record of the reading
before and after the service so that the correct mileage can
be determined.
The trip odometer shows individual trip mileage. To
toggle between the odometer and the trip odometer,
press the Odometer/Trip Odometer Button. To reset the
Trip Odometer, press and hold the button while in trip
mode, until the Trip Odometer resets.
176 UNDERSTANDING YOUR INSTRUMENT PANEL