Engine removal DODGE RAM 1999 Service Service Manual
[x] Cancel search | Manufacturer: DODGE, Model Year: 1999, Model line: RAM, Model: DODGE RAM 1999Pages: 1691, PDF Size: 40.34 MB
Page 633 of 1691
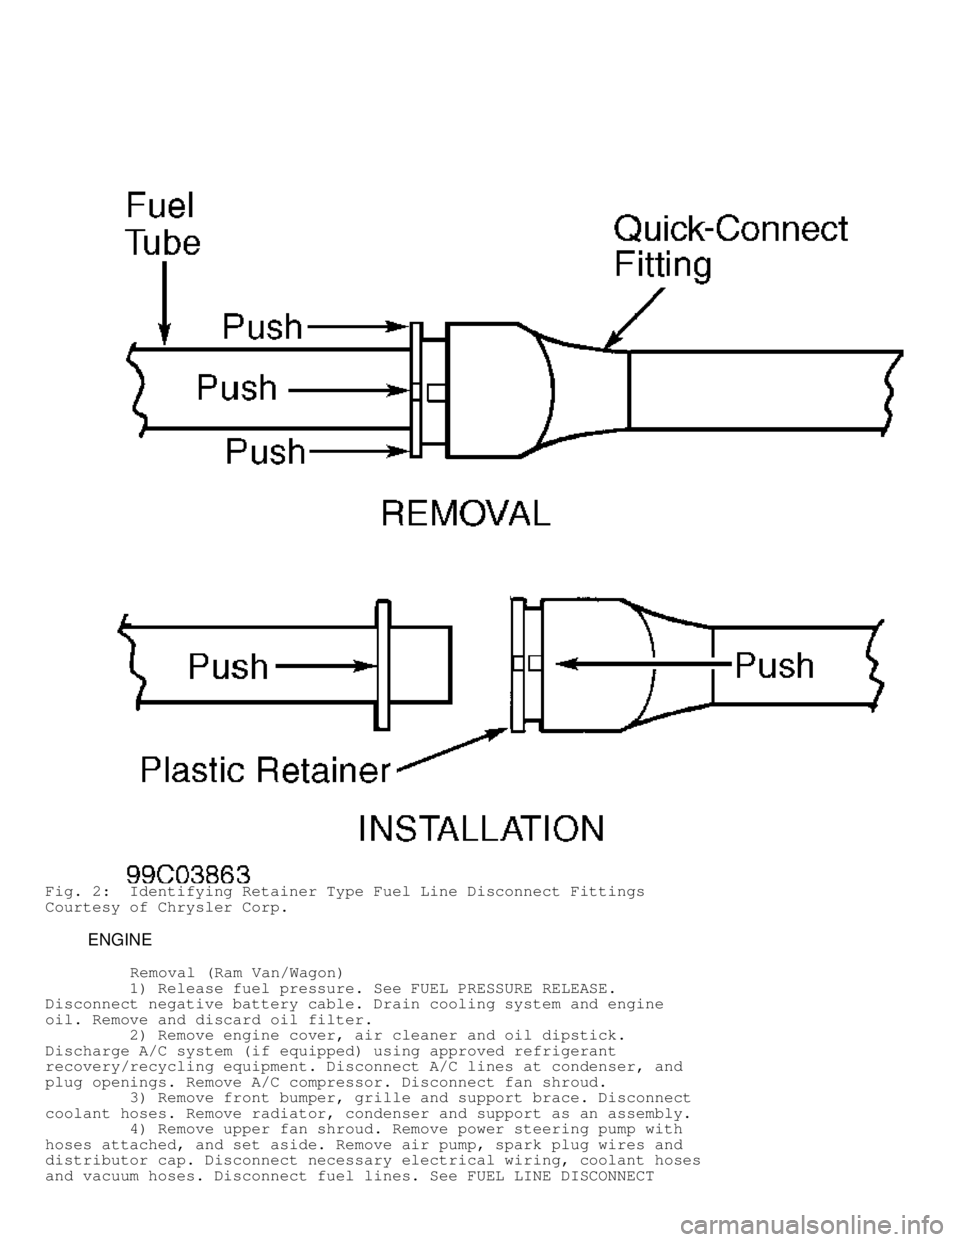
Fig. 2: Identifying Retainer Type Fuel Line Disconnect Fittings
Courtesy of Chrysler Corp.
ENGINE
Removal (Ram Van/Wagon)
1) Release fuel pressure. See FUEL PRESSURE RELEASE.
Disconnect negative battery cable. Drain cooling system and engine
oil. Remove and discard oil filter.
2) Remove engine cover, air cleaner and oil dipstick.
Discharge A/C system (if equipped) using approved refrigerant
recovery/recycling equipment. Disconnect A/C lines at condenser, and
plug openings. Remove A/C compressor. Disconnect fan shroud.
3) Remove front bumper, grille and support brace. Disconnect
coolant hoses. Remove radiator, condenser and support as an assembly.
4) Remove upper fan shroud. Remove power steering pump with
hoses attached, and set aside. Remove air pump, spark plug wires and
distributor cap. Disconnect necessary electrical wiring, coolant hoses
and vacuum hoses. Disconnect fuel lines. See FUEL LINE DISCONNECT
Page 634 of 1691
FITTINGS. Remove air cleaner, throttle body, drive belts, generator,
fan and fan pulley. Remove lower fan shroud.
CAUTION: When removing engine, DO NOT lift engine by intake manifold.
5) Remove intake manifold. See INTAKE MANIFOLD. Raise and
support vehicle. Remove starter. Remove exhaust pipe and heat shields.
Disconnect transmission shift linkage. Remove crank sensor.
6) On A/T models, remove transmission inspection cover. Mark
torque converter-to-flexplate position for installation reference.
Remove torque converter-to-flexplate bolts. On M/T models, disconnect
clutch release mechanism at clutch housing.
7) Attach engine hoist to cylinder heads (at intake manifold
flanges). On all models, support transmission using a floor jack.
Remove transmission or clutch housing-to-cylinder block bolts. Remove
engine mount bolts. Remove engine out front of vehicle.
Installation
To install, reverse removal procedure. Tighten bolts/nuts to
specification. See TORQUE SPECIFICATIONS table. On A/T models, ensure
reference marks on torque converter and flexplate are aligned.
Evacuate and charge A/C system.
Removal ( Dakota 2WD, Durango 2WD, Grand Cherokee & Ram
Pickup)
1) Release fuel pressure. See FUEL PRESSURE RELEASE.
Disconnect and remove battery. On all except Pickup, scribe hood
hinges for installation reference and remove hood.
2) On all models, drain cooling system. Disconnect coolant
hoses. Remove radiator, fan and shroud. Discharge A/C system (if
equipped) using approved refrigerant recovery/recycling equipment.
Disconnect A/C lines, and plug openings. On Pickup, remove upper core
support, transmission cooler and A/C condenser. On all models, remove
belt, air cleaner, vacuum lines, distributor cap and wiring.
3) Disconnect necessary electrical wiring. Disconnect fuel
lines. See FUEL LINE DISCONNECT FITTINGS. Remove throttle body and
linkage. Remove intake manifold. Remove starter, generator, charcoal
canister and horns. Disconnect power steering hoses (if equipped).
Raise and support vehicle. Drain oil. Disconnect exhaust pipe at
exhaust manifold.
4) On A/T models, remove transmission housing inspection
plate. Mark torque converter-to-flexplate position for installation
reference. Remove torque converter-to-flexplate bolts. Remove bracket
for transmission cooler lines.
NOTE: It may be necessary to remove manual transmission if
transmission cannot be supported using floor jack.
5) On M/T models, disconnect clutch release mechanism at
clutch housing. On all models, support transmission using a floor
jack. Remove transmission or clutch housing-to-cylinder block bolts.
Install engine lifting fixture, and attach chain.
CAUTION: When removing engine, DO NOT lift engine by intake manifold.
6) On Ram Pickup and Grand Cherokee, remove front engine
mount bolts. Remove engine from vehicle. On Dakota 2WD and Durango 2WD
models, remove front engine mount through-bolts. See Fig. 3. Remove
engine from vehicle.
Installation
To install, reverse removal procedure. Tighten bolts/nuts to
specification. See TORQUE SPECIFICATIONS table. On A/T models, ensure
Page 635 of 1691
reference marks on torque converter and flexplate are aligned.
Evacuate and charge A/C system.
Removal (Durango 4WD & Dakota 4WD)
1) Release fuel pressure. See FUEL PRESSURE RELEASE.
Disconnect and remove battery. Scribe hood hinges for installation
reference and remove hood.
2) Drain cooling system. Disconnect coolant hoses. Remove
radiator, fan and shroud. Discharge A/C system (if equipped) using
approved refrigerant recovery/recycling equipment. Disconnect A/C
lines, and plug openings. Remove air cleaner, vacuum lines,
distributor cap and wiring.
3) Disconnect necessary electrical wiring. Disconnect fuel
lines. See FUEL LINE DISCONNECT FITTINGS. Disconnect accelerator
linkage. Remove throttle body. Remove starter and generator.
Disconnect power steering hoses. Raise and support vehicle. Drain oil.
Disconnect exhaust pipe at exhaust manifold.
NOTE: Engine, transmission and front axle are connected and
supported with insulators and brackets. See Fig. 3.
4) On left side, remove 2 bolts attaching differential pinion
nose bracket-to-bellhousing bolts. Remove pinion nose bracket-to-
adapter bolts (located on top of differential, near pinion). Separate
engine from engine mount by removing engine mount through-bolt and nut
located on top of engine mount.
5) On right side, remove 2 axle-to-bracket bolts and bracket-
to-bellhousing bolt. Separate engine from engine mount by removing
engine mount through-bolt and nut located on top of engine mount.
Remove engine from vehicle.
Page 636 of 1691
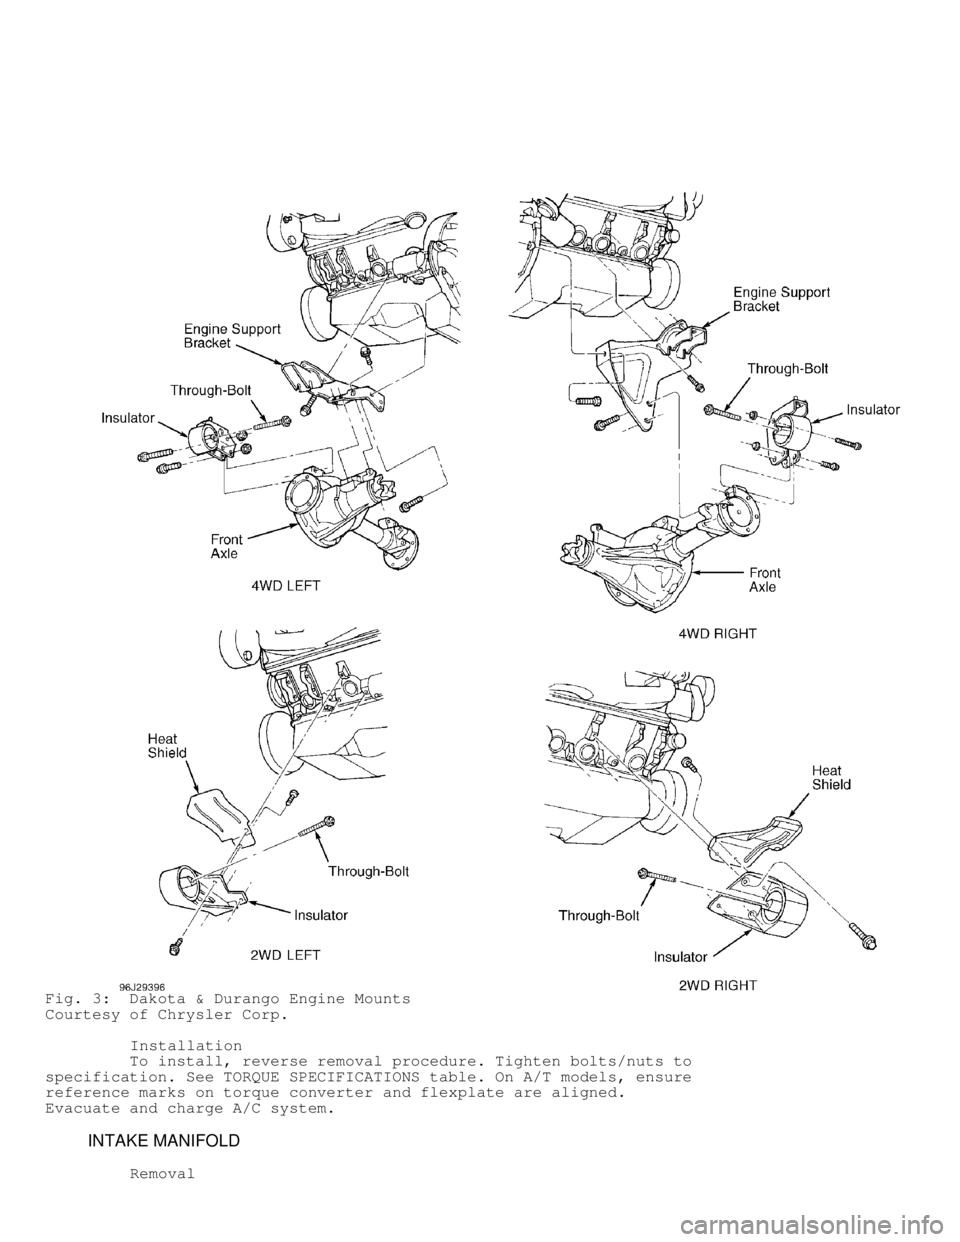
Fig. 3: Dakota & Durango Engine Mounts
Courtesy of Chrysler Corp.
Installation
To install, reverse removal procedure. Tighten bolts/nuts to
specification. See TORQUE SPECIFICATIONS table. On A/T models, ensure
reference marks on torque converter and flexplate are aligned.
Evacuate and charge A/C system.
INTAKE MANIFOLD
Removal
Page 640 of 1691
CAUTION: Install NEW studs in cylinder head if studs came out when
removing exhaust manifold. Apply sealant to coarse threads of
studs before installing in head.
Installation
To install, reverse removal procedure. Ensure conical washers
are installed in original locations. Tighten bolts/nuts to
specification, starting at center and working outward. See TORQUE
SPECIFICATIONS table.
CYLINDER HEAD
Removal
1) On Van, remove engine cover and heat shields. On all
models, disconnect battery, and drain coolant. Remove generator
bracket support rod and generator. Remove intake and exhaust manifold.
See INTAKE MANIFOLD and EXHAUST MANIFOLD.
2) Remove rocker arms and push rods. See ROCKER ARMS. Remove
cylinder head bolts, cylinder head and gasket.
Inspection
Check cylinder head warpage. Repair or replace cylinder head
if warpage exceeds specification. See CYLINDER HEAD table under ENGINE
SPECIFICATIONS.
Installation
To install, reverse removal procedure. Tighten cylinder head
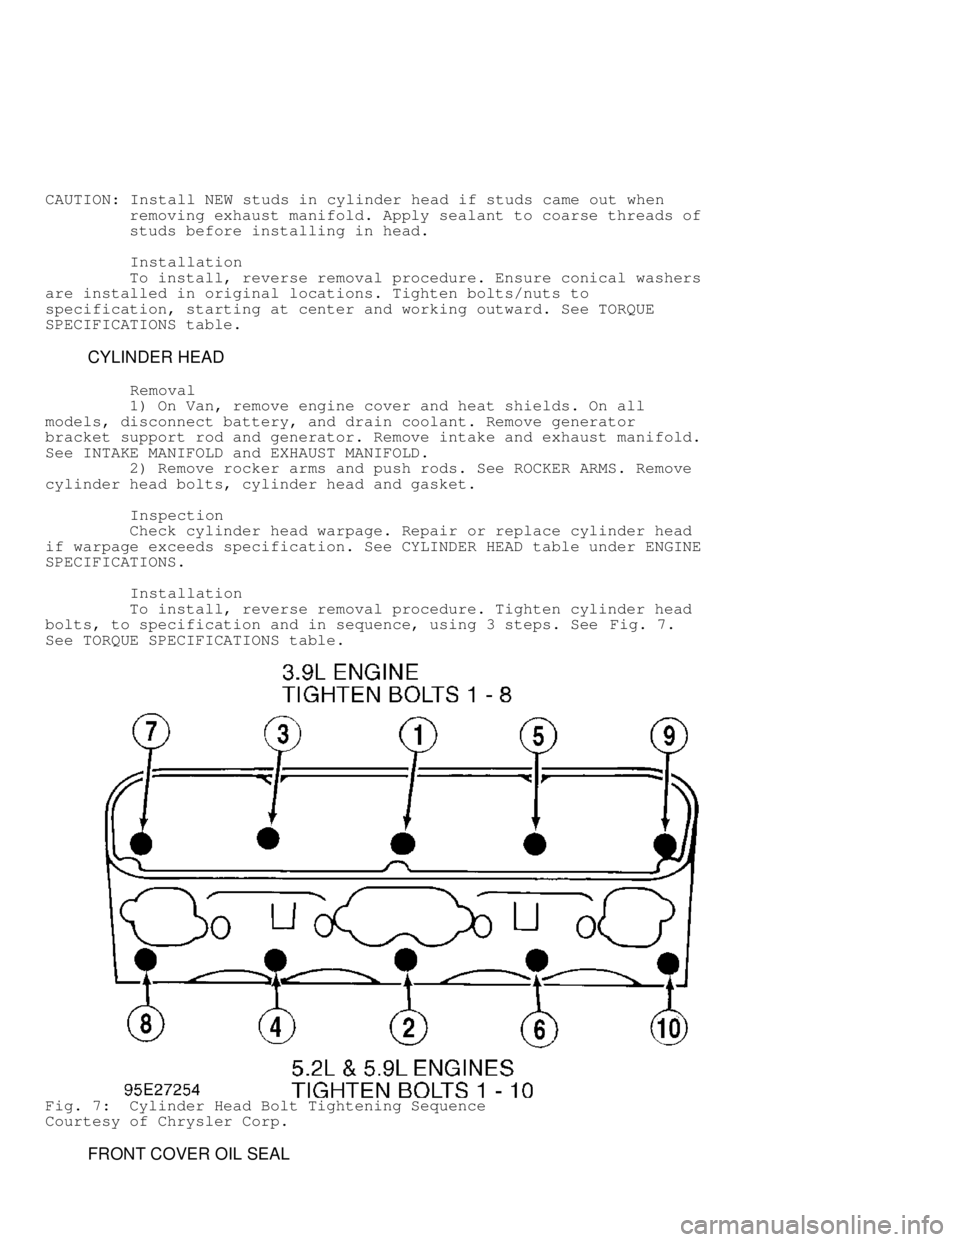
bolts, to specification and in sequence, using 3 steps. See Fig. 7.
See TORQUE SPECIFICATIONS table.
Fig. 7: Cylinder Head Bolt Tightening Sequence
Courtesy of Chrysler Corp.
FRONT COVER OIL SEAL
Page 641 of 1691
Removal
Disconnect negative battery cable. Remove drive belts from
crankshaft pulley. Remove fan and shroud. Remove crankshaft pulley and
vibration damper. Pry oil seal from front cover.
Installation
1) Use Seal Installer (6635) for seal installation. Installe\
r
should fit with minimum interference. If installer does not fit, front
cover must be removed and installed properly.
2) Position small diameter of oil seal over seal installer.
Using vibration damper bolt, tighten seal installer to draw seal into
position. Remove vibration damper bolt and seal installer. To complete
installation, reverse removal procedure.
FRONT COVER
Removal
1) Disconnect battery. Drain coolant. Remove power steering
pump (if equipped). Remove water pump. See WATER PUMP.
2) Remove crankshaft pulley and vibration damper. Loosen oil
pan bolts. Remove oil pan-to-front cover bolts on each side of oil
pan. Remove bolts, front cover and gasket. DO not damage oil pan
gasket.
Installation
1) Ensure sealing surfaces are clean. Apply a 1/8" (3.17 mm)\
bead of RTV sealant to oil pan gasket. Install gasket, front cover and
bolts. DO NOT tighten bolts at this time.
2) Install front cover oil seal. See FRONT COVER OIL SEAL.
Tighten front cover, oil pan and then vibration damper bolts to
specification. See TORQUE SPECIFICATIONS table. To complete
installation, reverse removal procedure.
TIMING CHAIN
Inspection
1) Remove front cover. See FRONT COVER. Position ruler at
camshaft sprocket, near timing chain link, to check timing chain
stretch.
NOTE: When applying torque to camshaft sprocket bolt, DO NOT allow
crankshaft to move. It may be necessary to hold crankshaft.
2) Place torque wrench on camshaft sprocket bolt. Apply 30
ft. lbs. (41 N.m) torque with cylinder heads installed, or 15 ft. lbs.\
(20 N.m) with cylinder heads removed, on camshaft sprocket bolt in
direction of engine rotation. Note reading on ruler.
3) Apply same amount of torque in opposite direction and note
amount of timing chain movement on ruler. If movement exceeds 1/8" (3.
17 mm), replace timing chain.
Removal
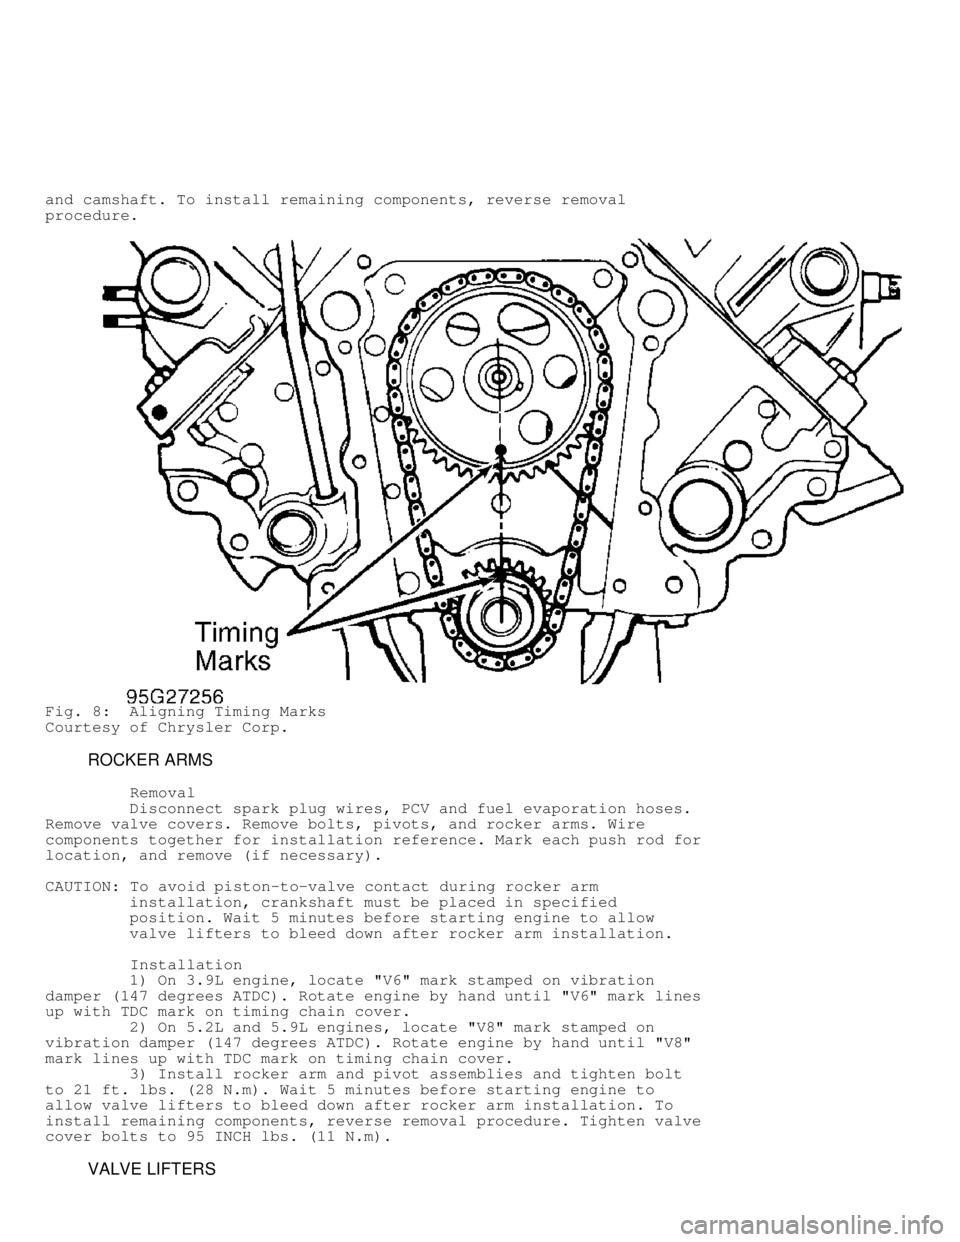
Rotate crankshaft so timing marks are aligned. See Fig. 8.
Remove camshaft sprocket bolt, camshaft sprocket, timing chain and
crankshaft sprocket.
Installation
1) Install timing chain and sprockets. Ensure timing marks
are aligned. See Fig. 8. Install camshaft sprocket bolt and tighten to
specification. See TORQUE SPECIFICATIONS table.
2) Ensure camshaft end play is within specification. See
CAMSHAFT table under ENGINE SPECIFICATIONS. If end play is not within
specification, replace thrust plate located between camshaft sprocket
Page 642 of 1691
and camshaft. To install remaining components, reverse removal
procedure.
Fig. 8: Aligning Timing Marks
Courtesy of Chrysler Corp.
ROCKER ARMS
Removal
Disconnect spark plug wires, PCV and fuel evaporation hoses.
Remove valve covers. Remove bolts, pivots, and rocker arms. Wire
components together for installation reference. Mark each push rod for
location, and remove (if necessary).
CAUTION: To avoid piston-to-valve contact during rocker arm
installation, crankshaft must be placed in specified
position. Wait 5 minutes before starting engine to allow
valve lifters to bleed down after rocker arm installation.
Installation
1) On 3.9L engine, locate "V6" mark stamped on vibration
damper (147 degrees ATDC). Rotate engine by hand until "V6" mark lines\
up with TDC mark on timing chain cover.
2) On 5.2L and 5.9L engines, locate "V8" mark stamped on
vibration damper (147 degrees ATDC). Rotate engine by hand until "V8"
mark lines up with TDC mark on timing chain cover.
3) Install rocker arm and pivot assemblies and tighten bolt
to 21 ft. lbs. (28 N.m). Wait 5 minutes before starting engine to
allow valve lifters to bleed down after rocker arm installation. To
install remaining components, reverse removal procedure. Tighten valve
cover bolts to 95 INCH lbs. (11 N.m).
VALVE LIFTERS
Page 643 of 1691
Removal
Remove air cleaner. Remove rocker arms. See ROCKER ARMS.
Remove intake manifold. See INTAKE MANIFOLD. Remove yoke retainer and
aligning yoke. Use Valve Lifter Remover/Installer (C-4129-A) to remove\
valve lifter(s).
NOTE: Cylinder block must be marked to indicate oversize valve
lifters. See SPECIAL ENGINE MARKS under ENGINE
IDENTIFICATION.
Inspection
Inspect components for damage. Measure lifter O.D. and bore
diameter in cylinder block. Determine oil clearance. Clearance must be
within specification. See VALVE LIFTERS table under ENGINE
SPECIFICATIONS. Cylinder block can be bored for oversize lifters.
CAUTION: DO NOT allow engine RPM to exceed fast idle until valve
lifters have filled with oil and become quiet.
Installation
1) Lubricate valve lifters and push rods before installing in
original locations. Ensure valve lifter is installed so oil feed hole
in side of valve lifter is facing upward, away from crankshaft.
2) Align yokes with arrow pointing toward camshaft. Install
yoke retainer, and tighten bolts to specification. See TORQUE
SPECIFICATIONS table.
CAMSHAFT
Removal
1) Remove engine. See ENGINE. Remove front cover and timing
chain. See FRONT COVER and TIMING CHAIN.
2) Remove valve lifters. See VALVE LIFTERS. Remove
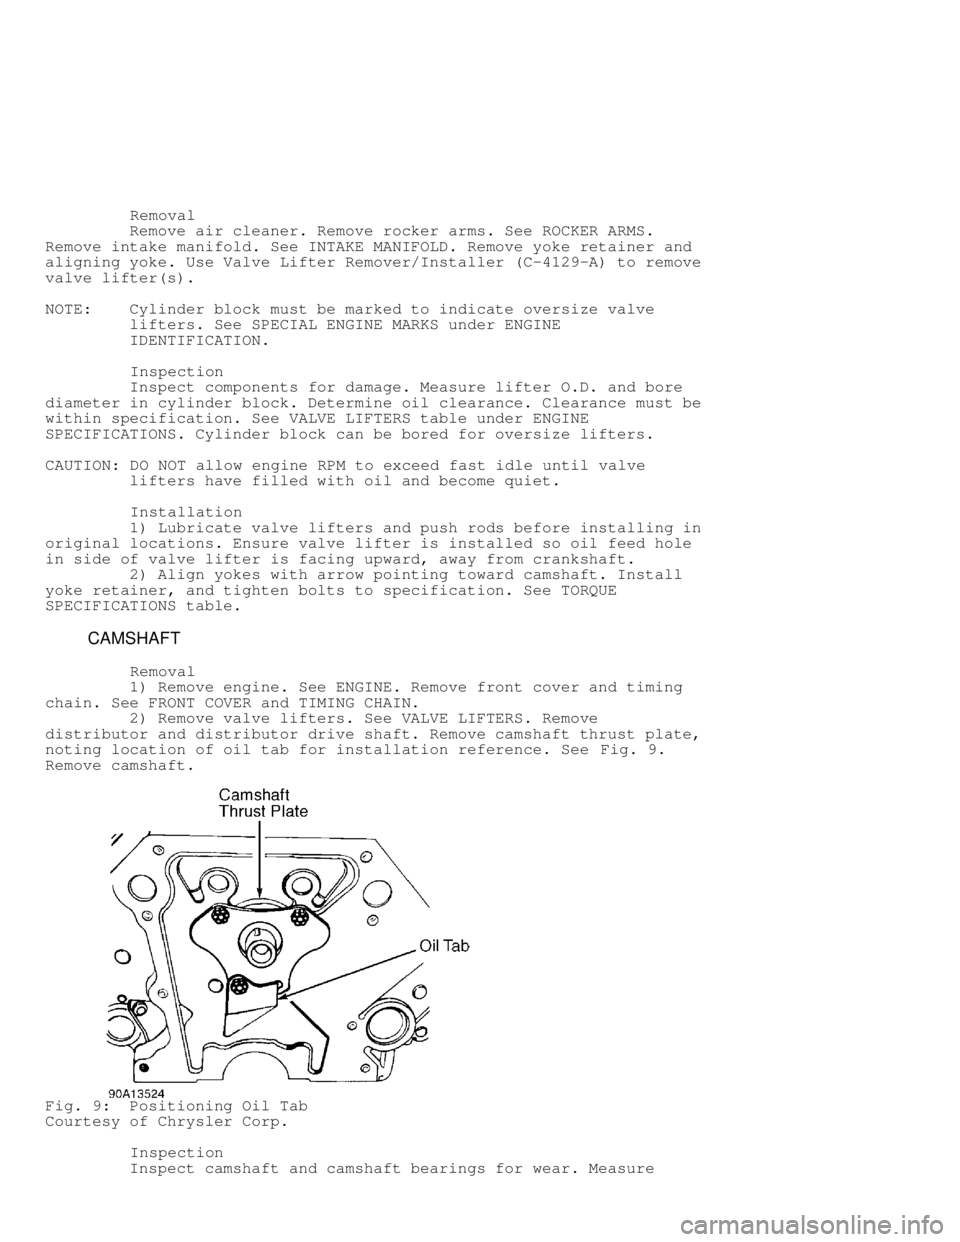
distributor and distributor drive shaft. Remove camshaft thrust plate,
noting location of oil tab for installation reference. See Fig. 9.
Remove camshaft.
Fig. 9: Positioning Oil Tab
Courtesy of Chrysler Corp.
Inspection
Inspect camshaft and camshaft bearings for wear. Measure
Page 644 of 1691
camshaft journal diameter and camshaft bearing I.D. Replace camshaft
or camshaft bearings if not within specification. See CAMSHAFT table
under ENGINE SPECIFICATIONS.
CAUTION: If camshaft is replaced, valve lifters must also be replaced.
Whenever new camshaft or valve lifters are installed,
manufacturer recommends addition of one pint of Chrysler
crankcase conditioner to engine oil for at least 500 miles to
aid break-in.
Installation
1) Ensure cup plugs are installed in oil passages behind
thrust plate. Lubricate camshaft and bearings, and install within 2"
(50.8 mm) of final installation location.
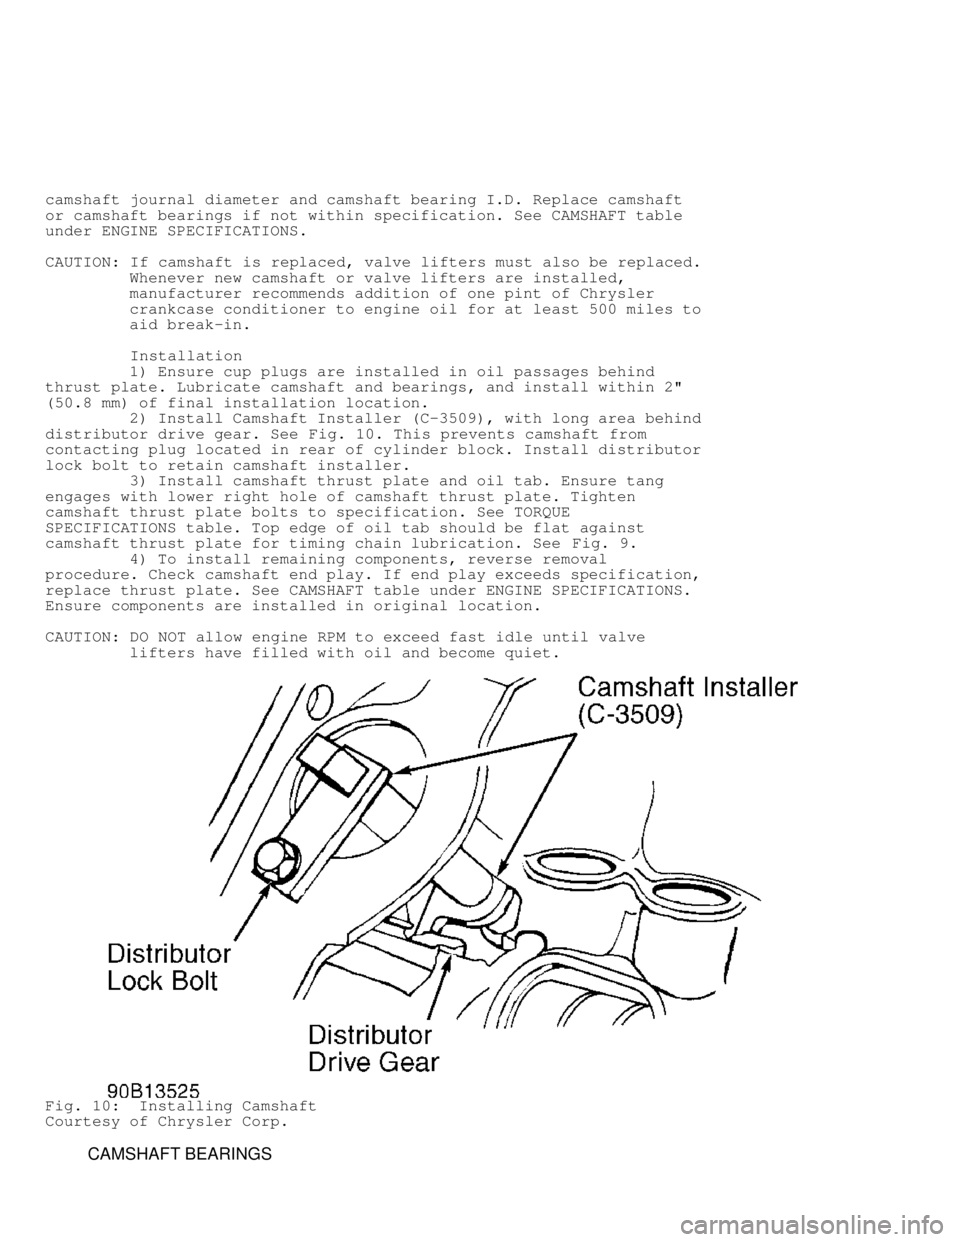
2) Install Camshaft Installer (C-3509), with long area behin\
d
distributor drive gear. See Fig. 10. This prevents camshaft from
contacting plug located in rear of cylinder block. Install distributor
lock bolt to retain camshaft installer.
3) Install camshaft thrust plate and oil tab. Ensure tang
engages with lower right hole of camshaft thrust plate. Tighten
camshaft thrust plate bolts to specification. See TORQUE
SPECIFICATIONS table. Top edge of oil tab should be flat against
camshaft thrust plate for timing chain lubrication. See Fig. 9.
4) To install remaining components, reverse removal
procedure. Check camshaft end play. If end play exceeds specification,
replace thrust plate. See CAMSHAFT table under ENGINE SPECIFICATIONS.
Ensure components are installed in original location.
CAUTION: DO NOT allow engine RPM to exceed fast idle until valve
lifters have filled with oil and become quiet.
Fig. 10: Installing Camshaft
Courtesy of Chrysler Corp.
CAMSHAFT BEARINGS
Page 645 of 1691
Removal & Installation
1) Use Camshaft Bearing Remover/Installer (C-3132-A) for
camshaft bearing replacement. Replace camshaft bearing if damaged or
if I.D. is not within specification. See CAMSHAFT table under ENGINE
SPECIFICATIONS.
2) Ensure oil holes are aligned. Ensure oil hole in No. 2
bearing aligns with oil hole to left cylinder head, and oil hole in
No. 3 bearing (3.9L) or No. 4 bearing (5.2L and 5.9L) aligns with oi\
l
hole to right cylinder head. Install NEW camshaft plug at rear of
cylinder block.
DISTRIBUTOR DRIVE SHAFT BUSHING
Removal
1) Rotate crankshaft so No. 1 cylinder is at TDC on
compression stroke. Remove distributor and distributor drive shaft.
Insert Bushing Puller (C-3052) into bushing, and thread down until
tight.
2) Hold bushing puller bolt, and rotate bushing puller nut
until distributor drive shaft bushing is removed.
Installation
1) Install NEW distributor drive shaft bushing over
burnishing end of Bushing Installer (C-3053). Insert bushing installer\
and distributor drive shaft bushing into cylinder block.
CAUTION: DO NOT ream distributor drive shaft bushing.
2) Using hammer, drive bushing installer and distributor
drive shaft bushing into cylinder block. Tighten nut to pull bushing
installer through distributor drive shaft bushing. Tightening nut
expands bushing tight in cylinder block and burnishes it to correct
size.
3) Ensure No. 1 cylinder is at TDC on compression stroke.
Install distributor drive shaft so slot is aligned toward left front
intake manifold bolt as viewed from rear of engine. Install
distributor with rotor positioned to No. 1 cylinder in distributor
cap.
REAR CRANKSHAFT OIL SEAL
Removal & Installation (Crankshaft Installed)
1) Remove oil pan. See OIL PAN. Remove oil pump. Remove rear
main bearing cap and discard lower rear crankshaft oil seal. Carefully
remove upper rear crankshaft oil seal and discard seal.
2) Lubricate new oil seal. Rotate upper rear crankshaft oil
seal in cylinder block with Yellow paint toward rear of engine.
Install lower rear crankshaft oil seal in main bearing cap with Yellow
paint toward rear of engine.
3) To prevent oil leakage, apply one drop of Loctite 515
sealant next to oil seal on main bearing cap surface before
installing. Apply silicone adhesive sealant at bearing cap-to-cylinder
block joint. See Fig. 11. Install main bearing cap, and tighten bolts
to specification. See TORQUE SPECIFICATIONS table. To install
remaining components, reverse removal procedure.
Removal & Installation (Crankshaft Removed)
1) Remove rear crankshaft oil seals from cylinder block and
main bearing cap. Lubricate oil seal. Install rear crankshaft oil
seals with Yellow paint toward rear of engine.
2) To prevent oil leakage, apply one drop of Loctite 515
sealant next to oil seal on main bearing cap surface before
installing. Apply silicone adhesive sealant at bearing cap-to-cylinder