DODGE RAM 1999 Service Repair Manual
Manufacturer: DODGE, Model Year: 1999, Model line: RAM, Model: DODGE RAM 1999Pages: 1691, PDF Size: 40.34 MB
Page 681 of 1691
using ridge reamer. DO NOT remove an excessive amount of material.
Ensure ridge is completely removed.
PISTON & CONNECTING ROD REMOVAL
Note top of piston. Some pistons may contain a notch, arrow
or be marked "FRONT". Piston must be installed in proper direction to
prevent damage with valve operation.
Check that connecting rod and cap are numbered for cylinder
location and which side of cylinder block the number faces. Proper cap
and connecting rod must be installed together. Connecting rod cap must
be installed on connecting rod in proper direction to ensure bearing
lock procedure. Mark connecting rod and cap if necessary. Pistons must
be installed in original location.
Remove cap retaining nuts or bolts. Remove bearing cap.
Install stud protectors on connecting rod bolts. This protects
cylinder walls from scoring during removal. Ensure proper removal of
ridge. Push piston and connecting rod from cylinder. Connecting rod
boss can be tapped with a wooden dowel or hammer handle to aid in
removal.
PISTON & CONNECTING ROD
Disassembly
Using ring expander, remove piston rings. Remove piston pin
retaining rings (if equipped). On pressed type piston pins, special
fixtures and procedures according to manufacturer must be used to
remove piston pins. Follow manufacturer's recommendations to avoid
piston distortion or breakage.
Cleaning
Remove all carbon and varnish from piston. Pistons and
connecting rods may be cleaned in cold type chemical tank. Using ring
groove cleaner, clean all deposits from ring grooves. Ensure all
deposits are cleaned from ring grooves to prevent ring breakage or
sticking. DO NOT attempt to clean pistons using wire brush.
Inspection
Inspect pistons for nicks, scoring, cracks or damage in ring
areas. Connecting rod should be checked for cracks using Magnaflux
procedure. Piston diameter must be measured in manufacturers specified
area.
Using telescopic gauge and micrometer, measure piston pin
bore of piston in 2 areas, 90 degrees apart. This is done to check
diameter and out-of-round.
Install proper bearing cap on connecting rod. Ensure bearing
cap is installed in proper location. Tighten bolts or nuts to
specification. Using inside micrometer, measure inside diameter in 2
areas, 90 degrees apart.
Connecting rod I.D. and out-of-round must be within
specification. Measure piston pin bore I.D. and piston pin O.D. All
components must be within specification. Subtract piston pin diameter
from piston pin bore in piston and connecting rod to determine proper
fit.
Connecting rod length must be measured from center of
crankshaft journal inside diameter to center of piston pin bushing
using proper caliper. Connecting rods must be the same length.
Connecting rods should be checked on an alignment fixture for bent or
twisted condition. Replace all components which are damaged or not
within specification.
PISTON & CYLINDER BORE FIT
Page 682 of 1691
Ensure cylinder is checked for taper, out-of-round and
properly honed prior to checking piston and cylinder bore fit. See
CYLINDER BLOCK in this article. Using dial bore gauge, measure
cylinder bore. Measure piston at right angle to piston pin in center
of piston skirt area. Subtract piston diameter from cylinder bore
diameter. The difference is piston-to-cylinder clearance. Clearance
must be within specification. Mark piston for proper cylinder
location.
ASSEMBLING PISTON & CONNECTING ROD
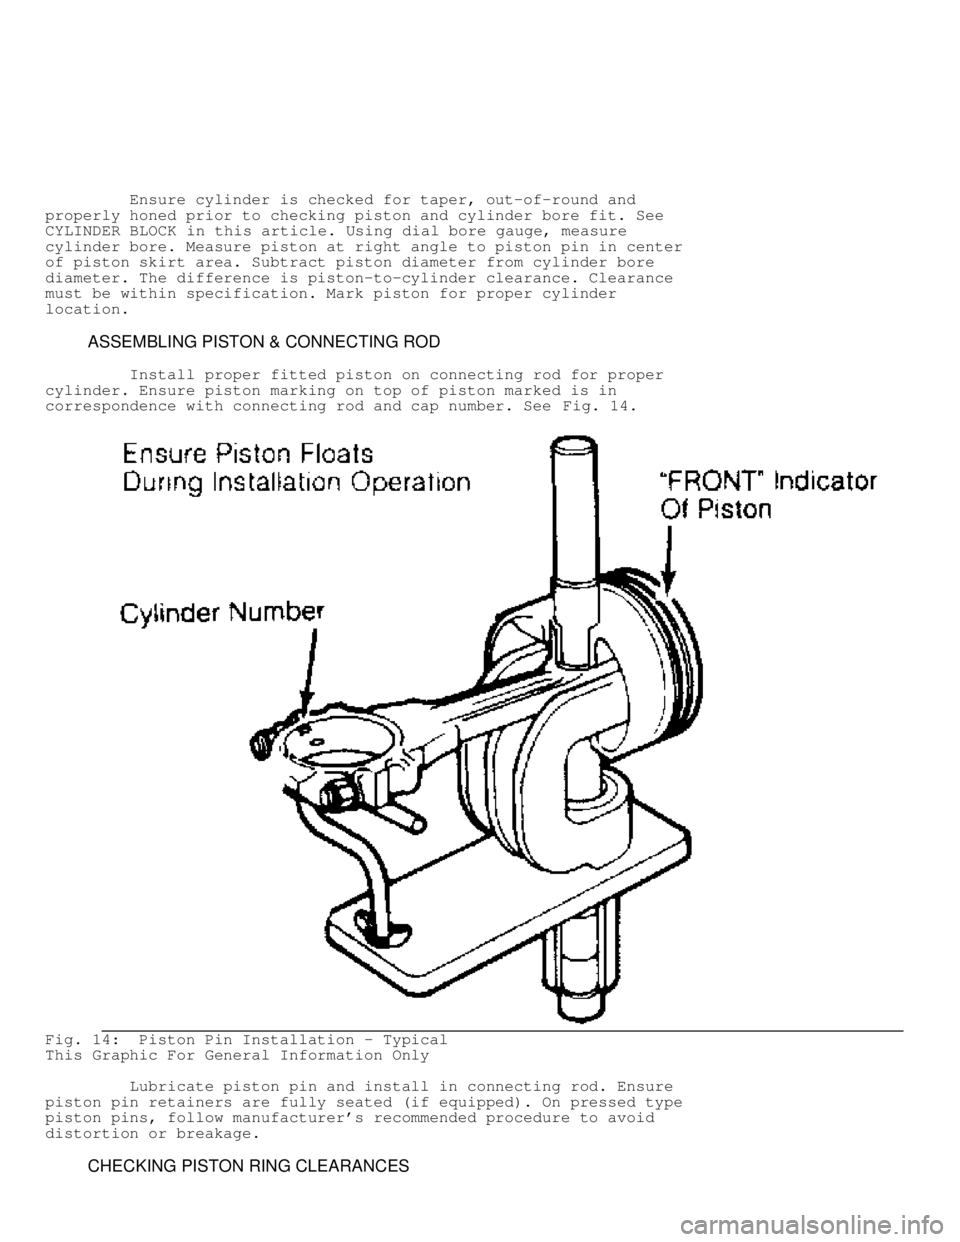
Install proper fitted piston on connecting rod for proper
cylinder. Ensure piston marking on top of piston marked is in
correspondence with connecting rod and cap number. See Fig. 14.
Fig. 14: Piston Pin Installation - Typical
This Graphic For General Information Only
Lubricate piston pin and install in connecting rod. Ensure
piston pin retainers are fully seated (if equipped). On pressed type
piston pins, follow manufacturer's recommended procedure to avoid
distortion or breakage.
CHECKING PISTON RING CLEARANCES
Page 683 of 1691
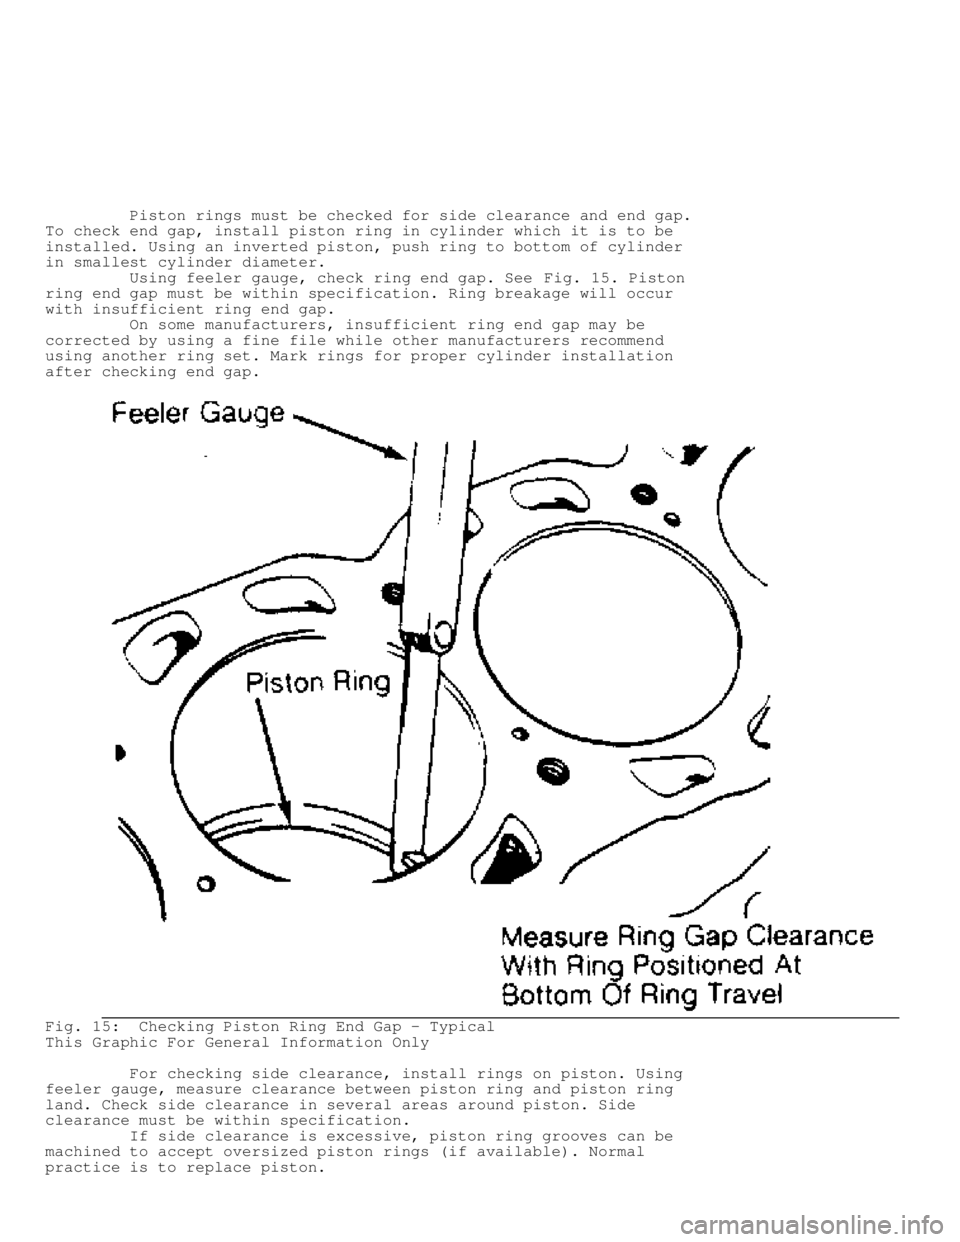
Piston rings must be checked for side clearance and end gap.
To check end gap, install piston ring in cylinder which it is to be
installed. Using an inverted piston, push ring to bottom of cylinder
in smallest cylinder diameter.
Using feeler gauge, check ring end gap. See Fig. 15. Piston
ring end gap must be within specification. Ring breakage will occur
with insufficient ring end gap.
On some manufacturers, insufficient ring end gap may be
corrected by using a fine file while other manufacturers recommend
using another ring set. Mark rings for proper cylinder installation
after checking end gap.
Fig. 15: Checking Piston Ring End Gap - Typical
This Graphic For General Information Only
For checking side clearance, install rings on piston. Using
feeler gauge, measure clearance between piston ring and piston ring
land. Check side clearance in several areas around piston. Side
clearance must be within specification.
If side clearance is excessive, piston ring grooves can be
machined to accept oversized piston rings (if available). Normal
practice is to replace piston.
Page 684 of 1691
PISTON & CONNECTING ROD INSTALLATION
Cylinders must be honed prior to piston installation. See
CYLINDER HONING under CYLINDER BLOCK in this article.
Install upper connecting rod bearings. Lubricate upper
bearings with engine oil. Install lower bearings in rod caps. Ensure
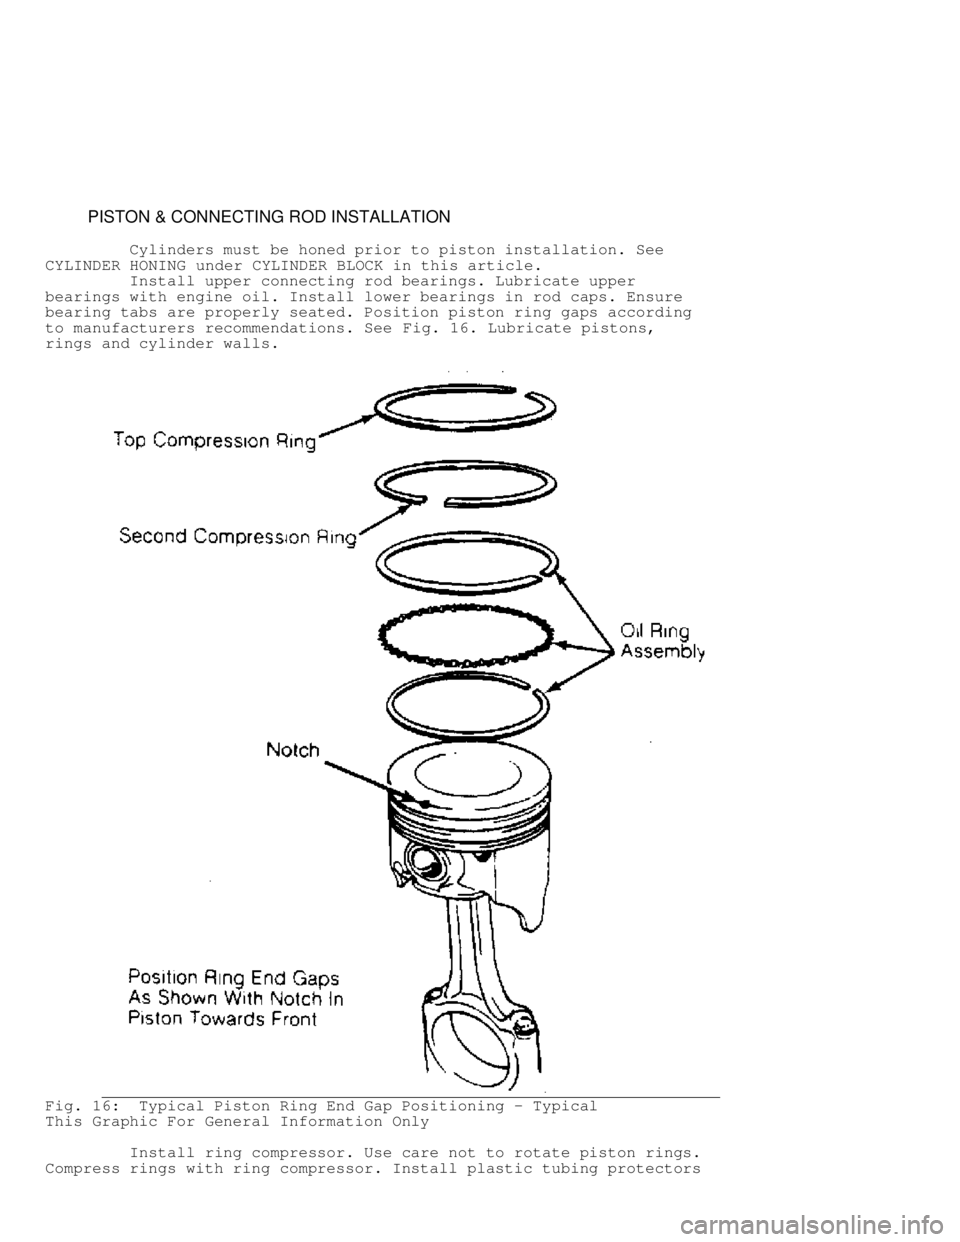
bearing tabs are properly seated. Position piston ring gaps according
to manufacturers recommendations. See Fig. 16. Lubricate pistons,
rings and cylinder walls.
Fig. 16: Typical Piston Ring End Gap Positioning - Typical
This Graphic For General Information Only
Install ring compressor. Use care not to rotate piston rings.
Compress rings with ring compressor. Install plastic tubing protectors
Page 685 of 1691
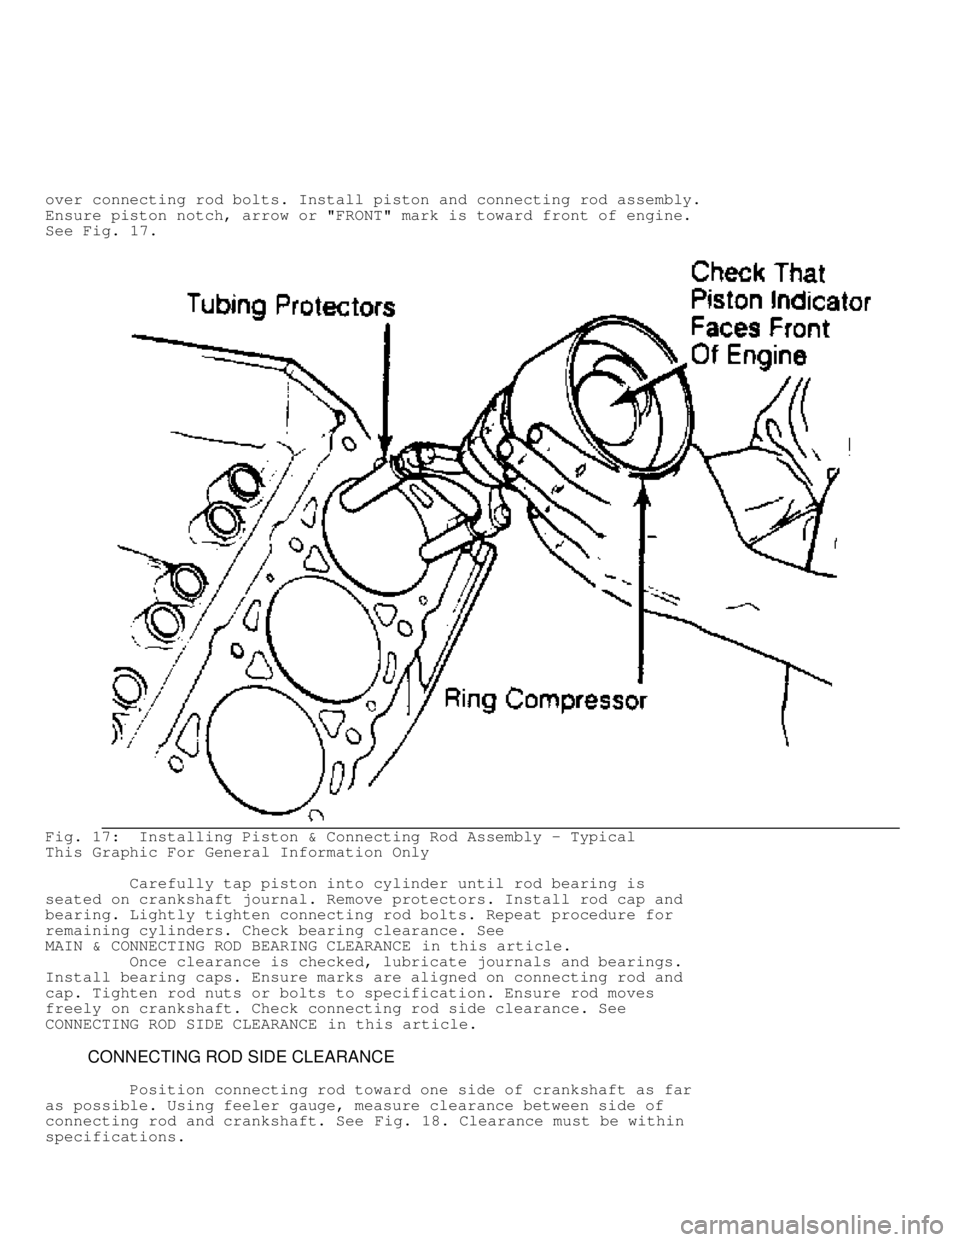
over connecting rod bolts. Install piston and connecting rod assembly.
Ensure piston notch, arrow or "FRONT" mark is toward front of engine.
See Fig. 17 .
Fig. 17: Installing Piston & Connecting Rod Assembly - Typical
This Graphic For General Information Only
Carefully tap piston into cylinder until rod bearing is
seated on crankshaft journal. Remove protectors. Install rod cap and
bearing. Lightly tighten connecting rod bolts. Repeat procedure for
remaining cylinders. Check bearing clearance. See
MAIN & CONNECTING ROD BEARING CLEARANCE in this article.
Once clearance is checked, lubricate journals and bearings.
Install bearing caps. Ensure marks are aligned on connecting rod and
cap. Tighten rod nuts or bolts to specification. Ensure rod moves
freely on crankshaft. Check connecting rod side clearance. See
CONNECTING ROD SIDE CLEARANCE in this article.
CONNECTING ROD SIDE CLEARANCE
Position connecting rod toward one side of crankshaft as far
as possible. Using feeler gauge, measure clearance between side of
connecting rod and crankshaft. See Fig. 18. Clearance must be within
specifications.
Page 686 of 1691
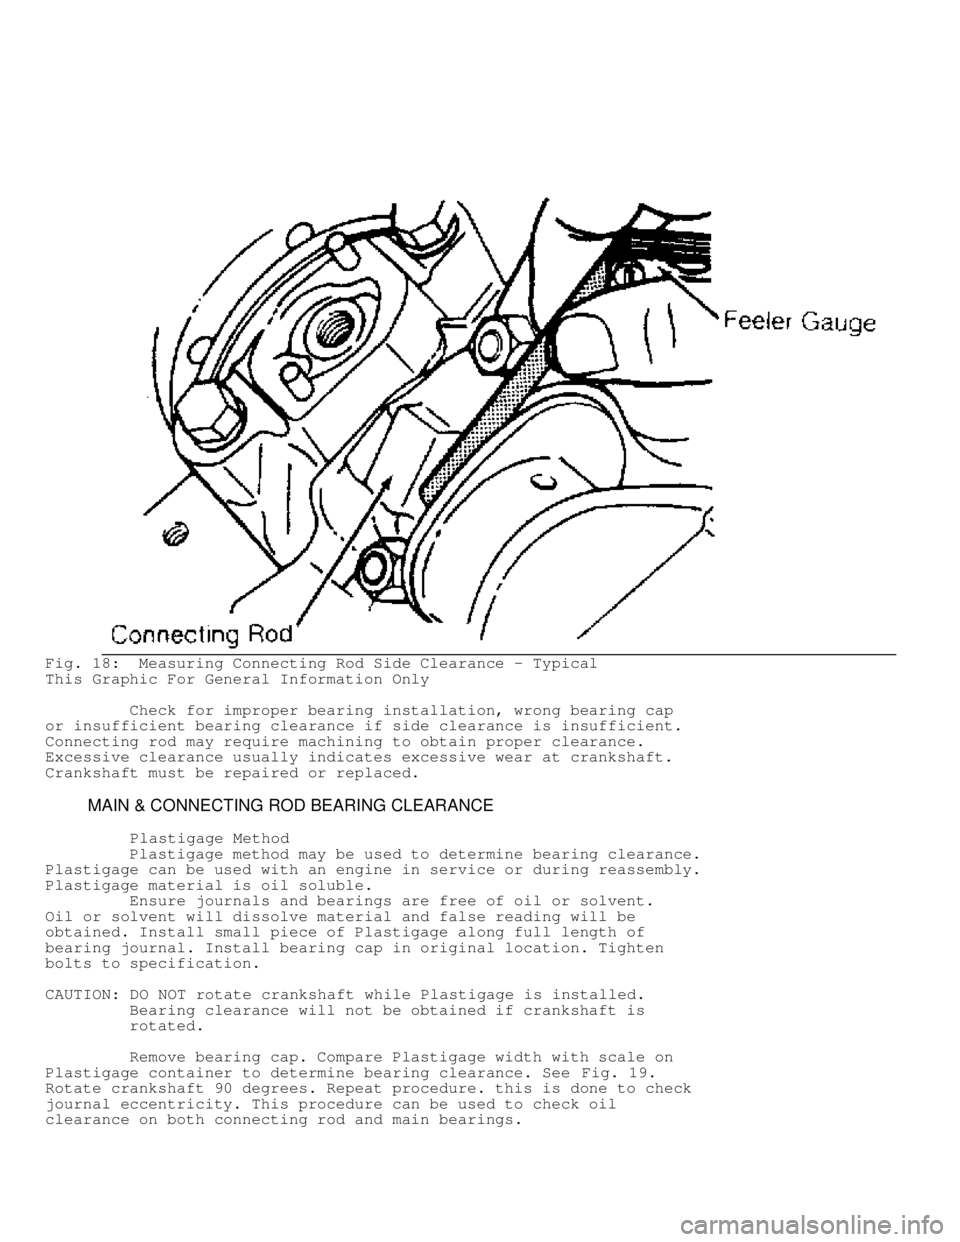
Fig. 18: Measuring Connecting Rod Side Clearance - Typical
This Graphic For General Information Only
Check for improper bearing installation, wrong bearing cap
or insufficient bearing clearance if side clearance is insufficient.
Connecting rod may require machining to obtain proper clearance.
Excessive clearance usually indicates excessive wear at crankshaft.
Crankshaft must be repaired or replaced.
MAIN & CONNECTING ROD BEARING CLEARANCE
Plastigage Method
Plastigage method may be used to determine bearing clearance.
Plastigage can be used with an engine in service or during reassembly.
Plastigage material is oil soluble.
Ensure journals and bearings are free of oil or solvent.
Oil or solvent will dissolve material and false reading will be
obtained. Install small piece of Plastigage along full length of
bearing journal. Install bearing cap in original location. Tighten
bolts to specification.
CAUTION: DO NOT rotate crankshaft while Plastigage is installed.
Bearing clearance will not be obtained if crankshaft is
rotated.
Remove bearing cap. Compare Plastigage width with scale on
Plastigage container to determine bearing clearance. See Fig. 19.
Rotate crankshaft 90 degrees. Repeat procedure. this is done to check
journal eccentricity. This procedure can be used to check oil
clearance on both connecting rod and main bearings.
Page 687 of 1691
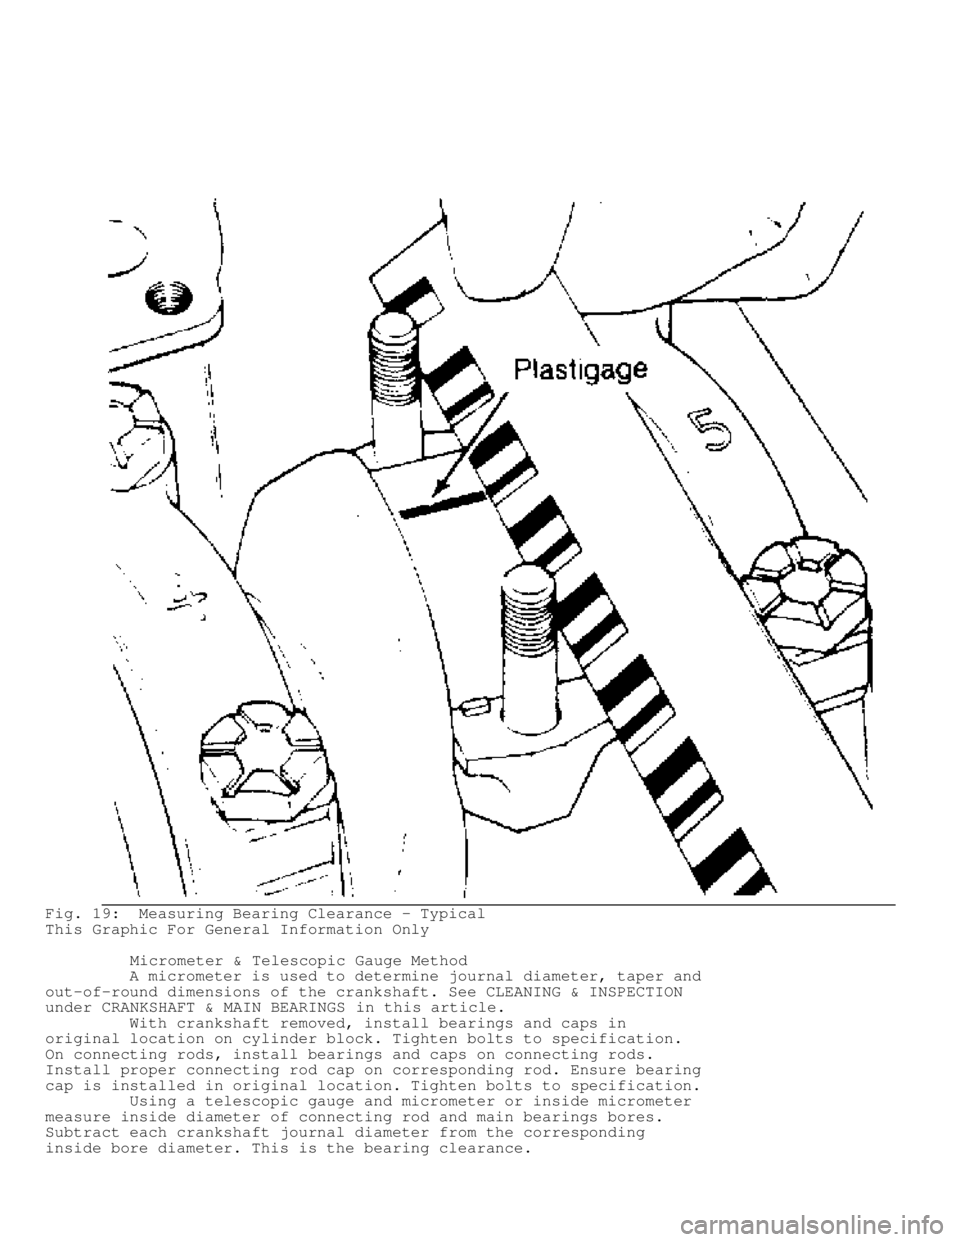
Fig. 19: Measuring Bearing Clearance - Typical
This Graphic For General Information Only
Micrometer & Telescopic Gauge Method
A micrometer is used to determine journal diameter, taper and
out-of-round dimensions of the crankshaft. See CLEANING & INSPECTION
under CRANKSHAFT & MAIN BEARINGS in this article.
With crankshaft removed, install bearings and caps in
original location on cylinder block. Tighten bolts to specification.
On connecting rods, install bearings and caps on connecting rods.
Install proper connecting rod cap on corresponding rod. Ensure bearing
cap is installed in original location. Tighten bolts to specification.
Using a telescopic gauge and micrometer or inside micrometer
measure inside diameter of connecting rod and main bearings bores.
Subtract each crankshaft journal diameter from the corresponding
inside bore diameter. This is the bearing clearance.
Page 688 of 1691
CRANKSHAFT & MAIN BEARINGS
* PLEASE READ THIS FIRST *
NOTE: Always refer to appropriate engine overhaul article in the
ENGINES section for complete overhaul procedures and
specifications for the vehicle being repaired.
REMOVAL
Ensure all main bearing caps are marked for location on
cylinder block. Some main bearing caps have an arrow stamped on it
which must face front of engine. Remove main bearing cap bolts. Remove
main bearing caps. Carefully remove crankshaft. Use care not to bind
crankshaft in cylinder block during removal.
CLEANING & INSPECTION
Thoroughly clean crankshaft using solvent. Dry with
compressed air. Ensure all oil passages are clear and free of sludge,
rust, dirt, and metal chips.
Inspect crankshaft for scoring and nicks. Inspect crankshaft
for cracks using Magnaflux procedure. Inspect rear seal area for
grooving or damage. Inspect bolt hole threads for damage. If pilot
bearing or bushing is used, check pilot bearing or bushing fit in
crankshaft. Inspect crankshaft gear for damaged or cracked teeth.
Replace gear if damaged. Check that oil passage plugs are tight (if
equipped).
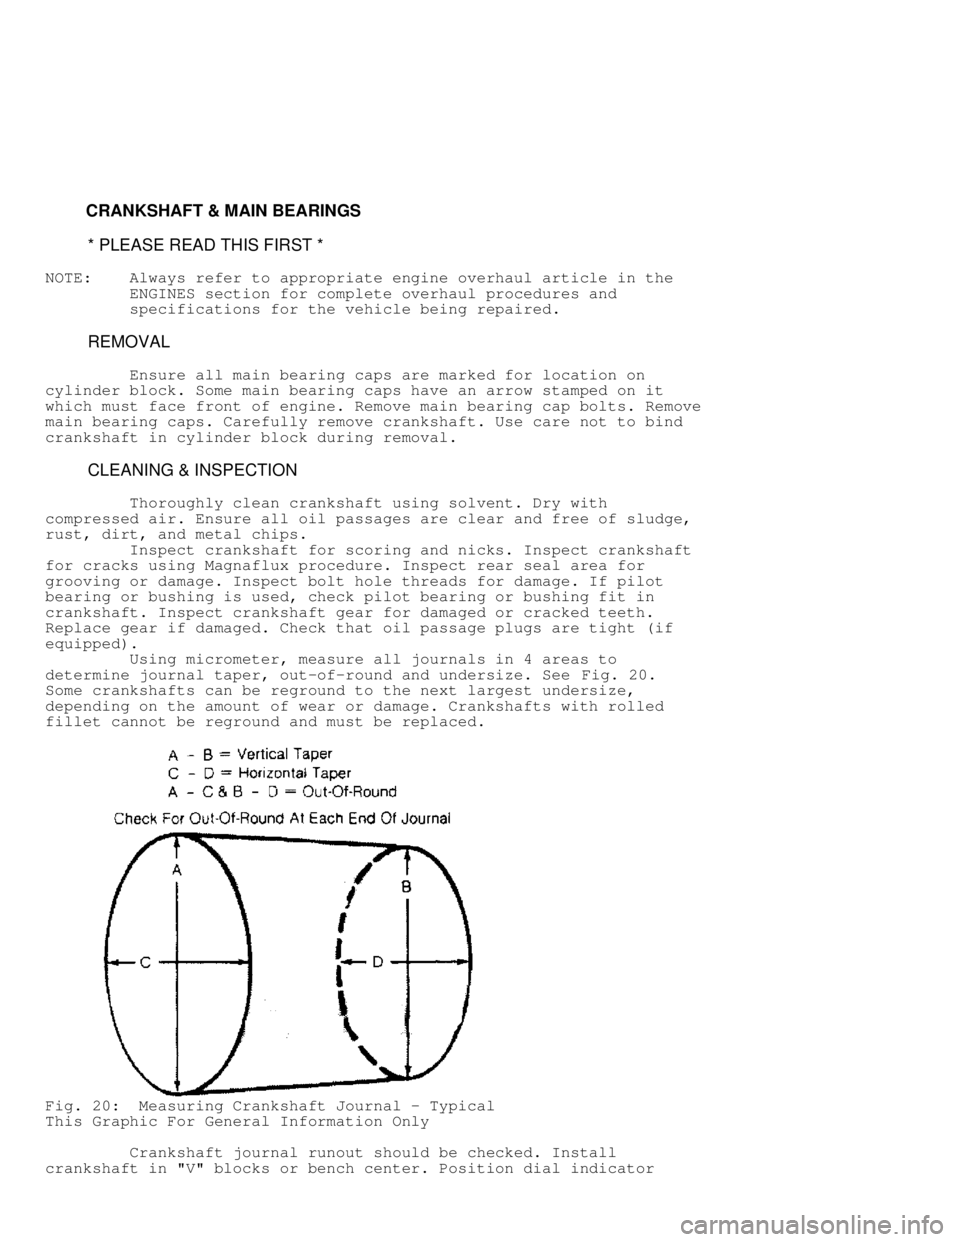
Using micrometer, measure all journals in 4 areas to
determine journal taper, out-of-round and undersize. See Fig. 20.
Some crankshafts can be reground to the next largest undersize,
depending on the amount of wear or damage. Crankshafts with rolled
fillet cannot be reground and must be replaced.
Fig. 20: Measuring Crankshaft Journal - Typical
This Graphic For General Information Only
Crankshaft journal runout should be checked. Install
crankshaft in "V" blocks or bench center. Position dial indicator
Page 689 of 1691
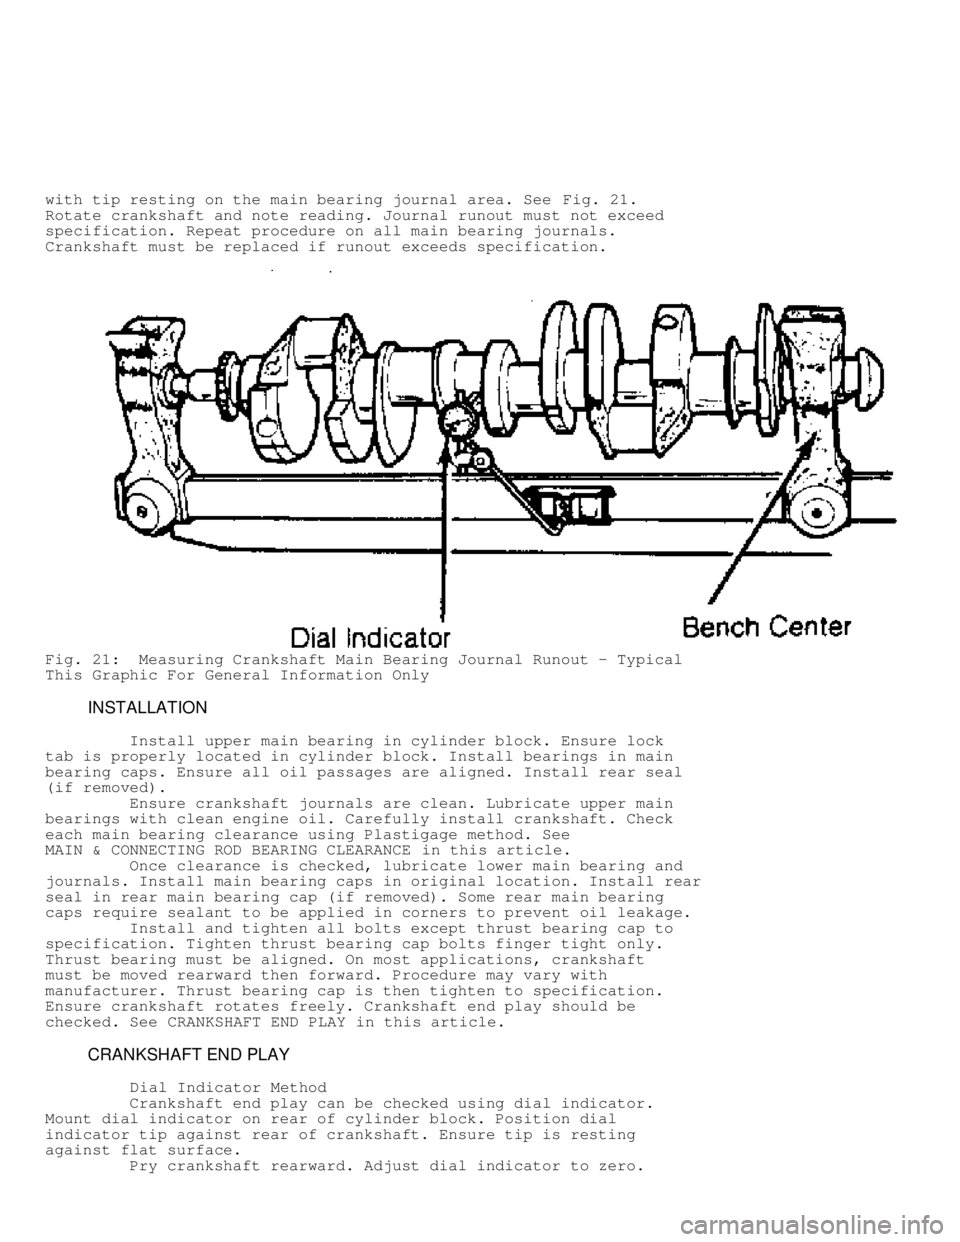
with tip resting on the main bearing journal area. See Fig. 21.
Rotate crankshaft and note reading. Journal runout must not exceed
specification. Repeat procedure on all main bearing journals.
Crankshaft must be replaced if runout exceeds specification.
Fig. 21: Measuring Crankshaft Main Bearing Journal Runout - Typical
This Graphic For General Information Only
INSTALLATION
Install upper main bearing in cylinder block. Ensure lock
tab is properly located in cylinder block. Install bearings in main
bearing caps. Ensure all oil passages are aligned. Install rear seal
(if removed).
Ensure crankshaft journals are clean. Lubricate upper main
bearings with clean engine oil. Carefully install crankshaft. Check
each main bearing clearance using Plastigage method. See
MAIN & CONNECTING ROD BEARING CLEARANCE in this article.
Once clearance is checked, lubricate lower main bearing and
journals. Install main bearing caps in original location. Install rear
seal in rear main bearing cap (if removed). Some rear main bearing
caps require sealant to be applied in corners to prevent oil leakage.
Install and tighten all bolts except thrust bearing cap to
specification. Tighten thrust bearing cap bolts finger tight only.
Thrust bearing must be aligned. On most applications, crankshaft
must be moved rearward then forward. Procedure may vary with
manufacturer. Thrust bearing cap is then tighten to specification.
Ensure crankshaft rotates freely. Crankshaft end play should be
checked. See CRANKSHAFT END PLAY in this article.
CRANKSHAFT END PLAY
Dial Indicator Method
Crankshaft end play can be checked using dial indicator.
Mount dial indicator on rear of cylinder block. Position dial
indicator tip against rear of crankshaft. Ensure tip is resting
against flat surface.
Pry crankshaft rearward. Adjust dial indicator to zero.
Page 690 of 1691
Pry crankshaft forward and note reading. Crankshaft end play must be
within specification. If end play is not within specification, check
for faulty thrust bearing installation or worn crankshaft. Some
applications offer oversized thrust bearings.
Feeler Gauge Method
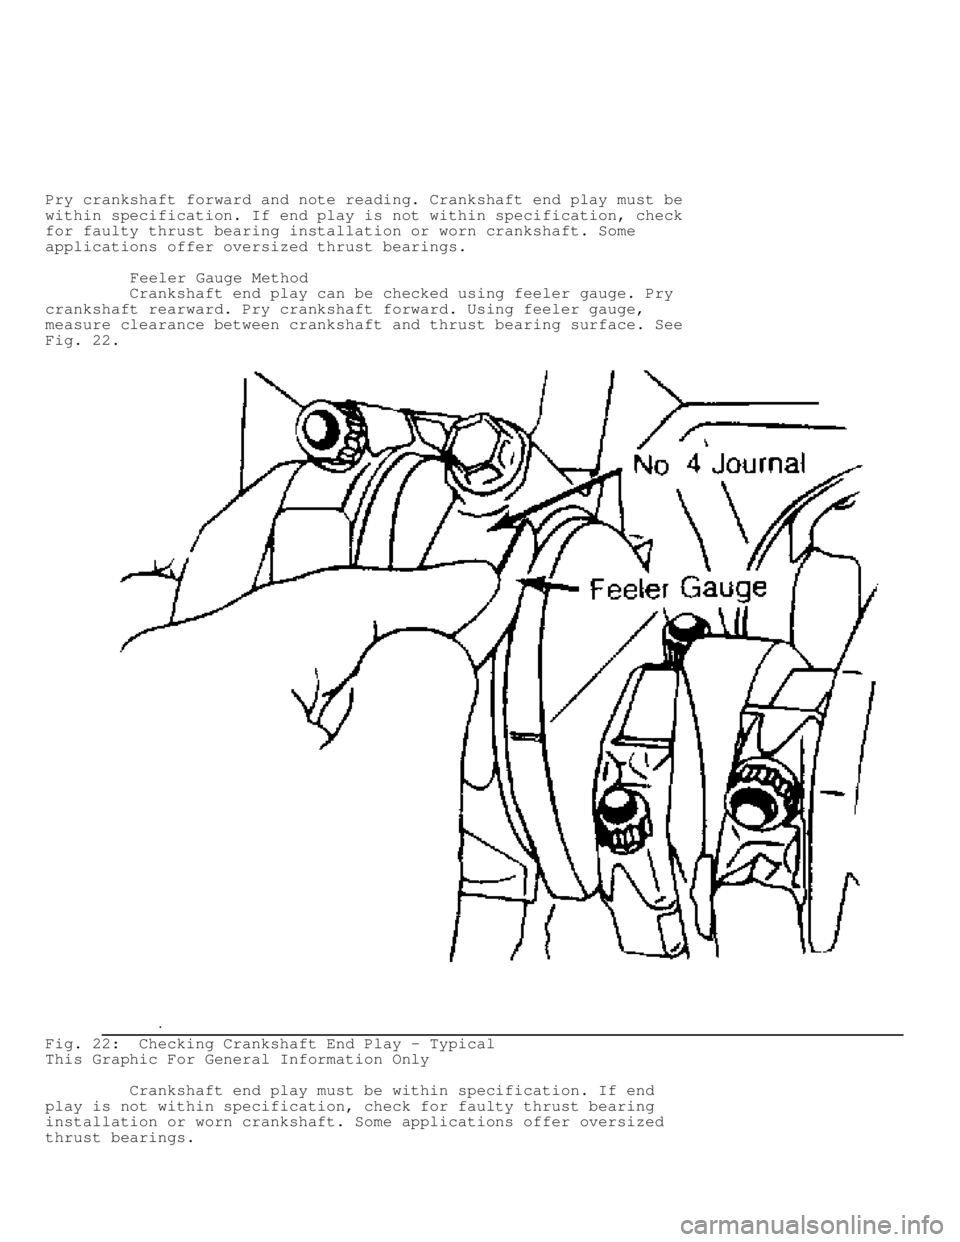
Crankshaft end play can be checked using feeler gauge. Pry
crankshaft rearward. Pry crankshaft forward. Using feeler gauge,
measure clearance between crankshaft and thrust bearing surface. See
Fig. 22 .
Fig. 22: Checking Crankshaft End Play - Typical
This Graphic For General Information Only
Crankshaft end play must be within specification. If end
play is not within specification, check for faulty thrust bearing
installation or worn crankshaft. Some applications offer oversized
thrust bearings.