check engine DODGE RAM 2003 Service Repair Manual
[x] Cancel search | Manufacturer: DODGE, Model Year: 2003, Model line: RAM, Model: DODGE RAM 2003Pages: 2895, PDF Size: 83.15 MB
Page 2222 of 2895
STANDARD PROCEDURE - FLUID AND FILTER
REPLACEMENT
For proper service intervals (Refer to LUBRICA-
TION & MAINTENANCE/MAINTENANCE SCHED-
ULES - DESCRIPTION). The service fluid fill after a
filter change is approximately 3.8 liters (4.0 quarts).
REMOVAL
(1) Hoist and support vehicle on safety stands.
(2) Place a large diameter shallow drain pan
beneath the transmission pan.
(3) Remove bolts holding front and sides of pan to
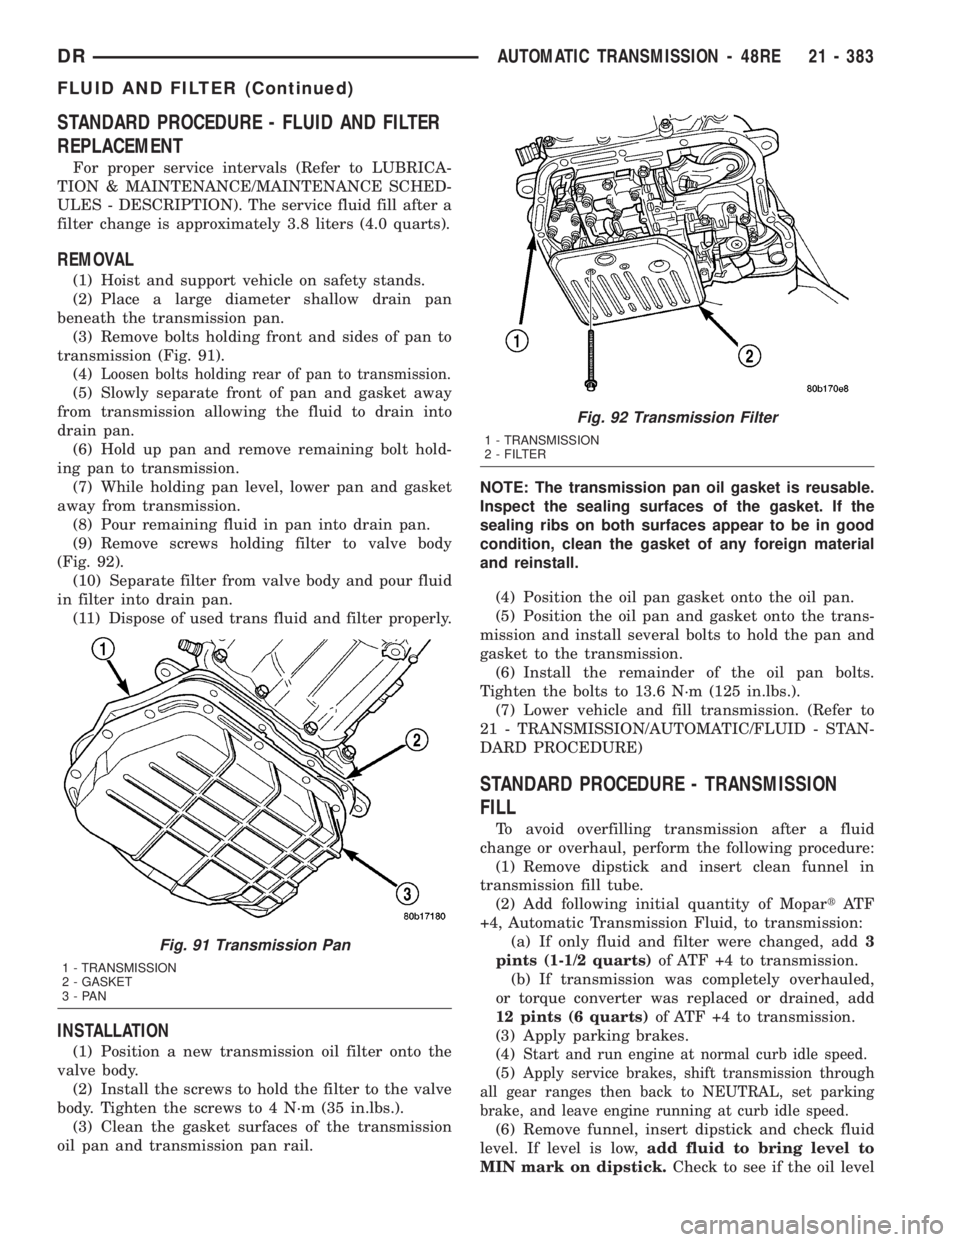
transmission (Fig. 91).
(4)
Loosen bolts holding rear of pan to transmission.
(5) Slowly separate front of pan and gasket away
from transmission allowing the fluid to drain into
drain pan.
(6) Hold up pan and remove remaining bolt hold-
ing pan to transmission.
(7) While holding pan level, lower pan and gasket
away from transmission.
(8) Pour remaining fluid in pan into drain pan.
(9) Remove screws holding filter to valve body
(Fig. 92).
(10) Separate filter from valve body and pour fluid
in filter into drain pan.
(11) Dispose of used trans fluid and filter properly.
INSTALLATION
(1) Position a new transmission oil filter onto the
valve body.
(2) Install the screws to hold the filter to the valve
body. Tighten the screws to 4 N´m (35 in.lbs.).
(3) Clean the gasket surfaces of the transmission
oil pan and transmission pan rail.NOTE: The transmission pan oil gasket is reusable.
Inspect the sealing surfaces of the gasket. If the
sealing ribs on both surfaces appear to be in good
condition, clean the gasket of any foreign material
and reinstall.
(4) Position the oil pan gasket onto the oil pan.
(5) Position the oil pan and gasket onto the trans-
mission and install several bolts to hold the pan and
gasket to the transmission.
(6) Install the remainder of the oil pan bolts.
Tighten the bolts to 13.6 N´m (125 in.lbs.).
(7) Lower vehicle and fill transmission. (Refer to
21 - TRANSMISSION/AUTOMATIC/FLUID - STAN-
DARD PROCEDURE)
STANDARD PROCEDURE - TRANSMISSION
FILL
To avoid overfilling transmission after a fluid
change or overhaul, perform the following procedure:
(1) Remove dipstick and insert clean funnel in
transmission fill tube.
(2) Add following initial quantity of MopartAT F
+4, Automatic Transmission Fluid, to transmission:
(a) If only fluid and filter were changed, add3
pints (1-1/2 quarts)of ATF +4 to transmission.
(b) If transmission was completely overhauled,
or torque converter was replaced or drained, add
12 pints (6 quarts)of ATF +4 to transmission.
(3) Apply parking brakes.
(4)
Start and run engine at normal curb idle speed.
(5)Apply service brakes, shift transmission through
all gear ranges then back to NEUTRAL, set parking
brake, and leave engine running at curb idle speed.
(6) Remove funnel, insert dipstick and check fluid
level. If level is low,add fluid to bring level to
MIN mark on dipstick.Check to see if the oil level
Fig. 91 Transmission Pan
1 - TRANSMISSION
2 - GASKET
3-PAN
Fig. 92 Transmission Filter
1 - TRANSMISSION
2 - FILTER
DRAUTOMATIC TRANSMISSION - 48RE 21 - 383
FLUID AND FILTER (Continued)
Page 2223 of 2895
is equal on both sides of the dipstick. If one side is
noticably higher than the other, the dipstick has
picked up some oil from the dipstick tube. Allow the
oil to drain down the dipstick tube and re-check.
(7) Drive vehicle until transmission fluid is at nor-
mal operating temperature.
(8) With the engine running at curb idle speed, the
gear selector in NEUTRAL, and the parking brake
applied, check the transmission fluid level.
CAUTION: Do not overfill transmission, fluid foam-
ing and shifting problems can result.
(9)
Add fluid to bring level up to MAX arrow mark.
When fluid level is correct, shut engine off, release
park brake, remove funnel, and install dipstick in fill
tube.
FRONT CLUTCH
DESCRIPTION
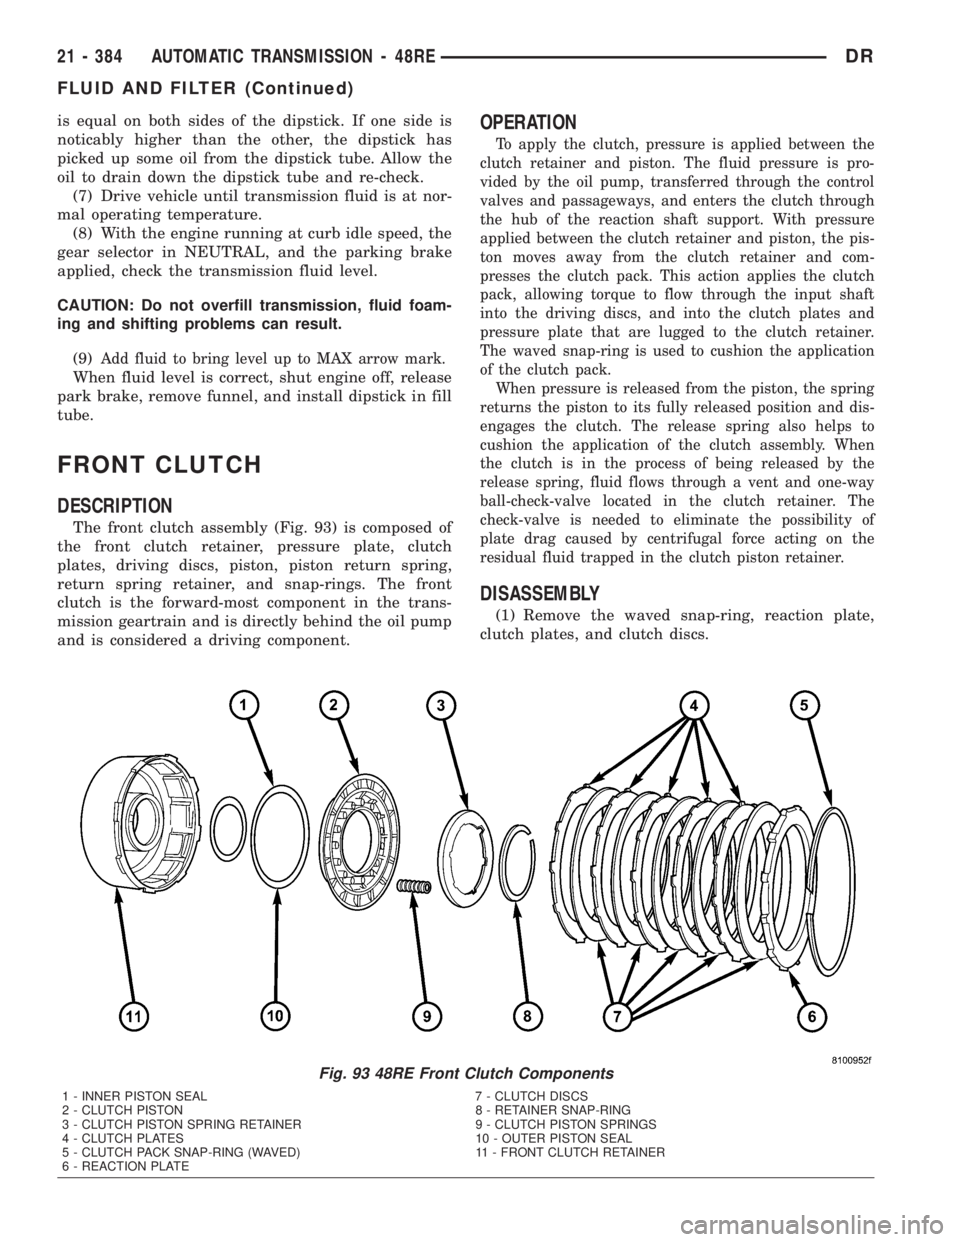
The front clutch assembly (Fig. 93) is composed of
the front clutch retainer, pressure plate, clutch
plates, driving discs, piston, piston return spring,
return spring retainer, and snap-rings. The front
clutch is the forward-most component in the trans-
mission geartrain and is directly behind the oil pump
and is considered a driving component.
OPERATION
To apply the clutch, pressure is applied between the
clutch retainer and piston. The fluid pressure is pro-
vided by the oil pump, transferred through the control
valves and passageways, and enters the clutch through
the hub of the reaction shaft support. With pressure
applied between the clutch retainer and piston, the pis-
ton moves away from the clutch retainer and com-
presses the clutch pack. This action applies the clutch
pack, allowing torque to flow through the input shaft
into the driving discs, and into the clutch plates and
pressure plate that are lugged to the clutch retainer.
The waved snap-ring is used to cushion the application
of the clutch pack.
When pressure is released from the piston, the spring
returns the piston to its fully released position and dis-
engages the clutch. The release spring also helps to
cushion the application of the clutch assembly. When
the clutch is in the process of being released by the
release spring, fluid flows through a vent and one-way
ball-check-valve located in the clutch retainer. The
check-valve is needed to eliminate the possibility of
plate drag caused by centrifugal force acting on the
residual fluid trapped in the clutch piston retainer.
DISASSEMBLY
(1) Remove the waved snap-ring, reaction plate,
clutch plates, and clutch discs.
Fig. 93 48RE Front Clutch Components
1 - INNER PISTON SEAL 7 - CLUTCH DISCS
2 - CLUTCH PISTON 8 - RETAINER SNAP-RING
3 - CLUTCH PISTON SPRING RETAINER 9 - CLUTCH PISTON SPRINGS
4 - CLUTCH PLATES 10 - OUTER PISTON SEAL
5 - CLUTCH PACK SNAP-RING (WAVED) 11 - FRONT CLUTCH RETAINER
6 - REACTION PLATE
21 - 384 AUTOMATIC TRANSMISSION - 48REDR
FLUID AND FILTER (Continued)
Page 2226 of 2895
(11) Install reaction plate followed by waved snap-
ring.
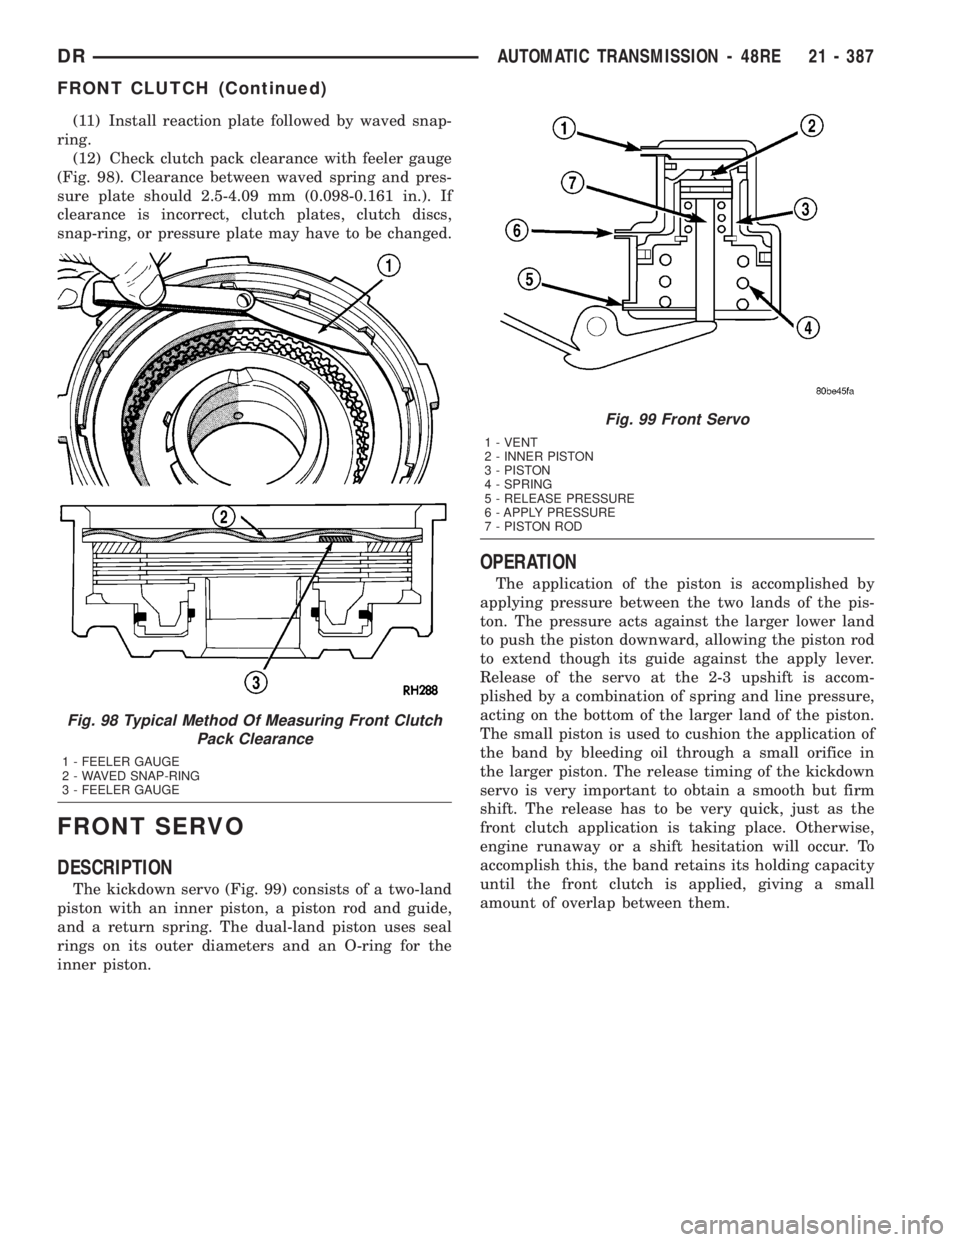
(12) Check clutch pack clearance with feeler gauge
(Fig. 98). Clearance between waved spring and pres-
sure plate should 2.5-4.09 mm (0.098-0.161 in.). If
clearance is incorrect, clutch plates, clutch discs,
snap-ring, or pressure plate may have to be changed.
FRONT SERVO
DESCRIPTION
The kickdown servo (Fig. 99) consists of a two-land
piston with an inner piston, a piston rod and guide,
and a return spring. The dual-land piston uses seal
rings on its outer diameters and an O-ring for the
inner piston.
OPERATION
The application of the piston is accomplished by
applying pressure between the two lands of the pis-
ton. The pressure acts against the larger lower land
to push the piston downward, allowing the piston rod
to extend though its guide against the apply lever.
Release of the servo at the 2-3 upshift is accom-
plished by a combination of spring and line pressure,
acting on the bottom of the larger land of the piston.
The small piston is used to cushion the application of
the band by bleeding oil through a small orifice in
the larger piston. The release timing of the kickdown
servo is very important to obtain a smooth but firm
shift. The release has to be very quick, just as the
front clutch application is taking place. Otherwise,
engine runaway or a shift hesitation will occur. To
accomplish this, the band retains its holding capacity
until the front clutch is applied, giving a small
amount of overlap between them.
Fig. 98 Typical Method Of Measuring Front Clutch
Pack Clearance
1 - FEELER GAUGE
2 - WAVED SNAP-RING
3 - FEELER GAUGE
Fig. 99 Front Servo
1 - VENT
2 - INNER PISTON
3 - PISTON
4 - SPRING
5 - RELEASE PRESSURE
6 - APPLY PRESSURE
7 - PISTON ROD
DRAUTOMATIC TRANSMISSION - 48RE 21 - 387
FRONT CLUTCH (Continued)
Page 2230 of 2895
(4) Raise the vehicle.
(5) Place the transmission manual shift lever in
the ªPARKº detent (rearmost) position and rotate
prop shaft to ensure transmission is in PARK.
(6) Route the gearshift cable through the transmis-
sion mounting bracket and secure the cable by snap-
ping the cable retaining ears into the transmission
bracket and snapping the cable eyelet on the manual
shift lever ball stud.
(7) Lower vehicle.
(8) Lock the shift cable adjustment by pressing the
cable adjuster lock tab downward until it snaps into
place.
(9) Check for proper operation of the transmission
range sensor.
(10) Adjust the gearshift cable and BTSI mecha-
nism as necessary.
ADJUSTMENTS
GEARSHIFT CABLE
Check adjustment by starting the engine in PARK
and NEUTRAL. Adjustment is CORRECT if the
engine starts only in these positions. Adjustment is
INCORRECT if the engine starts in one but not both
positions. If the engine starts in any position other
than PARK or NEUTRAL, or if the engine will not
start at all, the transmission range sensor may be
faulty.
Gearshift Adjustment Procedure
(1) Shift transmission into PARK.
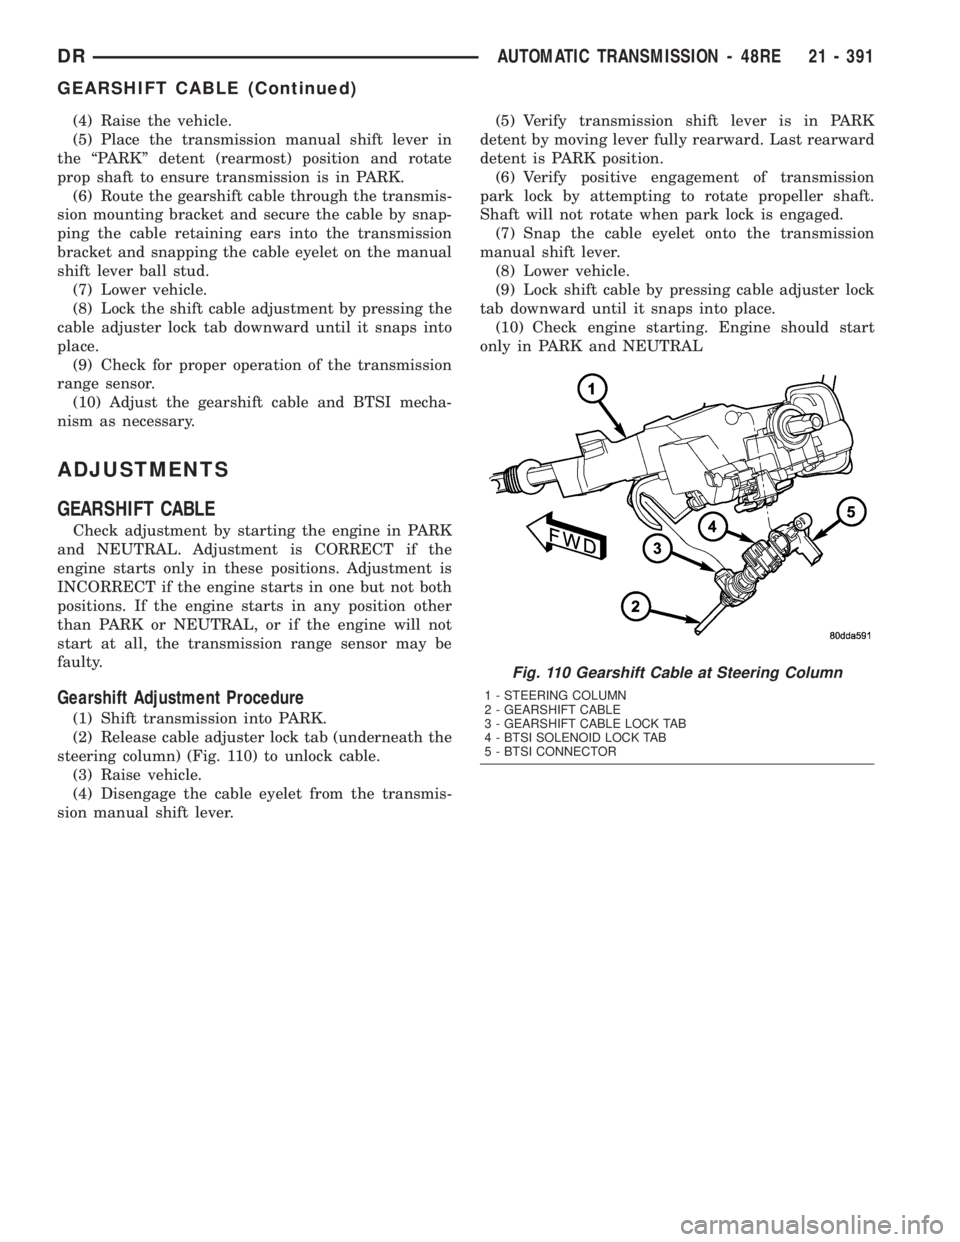
(2) Release cable adjuster lock tab (underneath the
steering column) (Fig. 110) to unlock cable.
(3) Raise vehicle.
(4) Disengage the cable eyelet from the transmis-
sion manual shift lever.(5) Verify transmission shift lever is in PARK
detent by moving lever fully rearward. Last rearward
detent is PARK position.
(6) Verify positive engagement of transmission
park lock by attempting to rotate propeller shaft.
Shaft will not rotate when park lock is engaged.
(7) Snap the cable eyelet onto the transmission
manual shift lever.
(8) Lower vehicle.
(9) Lock shift cable by pressing cable adjuster lock
tab downward until it snaps into place.
(10) Check engine starting. Engine should start
only in PARK and NEUTRAL
Fig. 110 Gearshift Cable at Steering Column
1 - STEERING COLUMN
2 - GEARSHIFT CABLE
3 - GEARSHIFT CABLE LOCK TAB
4 - BTSI SOLENOID LOCK TAB
5 - BTSI CONNECTOR
DRAUTOMATIC TRANSMISSION - 48RE 21 - 391
GEARSHIFT CABLE (Continued)
Page 2265 of 2895
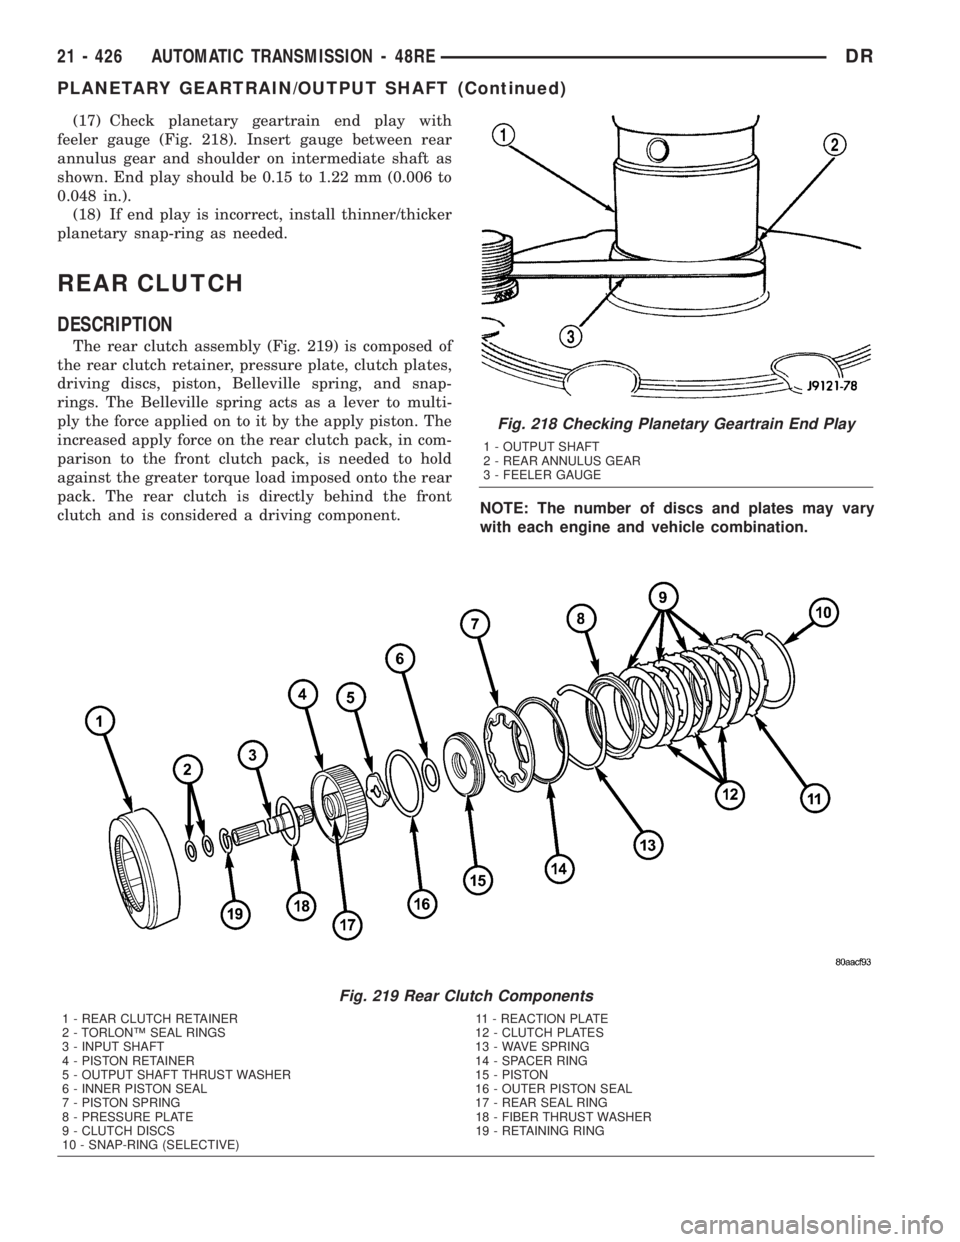
(17) Check planetary geartrain end play with
feeler gauge (Fig. 218). Insert gauge between rear
annulus gear and shoulder on intermediate shaft as
shown. End play should be 0.15 to 1.22 mm (0.006 to
0.048 in.).
(18) If end play is incorrect, install thinner/thicker
planetary snap-ring as needed.
REAR CLUTCH
DESCRIPTION
The rear clutch assembly (Fig. 219) is composed of
the rear clutch retainer, pressure plate, clutch plates,
driving discs, piston, Belleville spring, and snap-
rings. The Belleville spring acts as a lever to multi-
ply the force applied on to it by the apply piston. The
increased apply force on the rear clutch pack, in com-
parison to the front clutch pack, is needed to hold
against the greater torque load imposed onto the rear
pack. The rear clutch is directly behind the front
clutch and is considered a driving component.NOTE: The number of discs and plates may vary
with each engine and vehicle combination.
Fig. 218 Checking Planetary Geartrain End Play
1 - OUTPUT SHAFT
2 - REAR ANNULUS GEAR
3 - FEELER GAUGE
Fig. 219 Rear Clutch Components
1 - REAR CLUTCH RETAINER 11 - REACTION PLATE
2 - TORLONŸ SEAL RINGS 12 - CLUTCH PLATES
3 - INPUT SHAFT 13 - WAVE SPRING
4 - PISTON RETAINER 14 - SPACER RING
5 - OUTPUT SHAFT THRUST WASHER 15 - PISTON
6 - INNER PISTON SEAL 16 - OUTER PISTON SEAL
7 - PISTON SPRING 17 - REAR SEAL RING
8 - PRESSURE PLATE 18 - FIBER THRUST WASHER
9 - CLUTCH DISCS 19 - RETAINING RING
10 - SNAP-RING (SELECTIVE)
21 - 426 AUTOMATIC TRANSMISSION - 48REDR
PLANETARY GEARTRAIN/OUTPUT SHAFT (Continued)
Page 2273 of 2895
in an incorrect T.V. cable adjustment.Slide the
sheath of the T.V. cable (D) back and forth until the
centerlines of the T.V. cable end (B) and the throttle
bell crank lever (C) are aligned within one millimeter
(1mm) (Fig. 232).
(7) While holding the T.V. cable in the set position
push the T.V. cable lock (A) into the down position
(Fig. 232). This will lock the present T.V. cable
adjustment.
NOTE: Be sure that as the cable is pulled forward
and centered on the throttle lever stud, the cable
housing moves smoothly with the cable. Due to the
angle at which the cable housing enters the spring
housing, the cable housing may bind slightly and
create an incorrect adjustment.
(8) Reconnect the T.V. cable (B) to the throttle
bellcrank lever (C).
(9) Check cable adjustment. Verify transmission
throttle lever and lever on throttle body move simul-
taneously.
TORQUE CONVERTER
DESCRIPTION
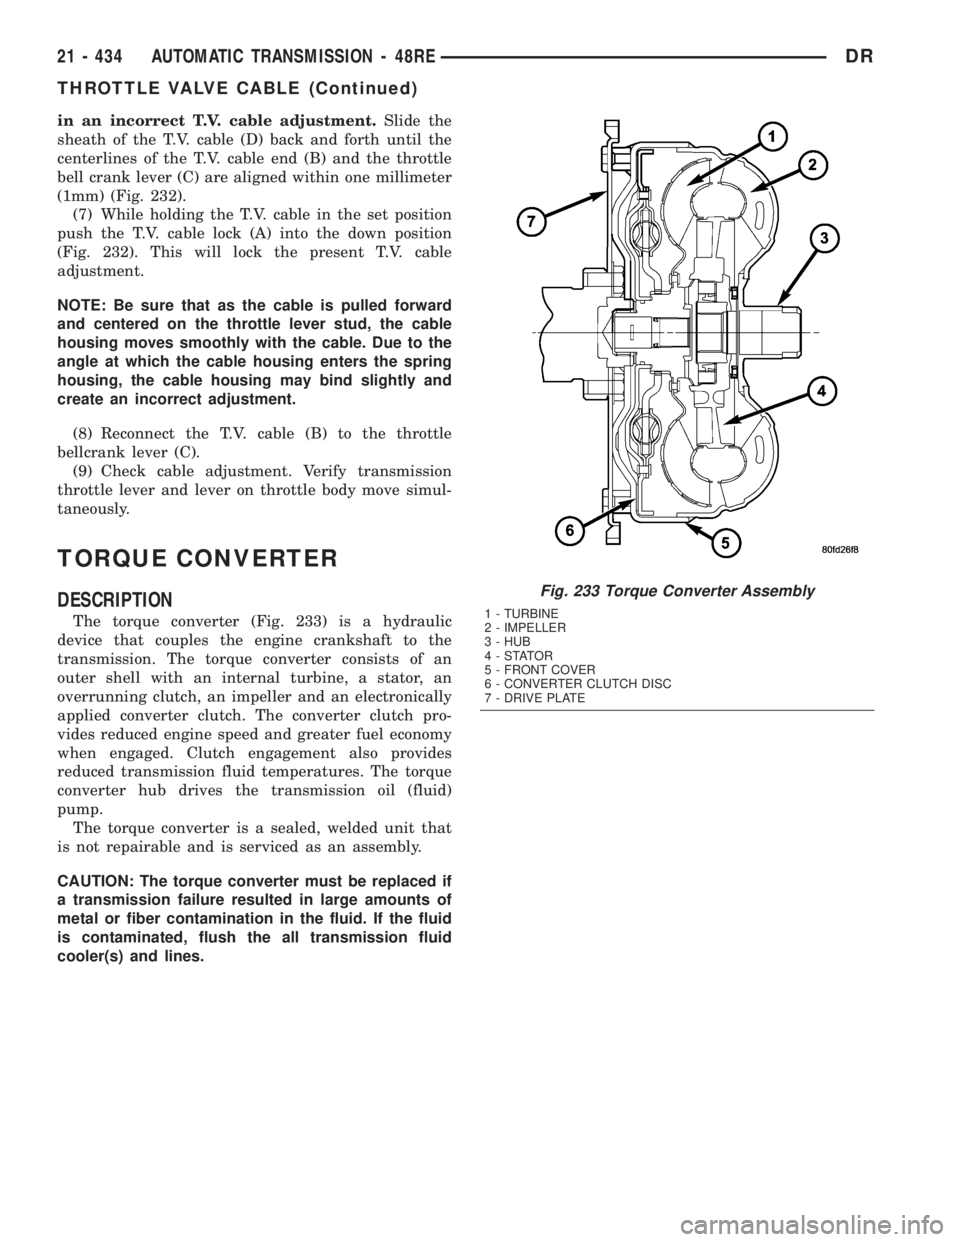
The torque converter (Fig. 233) is a hydraulic
device that couples the engine crankshaft to the
transmission. The torque converter consists of an
outer shell with an internal turbine, a stator, an
overrunning clutch, an impeller and an electronically
applied converter clutch. The converter clutch pro-
vides reduced engine speed and greater fuel economy
when engaged. Clutch engagement also provides
reduced transmission fluid temperatures. The torque
converter hub drives the transmission oil (fluid)
pump.
The torque converter is a sealed, welded unit that
is not repairable and is serviced as an assembly.
CAUTION: The torque converter must be replaced if
a transmission failure resulted in large amounts of
metal or fiber contamination in the fluid. If the fluid
is contaminated, flush the all transmission fluid
cooler(s) and lines.
Fig. 233 Torque Converter Assembly
1 - TURBINE
2 - IMPELLER
3 - HUB
4-STATOR
5 - FRONT COVER
6 - CONVERTER CLUTCH DISC
7 - DRIVE PLATE
21 - 434 AUTOMATIC TRANSMISSION - 48REDR
THROTTLE VALVE CABLE (Continued)
Page 2278 of 2895
STATOR
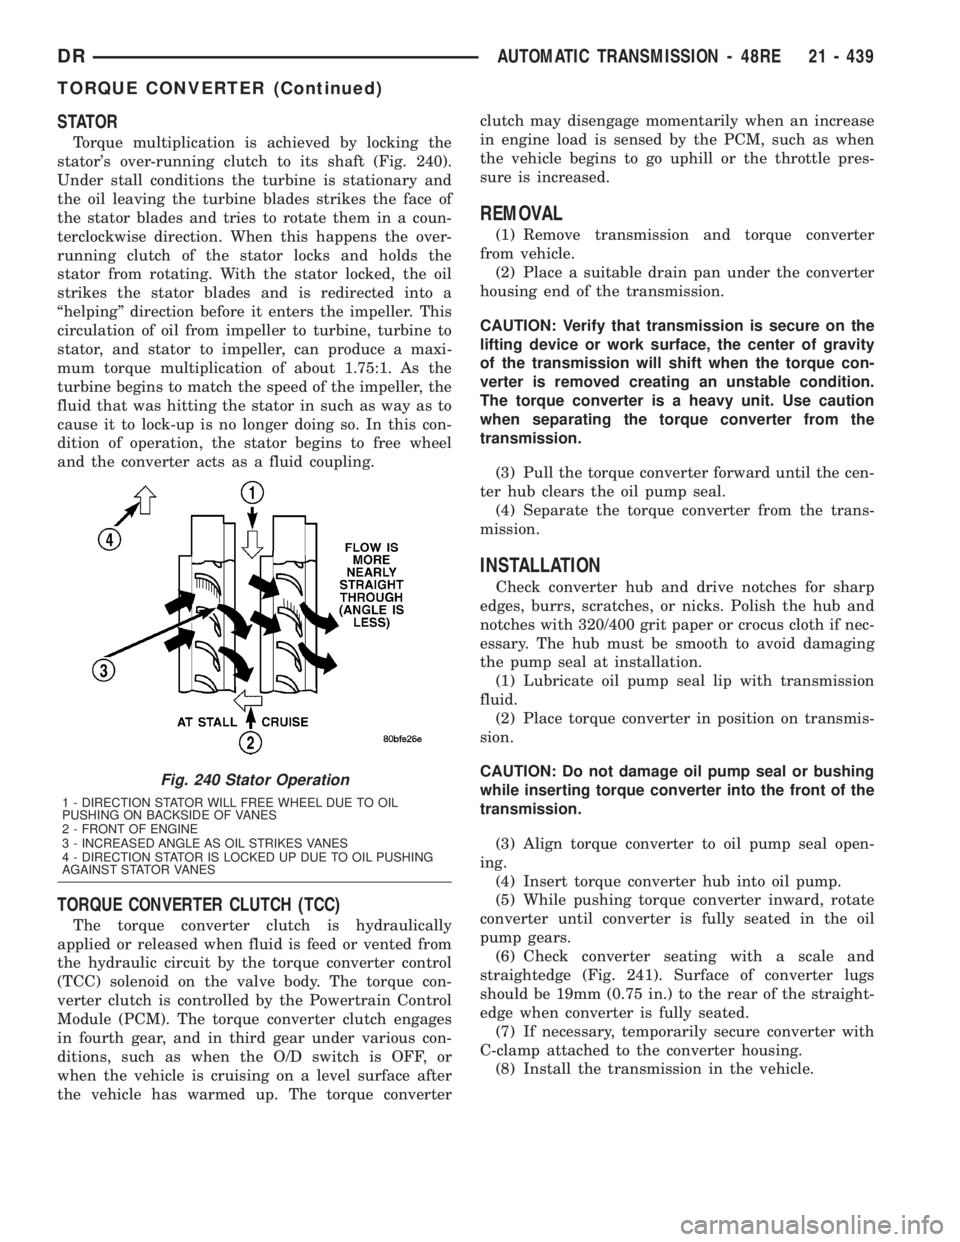
Torque multiplication is achieved by locking the
stator's over-running clutch to its shaft (Fig. 240).
Under stall conditions the turbine is stationary and
the oil leaving the turbine blades strikes the face of
the stator blades and tries to rotate them in a coun-
terclockwise direction. When this happens the over-
running clutch of the stator locks and holds the
stator from rotating. With the stator locked, the oil
strikes the stator blades and is redirected into a
ªhelpingº direction before it enters the impeller. This
circulation of oil from impeller to turbine, turbine to
stator, and stator to impeller, can produce a maxi-
mum torque multiplication of about 1.75:1. As the
turbine begins to match the speed of the impeller, the
fluid that was hitting the stator in such as way as to
cause it to lock-up is no longer doing so. In this con-
dition of operation, the stator begins to free wheel
and the converter acts as a fluid coupling.
TORQUE CONVERTER CLUTCH (TCC)
The torque converter clutch is hydraulically
applied or released when fluid is feed or vented from
the hydraulic circuit by the torque converter control
(TCC) solenoid on the valve body. The torque con-
verter clutch is controlled by the Powertrain Control
Module (PCM). The torque converter clutch engages
in fourth gear, and in third gear under various con-
ditions, such as when the O/D switch is OFF, or
when the vehicle is cruising on a level surface after
the vehicle has warmed up. The torque converterclutch may disengage momentarily when an increase
in engine load is sensed by the PCM, such as when
the vehicle begins to go uphill or the throttle pres-
sure is increased.
REMOVAL
(1) Remove transmission and torque converter
from vehicle.
(2) Place a suitable drain pan under the converter
housing end of the transmission.
CAUTION: Verify that transmission is secure on the
lifting device or work surface, the center of gravity
of the transmission will shift when the torque con-
verter is removed creating an unstable condition.
The torque converter is a heavy unit. Use caution
when separating the torque converter from the
transmission.
(3) Pull the torque converter forward until the cen-
ter hub clears the oil pump seal.
(4) Separate the torque converter from the trans-
mission.
INSTALLATION
Check converter hub and drive notches for sharp
edges, burrs, scratches, or nicks. Polish the hub and
notches with 320/400 grit paper or crocus cloth if nec-
essary. The hub must be smooth to avoid damaging
the pump seal at installation.
(1) Lubricate oil pump seal lip with transmission
fluid.
(2) Place torque converter in position on transmis-
sion.
CAUTION: Do not damage oil pump seal or bushing
while inserting torque converter into the front of the
transmission.
(3) Align torque converter to oil pump seal open-
ing.
(4) Insert torque converter hub into oil pump.
(5) While pushing torque converter inward, rotate
converter until converter is fully seated in the oil
pump gears.
(6) Check converter seating with a scale and
straightedge (Fig. 241). Surface of converter lugs
should be 19mm (0.75 in.) to the rear of the straight-
edge when converter is fully seated.
(7) If necessary, temporarily secure converter with
C-clamp attached to the converter housing.
(8) Install the transmission in the vehicle.
Fig. 240 Stator Operation
1 - DIRECTION STATOR WILL FREE WHEEL DUE TO OIL
PUSHING ON BACKSIDE OF VANES
2 - FRONT OF ENGINE
3 - INCREASED ANGLE AS OIL STRIKES VANES
4 - DIRECTION STATOR IS LOCKED UP DUE TO OIL PUSHING
AGAINST STATOR VANES
DRAUTOMATIC TRANSMISSION - 48RE 21 - 439
TORQUE CONVERTER (Continued)
Page 2289 of 2895
OPERATION
NOTE: Refer to the Hydraulic Schematics for a
visual aid in determining valve location, operation
and design.
CHECK BALLS
CHECK BALL
NUMBERDESCRIPTION
1 Allows either the manual valve to put line pressure on the 1-2 governor plug or the KD Valve to
put WOT line pressure on the 1-2 governor plug.
3 Allows either the Reverse circuit or the 3rd gear circuit to pressurize the front clutch.
4 Allows either the Manual Low circuit from the Manual Valve or the Reverse from the Manual
Valve circuit to pressurize the rear servo.
5 Directs line pressure to the spring end of the 2-3 shift valve in either Manual Low or Manual
2nd, forcing the downshift to 2nd gear regardless of governor pressure.
6 Provides a by-pass around the front servo orifice so that the servo can release quickly.
7 Provides a by-pass around the rear clutch orifice so that the clutch can release quickly.
8 Directs reverse line pressure through an orifice to the throttle valve eliminating the extra
leakage and insuring that Reverse line pressure pressure will be sufficient.
9 Provides a by-pass around the rear servo orifice so that the servo can release quickly.
10 Allows the lockup clutch to used at WOT in 3rd gear by putting line pressure from the 3-4
Timing Valve on the interlock area of the 2-3 shift valve, thereby preventing a 3rd gear Lock-up
to 2nd gear kickdown.
REGULATOR VALVE
The pressure regulator valve is needed to control
the hydraulic pressure within the system and reduce
the amount of heat produced in the fluid. The pres-
sure regulator valve is located in the valve body near
the manual valve. The pressure regulator valve train
controls the maximum pressure in the lines by
metering the dumping of fluid back into the sump.
Regulated pressure is referred to as ªline pressure.º
The regulator valve (Fig. 255) has a spring on one
end that pushes the valve to the left. This closes a
dump (vent) that is used to lower pressure. The clos-
ing of the dump will cause the oil pressure to
increase. Oil pressure on the opposite end of the
valve pushes the valve to the right, opening the
dump and lowering oil pressure. The result is spring
pressure working against oil pressure to maintain
the oil at specific pressures. With the engine run-
ning, fluid flows from the pump to the pressure reg-
ulator valve, manual valve, and the interconnected
circuits. As fluid is sent through passages to the reg-
ulator valve, the pressure pushes the valve to the
right against the large spring. It is also sent to the
reaction areas on the left side of the throttle pressure
plug and the line pressure plug. With the gear selec-tor in the PARK position, fluid recirculates through
the regulator and manual valves back to the sump.
Meanwhile, the torque converter is filled slowly. In
all other gear positions (Fig. 256), fluid flows
between two right side lands to the switch valve and
torque converter. At low pump speeds, the flow is
controlled by the pressure valve groove to reduce
pressure to the torque converter. After the torque
converter and switch valve fill with fluid, the switch
valve becomes the controlling metering device for
torque converter pressure. The regulator valve then
begins to control the line pressure for the other
transmission circuits. The balance of the fluid pres-
sure pushing the valve to the right and the spring
pressure pushing to the left determines the size of
the metering passage at land #2 (land #1 being at
the far right of the valve in the diagram). As fluid
leaks past the land, it moves into a groove connected
to the filter or sump. As the land meters the fluid to
the sump, it causes the pressure to reduce and the
spring decreases the size of the metering passage.
When the size of the metering passage is reduced,
the pressure rises again and the size of the land is
increased again. Pressure is regulated by this con-
stant balance of hydraulic and spring pressure.
21 - 450 AUTOMATIC TRANSMISSION - 48REDR
VALVE BODY (Continued)
Page 2330 of 2895
DIAGNOSIS AND TESTING
DIAGNOSIS AND TESTING - AUTOMATIC
TRANSMISSION
CAUTION: Before attempting any repair on a RFE
automatic transmission, check for Diagnostic Trou-
ble Codes with the DRBTscan tool.
Transmission malfunctions may be caused by these
general conditions:
²Poor engine performance
²Improper adjustments
²Hydraulic malfunctions
²Mechanical malfunctions
²Electronic malfunctions
Diagnosis of these problems should always begin
by checking the easily accessible variables: fluid level
and condition, gearshift cable adjustment. Then per-
form a road test to determine if the problem has been
corrected or if more diagnosis is necessary. If the
problem persists after the preliminary tests and cor-
rections are completed, hydraulic pressure checks
should be performed.
DIAGNOSIS AND TESTING - PRELIMINARY
Two basic procedures are required. One procedure
for vehicles that are drivable and an alternate proce-
dure for disabled vehicles (will not back up or move
forward).
VEHICLE IS DRIVABLE
(1) Check for transmission fault codes using DRBt
scan tool.
(2) Check fluid level and condition.
(3) Adjust gearshift cable if complaint was based
on delayed, erratic, or harsh shifts.
(4) Road test and note how transmission upshifts,
downshifts, and engages.
(5) Perform hydraulic pressure test if shift prob-
lems were noted during road test.
(6) Perform air-pressure test to check clutch oper-
ation.
VEHICLE IS DISABLED
(1) Check fluid level and condition.
(2) Check for broken or disconnected gearshift
cable.
(3) Check for cracked, leaking cooler lines, or loose
or missing pressure-port plugs.
(4) Raise and support vehicle on safety stands,
start engine, shift transmission into gear, and note
following:
(a) If propeller shaft turns but wheels do not,
problem is with differential or axle shafts.
(b) If propeller shaft does not turn and transmis-
sion is noisy, stop engine. Remove oil pan, and
check for debris. If pan is clear, remove transmis-
sion and check for damaged driveplate, converter,
oil pump, or input shaft.
(c) If propeller shaft does not turn and transmis-
sion is not noisy, perform hydraulic-pressure test to
determine if problem is hydraulic or mechanical.
DIAGNOSIS AND TESTING - ROAD TESTING
Before road testing, be sure the fluid level and con-
trol cable adjustments have been checked and
adjusted if necessary. Verify that all diagnostic trou-
ble codes have been resolved.
Observe engine performance during the road test.
A poorly tuned engine will not allow accurate analy-
sis of transmission operation.
Operate the transmission in all gear ranges. Check
for shift variations and engine flare which indicates
slippage. Note if shifts are harsh, spongy, delayed,
early, or if part throttle downshifts are sensitive.
Slippage indicated by engine flare, usually means
clutch, overrunning clutch, or line pressure problems.
A slipping clutch can often be determined by com-
paring which internal units are applied in the vari-
ous gear ranges. The Clutch Application charts
provide a basis for analyzing road test results.
DRAUTOMATIC TRANSMISSION - 45RFE/545RFE 21 - 491
AUTOMATIC TRANSMISSION - 45RFE/545RFE (Continued)
Page 2332 of 2895
DIAGNOSIS AND TESTING - HYDRAULIC
PRESSURE TEST
An accurate tachometer and pressure test gauges
are required. Test Gauge C-3293-SP has a 300 psi
range and is used at all locations where pressures
exceed 100 psi.
Pressure Test Port Locations
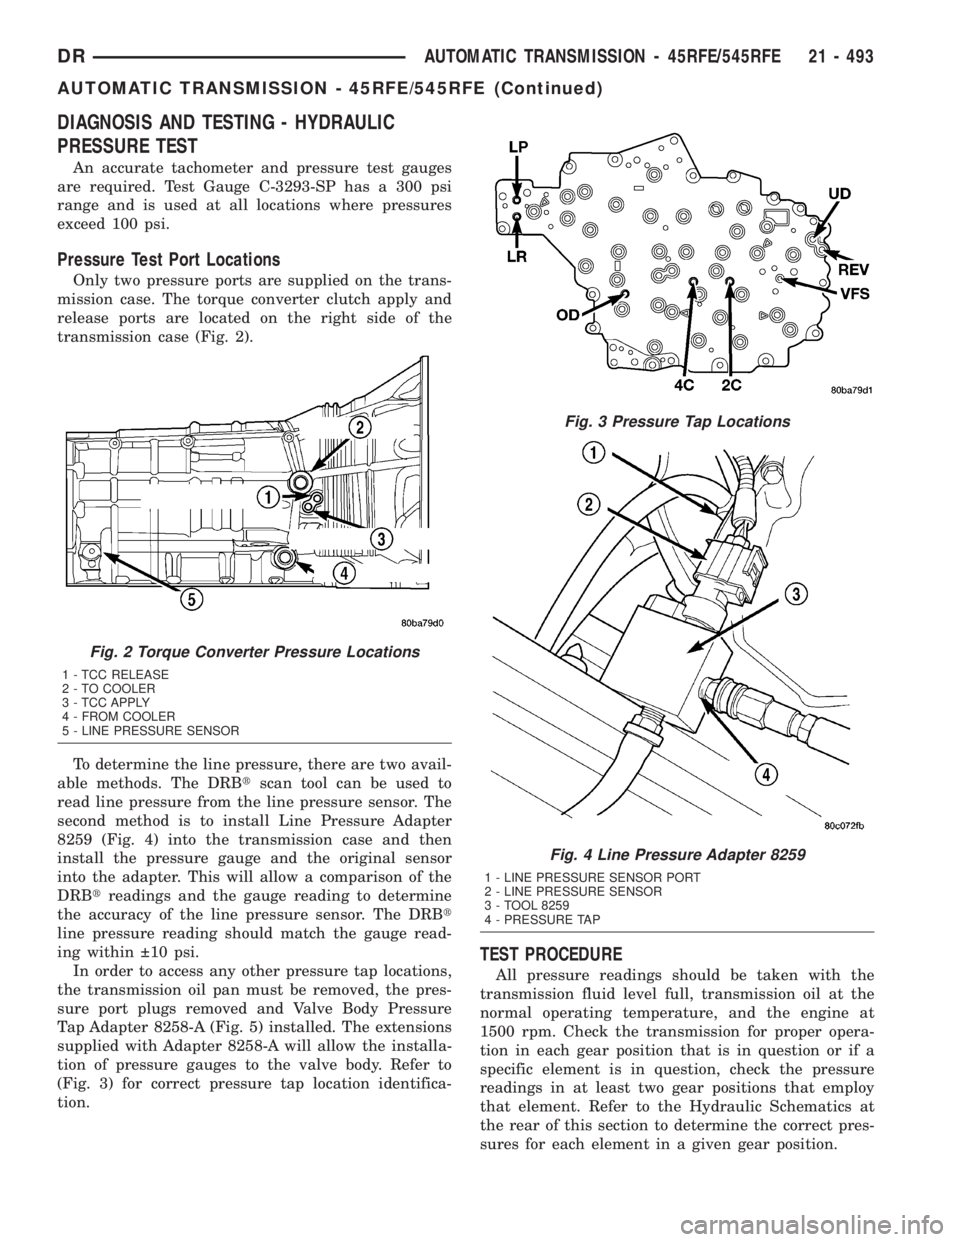
Only two pressure ports are supplied on the trans-
mission case. The torque converter clutch apply and
release ports are located on the right side of the
transmission case (Fig. 2).
To determine the line pressure, there are two avail-
able methods. The DRBtscan tool can be used to
read line pressure from the line pressure sensor. The
second method is to install Line Pressure Adapter
8259 (Fig. 4) into the transmission case and then
install the pressure gauge and the original sensor
into the adapter. This will allow a comparison of the
DRBtreadings and the gauge reading to determine
the accuracy of the line pressure sensor. The DRBt
line pressure reading should match the gauge read-
ing within 10 psi.
In order to access any other pressure tap locations,
the transmission oil pan must be removed, the pres-
sure port plugs removed and Valve Body Pressure
Tap Adapter 8258-A (Fig. 5) installed. The extensions
supplied with Adapter 8258-A will allow the installa-
tion of pressure gauges to the valve body. Refer to
(Fig. 3) for correct pressure tap location identifica-
tion.
TEST PROCEDURE
All pressure readings should be taken with the
transmission fluid level full, transmission oil at the
normal operating temperature, and the engine at
1500 rpm. Check the transmission for proper opera-
tion in each gear position that is in question or if a
specific element is in question, check the pressure
readings in at least two gear positions that employ
that element. Refer to the Hydraulic Schematics at
the rear of this section to determine the correct pres-
sures for each element in a given gear position.
Fig. 2 Torque Converter Pressure Locations
1 - TCC RELEASE
2 - TO COOLER
3 - TCC APPLY
4 - FROM COOLER
5 - LINE PRESSURE SENSOR
Fig. 3 Pressure Tap Locations
Fig. 4 Line Pressure Adapter 8259
1 - LINE PRESSURE SENSOR PORT
2 - LINE PRESSURE SENSOR
3 - TOOL 8259
4 - PRESSURE TAP
DRAUTOMATIC TRANSMISSION - 45RFE/545RFE 21 - 493
AUTOMATIC TRANSMISSION - 45RFE/545RFE (Continued)