Throttle Position Sensor DODGE RAM 2003 Service User Guide
[x] Cancel search | Manufacturer: DODGE, Model Year: 2003, Model line: RAM, Model: DODGE RAM 2003Pages: 2895, PDF Size: 83.15 MB
Page 469 of 2895
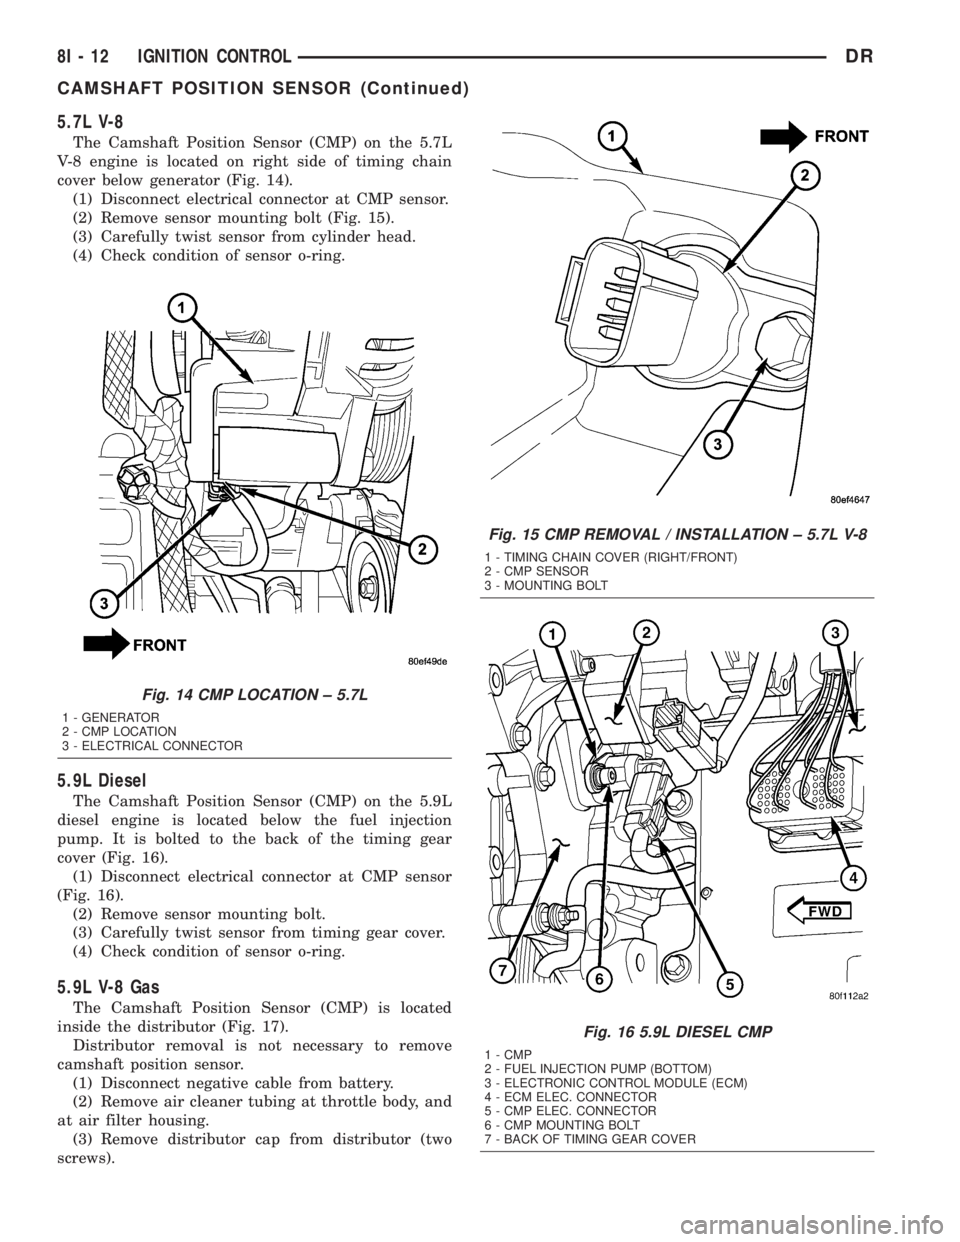
5.7L V-8
The Camshaft Position Sensor (CMP) on the 5.7L
V-8 engine is located on right side of timing chain
cover below generator (Fig. 14).
(1) Disconnect electrical connector at CMP sensor.
(2) Remove sensor mounting bolt (Fig. 15).
(3) Carefully twist sensor from cylinder head.
(4) Check condition of sensor o-ring.
5.9L Diesel
The Camshaft Position Sensor (CMP) on the 5.9L
diesel engine is located below the fuel injection
pump. It is bolted to the back of the timing gear
cover (Fig. 16).
(1) Disconnect electrical connector at CMP sensor
(Fig. 16).
(2) Remove sensor mounting bolt.
(3) Carefully twist sensor from timing gear cover.
(4) Check condition of sensor o-ring.
5.9L V-8 Gas
The Camshaft Position Sensor (CMP) is located
inside the distributor (Fig. 17).
Distributor removal is not necessary to remove
camshaft position sensor.
(1) Disconnect negative cable from battery.
(2) Remove air cleaner tubing at throttle body, and
at air filter housing.
(3) Remove distributor cap from distributor (two
screws).
Fig. 14 CMP LOCATION ± 5.7L
1 - GENERATOR
2 - CMP LOCATION
3 - ELECTRICAL CONNECTOR
Fig. 15 CMP REMOVAL / INSTALLATION ± 5.7L V-8
1 - TIMING CHAIN COVER (RIGHT/FRONT)
2 - CMP SENSOR
3 - MOUNTING BOLT
Fig. 16 5.9L DIESEL CMP
1 - CMP
2 - FUEL INJECTION PUMP (BOTTOM)
3 - ELECTRONIC CONTROL MODULE (ECM)
4 - ECM ELEC. CONNECTOR
5 - CMP ELEC. CONNECTOR
6 - CMP MOUNTING BOLT
7 - BACK OF TIMING GEAR COVER
8I - 12 IGNITION CONTROLDR
CAMSHAFT POSITION SENSOR (Continued)
Page 479 of 2895
4.7L V-8
Battery voltage is supplied to the 8 individual igni-
tion coils from the ASD relay. The Powertrain Con-
trol Module (PCM) opens and closes each ignition coil
ground circuit at a determined time for ignition coil
operation.
Base ignition timing is not adjustable.By con-
trolling the coil ground circuit, the PCM is able to set
the base timing and adjust the ignition timing
advance. This is done to meet changing engine oper-
ating conditions.
The ignition coil is not oil filled. The windings are
embedded in an epoxy compound. This provides heat
and vibration resistance that allows the ignition coil
to be mounted on the engine.
Because of coil design, spark plug cables (second-
ary cables) are not used with the 4.7L V-8 engine.
5.7L V-8
The ignition system is controlled by the Powertrain
Control Module (PCM) on all engines.
A ªwasted sparkº system is used on the 5.7L
engine combining paired, or dual-firing coils, and 2
spark plugs per cylinder. The coils and spark plugs
are connected with paired, secondary high-voltage
cables.
Each cylinder is equipped with 1 dual-output coil.
Meaning one coil mounts directly over one of the
dual spark plugs for 1 high-voltage output. A second
high-voltage output is supplied directly from the
same coil (using a plug cable) to one of the dual
spark plugs on a corresponding (paired) cylinder on
the opposite cylinder bank.
Each coil fires 2 spark plugs simultaneously on
each of the cylinder banks (one cylinder on compres-
sion stroke and one cylinder on exhaust stroke).
EXAMPLE :When the #1 cylinder is on compression
stroke and ready for spark, the #1 coil will fire one of
the dual spark plugs on the #1 cylinder (directly
below the coil). The other dual spark plug on the #1
cylinder will be fired by the #6 coil. At the same
time, the #1 coil will fire a ªwasted sparkº to one of
the dual spark plugs at the #6 cylinder as coil #6 also
fires a ªwasted sparkº to one of the dual spark plugs
at the #6 cylinder.
The firing order is paired at cylinders 1/6, 2/3, 4/7,
5/8. Basic cylinder firing order is 1±8±4±3±6±5±7±2.
Battery voltage is supplied to all of the ignition
coils positive terminals from the ASD relay. If the
PCM does not see a signal from the crankshaft and
camshaft sensors (indicating the ignition key is ON
but the engine is not running), it will shut down the
ASD circuit.
Base ignition timing is not adjustable on the
5.7L V-8 engine.By controlling the coil ground cir-
cuits, the PCM is able to set the base timing andadjust the ignition timing advance. This is done to
meet changing engine operating conditions.
The PCM adjusts ignition timing based on inputs it
receives from:
²The engine coolant temperature sensor
²The crankshaft position sensor (engine speed)
²The camshaft position sensor (crankshaft posi-
tion)
²The manifold absolute pressure (MAP) sensor
²The throttle position sensor
²Transmission gear selection
5.9L V-8
A single ignition coil is used. The Powertrain Con-
trol Module (PCM) opens and closes the ignition coil
ground circuit for ignition coil operation.
Battery voltage is supplied to the ignition coil pos-
itive terminal from the ASD relay. If the PCM does
not see a signal from the crankshaft and camshaft
sensors (indicating the ignition key is ON but the
engine is not running), it will shut down the ASD cir-
cuit.
Base ignition timing is not adjustable on any
engine.By controlling the coil ground circuit, the
PCM is able to set the base timing and adjust the
ignition timing advance. This is done to meet chang-
ing engine operating conditions.
Conventional spark plug cables (secondary cables)
are used with the 5.9L V-8 engine.
8.0L V-10
When one of the 5 independent coils discharges, it
fires two paired cylinders at the same time (one cyl-
inder on compression stroke and the other cylinder
on exhaust stroke).
Coil firing is paired together on cylinders:
²Number 5 and 10
²Number 9 and 8
²Number 1 and 6
²Number 7 and 4
²Number 3 and 2
The ignition system is controlled by the Powertrain
Control Module (PCM) on all engines.
Battery voltage is supplied to all of the ignition
coils positive terminals from the ASD relay. If the
PCM does not see a signal from the crankshaft and
camshaft sensors (indicating the ignition key is ON
but the engine is not running), it will shut down the
ASD circuit.
Conventional spark plug cables (secondary cables)
are used with the 8.0L V-10 engine.
Base ignition timing is not adjustable on the
8.0L V-10 engine.By controlling the coil ground cir-
cuits, the PCM is able to set the base timing and
adjust the ignition timing advance. This is done to
meet changing engine operating conditions.
8I - 22 IGNITION CONTROLDR
IGNITION COIL (Continued)
Page 480 of 2895
The PCM adjusts ignition timing based on inputs it
receives from:
²The engine coolant temperature sensor
²The crankshaft position sensor (engine speed)
²The camshaft position sensor (crankshaft posi-
tion)
²The manifold absolute pressure (MAP) sensor
²The throttle position sensor
²Transmission gear selection
REMOVAL
3.7L V-6
An individual ignition coil is used for each spark
plug (Fig. 30). The coil fits into machined holes in the
cylinder head. A mounting stud/nut secures each coil
to the top of the intake manifold (Fig. 31). The bot-
tom of the coil is equipped with a rubber boot to seal
the spark plug to the coil. Inside each rubber boot is
a spring. The spring is used for a mechanical contact
between the coil and the top of the spark plug. These
rubber boots and springs are a permanent part of the
coil and are not serviced separately. An o-ring (Fig.
30) is used to seal the coil at the opening into the cyl-
inder head.
(1) Depending on which coil is being removed, the
throttle body air intake tube or intake box may need
to be removed to gain access to coil.
(2) Disconnect electrical connector from coil by
pushing downward on release lock on top of connec-
tor and pull connector from coil.
(3) Clean area at base of coil with compressed air
before removal.
(4) Remove coil mounting nut from mounting stud
(Fig. 31).
(5) Carefully pull up coil from cylinder head open-
ing with a slight twisting action.
(6) Remove coil from vehicle.
4.7L V-8
An individual ignition coil is used for each spark
plug (Fig. 30). The coil fits into machined holes in the
cylinder head. A mounting stud/nut secures each coil
to the top of the intake manifold (Fig. 32). The bot-
tom of the coil is equipped with a rubber boot to seal
the spark plug to the coil. Inside each rubber boot is
a spring. The spring is used for a mechanical contact
between the coil and the top of the spark plug. These
rubber boots and springs are a permanent part of the
coil and are not serviced separately. An o-ring (Fig.
30) is used to seal the coil at the opening into the cyl-
inder head.
(1) Depending on which coil is being removed, the
throttle body air intake tube or intake box may need
to be removed to gain access to coil.(2) Disconnect electrical connector (Fig. 32) from
coil by pushing downward on release lock on top of
connector and pull connector from coil.
(3) Clean area at base of coil with compressed air
before removal.
(4) Remove coil mounting nut from mounting stud
(Fig. 32).
(5) Carefully pull up coil from cylinder head open-
ing with a slight twisting action.
(6) Remove coil from vehicle.
5.7L V-8
Before removing or disconnecting any spark plug
cables, note their original position. Remove cables
one-at-a-time. To prevent ignition crossfire, spark
plug cablesMUSTbe placed in cable tray (routing
loom) into their original position.
An individual ignition coil (Fig. 33) is used at each
cylinder. The coil mounts to the top of the valve cover
with 2 bolts (Fig. 34). The bottom of the coil is
equipped with a rubber boot to seal the spark plug to
the coil. Inside each rubber boot is a spring. The
spring is used for a mechanical contact between the
coil and the top of the spark plug.
(1) Depending on which coil is being removed, the
throttle body air intake tube or intake box may need
to be removed to gain access to coil.
(2) Unlock electrical connector (Fig. 34) by moving
slide lock first. Press on release lock (Fig. 34) while
pulling electrical connector from coil.
(3) Disconnect secondary high-voltage cable from
coil with a twisting action.
(4) Clean area at base of coil with compressed air
before removal.
(5) Remove 2 mounting bolts (note that mounting
bolts are retained to coil).
(6) Carefully pull up coil from cylinder head open-
ing with a slight twisting action.
(7) Remove coil from vehicle.
(8) Before installing spark plug cables to either the
spark plugs or coils, or before installing a coil to a
spark plug, apply dielectric grease to inside of boots.
5.9L V-8
The coil is not oil filled. The coil windings are
embedded in an epoxy compound. This provides heat
and vibration resistance that allows the coil to be
mounted on the engine. If the coil is replaced, it must
be replaced with the same type.
5.9L V-8 LDC-Gas Engines: The coil is mounted to
a bracket that is bolted to the front of the right
engine cylinder head (Fig. 35). This bracket is
mounted on top of the automatic belt tensioner
bracket using common bolts.
DRIGNITION CONTROL 8I - 23
IGNITION COIL (Continued)
Page 490 of 2895
IGNITION COIL CAPACITOR
DESCRIPTION
One coil capacitor is used. It is located in the right-
rear section of the engine compartment.
OPERATION
The coil capacitor(s) help dampen the amount of
conducted electrical noise to the camshaft position
sensor, crankshaft position sensor, and throttle posi-
tion sensor. This noise is generated on the 12V sup-
ply wire to the ignition coils and fuel injectors.
REMOVAL
The coil capacitor is located in the right-rear sec-
tion of the engine compartment. It is attached with a
mounting stud and nut.
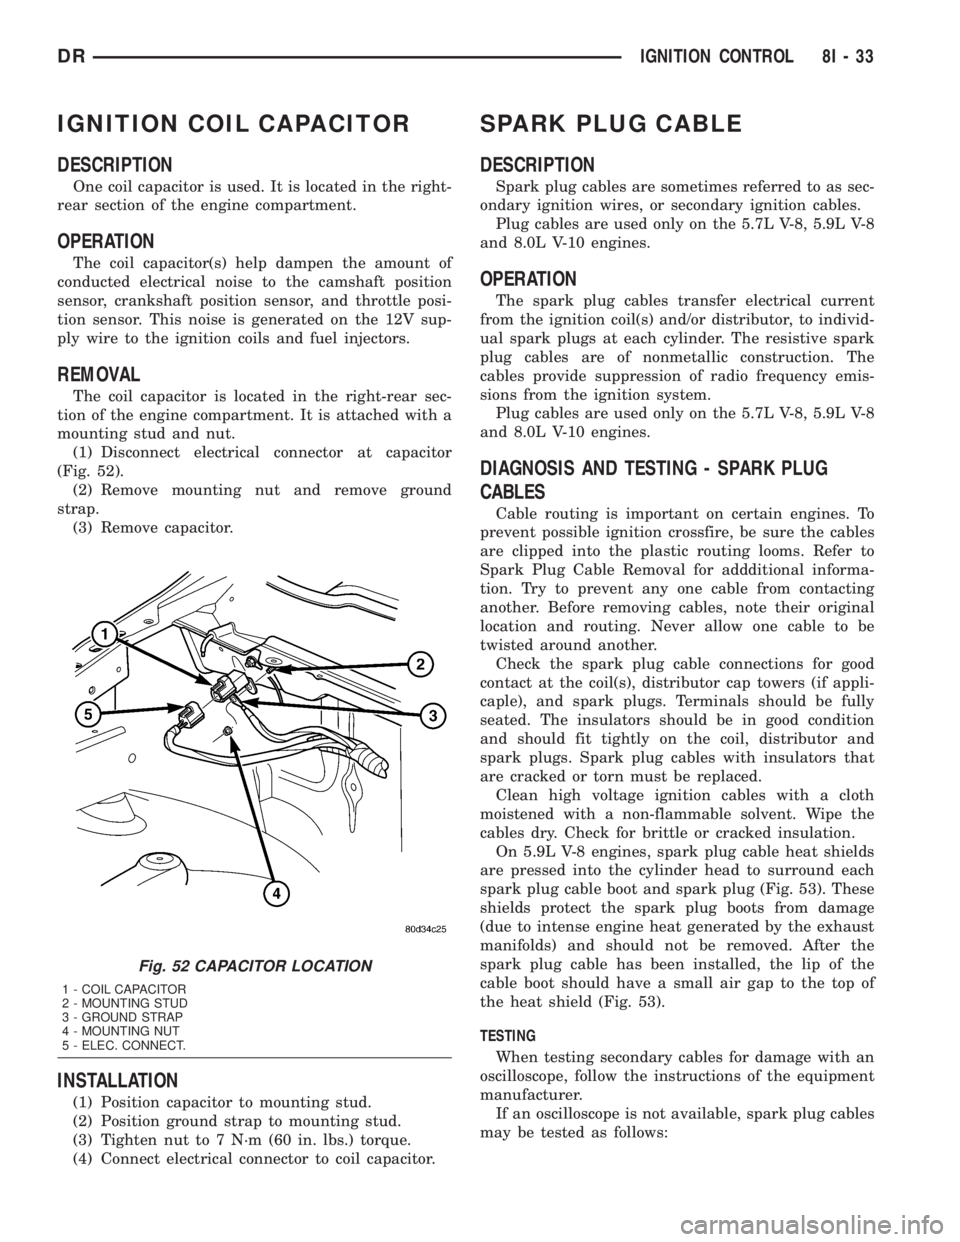
(1) Disconnect electrical connector at capacitor
(Fig. 52).
(2) Remove mounting nut and remove ground
strap.
(3) Remove capacitor.
INSTALLATION
(1) Position capacitor to mounting stud.
(2) Position ground strap to mounting stud.
(3) Tighten nut to 7 N´m (60 in. lbs.) torque.
(4) Connect electrical connector to coil capacitor.
SPARK PLUG CABLE
DESCRIPTION
Spark plug cables are sometimes referred to as sec-
ondary ignition wires, or secondary ignition cables.
Plug cables are used only on the 5.7L V-8, 5.9L V-8
and 8.0L V-10 engines.
OPERATION
The spark plug cables transfer electrical current
from the ignition coil(s) and/or distributor, to individ-
ual spark plugs at each cylinder. The resistive spark
plug cables are of nonmetallic construction. The
cables provide suppression of radio frequency emis-
sions from the ignition system.
Plug cables are used only on the 5.7L V-8, 5.9L V-8
and 8.0L V-10 engines.
DIAGNOSIS AND TESTING - SPARK PLUG
CABLES
Cable routing is important on certain engines. To
prevent possible ignition crossfire, be sure the cables
are clipped into the plastic routing looms. Refer to
Spark Plug Cable Removal for addditional informa-
tion. Try to prevent any one cable from contacting
another. Before removing cables, note their original
location and routing. Never allow one cable to be
twisted around another.
Check the spark plug cable connections for good
contact at the coil(s), distributor cap towers (if appli-
caple), and spark plugs. Terminals should be fully
seated. The insulators should be in good condition
and should fit tightly on the coil, distributor and
spark plugs. Spark plug cables with insulators that
are cracked or torn must be replaced.
Clean high voltage ignition cables with a cloth
moistened with a non-flammable solvent. Wipe the
cables dry. Check for brittle or cracked insulation.
On 5.9L V-8 engines, spark plug cable heat shields
are pressed into the cylinder head to surround each
spark plug cable boot and spark plug (Fig. 53). These
shields protect the spark plug boots from damage
(due to intense engine heat generated by the exhaust
manifolds) and should not be removed. After the
spark plug cable has been installed, the lip of the
cable boot should have a small air gap to the top of
the heat shield (Fig. 53).
TESTING
When testing secondary cables for damage with an
oscilloscope, follow the instructions of the equipment
manufacturer.
If an oscilloscope is not available, spark plug cables
may be tested as follows:
Fig. 52 CAPACITOR LOCATION
1 - COIL CAPACITOR
2 - MOUNTING STUD
3 - GROUND STRAP
4 - MOUNTING NUT
5 - ELEC. CONNECT.
DRIGNITION CONTROL 8I - 33
Page 510 of 2895
NOTE: Certain indicators in this instrument cluster
are automatically configured. This feature allows
those indicators to be activated or deactivated for
compatibility with certain optional equipment. If the
problem being diagnosed involves improper illumi-
nation of the cruise indicator, the electronic throttle
control indicator, the overdrive-off indicator, the
service four-wheel drive indicator, the transmission
overtemp indicator, the upshift indicator, the secu-
rity indicator or the gear selector indicator, discon-
nect and isolate the battery negative cable. After
about five minutes, reconnect the battery negative
cable and turn the ignition switch to the On posi-
tion. The instrument cluster should automatically
relearn the equipment in the vehicle and properly
configure the configurable indicators accordingly.
ABS INDICATOR
DESCRIPTION
An Antilock Brake System (ABS) indicator is stan-
dard equipment on all instrument clusters. However,
the instrument cluster can be programmed to disable
this indicator on vehicles that are not equipped with
the ABS or Rear Wheel Anti-Lock (RWAL) brake sys-
tems, which are not available in some markets. On
vehicles equipped with a gasoline engine, the ABS
indicator is located near the lower edge of the instru-
ment cluster, between the tachometer and the speed-
ometer. On vehicles equipped with a diesel engine,
the ABS indicator is located on the right side of the
instrument cluster, to the right of the engine temper-
ature gauge. The ABS indicator consists of a stencil-
like cutout of the International Control and Display
Symbol icon for ªFailure of Anti-lock Braking Sys-
temº in the opaque layer of the instrument cluster
overlay. The dark outer layer of the overlay prevents
the indicator from being clearly visible when it is not
illuminated. An amber Light Emitting Diode (LED)
behind the cutout in the opaque layer of the overlay
causes the icon to appear in amber through the
translucent outer layer of the overlay when the indi-
cator is illuminated from behind by the LED, which
is soldered onto the instrument cluster electronic cir-
cuit board. The ABS indicator is serviced as a unit
with the instrument cluster.
OPERATION
The ABS indicator gives an indication to the vehi-
cle operator when the ABS system is faulty or inop-
erative. This indicator is controlled by a transistor on
the instrument cluster circuit board based upon clus-
ter programming and electronic messages received by
the cluster from the Controller Antilock Brake (CAB)over the Programmable Communications Interface
(PCI) data bus. The ABS indicator Light Emitting
Diode (LED) is completely controlled by the instru-
ment cluster logic circuit, and that logic will only
allow this indicator to operate when the instrument
cluster receives a battery current input on the fused
ignition switch output (run-start) circuit. Therefore,
the LED will always be off when the ignition switch
is in any position except On or Start. The LED only
illuminates when it is provided a path to ground by
the instrument cluster transistor. The instrument
cluster will turn on the ABS indicator for the follow-
ing reasons:
²Bulb Test- Each time the ignition switch is
turned to the On position the ABS indicator is illu-
minated by the cluster for about two seconds as a
bulb test.
²ABS Lamp-On Message- Each time the clus-
ter receives a lamp-on message from the CAB, the
ABS indicator will be illuminated. The indicator
remains illuminated until the cluster receives a
lamp-off message from the CAB, or until the ignition
switch is turned to the Off position, whichever occurs
first.
²Communication Error- If the cluster receives
no lamp-on or lamp-off messages from the CAB for
three consecutive seconds, the ABS indicator is illu-
minated. The indicator remains illuminated until the
cluster receives a valid message from the CAB, or
until the ignition switch is turned to the Off position,
whichever occurs first.
²Actuator Test- Each time the instrument clus-
ter is put through the actuator test, the ABS indica-
tor will be turned on, then off again during the bulb
check portion of the test to confirm the functionality
of the LED and the cluster control circuitry.
²ABS Diagnostic Test- The ABS indicator is
blinked on and off by lamp-on and lamp-off messages
from the CAB during the performance of the ABS
diagnostic tests.
The CAB continually monitors the ABS circuits
and sensors to decide whether the system is in good
operating condition. The CAB then sends the proper
lamp-on or lamp-off messages to the instrument clus-
ter. If the CAB sends a lamp-on message after the
bulb test, it indicates that the CAB has detected a
system malfunction and/or that the ABS system has
become inoperative. The CAB will store a Diagnostic
Trouble Code (DTC) for any malfunction it detects.
Each time the ABS indicator fails to light due to an
open or short in the cluster ABS indicator circuit, the
cluster sends a message notifying the CAB of the
condition, then the instrument cluster and the CAB
will each store a DTC. For proper diagnosis of the
antilock brake system, the CAB, the PCI data bus, or
the electronic message inputs to the instrument clus-
DRINSTRUMENT CLUSTER 8J - 17
INSTRUMENT CLUSTER (Continued)
Page 517 of 2895
the cluster from the Powertrain Control Module
(PCM) on vehicles equipped with a gasoline engine,
or from the Engine Control Module (ECM) on vehi-
cles equipped with a diesel engine over the Program-
mable Communications Interface (PCI) data bus. The
engine coolant temperature gauge is an air core mag-
netic unit that receives battery current on the instru-
ment cluster electronic circuit board through the
fused ignition switch output (run-start) circuit when-
ever the ignition switch is in the On or Start posi-
tions. The cluster is programmed to move the gauge
needle back to the low end of the scale after the igni-
tion switch is turned to the Off position. The instru-
ment cluster circuitry controls the gauge needle
position and provides the following features:
²Engine Temperature Message- Each time
the cluster receives a message from the PCM or ECM
indicating the engine coolant temperature is between
the low end of normal [about 54É C (130É F) for gas-
oline engines, or about 60É C (140É F) for diesel
engines] and the high end of normal [about 122É C
(252É F) for gasoline engines, or about 116É C (240É
F) for diesel engines], the gauge needle is moved to
the actual relative temperature position on the gauge
scale.
²Engine Temperature Low Message- Each
time the cluster receives a message from the PCM or
ECM indicating the engine coolant temperature is
below the low end of normal [about 54É C (130É F) for
gasoline engines, or about 60É C (140É F) for diesel
engines], the gauge needle is held at the graduation
on the far left end of the gauge scale. The gauge nee-
dle remains at the left end of the gauge scale until
the cluster receives a message from the PCM or ECM
indicating that the engine temperature is above
about 54É C (130É F) for gasoline engines, or about
60É C (140É F) for diesel engines, or until the ignition
switch is turned to the Off position, whichever occurs
first.
²Engine Temperature High Message- Each
time the cluster receives a message from the PCM or
ECM indicating the engine coolant temperature is
above about 122É C (252É F) for gasoline engines, or
about 116É C (240É F) for diesel engines, the gauge
needle is moved into the red zone at the far right end
of gauge scale, the check gauges indicator is illumi-
nated, and a single chime tone is sounded. The gauge
needle remains in the red zone and the check gauges
indicator remains illuminated until the cluster
receives a message from the PCM or ECM indicating
that the engine temperature is below about 122É C
(252É F) for gasoline engines, or about 116É C (240É
F) for diesel engines, or until the ignition switch is
turned to the Off position, whichever occurs first.
The chime tone feature will only repeat during the
same ignition cycle if the check gauges indicator iscycled off and then on again by the appropriate
engine temperature messages from the PCM or ECM.
²Communication Error- If the cluster fails to
receive an engine temperature message, it will hold
the gauge needle at the last indication for about five
seconds or until the ignition switch is turned to the
Off position, whichever occurs first. After five sec-
onds, the cluster will move the gauge needle to the
low end of the gauge scale.
²Actuator Test- Each time the cluster is put
through the actuator test, the engine coolant temper-
ature gauge needle will be swept to several calibra-
tion points on the gauge scale in a prescribed
sequence in order to confirm the functionality of the
gauge and the cluster control circuitry.
On vehicles with a gasoline engine, the PCM con-
tinually monitors the engine coolant temperature
sensor to determine the engine operating tempera-
ture. On vehicles with a diesel engine, the ECM con-
tinually monitors the engine coolant temperature
sensor to determine the engine operating tempera-
ture. The PCM or ECM then sends the proper engine
coolant temperature messages to the instrument
cluster. For further diagnosis of the engine coolant
temperature gauge or the instrument cluster cir-
cuitry that controls the gauge, (Refer to 8 - ELEC-
TRICAL/INSTRUMENT CLUSTER - DIAGNOSIS
AND TESTING). If the instrument cluster turns on
the check gauges indicator due to a high engine tem-
perature gauge reading, it may indicate that the
engine or the engine cooling system requires service.
For proper diagnosis of the engine coolant tempera-
ture sensor, the PCM, the ECM, the PCI data bus, or
the electronic message inputs to the instrument clus-
ter that control the engine coolant temperature
gauge, a DRBIIItscan tool is required. Refer to the
appropriate diagnostic information.
ETC INDICATOR
DESCRIPTION
An Electronic Throttle Control (ETC) indicator is
standard equipment on all gasoline engine instru-
ment clusters. However, on vehicles not equipped
with the optional 5.7 liter gasoline engine, this indi-
cator is electronically disabled. The ETC indicator is
located on the right side of the instrument cluster, to
the right of the engine temperature gauge. The ETC
indicator consists of a stencil-like cutout of the Inter-
national Control and Display Symbol icon for ªElec-
tronic Throttle Controlº in the opaque layer of the
instrument cluster overlay. The dark outer layer of
the overlay prevents the indicator from being clearly
visible when it is not illuminated. A red Light Emit-
ting Diode (LED) behind the cutout in the opaque
8J - 24 INSTRUMENT CLUSTERDR
ENGINE TEMPERATURE GAUGE (Continued)
Page 518 of 2895
layer of the overlay causes the icon to appear in red
through the translucent outer layer of the overlay
when the indicator is illuminated from behind by the
LED, which is soldered onto the instrument cluster
electronic circuit board. The ETC indicator is ser-
viced as a unit with the instrument cluster.
OPERATION
The Electronic Throttle Control (ETC) indicator
gives an indication to the vehicle operator when the
ETC system is faulty or inoperative. The ETC indi-
cator is controlled by a transistor on the instrument
cluster circuit board based upon cluster programming
and electronic messages received by the cluster from
the Powertrain Control Module (PCM) over the Pro-
grammable Communications Interface (PCI) data
bus. The ETC indicator Light Emitting Diode (LED)
is completely controlled by the instrument cluster
logic circuit, and that logic will only allow this indi-
cator to operate when the instrument cluster receives
a battery current input on the fused ignition switch
output (run-start) circuit. Therefore, the LED will
always be off when the ignition switch is in any posi-
tion except On or Start. The LED only illuminates
when it is provided a path to ground by the instru-
ment cluster transistor. The instrument cluster will
turn on the ETC indicator for the following reasons:
²Bulb Test- Each time the ignition switch is
turned to the On position the ETC indicator is illu-
minated for about six seconds. The entire six second
bulb test is a function of the PCM.
²ETC Lamp-On Message- Each time the clus-
ter receives a lamp-on message from the PCM, the
ETC indicator will be illuminated. The indicator can
be flashed on and off, or illuminated solid, as dic-
tated by the PCM message. The indicator remains
illuminated solid or continues to flash for about
twelve seconds or until the cluster receives a lamp-off
message from the PCM, whichever is longer. If the
indicator is illuminated solid with the engine run-
ning the vehicle will usually remain drivable. If the
indicator is flashing with the engine running the
vehicle may require towing. A flashing indicator
means the ETC system requires immediate service.
²Communication Error- If the cluster receives
no ETC lamp messages for three consecutive seconds,
the ETC indicator is illuminated. The indicator
remains illuminated until the cluster receives a sin-
gle lamp-off message from the PCM.
²Actuator Test- Each time the cluster is put
through the actuator test, the ETC indicator will be
turned on, then off again during the bulb check por-
tion of the test to confirm the functionality of the
LED and the cluster control circuitry. The actuator
test illumination of the ETC indicator is a function of
the PCM.The PCM continually monitors the ETC system cir-
cuits and sensors to decide whether the system is in
good operating condition. The PCM then sends the
proper lamp-on or lamp-off messages to the instru-
ment cluster. If the PCM sends a lamp-on message
after the bulb test, it indicates that the PCM has
detected a system malfunction and/or that the ETC
system is inoperative. The PCM will store a Diagnos-
tic Trouble Code (DTC) for any malfunction it
detects. Each time the ETC indicator fails to illumi-
nate due to an open or short in the cluster ETC indi-
cator circuit, the cluster sends a message notifying
the PCM of the condition, the instrument cluster and
the PCM will each store a DTC. For proper diagnosis
of the ETC system, the PCM, the PCI data bus, or
the electronic message inputs to the instrument clus-
ter that control the ETC indicator, a DRBIIItscan
tool is required. Refer to the appropriate diagnostic
information.
FUEL GAUGE
DESCRIPTION
A fuel gauge is standard equipment on all instru-
ment clusters. The fuel gauge is located in the lower
left quadrant of the instrument cluster, below the
voltage gauge. The fuel gauge consists of a movable
gauge needle or pointer controlled by the instrument
cluster circuitry and a fixed 90 degree scale on the
cluster overlay that reads left-to-right from ªEº (or
Empty) to ªFº (or Full). An International Control and
Display Symbol icon for ªFuelº is located on the clus-
ter overlay, directly below the right end of the gauge
scale. An arrowhead pointed to the left side of the
vehicle is imprinted on the cluster overlay next to the
ªFuelº icon in the fuel gauge to provide the driver
with a reminder as to the location of the fuel filler
access. On vehicles equipped with a diesel engine,
text that specifies ªDIESEL ONLYº is located across
the fuel gauge below the gauge scale, but above the
hub of the gauge needle. The fuel gauge graphics are
black against a white field except for a single red
graduation at the low end of the gauge scale, making
them clearly visible within the instrument cluster in
daylight. When illuminated from behind by the panel
lamps dimmer controlled cluster illumination lighting
with the exterior lamps turned On, the black graph-
ics appear blue and the red graphics still appear red.
The orange gauge needle is internally illuminated.
Gauge illumination is provided by replaceable incan-
descent bulb and bulb holder units located on the
instrument cluster electronic circuit board. The fuel
gauge is serviced as a unit with the instrument clus-
ter.
DRINSTRUMENT CLUSTER 8J - 25
ETC INDICATOR (Continued)
Page 720 of 2895
8W-02 COMPONENT INDEX
Component Page
4WD Switch......................... 8W-30
A/C Compressor Clutch Relay............ 8W-42
A/C Compressor Clutch................. 8W-42
A/C Pressure Transducer................ 8W-42
A/C-Heater Control.................... 8W-42
Accelerator Pedal Position Sensor......... 8W-30
Adjustable Pedal Motor................. 8W-30
Adjustable Pedal Relay................. 8W-30
Adjustable Pedal Switch................ 8W-30
Airbag Control Modules................ 8W-43
Airbags............................. 8W-43
Ambient Temperature Sensor............ 8W-49
Amplifier Audio....................... 8W-47
Auto Shut Down Relay................. 8W-30
Automatic Day/Night Mirror............. 8W-49
Auxiliary Battery..................... 8W-20
Backup Lamp Switch.................. 8W-51
Battery Temperature Sensor............. 8W-30
Battery............................. 8W-20
Blend Door Actuator................... 8W-42
Blower Motor Resistor Block............. 8W-42
Blower Motor......................... 8W-42
Brake Lamp Switch.................... 8W-33
Brake Transmission Shift Interlock
Solenoid........................... 8W-40
Camshaft Position Sensor............... 8W-30
Capacitor............................ 8W-30
Center High Mounted Stop Lamp/Cargo
Lamp.......................... 8W-44, 51
Center High Mounted Stop Lamp-
Aftermarket..................... 8W-33, 51
Cigar Lighter Outlet................... 8W-41
Circuit Breaker....................... 8W-10
Clearance Lamps...................... 8W-50
Clockspring................. 8W-33, 41, 43, 47
Clutch Interlock Brake Switch........... 8W-21
Coil On Plugs........................ 8W-30
Compass/Mini-Trip Computer............ 8W-49
Condenser Fan Relay.................. 8W-42
Condenser Fan....................... 8W-42
Controller Antilock Brake............ 8W-34, 35
Crankshaft Position Sensor.............. 8W-30
Cylinder Lock Switch-Driver............. 8W-61
Cylinder Lock Switch-Passenger.......... 8W-61
Data Link Connector................... 8W-18
Data Link Connector-Engine............. 8W-18
Dome Lamp.......................... 8W-44
Door Ajar Switches.................... 8W-40
Door Lock Motor/Ajar Switches........ 8W-40, 61
Door Lock Switch-Passenger............. 8W-61
Driver Door Module.............. 8W-60, 61, 62
Electric Brake Provision............. 8W-33, 54Component Page
Electronic Throttle Control Module........ 8W-30
Engine Control Module................. 8W-30
Engine Coolant Temperature Sensor....... 8W-30
Engine Oil Pressure Switch.............. 8W-30
EVAP/Purge Solenoid.................. 8W-30
Evaporator Temperature Sensor.......... 8W-42
Fender Lamps........................ 8W-51
Fog Lamp Relay...................... 8W-50
Fog Lamps.......................... 8W-50
Front Control Module.................. 8W-10
Fuel Heater Relay..................... 8W-30
Fuel Heater.......................... 8W-30
Fuel Injectors........................ 8W-30
Fuel Injector Packs.................... 8W-30
Fuel Pump Module.................... 8W-30
Fuel Pump Motor..................... 8W-30
Fuel Pump Relay...................... 8W-30
Fuel Rail Pressure Sensor............... 8W-30
Fuses............................... 8W-10
Fusible Link......................... 8W-10
Grounds............................ 8W-15
Generator........................... 8W-20
Glove Box Lamp And Switch............. 8W-44
Headlamp Switch.................. 8W-40, 50
Headlamps.......................... 8W-50
Heated Mirror Relay................... 8W-62
Heated Seat Cushions.................. 8W-63
Heated Seat Switches.................. 8W-63
Horn Relay.......................... 8W-41
Horn Switch......................... 8W-41
Horns.............................. 8W-41
Idle Air Control Motor............ 8W-30, 30-36
Ignition Coils......................... 8W-30
Ignition Switch....................... 8W-10
Inlet Air Temperature/Pressure Sensor..... 8W-30
Input Speed Sensor.................... 8W-31
Instrument Cluster.................... 8W-40
Intake Air Heater Relays............... 8W-30
Intake Air Temperature Sensor........... 8W-30
Intake Air Temperature/Manifold Absolute
Pressure Sensor..................... 8W-30
Integrated Power Module............... 8W-10
Knock Sensors........................ 8W-30
Leak Detection Pump.................. 8W-30
License Lamps....................... 8W-51
Lift Pump Motor...................... 8W-30
Line Pressure Sensor................ 8W-30, 31
Lumbar Motors....................... 8W-63
Manifold Absolute Pressure Sensor........ 8W-30
Mode Door Actuators................... 8W-42
Multi-Function Switch............ 8W-40, 52, 53
Output Speed Sensor................... 8W-31
DR8W-02 COMPONENT INDEX 8W - 02 - 1
Page 721 of 2895
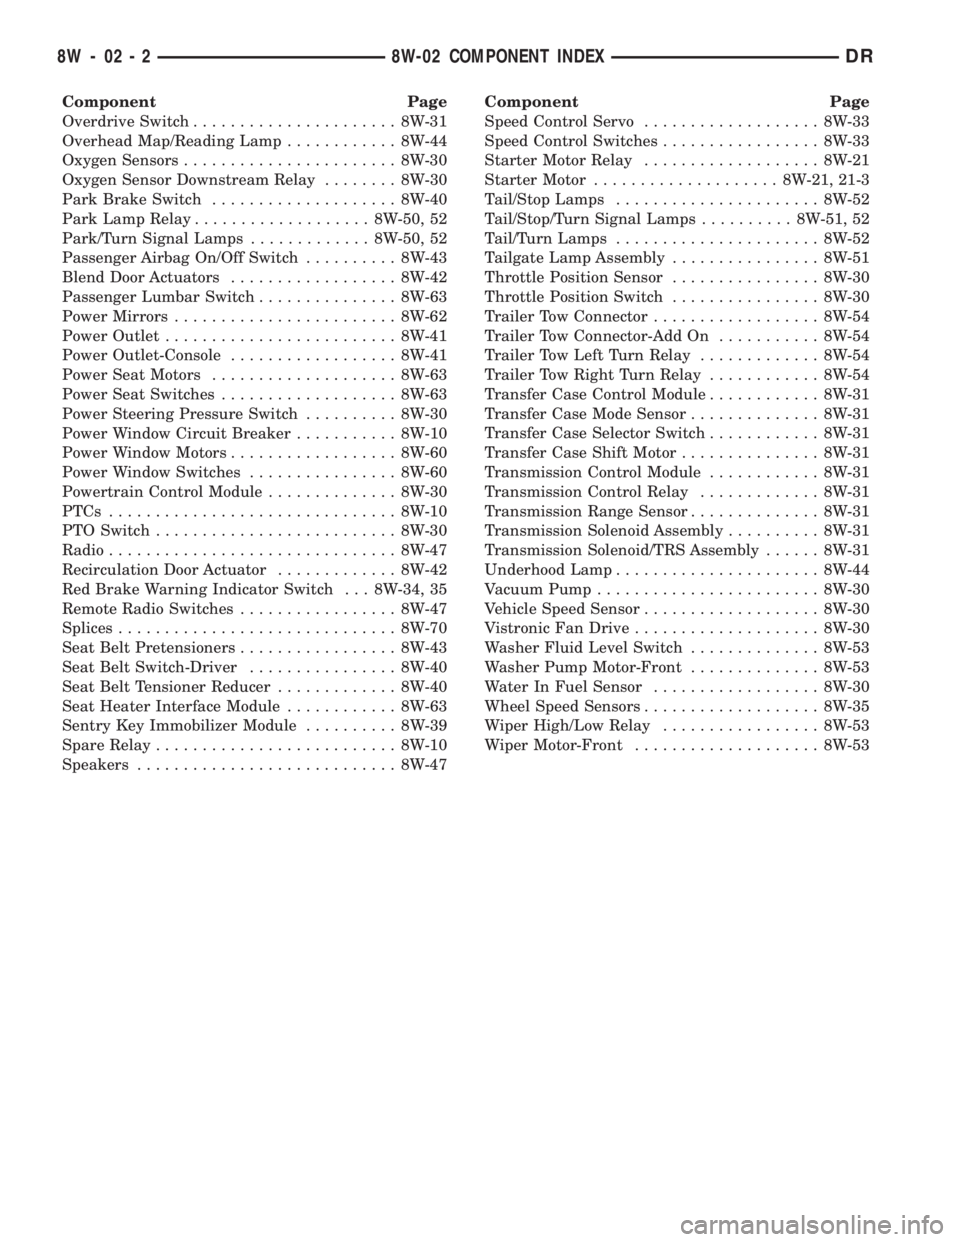
Component Page
Overdrive Switch...................... 8W-31
Overhead Map/Reading Lamp............ 8W-44
Oxygen Sensors....................... 8W-30
Oxygen Sensor Downstream Relay........ 8W-30
Park Brake Switch.................... 8W-40
Park Lamp Relay................... 8W-50, 52
Park/Turn Signal Lamps............. 8W-50, 52
Passenger Airbag On/Off Switch.......... 8W-43
Blend Door Actuators.................. 8W-42
Passenger Lumbar Switch............... 8W-63
Power Mirrors........................ 8W-62
Power Outlet......................... 8W-41
Power Outlet-Console.................. 8W-41
Power Seat Motors.................... 8W-63
Power Seat Switches................... 8W-63
Power Steering Pressure Switch.......... 8W-30
Power Window Circuit Breaker........... 8W-10
Power Window Motors.................. 8W-60
Power Window Switches................ 8W-60
Powertrain Control Module.............. 8W-30
PTCs............................... 8W-10
PTO Switch.......................... 8W-30
Radio............................... 8W-47
Recirculation Door Actuator............. 8W-42
Red Brake Warning Indicator Switch . . . 8W-34, 35
Remote Radio Switches................. 8W-47
Splices.............................. 8W-70
Seat Belt Pretensioners................. 8W-43
Seat Belt Switch-Driver................ 8W-40
Seat Belt Tensioner Reducer............. 8W-40
Seat Heater Interface Module............ 8W-63
Sentry Key Immobilizer Module.......... 8W-39
Spare Relay.......................... 8W-10
Speakers............................ 8W-47Component Page
Speed Control Servo................... 8W-33
Speed Control Switches................. 8W-33
Starter Motor Relay................... 8W-21
Starter Motor.................... 8W-21, 21-3
Tail/Stop Lamps...................... 8W-52
Tail/Stop/Turn Signal Lamps.......... 8W-51, 52
Tail/Turn Lamps...................... 8W-52
Tailgate Lamp Assembly................ 8W-51
Throttle Position Sensor................ 8W-30
Throttle Position Switch................ 8W-30
Trailer Tow Connector.................. 8W-54
Trailer Tow Connector-Add On........... 8W-54
Trailer Tow Left Turn Relay............. 8W-54
Trailer Tow Right Turn Relay............ 8W-54
Transfer Case Control Module............ 8W-31
Transfer Case Mode Sensor.............. 8W-31
Transfer Case Selector Switch............ 8W-31
Transfer Case Shift Motor............... 8W-31
Transmission Control Module............ 8W-31
Transmission Control Relay............. 8W-31
Transmission Range Sensor.............. 8W-31
Transmission Solenoid Assembly.......... 8W-31
Transmission Solenoid/TRS Assembly...... 8W-31
Underhood Lamp...................... 8W-44
Vacuum Pump........................ 8W-30
Vehicle Speed Sensor................... 8W-30
Vistronic Fan Drive.................... 8W-30
Washer Fluid Level Switch.............. 8W-53
Washer Pump Motor-Front.............. 8W-53
Water In Fuel Sensor.................. 8W-30
Wheel Speed Sensors................... 8W-35
Wiper High/Low Relay................. 8W-53
Wiper Motor-Front.................... 8W-53
8W - 02 - 2 8W-02 COMPONENT INDEXDR
Page 816 of 2895
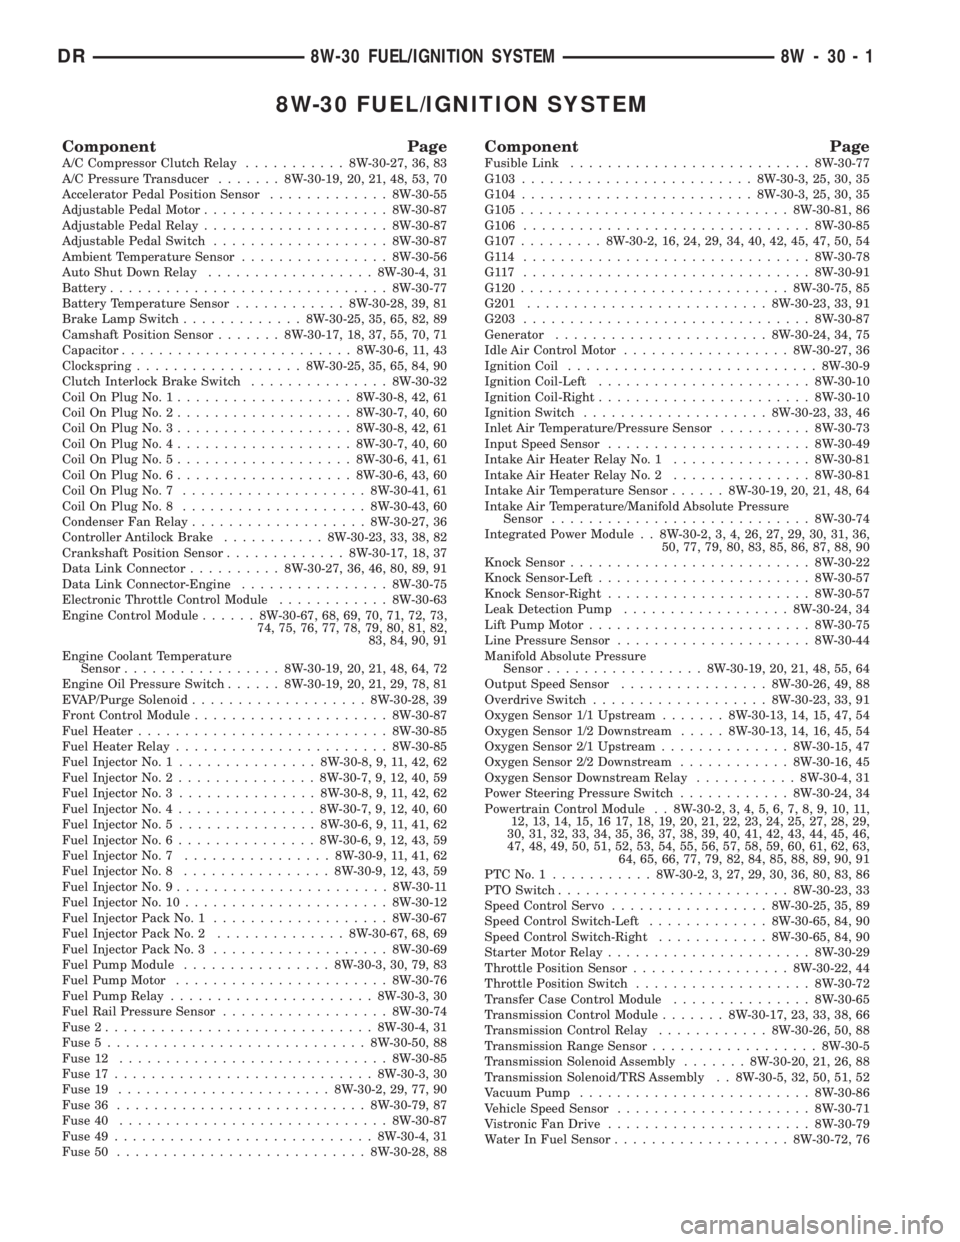
8W-30 FUEL/IGNITION SYSTEM
Component PageA/C Compressor Clutch Relay...........8W-30-27, 36, 83
A/C Pressure Transducer.......8W-30-19, 20, 21, 48, 53, 70
Accelerator Pedal Position Sensor.............8W-30-55
Adjustable Pedal Motor....................8W-30-87
Adjustable Pedal Relay....................8W-30-87
Adjustable Pedal Switch...................8W-30-87
Ambient Temperature Sensor................8W-30-56
Auto Shut Down Relay..................8W-30-4, 31
Battery..............................8W-30-77
Battery Temperature Sensor............8W-30-28, 39, 81
Brake Lamp Switch.............8W-30-25, 35, 65, 82, 89
Camshaft Position Sensor.......8W-30-17, 18, 37, 55, 70, 71
Capacitor.........................8W-30-6, 11, 43
Clockspring..................8W-30-25, 35, 65, 84, 90
Clutch Interlock Brake Switch...............8W-30-32
Coil On Plug No. 1...................8W-30-8, 42, 61
Coil On Plug No. 2...................8W-30-7, 40, 60
Coil On Plug No. 3...................8W-30-8, 42, 61
Coil On Plug No. 4...................8W-30-7, 40, 60
Coil On Plug No. 5...................8W-30-6, 41, 61
Coil On Plug No. 6...................8W-30-6, 43, 60
Coil On Plug No. 7....................8W-30-41, 61
Coil On Plug No. 8....................8W-30-43, 60
Condenser Fan Relay...................8W-30-27, 36
Controller Antilock Brake...........8W-30-23, 33, 38, 82
Crankshaft Position Sensor.............8W-30-17, 18, 37
Data Link Connector..........8W-30-27, 36, 46, 80, 89, 91
Data Link Connector-Engine................8W-30-75
Electronic Throttle Control Module............8W-30-63
Engine Control Module......8W-30-67, 68, 69, 70, 71, 72, 73,
74, 75, 76, 77, 78, 79, 80, 81, 82,
83, 84, 90, 91
Engine Coolant Temperature
Sensor.................8W-30-19, 20, 21, 48, 64, 72
Engine Oil Pressure Switch......8W-30-19, 20, 21, 29, 78, 81
EVAP/Purge Solenoid...................8W-30-28, 39
Front Control Module.....................8W-30-87
Fuel Heater...........................8W-30-85
Fuel Heater Relay.......................8W-30-85
Fuel Injector No. 1...............8W-30-8, 9, 11, 42, 62
Fuel Injector No. 2...............8W-30-7, 9, 12, 40, 59
Fuel Injector No. 3...............8W-30-8, 9, 11, 42, 62
Fuel Injector No. 4...............8W-30-7, 9, 12, 40, 60
Fuel Injector No. 5...............8W-30-6, 9, 11, 41, 62
Fuel Injector No. 6...............8W-30-6, 9, 12, 43, 59
Fuel Injector No. 7................8W-30-9, 11, 41, 62
Fuel Injector No. 8................8W-30-9, 12, 43, 59
Fuel Injector No. 9.......................8W-30-11
Fuel Injector No. 10......................8W-30-12
Fuel Injector Pack No. 1...................8W-30-67
Fuel Injector Pack No. 2..............8W-30-67, 68, 69
Fuel Injector Pack No. 3...................8W-30-69
Fuel Pump Module................8W-30-3, 30, 79, 83
Fuel Pump Motor.......................8W-30-76
Fuel Pump Relay......................8W-30-3, 30
Fuel Rail Pressure Sensor..................8W-30-74
Fuse 2.............................8W-30-4, 31
Fuse 5............................8W-30-50, 88
Fuse 12.............................8W-30-85
Fuse 17............................8W-30-3, 30
Fuse 19.......................8W-30-2, 29, 77, 90
Fuse 36...........................8W-30-79, 87
Fuse 40.............................8W-30-87
Fuse 49............................8W-30-4, 31
Fuse 50...........................8W-30-28, 88Component PageFusible Link..........................8W-30-77
G103.........................8W-30-3, 25, 30, 35
G104.........................8W-30-3, 25, 30, 35
G105.............................8W-30-81, 86
G106...............................8W-30-85
G107.........8W-30-2, 16, 24, 29, 34, 40, 42, 45, 47, 50, 54
G114 ...............................8W-30-78
G117 ...............................8W-30-91
G120.............................8W-30-75, 85
G201..........................8W-30-23, 33, 91
G203...............................8W-30-87
Generator.......................8W-30-24, 34, 75
Idle Air Control Motor..................8W-30-27, 36
Ignition Coil...........................8W-30-9
Ignition Coil-Left.......................8W-30-10
Ignition Coil-Right.......................8W-30-10
Ignition Switch....................8W-30-23, 33, 46
Inlet Air Temperature/Pressure Sensor..........8W-30-73
Input Speed Sensor......................8W-30-49
Intake Air Heater Relay No. 1...............8W-30-81
Intake Air Heater Relay No. 2...............8W-30-81
Intake Air Temperature Sensor......8W-30-19, 20, 21, 48, 64
Intake Air Temperature/Manifold Absolute Pressure
Sensor............................8W-30-74
Integrated Power Module . . 8W-30-2, 3, 4, 26, 27, 29, 30, 31, 36,
50, 77, 79, 80, 83, 85, 86, 87, 88, 90
Knock Sensor..........................8W-30-22
Knock Sensor-Left.......................8W-30-57
Knock Sensor-Right......................8W-30-57
Leak Detection Pump..................8W-30-24, 34
Lift Pump Motor........................8W-30-75
Line Pressure Sensor.....................8W-30-44
Manifold Absolute Pressure
Sensor.................8W-30-19, 20, 21, 48, 55, 64
Output Speed Sensor................8W-30-26, 49, 88
Overdrive Switch...................8W-30-23, 33, 91
Oxygen Sensor 1/1 Upstream.......8W-30-13, 14, 15, 47, 54
Oxygen Sensor 1/2 Downstream.....8W-30-13, 14, 16, 45, 54
Oxygen Sensor 2/1 Upstream..............8W-30-15, 47
Oxygen Sensor 2/2 Downstream............8W-30-16, 45
Oxygen Sensor Downstream Relay...........8W-30-4, 31
Power Steering Pressure Switch............8W-30-24, 34
Powertrain Control Module . . 8W-30-2, 3, 4, 5, 6, 7, 8, 9, 10, 11,
12, 13, 14, 15, 16 17, 18, 19, 20, 21, 22, 23, 24, 25, 27, 28, 29,
30, 31, 32, 33, 34, 35, 36, 37, 38, 39, 40, 41, 42, 43, 44, 45, 46,
47, 48, 49, 50, 51, 52, 53, 54, 55, 56, 57, 58, 59, 60, 61, 62, 63,
64, 65, 66, 77, 79, 82, 84, 85, 88, 89, 90, 91
PTCNo.1 ...........8W-30-2, 3, 27, 29, 30, 36, 80, 83, 86
PTO Switch.........................8W-30-23, 33
Speed Control Servo.................8W-30-25, 35, 89
Speed Control Switch-Left.............8W-30-65, 84, 90
Speed Control Switch-Right............8W-30-65, 84, 90
Starter Motor Relay......................8W-30-29
Throttle Position Sensor.................8W-30-22, 44
Throttle Position Switch...................8W-30-72
Transfer Case Control Module...............8W-30-65
Transmission Control Module.......8W-30-17, 23, 33, 38, 66
Transmission Control Relay............8W-30-26, 50, 88
Transmission Range Sensor..................8W-30-5
Transmission Solenoid Assembly.......8W-30-20, 21, 26, 88
Transmission Solenoid/TRS Assembly . . 8W-30-5, 32, 50, 51, 52
Vacuum Pump.........................8W-30-86
Vehicle Speed Sensor.....................8W-30-71
Vistronic Fan Drive......................8W-30-79
Water In Fuel Sensor...................8W-30-72, 76
DR8W-30 FUEL/IGNITION SYSTEM 8W - 30 - 1