weight DODGE RAM SRT-10 2006 Service User Guide
[x] Cancel search | Manufacturer: DODGE, Model Year: 2006, Model line: RAM SRT-10, Model: DODGE RAM SRT-10 2006Pages: 5267, PDF Size: 68.7 MB
Page 2022 of 5267
ENGINE - 8.3L - SERVICE INFORMATION
DESCRIPTION
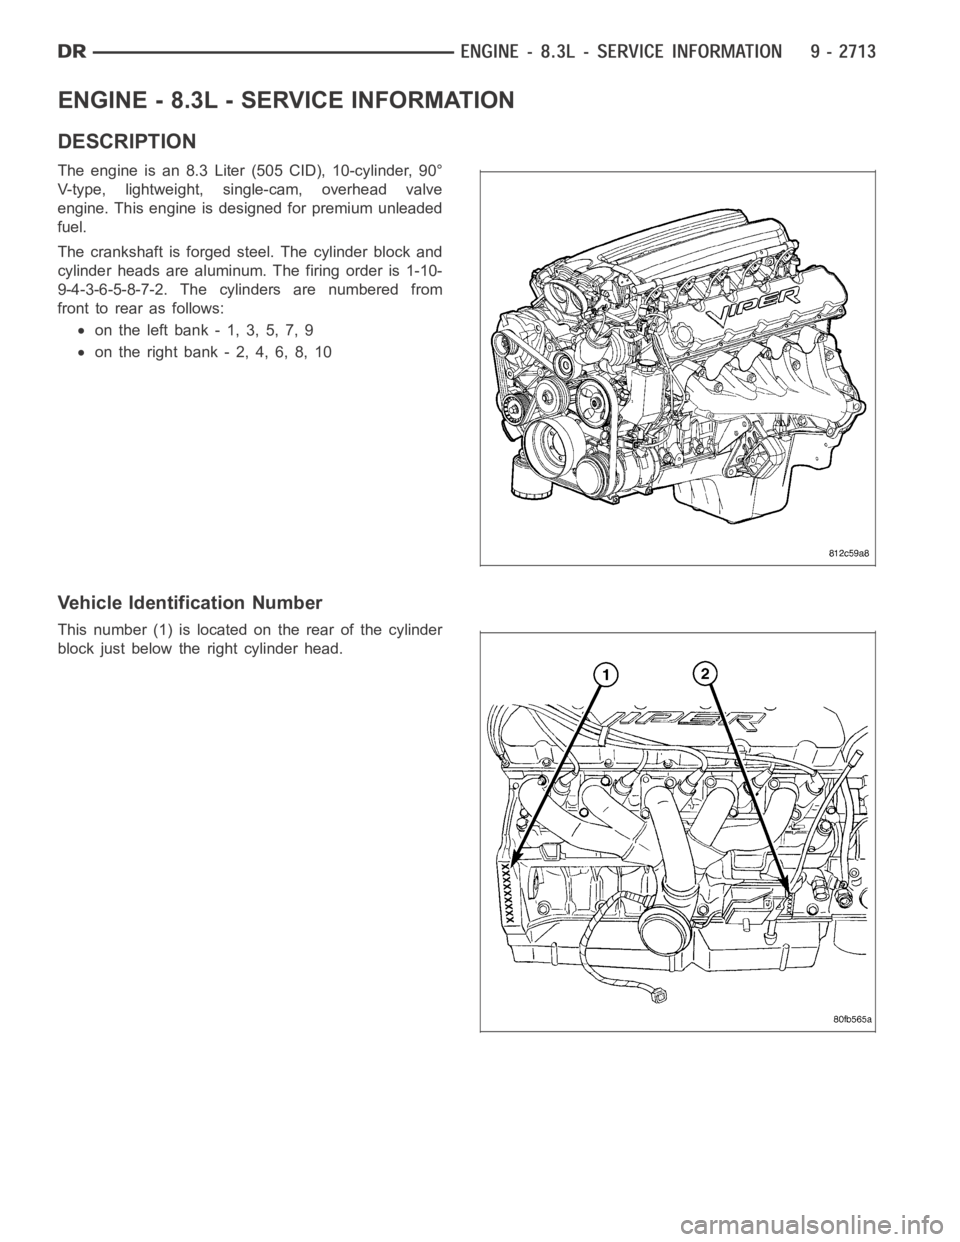
The engine is an 8.3 Liter (505 CID), 10-cylinder, 90°
V-type, lightweight, single-cam, overhead valve
engine. This engine is designed for premium unleaded
fuel.
The crankshaft is forged steel. The cylinder block and
cylinder heads are aluminum. The firing order is 1-10-
9-4-3-6-5-8-7-2. The cylinders are numbered from
front to rear as follows:
on the left bank - 1, 3, 5, 7, 9
on the right bank - 2, 4, 6, 8, 10
Vehicle Identification Number
This number (1) is located on the rear of the cylinder
block just below the right cylinder head.
Page 2040 of 5267
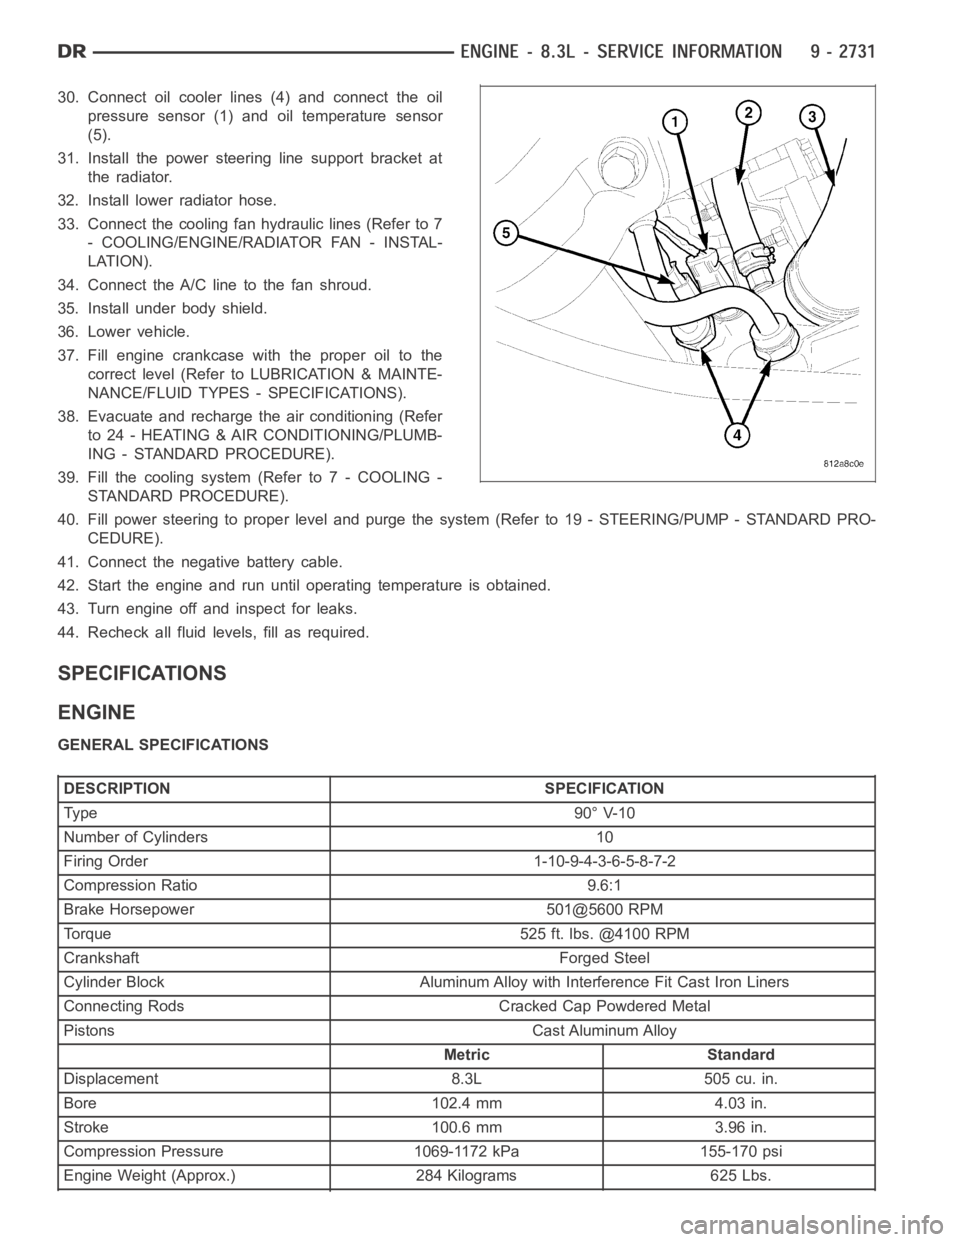
30. Connect oil cooler lines (4) and connect the oil
pressure sensor (1) and oil temperature sensor
(5).
31. Install the power steering line support bracket at
the radiator.
32. Install lower radiator hose.
33. Connect the cooling fan hydraulic lines (Refer to 7
- COOLING/ENGINE/RADIATOR FAN - INSTAL-
LATION).
34. Connect the A/C line to the fan shroud.
35. Install under body shield.
36. Lower vehicle.
37. Fill engine crankcase with the proper oil to the
correct level (Refer to LUBRICATION & MAINTE-
NANCE/FLUID TYPES - SPECIFICATIONS).
38. Evacuate and recharge the air conditioning (Refer
to 24 - HEATING & AIR CONDITIONING/PLUMB-
ING - STANDARD PROCEDURE).
39. Fill the cooling system (Refer to 7 - COOLING -
STANDARD PROCEDURE).
40. Fill power steering to proper leveland purge the system (Refer to 19 - STEERING/PUMP - STANDARD PRO-
CEDURE).
41. Connect the negative battery cable.
42. Start the engine and run until operating temperature is obtained.
43. Turn engine off and inspect for leaks.
44. Recheck all fluid levels, fill as required.
SPECIFICATIONS
ENGINE
GENERAL SPECIFICATIONS
DESCRIPTION SPECIFICATION
Ty pe 9 0° V-1 0
Number of Cylinders 10
Firing Order 1-10-9-4-3-6-5-8-7-2
Compression Ratio 9.6:1
Brake Horsepower 501@5600 RPM
Torque 525 ft. lbs. @4100 RPM
Crankshaft Forged Steel
Cylinder Block Aluminum Alloy with Interference Fit Cast Iron Liners
Connecting Rods Cracked Cap Powdered Metal
Pistons Cast Aluminum Alloy
Metric Standard
Displacement 8.3L 505 cu. in.
Bore 102.4 mm 4.03 in.
Stroke 100.6 mm 3.96 in.
Compression Pressure 1069-1172 kPa 155-170 psi
Engine Weight (Approx.) 284 Kilograms 625 Lbs.
Page 2041 of 5267
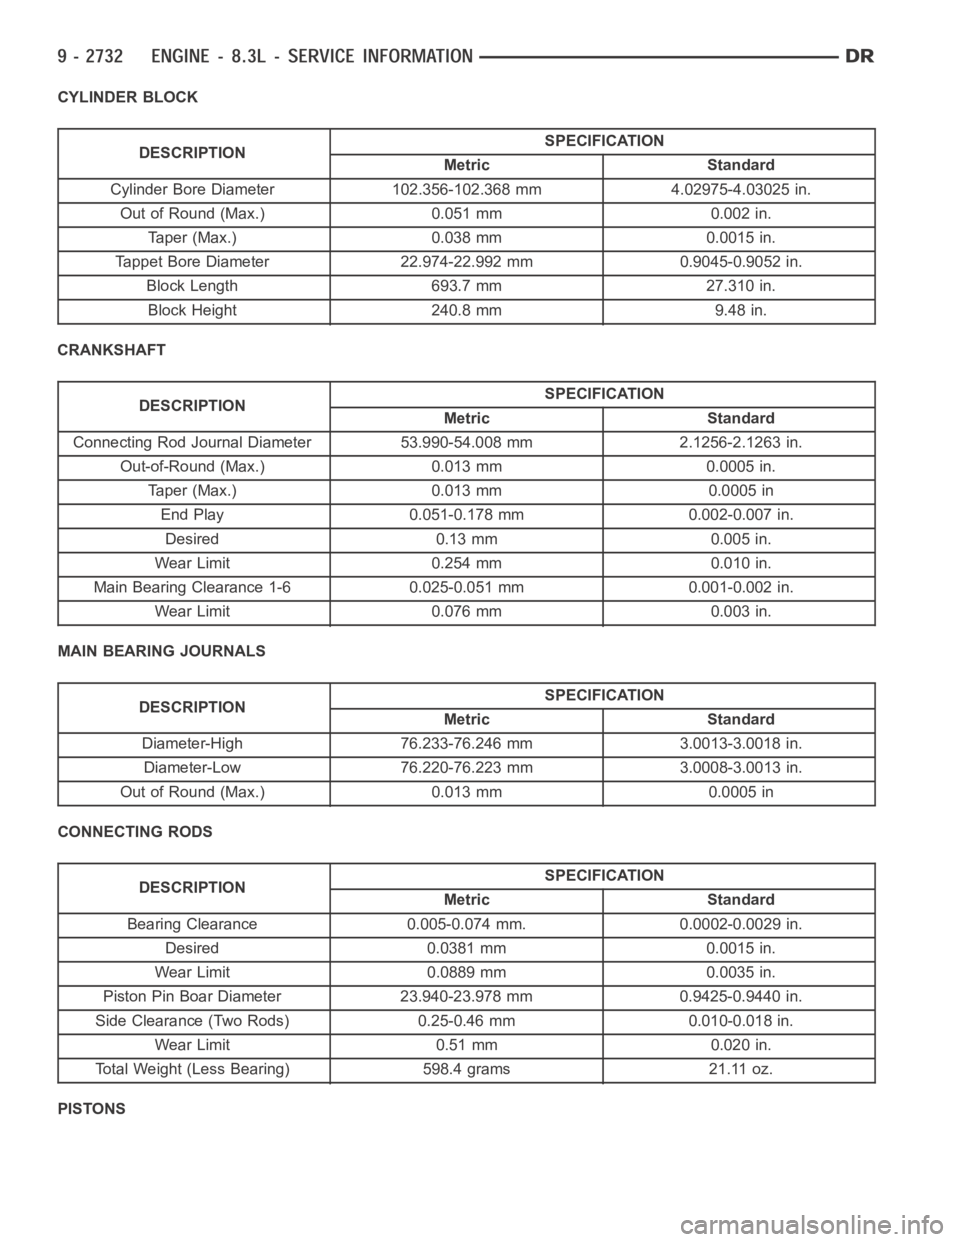
CYLINDER BLOCK
DESCRIPTIONSPECIFICATION
Metric Standard
Cylinder Bore Diameter 102.356-102.368 mm 4.02975-4.03025 in.
Out of Round (Max.) 0.051 mm 0.002 in.
Taper (Max.) 0.038 mm 0.0015 in.
Tappet Bore Diameter 22.974-22.992 mm 0.9045-0.9052 in.
Block Length 693.7 mm 27.310 in.
Block Height 240.8 mm 9.48 in.
CRANKSHAFT
DESCRIPTIONSPECIFICATION
Metric Standard
Connecting Rod Journal Diameter 53.990-54.008 mm 2.1256-2.1263 in.
Out-of-Round (Max.) 0.013 mm 0.0005 in.
Taper (Max.) 0.013 mm 0.0005 in
End Play 0.051-0.178 mm 0.002-0.007 in.
Desired 0.13 mm 0.005 in.
Wear Limit 0.254 mm 0.010 in.
Main Bearing Clearance 1-6 0.025-0.051 mm 0.001-0.002 in.
Wear Limit 0.076 mm 0.003 in.
MAIN BEARING JOURNALS
DESCRIPTIONSPECIFICATION
Metric Standard
Diameter-High 76.233-76.246 mm 3.0013-3.0018 in.
Diameter-Low 76.220-76.223 mm 3.0008-3.0013 in.
Out of Round (Max.) 0.013 mm 0.0005 in
CONNECTING RODS
DESCRIPTIONSPECIFICATION
Metric Standard
Bearing Clearance 0.005-0.074 mm. 0.0002-0.0029 in.
Desired 0.0381mm 0.0015in.
Wear Limit 0.0889 mm 0.0035 in.
Piston Pin Boar Diameter 23.940-23.978 mm 0.9425-0.9440 in.
Side Clearance (Two Rods) 0.25-0.46 mm 0.010-0.018 in.
Wear Limit 0.51 mm 0.020 in.
Total Weight (Less Bearing) 598.4 grams 21.11 oz.
PISTONS
Page 2042 of 5267
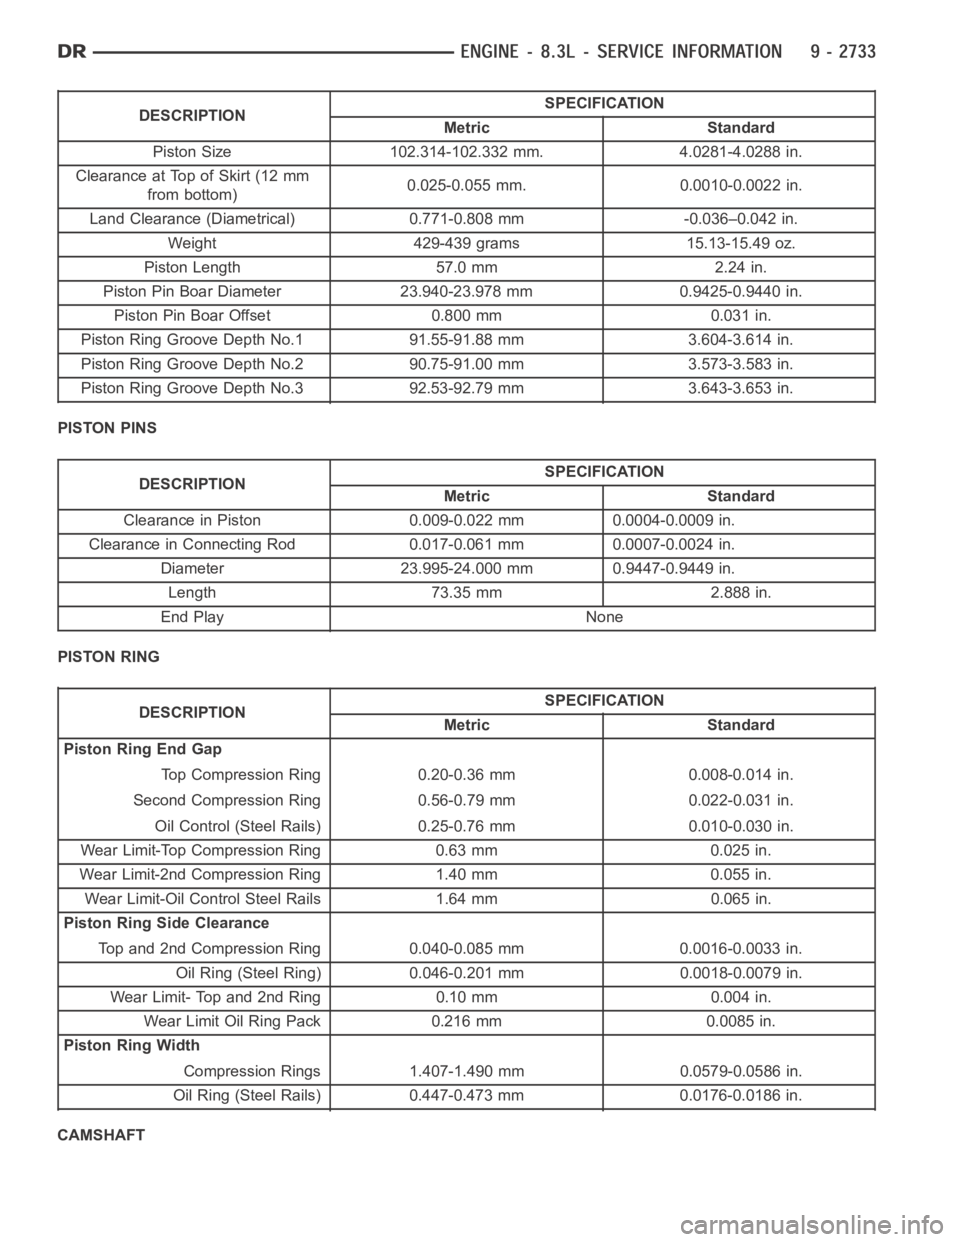
DESCRIPTIONSPECIFICATION
Metric Standard
Piston Size 102.314-102.332 mm. 4.0281-4.0288 in.
Clearance at Top of Skirt (12 mm
from bottom)0.025-0.055 mm. 0.0010-0.0022 in.
Land Clearance (Diametrical) 0.771-0.808 mm -0.036–0.042 in.
Weight 429-439 grams 15.13-15.49 oz.
Piston Length 57.0 mm 2.24 in.
Piston Pin Boar Diameter 23.940-23.978 mm 0.9425-0.9440 in.
Piston Pin Boar Offset 0.800 mm 0.031 in.
Piston Ring Groove Depth No.1 91.55-91.88 mm 3.604-3.614 in.
Piston Ring Groove Depth No.2 90.75-91.00 mm 3.573-3.583 in.
Piston Ring Groove Depth No.3 92.53-92.79 mm 3.643-3.653 in.
PISTON PINS
DESCRIPTIONSPECIFICATION
Metric Standard
Clearance in Piston 0.009-0.022 mm 0.0004-0.0009 in.
Clearance in Connecting Rod 0.017-0.061 mm 0.0007-0.0024 in.
Diameter 23.995-24.000 mm 0.9447-0.9449 in.
Length 73.35 mm 2.888 in.
End Play None
PISTON RING
DESCRIPTIONSPECIFICATION
Metric Standard
Piston Ring End Gap
Top Compression Ring 0.20-0.36 mm 0.008-0.014 in.
Second Compression Ring 0.56-0.79 mm 0.022-0.031 in.
Oil Control (Steel Rails) 0.25-0.76 mm 0.010-0.030 in.
Wear Limit-Top Compression Ring 0.63 mm 0.025 in.
Wear Limit-2nd Compression Ring 1.40 mm 0.055 in.
Wear Limit-Oil Control Steel Rails 1.64 mm 0.065 in.
Piston Ring Side Clearance
Top and 2nd Compression Ring 0.040-0.085 mm 0.0016-0.0033 in.
Oil Ring (Steel Ring) 0.046-0.201 mm 0.0018-0.0079 in.
Wear Limit- Top and 2nd Ring 0.10 mm 0.004 in.
Wear Limit Oil Ring Pack 0.216 mm 0.0085 in.
Piston Ring Width
Compression Rings 1.407-1.490 mm 0.0579-0.0586 in.
Oil Ring (Steel Rails) 0.447-0.473 mm 0.0176-0.0186 in.
CAMSHAFT
Page 2111 of 5267
ROD-PISTON & CONNECTING
DESCRIPTION
The pistons are made of cast aluminum with an added anodized coating on bothsides of the skirt and the top
piston ring groove for reduced wear and it’s low friction properties. Three piston rings are used; two compression
and one three-piece oil control ring. The piston pin (press-fit into the rods) joins the piston to a forged steel, frac-
tured cap, designed connecting rod, with a custom twelve point nine millimeter threaded bolt. The piston and con-
necting rod is serviced as an assembly and is not interchangeable with previous model years.
STANDARD PROCEDURE
PISTON FITTING
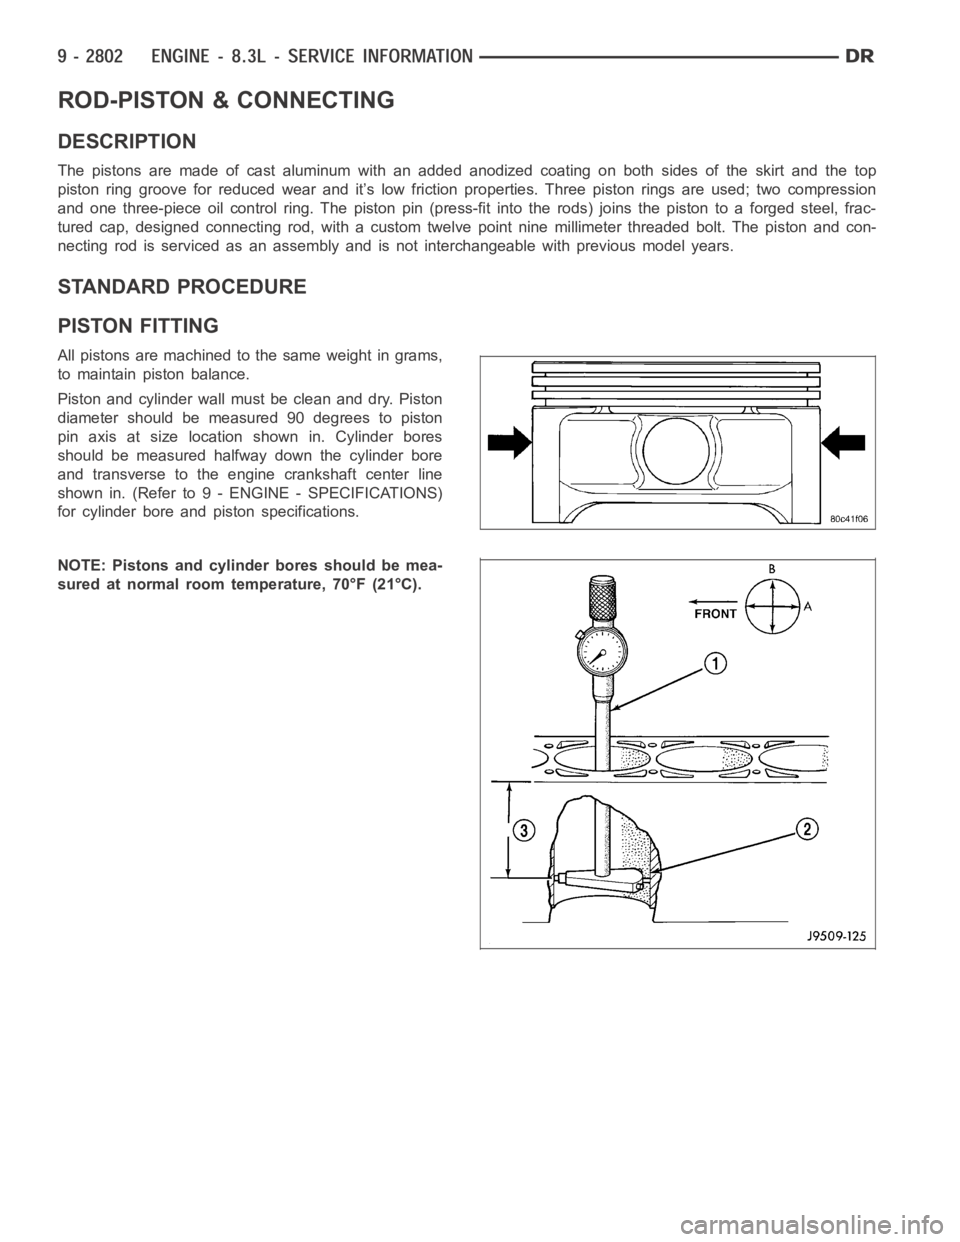
All pistons are machined to the same weight in grams,
to maintain piston balance.
Piston and cylinder wall must be clean and dry. Piston
diameter should be measured 90 degrees to piston
pin axis at size location shown in. Cylinder bores
should be measured halfway down the cylinder bore
and transverse to the engine crankshaft center line
shown in. (Refer to 9 - ENGINE - SPECIFICATIONS)
for cylinder bore and piston specifications.
NOTE: Pistons and cylinder bores should be mea-
sured at normal room temperature, 70°F (21°C).
Page 2126 of 5267
BEARINGS-CRANKSHAFT MAIN
DESCRIPTION
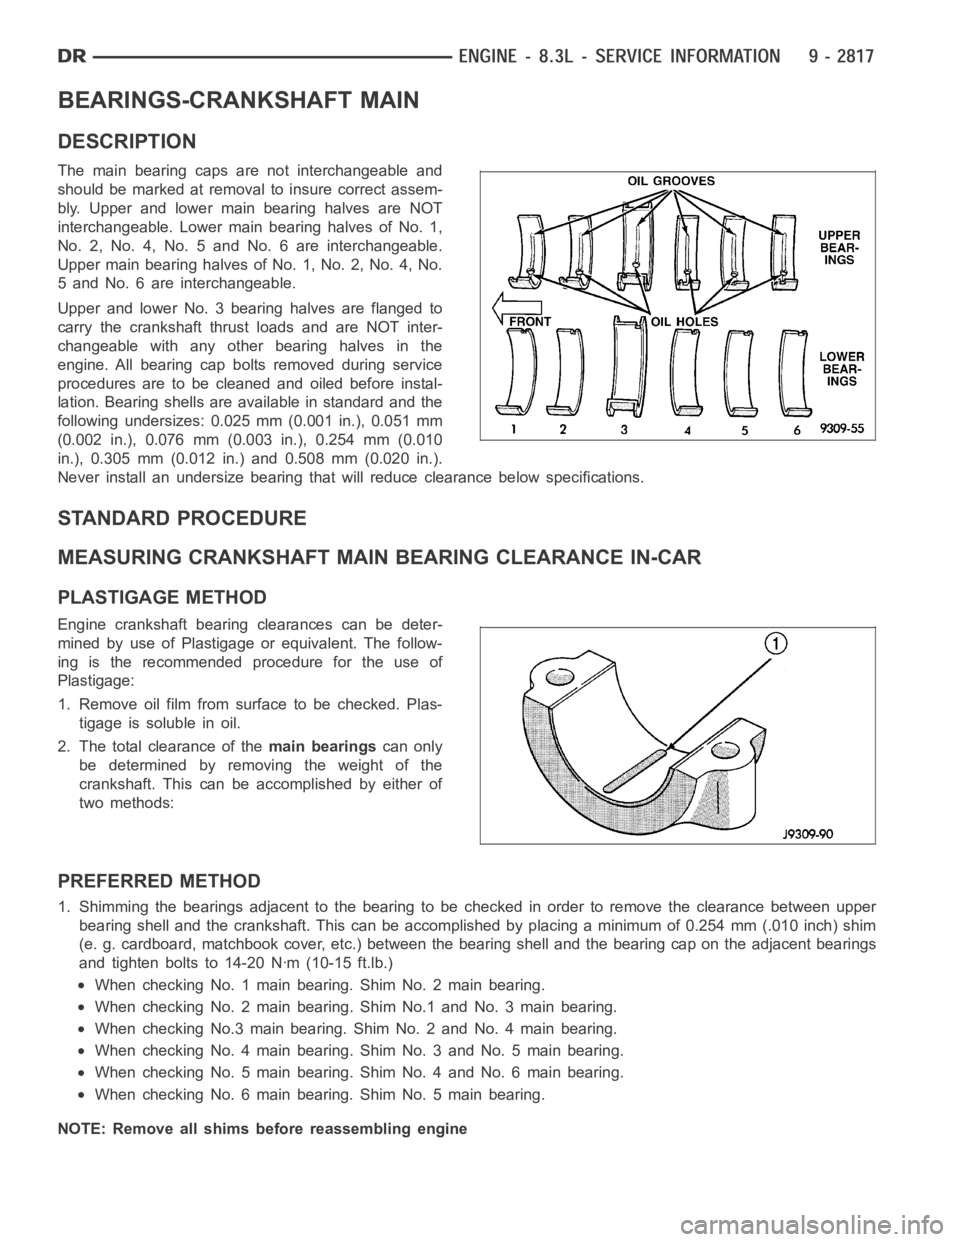
The main bearing caps are not interchangeable and
should be marked at removalto insure correct assem-
bly. Upper and lower main bearing halves are NOT
interchangeable. Lower main bearing halves of No. 1,
No. 2, No. 4, No. 5 and No. 6 are interchangeable.
Upper main bearing halves of No. 1, No. 2, No. 4, No.
5 and No. 6 are interchangeable.
Upper and lower No. 3 bearing halves are flanged to
carry the crankshaft thrust loads and are NOT inter-
changeable with any other bearing halves in the
engine. All bearing cap bolts removed during service
procedures are to be cleaned and oiled before instal-
lation. Bearing shells are available in standard and the
following undersizes: 0.025 mm (0.001 in.), 0.051 mm
(0.002 in.), 0.076 mm (0.003 in.), 0.254 mm (0.010
in.), 0.305 mm (0.012 in.) and 0.508 mm (0.020 in.).
Never install an undersize bearing that will reduce clearance below specifications.
STANDARD PROCEDURE
MEASURING CRANKSHAFT MAIN BEARING CLEARANCE IN-CAR
PLASTIGAGE METHOD
Engine crankshaft bearing clearances can be deter-
mined by use of Plastigage or equivalent. The follow-
ing is the recommended procedure for the use of
Plastigage:
1. Remove oil film from surface to be checked. Plas-
tigage is soluble in oil.
2. The total clearance of themain bearingscan only
be determined by removing the weight of the
crankshaft. This can be accomplished by either of
two methods:
PREFERRED METHOD
1. Shimming the bearings adjacent to the bearing to be checked in order to remove the clearance between upper
bearing shell and the crankshaft. Thiscanbeaccomplishedbyplacingaminimum of 0.254 mm (.010 inch) shim
(e. g. cardboard, matchbook cover, etc.) between the bearing shell and thebearing cap on the adjacent bearings
and tighten bolts to 14-20 Nꞏm (10-15 ft.lb.)
When checking No. 1 main bearing. Shim No. 2 main bearing.
When checking No. 2 main bearing. Shim No.1 and No. 3 main bearing.
When checking No.3 main bearing. Shim No. 2 and No. 4 main bearing.
When checking No. 4 main bearing. Shim No. 3 and No. 5 main bearing.
When checking No. 5 main bearing. Shim No. 4 and No. 6 main bearing.
When checking No. 6 main bearing. Shim No. 5 main bearing.
NOTE: Remove all shims before reassembling engine
Page 2127 of 5267
ALTERNATIVE METHOD
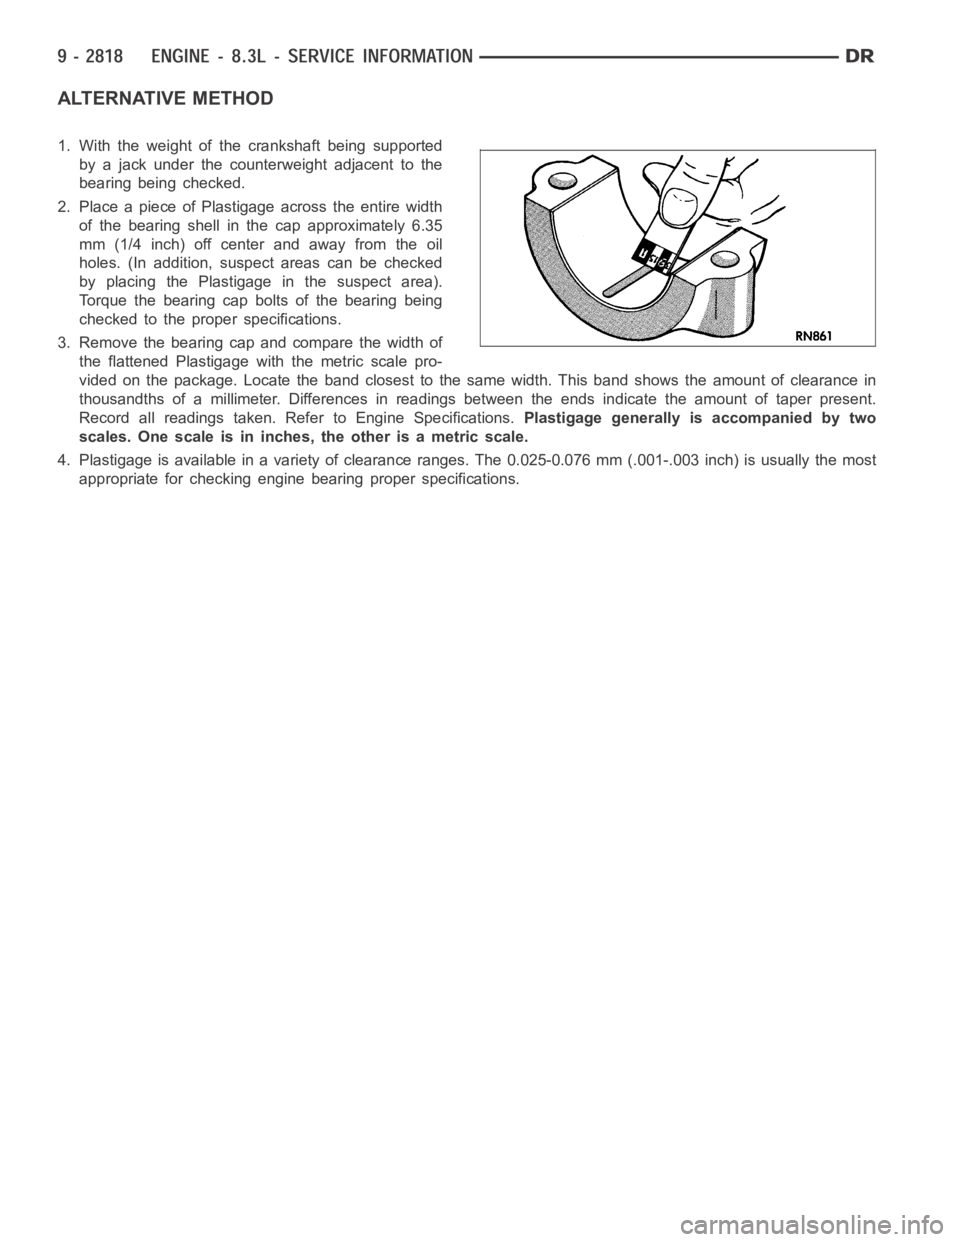
1. With the weight of the crankshaft being supported
by a jack under the counterweight adjacent to the
bearing being checked.
2. Place a piece of Plastigage across the entire width
of the bearing shell in the cap approximately 6.35
mm (1/4 inch) off center and away from the oil
holes. (In addition, suspect areas can be checked
by placing the Plastigage in the suspect area).
Torque the bearing cap bolts of the bearing being
checked to the proper specifications.
3. Remove the bearing cap and compare the width of
the flattened Plastigage with the metric scale pro-
vided on the package. Locate the band closest to the same width. This band shows the amount of clearance in
thousandths of a millimeter. Differences in readings between the ends indicate the amount of taper present.
Record all readings taken. Refer to Engine Specifications.Plastigage generally is accompanied by two
scales. One scale is in inches, the other is a metric scale.
4. Plastigage is available in a variety of clearance ranges. The 0.025-0.076 mm (.001-.003 inch) is usually the most
appropriate for checking engine bearing proper specifications.
Page 2132 of 5267
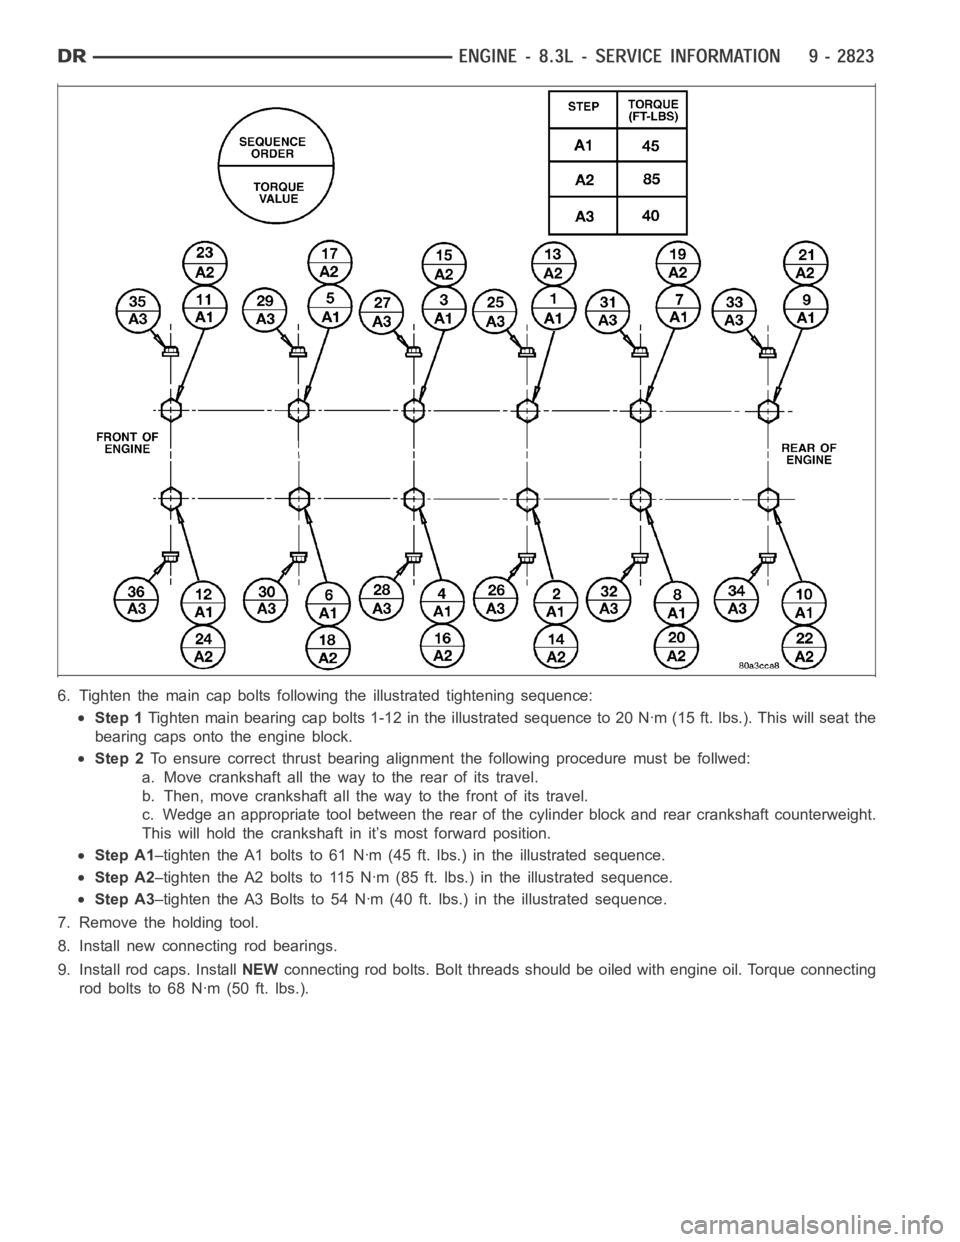
6. Tighten the main cap bolts following the illustrated tightening sequence:
Step 1Tighten main bearing cap bolts 1-12 inthe illustrated sequence to 20 Nꞏm (15 ft. lbs.). This will seat the
bearing caps onto the engine block.
Step 2To ensure correct thrust bearing alignment the following procedure must be follwed:
a. Move crankshaft all the way to the rear of its travel.
b. Then, move crankshaft all the way to the front of its travel.
c. Wedge an appropriate tool between the rear of the cylinder block and rearcrankshaft counterweight.
This will hold the crankshaft in it’s most forward position.
Step A1–tighten the A1 bolts to 61 Nꞏm (45 ft. lbs.) in the illustrated sequence.
Step A2–tighten the A2 bolts to 115 Nꞏm (85 ft. lbs.) in the illustrated sequence.
Step A3–tighten the A3 Bolts to 54 Nꞏm (40 ft. lbs.) in the illustrated sequence.
7. Remove the holding tool.
8. Install new connecting rod bearings.
9. Install rod caps. InstallNEWconnecting rod bolts. Bolt threads should be oiled with engine oil. Torqueconnecting
rod bolts to 68 Nꞏm (50 ft. lbs.).
Page 2469 of 5267
TIE ROD END
DIAGNOSIS AND TESTING
OUTERTIERODEND
NOTE: If the outer tie rod end is equipped with a lubrication fitting, grease the joint then road test the vehi-
cle before performing test.
1. Raise the front of the vehicle. Place safety floor stands under both lower control arms as far outboard as pos-
sible. Lower the vehicle to allow the stands to support some or all of the vehicle weight.
2. Remove the front tires.
3. Mount a dial indicator solidly to the vehicle steering knuckle and then zero the dial indicator.
4. Position indicator plunger on the topside of the outer tie rod end.
NOTE: The dial indicator plunger must be perpendicular to the machined surface of the outer tie rod end.
5. Position a pry bar in order to pry downwards on the outer tie rod end.
6. If the travel exceeds 0.5 mm (0.020 in.), replace the outer tie rod end (Refer to 19 - STEERING/LINKAGE/TIE
ROD END - REMOVAL).
7. If the outer tie rod end is within specs reinstall the front tires (Refer to 22 - TIRES/WHEELS/WHEELS - STAN-
DARD PROCEDURE).
REMOVAL - OUTER TIE ROD END
NOTE: Do not twist the boot anytime during
removal or installation.
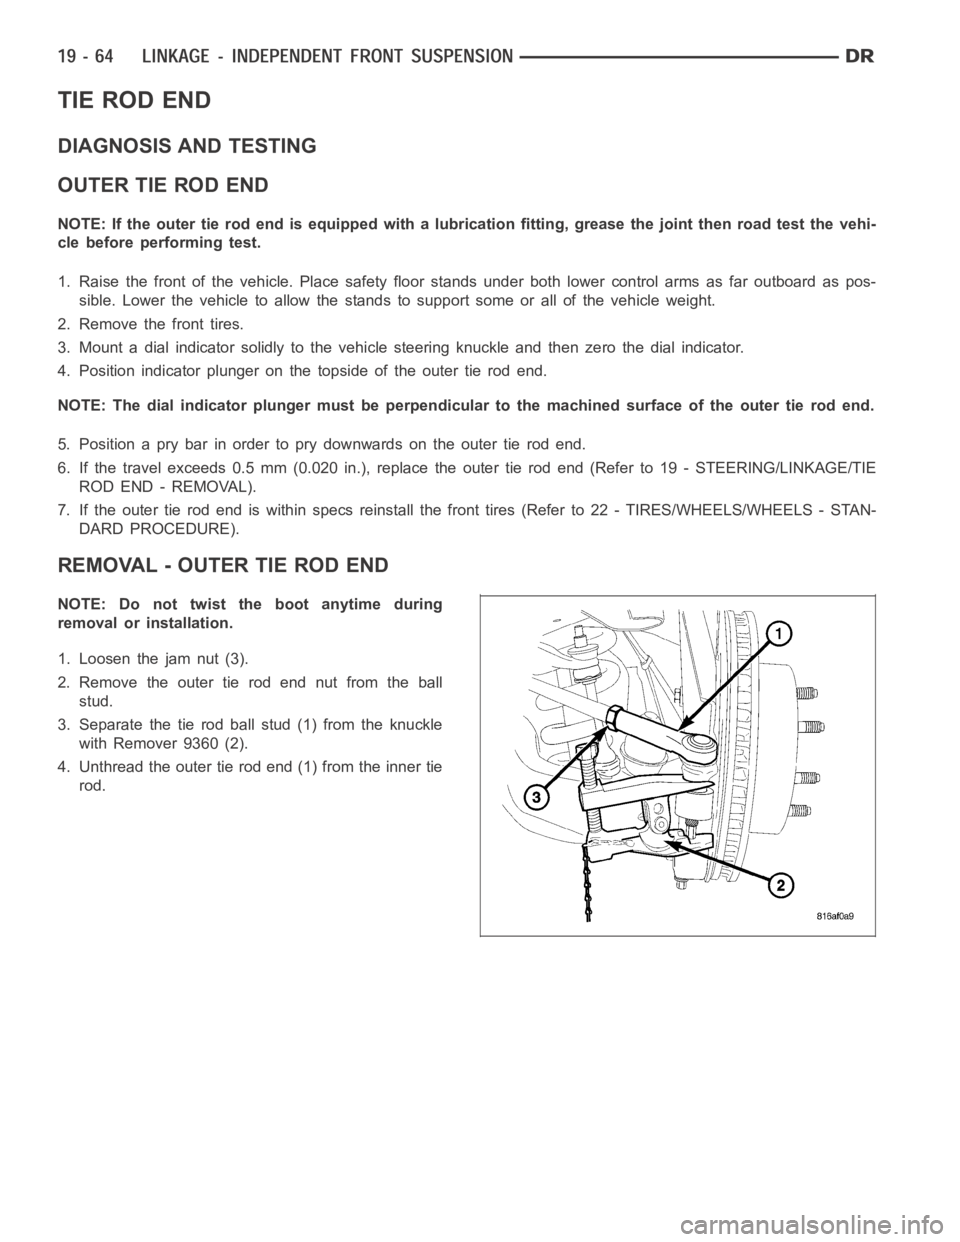
1. Loosen the jam nut (3).
2. Remove the outer tie rod end nut from the ball
stud.
3. Separate the tie rod ball stud (1) from the knuckle
with Remover 9360 (2).
4. Unthread the outer tie rod end (1) from the inner tie
rod.
Page 3899 of 5267
UNIT-OVERDRIVE
REMOVAL
1. Shift transmission into PARK.
2. Raise vehicle.
3. Remove transfer case, if equipped.
4. Mark propeller shaft universal joint(s) and axle pinion yoke, or the companion flange and flange yoke, for align-
ment reference at installation, if necessary.
5. Disconnect and remove the rear propeller shaft, if necessary. (Refer to3 - DIFFERENTIAL & DRIVELINE/PRO-
PELLER SHAFT/PROPELLER SHAFT - REMOVAL)
6. Remove transmission oil pan, remove gasket, drain oil and reinstall pan.
7. If overdrive unit had malfunctioned, or if fluid is contaminated, remove entire transmission. If diagnosis indicated
overdrive problems only, remove just the overdrive unit.
8. Support transmission with transmission jack.
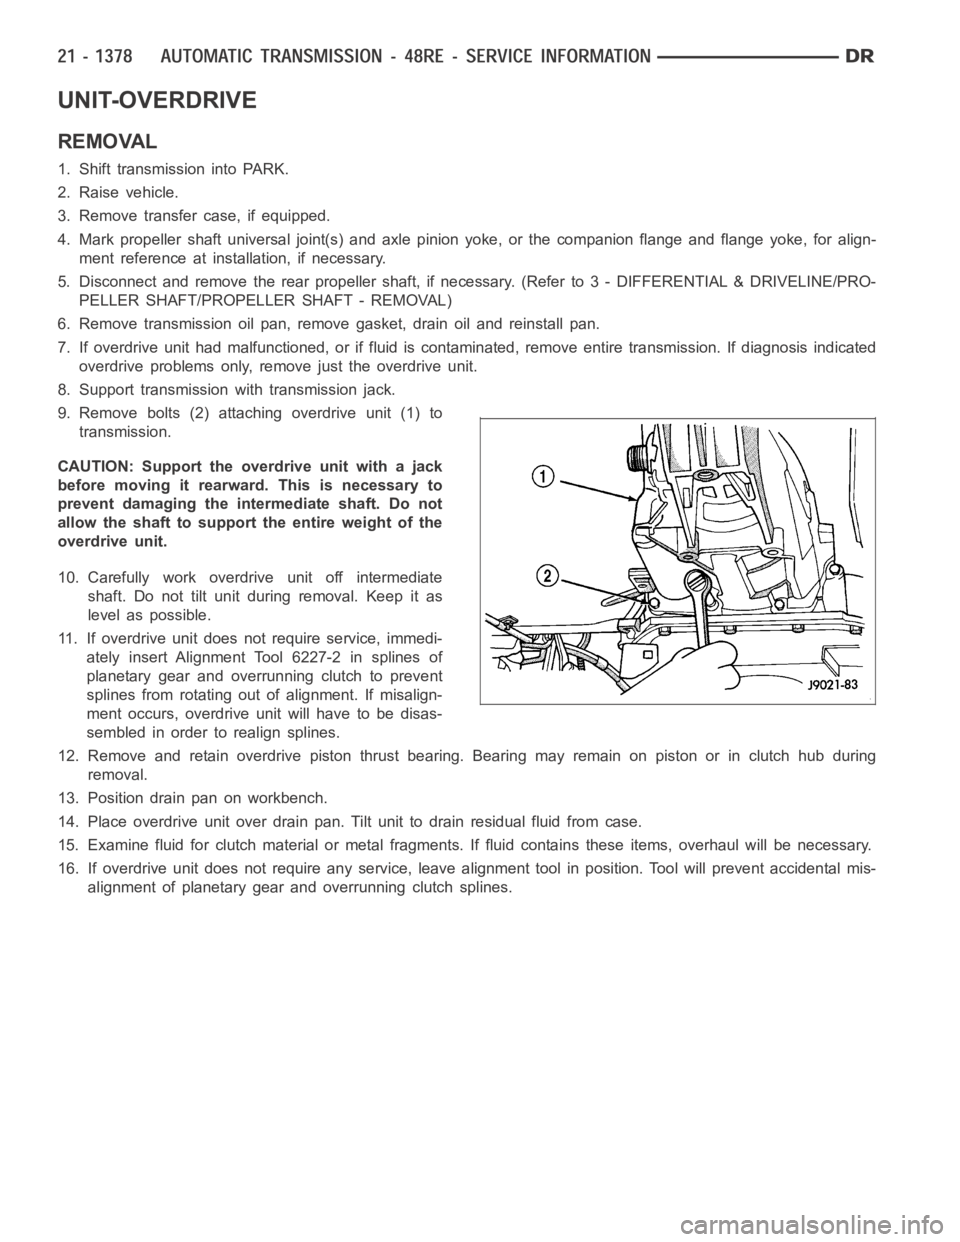
9. Remove bolts (2) attaching overdrive unit (1) to
transmission.
CAUTION: Support the overdrive unit with a jack
before moving it rearward. This is necessary to
prevent damaging the intermediate shaft. Do not
allow the shaft to support the entire weight of the
overdrive unit.
10. Carefully work overdrive unit off intermediate
shaft. Do not tilt unit during removal. Keep it as
level as possible.
11. If overdrive unit does not require service, immedi-
ately insert Alignment Tool 6227-2 in splines of
planetary gear and overrunning clutch to prevent
splines from rotating out of alignment. If misalign-
ment occurs, overdrive unit will have to be disas-
sembled in order to realign splines.
12. Remove and retain overdrive piston thrust bearing. Bearing may remainon piston or in clutch hub during
removal.
13. Position drain pan on workbench.
14. Place overdrive unit over drain pan. Tilt unit to drain residual fluid from case.
15. Examine fluid for clutch material or metal fragments. If fluid contains these items, overhaul will be necessary.
16. If overdrive unit does not require any service, leave alignment tool inposition. Tool will prevent accidental mis-
alignment of planetary gear and overrunning clutch splines.