window DODGE RAM SRT-10 2006 Service Owner's Manual
[x] Cancel search | Manufacturer: DODGE, Model Year: 2006, Model line: RAM SRT-10, Model: DODGE RAM SRT-10 2006Pages: 5267, PDF Size: 68.7 MB
Page 4386 of 5267
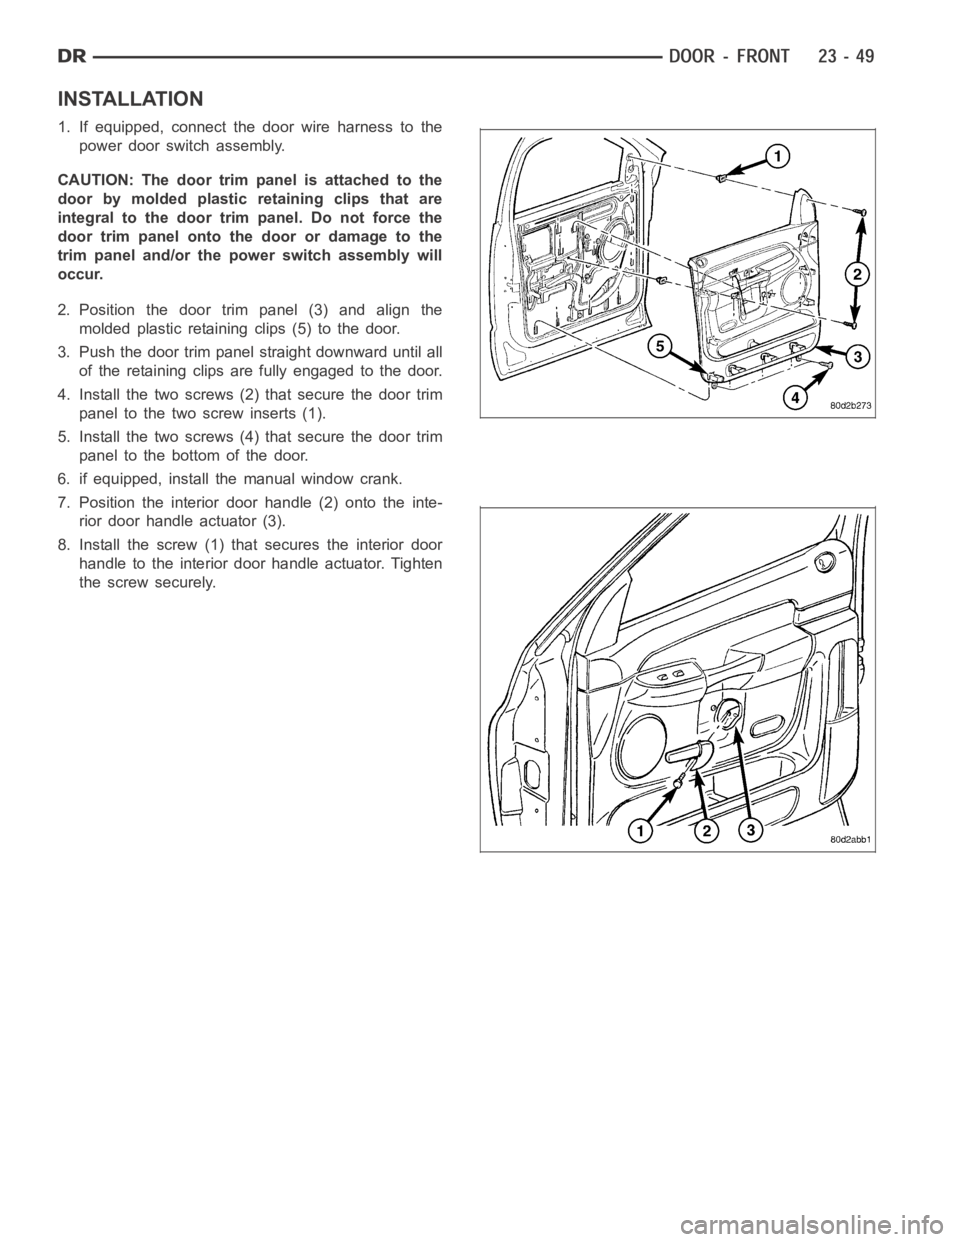
INSTALLATION
1. If equipped, connect the door wire harness to the
power door switch assembly.
CAUTION: The door trim panel is attached to the
door by molded plastic retaining clips that are
integral to the door trim panel. Do not force the
door trim panel onto the door or damage to the
trim panel and/or the power switch assembly will
occur.
2. Position the door trim panel (3) and align the
molded plastic retaining clips (5) to the door.
3. Push the door trim panel straight downward until all
of the retaining clips are fully engaged to the door.
4. Install the two screws (2) that secure the door trim
panel to the two screw inserts (1).
5. Install the two screws (4) that secure the door trim
panel to the bottom of the door.
6. if equipped, install the manual window crank.
7. Position the interior door handle (2) onto the inte-
rior door handle actuator (3).
8. Install the screw (1) that secures the interior door
handle to the interior door handle actuator. Tighten
the screw securely.
Page 4388 of 5267
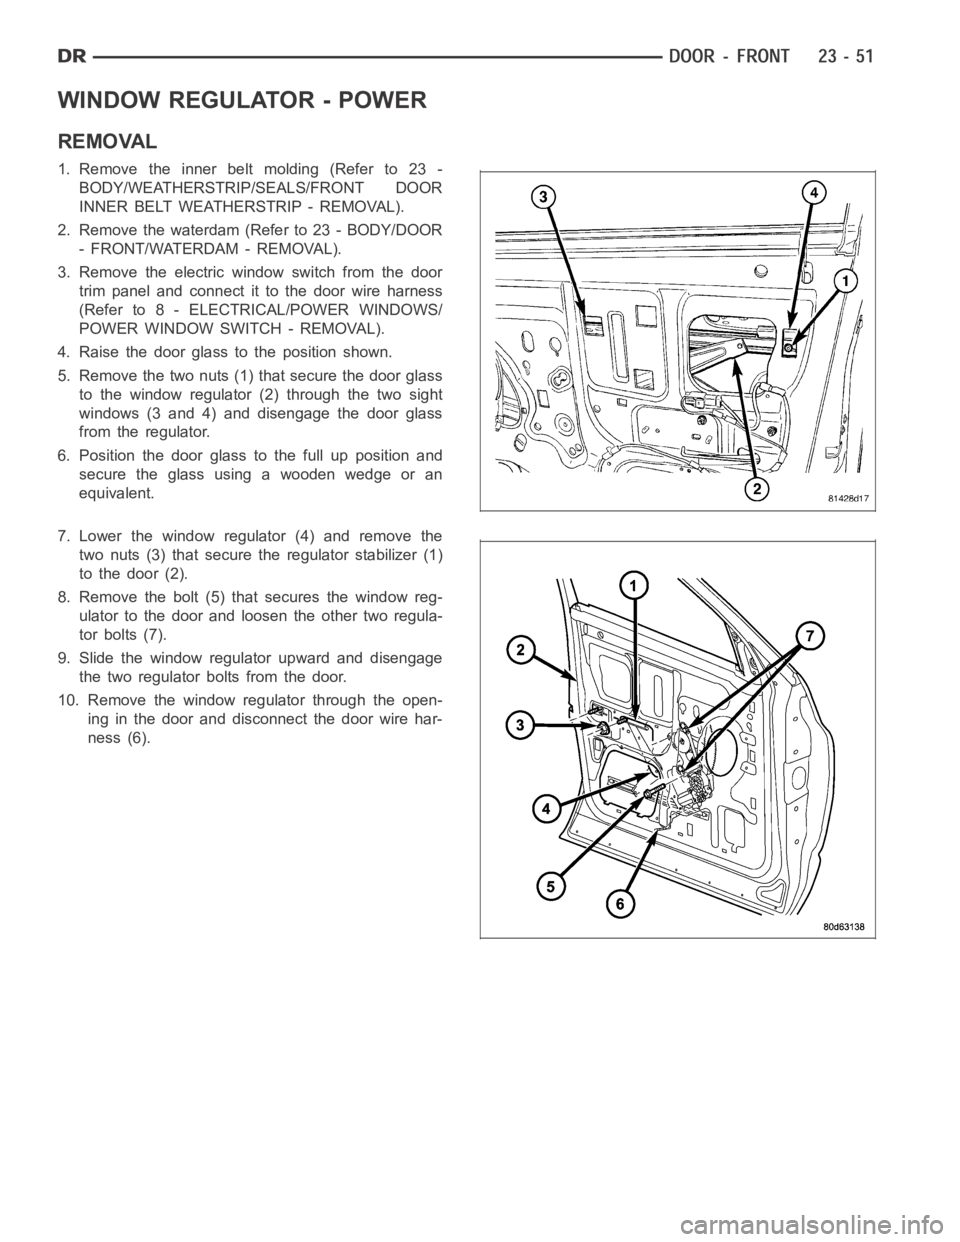
WINDOW REGULATOR - POWER
REMOVAL
1. Remove the inner belt molding (Refer to 23 -
BODY/WEATHERSTRIP/SEALS/FRONT DOOR
INNER BELT WEATHERSTRIP - REMOVAL).
2. Remove the waterdam (Refer to 23 - BODY/DOOR
- FRONT/WATERDAM - REMOVAL).
3. Remove the electric window switch from the door
trim panel and connect it to the door wire harness
(Refer to 8 - ELECTRICAL/POWER WINDOWS/
POWER WINDOW SWITCH - REMOVAL).
4. Raisethedoorglasstothepositionshown.
5. Remove the two nuts (1) that secure the door glass
to the window regulator (2) through the two sight
windows (3 and 4) and disengage the door glass
from the regulator.
6. Position the door glass to the full up position and
secure the glass using a wooden wedge or an
equivalent.
7. Lower the window regulator (4) and remove the
two nuts (3) that secure the regulator stabilizer (1)
to the door (2).
8. Remove the bolt (5) that secures the window reg-
ulator to the door and loosen the other two regula-
tor bolts (7).
9. Slide the window regulator upward and disengage
the two regulator bolts from the door.
10. Remove the window regulator through the open-
ing in the door and disconnect the door wire har-
ness (6).
Page 4389 of 5267
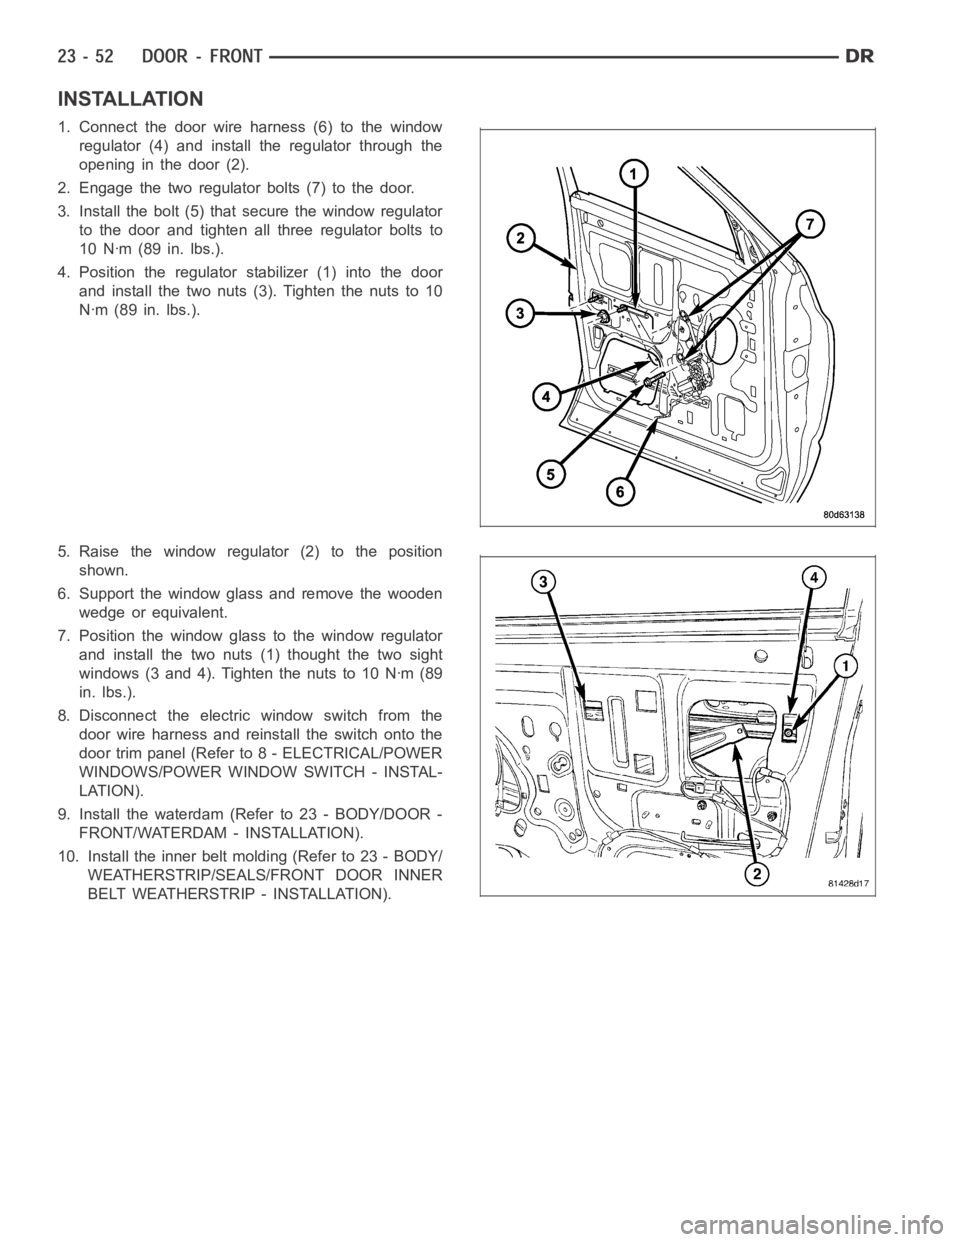
INSTALLATION
1. Connect the door wire harness (6) to the window
regulator (4) and install the regulator through the
opening in the door (2).
2. Engage the two regulator bolts (7) to the door.
3. Install the bolt (5) that secure the window regulator
to the door and tighten all three regulator bolts to
10 Nꞏm (89 in. lbs.).
4. Position the regulator stabilizer (1) into the door
and install the two nuts (3). Tighten the nuts to 10
Nꞏm (89 in. lbs.).
5. Raise the window regulator (2) to the position
shown.
6. Support the window glass and remove the wooden
wedge or equivalent.
7. Position the window glass to the window regulator
and install the two nuts (1) thought the two sight
windows (3 and 4). Tighten the nuts to 10 Nꞏm (89
in. lbs.).
8. Disconnect the electric window switch from the
door wire harness and reinstall the switch onto the
door trim panel (Refer to 8 - ELECTRICAL/POWER
WINDOWS/POWER WINDOW SWITCH - INSTAL-
LATION).
9. Install the waterdam (Refer to 23 - BODY/DOOR -
FRONT/WATERDAM - INSTALLATION).
10. Install the inner belt molding (Refer to 23 - BODY/
WEATHERSTRIP/SEALS/FRONT DOOR INNER
BELT WEATHERSTRIP - INSTALLATION).
Page 4390 of 5267
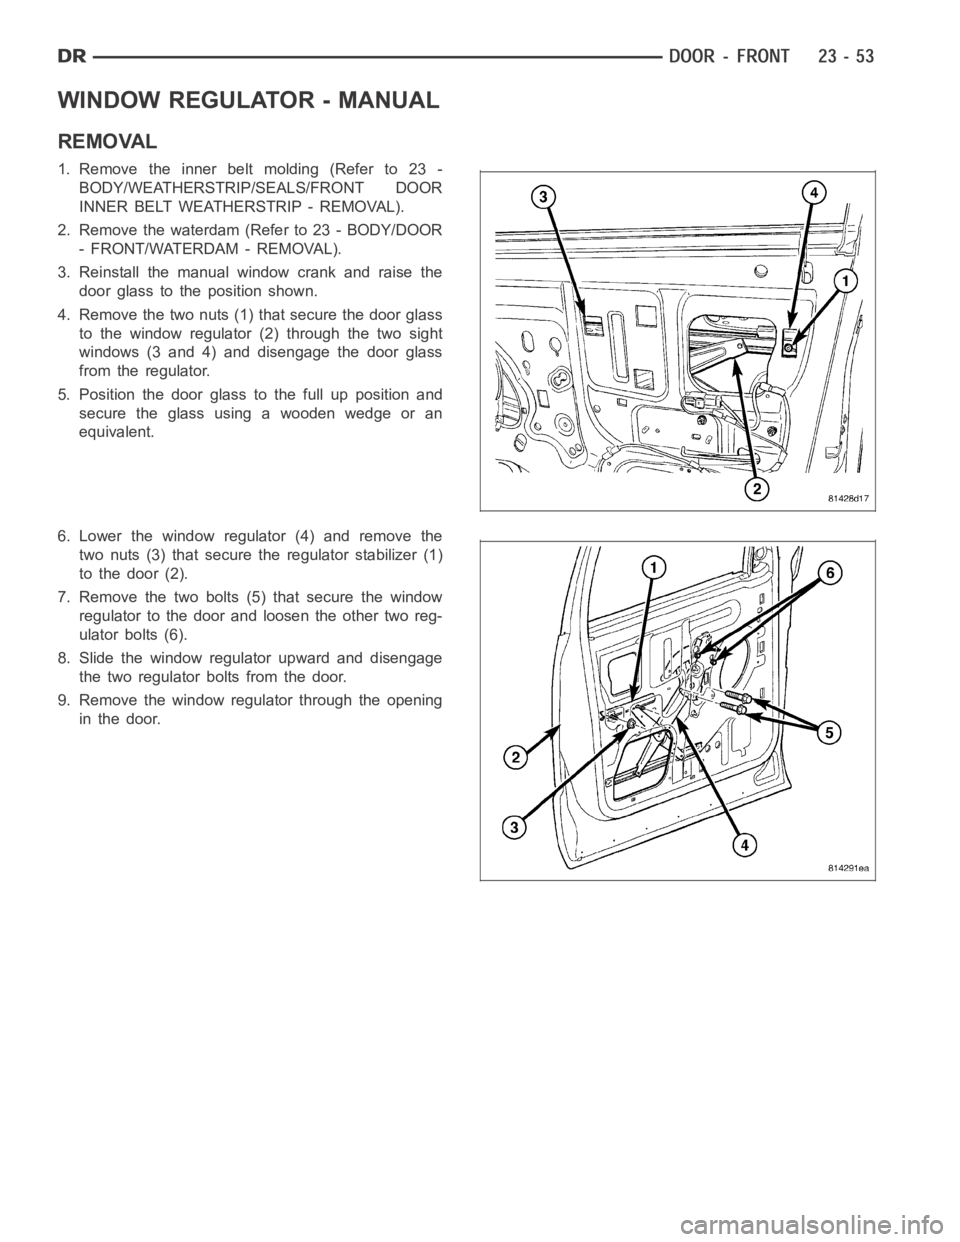
WINDOW REGULATOR - MANUAL
REMOVAL
1. Remove the inner belt molding (Refer to 23 -
BODY/WEATHERSTRIP/SEALS/FRONT DOOR
INNER BELT WEATHERSTRIP - REMOVAL).
2. Remove the waterdam (Refer to 23 - BODY/DOOR
- FRONT/WATERDAM - REMOVAL).
3. Reinstall the manual window crank and raise the
door glass to the position shown.
4. Remove the two nuts (1) that secure the door glass
to the window regulator (2) through the two sight
windows (3 and 4) and disengage the door glass
from the regulator.
5. Position the door glass to the full up position and
secure the glass using a wooden wedge or an
equivalent.
6. Lower the window regulator (4) and remove the
two nuts (3) that secure the regulator stabilizer (1)
to the door (2).
7. Remove the two bolts (5) that secure the window
regulator to the door and loosen the other two reg-
ulator bolts (6).
8. Slide the window regulator upward and disengage
the two regulator bolts from the door.
9. Remove the window regulator through the opening
in the door.
Page 4391 of 5267
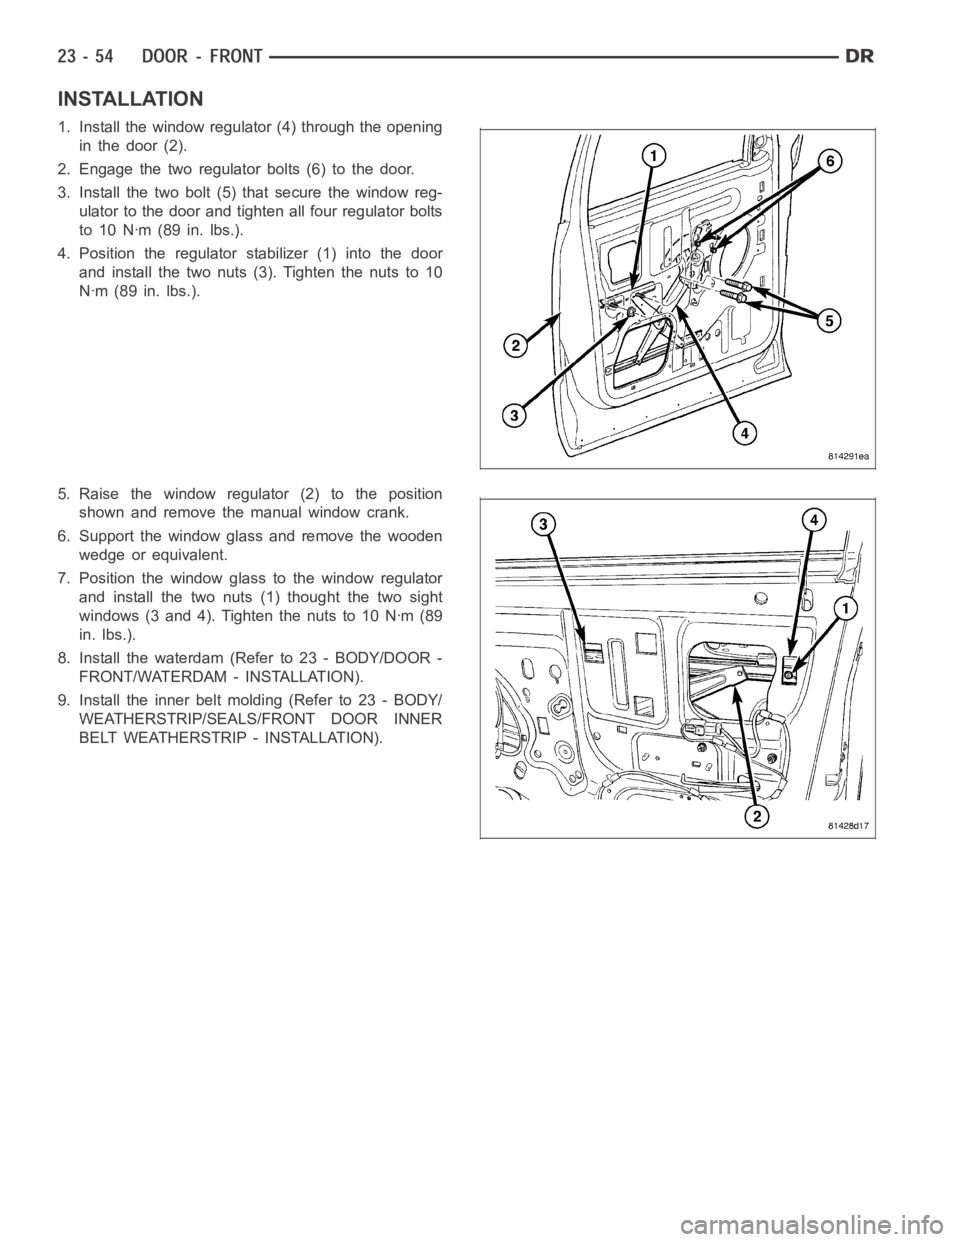
INSTALLATION
1. Install the window regulator (4) through the opening
in the door (2).
2. Engage the two regulator bolts (6) to the door.
3. Install the two bolt (5) that secure the window reg-
ulator to the door and tighten all four regulator bolts
to 10 Nꞏm (89 in. lbs.).
4. Position the regulator stabilizer (1) into the door
and install the two nuts (3). Tighten the nuts to 10
Nꞏm (89 in. lbs.).
5. Raise the window regulator (2) to the position
shown and remove the manual window crank.
6. Support the window glass and remove the wooden
wedge or equivalent.
7. Position the window glass to the window regulator
and install the two nuts (1) thought the two sight
windows (3 and 4). Tighten the nuts to 10 Nꞏm (89
in. lbs.).
8. Install the waterdam (Refer to 23 - BODY/DOOR -
FRONT/WATERDAM - INSTALLATION).
9. Install the inner belt molding (Refer to 23 - BODY/
WEATHERSTRIP/SEALS/FRONT DOOR INNER
BELT WEATHERSTRIP - INSTALLATION).
Page 4393 of 5267
page page
DOOR
REMOVAL .................................... 57
INSTALLATION ............................... 57
ADJUSTMENTS ............................... 58
DOOR GLASS
REMOVAL .................................... 63
INSTALLATION ............................... 64
EXTERIOR HANDLE
REMOVAL .................................... 65
INSTALLATION ............................... 65
GLASS RUN CHANNEL
REMOVAL
FRONT .................................... 66
REAR ...................................... 67
INSTALLATION
FRONT .................................... 67
REAR ...................................... 68
HINGE
REMOVAL .................................... 69
INSTALLATION ............................... 71
INTERIOR HANDLE ACTUATOR
REMOVAL .................................... 73INSTALLATION ............................... 73
LATCH
REMOVAL .................................... 74
INSTALLATION ............................... 75
ADJUSTMENTS ............................... 76
LATCH STRIKER
REMOVAL .................................... 77
INSTALLATION ............................... 77
ADJUSTMENTS ............................... 78
TRIM PANEL
REMOVAL .................................... 79
INSTALLATION ............................... 80
WATERDAM
REMOVAL .................................... 81
INSTALLATION ............................... 81
WINDOW REGULATOR - POWER
REMOVAL .................................... 82
INSTALLATION ............................... 83
WINDOW REGULATOR - MANUAL
REMOVAL .................................... 84
INSTALLATION ............................... 85
Page 4400 of 5267
DOOR GLASS
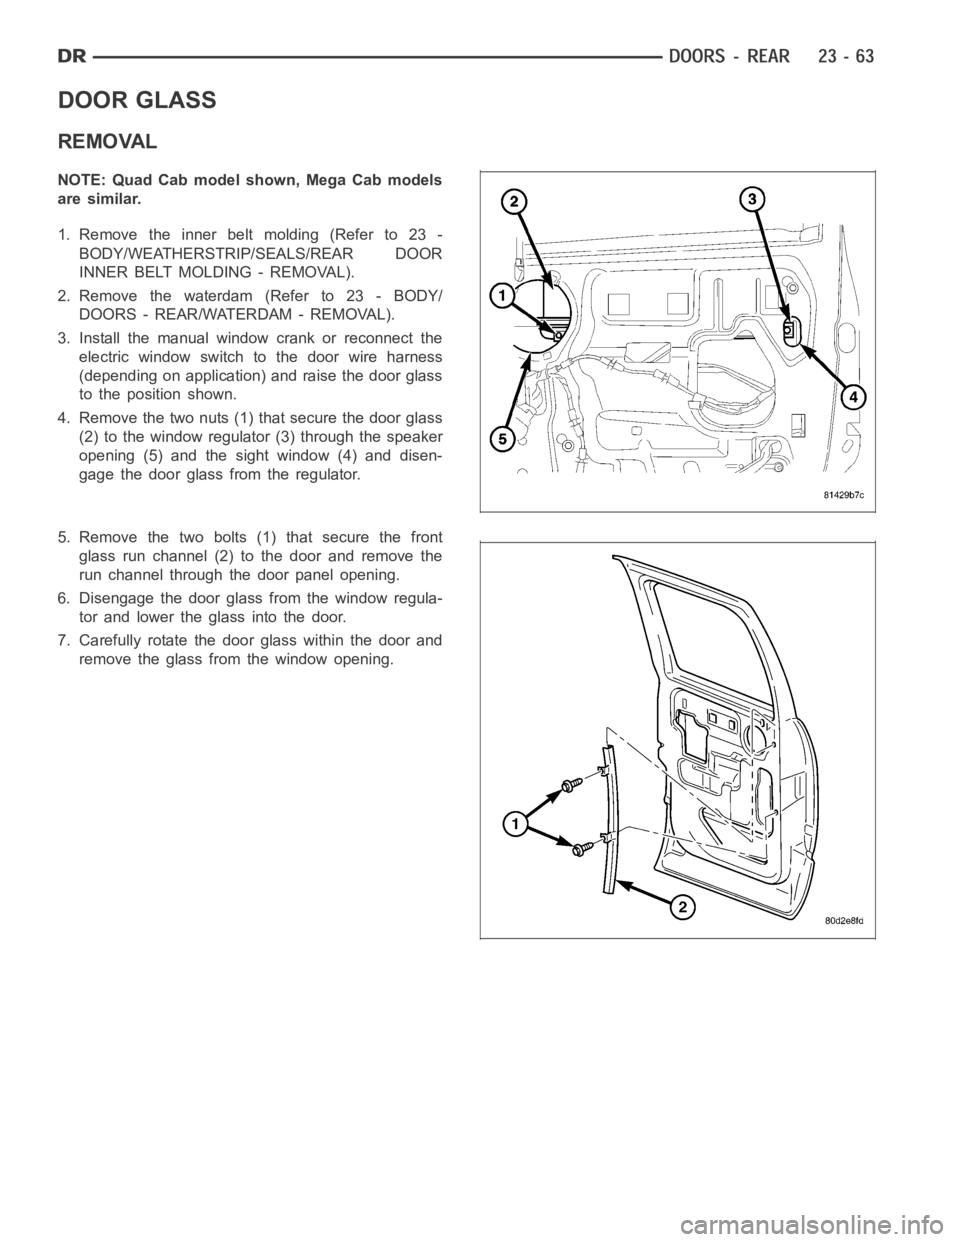
REMOVAL
NOTE: Quad Cab model shown, Mega Cab models
are similar.
1. Remove the inner belt molding (Refer to 23 -
BODY/WEATHERSTRIP/SEALS/REAR DOOR
INNER BELT MOLDING - REMOVAL).
2. Remove the waterdam (Refer to 23 - BODY/
DOORS - REAR/WATERDAM - REMOVAL).
3. Install the manual window crank or reconnect the
electric window switch to the door wire harness
(depending on application) and raise the door glass
to the position shown.
4. Remove the two nuts (1) that secure the door glass
(2) to the window regulator (3) through the speaker
opening (5) and the sight window (4) and disen-
gage the door glass from the regulator.
5. Remove the two bolts (1) that secure the front
glass run channel (2) to the door and remove the
run channel through the door panel opening.
6. Disengage the door glass from the window regula-
tor and lower the glass into the door.
7. Carefully rotate the door glass within the door and
remove the glass from the window opening.
Page 4401 of 5267
INSTALLATION
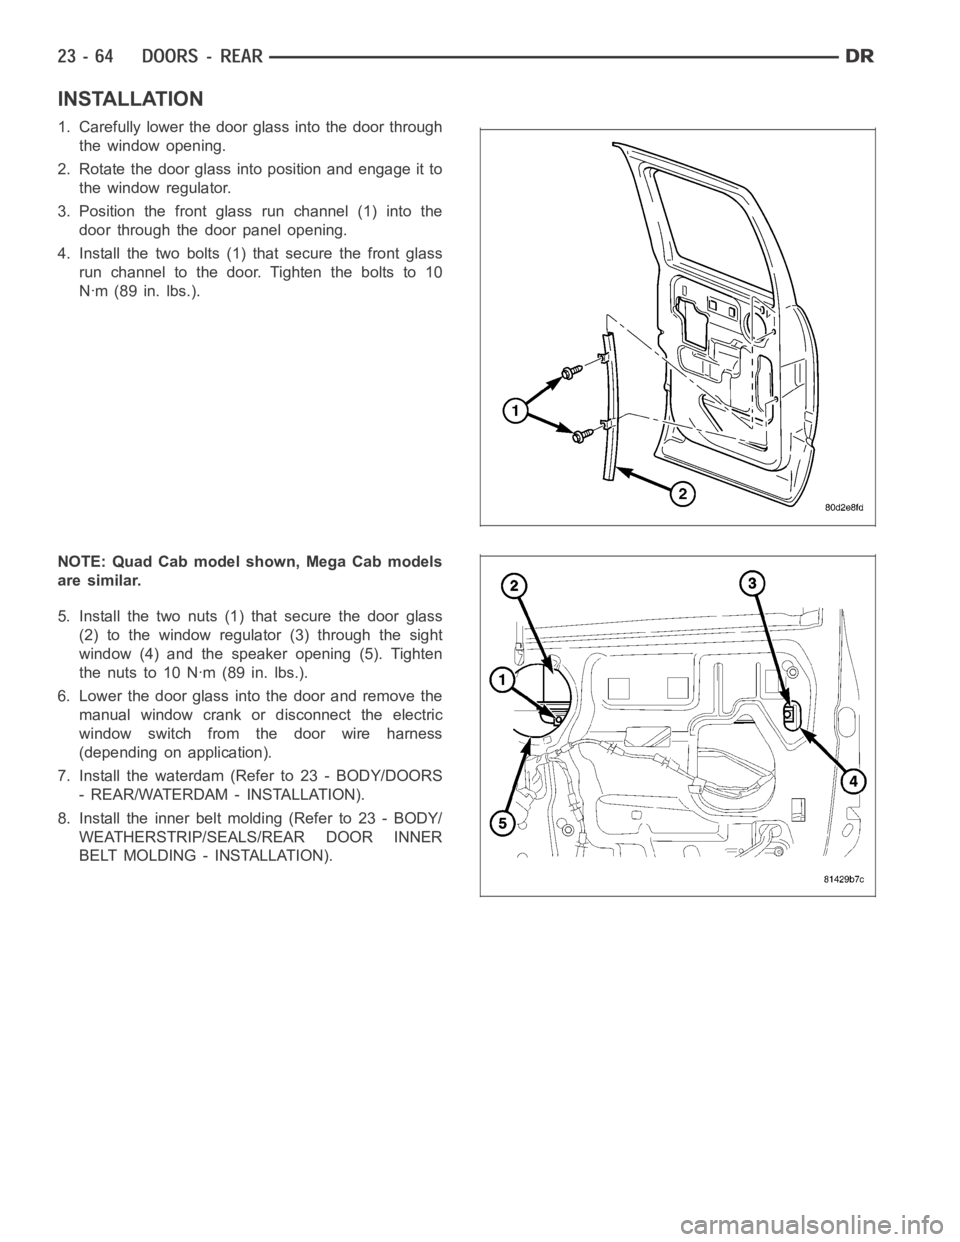
1. Carefully lower the door glass into the door through
the window opening.
2. Rotate the door glass into position and engage it to
the window regulator.
3. Position the front glass run channel (1) into the
door through the door panel opening.
4. Install the two bolts (1) that secure the front glass
run channel to the door. Tighten the bolts to 10
Nꞏm (89 in. lbs.).
NOTE: Quad Cab model shown, Mega Cab models
are similar.
5. Install the two nuts (1) that secure the door glass
(2) to the window regulator (3) through the sight
window (4) and the speaker opening (5). Tighten
thenutsto10Nꞏm(89in.lbs.).
6. Lower the door glass into the door and remove the
manual window crank or disconnect the electric
window switch from the door wire harness
(depending on application).
7. Install the waterdam (Refer to 23 - BODY/DOORS
- REAR/WATERDAM - INSTALLATION).
8. Install the inner belt molding (Refer to 23 - BODY/
WEATHERSTRIP/SEALS/REAR DOOR INNER
BELT MOLDING - INSTALLATION).
Page 4403 of 5267
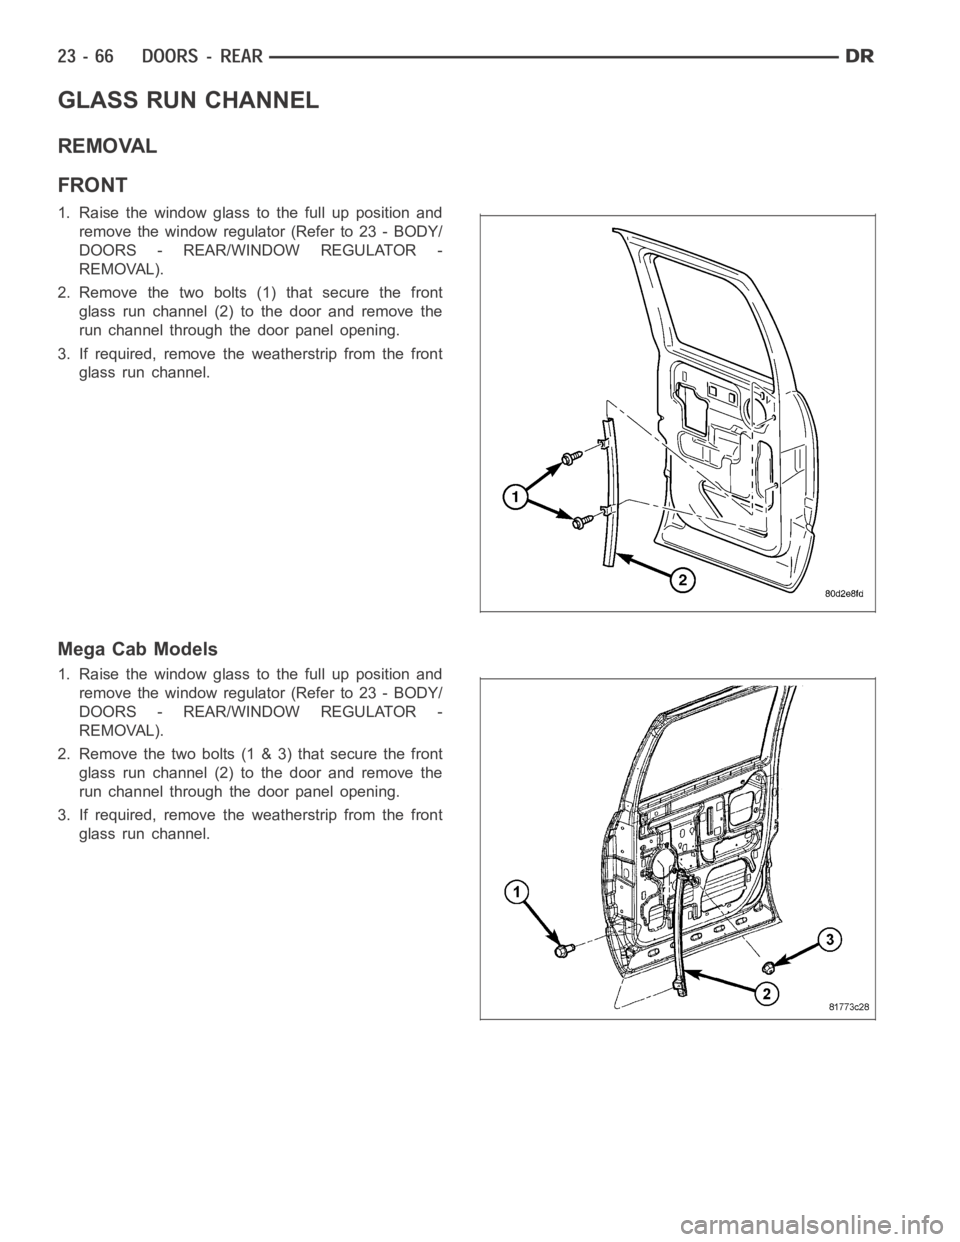
GLASS RUN CHANNEL
REMOVAL
FRONT
1. Raise the window glass to the full up position and
remove the window regulator (Refer to 23 - BODY/
DOORS - REAR/WINDOW REGULATOR -
REMOVAL).
2. Remove the two bolts (1) that secure the front
glass run channel (2) to the door and remove the
run channel through the door panel opening.
3. If required, remove the weatherstrip from the front
glass run channel.
Mega Cab Models
1. Raise the window glass to the full up position and
remove the window regulator (Refer to 23 - BODY/
DOORS - REAR/WINDOW REGULATOR -
REMOVAL).
2. Remove the two bolts (1 & 3) that secure the front
glass run channel (2) to the door and remove the
run channel through the door panel opening.
3. If required, remove the weatherstrip from the front
glass run channel.
Page 4404 of 5267
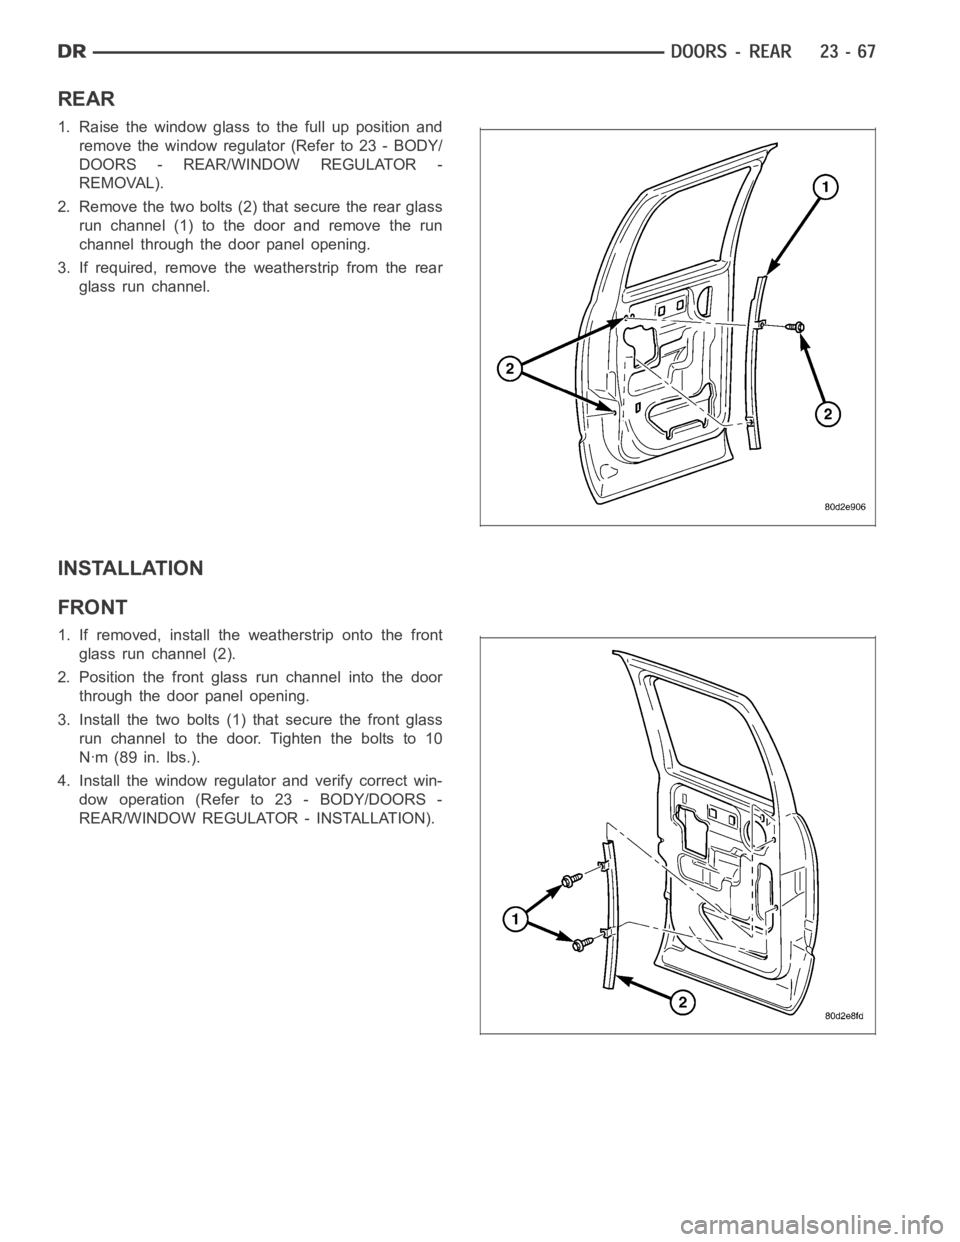
REAR
1. Raise the window glass to the full up position and
remove the window regulator (Refer to 23 - BODY/
DOORS - REAR/WINDOW REGULATOR -
REMOVAL).
2. Remove the two bolts (2) that secure the rear glass
run channel (1) to the door and remove the run
channel through the door panel opening.
3. If required, remove the weatherstrip from the rear
glass run channel.
INSTALLATION
FRONT
1. If removed, install the weatherstrip onto the front
glass run channel (2).
2. Position the front glass run channel into the door
through the door panel opening.
3. Install the two bolts (1) that secure the front glass
run channel to the door. Tighten the bolts to 10
Nꞏm (89 in. lbs.).
4. Install the window regulator and verify correct win-
dow operation (Refer to 23 - BODY/DOORS -
REAR/WINDOW REGULATOR - INSTALLATION).