DODGE RAM SRT-10 2006 Service Repair Manual
Manufacturer: DODGE, Model Year: 2006, Model line: RAM SRT-10, Model: DODGE RAM SRT-10 2006Pages: 5267, PDF Size: 68.7 MB
Page 3381 of 5267
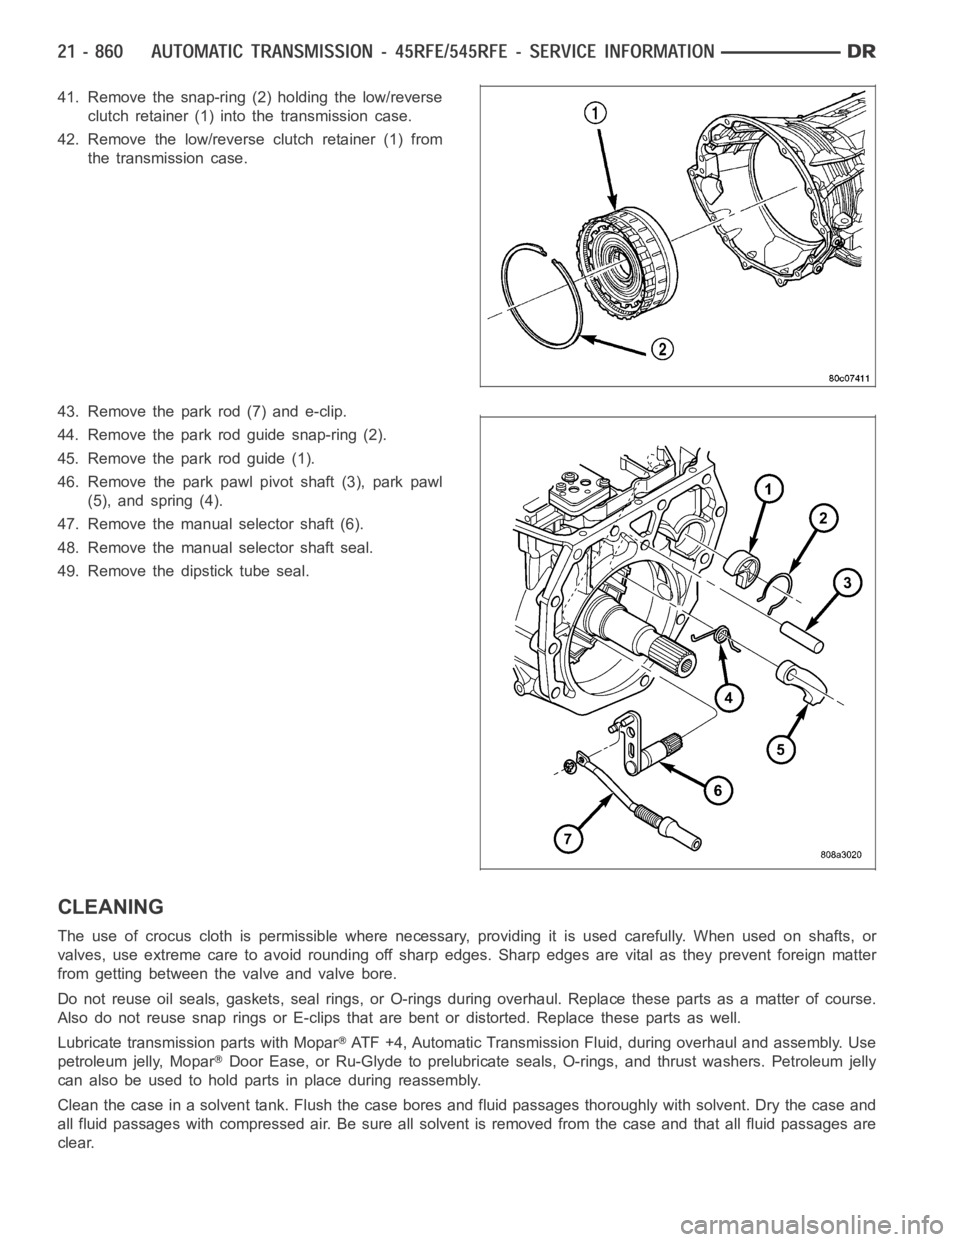
41. Remove the snap-ring (2) holding the low/reverse
clutch retainer (1) into the transmission case.
42. Remove the low/reverse clutch retainer (1) from
the transmission case.
43. Remove the park rod (7) and e-clip.
44. Remove the park rod guide snap-ring (2).
45. Remove the park rod guide (1).
46. Remove the park pawl pivot shaft (3), park pawl
(5), and spring (4).
47. Remove the manual selector shaft (6).
48. Remove the manual selector shaft seal.
49. Remove the dipstick tube seal.
CLEANING
The use of crocus cloth is permissible where necessary, providing it is usedcarefully.Whenusedonshafts,or
valves, use extreme care to avoid rounding off sharp edges. Sharp edges arevital as they prevent foreign matter
from getting between the valve and valve bore.
Do not reuse oil seals, gaskets, seal rings, or O-rings during overhaul. Replace these parts as a matter of course.
Also do not reuse snap rings or E-clips that are bent or distorted. Replace these parts as well.
Lubricate transmission parts with Mopar
ATF +4, Automatic Transmission Fluid, during overhaul and assembly. Use
petroleum jelly, Mopar
Door Ease, or Ru-Glyde to prelubricate seals, O-rings, and thrust washers. Petroleum jelly
canalsobeusedtoholdpartsinplaceduringreassembly.
Clean the case in a solvent tank. Flush the case bores and fluid passages thoroughly with solvent. Dry the case and
all fluid passages with compressed air. Be sure all solvent is removed fromthe case and that all fluid passages are
clear.
Page 3382 of 5267
NOTE: Do not use shop towels or rags to dry the case (or any other transmission component) unless they
aremadefromlint-freematerials.Lintwillsticktocasesurfacesandtransmission components and circu-
late throughout the transmission after assembly. A sufficient quantity of lint can block fluid passages and
interfere with valve body operation.
INSPECTION
Inspect the case for cracks, porous spots, worn bores, or damaged threads.Damaged threads can be repaired with
Helicoil
thread inserts. However, the case will have to be replaced if it exhibits any type of damage or wear.
ASSEMBLY
NOTE: Clean and inspect all components. Replace any components which showevidence of excessive wear
or scoring.
1. Install the cooler filter bypass valve. Torque the
bypass valve to specification. The valve uses a
tapered pipe thread and excessive torque can
damage the transmission case. Tighten the cooler
filter bypass valve to 4.5 Nꞏm (40 in.lbs.).
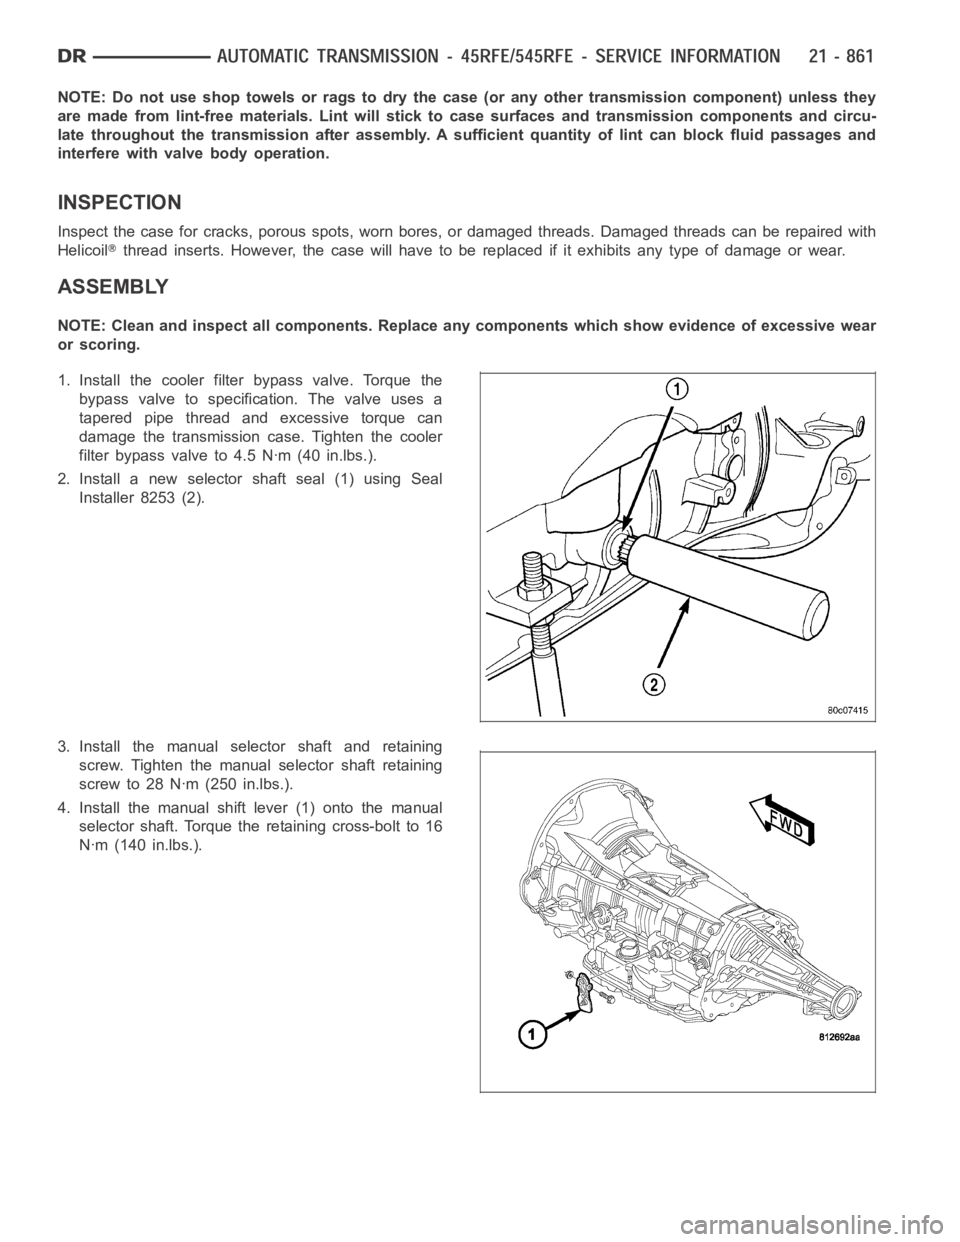
2. Install a new selector shaft seal (1) using Seal
Installer 8253 (2).
3. Install the manual selector shaft and retaining
screw. Tighten the manual selector shaft retaining
screw to 28 Nꞏm (250 in.lbs.).
4. Install the manual shift lever (1) onto the manual
selector shaft. Torque the retaining cross-bolt to 16
Nꞏm (140 in.lbs.).
Page 3383 of 5267
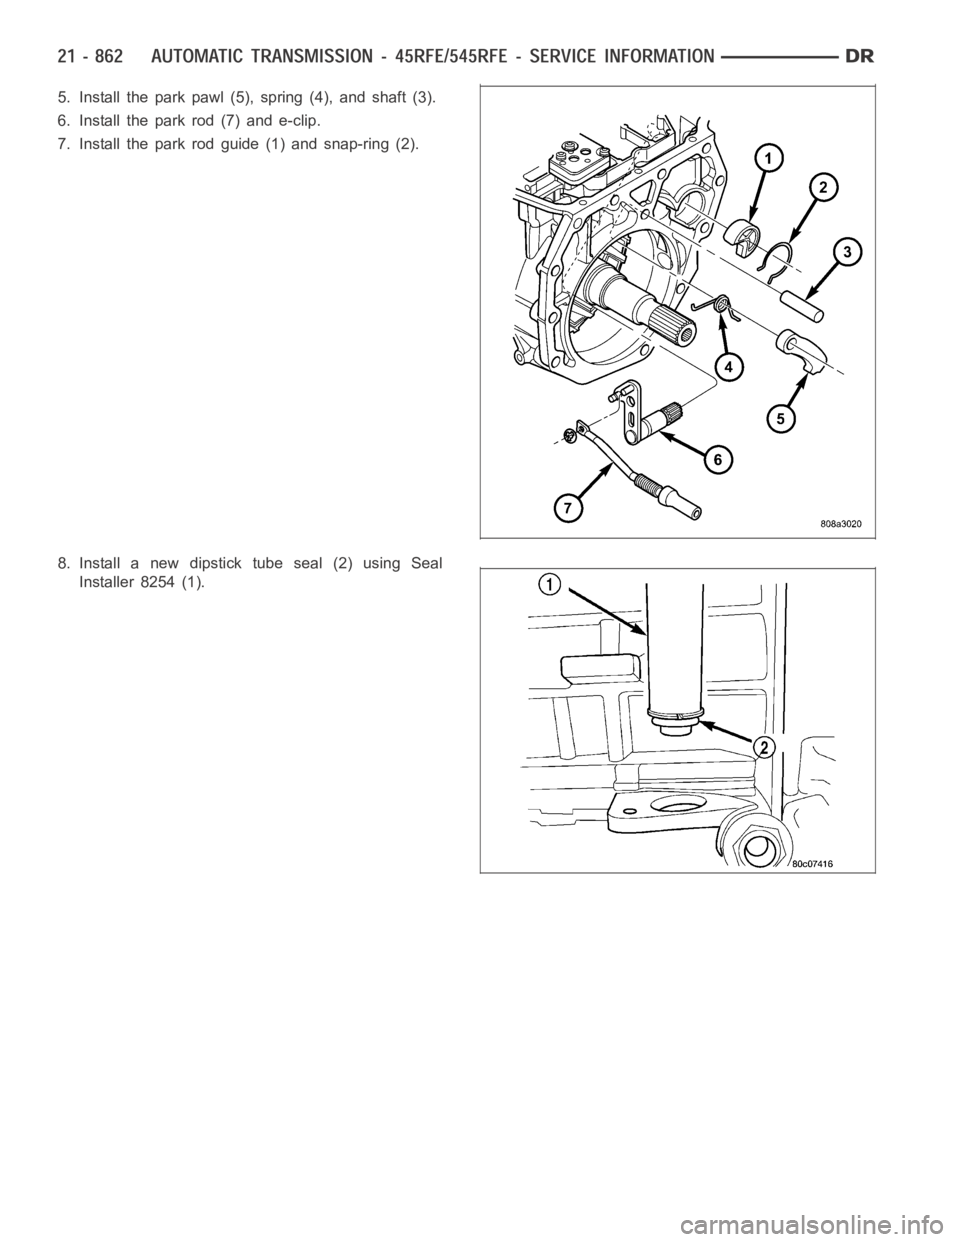
5. Install the park pawl (5), spring (4), and shaft (3).
6. Install the park rod (7) and e-clip.
7. Install the park rod guide (1) and snap-ring (2).
8. Install a new dipstick tube seal (2) using Seal
Installer 8254 (1).
Page 3384 of 5267
NOTE: Before final assembly of transmission cen-
terline, the 2C/4C clutch components should be
installed into position and measured as follows:
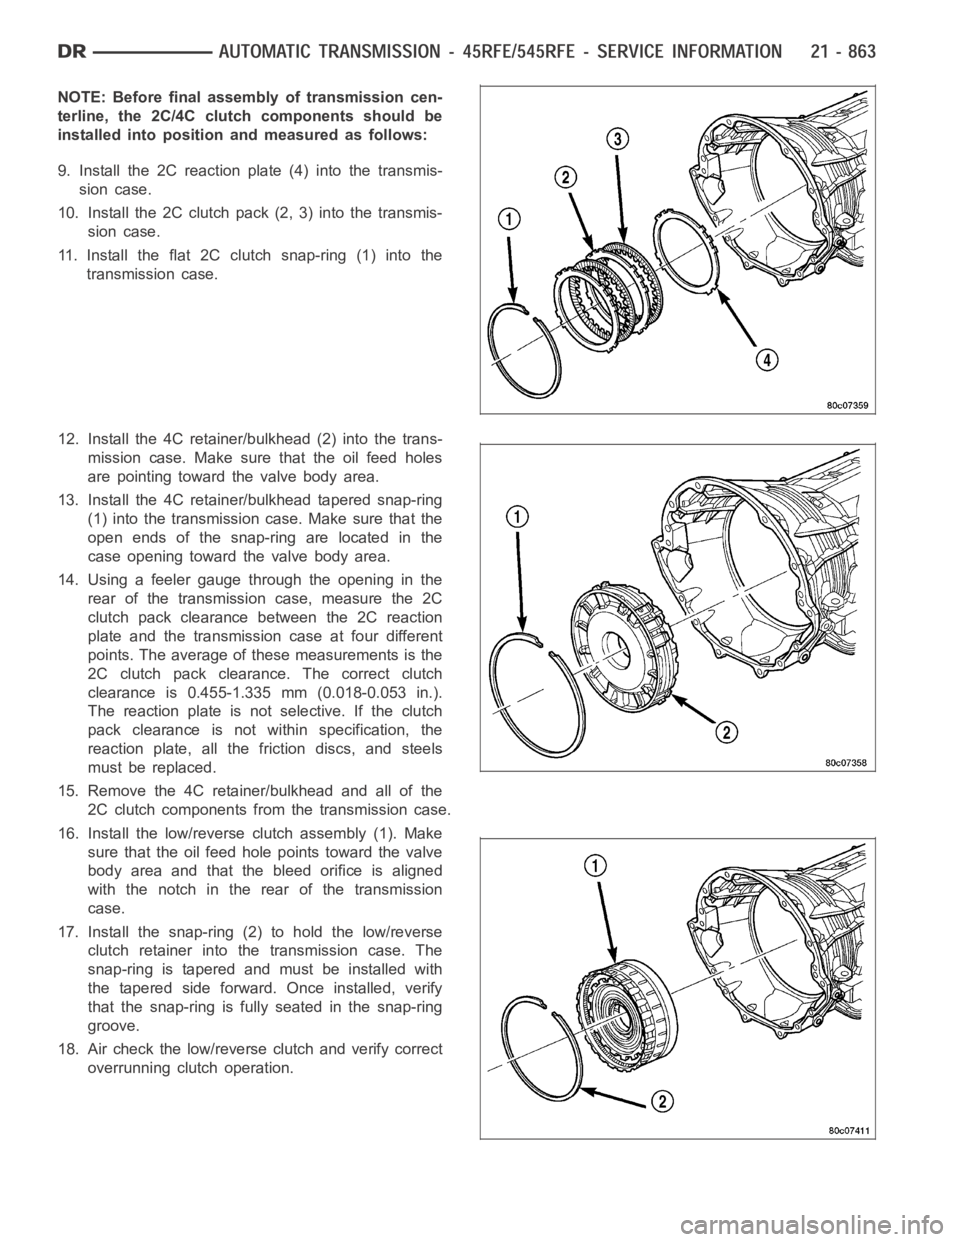
9. Install the 2C reaction plate (4) into the transmis-
sion case.
10. Install the 2C clutch pack (2, 3) into the transmis-
sion case.
11. Install the flat 2C clutchsnap-ring(1)intothe
transmission case.
12. Install the 4C retainer/bulkhead (2) into the trans-
mission case. Make sure that the oil feed holes
are pointing toward the valve body area.
13. Install the 4C retainer/bulkhead tapered snap-ring
(1) into the transmission case. Make sure that the
open ends of the snap-ring are located in the
case opening toward the valve body area.
14. Using a feeler gauge through the opening in the
rear of the transmission case, measure the 2C
clutch pack clearance between the 2C reaction
plate and the transmission case at four different
points. The average of these measurements is the
2C clutch pack clearance. The correct clutch
clearance is 0.455-1.335 mm (0.018-0.053 in.).
The reaction plate is not selective. If the clutch
pack clearance is not within specification, the
reaction plate, all the friction discs, and steels
must be replaced.
15. Remove the 4C retainer/bulkhead and all of the
2C clutch components from the transmission case.
16. Install the low/reverse clutch assembly (1). Make
sure that the oil feed hole points toward the valve
body area and that the bleed orifice is aligned
with the notch in the rear of the transmission
case.
17. Install the snap-ring (2) to hold the low/reverse
clutch retainer into the transmission case. The
snap-ring is tapered and must be installed with
the tapered side forward. Once installed, verify
that the snap-ring is fully seated in the snap-ring
groove.
18. Air check the low/reverse clutch and verify correct
overrunning clutch operation.
Page 3385 of 5267
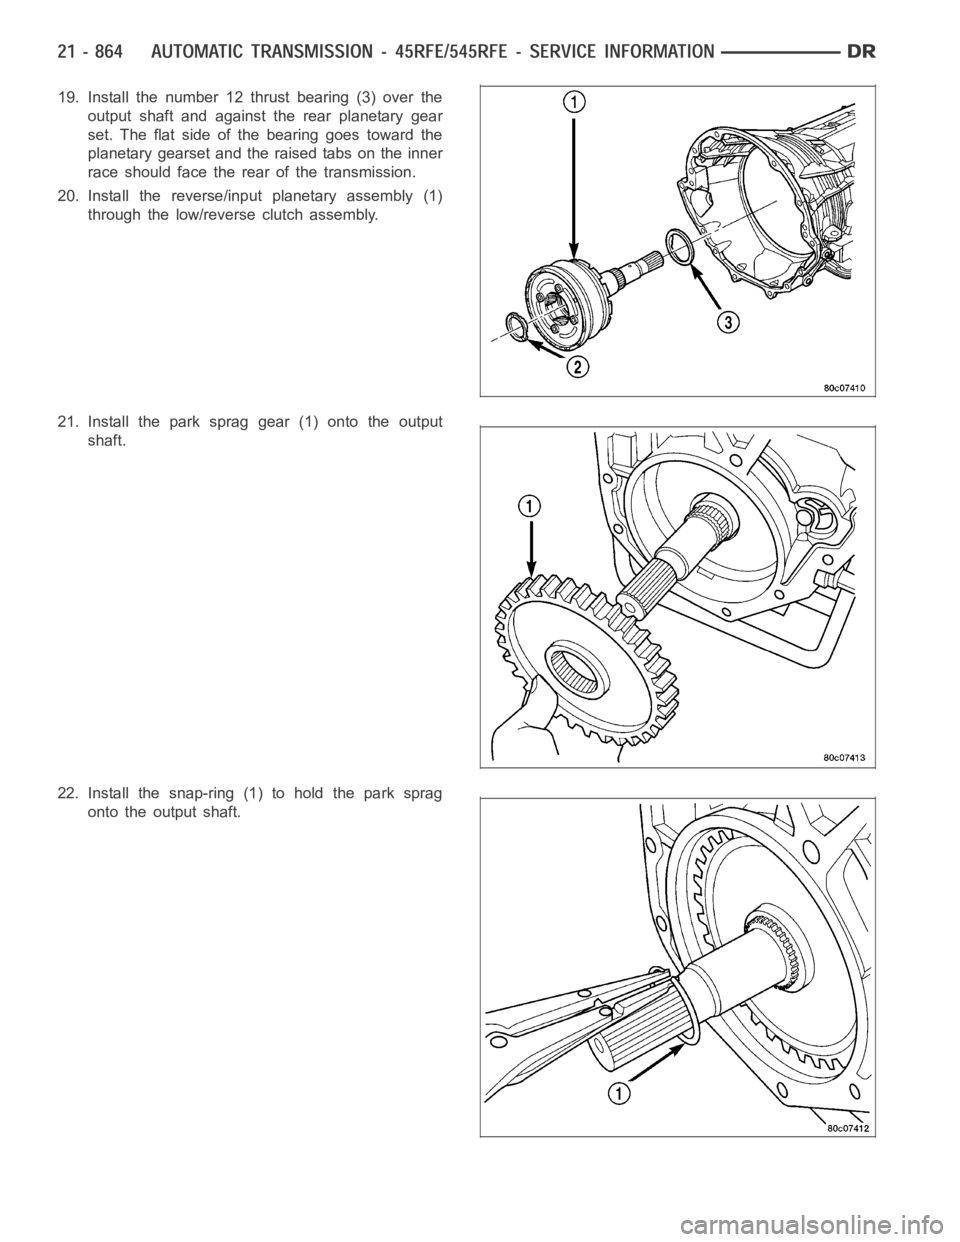
19. Install the number 12 thrust bearing (3) over the
output shaft and against the rear planetary gear
set. The flat side of the bearing goes toward the
planetary gearset and the raised tabs on the inner
race should face the rear of the transmission.
20. Install the reverse/input planetary assembly (1)
through the low/reverse clutch assembly.
21. Install the park sprag gear (1) onto the output
shaft.
22. Install the snap-ring (1) to hold the park sprag
onto the output shaft.
Page 3386 of 5267
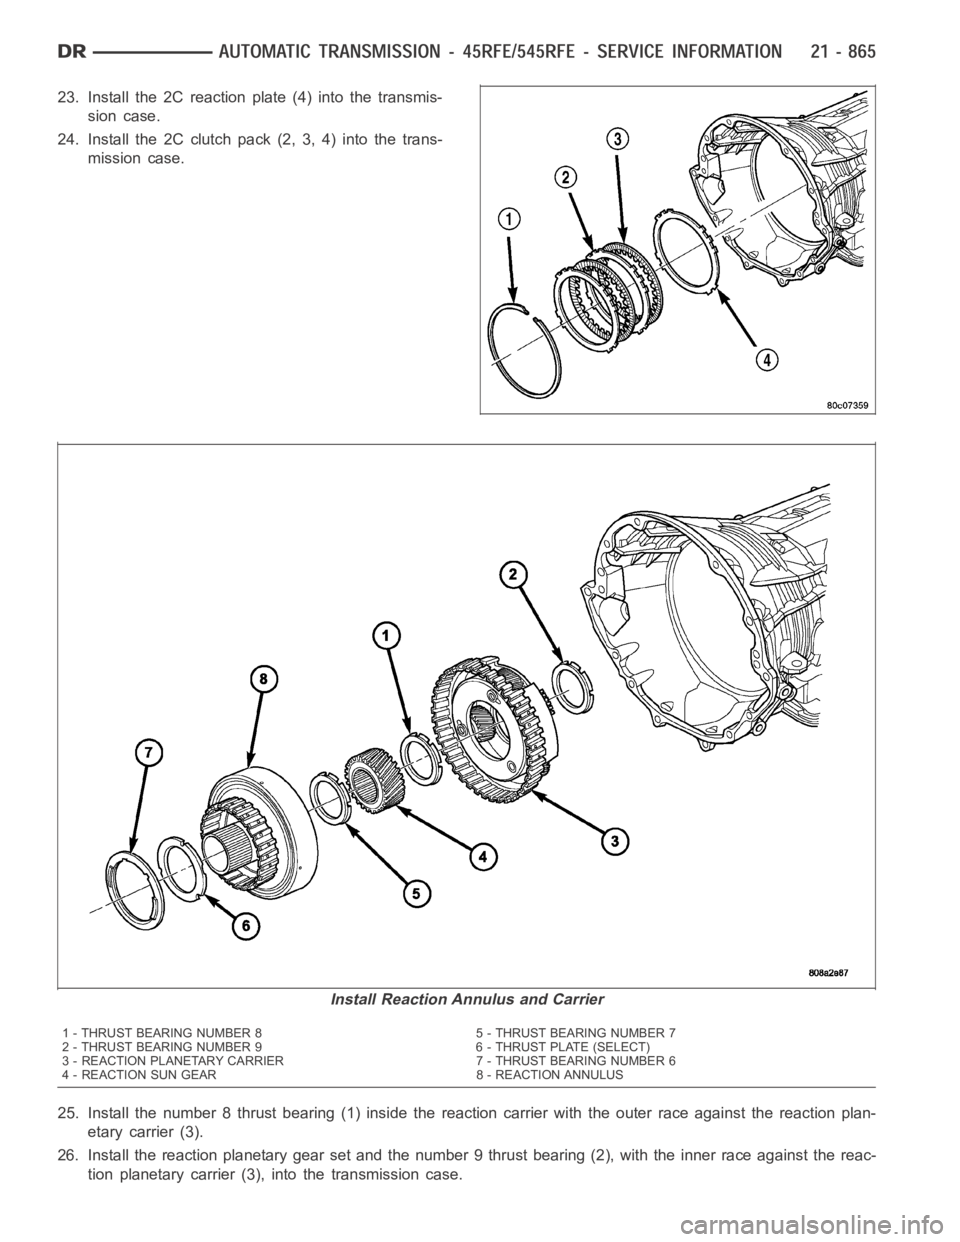
23. Install the 2C reaction plate (4) into the transmis-
sion case.
24. Install the 2C clutch pack (2, 3, 4) into the trans-
mission case.
25. Install the number 8 thrust bearing (1) inside the reaction carrier with the outer race against the reaction plan-
etary carrier (3).
26. Install the reaction planetary gear set and the number 9 thrust bearing(2), with the inner race against the reac-
tion planetary carrier (3), into the transmission case.
Install Reaction Annulus and Carrier
1 - THRUST BEARING NUMBER 8 5 - THRUST BEARING NUMBER 7
2 - THRUST BEARING NUMBER 9 6 - THRUST PLATE (SELECT)
3 - REACTION PLANETARY CARRIER 7 - THRUST BEARING NUMBER 6
4 - REACTION SUN GEAR 8 - REACTION ANNULUS
Page 3387 of 5267
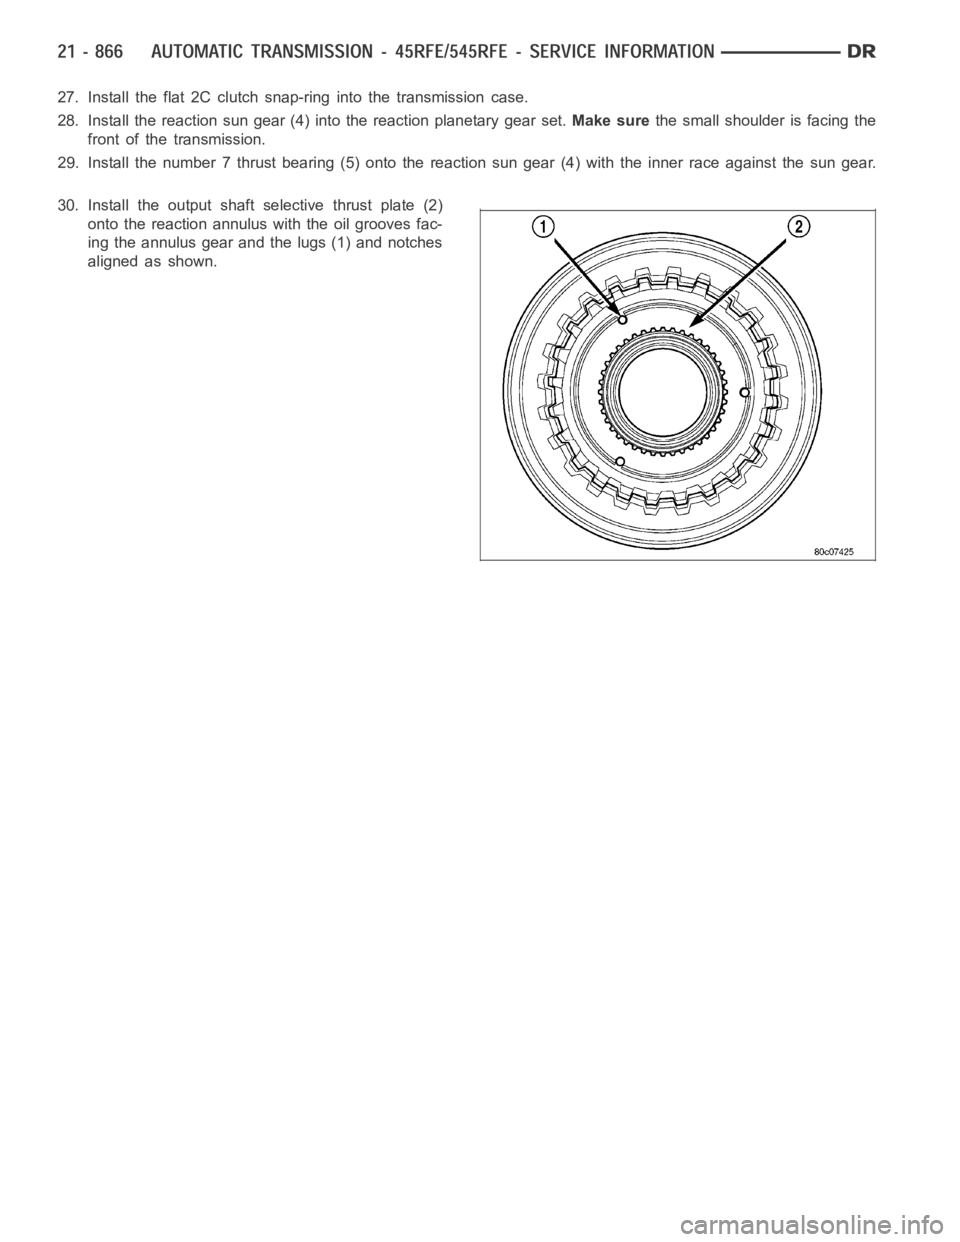
27. Install the flat 2C clutch snap-ring into the transmission case.
28. Install the reaction sun gear (4) into the reaction planetary gear set.Make surethe small shoulder is facing the
front of the transmission.
29. Install the number 7 thrust bearing (5) onto the reaction sun gear (4) with the inner race against the sun gear.
30. Install the output shaft selective thrust plate (2)
onto the reaction annulus with the oil grooves fac-
ing the annulus gear and the lugs (1) and notches
aligned as shown.
Page 3388 of 5267
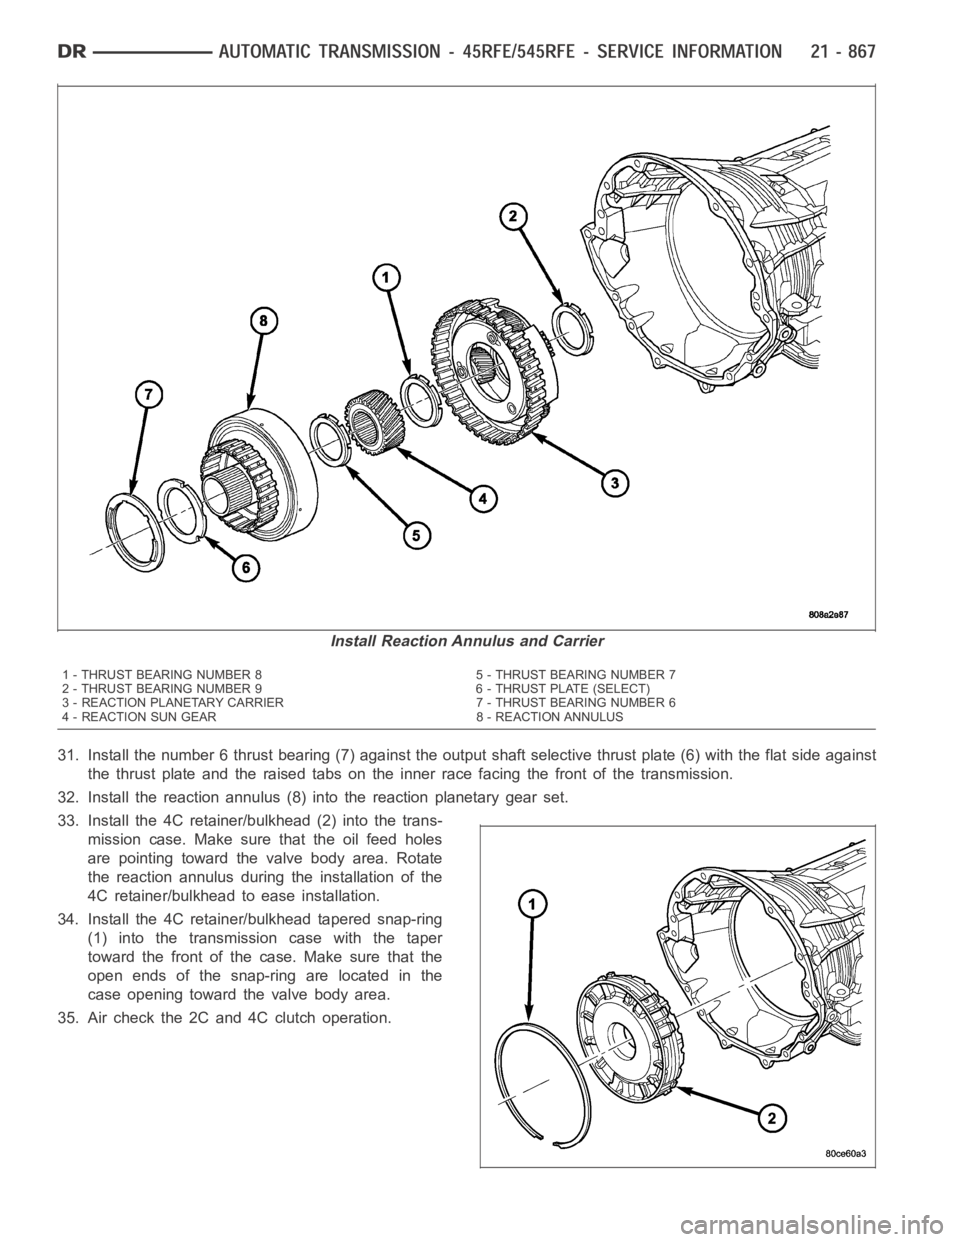
31. Install the number 6 thrust bearing (7) against the output shaft selective thrust plate (6) with the flat side against
the thrust plate and the raised tabs on the inner race facing the front of thetransmission.
32. Install the reaction annulus (8) into the reaction planetary gear set.
33. Install the 4C retainer/bulkhead (2) into the trans-
mission case. Make sure that the oil feed holes
are pointing toward the valve body area. Rotate
the reaction annulus during the installation of the
4C retainer/bulkhead to ease installation.
34. Install the 4C retainer/bulkhead tapered snap-ring
(1) into the transmission case with the taper
toward the front of the case. Make sure that the
open ends of the snap-ring are located in the
case opening toward the valve body area.
35. Air check the 2C and 4C clutch operation.
Install Reaction Annulus and Carrier
1 - THRUST BEARING NUMBER 8 5 - THRUST BEARING NUMBER 7
2 - THRUST BEARING NUMBER 9 6 - THRUST PLATE (SELECT)
3 - REACTION PLANETARY CARRIER 7 - THRUST BEARING NUMBER 6
4 - REACTION SUN GEAR 8 - REACTION ANNULUS
Page 3389 of 5267
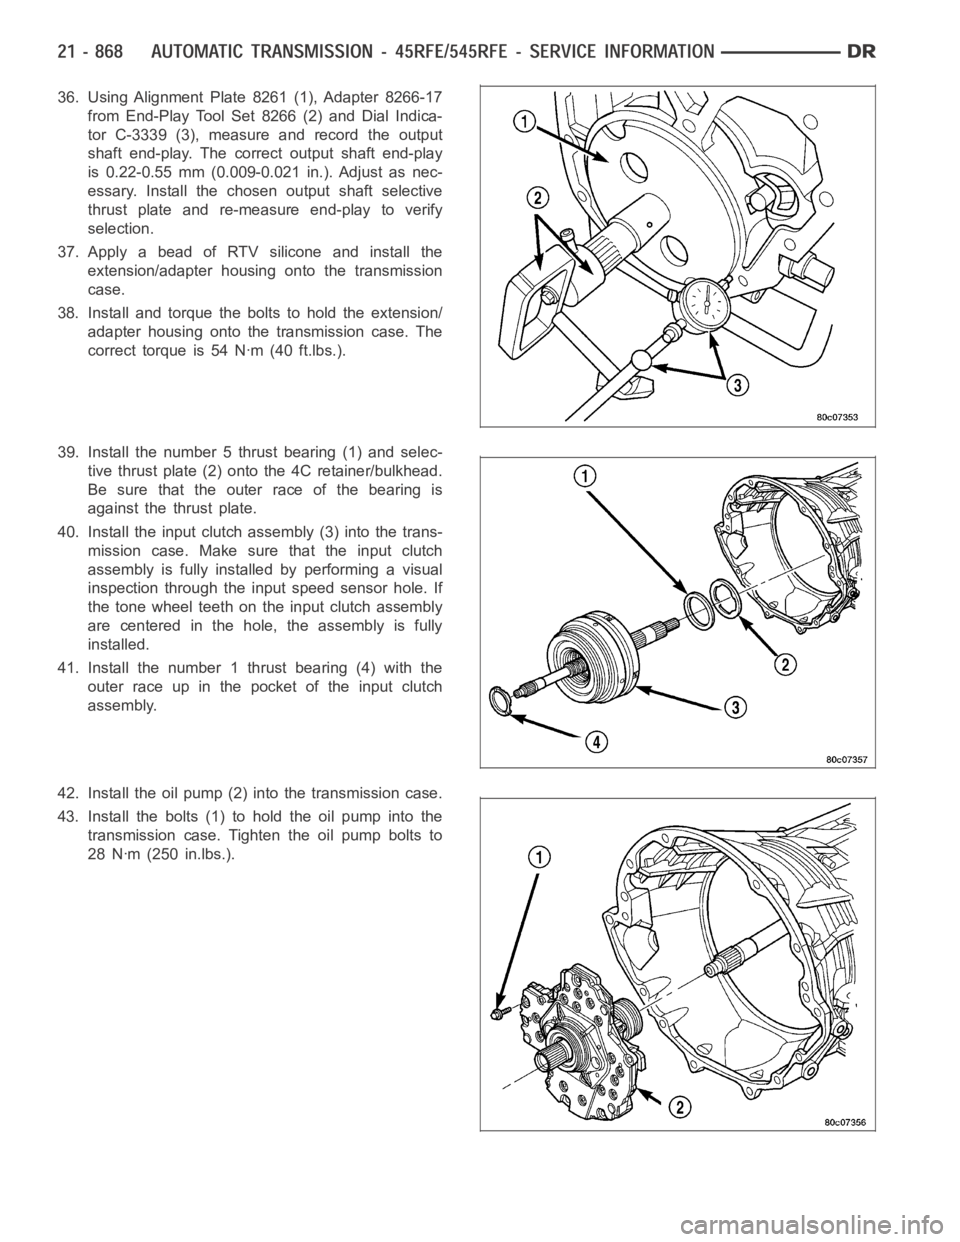
36. Using Alignment Plate 8261 (1), Adapter 8266-17
from End-Play Tool Set 8266 (2) and Dial Indica-
tor C-3339 (3), measure and record the output
shaft end-play. The correct output shaft end-play
is 0.22-0.55 mm (0.009-0.021 in.). Adjust as nec-
essary. Install the chosen output shaft selective
thrust plate and re-measure end-play to verify
selection.
37. Apply a bead of RTV silicone and install the
extension/adapter housing onto the transmission
case.
38. Install and torque the bolts to hold the extension/
adapter housing onto the transmission case. The
correct torque is 54 Nꞏm (40 ft.lbs.).
39. Install the number 5 thrust bearing (1) and selec-
tive thrust plate (2) onto the 4C retainer/bulkhead.
Be sure that the outer race of the bearing is
against the thrust plate.
40. Install the input clutch assembly (3) into the trans-
mission case. Make sure that the input clutch
assembly is fully installedbyperformingavisual
inspection through the input speed sensor hole. If
the tone wheel teeth on the input clutch assembly
are centered in the hole, the assembly is fully
installed.
41. Install the number 1 thrust bearing (4) with the
outer race up in the pocket of the input clutch
assembly.
42. Install the oil pump (2) into the transmission case.
43. Install the bolts (1) to hold the oil pump into the
transmission case. Tighten the oil pump bolts to
28 Nꞏm (250 in.lbs.).
Page 3390 of 5267
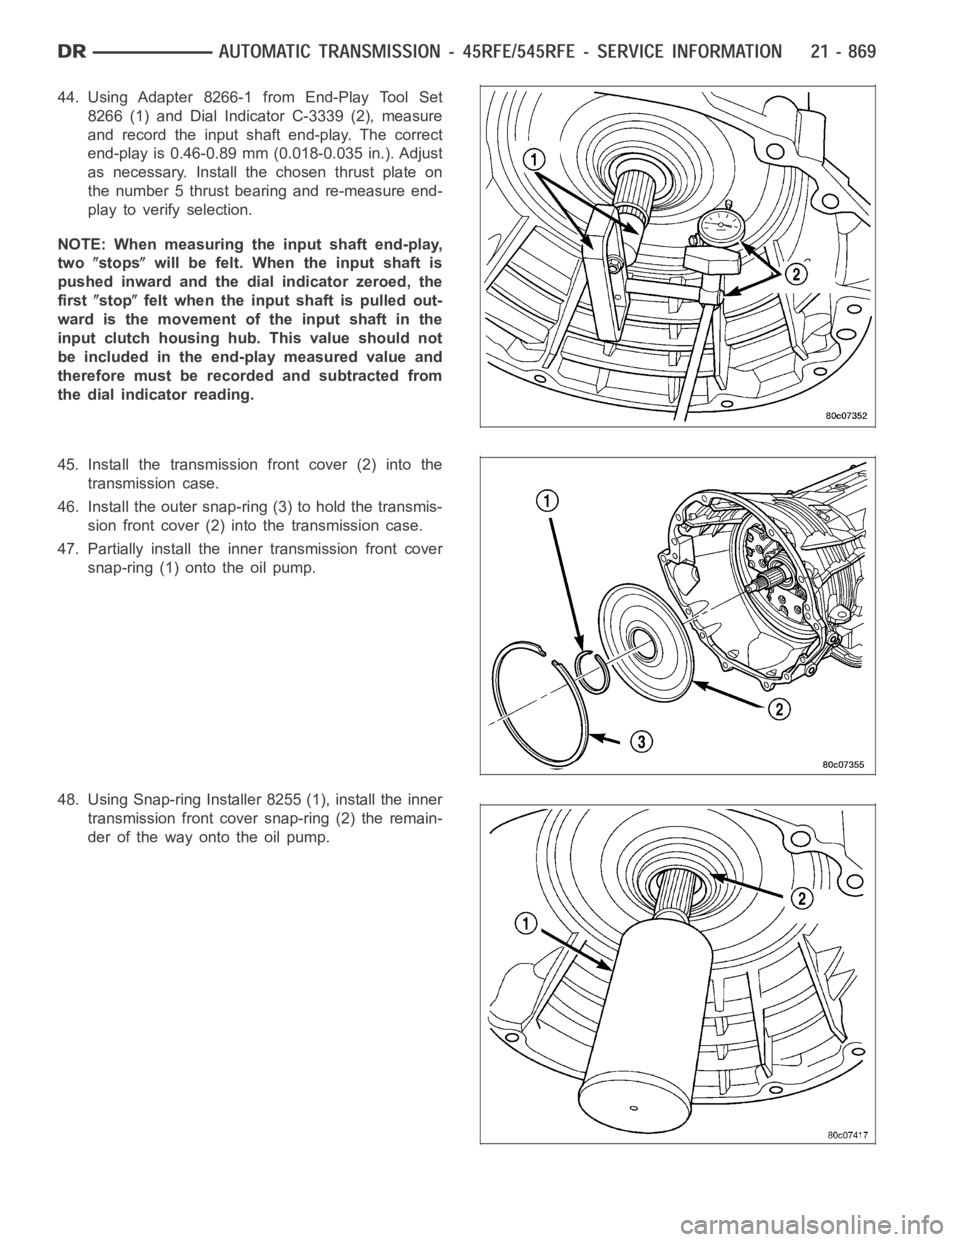
44. Using Adapter 8266-1 from End-Play Tool Set
8266 (1) and Dial Indicator C-3339 (2), measure
and record the input shaft end-play. The correct
end-play is 0.46-0.89 mm (0.018-0.035 in.). Adjust
as necessary. Install the chosen thrust plate on
the number 5 thrust bearing and re-measure end-
play to verify selection.
NOTE: When measuring the input shaft end-play,
two
stopswill be felt. When the input shaft is
pushed inward and the dial indicator zeroed, the
first
stopfelt when the input shaft is pulled out-
wardisthemovementoftheinputshaftinthe
input clutch housing hub. This value should not
be included in the end-play measured value and
therefore must be recorded and subtracted from
the dial indicator reading.
45. Install the transmission front cover (2) into the
transmission case.
46. Install the outer snap-ring (3) to hold the transmis-
sion front cover (2) into the transmission case.
47. Partially install the inner transmission front cover
snap-ring (1) onto the oil pump.
48. Using Snap-ring Installer 8255 (1), install the inner
transmission front cover snap-ring (2) the remain-
der of the way onto the oil pump.