warning light DODGE SPRINTER 2007 2.G Owner's Manual
[x] Cancel search | Manufacturer: DODGE, Model Year: 2007, Model line: SPRINTER, Model: DODGE SPRINTER 2007 2.GPages: 393, PDF Size: 7.61 MB
Page 116 of 393
115 Controls in detail
Driving and parking
3
Handbrake
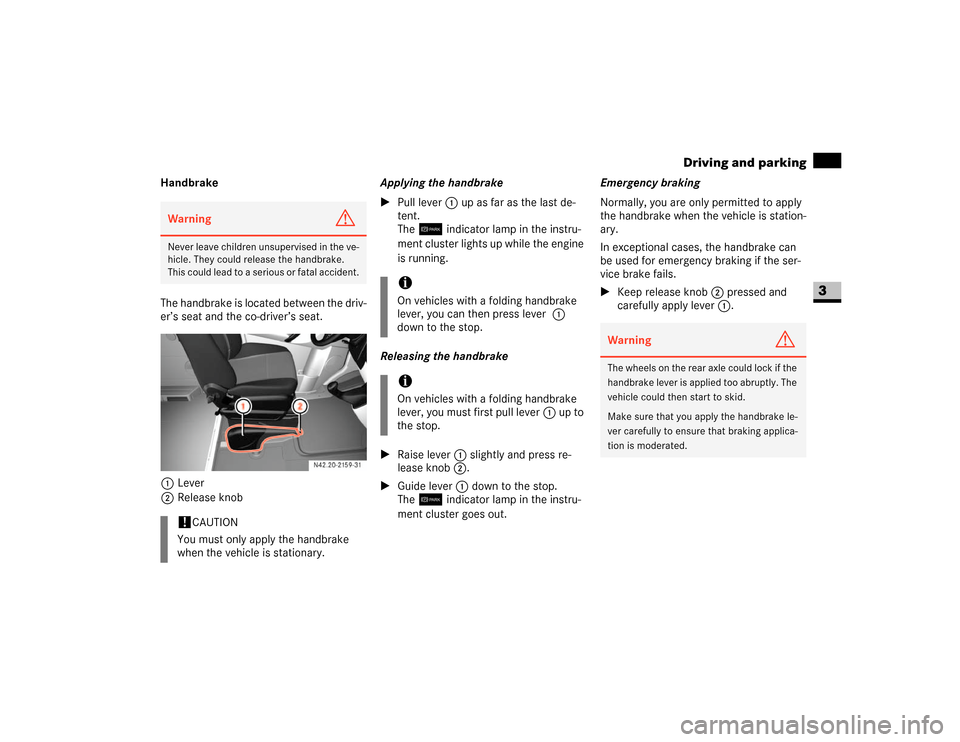
The handbrake is located between the driv-
er’s seat and the co-driver’s seat.
1Lever
2Release knobApplying the handbrake
\1Pull lever1 up as far as the last de-
tent.
The7 indicator lamp in the instru-
ment cluster lights up while the engine
is running.
Releasing the handbrake
\1Raise lever1 slightly and press re-
lease knob2.
\1Guide lever1 down to the stop.
The7 indicator lamp in the instru-
ment cluster goes out.Emergency braking
Normally, you are only permitted to apply
the handbrake when the vehicle is station-
ary.
In exceptional cases, the handbrake can
be used for emergency braking if the ser-
vice brake fails.
\1Keep release knob2 pressed and
carefully apply lever1.Warning
G
Never leave children unsupervised in the ve-
hicle. They could release the handbrake.
This could lead to a serious or fatal accident.!
CAUTION
You must only apply the handbrake
when the vehicle is stationary.
iOn vehicles with a folding handbrake
lever, you can then press lever1
down to the stop.iOn vehicles with a folding handbrake
lever, you must first pull lever1 up to
the stop.
Warning
G
The wheels on the rear axle could lock if the
handbrake lever is applied too abruptly. The
vehicle could then start to skid.
Make sure that you apply the handbrake le-
ver carefully to ensure that braking applica-
tion is moderated.
Page 125 of 393
124 Controls in detailAutomatic transmission
3
Stopping
If you are only stopping briefly:
\1leave the selector lever in the drive po-
sition
\1secure the vehicle against rolling away
using the brake pedal
Maneuvering
Maneuvering in a tight space:
\1Control the speed by braking carefully.
\1Accelerate only slightly and avoid jolt-
ing.Trailer towing
\1Run the engine in the moderate engine
speed range on steep uphill gradients.
\1Depending on the uphill or downhill
gradient, shift down to shift range3 or
2 (\2page 123), even if cruise control*
is switched on.
Working on the vehicle
iFor rapid maneuvering (e.g. to rock the
vehicle out of snow or slush), you can
shift back and forth between drive
positionD and reverse gearR at low
speeds without applying the brakes.
Warning
G
Apply the handbrake before working on the
vehicle and shift the automatic transmission
into parking positionP.
The vehicle could otherwise roll away.
Page 152 of 393
151 Controls in detail
Driving systems
3
Front sensors
Rear sensors
Minimum distance
If an obstacle is within this range, all seg-
ments of the warning displays light up and
you will hear an audible warning tone. The
distance may no longer be displayed if you
drive the vehicle closer to the obstacle
than the minimum distance.Warning displays
The warning displays indicate the distance
between the sensor and the obstacle.
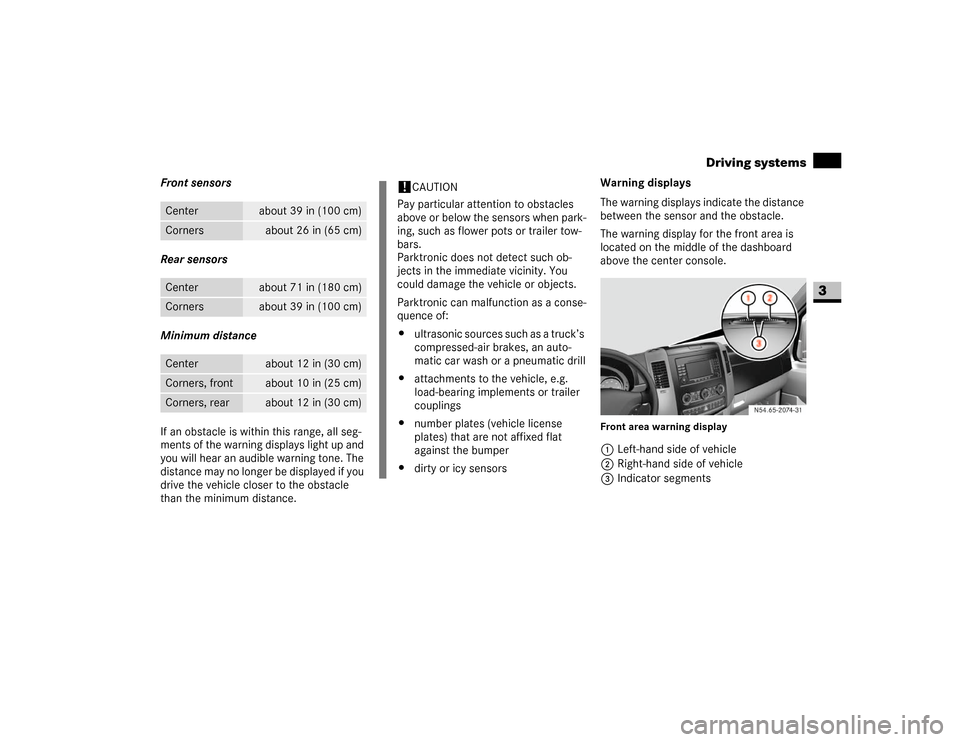
The warning display for the front area is
located on the middle of the dashboard
above the center console.
Front area warning display1Left-hand side of vehicle
2Right-hand side of vehicle
3Indicator segments
Center
about 39 in (100 cm)
Corners
about 26 in (65 cm)
Center
about 71 in (180 cm)
Corners
about 39 in (100 cm)
Center
about 12 in (30 cm)
Corners, front
about 10 in (25 cm)
Corners, rear
about 12 in (30 cm)
!
CAUTION
Pay particular attention to obstacles
above or below the sensors when park-
ing, such as flower pots or trailer tow-
bars.
Parktronic does not detect such ob-
jects in the immediate vicinity. You
could damage the vehicle or objects.
Parktronic can malfunction as a conse-
quence of:
\4ultrasonic sources such as a truck’s
compressed-air brakes, an auto-
matic car wash or a pneumatic drill
\4attachments to the vehicle, e.g.
load-bearing implements or trailer
couplings
\4number plates (vehicle license
plates) that are not affixed flat
against the bumper
\4dirty or icy sensors
N54.65-2074-31
Page 153 of 393
152 Controls in detailDriving systems
3
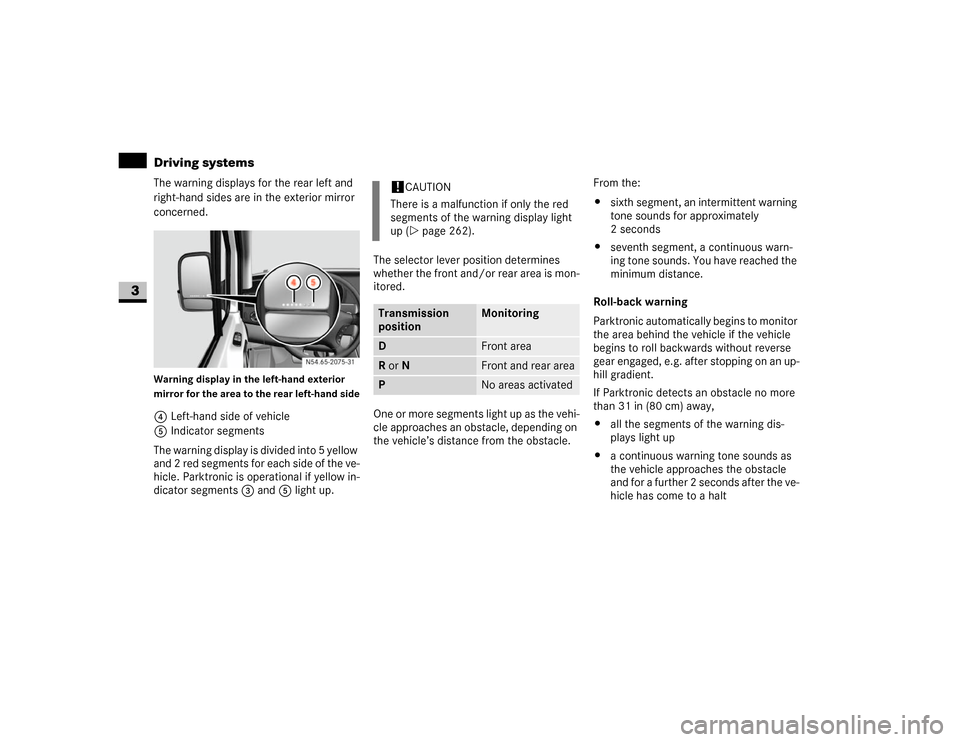
The warning displays for the rear left and
right-hand sides are in the exterior mirror
concerned.Warning display in the left-hand exterior
mirror for the area to the rear left-hand side4Left-hand side of vehicle
5Indicator segments
The warning display is divided into 5 yellow
and 2 red segments for each side of the ve-
hicle. Parktronic is operational if yellow in-
dicator segments3 and5 light up.The selector lever position determines
whether the front and/or rear area is mon-
itored.
One or more segments light up as the vehi-
cle approaches an obstacle, depending on
the vehicle’s distance from the obstacle.From the:
\4sixth segment, an intermittent warning
tone sounds for approximately
2seconds
\4seventh segment, a continuous warn-
ing tone sounds. You have reached the
minimum distance.
Roll-back warning
Parktronic automatically begins to monitor
the area behind the vehicle if the vehicle
begins to roll backwards without reverse
gear engaged, e.g. after stopping on an up-
hill gradient.
If Parktronic detects an obstacle no more
than 31 in (80 cm) away,
\4all the segments of the warning dis-
plays light up
\4a continuous warning tone sounds as
the vehicle approaches the obstacle
and for a further 2 seconds after the ve-
hicle has come to a halt N54.65-2075-31
!
CAUTION
There is a malfunction if only the red
segments of the warning display light
up (\2page 262).
Transmission
position
Monitoring
D
Front area
R or N
Front and rear area
P
No areas activated
Page 162 of 393
161 Controls in detail
Transporting
3
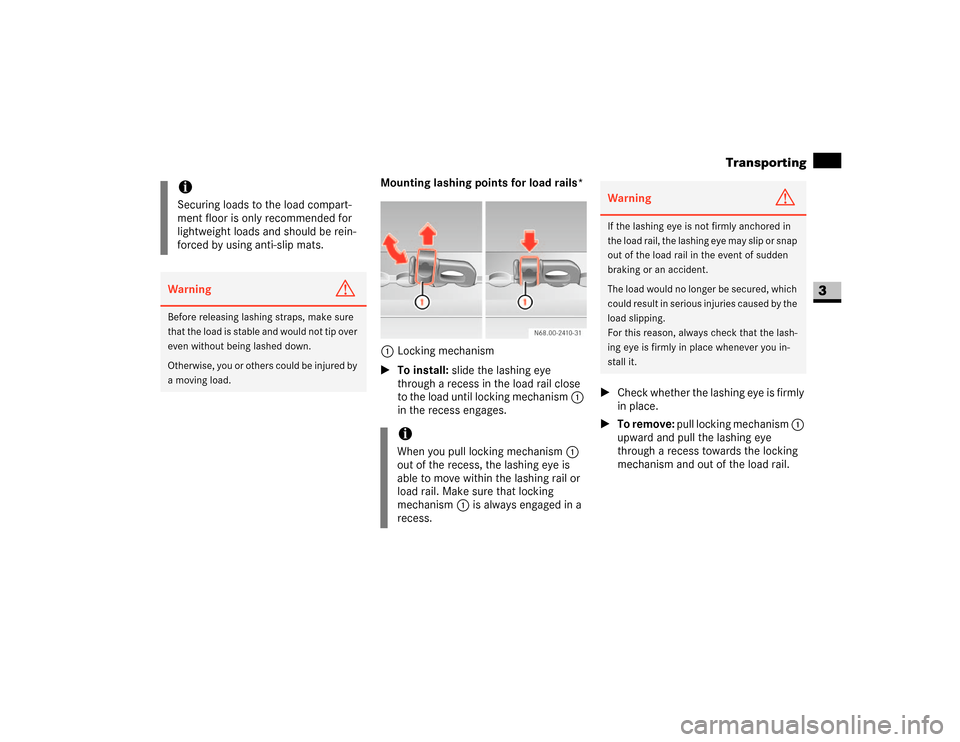
Mounting lashing points for load rails*
1Locking mechanism
\1To install: slide the lashing eye
through a recess in the load rail close
to the load until locking mechanism 1
in the recess engages.\1Check whether the lashing eye is firmly
in place.
\1To remove: pull locking mechanism 1
upward and pull the lashing eye
through a recess towards the locking
mechanism and out of the load rail.
iSecuring loads to the load compart-
ment floor is only recommended for
lightweight loads and should be rein-
forced by using anti-slip mats.Warning
G
Before releasing lashing straps, make sure
that the load is stable and would not tip over
even without being lashed down.
Otherwise, you or others could be injured by
a moving load.
iWhen you pull locking mechanism1
out of the recess, the lashing eye is
able to move within the lashing rail or
load rail. Make sure that locking
mechanism1 is always engaged in a
recess.
Warning
G
If the lashing eye is not firmly anchored in
the load rail, the lashing eye may slip or snap
out of the load rail in the event of sudden
braking or an accident.
The load would no longer be secured, which
could result in serious injuries caused by the
load slipping.
For this reason, always check that the lash-
ing eye is firmly in place whenever you in-
stall it.
Page 165 of 393
164 Controls in detailFeatures
3
\3 FeaturesStorage compartments above the wind-
shieldStorage compartment above the roof
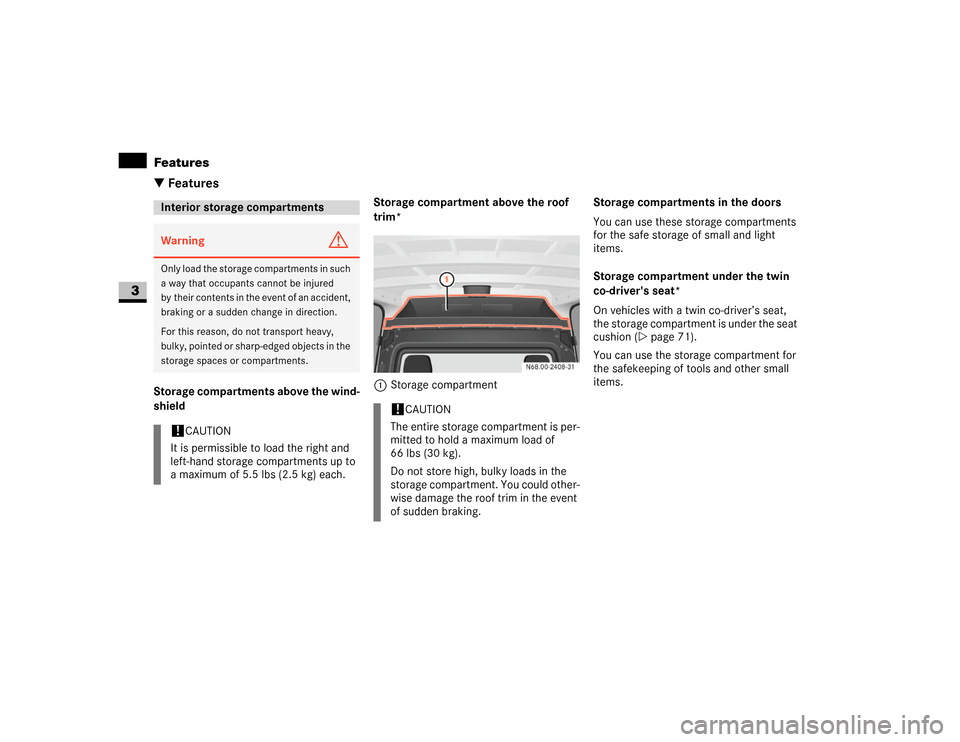
trim*
1Storage compartmentStorage compartments in the doors
You can use these storage compartments
for the safe storage of small and light
items.
Storage compartment under the twin
co-driver's seat*
On vehicles with a twin co-driver’s seat,
the storage compartment is under the seat
cushion (\2page 71).
You can use the storage compartment for
the safekeeping of tools and other small
items.Interior storage compartmentsWarning
G
Only load the storage compartments in such
a way that occupants cannot be injured
by their contents in the event of an accident,
braking or a sudden change in direction.
For this reason, do not transport heavy,
bulky, pointed or sharp-edged objects in the
storage spaces or compartments.!
CAUTION
It is permissible to load the right and
left-hand storage compartments up to
a maximum of 5.5 lbs (2.5 kg) each.
!
CAUTION
The entire storage compartment is per-
mitted to hold a maximum load of
66 lbs (30 kg).
Do not store high, bulky loads in the
storage compartment. You could other-
wise damage the roof trim in the event
of sudden braking.
Page 170 of 393
169 Controls in detail
Features
3
Ashtray in the passenger compart-
ment*
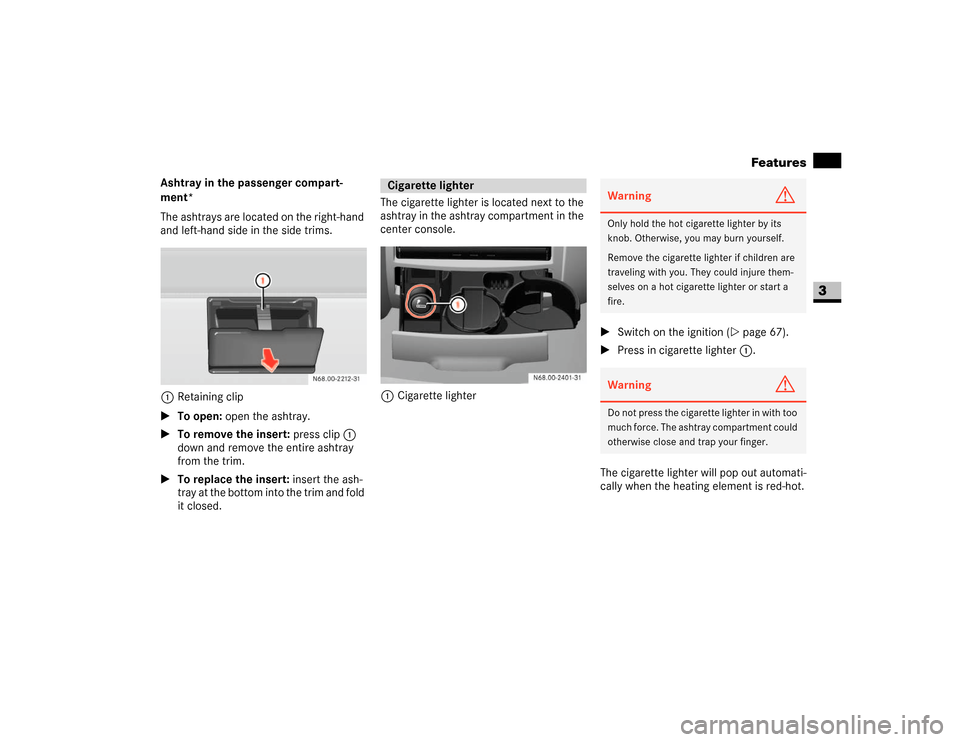
The ashtrays are located on the right-hand
and left-hand side in the side trims.
1Retaining clip
\1To open: open the ashtray.
\1To remove the insert: press clip1
down and remove the entire ashtray
from the trim.
\1To replace the insert: insert the ash-
tray at the bottom into the trim and fold
it closed.The cigarette lighter is located next to the
ashtray in the ashtray compartment in the
center console.
1Cigarette lighter\1Switch on the ignition (\2page 67).
\1Press in cigarette lighter 1.
The cigarette lighter will pop out automati-
cally when the heating element is red-hot.
Cigarette lighter
Warning
G
Only hold the hot cigarette lighter by its
knob. Otherwise, you may burn yourself.
Remove the cigarette lighter if children are
traveling with you. They could injure them-
selves on a hot cigarette lighter or start a
fire.Warning
G
Do not press the cigarette lighter in with too
much force. The ashtray compartment could
otherwise close and trap your finger.
Page 179 of 393
178 OperationDriving tips
4
Attaching a trailer
Please observe the maximum permitted
trailer dimensions (width and length).
Most states and all Canadian provinces re-
quire safety chains between your tow vehi-
cle and the trailer. The chains should be
crisscrossed under the trailer tongue. They
must be attached to the hitch receiver, and
not to the vehicle’s bumper or axle. Be sure
to leave enough slack in the chains to per-
mit turning corners.Towing a trailer
There are many different laws, including
speed limit restrictions, having to do with
trailer towing. Make sure that your vehicle-
trailer combination will be legal, not only
for where you reside, but also for where
you will be driving. A good source for this
information can be the police or local au-
thorities.
Before you start driving with the trailer,
check the trailer hitch, break-away switch,
safety chains, electrical connections, light-
ing and tires. Also adjust the mirrors to
permit an unobstructed view beyond the
rear of the trailer.
If the trailer has electric brakes, start your
vehicle and trailer moving slowly, and then
apply only the trailer brake controller by
hand to be sure that the brakes are work-
ing properly.
When towing a trailer, check occasionally
to be sure that the load is secure, and that
lighting and trailer brakes (if so equipped)
are functioning properly.
iMost states and all Canadian provinces
require a separate brake system at var-
ious trailer weights.
Warning
G
Do not connect a trailer brake system (if
trailer is so equipped) directly to the vehi-
cle’s hydraulic brake system as your vehicle
is equipped with antilock brakes. If you do,
neither the vehicle’s brakes nor the trailer’s
brakes will function properly. This could
cause an accident resulting in property dam-
age, injury or death to you or others.
The provided vehicle electrical wiring har-
ness for trailer towing has a brake signal
wire for hook-up to a brake controller.
Most states and all Canadian provinces re-
quire a break-away switch on trailers with a
separate brake system. The switch activates
the trailer brakes in the possible event that
the trailer might separate from the tow vehi-
cle.
You should consider using a trailer sway
control system. For further information, see
your authorized Sprinter Dealer.
Page 180 of 393
179 Operation
Driving tips
4
Always secure items in the trailer to pre-
vent load shifts while driving.
Take into consideration that when towing a
trailer, the handling characteristics are dif-
ferent and less stable from those when op-
erating the vehicle without a trailer. It is
important to avoid sudden maneuvers.
The vehicle and trailer combination is
heavier, and therefore is limited in acceler-
ation and climbing ability, and requires
longer stopping distances. It is more prone
to reacting to side wind gusts, and requires
more sensitive steering input.
In order to gain skill and an understanding
of the vehicle’s behavior, you should prac-
tice turning , st opping and backing up in a n
area which is free from traffic.
If possible, do not brake abruptly, but rath-
er engage the brake slightly at first to per-
mit the trailer to activate its brake. Then
increase the braking force.
Warning
G
Take into consideration that when towing a
trailer, the handling characteristics are dif-
ferent and less stable from those when op-
erating the vehicle without a trailer.
It is important to avoid sudden maneuvers.
Sudden maneuvers may lead to loss of con-
trol over the vehicle-trailer combination.
This could cause an accident resulting in
property damage or injury to you or others.!
CAUTION
If the transmission hunts between
gears on inclines, manually shift to a
lower gear (select
"4", "3", "2" or
"1").
A lower gear and reduction of speed re-
duces the chance of the engine over-
loading and / or overheating.
When going down a long hill, shift into
a lower gear and use the engine’s brak-
ing effect. Avoid riding the brakes, thus
overheating the vehicle and trailer
brakes.
If the engine coolant rises to an ex-
tremely high temperature (coolant tem-
perature needle approaching the red
zone) when the air conditioner is on,
turn off the air conditioner. Engine
coolant heat can be additionally vented
by opening the windows, switching the
climate control fan speed to high and
setting the temperature control to the
maximum hot position.
Extreme care must be exercised since
your vehicle with a trailer will require
additional passing distance ahead than
when driving without a trailer. Because
your vehicle and trailer is longer than
your vehicle alone, you will also need to
go much farther ahead of the passed
vehicle before you can return to your
lane.
Page 182 of 393
181 Operation
Driving tips
4
Check regularly, e.g. weekly or when refu-
eling:
\4the vehicle lighting
\4the condition of the tires (\2page 201)
and the tire pressures (\2page 210)
\4the engine oil level (\2page 187)
\4the brake fluid level (\2page 192)
\4the fluid level in the windshield washer
system / headlamp cleaning system
reservoir (\2page 193)
\4the contamination level of the rear air-
conditioning air cleaner (\2page 240)
Your vehicle is equipped with monolithic-
type catalytic converters, an important el-
ement in conjunction with the oxygen sen-
sors to achieve substantial control of the
pollutants in the exhaust emissions. Keep
your vehicle in proper operating condition
by following our recommended mainte-
nance instructions as outlined in your Ser-
vice Booklet.Your vehicle is equipped with an oxidation
catalyst, an important element in conjunc-
tion with the oxygen sensors to achieve
substantial control of the pollutants in the
exhaust emissions. Keep your vehicle in
proper operating condition by following
our recommended maintenance instruc-
tions as outlined in your Service Booklet.Regular checksCatalytic converter (gasoline engine)
!
CAUTION
To prevent damage to the catalytic con-
verters, only use premium unleaded
gasoline in this vehicle.
Any noticeable irregularities in engine
operation should be repaired promptly.
Otherwise, excessive unburned fuel
may reach the catalytic converter,
causing it to overheat and potentially
start a fire.
Warning
G
As with any vehicle, do not idle, park or op-
erate this vehicle in areas where combusti-
ble materials such as grass, hay, or leaves
can come into contact with the hot exhaust
system, as these materials could be ignited
and cause a vehicle fire.
Oxidation catalyst (diesel engine)Warning
G
As with any vehicle, do not idle, park or op-
erate this vehicle in areas where combusti-
ble materials such as grass, hay, or leaves
can come into contact with the hot exhaust
system, as these materials could be ignited
and cause a vehicle fire.