DODGE SPRINTER 2008 2.G Owners Manual
Manufacturer: DODGE, Model Year: 2008, Model line: SPRINTER, Model: DODGE SPRINTER 2008 2.GPages: 666, PDF Size: 14.11 MB
Page 541 of 666
539 Practical hints
Changing the batteries
5
\3 Changing the batteriesIf the remote control batteries (remote
keyless entry) are discharged, you will
only be able to lock and unlock the vehi-
cle manually using the key.
If the batteries in the auxiliary heating
remote control are discharged, you will
only be able to switch the auxiliary heat-
ing on or off using the auxiliary heating /
heater booster switch inside the vehicle
(\2
page 238).
It is advisable to have the batteries
changed at an authorized Sprinter Deal-
er.
Warning
G
Keep batteries away from children.
Consult a doctor immediately if a battery
is swallowed.
Dispose of used batteries in an environ-
mentally responsible manner.
Danger of explosion if the battery is not
correctly replaced.
Replacements should always be either of
the same type or one which has been rec-
ommended by the manufacturer.
Environmental note
H
Batteries contain materials that can harm
the environment if disposed of improper-
ly. Recycling of batteries is the preferred
method of disposal. Many states require
sellers of batteries to accept old batteries
for recycling.
nf_BA.book Page 539 Friday, January 25, 2008 3:53 PM
Page 542 of 666
540 Practical hintsChanging the batteries
5
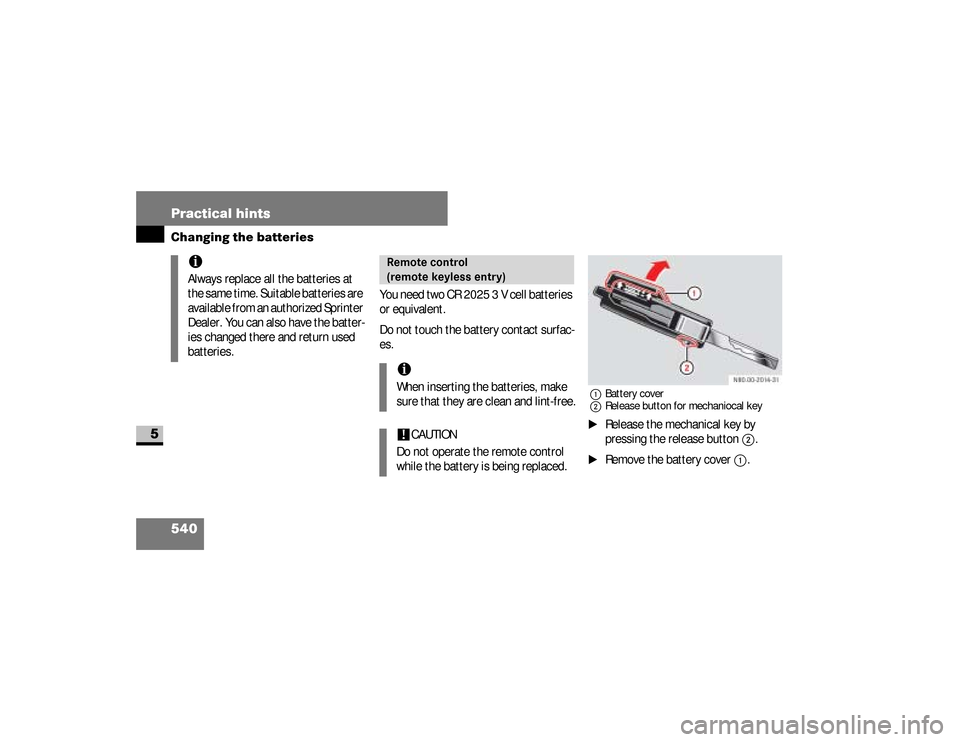
You need two CR 2025 3 V cell batteries
or equivalent.
Do not touch the battery contact surfac-
es.
1Battery cover
2Release button for mechaniocal key\1
Release the mechanical key by
pressing the release button
2
.
\1
Remove the battery cover
1
.
iAlways replace all the batteries at
the same time. Suitable batteries are
available from an authorized Sprinter
Dealer. You can also have the batter-
ies changed there and return used
batteries.
Remote control
(remote keyless entry)iWhen inserting the batteries, make
sure that they are clean and lint-free.!
CAUTION
Do not operate the remote control
while the battery is being replaced.
nf_BA.book Page 540 Friday, January 25, 2008 3:53 PM
Page 543 of 666
541 Practical hints
Changing the batteries
5
\1
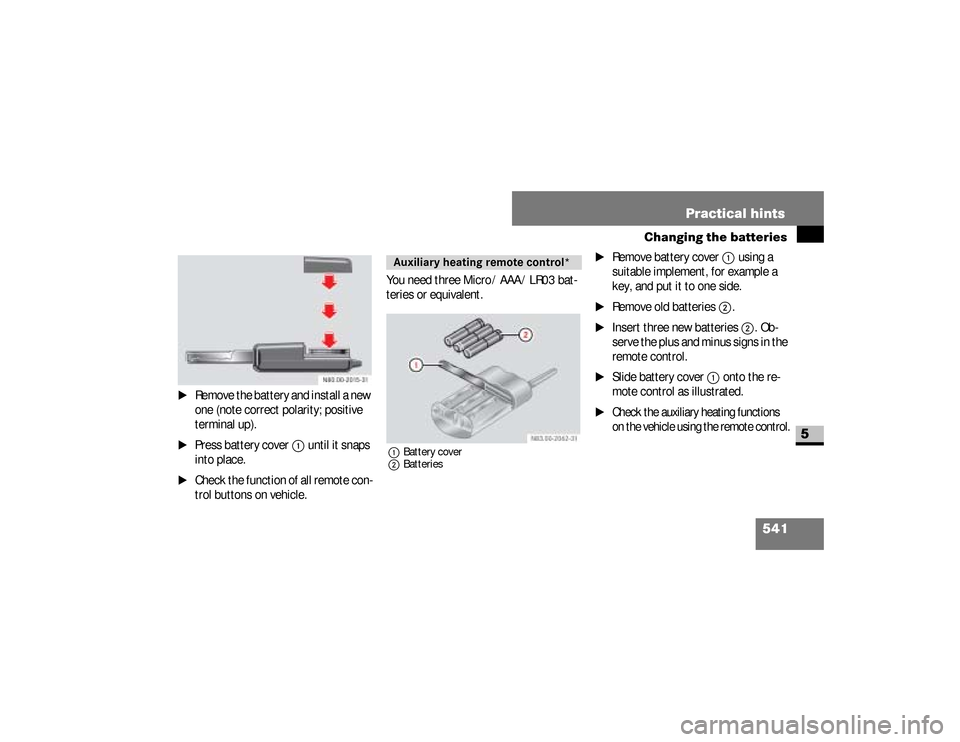
Remove the battery and install a new
one (note correct polarity; positive
terminal up).
\1
Press battery cover
1
until it snaps
into place.
\1
Check the function of all remote con-
trol buttons on vehicle.You need three Micro / AAA / LR03 bat-
teries or equivalent.
1Battery cover
2Batteries
\1
Remove battery cover
1
using a
suitable implement, for example a
key, and put it to one side.
\1
Remove old batteries
2
.
\1
Insert three new batteries
2
. Ob-
serve the plus and minus signs in the
remote control.
\1
Slide battery cover
1
onto the re-
mote control as illustrated.
\1
Check the auxiliary heating functions
on the vehicle using the remote control.
Auxiliary heating remote control*
N83.00-2062-31
nf_BA.book Page 541 Friday, January 25, 2008 3:53 PM
Page 544 of 666
542 Practical hintsFuel system
5
\3 Fuel systemOn vehicles with a diesel engine, it is
necessary to drain the fuel filter if
the
/
indicator lamp lights up.
To this end, have the fuel filter with wa-
ter separator drained at an authorized
Sprinter Dealer which has the necessary
specialist knowledge and tools to carry
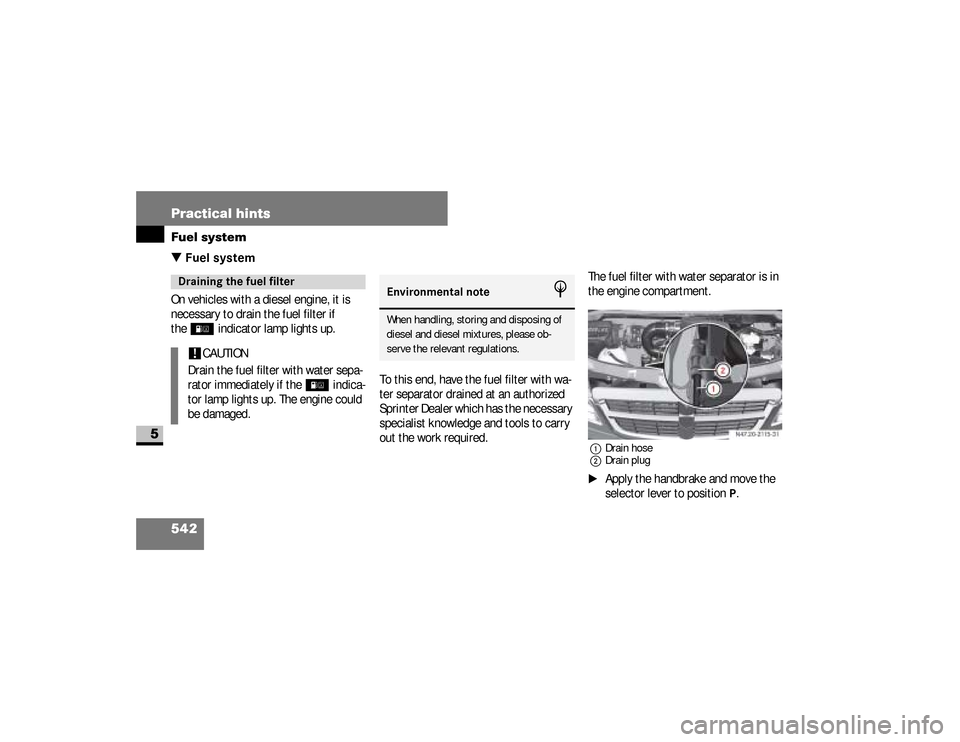
out the work required.The fuel filter with water separator is in
the engine compartment.
1Drain hose
2Drain plug\1
Apply the handbrake and move the
selector lever to position
P.
Draining the fuel filter!
CAUTION
Drain the fuel filter with water sepa-
rator immediately if the
/
indica-
tor lamp lights up. The engine could
be damaged.
Environmental note
H
When handling, storing and disposing of
diesel and diesel mixtures, please ob-
serve the relevant regulations.
nf_BA.book Page 542 Friday, January 25, 2008 3:53 PM
Page 545 of 666
543 Practical hints
Fuel system
5
\1
Switch off the engine and open the
hood (
\2
page 318).
\1
Place a suitable container under
drain hose
1
.
\1
Switch on the ignition (
\2
page 111).
\1
Unscrew drain plug
2
immediately
one turn or until liquid flows out of
drain hose
1
.
\1
Make sure that the liquid flows into
the container under drain hose
1
.
\1
Close drain plug
2
as soon as ap-
proximately 0.2 US qt (0.2 l) of liquid
has been collected.
\1
When you have drained the fuel filter
with water separator, turn the key
back to position
0 in the ignition lock
(
\2
page 111).
\1
Dispose of the collected liquid in an
environmentally responsible man-
ner.
iThe electric fuel delivery pump stops
the flow of liquid automatically after
30 seconds.
nf_BA.book Page 543 Friday, January 25, 2008 3:53 PM
Page 546 of 666
544 Practical hintsFuel system
5
\1
Drain the fuel filter again if the
/
indicator lamp remains lit.If the fuel tank on a vehicle with diesel
engine has been run dry, there is a pos-
sibility that the engine may not start im-
mediately after refueling because air
may remain in the fuel system.
After refueling:
\1
Switch on the ignition for approxi-
mately 10 seconds.
\1
Start the engine repeatedly for no
more than 60 seconds until it runs
smoothly.
If the engine does not start:
\1
Wait approximately 2 minutes.
\1
Then start the engine repeatedly
again for no more than 60 seconds
until it runs smoothly.
If this attempt also fails, do not continue
to start the engine. Consult an autho-
rized Sprinter Dealer.
Environmental note
H
Have the drained liquid disposed of at an
authorized Sprinter Dealer.!
CAUTION
If the
/
indicator lamp remains
lit even after draining for the second
time, have the cause checked imme-
diately at an authorized Sprinter
Dealer.
Bleeding the fuel systemiToo many attempts to start the en-
gine could drain the battery.
nf_BA.book Page 544 Friday, January 25, 2008 3:53 PM
Page 547 of 666
545 Practical hints
Replacing the wiper blades
5
\3 Replacing the wiper blades
\1
Apply the handbrake (
\2
page 191).
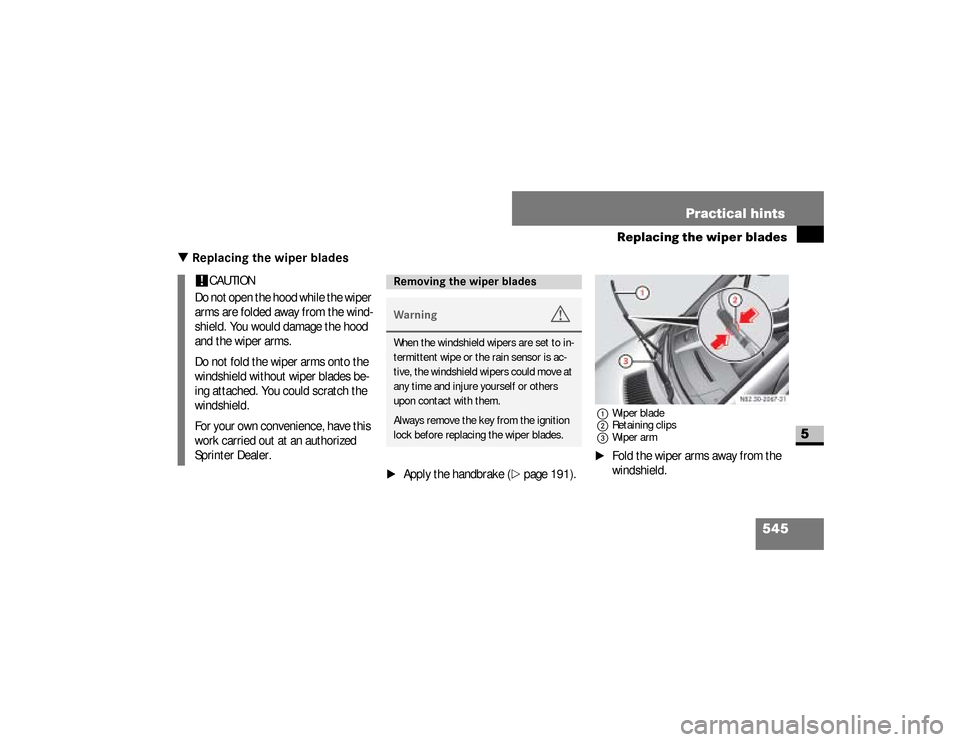
1Wiper blade
2Retaining clips
3Wiper arm\1
Fold the wiper arms away from the
windshield.
!
CAUTION
Do not open the hood while the wiper
arms are folded away from the wind-
shield. You would damage the hood
and the wiper arms.
Do not fold the wiper arms onto the
windshield without wiper blades be-
ing attached. You could scratch the
windshield.
For your own convenience, have this
work carried out at an authorized
Sprinter Dealer.
Removing the wiper bladesWarning
G
When the windshield wipers are set to in-
termittent wipe or the rain sensor is ac-
tive, the windshield wipers could move at
any time and injure yourself or others
upon contact with them.
Always remove the key from the ignition
lock before replacing the wiper blades.
nf_BA.book Page 545 Friday, January 25, 2008 3:53 PM
Page 548 of 666
546 Practical hintsReplacing the wiper blades
5
\1
Press two retaining clips
2
together
in the direction of the arrow and fold
wiper blade
1
away from wiper
arm
3
.
\1
Pull wiper blade
1
up and out of the
retainer.
\1
Slide wiper blade
1
into the retainer
on the wiper arm.
\1
Press wiper blade
1
onto wiper
arm
3
until you hear retaining
clips2
engage.
\1
Fold wiper arm
3
onto the wind-
shield again.
Installing the wiper blades
nf_BA.book Page 546 Friday, January 25, 2008 3:53 PM
Page 549 of 666
547 Practical hints
Flat tire
5
\3 Flat tireThe vehicle is either equipped with a
spare wheel or the Premium tire seal-
ant*.
The spare wheel is located under the
rear end of the vehicle if the vehicle is
not equipped with Premium tire sealant*
(\2
page 517).When you replace a tire, the manufactur-
er also recommends that you replace
the tire valve.
Warning
G
Defective or worn tires, and tire pressures
that are either too high or too low, can
cause significant changes in the vehicle’s
handling and braking characteristics.
There is an increased risk of an accident.
Replace the tires, including the spare tire,
at least every 6 years, regardless of the
degree of treadwear. Check the tire pres-
sure on the spare wheel at regular inter-
vals.
!
CAUTION
For safety reasons, the following tire
valves from the company Schrader
must be used on the vehicles:
\4
TR 600 for vehicle model type
2500
\4
TR 418 for vehicle model type
3500
nf_BA.book Page 547 Friday, January 25, 2008 3:53 PM
Page 550 of 666
548 Practical hintsFlat tire
5
\1
Park the vehicle as far away as pos-
sible from traffic and on a level, firm,
and non-slip surface.
\1
Switch on the hazard warning lamps.
\1
Apply the handbrake.
\1
Engage first gear or reverse gear or
move the selector lever to
position
P.
\1
Any passengers should leave the ve-
hicle, ensuring that they are not en-
dangered as they do so.
\1
Place the warning triangle or hazard
warning lamps at a suitable distance.
Observe legal requirements.Preparing the vehicle
Changing a wheelWarning
G
To avoid the risk of causing serious or fa-
tal injury, or damage to the vehicle, please
bear the following points in mind:The jack is only designed to raise the ve-
hicle for a short time when changing a
wheel.Position the jack under the appropriate
jacking point only (\2page 551). Check
that the jack is correctly seated under the
jacking point before raising the vehicle.The jack must be placed on a firm, flat sur-
face only.
Continued
Warning (Continued)
G
Before raising the vehicle, also secure it
against rolling away, for example using
chocks or similar. Never release the hand-
brake while the vehicle is raised. Make
sure that the distance between the under-
side of the tires and the ground does not
exceed 1.2 in (3 cm). The vehicle could
slip or topple off the jack.Do not reach under the raised vehicle with
your hands or feet.Do not start the engine and avoid creating
other vibrations while the vehicle is
jacked up. The vehicle could slip off the
jack.
nf_BA.book Page 548 Friday, January 25, 2008 3:53 PM