air condition DODGE TRUCK 1993 Service Repair Manual
[x] Cancel search | Manufacturer: DODGE, Model Year: 1993, Model line: TRUCK, Model: DODGE TRUCK 1993Pages: 1502, PDF Size: 80.97 MB
Page 1458 of 1502
•
HEATING
AND AIR
CONDITIONING
24 - 21 (a) Loosen both test hoses at the manifold gauge
set. Tighten the hoses as soon as the air is purged. (b) Loosen charging hose connection at manifold
gauge set. This will purge air from the charging
hose.
Tighten connection as soon as air is purged.
(9) With vehicle windows open and hood up, oper
ate engine at 1,300 RPM. (10) Place air conditioner control on A/C and place
the fan switch on high. (11) If necessary, block the condenser to maintain
a discharge pressure of 1 550-1 725 kPag (225-250
psig).
System must be charged through the evapora
tor suction service ports as follows:
(a) Slowly open the suction service gauge valve.
Meter flow of refrigerant by adjusting the suction service gauge valve so the pressure registered at
the suction service gauge does not exceed 345 kPag
COMPRESSOR
J
(50
psig). Keep refrigerant container upright.
(b) Add refrigerant gas until there is no foam visi
ble at the sight glass. As soon as all foam clears, note the weight registered on the refrigerant scale.
(c) Watch the refrigerant weighing scale and add
437 g (14 oz.) of refrigerant (equivalent to 1 can).
(d) Close the suction gauge valve.
CAUTION:
TOO
much
refrigerant
in the
system
can
cause
abnormally high discharge pressures. Care
must
be
used
so the
exact recommended amount
of
refrigerant
is
added
after
foam clears
in the
sight
glass.
(e) Close dispensing manifold valve. Remove test
hoses and adapters from the service ports of com
pressor and install protective caps at service ports.
RVICE (SD-709)
INDEX
page
Compressor
21
Compressor
Shaft Seal
.................... 25
The A/C system uses a 7 piston design Sanden SD-
709 compressor. Designated the SD-709, the compres
sor is mounted on the front right side of the engine
and is driven by a serpentine belt.
System lubrication is provided by 135cc ±15cc (4.6
cu. in. ±0.5 cu. in.) of 500 viscosity refrigerant oil.
The clutch used on the compressor consists of 3 ba
sic components:
(1) The pulley.
(2) The front plate. (3) The field coil.
The pulley and field coil are attached to the front
head of the compressor with snap rings. The hub is keyed to the compressor shaft and is retained on the
shaft with a self-locking nut. Special service tools are
required to remove and install the clutch plate on
the compressor shaft.
COMPRESSOR
REMOVAL
(1) Disconnect the negative cable from the battery.
(2) Disconnect the clutch lead wire.
(3) Remove the discharge and inlet (suction) ser
vice valves from the compressor. Plug or tape all the
openings.
(4) Refer to Group 7, Cooling System and remove
the drive belt(s). (5) Remove the bolts and lift the compressor from
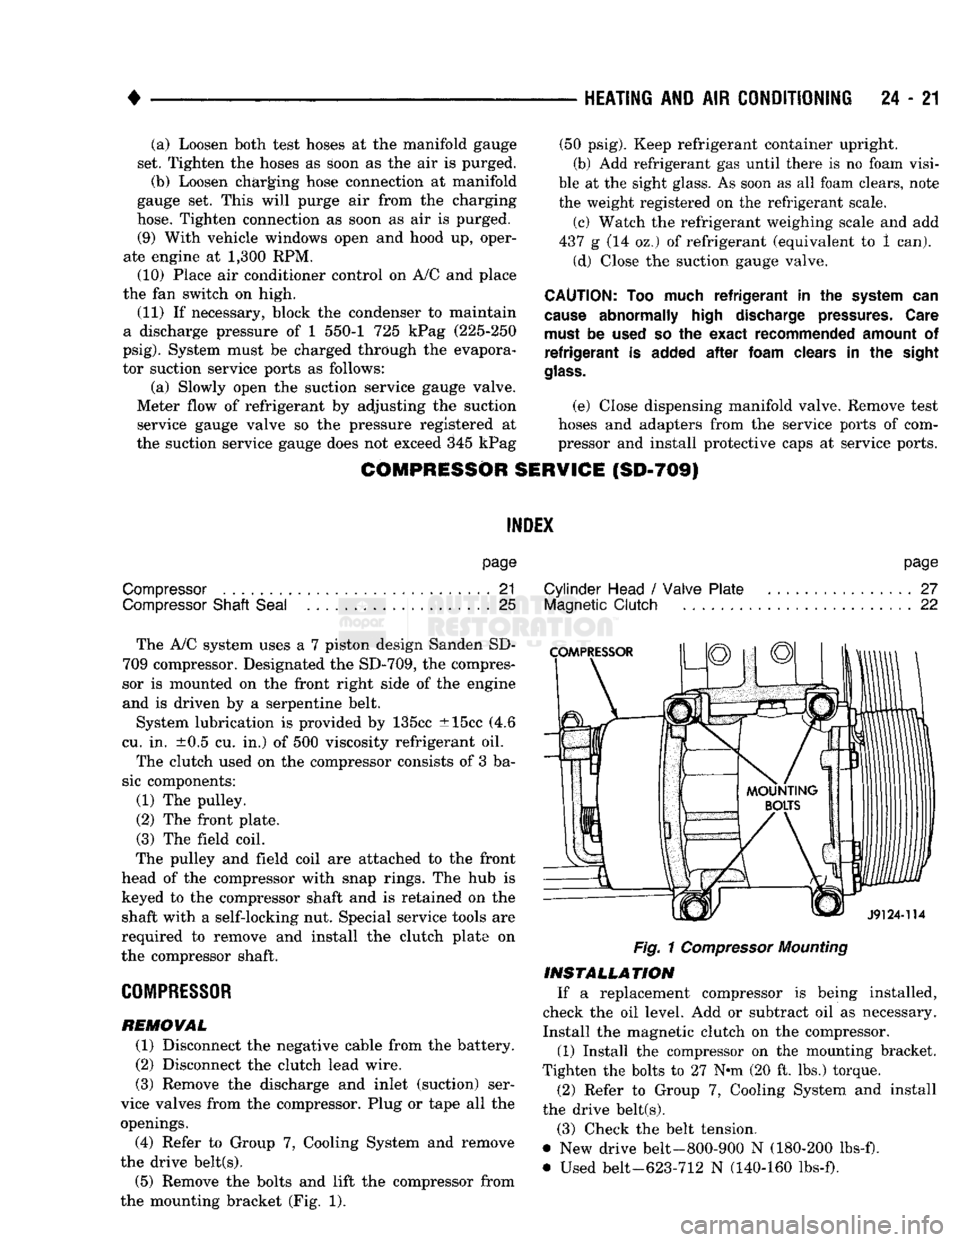
the mounting bracket (Fig. 1).
page
Cylinder Head
/
Valve Plate
27
Magnetic
Clutch
22
Fig.
1
Compressor
Mounting
INSTALLATION
If a replacement compressor is being installed,
check the oil level. Add or subtract oil as necessary.
Install the magnetic clutch on the compressor.
(1) Install the compressor on the mounting bracket.
Tighten the bolts to 27 N*m (20 ft. lbs.) torque.
(2) Refer to Group 7, Cooling System and install
the drive belt(s).
(3) Check the belt tension.
@ New drive belt-800-900 N (180-200 lbs-f).
• Used belt-623-712 N (140-160 lbs-f).
Page 1459 of 1502
24 - 22
HEATING
AND AIR
CONDITIONING
•
(4)
Remove the tape or plastic plugs from all the
suction and discharge openings and install the ser
vice valves on the compressor.
(5)
Connect the clutch lead wire.
(6) Connect the negative cable to the battery.
(7)
Evacuate, charge and test the system for leaks.
MAGNETIC
CLUTCH
The magnetic clutch consists of a stationary electro
magnetic coil and a rotating pulley and plate assembly. The electromagnetic coil is retained on the com
pressor with a snap ring and is dimpled to maintain its position. The pulley and plate assembly are mounted on the
compressor shaft. When the compressor is not in operation, the pul
ley free wheels on the clutch hub bearing. When the
coil is energized the plate is magnetically engaged
with the pulley and turns the compressor shaft.
J8924-18
Fig.
3
Clutch
Front
Plate
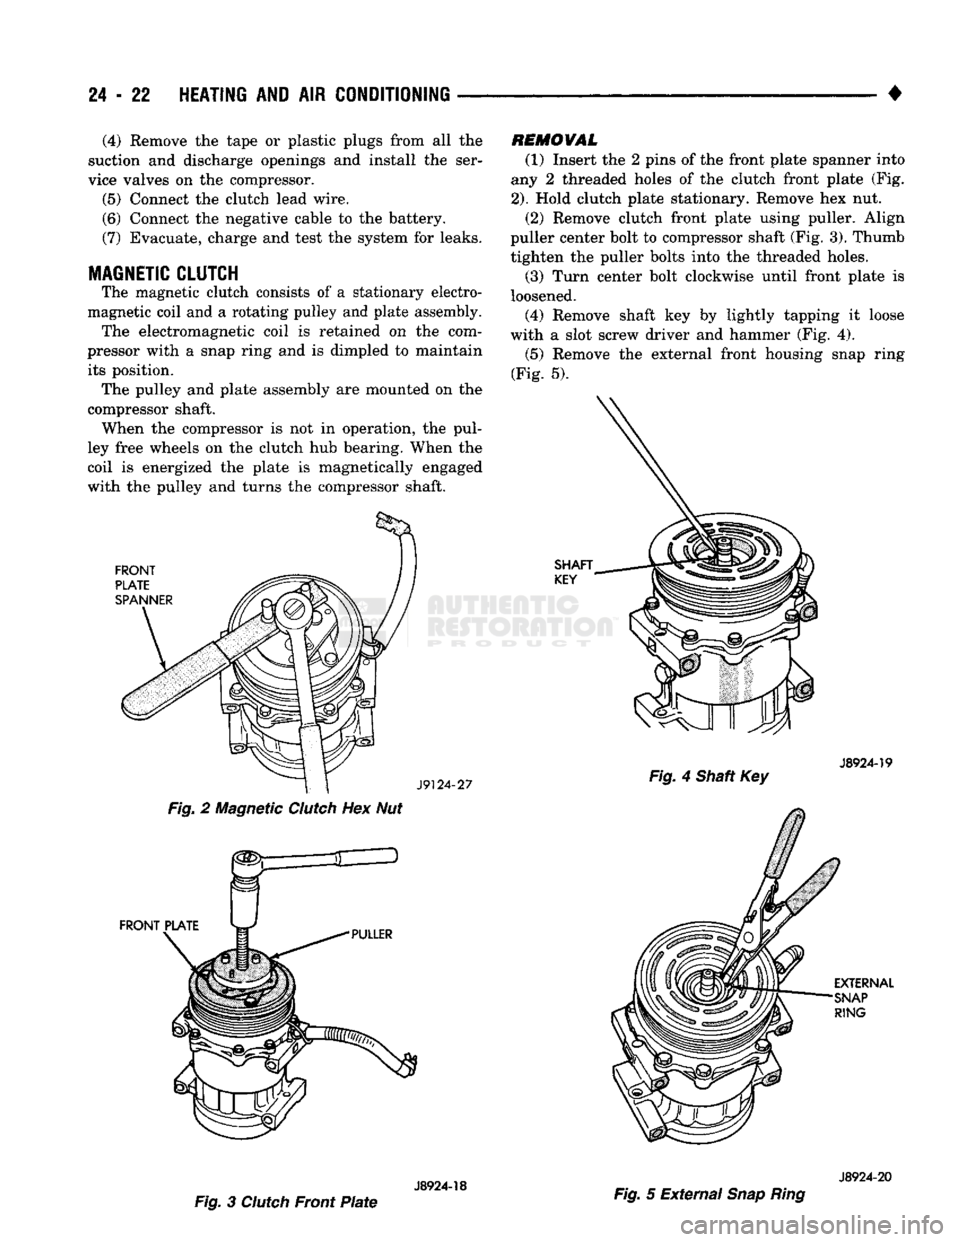
REMOVAL
(1) Insert the 2 pins of the front plate spanner into
any 2 threaded holes of the clutch front plate (Fig.
2).
Hold clutch plate stationary. Remove hex nut. (2) Remove clutch front plate using puller. Align
puller center bolt to compressor shaft (Fig. 3). Thumb tighten the puller bolts into the threaded holes. (3) Turn center bolt clockwise until front plate is
loosened. (4) Remove shaft key by lightly tapping it loose
with a slot screw driver and hammer (Fig. 4).
(5)
Remove the external front housing snap ring
(Fig. 5).
J8924-19
Fig.
4 Shaft Key
J8924-20
Fig.
5 External
Snap Ring
Page 1460 of 1502

HEATING
AND AIR
CONDITIONING
24 - 23
PULLER
SHAFT
PROTECTOR
JAWS
(10) Loosen coil lead wire from clip on top of com
pressor front housing (Fig. 8). (11) Remove snap ring and field coil (Fig. 9).
J8924-21
Fig. 6 Shaft Protector
(6)
Insert the lip of the jaws of the rotor puller into
the snap ring groove exposed in the previous step (Fig. 6).
(7) Place rotor puller shaft protector over the ex
posed shaft.
(8) Install the puller plate and bolt (Fig. 7). 2 bolts
go through the plate and into the jaws. Finger
tighten bolts.
(9) Turn puller center bolt clockwise using 3/4 inch
socket until rotor pulley is free.
J8924-23
Fig. 8 Loosen Coil Lead Wire
FIELD
COIL
SNAP
RING
J8924-22
J8924-24
Fig. 9 Snap Ring and Field Coil
INSTALLATION (1) Install the field coil with the snap ring.
(2)
Place coil lead wire under clip on top of com
pressor front housing and tighten the retaining screw.
Fig. 7 Puller Plate
Page 1461 of 1502
24 - 24
HEATING
AND AIR
CONDITIONING
(3) Support the compressor on the 4 mounting ears
at the compressor rear. If a vise is being used, clamp
only on the mounting ears. Never clamp on the com
pressor body.
(4) Align rotor assembly squarely on the front
housing hub.
(5)
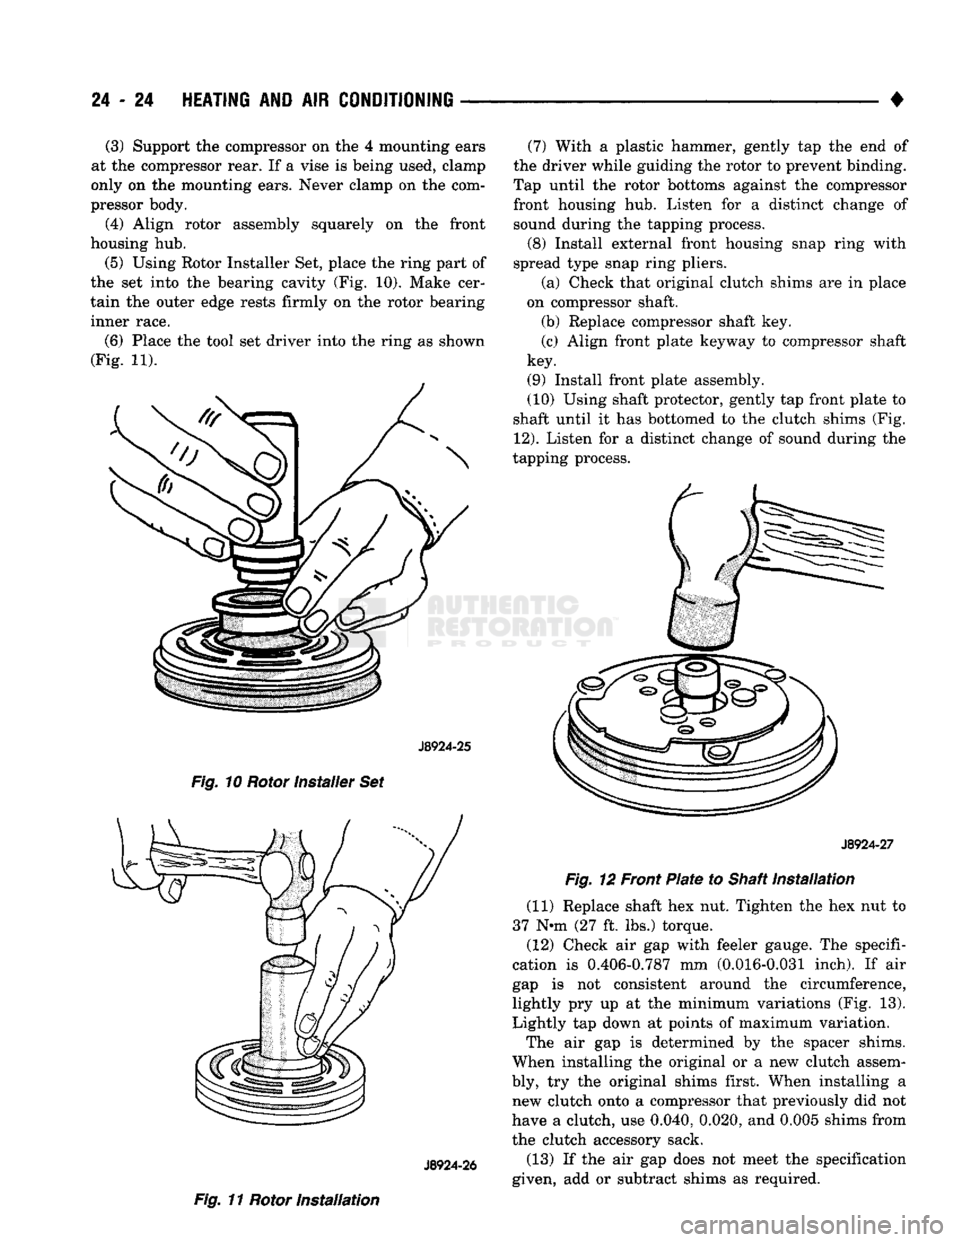
Using Rotor Installer Set, place the ring part of
the set into the bearing cavity (Fig. 10). Make cer
tain the outer edge rests firmly on the rotor bearing
inner race.
(6) Place the tool set driver into the ring as shown
(Fig. 11).
J8924-25
Fig. 10 Rotor installer Set
J8924-26
Fig. 11 Rotor Installation (7) With a plastic hammer, gently tap the end of
the driver while guiding the rotor to prevent binding.
Tap until the rotor bottoms against the compressor front housing hub. Listen for a distinct change of sound during the tapping process.
(8) Install external front housing snap ring with
spread type snap ring pliers.
(a) Check that original clutch shims are in place
on compressor shaft.
(b) Replace compressor shaft key.
(c) Align front plate keyway to compressor shaft
key.
(9) Install front plate assembly.
(10) Using shaft protector, gently tap front plate to
shaft until it has bottomed to the clutch shims (Fig.
12).
Listen for a distinct change of sound during the
tapping process.
J8924-27
Fig. 12 Front Plate to Shaft Installation
(11) Replace shaft hex nut. Tighten the hex nut to
37 N*m (27 ft, lbs.) torque.
(12) Check air gap with feeler gauge. The specifi
cation is 0.406-0.787 mm (0.016-0.031 inch). If air
gap is not consistent around the circumference,
lightly pry up at the minimum variations (Fig. 13).
Lightly tap down at points of maximum variation.
The air gap is determined by the spacer shims.
When installing the original or a new clutch assem
bly, try the original shims first. When installing a new clutch onto a compressor that previously did not
have a clutch, use 0.040, 0.020, and 0.005 shims from
the clutch accessory sack.
(13) If the air gap does not meet the specification
given, add or subtract shims as required.
Page 1462 of 1502

•
HEATING
AND AIR
CONDITIONING
24 - 25
J8924-28
Fig.
13
Check
Air Gap
COMPRESSOR
SHAFT
SEAL
REMOWAL (1) Insert the 2 pins of the front plate spanner into
any 2 threaded holes of the clutch front plate (Fig.
2).
Hold clutch plate stationary. Remove hex nut. (2) Remove clutch front plate using puller. Align
puller center bolt to compressor shaft. Thumb tighten
the 3 puller bolts into the threaded holes.
(3) Turn center bolt clockwise until front plate is
loosened.
Shaft seal replacement should be done on the
bench. Never use any old parts of the shaft seal assembly. Rebuild the complete assembly. (4) Insert the snap ring tool points into the 2 holes
of the felt ring metal retainer and remove felt ring (Fig. 14). (5) Remove the clutch shim. Use O-ring hook and
a small screwdriver to prevent shim from binding on
shaft (Fig. 15).
(6) Remove shaft seal seat retaining snap ring
with pinch type snap ring pliers (Fig. 16). J8924-31
Fig.
16
Snap Ring
Fig.
14 Felt
Ring
Page 1463 of 1502

24 - 26
HEATING
AND AIR
CONDITIONING
• (7) Remove the shaft seal seat, using seal seat tool
(Fig. 17).
J8924-32
Fig.
17 Shaft
Seal
Seat
(8) Insert the Seal Remover and Installer Tool
against the seal assembly. Press down against the
seal spring and twist the tool until it engages the
slots of the seal cage (Fig. 18). Lift out seal assembly.
J8924-33
Fig.
18
Seal Assembly
INSTALLATION
(1) Clean seal cavity thoroughly with a lint-free or
synthetic cloth and clean refrigerant oil. Then blow
out with dry pressurized vapor. (2) Make sure all foreign substances are thor
oughly removed. (3) Insert Seal Sleeve Protector over compressor
shaft (Fig. 19).
J8924-34
Fig.
19 Insert
Seal Sleeve
Protector (4) Do not touch the new seal lapping surfaces. Dip
the mating surfaces in clean refrigerant oil before
proceeding.
(5) Engage slots of Seal Remover and Installer to
new seal cage and insert seal assembly firmly into
place in the compressor seal cavity (Fig. 20). Twist
tool in opposite direction to disengage tool from seal
cage.
Remove tool.
Fig.
20
Seal Assembly
Page 1464 of 1502
•
HEATING
AND AIR
CONDITIONING
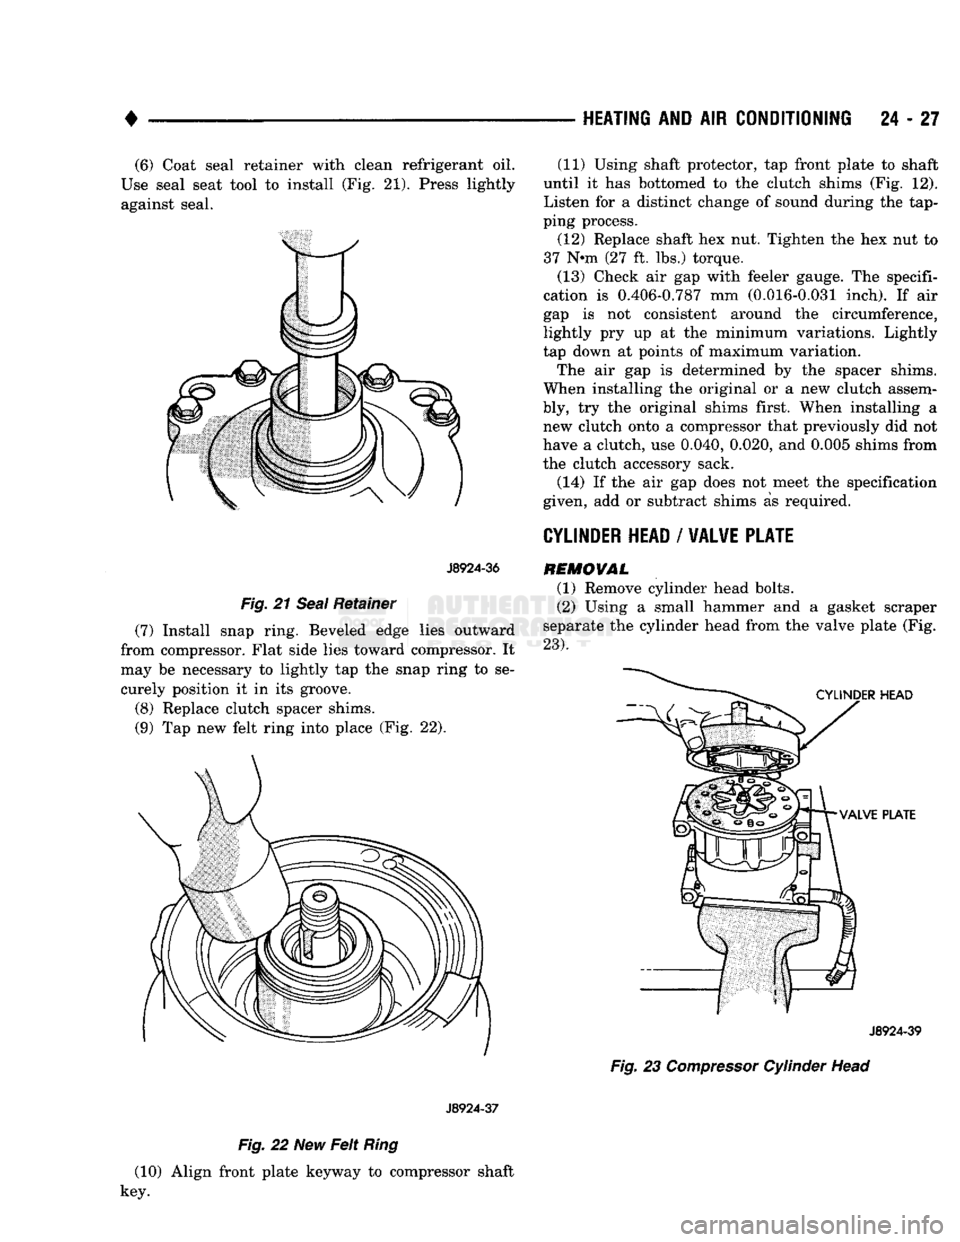
24 - 27 (6) Coat seal retainer with clean refrigerant oil.
Use seal seat tool to install (Fig. 21). Press lightly against seal.
J8924-36
Fig.
21
Seal
Retainer
(7) Install snap ring. Beveled edge lies outward
from compressor. Flat side lies toward compressor. It
may be necessary to lightly tap the snap ring to se curely position it in its groove.
(8) Replace clutch spacer shims.
(9) Tap new felt ring into place (Fig. 22).
J8924-37
Fig.
22 New
Felt
Ring
(10) Align front plate keyway to compressor shaft
key. (11) Using shaft protector, tap front plate to shaft
until it has bottomed to the clutch shims (Fig. 12).
Listen for a distinct change of sound during the tap
ping process.
(12) Replace shaft hex nut. Tighten the hex nut to
37 N-m (27 ft. lbs.) torque.
(13) Check air gap with feeler gauge. The specifi
cation is 0.406-0.787 mm (0.016-0.031 inch). If air
gap is not consistent around the circumference,
lightly pry up at the minimum variations. Lightly
tap down at points of maximum variation.
The air gap is determined by the spacer shims.
When installing the original or a new clutch assem
bly, try the original shims first. When installing a new clutch onto a compressor that previously did not
have a clutch, use 0.040, 0.020, and 0.005 shims from
the clutch accessory sack.
(14) If the air gap does not meet the specification
given, add or subtract shims as required.
CYLINDER
HEAD
/
VALVE PLATE
REMOVAL
(1) Remove cylinder head bolts.
(2) Using a small hammer and a gasket scraper
separate the cylinder head from the valve plate (Fig.
23).
J8924-39
Fig.
23
Compressor
Cylinder Head
Page 1465 of 1502

24
- 28
HEATING
AND AIR
CONDITIONING
—
J8924-40
Fig.
24
Waive
Plate
(5) Visually inspect the rear valves and discharge
retainer for damage. Discard any component if any
portion is damaged.
If valve plate and/or cylinder head are to be reused,
carefully remove gasket materials using the gasket scraper. Do not damage cylinder block or valve plate
surfaces. . . . _ #
E8924-207
Fig.
25 Cylinder Head
Bolt
Torque
Sequence
INSTALLATION
When installing the cylinder head valve plate, use
the new gaskets in the parts kit. (1) Coat new valve plate gasket with clean refrig
erant oil. (2) Install valve plate gasket by aligning valve
plate gasket to locating pin holes and oil orifice in cylinder block. (For easy reference, the gaskets have a notch at the bottom outside edge). (3) Install valve plate by aligning valve plate lo
cating pins to the pin holes in the block and position
valve plate. (4) Install cylinder head and tighten bolts in order
to 32 N*m (24 ft. lbs.) torque (Fig. 25).
(3) Visually inspect all parts for damage.
(4) Separate the valve plate from the cylinder
block (Fig. 24).
Page 1466 of 1502
HEATING
AND
AIR
CONDITIONING
24 - 29
CLIMATE CONTROL
SYSTEM
INDEX
page
Air Conditioner Distribution
and
Spot Cooler
Ducts-Center
. . 38
Air Conditioner Distribution
and
Spot Cooler
Ducts-Left Bi-Level
38
Air Conditioner Distribution
and
Spot Cooler
Ducts-Right
Bi-Level
38
Air
Outlet
Assemblies Right
Side
.............
38
Control Test
......
30
Defroster Duct
34
Electrical Controls
and
Circuits
30
Electronic Temperature Cycling Switch
37
Evaporator Control Unit
. . 34
GENERAL
INFORMATION
This
air
conditioner
is
designed specifically
for
con
ventional
cab
trucks with
the
heater-evaporator
package designed
to fit
under
the
instrument panel.
The system
is
manually controlled
by the
operator. Controls have been kept simple
for
ease
of
service and operation. In
the
blend
air
reheat
air
conditioning unit,
all
the
air
entering
the
system passes through
the
evap orator.
A
selected portion passes through
the
heater
core depending
on the
position
of the
blend
air
door.
The system controls
are
located
in the
center
of the
instrument panel within easy reach
of the
driver.
The combination electrical
and
vacuum switch con
trols
the
compressor clutch, mode
of
operation
and
blower. Modes
are Off, Max. A/C, A/C,
Vent, Heat and Defrost.
A
4-speed blower motor switch controls
the amount
of air
flow.
The
evaporator-heater pack age includes:
•
The
blower motor. • Intake duct with outside
air
recirculating door.
• Evaporator coil
• Heater core.
• Defroster discharge doors.
• Blower motor speed resistors.
• Vacuum harness.
• Vacuum actuators.
•
A/C air
outlets
to the
distribution ducts. Defrost, Heat,
A/C and
Vent modes automatically
supply
100%
outside
air.
The
air
distribution ducts supply
air
from
the
unit
to
4
panel mounted, fully directional, outlets.
The
faceplate
has 2
outlets
and 2 are
snapped into
the
panel
on the
right side. Satisfactory performance
of the air
conditioning
and heating system
is
dependent upon correct opera
tion
and
adjustment
of all
operating controls.
The in
spections, tests
and
adjustments should
be
used
to
locate
the
cause
of a
malfunction.
The
tests
in
this
page
Evaporator Heater Assembly
36
Expansion
(H)
Valve
37
Faceplate
32
General Information
. 29
Heater Assembly
. 33
Heater Control
32
Louver
Assemblies
39
Operation
of All
Controls
29
Resistor
Block
33
Temperature
and
Mode Control Cables
. 32
Vacuum
Actuators
36
Vacuum
Controls
and
Circuits
30
manual have been arranged
in a
logical sequence
that
has
proved
to be the
surest
and
shortest route
to
accurate diagnosis.
It is
recommended that they
be
followed
and
performed
in the
order they
are
pre sented.
OPERATION
OF ALL
CONTROLS
Operation must
be
tested
as
described
in the
fol
lowing sequence: (1) Inspect, test,
and
adjust compressor drive belt.
(2) Start engine
and
adjust engine speed
to 1,300
RPM.
Use a
reliable tachometer. (3) Move temperature control lever
to
Cool position
and mode lever
to A/C
position. (4)
The
inlet
air
door should
be
open
to
outside
air.
Open vehicle windows. (5) Test
the
blower operation
at all 4
speed posi
tions.
If the
blower does
not
operate correctly refer
to
Electrical Controls
and
Circuit. Leave
the
blower switch
in the
HIGH position.
(6)
The
compressor should
be
running
and the air
conditioning system
in
operation. In addition
to the six
position push button selector,
the
A/C
Heater control consists
of:
TEMPERATURE LEVER-Controls
the
tempera-.
ture
of the
discharge
air in all
modes except
MAX
A/C
and Off
when
the
vacuum operated water valve is closed. Moving
the
lever
to the
left provides cooler
air
and
moving
it to the
right provides warmer
air.
BLOWER SWITCH-The system blower
can be op
erated
at 4
speeds.
•
LOW at the
bottom. • MEDIUM
1 at the
lower center.
• MEDIUM
2 at the
upper center.
• HIGH
at the top
switch position. The blower will
be on and
operating
at the
speed
selected,
in all
push button positions except
Off.
AIR DIRECTIONAL VANES-Air
is
delivered
through
4
panel outlets.
The 4
outlets
are
adjustable
Page 1467 of 1502
24 - 30
HEATING
AND AIR
CONDITIONING
•
up,
down or to either side and can be shut off by
pushing the vanes up. Floor air is delivered through
the lower outlets.
VACUUM CONTROLS
AND
CIRCUITS
For an explanation of the vacuum and electrical
logic that controls the operation of the unit (Fig. 1
and Control Chart). MODES—The vacuum and electrical logic is deter
mined by the push button switch. The vacuum por
tion of the switch controls the water valve and
positions all doors in the unit except the blend air
door. The electrical portion of the switch controls the compressor and blower operation. The following is a
breakdown of the vacuum and electrical logic for each mode. Refer to Control Chart in this section.
OFF Vacuum application is as indicated in Fig. 1. The
inlet air door is closed to outside, open to recirculat
ing air. The mode door is in the A/C position. The
Heat/Defrost door is in the Heat position. The heater core coolant flow is
shut-off.
No air flows through the unit and the compressor
is idle because the blower and compressor clutch cir
cuits are open.
MAX A/C All of the doors are in the same position as they
are in Off. The Max. A/C mode merely closes the
electrical circuits to the blower motor and the com
pressor clutch. This mode is recommended for initial cool down, extreme outside humidity or high ambient
temperature.
A/C
This mode is recommended for use after the vehicle
has been cooled to the desired temperature. The vac
uum application at the outside-recirculating air door actuator is transferred to the rod side. This moves
the door away from the outside-air inlet and closes
the recirculating inlet. The water valve is open. All
other vacuum applications and door positions are the
same for the Max. A/C position. The blower motor and compressor are on.
VENT The vacuum circuit remains the same as in the
A/C position but the compressor clutch electrical cir
cuit is opened, preventing the compressor from oper ating. The blower motor is used to force outside air
into the passenger compartment through the A/C
outlets in the instrument panel.
HEAT
In the Heat mode the outside air door is open same
as A/C mode. Vacuum is applied to the top side of the air condi
tioning door actuator. This will close off the passage
to the air conditioning distribution duct and open the
passage to the heater/defroster duct. Since the heat er-defroster door is in the heat position, the full flow
of heated air goes through the heater outlets. A
small amount of heated air will bleed through the
defroster outlets. The water valve is open, the blower
switch is activated and the compressor is off.
DEFROST When the defrost mode is selected all conditions
are the same as for heater operation, except that no
vacuum is applied to the defrost door actuator. The defrost door is spring loaded to the defrost position.
The door opens the defroster outlets and partially closes off the heater outlets. The heater outlets are
left open far enough to direct about 30 percent of the
air to the floor. The other 70% is defrost air directed
to the windshield area. The compressor clutch will be engaged.
ELECTRICAL CONTROLS AND CIRCUITS
The electrical feed for the air conditioning circuit is
from 2 fuses in the fuse block. A 20 ampere fuse pro
tects the compressor clutch circuit, and a 30 ampere fuse protects the blower motor control circuit.
CONTROL TEST
Test operation of controls in the following manner.
(1) Inspect compressor drive belt. Adjust, if neces
sary. (2) Start engine. (3) Move temperature lever to extreme left (cool)
position. (4) Push A/C button.
(5)
Refer to Control Chart. Check position of doors,
operation of compressor clutch, blower motor and wa
ter valve. The water valve is open when there is no
vacuum to valve. (6) Check blower switch by moving it to all 4 posi
tions and noting air flow change. In case of malfunc
tion refer to Electrical Control Circuit. (7) Check operation of blend air door by moving
temperature lever from full warm toward cool posi
tion. Discharge air temperature should change with lever movement if the engine coolant is warm. (8) Repeat steps 5 and 6 in each push-button posi
tion. If actuation of the doors is slow or incomplete,
check for mechanical misalignment, binding or vac uum leaks. The air conditioning door has a seven
second vacuum delay in mode switching from Off,
Max A/C, A/C, or Vent to Heat or Defrost. Check
temperature control cable for correct adjustment.