DODGE TRUCK 1993 Service Repair Manual
Manufacturer: DODGE, Model Year: 1993, Model line: TRUCK, Model: DODGE TRUCK 1993Pages: 1502, PDF Size: 80.97 MB
Page 651 of 1502
9
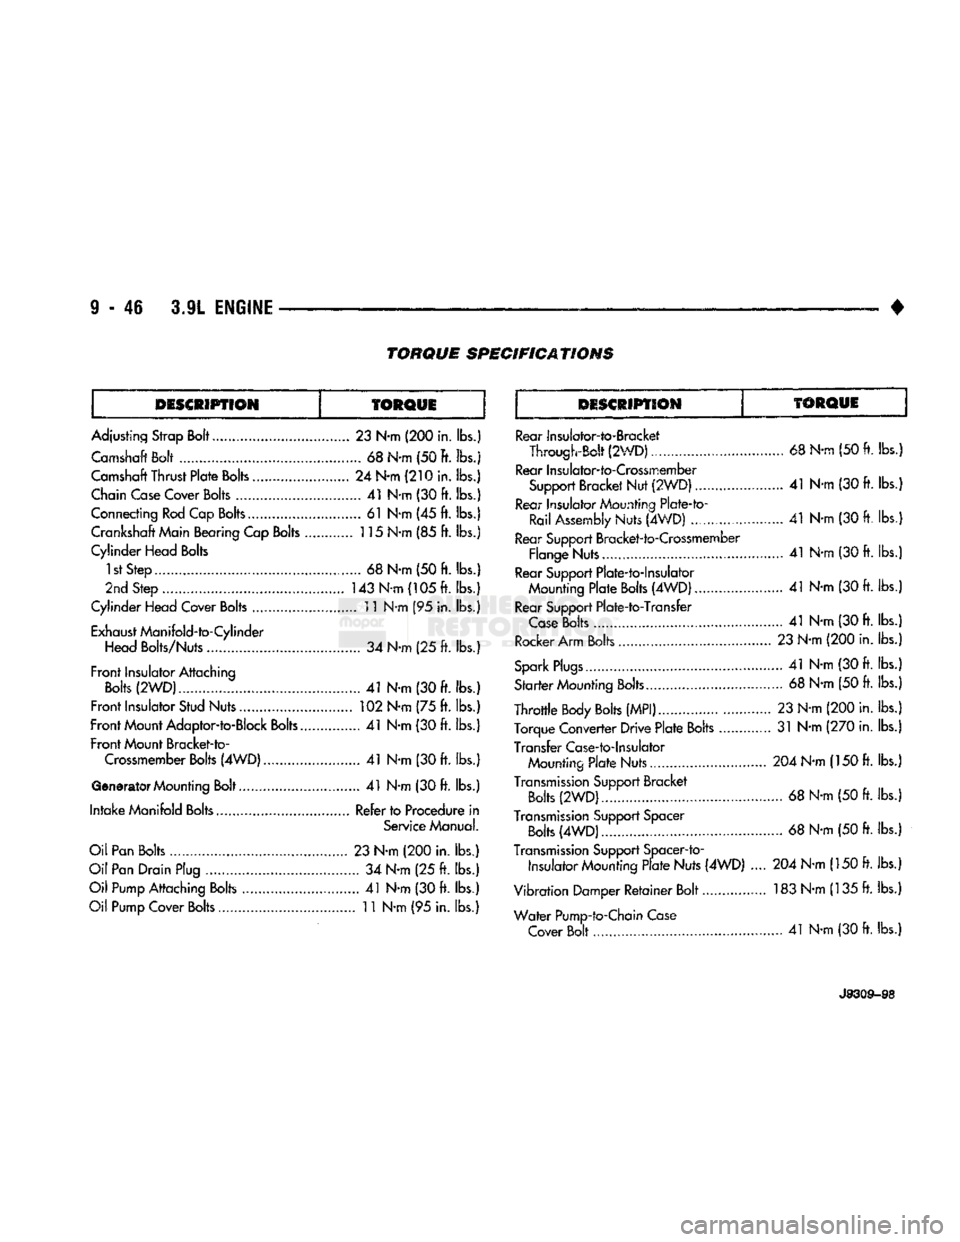
- 46 3.9L
ENGINE
TORQUE
SPECIFICATIONS
DESCRIPTION
TORQUE
DESCRIPTION
TORQUE
Adjusting Strap Bolt.....
23
N-m
(200
in. lbs.) Camshaft Bolt
68
N-m (50 ft. lbs.j
Camshaft Thrust
Plate
Bolts
24
N-m
(210
in. lbs.)
Chain Case Cover
Bolts
41
N-m
(30 ft.
lbs.)
Connecting Rod Cap Bolts
61
N*m
(45 ft.
lbs.) Crankshaft Main Bearing Cap
Bolts
115 N-m
(85 ft.
lbs.}
Cylinder Head Bolts
1st Step
. 68
N-m
(50 ft.
lbs.)
2nd Step
.............................................
143 N-m (105 ft. lbs.)
Cylinder Head Cover
Bolts
11 N-m
(95
in. lbs.)
Exhaust ManifoId-to-Cylinder Head Bolts/Nuts
34
N-m
(25 ft.
lbs.)
Front
Insulator Attaching
Bolts
(2WD)...
41
N-m
(30 ft.
lbs.)
Front
Insulator Stud Nuts
102
N-m
(75 ft.
lbs.)
Front
Mount Adaptor-to-Block
Bolts..
41
N-m
(30 ft.
lbs.)
Front
Mount Bracket-to- Crossmember
Bolts
(4WD).
41
N-m
(30 ft.
lbs.)
Generator Mounting Bolt
41
N-m
(30 ft.
lbs.)
Intake
Manifold Bolts Refer to Procedure
in
Service Manual.
Oil Pan Bolts
23
N-m
(200
in.
lbs.)
Oil Pan Drain Plug
34
N-m
(25 ft.
lbs.)
Oil Pump Attaching Bolts
41
N-m
(30 ft. lbs.)
Oil Pump Cover
Bolts
11
N-m
(95
in. lbs.) Rear Insulalor-to-Bracket
Through-Bolt (2WD)
68
N-rn
(50 ft. lbs.)
Rear Insuiator-to-Crossmember Support Bracket Nut (2WDJ
.. 41
N-m
(30 ft.
lbs.
Rear Insulator Mounting Plate-to- Rail Assembly
Nuts (4WD)
......................
41
N-m
(30 ft. lbs.
Rear Support Bracket-to-Crossmember Flange Nuts....
41
N-m
(30 ft.
lbs.
Rear Support Plate-to-lnsulator Mounting
Plate
Bolts
(4WD) 41
N-m
(30
ft. lbs.
Rear Support Plate-to-Transfer
Case
Bolts
41
N-m
(30 ft.
lbs.
Rocker Arm Bolts
23
N-m
(200
in. lbs.
Spark
Plugs.......
41
N-m
(30 ft. lbs.
Sfarfer Counting
Bolts.
68
N-m
(50 ft.
lbs.
Throttle
Body
Bolts
(MPI)
23
N-m
(200
in. lbs.
Torque Converter Drive
Plate
Bolts
31
N-m
(270
in. lbs.
Transfer Case-to-Insulator Mounting
Plate
Nuts..............
204
N-m
(150
ft. lbs.
Transmission
Support Bracket
Bolts
(2WD)
68
N-m
(50 ft.
lbs.
Transmission
Support Spacer
Bolts
(4WD).
68
N-m
(50 ft.
lbs.
Transmission
Support Spacer-to-
Insulator Mounting
Plate
Nuts (4WD)
.... 204
N-m
(150 ft.
lbs.
Vibration Damper
Retainer
Bolt................ 183 N-m (135
ft.
lbs.
Water
Pump-to-Chain Case Cover Bolt...
41
N-m
(30
ft. lbs.)
J9309-S8
Page 652 of 1502
5.2L
ENGINE
9 - 47
S.2L ENGINE
SERVICE
PROCEDURES
INDEX
page
Camshaft
. , . 61
Crankshaft
68
Crankshaft Main Bearings
69
Crankshaft Rear
Oil
Seals
...... ........
70
Cylinder Block ...........................
71
Cylinder Head Cover
. . . . 51
Cylinder Heads
52
Distributor
62
Engine
Assembly
. 50
Engine
Front Mounts
47
Engine
Rear Mount ...............
48
Front Crankshaft
Oil
Seal Replacement
. . 61
GENERAL
INFORMATION
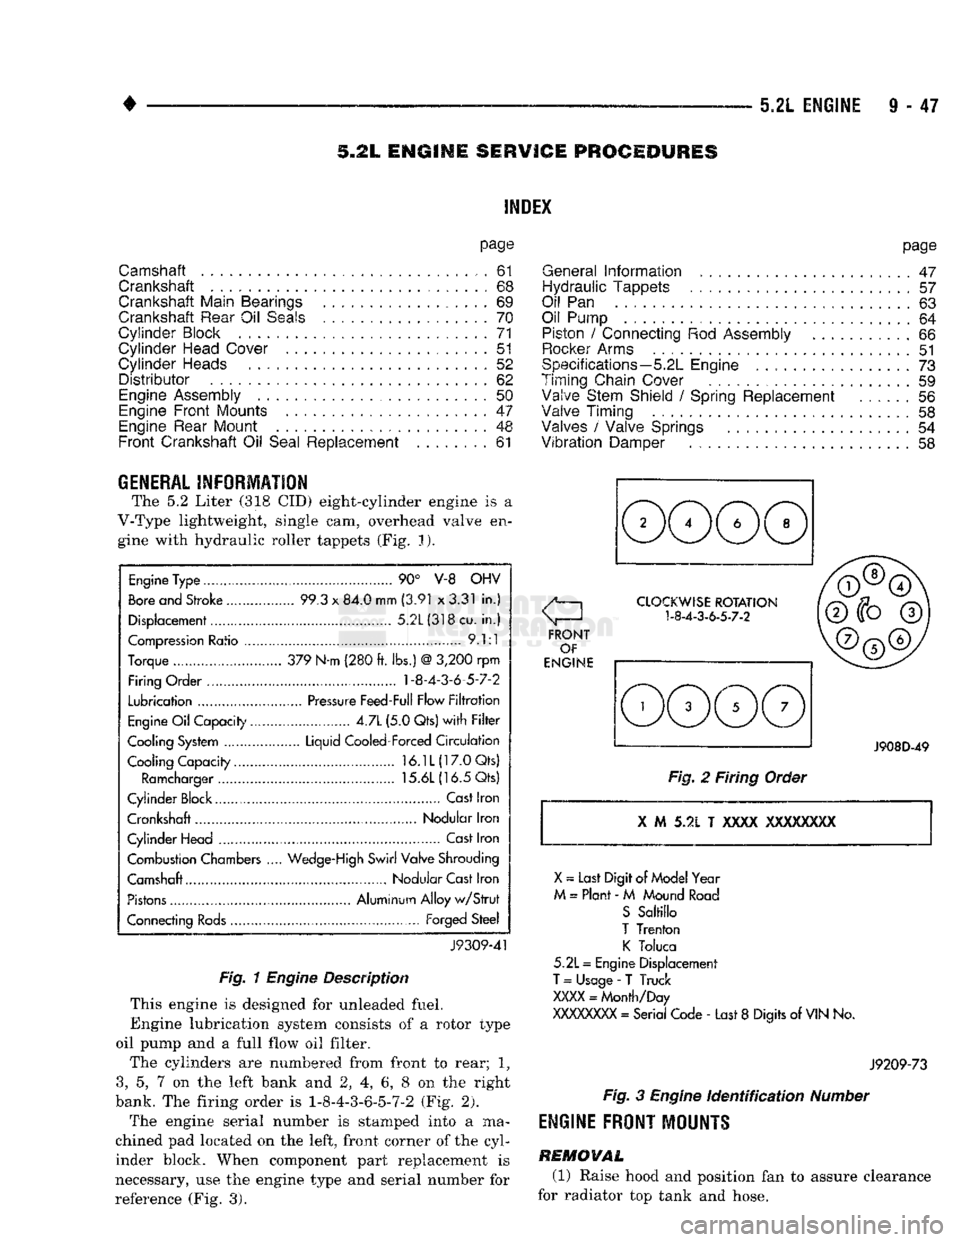
The 5.2 Liter (318 CID) eight-cylinder engine is a
V-Type lightweight, single cam, overhead valve en gine with hydraulic roller tappets (Fig. J).
Engine
Type ....
90° V-8 OHV
Bore
and Stroke .....
99.3
x
84.0 mm
(3.91
x
3.31
in.)
Displacement................
5.2L(318cu.
in.)
Compression
Ratio ....... .
9.1:1
Torque .. 379 N-m (280
ft.
lbs.)
@
3,200
rpm
Firing Order .... 1-8-4-3-6-5-7-2
Lubrication
.......
Pressure
Feed-Full Flow
Filtration
Engine
Oil
Capacity......
4.7L
(5.0 Qts)
with Filter
Cooling System ...... Liquid Cooled-Forced
Circulation
Cooling Capacity..........
16.1L(17.0Qts)
Ramcharger
15.6L
(16.5 Qts)
Cylinder Block
,
Cast
Iron
Crankshaft Nodular Iron
Cylinder Head ..............
Cast
Iron
Combustion Chambers
..
Wedge-High
Swirl Valve Shrouding
Camshaft Nodular Cast Iron
Pistons
Aluminum Alloy
w/Strut
Connecting
Rods...........
Forged
Steel
J9309-41
Fig. 1
Engine
Description
This engine is designed for unleaded fuel.
Engine lubrication system consists of a rotor type
oil pump and a full flow oil filter.
The cylinders are numbered from front to rear; 1?
3,
5, 7 on the left bank and 2, 4, 6, 8 on the right
bank. The firing order is 1-8-4-3-6-5-7-2 (Fig. 2).
The engine serial number is stamped into a ma
chined pad located on the left, front corner of the cyl
inder block. When component part replacement is
necessary, use the engine type and serial number for
reference (Fig. 3).
page
General
Information
.......................
47
Hydraulic Tappets
57
Oil
Pan . 63
Oil Pump
. 64
Piston
/
Connecting
Rod
Assembly
66
Rocker
Arms
51
Specifications—5.2L Engine
73
Timing Chain Cover ................
59
Valve Stem Shield
/
Spring Replacement
56
Valve Timing
. 58
Valves
/
Valve Springs
54
Vibration
Damper
. . 58
J908D-49
Fig.
2 Firing Order
X
M 5.2L T
XXXX
XXXXXXXX
X
~
Last Digit of
Model
Year
M
=
Plant
- M
Mound
Road
S
Saltillo
T
Trenton
K
Toluca
5.2L
=
Engine Displacement
T
=
Usage
-
T Truck
XXXX
=
Month/Day
XXXXXXXX
=
Serial Code
-
Last
8
Digits
of
VIN
No.
J9209-73
Fig.
3
Engine
Identification
Number
ENGINE
FRONT
MOUNTS
REMOVAL
(1) Raise hood and position fan to assure clearance
for radiator top tank and hose.
Page 653 of 1502
9
• 48 5.2L
ENGINE
•
CAUTION;
DO NOT lift the
engine
by the
intake
manifold.
(2) Install an engine lifting fixture.
(3) Raise vehicle on hoist.
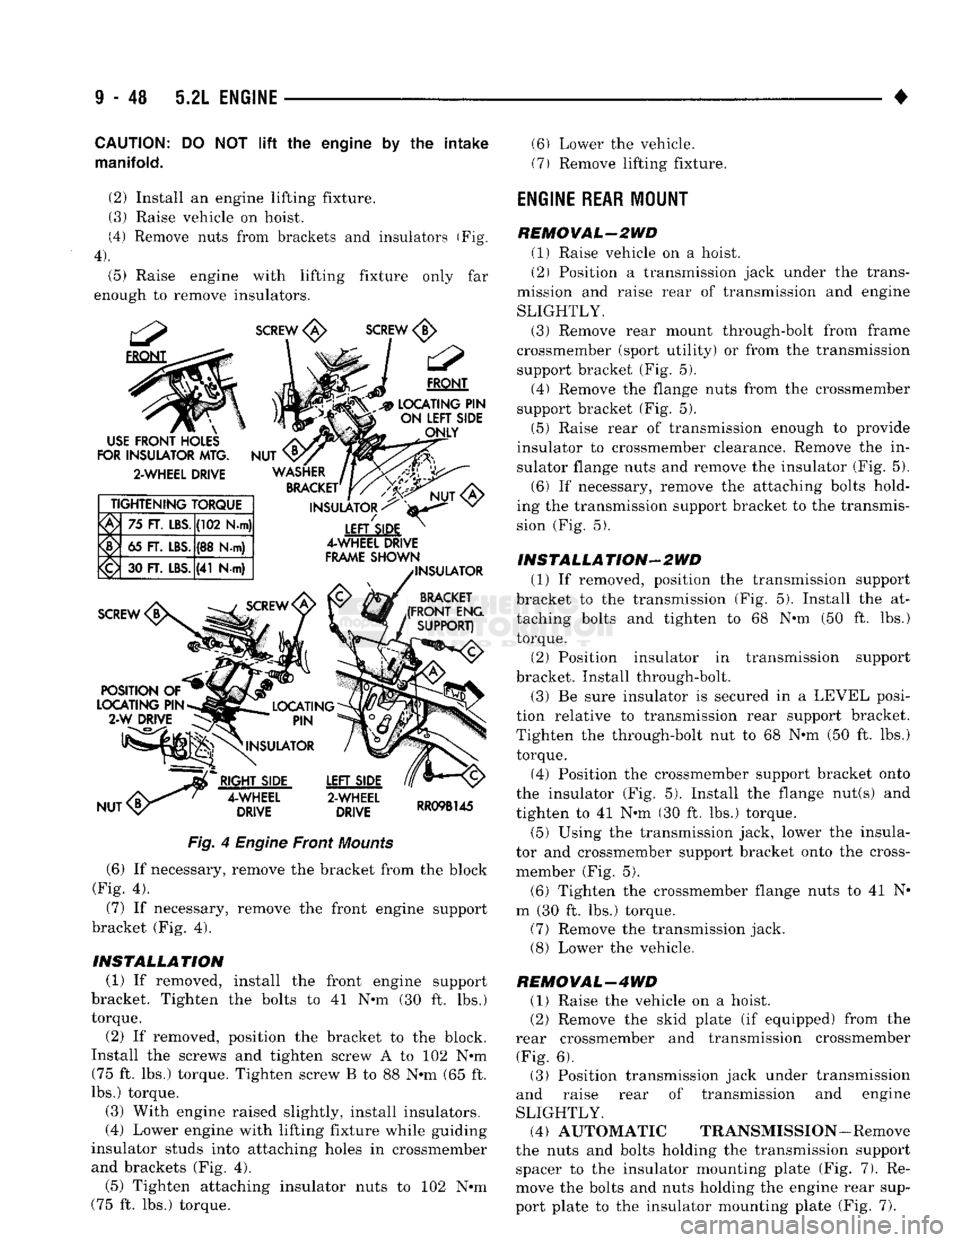
(4) Remove nuts from brackets and insulators (Fig.
4).
(5) Raise engine with lifting fixture only far
enough to remove insulators.
SCREW
<£>
SCREW
<1j>
FRONT
LOCATING PIN
" ON LEFT
SIDE
ONLY
USE
FRONT HOLES
FOR
INSULATOR MTG,
2-WHEEL DRIVE TIGHTENING TORQUE
75
FT. LBS. (102 N-m)
65 FT. LBS. (88 N.m)
<£>
30 FT. LBS.
(41
N-m)
NUT
WASHER
BRACKET'
INSULATOR
<
LEFTSIDE
4-WHEEL DRIVE
FRAME SHOWN INSULATOR
BRACKET
(FRONT ENG SUPPORT)
Fig.
4
Engine
Front
Mounts
(6) If necessary, remove the bracket from the block
(Fig. 4).
(7) If necessary, remove the front engine support
bracket (Fig. 4).
INSTALLATION (1) If removed, install the front engine support
bracket. Tighten the bolts to 41 N-m (30 ft. lbs.)
torque.
(2) If removed, position the bracket to the block.
Install the screws and tighten screw A to 102 N-m (75 ft. lbs.) torque. Tighten screw B to 88 N-m (65 ft.
lbs.) torque.
(3) With engine raised slightly, install insulators.
(4) Lower engine with lifting fixture while guiding
insulator studs into attaching holes in crossmember
and brackets (Fig. 4). (5) Tighten attaching insulator nuts to 102 N-m
(75 ft. lbs.) torque. (6) Lower the vehicle.
(7) Remove lifting fixture.
ENGINE REAR
MOUNT
REMOVAL-2WD (1) Raise vehicle on a hoist.
(2) Position a transmission jack under the trans
mission and raise rear of transmission and engine
SLIGHTLY. (3) Remove rear mount through-bolt from frame
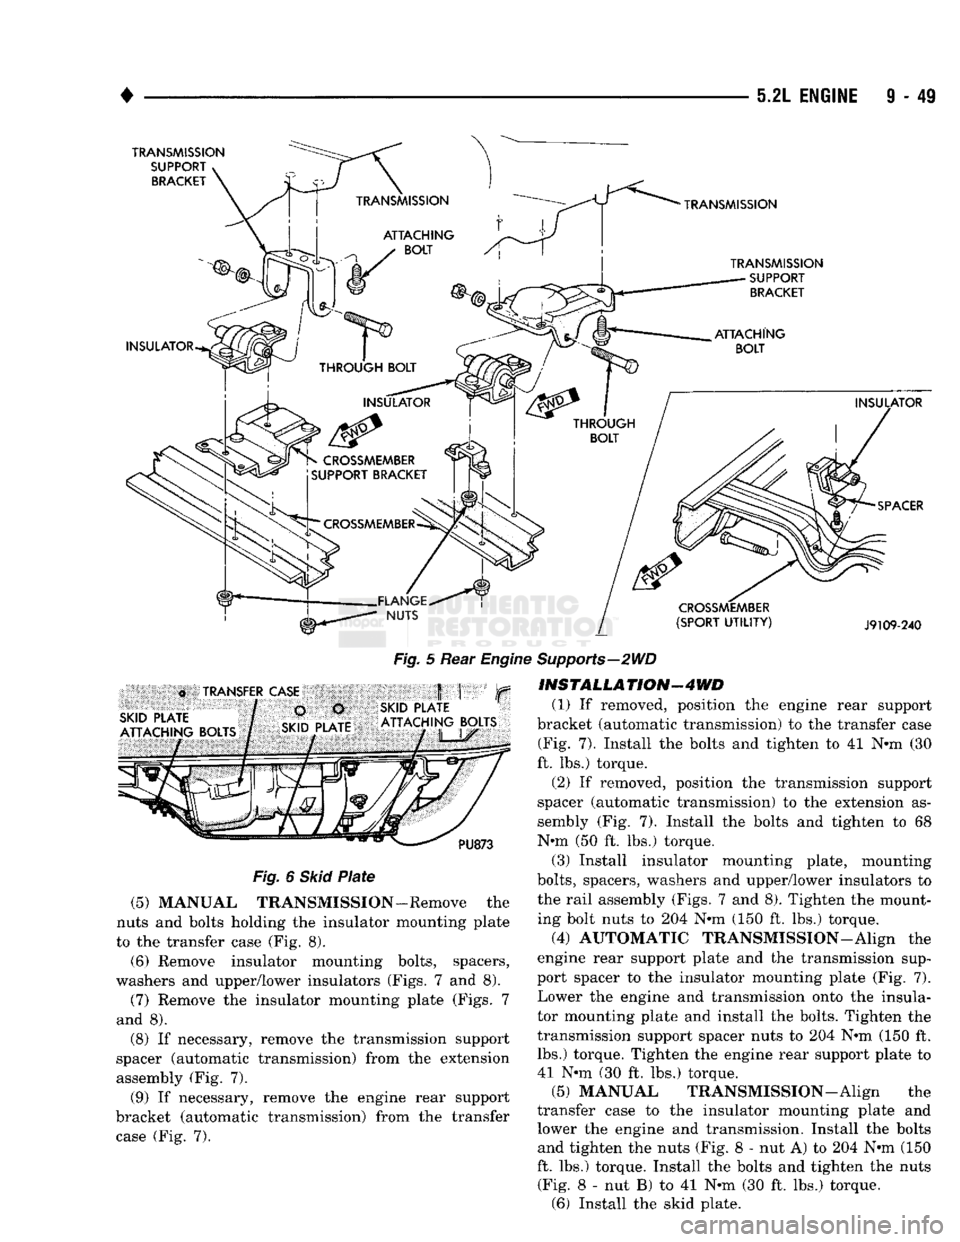
crossmember (sport utility) or from the transmission support bracket (Fig. 5). (4) Remove the flange nuts from the crossmember
support bracket (Fig. 5).
(5) Raise rear of transmission enough to provide
insulator to crossmember clearance. Remove the in
sulator flange nuts and remove the insulator (Fig. 5). (6) If necessary, remove the attaching bolts hold
ing the transmission support bracket to the transmis
sion (Fig. 5).
INSTALLATION-2WD (1) If removed, position the transmission support
bracket to the transmission (Fig. 5). Install the at taching bolts and tighten to 68 N-m (50 ft. lbs.)
torque.
(2) Position insulator in transmission support
bracket. Install through-bolt.
(3) Be sure insulator is secured in a LEVEL posi
tion relative to transmission rear support bracket.
Tighten the through-bolt nut to 68 N-m (50 ft. lbs.) torque.
(4) Position the crossmember support bracket onto
the insulator (Fig. 5). Install the flange nut(s) and
tighten to 41 N-m (30 ft. lbs.) torque.
(5) Using the transmission jack, lower the insula
tor and crossmember support bracket onto the cross-
member (Fig. 5).
(6) Tighten the crossmember flange nuts to 41 N-
m (30 ft. lbs.) torque. (7) Remove the transmission jack. (8) Lower the vehicle.
REMOVAL-4WD (1) Raise the vehicle on a hoist.
(2) Remove the skid plate (if equipped) from the
rear crossmember and transmission crossmember (Fig. 6). (3) Position transmission jack under transmission
and raise rear of transmission and engine
SLIGHTLY. (4) AUTOMATIC TRANSMISSION-Remove
the nuts and bolts holding the transmission support spacer to the insulator mounting plate (Fig. 7). Re
move the bolts and nuts holding the engine rear sup
port plate to the insulator mounting plate (Fig. 7).
Page 654 of 1502
•
5.21 ENGINE 9 - 49
TRANSMISSION
SUPPORT
BRACKET
TRANSMISSION
TRANSMISSION SUPPORT BRACKET
INSULATOR
CROSSMEMBER
(SPORT
UTILITY)
J9109-240
l^^^U.TRANSFERJCASE
.
SKIDRATlf
~—l!pW;;^
ni ®p
ATTACHING
BOLTS
1|BS^ID
PLATE|
Fig.
5 Rear
Engine
iSKID PLATE
I
ATTACHING
BOLTS
PU873
Fig.
6
Skid
Plate
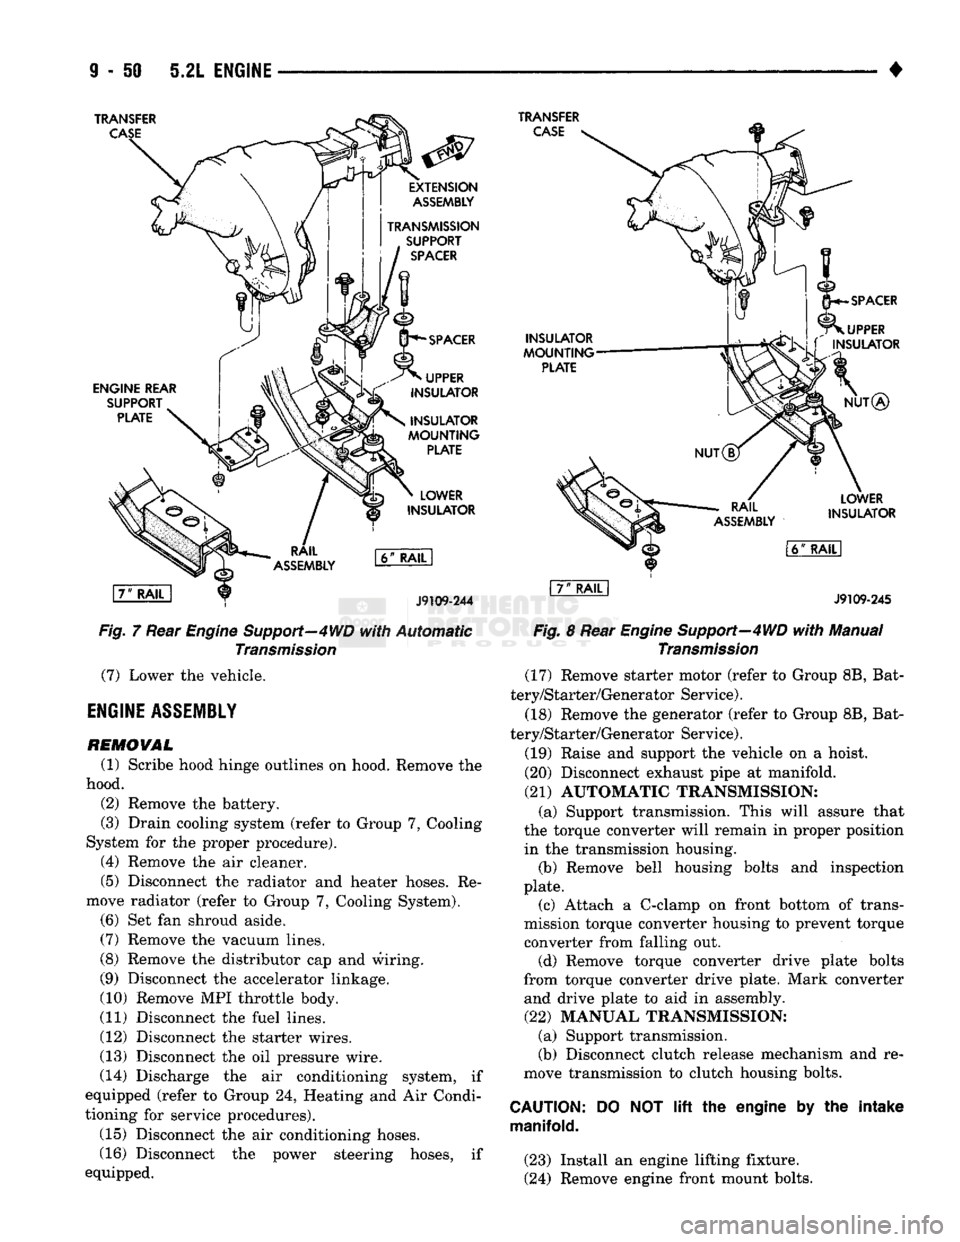
(5) MANUAL TRANSMISSION-Remove the
nuts and bolts holding the insulator mounting plate
to the transfer case (Fig. 8).
(6) Remove insulator mounting bolts, spacers,
washers and upper/lower insulators (Figs. 7 and 8).
(7) Remove the insulator mounting plate (Figs. 7
and 8). (8) If necessary, remove the transmission support
spacer (automatic transmission) from the extension
assembly (Fig. 7).
(9) If necessary, remove the engine rear support
bracket (automatic transmission) from the transfer case (Fig. 7).
Supports—2WD
mSYALLATION-4WD
(1) If removed, position the engine rear support
bracket (automatic transmission) to the transfer case (Fig. 7). Install the bolts and tighten to 41 N-m (30
ft. lbs.) torque.
(2) If removed, position the transmission support
spacer (automatic transmission) to the extension as
sembly (Fig. 7). Install the bolts and tighten to 68
Nnn (50 ft. lbs.) torque.
(3) Install insulator mounting plate, mounting
bolts,
spacers, washers and upper/lower insulators to the rail assembly (Figs. 7 and 8). Tighten the mounting bolt nuts to 204 N-m (150 ft. lbs.) torque.
(4) AUTOMATIC TRANSMISSION—Align the
engine rear support plate and the transmission sup
port spacer to the insulator mounting plate (Fig. 7). Lower the engine and transmission onto the insula
tor mounting plate and install the bolts. Tighten the
transmission support spacer nuts to 204 N-m (150 ft. lbs.) torque. Tighten the engine rear support plate to
41 N-m (30 ft. lbs.) torque. (5) MANUAL TRANSMISSION—Align the
transfer case to the insulator mounting plate and lower the engine and transmission. Install the bolts and tighten the nuts (Fig. 8 - nut A) to 204 N-m (150
ft. lbs.) torque. Install the bolts and tighten the nuts (Fig. 8 - nut B) to 41 N-m (30 ft. lbs.) torque. (6) Install the skid plate.
Page 655 of 1502
TRANSFER
CASE
TRANSFER
CASE
ENGINE
REAR
SUPPORT PLATE
EXTENSION
ASSEMBLY
TRANSMISSION
SUPPORT
SPACER
SPACER
UPPER
INSULATOR
INSULATOR
MOUNTING
PLATE
LOWER
INSULATOR
fT^RAIL
J9109-244
Fig,
7 Rear Engine Support—4WD
with
Automatic
Transmission
(7)
Lower the vehicle.
ENGINE
ASSEMBLY
REMOVAL
(1) Scribe hood hinge outlines on hood. Remove the
hood. (2) Remove the battery.
(3) Drain cooling system (refer to Group 7, Cooling
System for the proper procedure). (4) Remove the air cleaner.
(5) Disconnect the radiator and heater hoses. Re
move radiator (refer to Group 7, Cooling System). (6) Set fan shroud aside.
(7)
Remove the vacuum lines.
(8) Remove the distributor cap and wiring.
(9) Disconnect the accelerator linkage.
(10) Remove MPI throttle body.
(11) Disconnect the fuel lines.
(12) Disconnect the starter wires.
(13) Disconnect the oil pressure wire.
(14) Discharge the air conditioning system, if
equipped (refer to Group 24, Heating and Air Condi
tioning for service procedures).
(15) Disconnect the air conditioning hoses.
(16) Disconnect the power steering hoses, if
equipped.
INSULATOR
MOUNTING
PLATE
SPACER
UPPER
L\ f
INSULATOR
NUT®
RAIL
ASSEMBLY
LOWER
INSULATOR
l6ff
RAIL
I
J9109-245
Fig.
8 Rear
Engine
Support—4WD
with
Manual
Transmission
(17) Remove starter motor (refer to Group 8B, Bat
tery/Starter/Generator Service).
(18) Remove the generator (refer to Group 8B, Bat
tery/Starter/Generator Service).
(19) Raise and support the vehicle on a hoist.
(20) Disconnect exhaust pipe at manifold.
(21)
AUTOMATIC TRANSMISSION: (a) Support transmission. This will assure that
the torque converter will remain in proper position in the transmission housing. (b) Remove bell housing bolts and inspection
plate. (c) Attach a C-clamp on front bottom of trans
mission torque converter housing to prevent torque
converter from falling out. (d) Remove torque converter drive plate bolts
from torque converter drive plate. Mark converter and drive plate to aid in assembly.
(22)
MANUAL TRANSMISSION; (a) Support transmission.
(b) Disconnect clutch release mechanism and re
move transmission to clutch housing bolts.
CAUTION:
manifold.
DO
NOT lift the
engine
by the
intake
(23) Install an engine lifting fixture.
(24) Remove engine front mount bolts.
Page 656 of 1502
•
5.2L
ENGINE
9 - 51 (25) Lower the vehicle.
(26) On automatic transmission vehicles, discon
nect the engine from the torque converter drive
plate. On manual transmission vehicles, move engine forward until drive pinion shaft clears the clutch
disc.
Remove engine from engine compartment.
(27) Install engine assembly on engine repair
stand.
INSTALLATION
(1) Remove engine from the repair stand and posi
tion in the engine compartment.
(2) Install an engine support fixture.
(3) Raise and support the vehicle on a hoist.
(4) AUTOMATIC TRANSMISSION: (a) Position the torque converter and drive plate.
Install torque converter drive plate bolts. Tighten
the bolts to 31 N-m (270 in. lbs.) torque.
(b) Install the engine front mounts.
(c) Install bell housing bolts. Tighten the bolts to
41 N-m (30 ft. lbs.) torque.
(d) Remove C-clamp.
(e) Install the inspection plate.
(5) MANUAL TRANSMISSION: (a) Position the drive pinion shaft to the clutch
disc.
(b) Connect the clutch release mechanism and
install the transmission to clutch bolts. Tighten the
bolts to 68 N-m (50 ft. lbs.) torque.
(c) Install the engine front mounts.
(6) Remove transmission support.
(7) Install exhaust pipe to manifold. (8) Lower the vehicle.
(9) Remove engine lifting fixture. (10) Install the generator (refer to Group 8B, Bat
tery/Starter/ Generator Service). (11) Install the starter motor (refer to Group 8B,
Battery/Starter/Generator Service). (12) Connect power steering hoses, if so equipped.
(13) Connect air conditioning hoses.
(14) Evacuate and charge the air conditioning sys
tem, if equipped (refer to Group 24, Heater and Air Conditioning for service procedures).
(15) Using a new gasket, install MPI throttle body.
Tighten the throttle body bolts to 23 N-m (200 in. lbs.) torque. (16) Connect the accelerator linkage.
(17) Connect the starter wires.
(18) Connect the oil pressure wire. (19) Install the distributor cap and wiring.
(20) Connect the vacuum lines.
(21) Connect the fuel lines,
(22) Install the radiator (refer to Group 7, Cooling
System). Connect the radiator hoses and heater
hoses.
(23) Install fan shroud in position.
(24) Fill cooling system (refer to Group 7, Cooling
System for the proper procedure). (25) Install the air cleaner.
(26) Install the battery. (27) Warm engine and adjust.
(28) Install hood and line up with the scribe
marks. (29) Road test vehicle.
CYLIiiER
HEAD
COVER
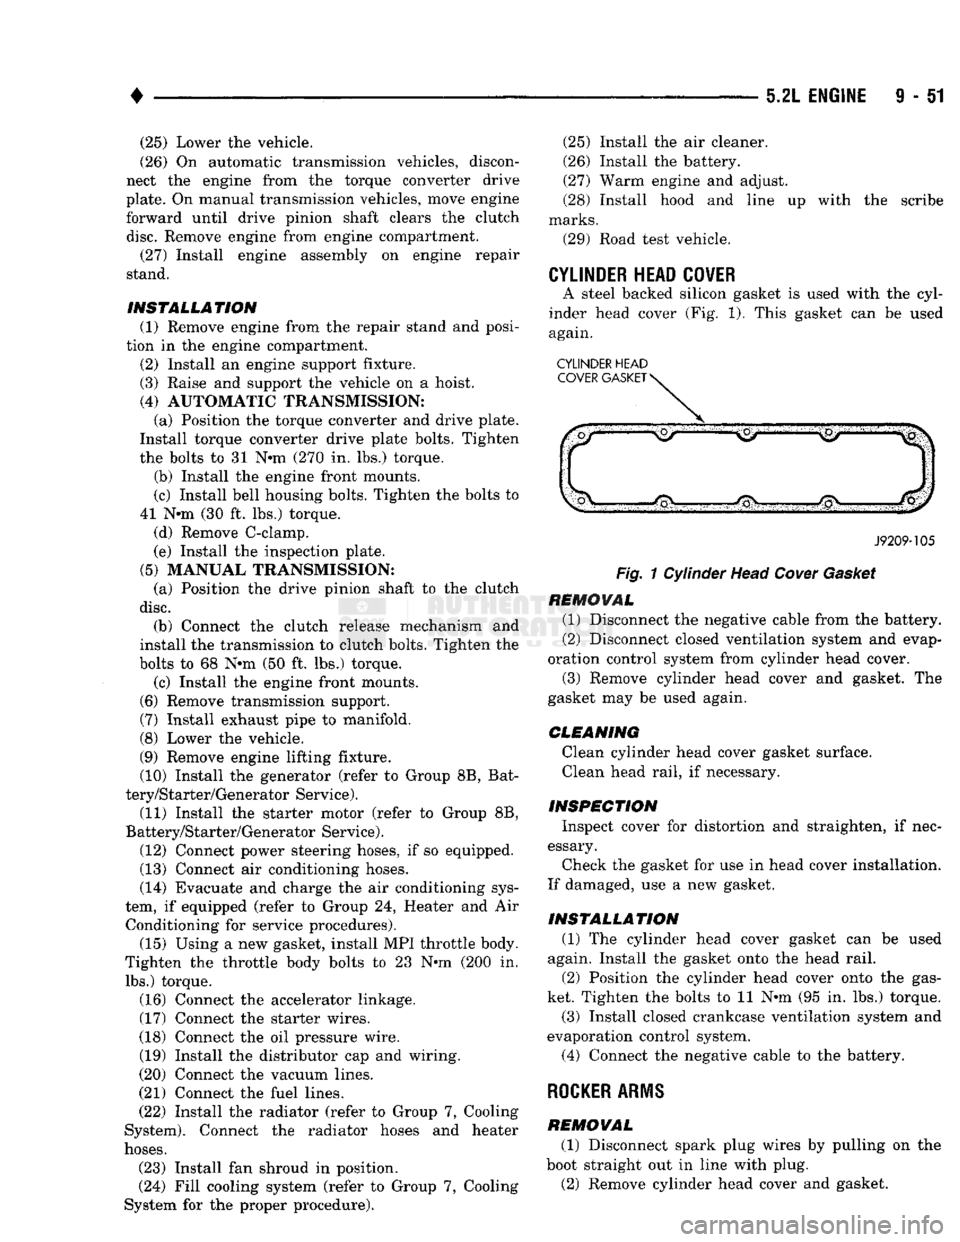
A steel backed silicon gasket is used with the cyl
inder head cover (Fig. 1). This gasket can be used
again.
CYLINDER HEAD
J9209-105
Fig.
1 Cylinder Head
Cover
Gasket
REMOVAL
(1) Disconnect the negative cable from the battery.
(2) Disconnect closed ventilation system and evap
oration control system from cylinder head cover.
(3) Remove cylinder head cover and gasket. The
gasket may be used again.
CLEANING
Clean cylinder head cover gasket surface. Clean head rail, if necessary.
INSPECTION
Inspect cover for distortion and straighten, if nec
essary.
Check the gasket for use in head cover installation.
If damaged, use a new gasket.
INSTALLATION
(1) The cylinder head cover gasket can be used
again. Install the gasket onto the head rail.
(2) Position the cylinder head cover onto the gas
ket. Tighten the bolts to 11 N-m (95 in. lbs.) torque.
(3) Install closed crankcase ventilation system and
evaporation control system.
(4) Connect the negative cable to the battery.
ROCKER ARMS
REMOVAL
(1) Disconnect spark plug wires by pulling on the
boot straight out in line with plug. (2) Remove cylinder head cover and gasket.
Page 657 of 1502
9
- 52 5.2L
ENGINE
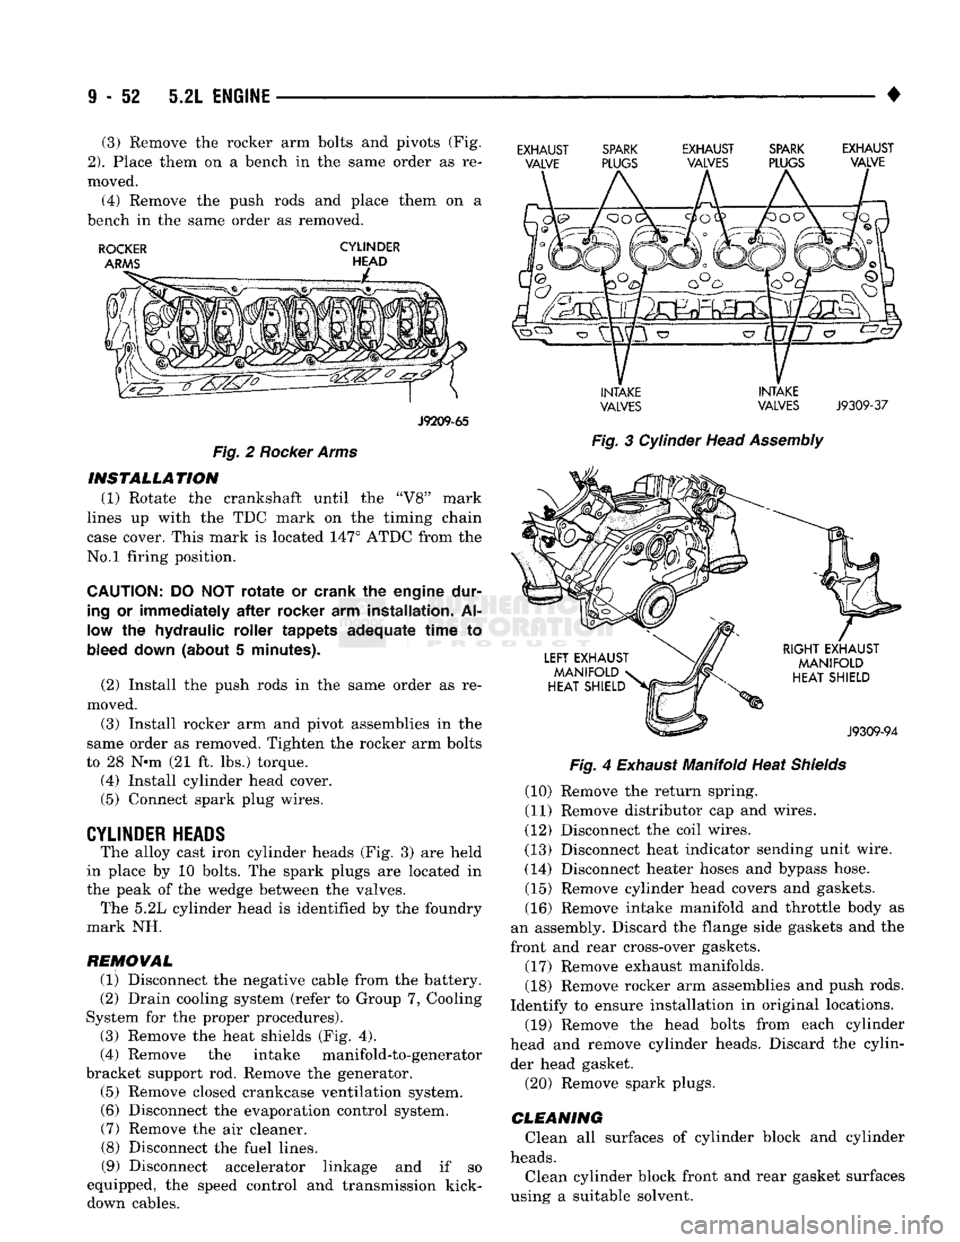
• (3) Remove the rocker arm bolts and pivots (Fig,
2).
Place them on a bench in the same order as re
moved.
(4) Remove the push rods and place them on a
bench in the same order as removed.
ROCKER
CYLINDER
J9209-65
Fig.
2
Rocker
Arms INSTALLATION
(1) Rotate the crankshaft until the "V8" mark
lines up with the TDC mark on the timing chain
case cover. This mark is located 147° ATDC from the
No.l firing position.
CAUTION:
DO NOT
rotate
or crank the engine dur
ing
or immediately
after
rocker arm installation. Al
low
the hydraulic roller tappets adequate
time
to
bleed
down
(about 5 minutes).
(2) Install the push rods in the same order as re
moved.
(3) Install rocker arm and pivot assemblies in the
same order as removed. Tighten the rocker arm bolts
to 28 N-m (21 ft. lbs.) torque. (4) Install cylinder head cover.
(5) Connect spark plug wires.
CYLINDER HEADS
The alloy cast iron cylinder heads (Fig. 3) are held
in place by 10 bolts. The spark plugs are located in
the peak of the wedge between the valves. The 5.2L cylinder head is identified by the foundry
mark NH.
REMOVAL (1) Disconnect the negative cable from the battery.
(2) Drain cooling system (refer to Group 7, Cooling
System for the proper procedures).
(3) Remove the heat shields (Fig. 4).
(4) Remove the intake manifold-to-generator
bracket support rod. Remove the generator. (5) Remove closed crankcase ventilation system. (6) Disconnect the evaporation control system. (7) Remove the air cleaner.
(8) Disconnect the fuel lines. (9) Disconnect accelerator linkage and if so
equipped, the speed control and transmission kick- down cables.
EXHAUST SPARK EXHAUST SPARK EXHAUST
VALVE PLUGS VALVES PLUGS VALVE
INTAKE INTAKE
VALVES VALVES
J9309-37
Fig.
3 Cylinder Head
Assembly
Fig.
4
Exhaust
Manifold Heat
Shields
(10) Remove the return spring.
(11) Remove distributor cap and wires.
(12) Disconnect the coil wires.
(13) Disconnect heat indicator sending unit wire.
(14) Disconnect heater hoses and bypass hose. (15) Remove cylinder head covers and gaskets. (16) Remove intake manifold and throttle body as
an assembly. Discard the flange side gaskets and the
front and rear cross-over gaskets.
(17) Remove exhaust manifolds.
(18) Remove rocker arm assemblies and push rods.
Identify to ensure installation in original locations.
(19) Remove the head bolts from each cylinder
head and remove cylinder heads. Discard the cylin der head gasket.
(20) Remove spark plugs.
CLEANING
Clean all surfaces of cylinder block and cylinder
heads.
Clean cylinder block front and rear gasket surfaces
using a suitable solvent.
Page 658 of 1502
•
5.2L ENGINE
9 - 53
INSPECTION
Inspect all surfaces with a straightedge if there is
any reason to suspect leakage. If out-of-flatness ex
ceeds 0.00075 mm/mm (0.00075 inch/inch) times the span length in inches in any direction, either replace
head or lightly machine the head surface.
FOR EXAMPLE: A 305 mm (12 inch) span is
0.102 mm (0.004 inch) out-of-flat. The allowable out-
of-flat is 305 x 0.00075 (12 x 0.00075) equals 0.23
mm (0.009 inch). This amount of out-of-flat is accept
able.
The cylinder head surface finish should be 1.78-
3.00 microns (70-125 microinches). Inspect push rods. Replace worn or bent rods.
INSTALLATION
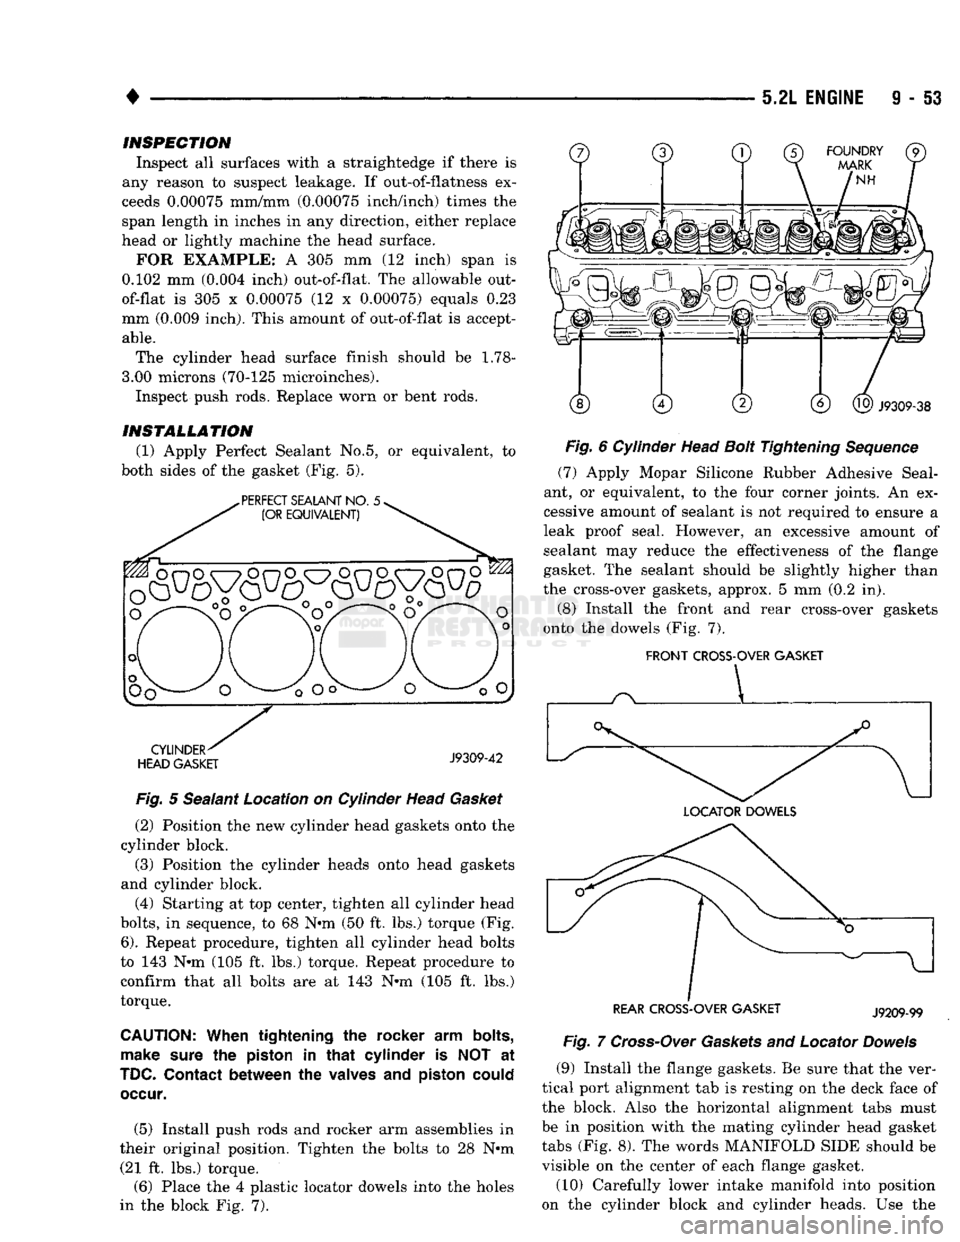
(1) Apply Perfect Sealant No.5, or equivalent, to
both sides of the gasket (Fig. 5).
Fig.
5 Sealant Location on Cylinder Head
Gasket
(2) Position the new cylinder head gaskets onto the
cylinder block. (3) Position the cylinder heads onto head gaskets
and cylinder block. (4) Starting at top center, tighten all cylinder head
bolts,
in sequence, to 68 N»m (50 ft. lbs.) torque (Fig.
6).
Repeat procedure, tighten all cylinder head bolts
to 143 N®m (105 ft. lbs.) torque. Repeat procedure to confirm that all bolts are at 143 N-m (105 ft. lbs.)
torque.
CAUTION:
When
tightening the rocker arm
bolts,
make
sure
the
piston
in
that
cylinder is NOT at
TDC.
Contact
between the
valves
and
piston
could
occur.
(5) Install push rods and rocker arm assemblies in
their original position. Tighten the bolts to 28 N»m (21 ft. lbs.) torque. (6) Place the 4 plastic locator dowels into the holes
in the block Fig. 7).
Fig.
6 Cylinder Head
Bolt
Tightening
Sequence
(7) Apply Mopar Silicone Rubber Adhesive Seal
ant, or equivalent, to the four corner joints. An ex
cessive amount of sealant is not required to ensure a
leak proof seal. However, an excessive amount of sealant may reduce the effectiveness of the flange
gasket. The sealant should be slightly higher than
the cross-over gaskets, approx. 5 mm (0.2 in).
(8) Install the front and rear cross-over gaskets
onto the dowels (Fig. 7).
FRONT
CROSS-OVER GASKET
REAR CROSS-OVER GASKET
J9209-99
Fig.
7
Cross-Over
Gaskets
and Locator
Dowels
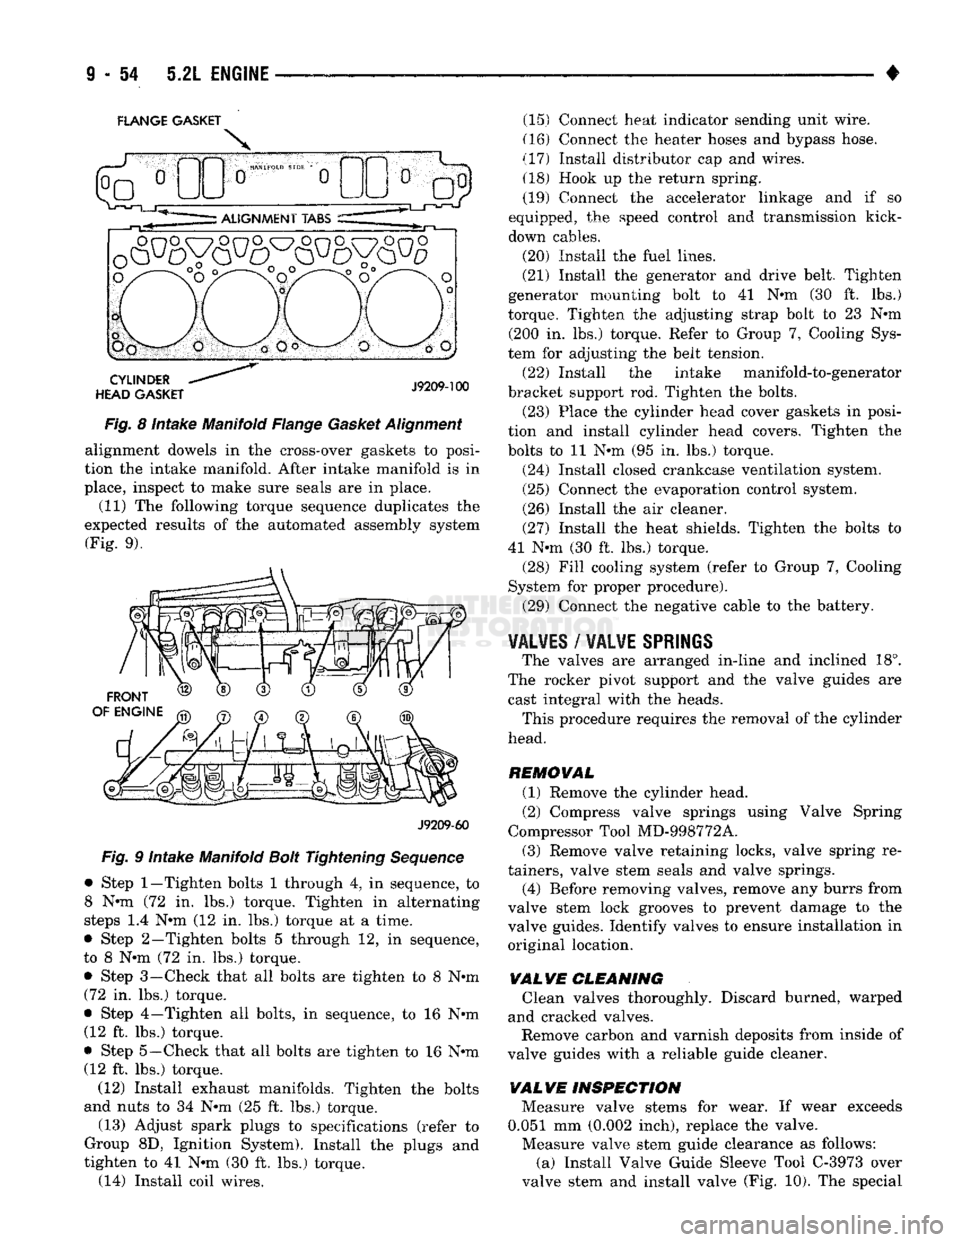
(9) Install the flange gaskets. Be sure that the ver
tical port alignment tab is resting on the deck face of
the block. Also the horizontal alignment tabs must
be in position with the mating cylinder head gasket
tabs (Fig. 8). The words MANIFOLD SIDE should be visible on the center of each flange gasket.
(10) Carefully lower intake manifold into position
on the cylinder block and cylinder heads. Use the
Page 659 of 1502
FLANGE GASKET
X
Fig. 8 intake Manifold Flange Gasket Alignment alignment dowels in the cross-over gaskets to posi
tion the intake manifold. After intake manifold is in
place, inspect to make sure seals are in place. (11) The following torque sequence duplicates the
expected results of the automated assembly system (Fig. 9).
J9209-60
Fig. 9 Intake Manifold Bolt Tightening Sequence
• Step
1—Tighten
bolts 1 through 4, in sequence, to
8 N-m (72 in. lbs.) torque. Tighten in alternating
steps 1.4 N-m (12 in. lbs.) torque at a time.
• Step 2—Tighten bolts 5 through 12, in sequence,
to 8 N-m (72 in. lbs.) torque.
• Step 3—Check that all bolts are tighten to 8 N-m (72 in. lbs.) torque.
• Step 4—Tighten all bolts, in sequence, to 16 N-m (12 ft. lbs.) torque.
• Step
5—Check
that all bolts are tighten to 16 N-m (12 ft. lbs.) torque.
(12) Install exhaust manifolds. Tighten the bolts
and nuts to 34 N-m (25 ft. lbs.) torque.
(13) Adjust spark plugs to specifications (refer to
Group 8D, Ignition System). Install the plugs and
tighten to 41 N-m (30 ft. lbs.) torque. (14) Install coil wires. (15) Connect heat indicator sending unit wire.
(16) Connect the heater hoses and bypass hose.
(17) Install distributor cap and wires. (18) Hook up the return spring.
(19) Connect the accelerator linkage and if so
equipped, the speed control and transmission kick-
down cables.
(20) Install the fuel lines.
(21) Install the generator and drive belt. Tighten
generator mounting bolt to 41 N-m (30 ft. lbs.)
torque. Tighten the adjusting strap bolt to 23 N-m (200 in. lbs.) torque. Refer to Group 7, Cooling Sys
tem for adjusting the belt tension.
(22) Install the intake manifold-to-generator
bracket support rod. Tighten the bolts. (23) Place the cylinder head cover gaskets in posi
tion and install cylinder head covers. Tighten the
bolts to 11 N-m (95 in. lbs.) torque.
(24) Install closed crankcase ventilation system.
(25) Connect the evaporation control system.
(26) Install the air cleaner.
(27) Install the heat shields. Tighten the bolts to
41 N-m (30 ft. lbs.) torque. (28) Fill cooling system (refer to Group 7, Cooling
System for proper procedure).
(29) Connect the negative cable to the battery.
VALVES
/
VALVE
SPRINGS
The valves are arranged in-line and inclined 18°.
The rocker pivot support and the valve guides are cast integral with the heads. This procedure requires the removal of the cylinder
head.
REMOVAL (1) Remove the cylinder head.
(2) Compress valve springs using Valve Spring
Compressor Tool MD-998772A.
(3) Remove valve retaining locks, valve spring re
tainers, valve stem seals and valve springs.
(4) Before removing valves, remove any burrs from
valve stem lock grooves to prevent damage to the
valve guides. Identify valves to ensure installation in
original location.
VALVE CLEANING Clean valves thoroughly. Discard burned, warped
and cracked valves. Remove carbon and varnish deposits from inside of
valve guides with a reliable guide cleaner.
VAL VE INSPECTION Measure valve stems for wear. If wear exceeds
0.051 mm (0.002 inch), replace the valve. Measure valve stem guide clearance as follows:
(a) Install Valve Guide Sleeve Tool C-3973 over
valve stem and install valve (Fig. 10). The special
Page 660 of 1502
•
5.2L
ENGINE
I - 55
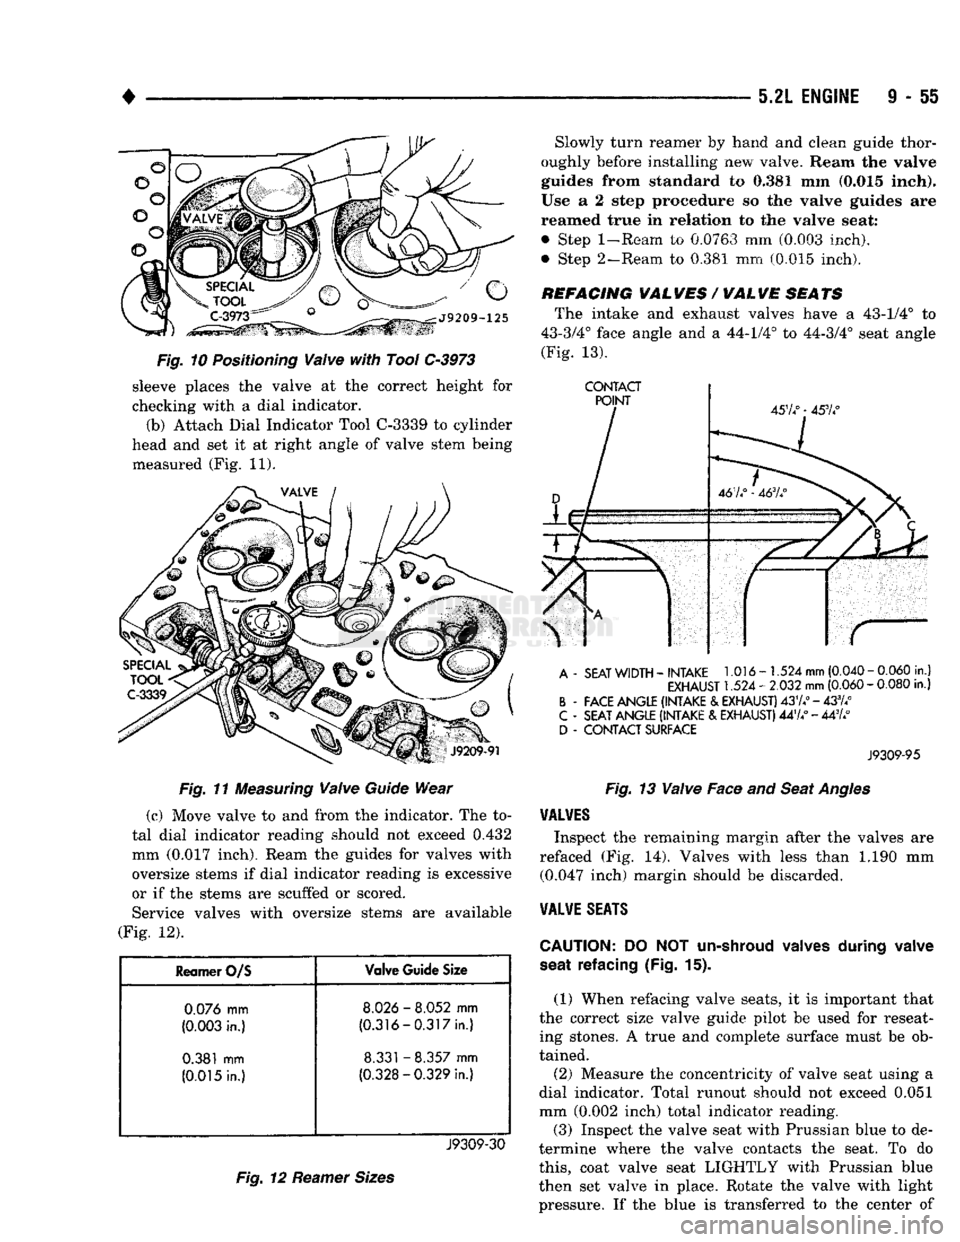
Fig. 10 Positioning Valve with Tool C-3973 sleeve places the valve at the correct height for
checking with a dial indicator.
(b) Attach Dial Indicator Tool C-3339 to cylinder
head and set it at right angle of valve stem being measured (Fig. 11).
Fig. 11 Measuring Valve Guide Wear
(c) Move valve to and from the indicator. The to
tal dial indicator reading should not exceed
0.432
mm
(0.017
inch). Ream the guides for valves with
oversize stems if dial indicator reading is excessive
or if the stems are scuffed or scored. Service valves with oversize stems are available
(Fig. 12).
Reamer
O/S
Valve
Guide
Size
0.076
mm
8.026
-
8.052
mm
(0.003
in.)
(0.316-0.317in.)
0.381
mm
8.331
-
8.357
mm
(0.015
In.)
(0.328-0.329
In.)
J9309-30
Fig. 12 Reamer Sizes
Slowly turn reamer
by
hand
and
clean guide thor
oughly before installing
new
valve. Ream
the valve
guides from standard
to 0,381 mm
(0.015 Inch).
Use
a 2
step procedure
so the
valve guides
are
reamed true
in
relation
to the
valve seat:
• Step
1-Ream
to 0.0763 mm (0.003 inch),
• Step 2—Ream, to 0.381 mm (0.015 inch).
REFACING
VAL
WES
/
WAL
WE
SEATS
The intake and exhaust valves have a 43-1/4° to
43-3/4° face angle and a 44-1/4° to 44-3/4° seat angle
(Fig.
13).
CONTACT
A
-
SEAT
WIDTH
-
INTAKE
1.016-1.524
mm
(0.040
-
0.060
in.)
EXHAUST
1.524 -
2.032
mm
(0.060
-
0.080
in.)
B
-
FACE ANGLE (INTAKE
&
EXHAUST)
437.°
-433//
C
-
SEAT ANGLE (INTAKE
&
EXHAUST)
447/ - 447/
D
-
CONTACT SURFACE
J9309-95
Fig. 13 Valve Face and Seat Angles
VALVES
Inspect the remaining margin after the valves are
refaced (Fig. 14). Valves with less than 1.190 mm (0.047 inch) margin should be discarded.
VALVE
SEATS
CAUTION:
DO NOT
un-shroud valves
during
valve
seat
refacing (Fig.
15).
(1) When refacing valve seats, it is important that
the correct size valve guide pilot be used for reseat ing stones. A true and complete surface must be ob
tained.
(2) Measure the concentricity of valve seat using a
dial indicator. Total runout should not exceed 0.051
mm (0.002 inch) total indicator reading. (3) Inspect the valve seat with Prussian blue to de
termine where the valve contacts the seat. To do
this,
coat valve seat LIGHTLY with Prussian blue
then set valve in place. Rotate the valve with light
pressure. If the blue is transferred to the center of