ECO mode DODGE VIPER 2015 VX / 3.G User Guide
[x] Cancel search | Manufacturer: DODGE, Model Year: 2015, Model line: VIPER, Model: DODGE VIPER 2015 VX / 3.GPages: 148, PDF Size: 21.7 MB
Page 3 of 148
INTRODUCTION/WELCOME
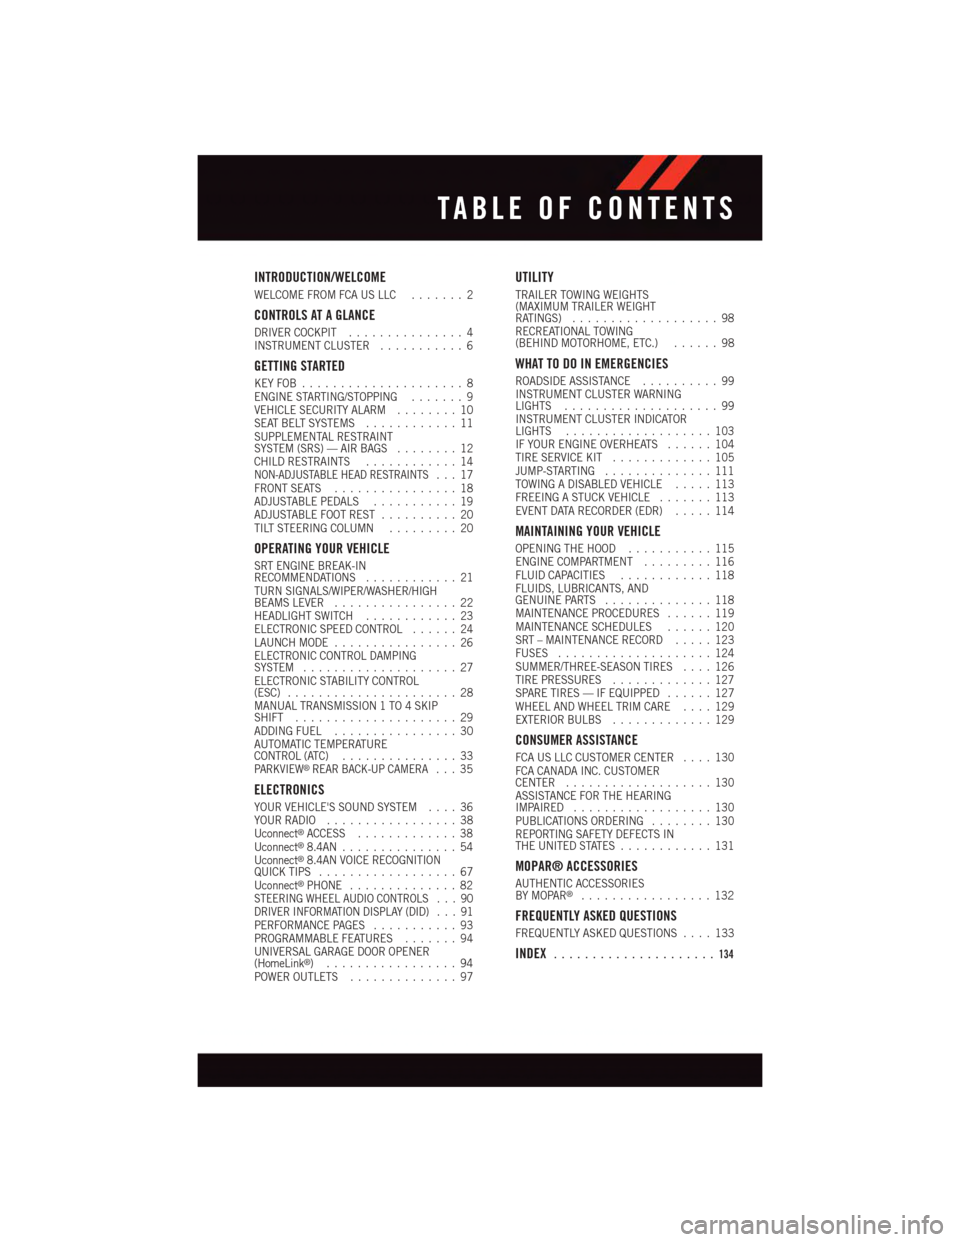
WELCOME FROM FCA US LLC.......2
CONTROLS AT A GLANCE
DRIVER COCKPIT...............4INSTRUMENT CLUSTER...........6
GETTING STARTED
KEY FOB . . . . . . . . . . . . . . . . . . . . . 8ENGINE STARTING/STOPPING.......9VEHICLE SECURITY ALARM........10SEAT BELT SYSTEMS............11SUPPLEMENTAL RESTRAINTSYSTEM (SRS) — AIR BAGS........12CHILD RESTRAINTS............14NON-ADJUSTABLE HEAD RESTRAINTS...17FRONT SEATS................18ADJUSTABLE PEDALS...........19ADJUSTABLE FOOT REST..........20TILT STEERING COLUMN.........20
OPERATING YOUR VEHICLE
SRT ENGINE BREAK-INRECOMMENDATIONS............21TURN SIGNALS/WIPER/WASHER/HIGHBEAMS LEVER................22HEADLIGHT SWITCH............23ELECTRONIC SPEED CONTROL......24LAUNCH MODE................26ELECTRONIC CONTROL DAMPINGSYSTEM....................27ELECTRONIC STABILITY CONTROL(ESC)......................28MANUAL TRANSMISSION 1 TO 4 SKIPSHIFT.....................29ADDING FUEL................30AUTOMATIC TEMPERATURECONTROL (ATC)...............33PA R K V I E W®REAR BACK-UP CAMERA...35
ELECTRONICS
YOUR VEHICLE'S SOUND SYSTEM....36YOUR RADIO.................38Uconnect®ACCESS.............38Uconnect®8.4AN...............54Uconnect®8.4AN VOICE RECOGNITIONQUICK TIPS..................67Uconnect®PHONE..............82STEERING WHEEL AUDIO CONTROLS . . . 90DRIVER INFORMATION DISPLAY (DID) . . . 91PERFORMANCE PAGES...........93PROGRAMMABLE FEATURES.......94UNIVERSAL GARAGE DOOR OPENER(HomeLink®).................94POWER OUTLETS..............97
UTILITY
TRAILER TOWING WEIGHTS(MAXIMUM TRAILER WEIGHTRATINGS)...................98RECREATIONAL TOWING(BEHIND MOTORHOME, ETC.)......98
WHAT TO DO IN EMERGENCIES
ROADSIDE ASSISTANCE..........99INSTRUMENT CLUSTER WARNINGLIGHTS....................99INSTRUMENT CLUSTER INDICATORLIGHTS...................103IF YOUR ENGINE OVERHEATS......104TIRE SERVICE KIT.............105JUMP-STARTING..............111TOWING A DISABLED VEHICLE.....113FREEING A STUCK VEHICLE.......113EVENT DATA RECORDER (EDR).....114
MAINTAINING YOUR VEHICLE
OPENING THE HOOD...........115ENGINE COMPARTMENT.........116FLUID CAPACITIES............118FLUIDS, LUBRICANTS, ANDGENUINE PARTS..............118MAINTENANCE PROCEDURES......119MAINTENANCE SCHEDULES......120SRT – MAINTENANCE RECORD.....123FUSES....................124SUMMER/THREE-SEASON TIRES....126TIRE PRESSURES.............127SPARE TIRES — IF EQUIPPED......127WHEEL AND WHEEL TRIM CARE....129EXTERIOR BULBS.............129
CONSUMER ASSISTANCE
FCA US LLC CUSTOMER CENTER....130FCA CANADA INC. CUSTOMERCENTER...................130ASSISTANCE FOR THE HEARINGIMPAIRED..................130PUBLICATIONS ORDERING........130REPORTING SAFETY DEFECTS INTHE UNITED STATES............131
MOPAR® ACCESSORIES
AUTHENTIC ACCESSORIESBY MOPAR®.................132
FREQUENTLY ASKED QUESTIONS
FREQUENTLY ASKED QUESTIONS....133
INDEX.....................134
TABLE OF CONTENTS
Page 5 of 148
VEHICLES SOLD IN CANADA
With respect to any vehicles sold in Canada, the name FCA US LLC shall be deemed to be
deleted and the name FCA Canada Inc. used in substitution (excluding legal lines).
WARNING!
•Pedalsthatcannotmovefreelycancauselossofvehiclecontrolandincreasethe
risk of serious personal injury.
•Alwaysmakesurethatobjectscannotfallintothedriverfootwellwhilethevehicle
is moving. Objects can become trapped under the brake pedal and accelerator
pedal causing a loss of vehicle control.
•Failuretoproperlyfollowfloormatinstallationormountingcancauseinterference
with the brake pedal and accelerator pedal operation causing loss of control of the
vehicle.
•Never leave children alone in a vehicle, or with access to an unlocked vehicle. Allowing
children to be in a vehicle unattended is dangerous for a number of reasons. A child or
others could be seriously or fatally injured. Children should be warned not to touch the
parking brake, brake pedal or the shift lever/transmission gear selector.
•Do not leave the key fob in or near the vehicle, or in a location accessible to children,
and do not leave the ignition of a vehicle equipped with Keyless Enter-N-Go™ in the
ACC or ON/RUN mode. A child could operate power windows, other controls, or move
the vehicle.
•Neverusethe“PARK”positionasasubstitutefortheparkingbrake.Alwaysapply
the parking brake fully when parked to guard against vehicle movement and
possible injury or damage.
•RefertoyourOwner'sManualontheDVDforfurtherdetails.
USE OF AFTERMARKET PRODUCTS (ELECTRONICS)
The use of aftermarket devices including cell phones, MP3 players, GPS systems, or
chargers may affect the performance of on-board wireless features including Keyless
Enter-N-Go™ and Remote Start range. If you are experiencing difficulties with any of your
wireless features, try disconnecting your aftermarket devices to see if the situation
improves. If your symptoms persist, please see an authorized dealer.
CHRYSLER, DODGE, JEEP, RAM, MOPAR and Uconnect are registered trademarks of
FCA US LLC.
COPYRIGHT ©2015 FCA US LLC
INTRODUCTION/WELCOME
3
Page 17 of 148
Installing the Child Restraint Using the Vehicle Seat Belts
•ThefrontpassengerseatingpositionisequippedwithaSwitchableAutomaticLocking
Retractor (ALR) that is designed to keep the lap portion of the seat belt tight around the
child restraint. Any seat belt system will loosen with time, so check the belt occasion-
ally, and pull it tight if necessary.
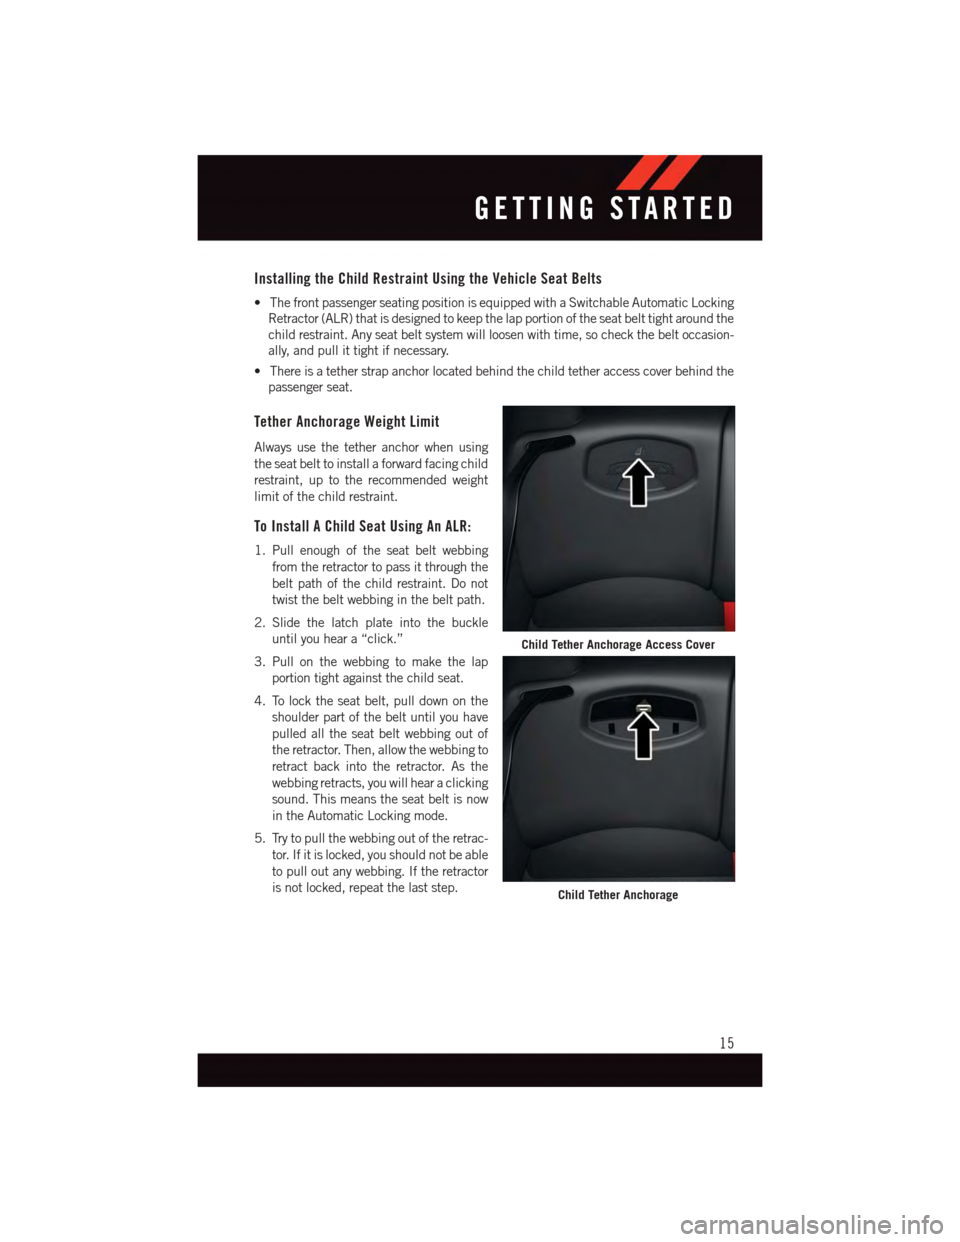
•Thereisatetherstrapanchorlocatedbehindthechildtetheraccesscoverbehindthe
passenger seat.
Tether Anchorage Weight Limit
Always use the tether anchor when using
the seat belt to install a forward facing child
restraint, up to the recommended weight
limit of the child restraint.
To Install A Child Seat Using An ALR:
1. Pull enough of the seat belt webbing
from the retractor to pass it through the
belt path of the child restraint. Do not
twist the belt webbing in the belt path.
2. Slide the latch plate into the buckle
until you hear a “click.”
3. Pull on the webbing to make the lap
portion tight against the child seat.
4. To lock the seat belt, pull down on the
shoulder part of the belt until you have
pulled all the seat belt webbing out of
the retractor. Then, allow the webbing to
retract back into the retractor. As the
webbing retracts, you will hear a clicking
sound. This means the seat belt is now
in the Automatic Locking mode.
5. Try to pull the webbing out of the retrac-
tor. If it is locked, you should not be able
to pull out any webbing. If the retractor
is not locked, repeat the last step.
Child Tether Anchorage Access Cover
Child Tether Anchorage
GETTING STARTED
15
Page 23 of 148
SRT ENGINE BREAK-IN RECOMMENDATIONS
SRT Engine Break-In Recommendations: The following tips will be helpful in obtaining
optimum performance and maximum durability for your new SRT Vehicle.
Despite modern technology and World Class manufacturing methods, the moving parts of
the vehicle must still wear in with each other. This wearing in occurs mainly during the first
500 miles (805 km) and continues through the first oil change interval.
It is recommended for the operator to observe the following driving behaviors during the
new vehicle break-in period:
0to100miles(0to161km):
•Donotallowtheenginetooperateatidleforanextendedperiodoftime.
•Depress the accelerator pedal slowly and not more than halfway to avoid rapid accelera-
tion.
•Avoidaggressivebraking.
•Drivewiththeenginespeedlessthan3,500RPM.
•Maintainvehiclespeedbelow55mph(88km/h)andobservelocalspeedlimits.
100 to 300 miles (161 to 483 km):
•Depress the accelerator pedal slowly and not more than halfway to avoid rapid acceleration
in lower gears (1st to 3rd gears).
•Avoidaggressivebraking.
•Drivewiththeenginespeedlessthan5,000RPM.
•Maintainvehiclespeedbelow70mph(112km/h)andobservelocalspeedlimits.
300 to 500 miles (483 to 805 km):
•Exercisethefullenginerpmrange,shiftingmanually(paddlesorgearshift)athigher
rpms when possible.
•Donotperformsustainedoperationwiththeacceleratorpedalatwideopenthrottle.
•Maintainvehiclespeedbelow85mph(136km/h)andobservelocalspeedlimits.
For the first 1500 mi (2414 km):
•Donotparticipateintrackevents,sportdrivingschools,orsimilaractivitiesduringthe
first 1500 mi (2414 km).
NOTE:
Check engine oil with every refueling and add if necessary. Oil and fuel consumption may
be higher through the first oil change interval.
OPERATING YOUR VEHICLE
21
Page 28 of 148
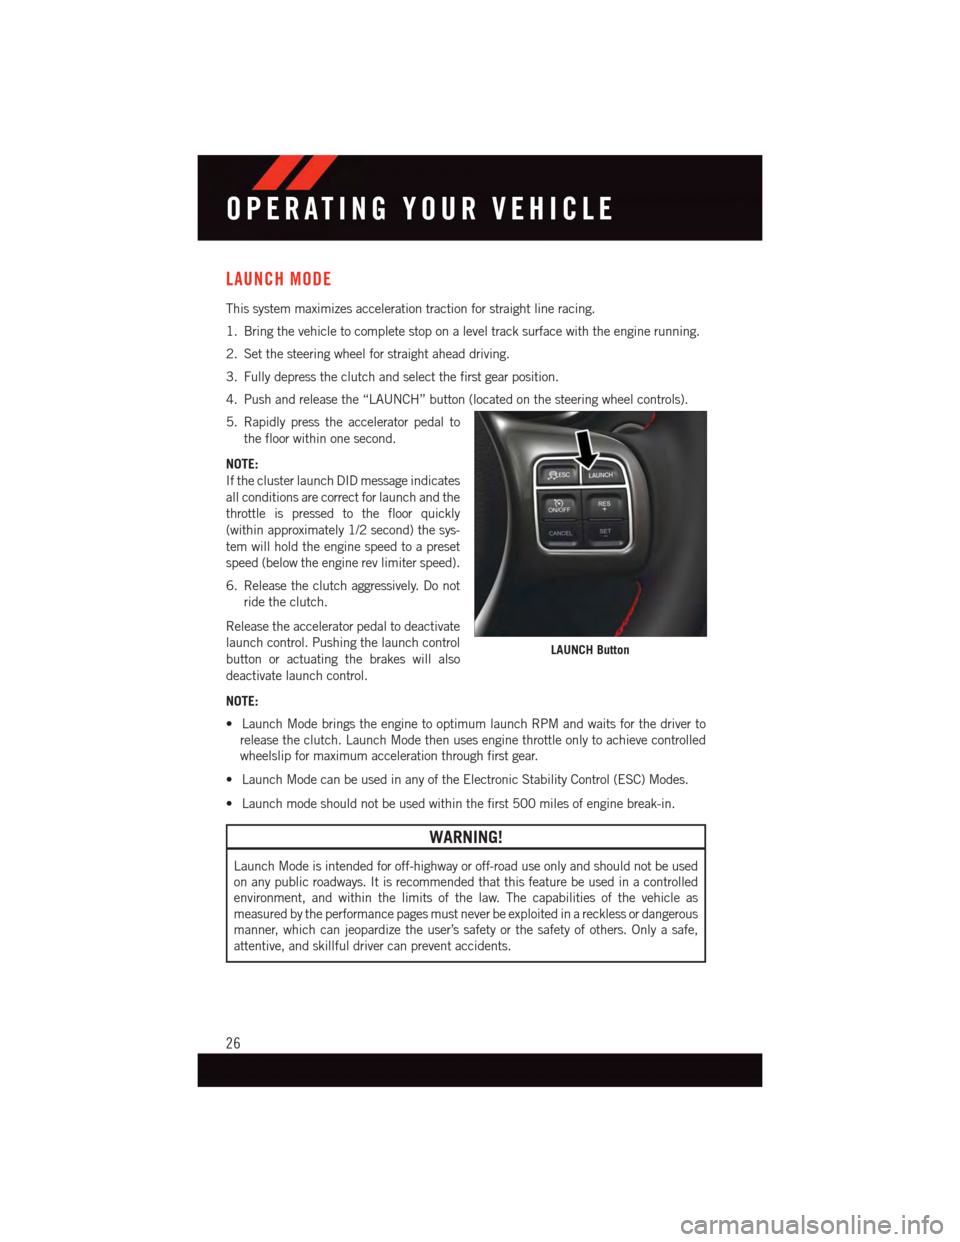
LAUNCH MODE
This system maximizes acceleration traction for straight line racing.
1. Bring the vehicle to complete stop on a level track surface with the engine running.
2. Set the steering wheel for straight ahead driving.
3. Fully depress the clutch and select the first gear position.
4. Push and release the “LAUNCH” button (located on the steering wheel controls).
5. Rapidly press the accelerator pedal to
the floor within one second.
NOTE:
If the cluster launch DID message indicates
all conditions are correct for launch and the
throttle is pressed to the floor quickly
(within approximately 1/2 second) the sys-
tem will hold the engine speed to a preset
speed (below the engine rev limiter speed).
6. Release the clutch aggressively. Do not
ride the clutch.
Release the accelerator pedal to deactivate
launch control. Pushing the launch control
button or actuating the brakes will also
deactivate launch control.
NOTE:
•LaunchModebringstheenginetooptimumlaunchRPMandwaitsforthedriverto
release the clutch. Launch Mode then uses engine throttle only to achieve controlled
wheelslip for maximum acceleration through first gear.
•LaunchModecanbeusedinanyoftheElectronicStabilityControl(ESC)Modes.
•Launchmodeshouldnotbeusedwithinthefirst500milesofenginebreak-in.
WARNING!
Launch Mode is intended for off-highway or off-road use only and should not be used
on any public roadways. It is recommended that this feature be used in a controlled
environment, and within the limits of the law. The capabilities of the vehicle as
measured by the performance pages must never be exploited in a reckless or dangerous
manner, which can jeopardize the user’s safety or the safety of others. Only a safe,
attentive, and skillful driver can prevent accidents.
LAUNCH Button
OPERATING YOUR VEHICLE
26
Page 30 of 148
ELECTRONIC STABILITY CONTROL (ESC)
•TheESCcorrectsforoversteeringandundersteeringthevehiclebyapplyingthebrake
of the appropriate wheel. Engine power may also be reduced to assist in counteracting
the condition of oversteer or understeer and help the vehicle maintain the desired path.
•InfullonmodeESCutilizessensorsinthevehicletodeterminethepaththatthedriver
intends to steer the vehicle and compares it to the actual path of the vehicle. When the
actual path does not match the intended path, the ESC applies the brake of the
appropriate wheel to assist in counteracting the condition of oversteer or understeer.
Electronic Stability Control (ESC) Operating Modes
The ESC system may have five available operating modes:
ESC On
•ThisisthenormaloperatingmodefortheESCsystem.Wheneverthevehicleisstarted,
the ESC system will be in this mode. The ESC On mode should be used for most driving
situations. The ESC should only be turned OFF for specific reasons as noted in the
following paragraphs.
ESC Full Off
•TheESCOffmodeisintendedforoff-highwayoroff-roaduseonlyandshouldnotbeused on any public roadways. In this mode, all TCS and ESC stability features areturned OFF. To enter the “Full Off” mode, push and hold the “ESC Off” switch for fiveseconds while the vehicle is stopped with the engine running. After five seconds, achime will sound, the “ESC Activation/Malfunction Indicator Light” will illuminate, andthe “ESC OFF” message will display in the vehicle cluster (left of the odometer). The“ESC OFF” message may appear in the Driver Information Display (DID). To turn ESCON again, momentarily push the “ESC Off” switch.
Sport Mode
•Sportmodehasreducedtractioncontrolandreducedstabilitycontrol.Toenterthe
“Sport Mode” mode, push the “ESC” switch once (located on the steering wheel). The
“ESC SPORT” light will illuminate, and the “ESC SPORT” message will display in the
vehicle cluster (left of the odometer).
Track Mode
•Tr a c k M o d e h a s n o t r a c t i o n c o n t r o l a n d h a s r e d u c e d s t a b i l i t y c o n t r o l . To e n t e r t h e “ Tr a c k
Mode” mode, push the “ESC” switch twice. The “ESC TRACK” light will illuminate, and
the “ESC TRACK” message will display in the vehicle cluster (left of the odometer).
OPERATING YOUR VEHICLE
28
Page 31 of 148
Rain Mode
•Rainmodeoffersincreasedtractioncontrolandstabilitycontrolforlowtraction
conditions such as wet roads, dry roads during cold temperatures, or when the driver
wants enhanced stability due to lack of familiarity or experience with the vehicle’s
response. To enter the “Rain Mode” mode, push the “ESC” switch three times. The
“ESC RAIN” light will illuminate, and the “ESC RAIN” message will display in the
vehicle cluster (left of the odometer).
NOTE:
Some models may not offer “Sport” or “Track” Mode.
WARNING!
The Electronic Stability Control System (ESC) cannot prevent the natural laws of physics
from acting on the vehicle, nor can it increase the traction afforded by prevailing road
conditions. ESC cannot prevent all accidents, including those resulting from excessive
speed in turns, driving on very slippery surfaces, or hydroplaning. ESC also cannot
prevent accidents resulting from loss of vehicle control due to inappropriate driver input
for the conditions. Only a safe, attentive, and skillful driver can prevent accidents. The
capabilities of an ESC equipped vehicle must never be exploited in a reckless or
dangerous manner which could jeopardize the user’s safety or the safety of others.
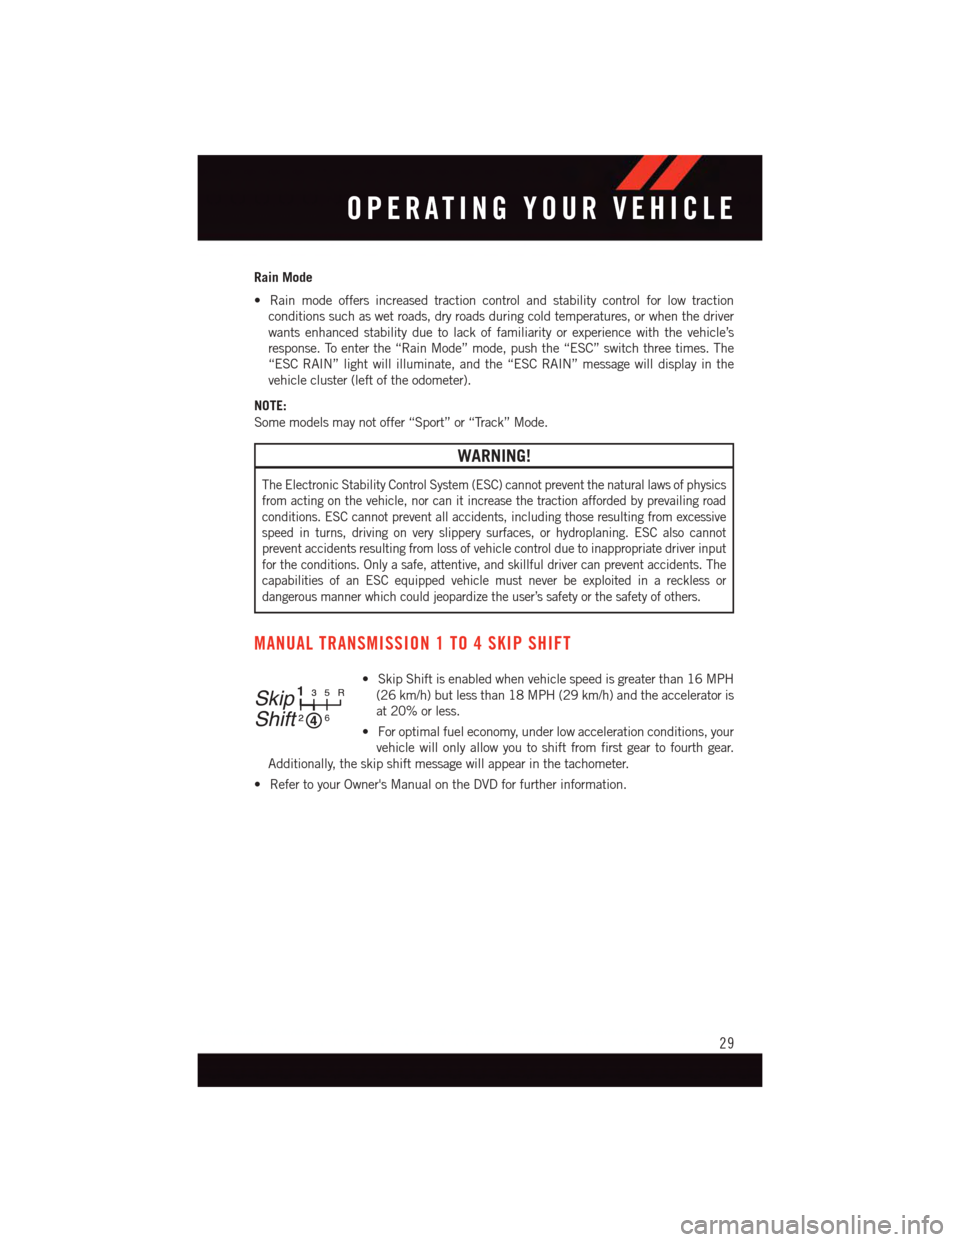
MANUAL TRANSMISSION 1 TO 4 SKIP SHIFT
•SkipShiftisenabledwhenvehiclespeedisgreaterthan16MPH
(26 km/h) but less than 18 MPH (29 km/h) and the accelerator is
at 20% or less.
•Foroptimalfueleconomy,underlowaccelerationconditions,your
vehicle will only allow you to shift from first gear to fourth gear.
Additionally, the skip shift message will appear in the tachometer.
•RefertoyourOwner'sManualontheDVDforfurtherinformation.
Skip
Shift
133
22
55RR
6
OPERATING YOUR VEHICLE
29
Page 35 of 148
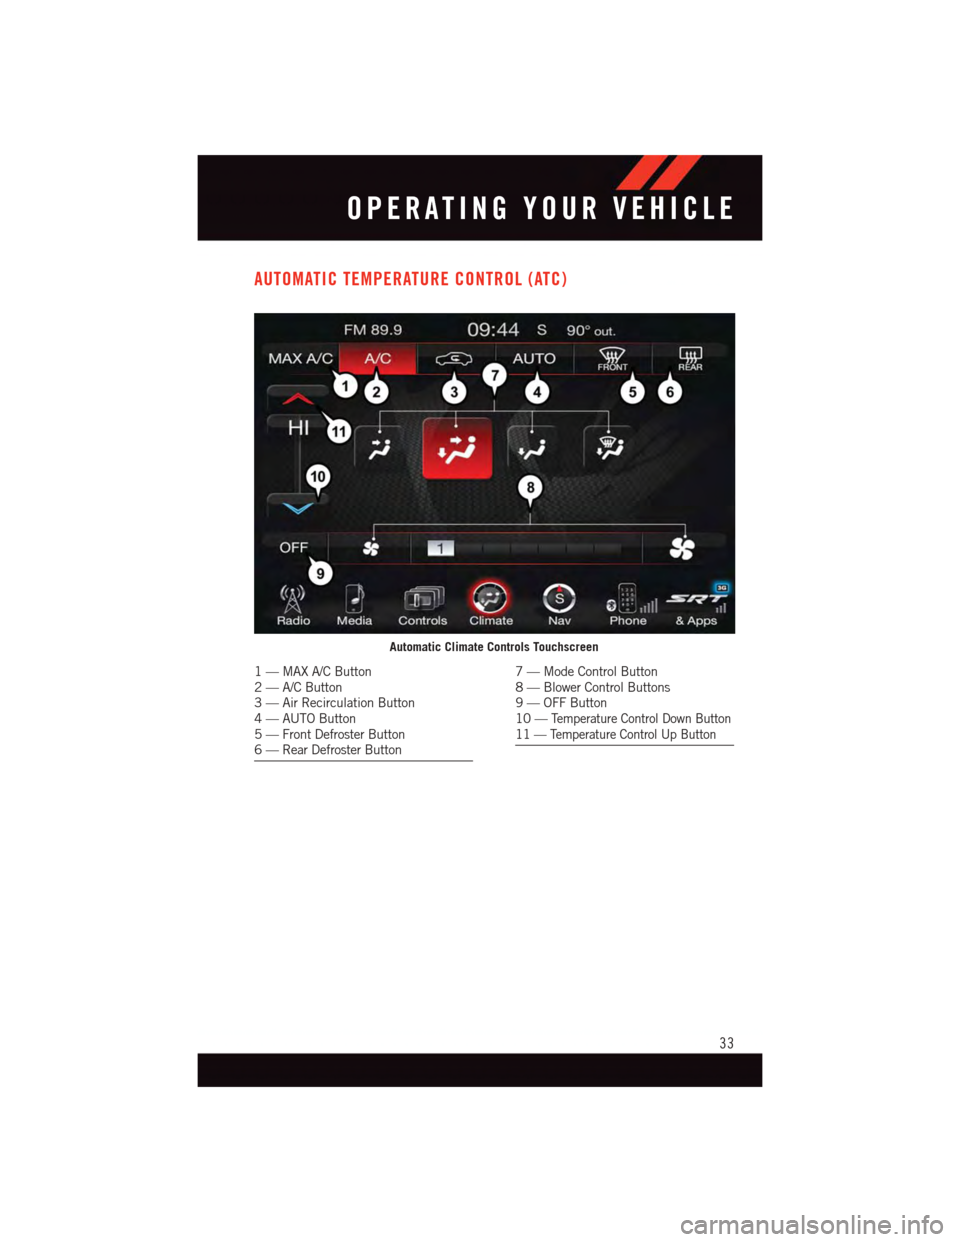
AUTOMATIC TEMPERATURE CONTROL (ATC)
Automatic Climate Controls Touchscreen
1—MAXA/CButton2—A/CButton3—AirRecirculationButton4—AUTOButton5—FrontDefrosterButton6—RearDefrosterButton
7—ModeControlButton8—BlowerControlButtons9—OFFButton10 —Te m p e r a t u r e C o n t r o l D o w n B u t t o n11 — Temperature Control Up Button
OPERATING YOUR VEHICLE
33
Page 37 of 148
Air Conditioning (A/C)
•IftheairconditioningbuttonispressedwhileinAUTOmode,thesystemwillexitAUTO
mode and stay in A/C. The mode and blower will be set at the closest mode and blower
position that the system was operating in AUTO.
Air Recirculation/MaxA/C
•RotatetheTemperatureControltotheMAXA/Cpositiontoautomaticallyturnonboth
Air Conditioning and Recirculation.
•Forwindowdefogging,turntherecirculationbuttonoff.
•Recirculationisnotallowedindefrost/floor(mix)modesforapproximatelyfive
minutes. Recirculation is allowed in floor mode.
PARKVIEW® REAR BACK-UP CAMERA
•Youcanseeanon-screenimageoftherearsurroundingsofyourvehiclewheneverthe
shift lever is put into REVERSE. The ParkView®Rear Back-Up Camera image will be
displayed in the touchscreen display along with a caution note to “check entire
surroundings” across the top of the screen. After five seconds this note will disappear.
•Iftherearviewmirrorortouchscreendisplayappearsfoggy,cleantheParkView®
camera located above the licence plate.
WARNING!
Drivers must be careful when backing up; even when using the ParkView®Rear
Back-Up Camera. Always check carefully behind your vehicle, and be sure to check for
pedestrians, animals, other vehicles, obstructions, or blind spots before backing up.
Yo u m u s t c o n t i n u e t o p a y a t t e n t i o n w h i l e b a c k i n g u p . F a i l u r e t o d o s o c a n r e s u l t i n
serious injury or death.
OPERATING YOUR VEHICLE
35
Page 58 of 148
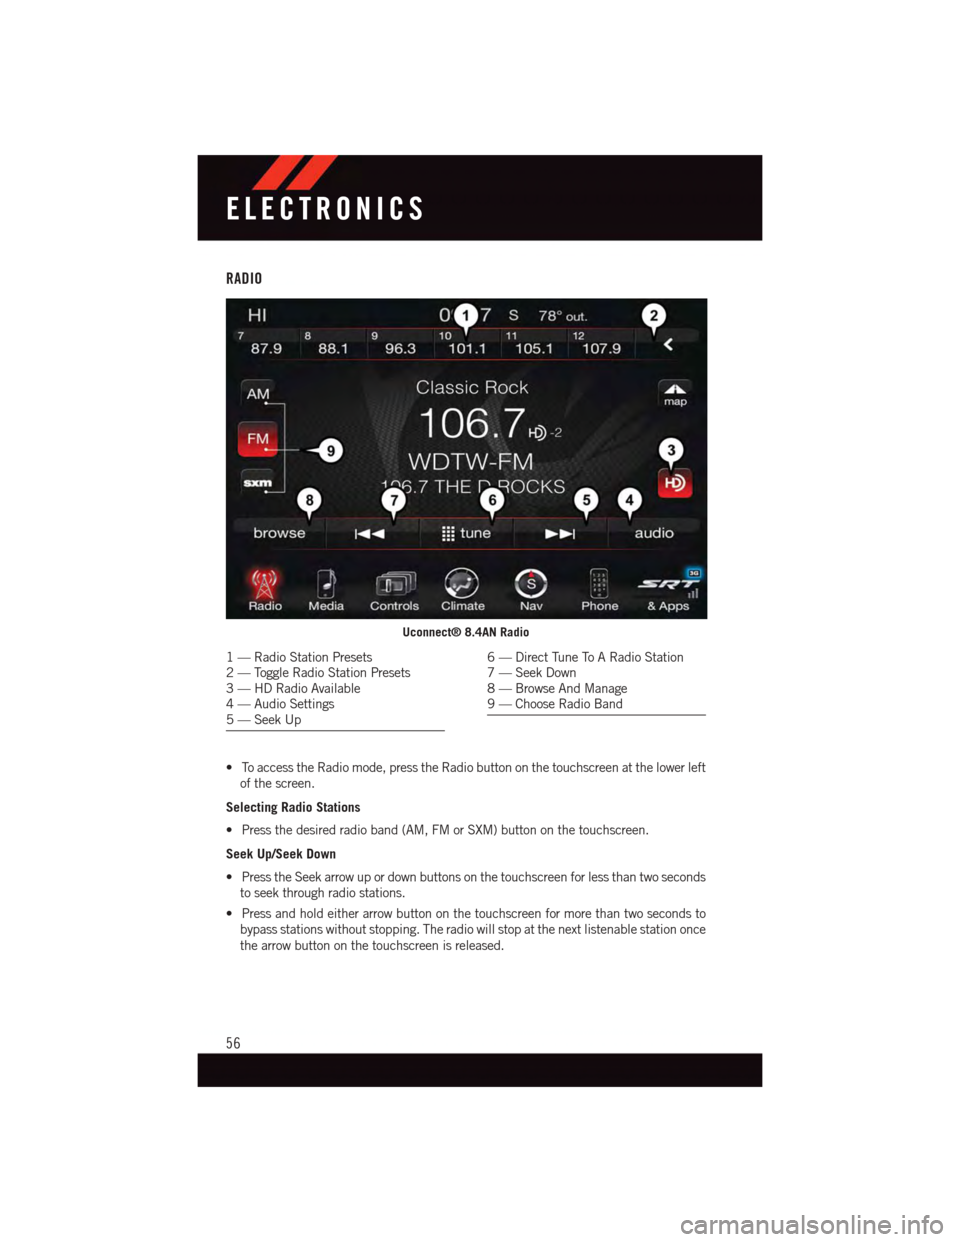
RADIO
•ToaccesstheRadiomode,presstheRadiobuttononthetouchscreenatthelowerleft
of the screen.
Selecting Radio Stations
•Pressthedesiredradioband(AM,FMorSXM)buttononthetouchscreen.
Seek Up/Seek Down
•PresstheSeekarrowupordownbuttonsonthetouchscreenforlessthantwoseconds
to seek through radio stations.
•Pressandholdeitherarrowbuttononthetouchscreenformorethantwosecondsto
bypass stations without stopping. The radio will stop at the next listenable station once
the arrow button on the touchscreen is released.
Uconnect® 8.4AN Radio
1—RadioStationPresets2—ToggleRadioStationPresets3—HDRadioAvailable4—AudioSettings5—SeekUp
6—DirectTuneToARadioStation7—SeekDown8—BrowseAndManage9—ChooseRadioBand
ELECTRONICS
56