bulb FIAT 500 2018 Owner handbook (in English)
[x] Cancel search | Manufacturer: FIAT, Model Year: 2018, Model line: 500, Model: FIAT 500 2018Pages: 224, PDF Size: 3.89 MB
Page 22 of 224
KNOWING YOUR CAR
20
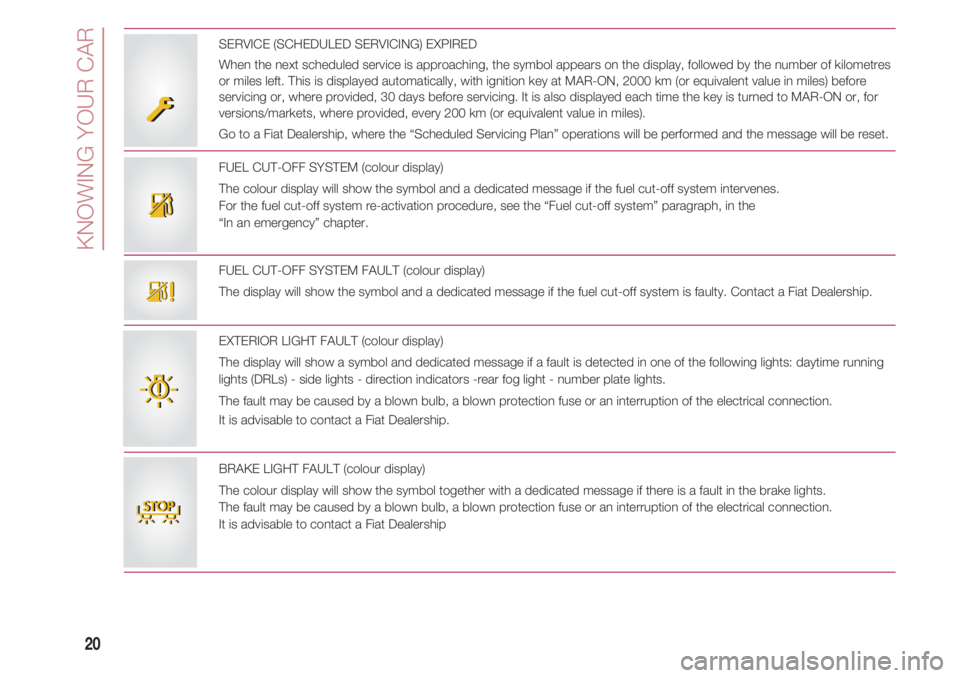
FUEL CUT-OFF SYSTEM FAULT (colour display)
The display will show the symbol and a dedicated message if the fuel cut-off system is faulty. Contact a Fiat Dealership.
FUEL CUT-OFF SYSTEM (colour display)
The colour display will show the symbol and a dedicated message if the fuel cut-off system intervenes.
For the fuel cut-off system re-activation procedure, see the “Fuel cut-off system” paragraph, in the
“In an emergency” chapter.
ss
EXTERIOR LIGHT FAULT (colour display)
The display will show a symbol and dedicated message if a fault is detected in one of the following lights: daytime running
lights (DRLs) - side lights - direction indicators -rear fog light - number plate lights.
The fault may be caused by a blown bulb, a blown protection fuse or an interruption of the electrical connection.
It is advisable to contact a Fiat Dealership.
BB
SERVICE (SCHEDULED SERVICING) EXPIRED
When the next scheduled service is approaching, the symbol appears on the display, followed by the number of kilometres
or miles left. This is displayed automatically, with ignition key at MAR-ON, 2000 km (or equivalent value in miles) before
servicing or, where provided, 30 days before servicing. It is also displayed each time the key is turned to MAR-ON or, for
versions/markets, where provided, every 200 km (or equivalent value in miles).
Go to a Fiat Dealership, where the “Scheduled Servicing Plan” operations will be performed and the message will be reset.
BRAKE LIGHT FAULT (colour display)
The colour display will show the symbol together with a dedicated message if there is a fault in the brake lights.
The fault may be caused by a blown bulb, a blown protection fuse or an interruption of the electrical connection.
It is advisable to contact a Fiat Dealership
TT
Page 136 of 224
IN AN EMERGENCY
134
REPLACING A BULB
34) 19)
GENERAL
INSTRUCTIONS
❒ Before changing a bulb check the
contacts for oxidation;
❒ burnt bulbs must be replaced by
others of the same type and power;
❒ always check the headlight beam
aiming after changing a bulb;
❒ whenever a lamp does not work,
please check that the
corresponding fuse is in tact before
replacing it: please refer to the
paragraph “Replacing fuses” in this
chapter for the location of fuses.
IMPORTANT Whenever the weather is
hot or cold, of after heavy rain, the
surface of the headlights or rear lights
may steam up and/or form droplets of
condensation on the inside. This is a
natural phenomenon due to the
difference in temperature and humidity
between the inside and the outside of
the glass which does not indicate a
fault and does not compromise the
normal operation of lighting devices.
The mist disappears quickly when the
lights are turned on, starting from the
centre of the diffuser, extending
progressively towards the edges.
Page 137 of 224
135
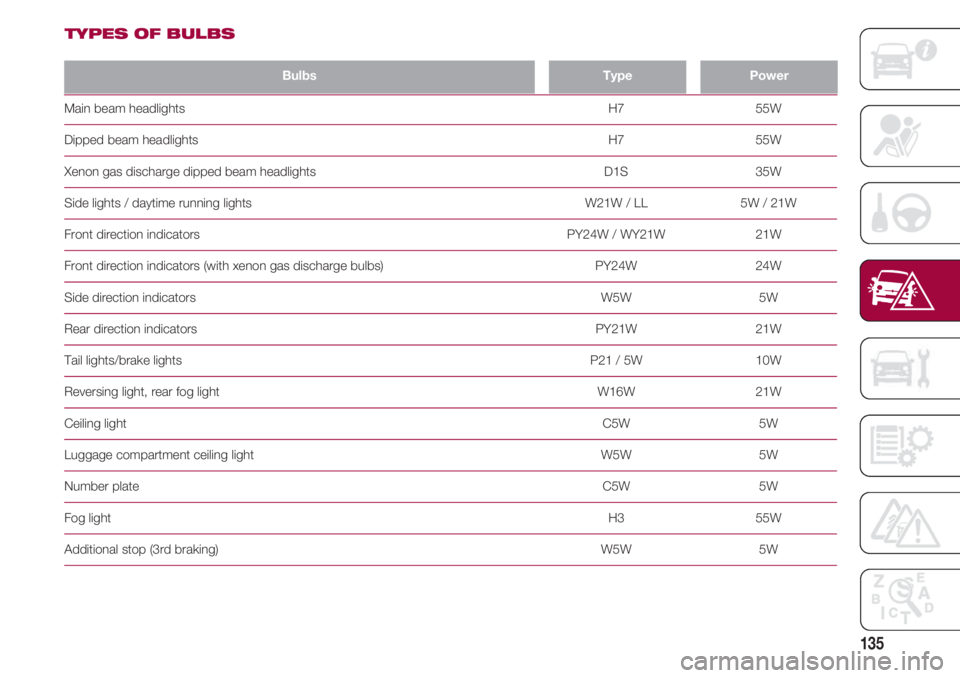
TYPES OF BULBS
BulbsTypePower
Main beam headlights H7 55W
Dipped beam headlights H7 55W
Xenon gas discharge dipped beam headlights D1S 35W
Side lights / daytime running lights W21W / LL 5W / 21W
Front direction indicators PY24W / WY21W 21W
Front direction indicators (with xenon gas discharge bulbs) PY24W 24W
Side direction indicators W5W 5W
Rear direction indicators PY21W 21W
Tail lights/brake lights P21 / 5W 10W
Reversing light, rear fog light W16W 21W
Ceiling light C5W 5W
Luggage compartment ceiling light W5W 5W
Number plate C5W 5W
Fog light H3 55W
Additional stop (3rd braking) W5W 5W
Page 138 of 224
IN AN EMERGENCY
136
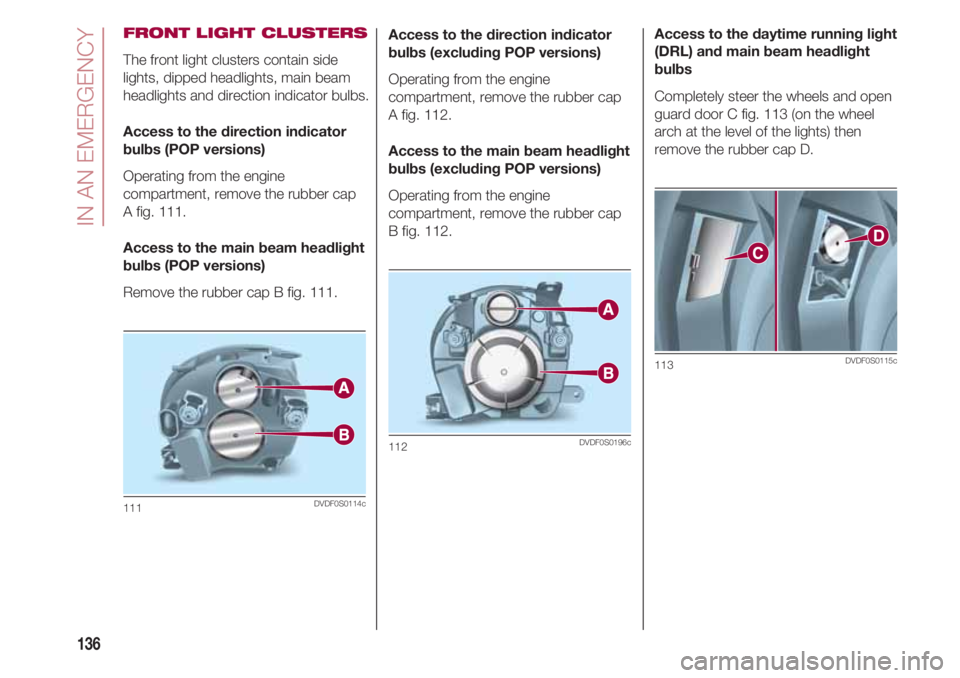
FRONT LIGHT CLUSTERS
The front light clusters contain side
lights, dipped headlights, main beam
headlights and direction indicator bulbs.
Access to the direction indicator
bulbs (POP versions)
Operating from the engine
compartment, remove the rubber cap
A fig. 111.
Access to the main beam headlight
bulbs (POP versions)
Remove the rubber cap B fig. 111.
111DVDF0S0114c
Access to the direction indicator
bulbs (excluding POP versions)
Operating from the engine
compartment, remove the rubber cap
A fig. 112.
Access to the main beam headlight
bulbs (excluding POP versions)
Operating from the engine
compartment, remove the rubber cap
B fig. 112.
112DVDF0S0196c
Access to the daytime running light
(DRL) and main beam headlight
bulbs
Completely steer the wheels and open
guard door C fig. 113 (on the wheel
arch at the level of the lights) then
remove the rubber cap D.
113DVDF0S0115c
Page 139 of 224
137
MAIN BEAM
HEADLIGHTS
(POP versions)
To replace the bulb, proceed as
follows:
❒ remove the protecting rubber cap
mentioned above;
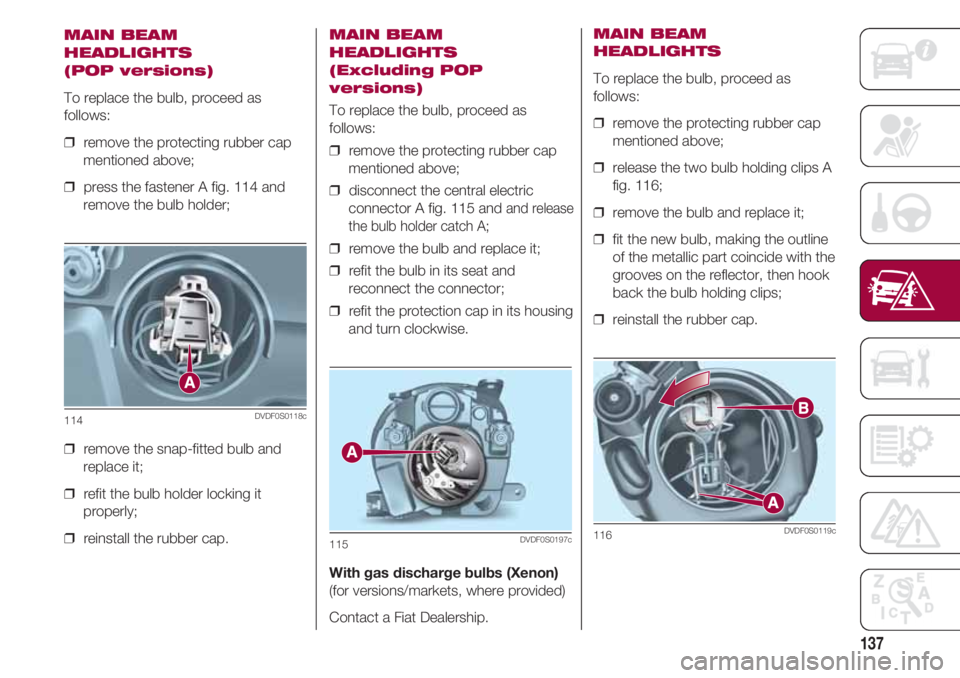
❒ press the fastener A fig. 114 and
remove the bulb holder;
❒ remove the snap-fitted bulb and
replace it;
❒ refit the bulb holder locking it
properly;
❒ reinstall the rubber cap.
114DVDF0S0118c
MAIN BEAM
HEADLIGHTS
(Excluding POP
versions)
To replace the bulb, proceed as
follows:
❒ remove the protecting rubber cap
mentioned above;
❒ disconnect the central electric
connector A fig. 115 and
and release
the bulb holder catch A;
❒ remove the bulb and replace it;
❒ refit the bulb in its seat and
reconnect the connector;
❒ refit the protection cap in its housing
and turn clockwise.
With gas discharge bulbs (Xenon)
(for versions/markets, where provided)
Contact a Fiat Dealership.
115DVDF0S0197c
MAIN BEAM
HEADLIGHTS
To replace the bulb, proceed as
follows:
❒ remove the protecting rubber cap
mentioned above;
❒ release the two bulb holding clips A
fig. 116;
❒ remove the bulb and replace it;
❒ fit the new bulb, making the outline
of the metallic part coincide with the
grooves on the reflector, then hook
back the bulb holding clips;
❒ reinstall the rubber cap.
116DVDF0S0119c
Page 140 of 224
IN AN EMERGENCY
138
SIDE LIGHTS / DAYTIME
RUNNING LIGHTS
To replace the bulb, proceed as
follows:
❒ remove the protecting rubber cap
mentioned above;
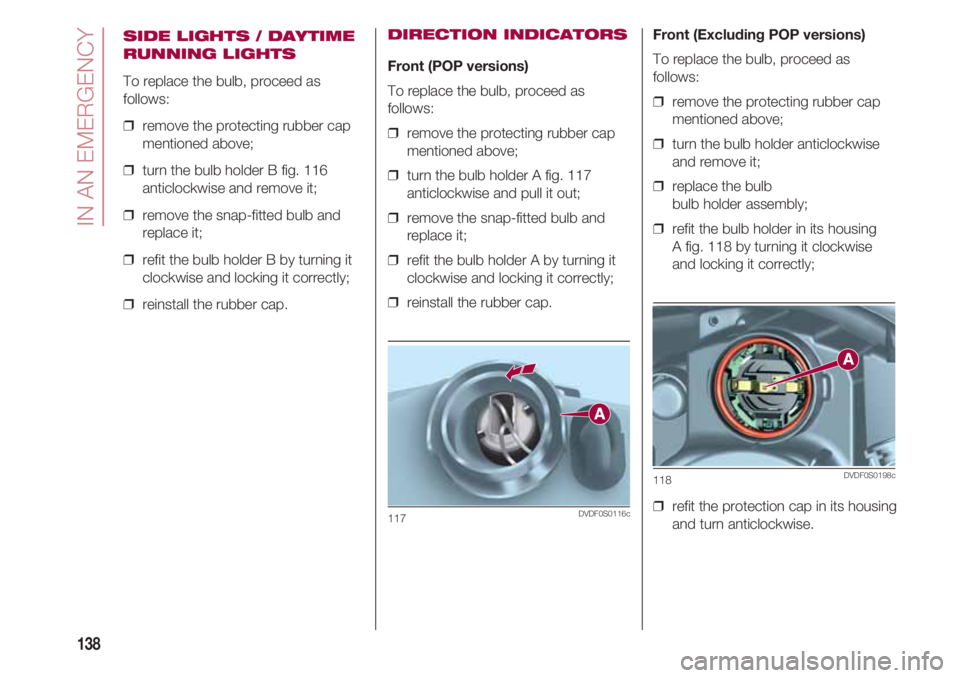
❒ turn the bulb holder B fig. 116
anticlockwise and remove it;
❒ remove the snap-fitted bulb and
replace it;
❒ refit the bulb holder B by turning it
clockwise and locking it correctly;
❒ reinstall the rubber cap.
DIRECTION INDICATORS
Front (POP versions)
To replace the bulb, proceed as
follows:
❒ remove the protecting rubber cap
mentioned above;
❒ turn the bulb holder A fig. 117
anticlockwise and pull it out;
❒ remove the snap-fitted bulb and
replace it;
❒ refit the bulb holder A by turning it
clockwise and locking it correctly;
❒ reinstall the rubber cap.
117DVDF0S0116c
Front (Excluding POP versions)
To replace the bulb, proceed as
follows:
❒ remove the protecting rubber cap
mentioned above;
❒ turn the bulb holder anticlockwise
and remove it;
❒ replace the bulb
bulb holder assembly;
❒ refit the bulb holder in its housing
A fig. 118 by turning it clockwise
and locking it correctly;
❒ refit the protection cap in its housing
and turn anticlockwise.
118DVDF0S0198c
Page 141 of 224
139
Side
IMPORTANT The intervention must be
carried out taking all precautions
necessary to avoid damaging the
bodywork (use a sufficiently rigid and
appropriately thick plastic card).
To replace the bulb, proceed as
follows:
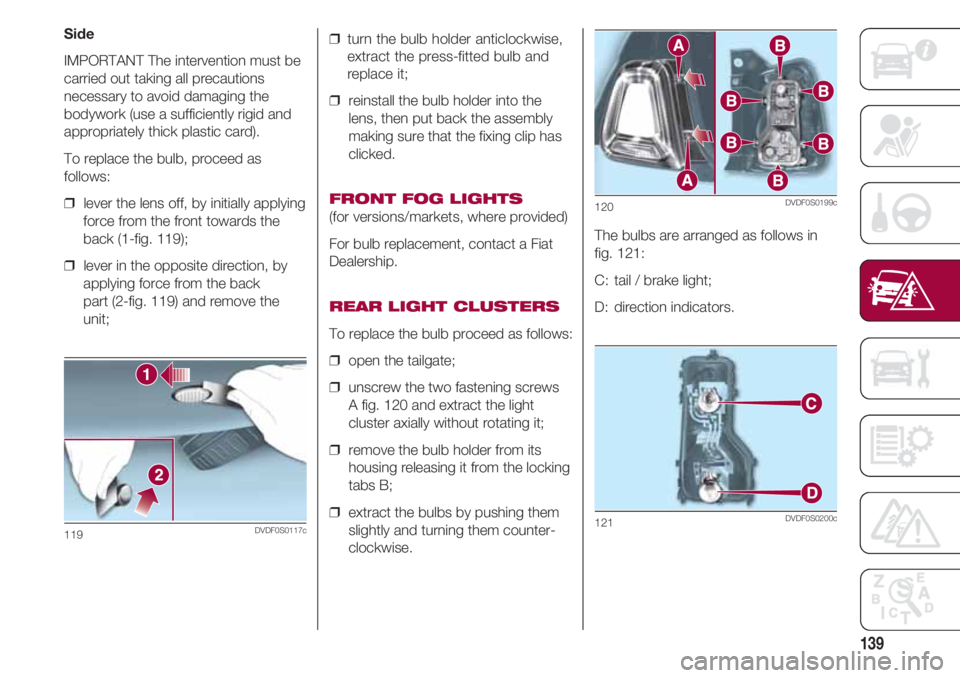
❒ lever the lens off, by initially applying
force from the front towards the
back (1-fig. 119);
❒ lever in the opposite direction, by
applying force from the back
part (2-fig. 119) and remove the
unit;
119DVDF0S0117c
❒ turn the bulb holder anticlockwise,
extract the press-fitted bulb and
replace it;
❒ reinstall the bulb holder into the
lens, then put back the assembly
making sure that the fixing clip has
clicked.
FRONT FOG LIGHTS
(for versions/markets, where provided)
For bulb replacement, contact a Fiat
Dealership.
REAR LIGHT CLUSTERS
To replace the bulb proceed as follows:
❒ open the tailgate;
❒ unscrew the two fastening screws
A fig. 120 and extract the light
cluster axially without rotating it;
❒ remove the bulb holder from its
housing releasing it from the locking
tabs B;
❒ extract the bulbs by pushing them
slightly and turning them counter-
clockwise.The bulbs are arranged as follows in
fig. 121:
C: tail / brake light;
D: direction indicators.
120DVDF0S0199c
121DVDF0S0200c
Page 142 of 224
IN AN EMERGENCY
140
REVERSING LIGHT/REAR
FOG LIGHT
To replace the bulb, proceed as
follows:
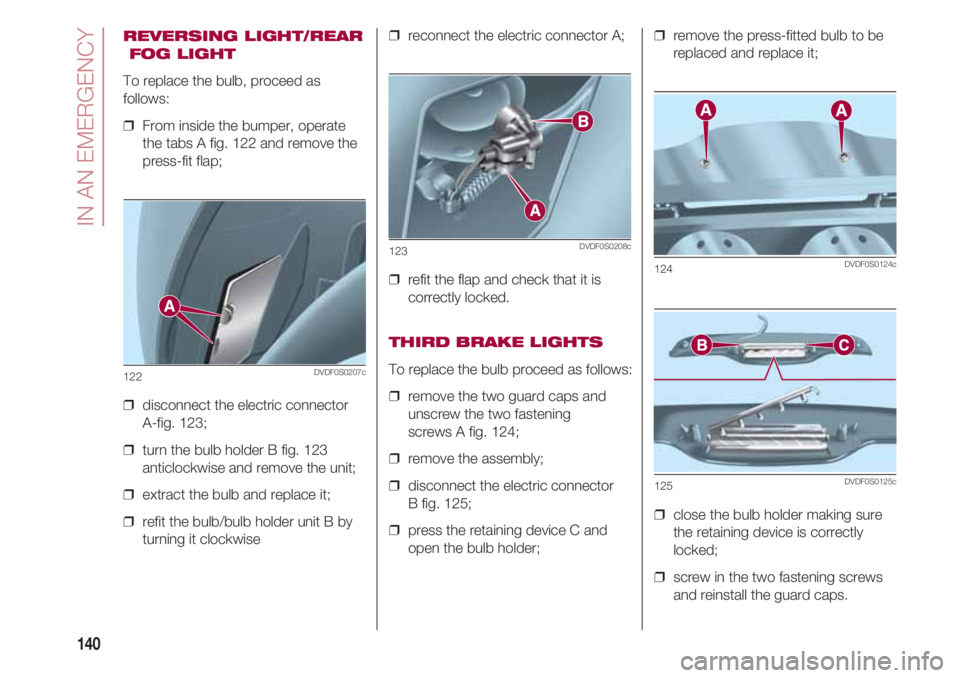
❒ From inside the bumper, operate
the tabs A fig. 122 and remove the
press-fit flap;
❒ disconnect the electric connector
A-fig. 123;
❒ turn the bulb holder B fig. 123
anticlockwise and remove the unit;
❒ extract the bulb and replace it;
❒ refit the bulb/bulb holder unit B by
turning it clockwise
122DVDF0S0207c
❒ reconnect the electric connector A;
❒ refit the flap and check that it is
correctly locked.
THIRD BRAKE LIGHTS
To replace the bulb proceed as follows:
❒ remove the two guard caps and
unscrew the two fastening
screws A fig. 124;
❒ remove the assembly;
❒ disconnect the electric connector
B fig. 125;
❒ press the retaining device C and
open the bulb holder;
123DVDF0S0208c
❒ remove the press-fitted bulb to be
replaced and replace it;
❒ close the bulb holder making sure
the retaining device is correctly
locked;
❒ screw in the two fastening screws
and reinstall the guard caps.
124DVDF0S0124c
125DVDF0S0125c
Page 143 of 224
141
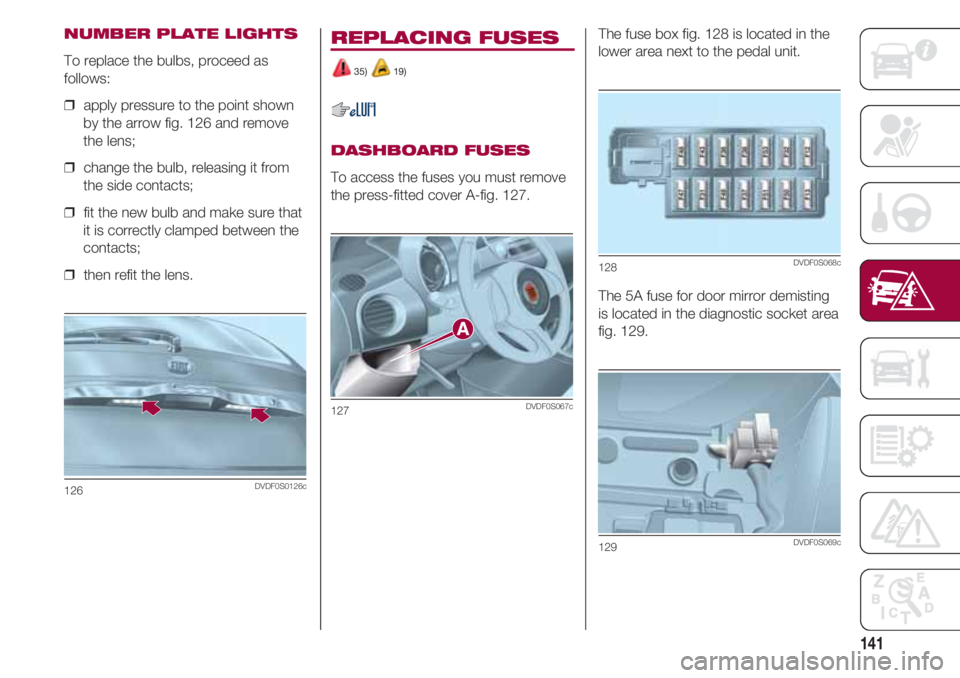
NUMBER PLATE LIGHTS
To replace the bulbs, proceed as
follows:
❒ apply pressure to the point shown
by the arrow fig. 126 and remove
the lens;
❒ change the bulb, releasing it from
the side contacts;
❒ fit the new bulb and make sure that
it is correctly clamped between the
contacts;
❒ then refit the lens.
126DVDF0S0126c
REPLACING FUSES
35) 19)
DASHBOARD FUSES
To access the fuses you must remove
the press-fitted cover A-fig. 127.
127DVDF0S067c
The fuse box fig. 128 is located in the
lower area next to the pedal unit.
The 5A fuse for door mirror demisting
is located in the diagnostic socket area
fig. 129.
128DVDF0S068c
129DVDF0S069c
Page 200 of 224
IMPORTANT INFORMATION AND RECOMMENDATIONS
198
PERSONAL SAFETY
(CONTINUED)
Do not use the jack for loads higher than the one shown on its
label. Never start the engine with vehicle raised. If the vehicle is
raised more than necessary, everything can become more
unstable, with the risk of the vehicle dropping violently.
Thus, lift the vehicle only as needed in order to access the
spare tyre.
33) FIX&GO QUICK TYRE REPAIR KIT
•The information required by the applicable regulation is
indicated on the Fix&Go kit package label. Carefully read the
label on the cartridge before use, avoid improper use. The kit
should be used by adults and cannot be used by children.
IMPORTANT: Do not exceed 80 km/h. Avoid sudden
acceleration or braking. The kit provides a temporary repair,
therefore the tyre must be examined and repaired by a
specialist as soon as possible. Before using the kit, ensure that
the tyre is not excessively damaged and that the rim is in good
condition, otherwise do not use it and call roadside assistance.
Do not remove foreign bodies from the tyre. Do not let the
compressor turned on for more than 20 consecutive minutes -
overheating hazard.
34) CHANGING A BULB
•Modifications or repairs to the electric system that are not
carried out properly or do not take the system technical
specifications into account can cause malfunctions leading to
the risk of fire.
•Halogen bulbs contain pressurised gas, in the case of
breakage they may burst causing glass fragments to be
projected outwards.
•Due to the high power supply voltage, gas discharge bulbs
(Xenon) should only be replaced by specialised personnel:
danger of death! Contact a Fiat Dealership.35) REPLACING FUSES
•If the replaced fuse blows again, contact a Fiat Dealership.
•Never replace a fuse with metal wires or anything else.
•Never replace a fuse with another with a higher amp rating; RISK
OF FIRE.
•If a general fuse (MEGA-FUSE, MIDI-FUSE,
MAXI-FUSE) blows contact a Fiat Dealership.
•Before replacing a fuse, make sure that the ignition key has
been removed and that all the other services are switched off
and/or disengaged.
•Contact Fiat Dealership if a safety system (airbags, brakes),
engine system
(engine, gearbox) or steering system general protection fuse
blows.
36) BATTERY RECHARGING
•Battery fluid is poisonous and corrosive:
avoid contact with your skin and eyes. The battery should be
charged in a well ventilated place, away from naked flames or
possible sources of sparks: danger of explosion and fire.
•Do not attempt to charge a frozen battery: it must be thawed
first, otherwise it may explode.
If freezing has occurred, the battery should be checked by skilled
personnel to make sure that the internal elements are not
damaged and that the body is not cracked, with the risk of leaking
poisonous and corrosive acid.
37) TOWING THE CAR
•Before tightening the ring clean the threaded housing thoroughly.
Make sure that the ring is fully fastened in the housing before
towing the car.
(CONTINUES)