lights FIAT 500 ABARTH 2013 2.G User Guide
[x] Cancel search | Manufacturer: FIAT, Model Year: 2013, Model line: 500 ABARTH, Model: FIAT 500 ABARTH 2013 2.GPages: 84, PDF Size: 4.63 MB
Page 3 of 84
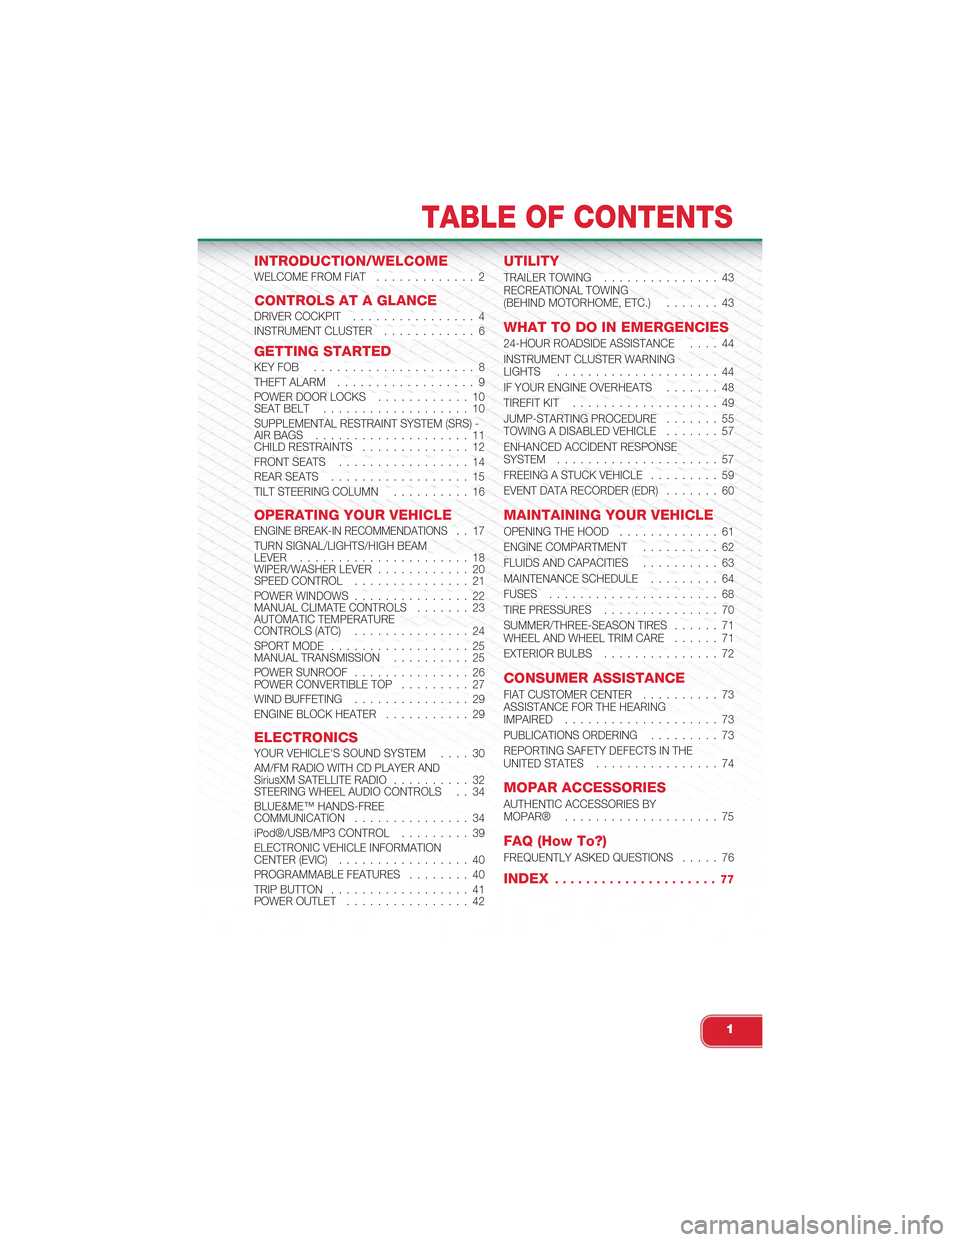
INTRODUCTION/WELCOMEWELCOME FROM FIAT............. 2
CONTROLS AT A GLANCEDRIVER COCKPIT................ 4INSTRUMENT CLUSTER............ 6
GETTING STARTEDKEY FOB . . . . . . . . . . . . . . . . . . . . . 8THEFT ALARM.................. 9POWER DOOR LOCKS. . . . . . . . . . . . 10SEAT BELT. . . . . . . . . . . . . . . . . . . 10SUPPLEMENTAL RESTRAINT SYSTEM (SRS) -AIR BAGS. . . . . . . . . . . . . . . . . . . . 11CHILD RESTRAINTS. . . . . . . . . . . . . . 12FRONT SEATS. . . . . . . . . . . . . . . . . 14REAR SEATS. . . . . . . . . . . . . . . . . . 15TILT STEERING COLUMN. . . . . . . . . . 16
OPERATING YOUR VEHICLEENGINE BREAK-IN RECOMMENDATIONS. . 17TURN SIGNAL/LIGHTS/HIGH BEAMLEVER. . . . . . . . . . . . . . . . . . . . . . 18WIPER/WASHER LEVER. . . . . . . . . . . . 20SPEED CONTROL. . . . . . . . . . . . . . . 21POWER WINDOWS. . . . . . . . . . . . . . . 22MANUAL CLIMATE CONTROLS. . . . . . . 23AUTOMATIC TEMPERATURECONTROLS (ATC). . . . . . . . . . . . . . . 24SPORT MODE. . . . . . . . . . . . . . . . . . 25MANUAL TRANSMISSION. . . . . . . . . . 25POWER SUNROOF. . . . . . . . . . . . . . . 26POWER CONVERTIBLE TOP. . . . . . . . . 27WIND BUFFETING. . . . . . . . . . . . . . . 29ENGINE BLOCK HEATER. . . . . . . . . . . 29
ELECTRONICSYOUR VEHICLE'S SOUND SYSTEM. . . . 30AM/FM RADIO WITH CD PLAYER ANDSiriusXM SATELLITE RADIO. . . . . . . . . . 32STEERING WHEEL AUDIO CONTROLS . . 34BLUE&ME™ HANDS-FREECOMMUNICATION. . . . . . . . . . . . . . . 34iPod®/USB/MP3 CONTROL. . . . . . . . . 39ELECTRONIC VEHICLE INFORMATIONCENTER (EVIC). . . . . . . . . . . . . . . . . 40PROGRAMMABLE FEATURES. . . . . . . . 40TRIP BUTTON. . . . . . . . . . . . . . . . . . 41POWER OUTLET. . . . . . . . . . . . . . . . 42
UTILITY
TRAILER TOWING. . . . . . . . . . . . . . . 43RECREATIONAL TOWING(BEHIND MOTORHOME, ETC.). . . . . . . 43
WHAT TO DO IN EMERGENCIES
24-HOUR ROADSIDE ASSISTANCE. . . . 44INSTRUMENT CLUSTER WARNINGLIGHTS. . . . . . . . . . . . . . . . . . . . . 44IF YOUR ENGINE OVERHEATS. . . . . . . 48TIREFIT KIT. . . . . . . . . . . . . . . . . . . 49JUMP-STARTING PROCEDURE. . . . . . . 55TOWING A DISABLED VEHICLE. . . . . . . 57ENHANCED ACCIDENT RESPONSESYSTEM. . . . . . . . . . . . . . . . . . . . . 57FREEING A STUCK VEHICLE. . . . . . . . . 59EVENT DATA RECORDER (EDR). . . . . . . 60
MAINTAINING YOUR VEHICLE
OPENING THE HOOD. . . . . . . . . . . . . 61ENGINE COMPARTMENT. . . . . . . . . . 62FLUIDS AND CAPACITIES. . . . . . . . . . 63MAINTENANCE SCHEDULE. . . . . . . . . 64FUSES. . . . . . . . . . . . . . . . . . . . . . 68TIRE PRESSURES. . . . . . . . . . . . . . . 70SUMMER/THREE-SEASON TIRES. . . . . . 71WHEEL AND WHEEL TRIM CARE. . . . . . 71EXTERIOR BULBS. . . . . . . . . . . . . . . 72
CONSUMER ASSISTANCE
FIAT CUSTOMER CENTER. . . . . . . . . . 73ASSISTANCE FOR THE HEARINGIMPAIRED. . . . . . . . . . . . . . . . . . . . 73PUBLICATIONS ORDERING. . . . . . . . . 73REPORTING SAFETY DEFECTS IN THEUNITED STATES. . . . . . . . . . . . . . . . 74
MOPAR ACCESSORIES
AUTHENTIC ACCESSORIES BYMOPAR®. . . . . . . . . . . . . . . . . . . . 75
FAQ (How To?)
FREQUENTLY ASKED QUESTIONS. . . . . 76
INDEX. . . . . . . . . . . . . . . . . . . . . 77
TABLE OF CONTENTS
1
Page 7 of 84
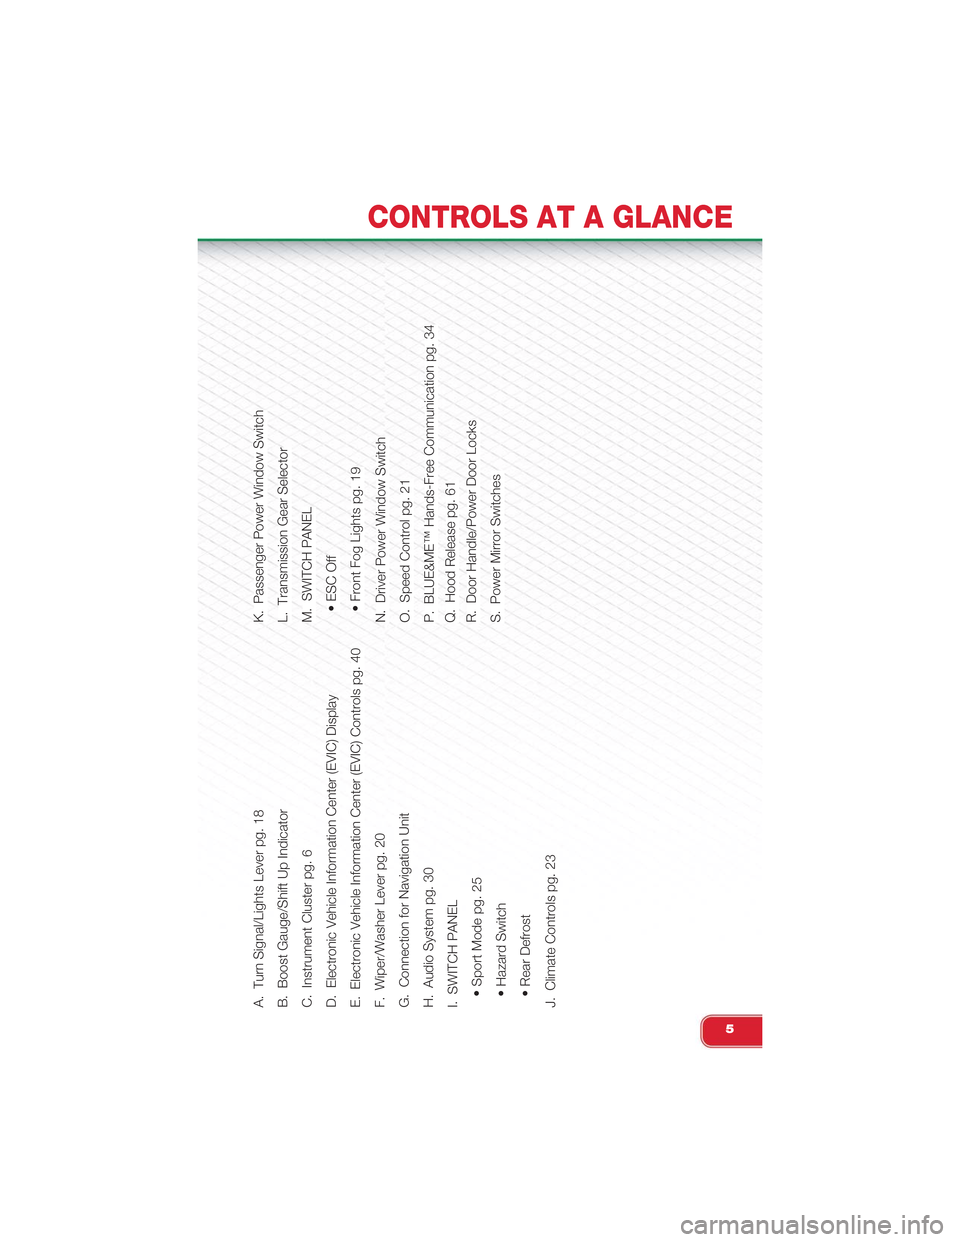
A. Turn Signal/Lights Lever pg. 18B. Boost Gauge/Shift Up IndicatorC. Instrument Cluster pg. 6D. Electronic Vehicle Information Center (EVIC) DisplayE. Electronic Vehicle Information Center (EVIC) Controls pg. 40F. Wiper/Washer Lever pg. 20G. Connection for Navigation UnitH. Audio System pg. 30I. SWITCH PANEL• Sport Mode pg. 25• Hazard Switch• Rear DefrostJ. Climate Controls pg. 23
K. Passenger Power Window SwitchL. Transmission Gear SelectorM. SWITCH PANEL• ESC Off• Front Fog Lights pg. 19N. Driver Power Window SwitchO. Speed Control pg. 21P. BLUE&ME™ Hands-Free Communication pg. 34Q. Hood Release pg. 61R. Door Handle/Power Door LocksS. Power Mirror Switches
CONTROLS AT A GLANCE
5
Page 8 of 84
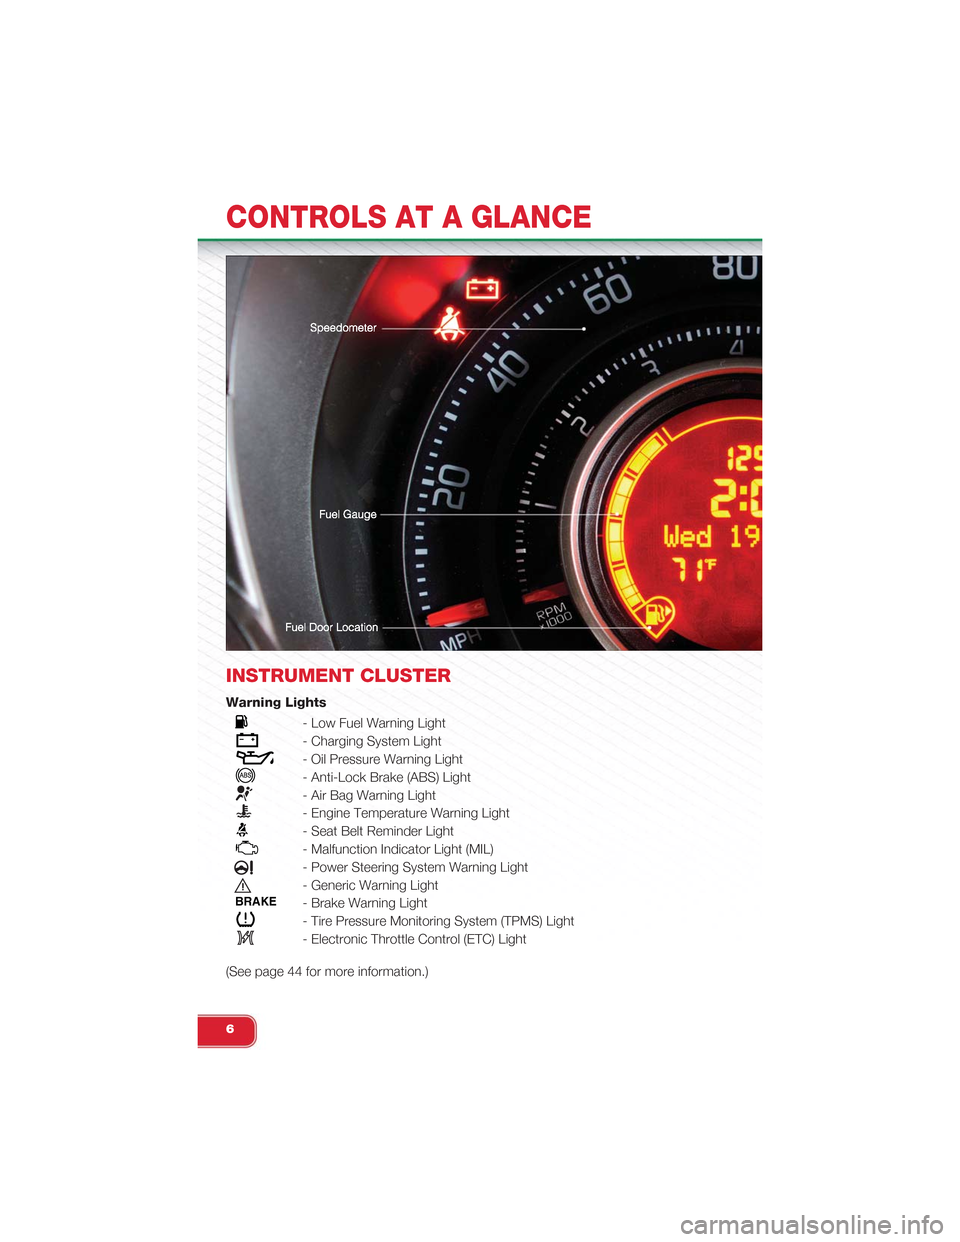
INSTRUMENT CLUSTER
Warning Lights
- Low Fuel Warning Light
- Charging System Light
- Oil Pressure Warning Light
- Anti-Lock Brake (ABS) Light
- Air Bag Warning Light
- Engine Temperature Warning Light
- Seat Belt Reminder Light
- Malfunction Indicator Light (MIL)
- Power Steering System Warning Light
- Generic Warning Light
BRAKE- Brake Warning Light
- Tire Pressure Monitoring System (TPMS) Light
- Electronic Throttle Control (ETC) Light
(See page 44 for more information.)
CONTROLS AT A GLANCE
6
Page 20 of 84
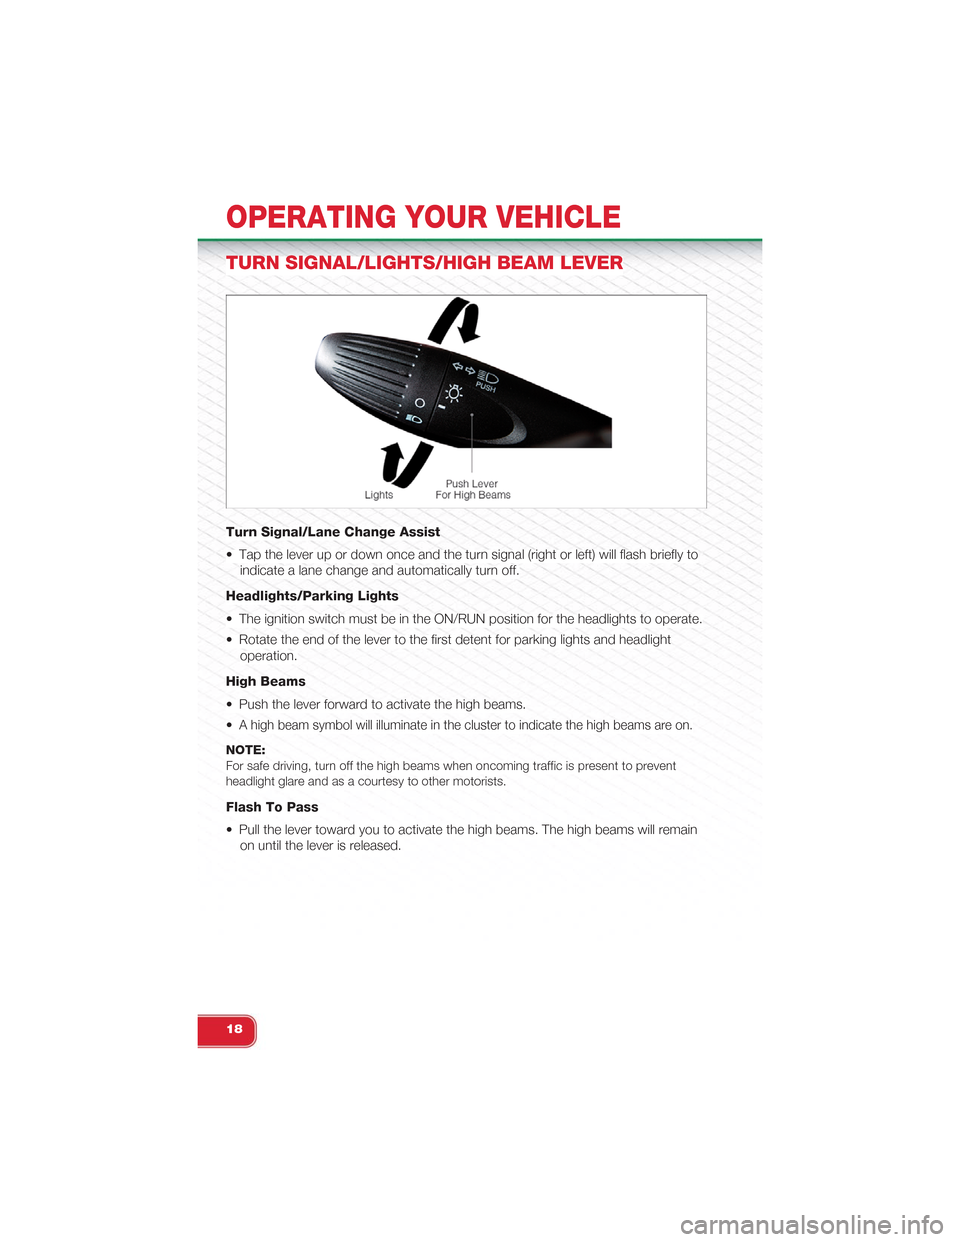
TURN SIGNAL/LIGHTS/HIGH BEAM LEVER
Turn Signal/Lane Change Assist
• Tap the lever up or down once and the turn signal (right or left) will flash briefly to
indicate a lane change and automatically turn off.
Headlights/Parking Lights
• The ignition switch must be in the ON/RUN position for the headlights to operate.
• Rotate the end of the lever to the first detent for parking lights and headlight
operation.
High Beams
• Push the lever forward to activate the high beams.
•A high beam symbol will illuminate in the cluster to indicate the high beams are on.
NOTE:For safe driving, turn off the high beams when oncoming traffic is present to preventheadlight glare and as a courtesy to other motorists.
Flash To Pass
• Pull the lever toward you to activate the high beams. The high beams will remain
on until the lever is released.
OPERATING YOUR VEHICLE
18
Page 21 of 84
Headlight Delay (Follow Me Home)
• Within two minutes of the ignition switch being turned to the OFF/LOCK position
or the ignition key being removed from the ignition, pull the turn signal lever to-
ward the steering wheel.
• Each movement of the lever toward the steering wheel will increase the illumina-
tion period by 30 seconds, up to a maximum of 210 seconds.
• To deactivate, pull the multifunction lever toward the steering wheel and hold it for
more than two seconds.
NOTE:Activation of Follow Me Home is only enabled once per key cycle and steps must be re-peated each time you want to activate it.
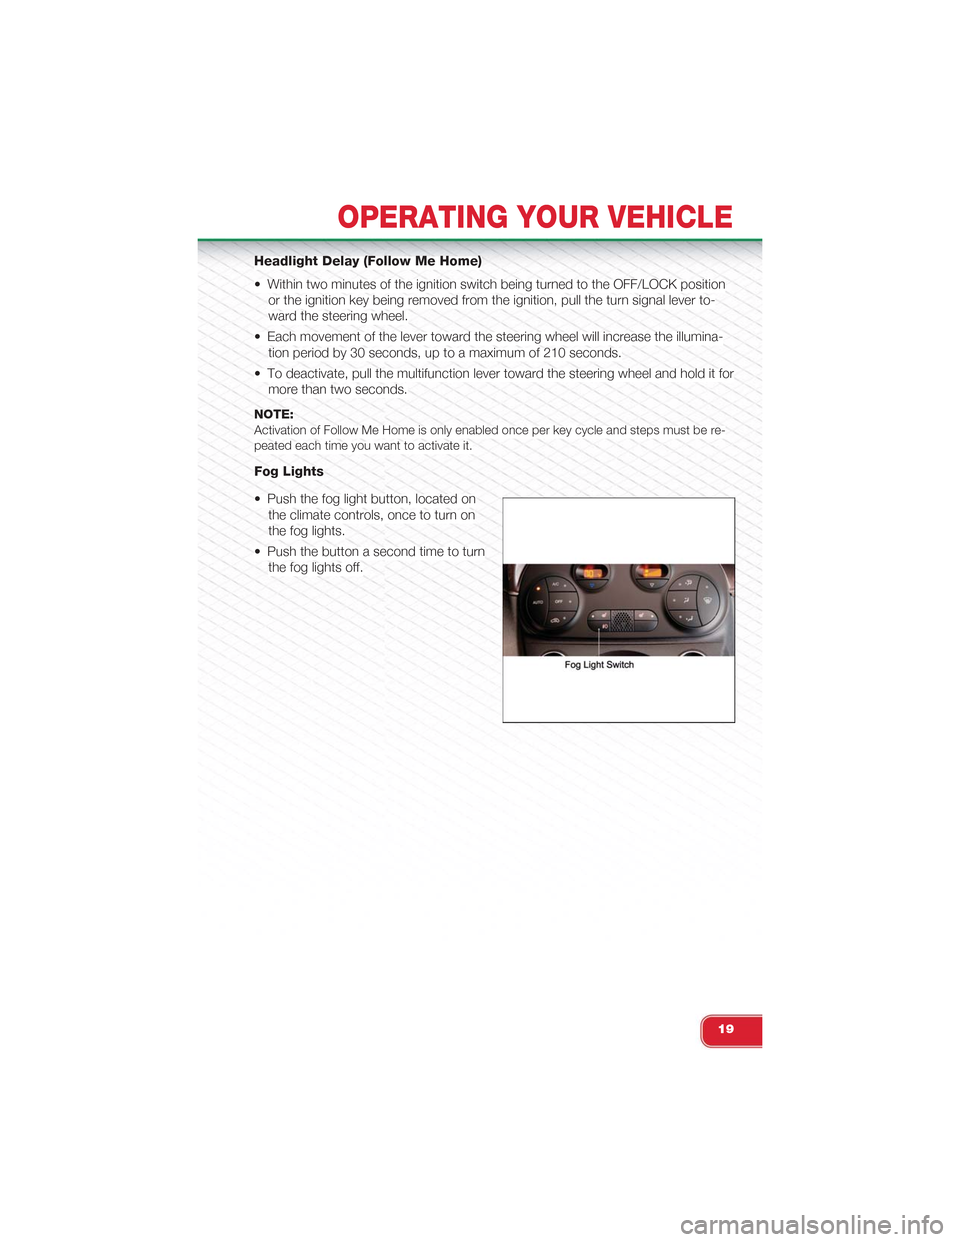
Fog Lights
• Push the fog light button, located on
the climate controls, once to turn on
the fog lights.
• Push the button a second time to turn
the fog lights off.
OPERATING YOUR VEHICLE
19
Page 46 of 84
24-HOUR ROADSIDE ASSISTANCE
• If your Abarth requires jump start assistance, out of gas/fuel delivery, tire service,
lockout service or towing due to a defect covered under the Basic Limited War-
ranty, dial toll-free 1-888-242-6342. See your Warranty booklet for further details.
• Provide your name, vehicle identification number and license plate number.
• Provide your location, including telephone number, from which you are calling.
• Briefly describe the nature of the problem and answer a few simple questions.
• You will be given the name of the service provider and an estimated time of ar-
rival. If you feel you are in an “unsafe situation”, please let us know. With your
consent, we will contact local police or safety authorities.
INSTRUMENT CLUSTER WARNING LIGHTS
- Generic Warning Light
• The Generic Warning Light will illuminate if any of the following conditions occur:
Oil Change Request, Engine Oil Pressure Sensor Failure, After Run Cooling
Pump, External Light Failure, Fuel Cut-Off Intervention, Fuel Cut-Off Not Available,
Parking Sensor Failure.
- Power Steering System Warning
• If the “POWER STEERING SYSTEM OVER TEMP” message and icon are dis-
played in the Electronic Vehicle Information Center (EVIC) display, it indicates that
extreme steering maneuvers have occurred, which caused an over temperature
condition in the power steering system. You will lose power steering assistance
momentarily until the over temperature condition no longer exists. Once driving
conditions are safe, pull over and let the vehicle idle. After approximately five min-
utes, the system will cool and return to normal operation.
- Engine Temperature Warning Light
• This light warns of an overheated engine condition.
• If the light turns on or flashes continuously while driving, safely pull over and stop
the vehicle. If the A/C system is on, turn it off. Also, shift the transmission into
NEUTRAL and idle the vehicle. If the temperature reading does not return to nor-
mal, turn the engine off immediately.
• We recommend that you do not operate the vehicle or engine damage will occur.
Have the vehicle serviced immediately.
WARNING!
A hot engine cooling system is dangerous. You or others could be badly burned
by steam or boiling coolant. You may want to call an authorized studio for service
if your vehicle overheats.
WHAT TO DO IN EMERGENCIES
44
Page 59 of 84
TOWING A DISABLED VEHICLE
With Ignition Key
Manual Transmission
• Vehicle can be flat towed (all four wheels on the ground) with the transmission in
NEUTRAL.
• Vehicle can be towed with the front wheels elevated.
• Vehicle can be towed on a flatbed truck (all wheels off the ground).
NOTE:If it is necessary to use the accessories while being towed (wipers, defrosters, etc.), the keymust be in the ON/RUN position. Make certain the transmission remains in NEUTRAL.
Without The Ignition Key
• Special care must be taken when the vehicle is towed with the ignition in the
OFF/LOCK position. A dolly should be used under the front wheels if the rear
wheels are raised. Proper towing equipment is necessary to prevent damage to
the vehicle.
CAUTION!
• Failure to follow these towing methods can cause severe transmission dam-
age. Such damage is not covered by the New Vehicle Limited Warranty.
• If the vehicle being towed requires steering, the ignition switch must be in the
ON/RUN position.
• Do not attempt to use sling-type equipment when towing. When securing
the vehicle to a flatbed truck, do not attach to front or rear suspension com-
ponents. Damage to your vehicle may result from improper towing.
ENHANCED ACCIDENT RESPONSE SYSTEM
• In the event of an impact causing air bag deployment, if the communication net-
work remains intact, and the power remains intact, depending on the nature of
the event the Occupant Restraint Controller (ORC) will determine whether to have
the Enhanced Accident Response System perform the following functions:
• Cut off fuel to the engine.
• Flash hazard lights as long as the battery has power or until the ignition key is
turned off.
• Turn on the interior lights, which remain on as long as the battery has power or
until the ignition key is removed.
• Unlock the doors automatically.
WHAT TO DO IN EMERGENCIES
57
Page 60 of 84
• After the event occurs, when the system is active, the message "Fuel Cutoff See
Handbook" is displayed.
• Carefully check the vehicle for fuel leaks in the engine compartment and on the
ground near the engine compartment and fuel tank before resetting the system
and starting the engine.
NOTE:
In order to start the engine and move the vehicle to a safe location after an impact, the
System Reset Procedure must be completed.
System Reset Procedure
• After an impact causing air bag deployment, the left and right turn signal lights,
located in the instrument panel cluster, will both be blinking until the ignition is
turned off.
• In order to move your vehicle to the side of the road you must follow the system
reset procedure.
Customer Action Customer Will See
1. Turn ignition OFF. (Turn SignalSwitch must be placed in NeutralState).
2. Turn ignition ON. Left Turn Light is OFF. Right Turn LightBLINKS.
3. Turn Right Turn Signal Switch ON. Right Turn Light is ON SOLID. Left TurnLight BLINKS.
4. Turn Left Turn Signal Switch ON. Left Turn Light is ON SOLID. Right TurnLight BLINKS.
5. Turn Right Turn Signal Switch ON. Right Turn Light is ON SOLID. Left TurnLight BLINKS.
6. Turn Left Turn Signal Switch ON. Left Turn Light is ON SOLID. Right TurnLight is ON SOLID.
7. Turn Left Turn Signal Switch OFF.(Turn Signal Switch must be placed inNeutral State).
Left Turn Light is OFF. Right Turn Lightis OFF.
8. Turn ignition OFF. System is now reset and the enginemay be started.
9. Turn Hazard Flashers OFF (manually).
• If a reset procedure step is not completed within 45 seconds, then the turn signal
lights will turn off and the reset procedure must be performed again in order to be
successful.
WHAT TO DO IN EMERGENCIES
58
Page 66 of 84
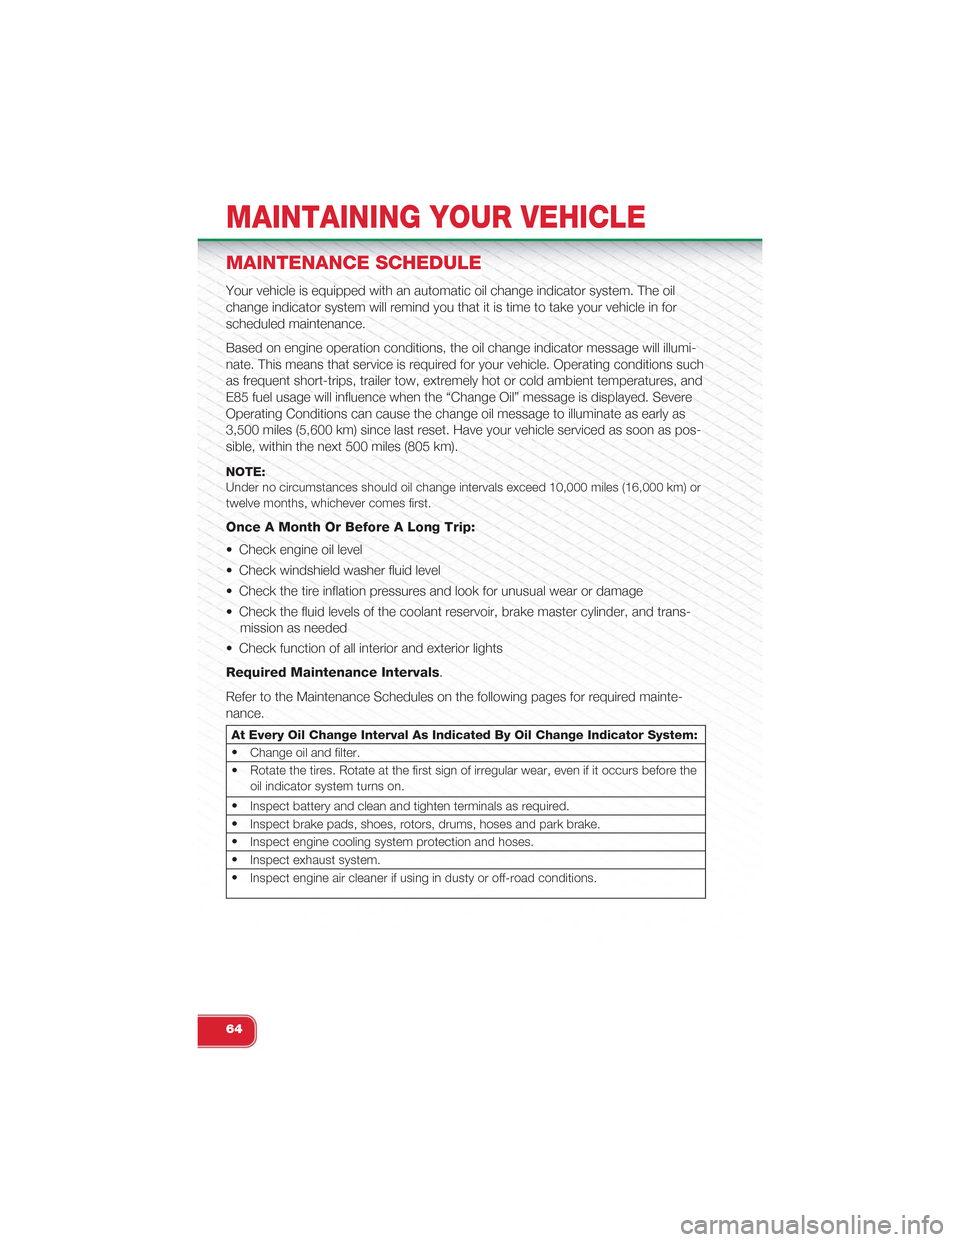
MAINTENANCE SCHEDULE
Your vehicle is equipped with an automatic oil change indicator system. The oil
change indicator system will remind you that it is time to take your vehicle in for
scheduled maintenance.
Based on engine operation conditions, the oil change indicator message will illumi-
nate. This means that service is required for your vehicle. Operating conditions such
as frequent short-trips, trailer tow, extremely hot or cold ambient temperatures, and
E85 fuel usage will influence when the “Change Oil” message is displayed. Severe
Operating Conditions can cause the change oil message to illuminate as early as
3,500 miles (5,600 km) since last reset. Have your vehicle serviced as soon as pos-
sible, within the next 500 miles (805 km).
NOTE:Under no circumstances should oil change intervals exceed 10,000 miles (16,000 km) ortwelve months, whichever comes first.
Once A Month Or Before A Long Trip:
• Check engine oil level
• Check windshield washer fluid level
• Check the tire inflation pressures and look for unusual wear or damage
• Check the fluid levels of the coolant reservoir, brake master cylinder, and trans-
mission as needed
• Check function of all interior and exterior lights
Required Maintenance Intervals.
Refer to the Maintenance Schedules on the following pages for required mainte-
nance.
At Every Oil Change Interval As Indicated By Oil Change Indicator System:
•Change oil and filter.
• Rotate the tires. Rotate at the first sign of irregular wear, even if it occurs before theoil indicator system turns on.
•Inspect battery and clean and tighten terminals as required.
•Inspect brake pads, shoes, rotors, drums, hoses and park brake.
•Inspect engine cooling system protection and hoses.
•Inspect exhaust system.
•Inspect engine air cleaner if using in dusty or off-road conditions.
MAINTAINING YOUR VEHICLE
64
Page 70 of 84
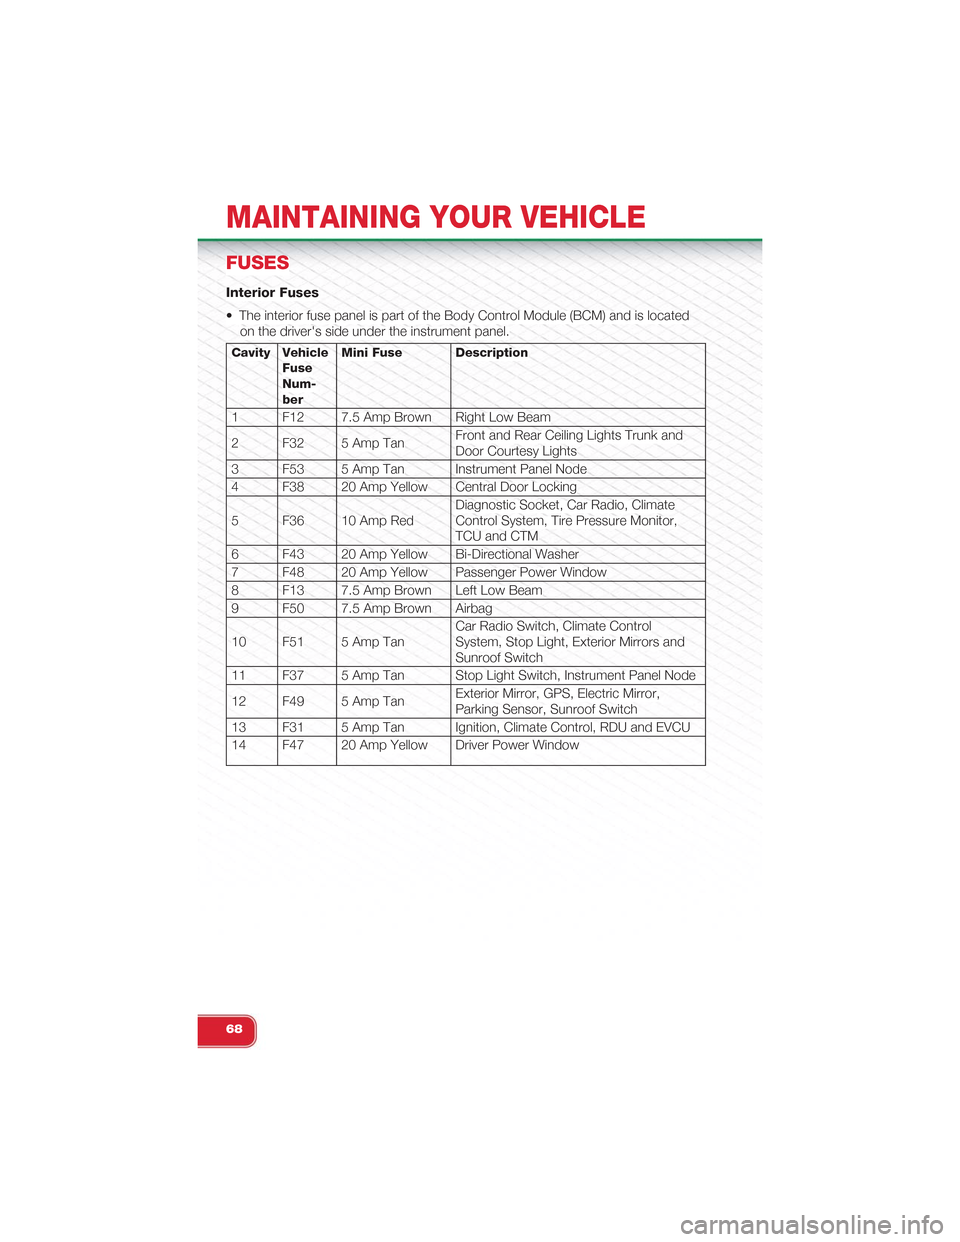
FUSES
Interior Fuses
• The interior fuse panel is part of the Body Control Module (BCM) and is located
on the driver's side under the instrument panel.
Cavity VehicleFuseNum-ber
Mini Fuse Description
1 F12 7.5 Amp Brown Right Low Beam
2 F32 5 Amp TanFront and Rear Ceiling Lights Trunk andDoor Courtesy Lights
3 F53 5 Amp Tan Instrument Panel Node
4 F38 20 Amp Yellow Central Door Locking
5 F36 10 Amp RedDiagnostic Socket, Car Radio, ClimateControl System, Tire Pressure Monitor,TCU and CTM
6 F43 20 Amp Yellow Bi-Directional Washer
7 F48 20 Amp Yellow Passenger Power Window
8 F13 7.5 Amp Brown Left Low Beam
9 F50 7.5 Amp Brown Airbag
10 F51 5 Amp TanCar Radio Switch, Climate ControlSystem, Stop Light, Exterior Mirrors andSunroof Switch
11 F37 5 Amp Tan Stop Light Switch, Instrument Panel Node
12 F49 5 Amp TanExterior Mirror, GPS, Electric Mirror,Parking Sensor, Sunroof Switch
13 F31 5 Amp Tan Ignition, Climate Control, RDU and EVCU
14 F47 20 Amp Yellow Driver Power Window
MAINTAINING YOUR VEHICLE
68