stop start FIAT 500 ABARTH 2013 2.G User Guide
[x] Cancel search | Manufacturer: FIAT, Model Year: 2013, Model line: 500 ABARTH, Model: FIAT 500 ABARTH 2013 2.GPages: 84, PDF Size: 4.63 MB
Page 10 of 84
KEY FOB
Locking and Unlocking the Doors
and Liftgate
• Press the LOCK button once to lock
all the doors and the liftgate.
• Press the UNLOCK button once to
unlock the driver’s door only and
twice within five seconds to unlock all
the doors and liftgate.
• All doors can be programmed to un-
lock on the first press of the UNLOCK
button. Refer to Programmable Fea-
tures in this guide.
Open Power Top Remote Function
The remote keyless power top function
can only be used with the engine off.
NOTE:The remote control can be used to openthe power top to the spoiler position.
Open Power Top Remote Function:
•OPEN— Push and hold the unlock
button down on the key fob for a minimum of three seconds to initiate Power Top
Open. The roof will stop opening whenever the unlock button on the key fob is
released, or when it reaches the spoiler position.
NOTE:If your power convertible top does not open with the remote, please refer to the "PowerConvertible Top Relearn Procedure” in “Operating Your Vehicle” in this guide for addi-tional information.
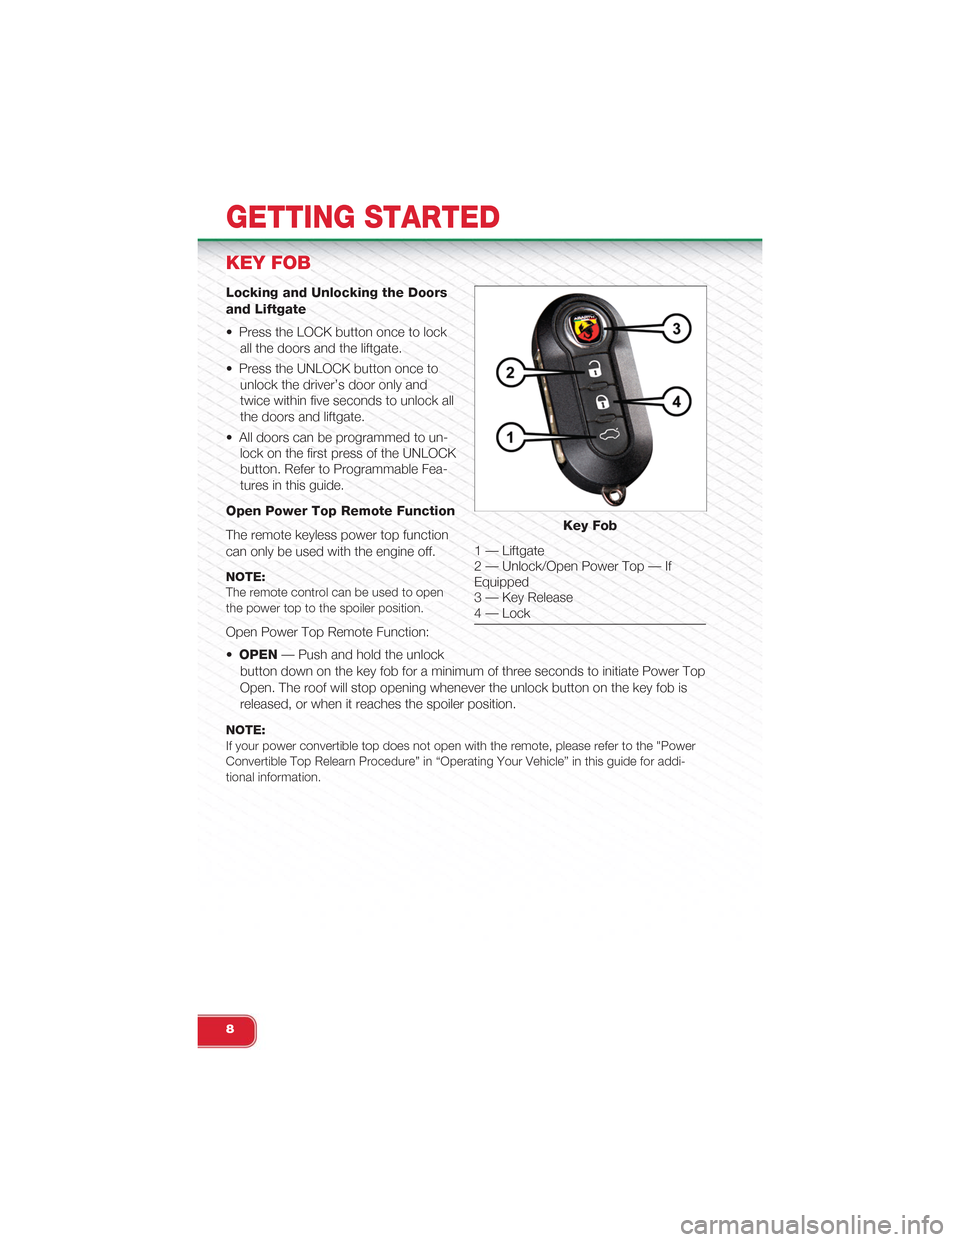
Key Fob
1 — Liftgate2 — Unlock/Open Power Top — IfEquipped3 — Key Release4 — Lock
GETTING STARTED
8
Page 12 of 84
POWER DOOR LOCKS
• The vehicles power door locks are activated by moving the inside door handles.
NOTE:
The vehicle’s door must be closed to initiate this feature.
• Push or pull the door handle to lock or unlock the doors and liftgate when the
doors are closed.
SEAT BELT
• Be sure everyone in your vehicle is in a seat and using a seat belt properly.
• Position the lap belt across your thighs, below your abdomen. To remove slack in
the lap portion, pull up a bit on the shoulder belt. To loosen the lap belt if it is too
tight, tilt the latch plate and pull on the lap belt. A snug belt reduces the risk of
sliding under the belt in a collision.
• Position the shoulder belt on your chest so that it is comfortable and not resting
on your neck. The retractor will withdraw any slack in the belt.
• A shoulder belt placed behind you will not protect you from injury during a colli-
sion. You are more likely to hit your head in a collision if you do not wear your
shoulder belt. The lap and shoulder belt are meant to be used together.
• A belt that is too loose will not protect you properly. In a sudden stop you could
move too far forward, increasing the possibility of injury. Wear your seat belt
snugly.
• A frayed or torn belt could rip apart in a collision and leave you with no protection.
Inspect the belt system periodically, checking for cuts, frays, or loose parts. Dam-
aged parts must be replaced immediately. Do not disassemble or modify the sys-
tem. Seat belt assemblies must be replaced after a collision if they have been
damaged (bent retractor, torn webbing, etc.).
• The seat belts for both front seating positions are equipped with pretensioning
devices that are designed to remove slack from the seat belt in the event of a col-
lision.
• A deployed pretensioner or a deployed air bag must be replaced immediately.
WARNING!
In a collision, you and your passengers can suffer much greater injuries if you are
not buckled up properly. You can strike the interior of your vehicle or other pas-
sengers, or you can be thrown out of the vehicle. Always be sure you and others
in your vehicle are buckled up properly.
GETTING STARTED
10
Page 27 of 84
SPORT MODE
• In Sport mode, the engine is more responsive to the throttle pedal, and provides
more power by increasing turbo boost.
• Steering feedback is also improved, and steering effort is slightly higher.
• Sport mode driving is useful while driving on winding roads where more steering
precision is desired.
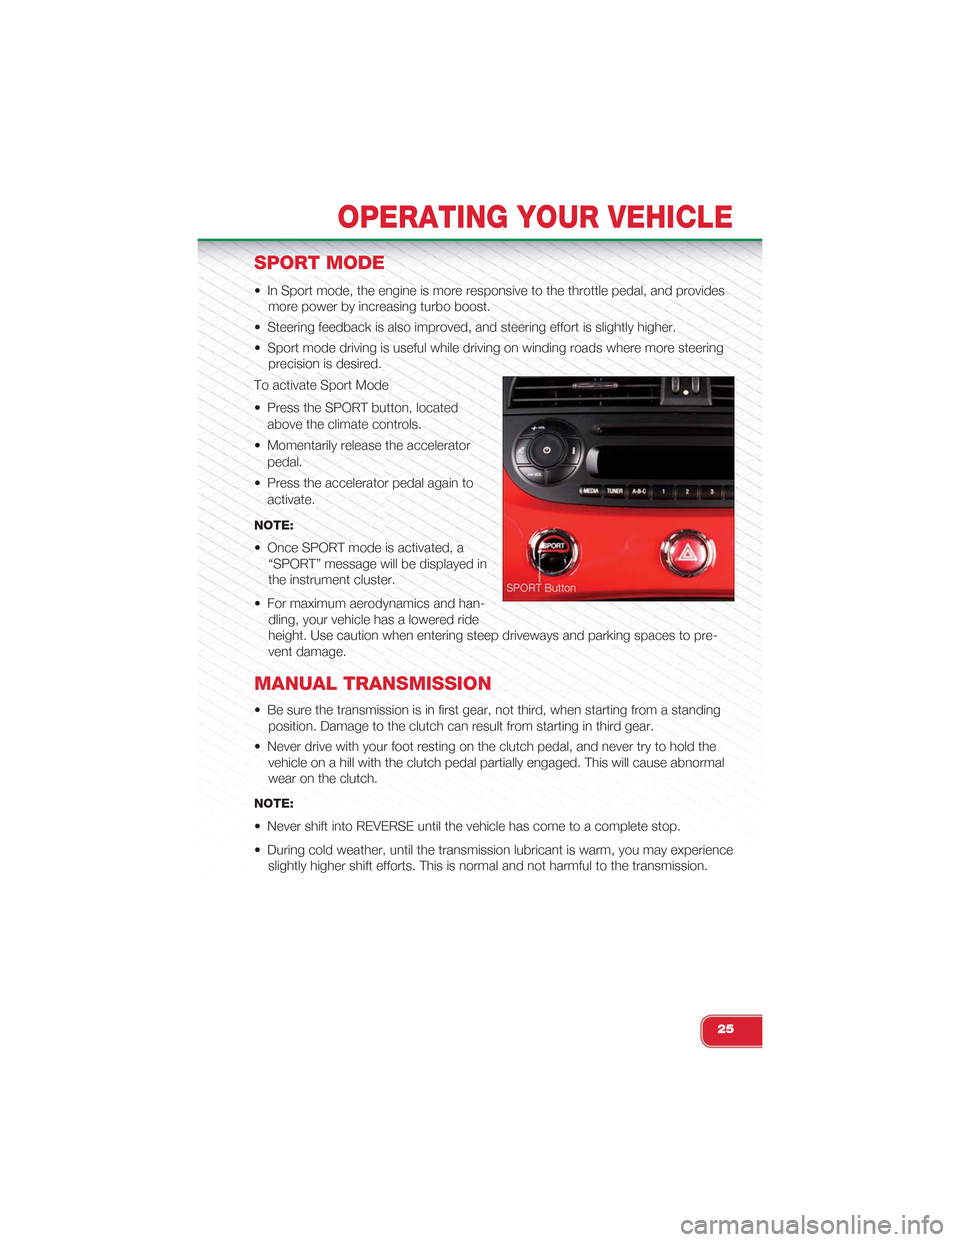
To activate Sport Mode
• Press the SPORT button, located
above the climate controls.
• Momentarily release the accelerator
pedal.
• Press the accelerator pedal again to
activate.
NOTE:
• Once SPORT mode is activated, a
“SPORT” message will be displayed in
the instrument cluster.
• For maximum aerodynamics and han-
dling, your vehicle has a lowered ride
height. Use caution when entering steep driveways and parking spaces to pre-
vent damage.
MANUAL TRANSMISSION
• Be sure the transmission is in first gear, not third, when starting from a standing
position. Damage to the clutch can result from starting in third gear.
• Never drive with your foot resting on the clutch pedal, and never try to hold the
vehicle on a hill with the clutch pedal partially engaged. This will cause abnormal
wear on the clutch.
NOTE:
• Never shift into REVERSE until the vehicle has come to a complete stop.
• During cold weather, until the transmission lubricant is warm, you may experience
slightly higher shift efforts. This is normal and not harmful to the transmission.
OPERATING YOUR VEHICLE
25
Page 31 of 84
At the end of step 7 the top will automatically cycle to the fully open position, and
then close to the 1/4 open position.
This will confirm that the relearn procedure was successful.
Auto Open/Close will now be functional. Trunk lid operation will be functional.
Remote Keyless Power Top Function will be functional.
NOTE:
DO NOT interrupt this activity.
If the power convertible top does not relearn repeat the procedure a second time.
Wind Stop
The Wind Stop installs in the backseat area of the vehicle. The Wind Stop will not inter-
fere with power top operation. Therefore, it can remain installed when the top is up.
WIND BUFFETING
• Wind buffeting can be described as a helicopter-type percussion sound. If buffet-
ing occurs with the windows down, adjust one or both windows up or down
slightly.
• If buffeting occurs with the sunroof open, adjust the sunroof opening, or adjust
any window. This will minimize buffeting.
ENGINE BLOCK HEATER
• To prevent possible engine damage while starting at low temperatures, this ve-
hicle will inhibit engine cranking when the ambient temperature is less than
–22° F (–30° C) and the oil temperature sensor reading indicates an engine block
heater has not been used. An externally-powered electric engine block heater is
available as optional equipment or from your authorized studio.
• The message "plug in engine heater" will be displayed in the instrument cluster
when the ambient temperature is below 5° F (–15° C) at the time the engine is
shut off as a reminder to avoid possible crank delays at the next cold start.
OPERATING YOUR VEHICLE
29
Page 46 of 84
24-HOUR ROADSIDE ASSISTANCE
• If your Abarth requires jump start assistance, out of gas/fuel delivery, tire service,
lockout service or towing due to a defect covered under the Basic Limited War-
ranty, dial toll-free 1-888-242-6342. See your Warranty booklet for further details.
• Provide your name, vehicle identification number and license plate number.
• Provide your location, including telephone number, from which you are calling.
• Briefly describe the nature of the problem and answer a few simple questions.
• You will be given the name of the service provider and an estimated time of ar-
rival. If you feel you are in an “unsafe situation”, please let us know. With your
consent, we will contact local police or safety authorities.
INSTRUMENT CLUSTER WARNING LIGHTS
- Generic Warning Light
• The Generic Warning Light will illuminate if any of the following conditions occur:
Oil Change Request, Engine Oil Pressure Sensor Failure, After Run Cooling
Pump, External Light Failure, Fuel Cut-Off Intervention, Fuel Cut-Off Not Available,
Parking Sensor Failure.
- Power Steering System Warning
• If the “POWER STEERING SYSTEM OVER TEMP” message and icon are dis-
played in the Electronic Vehicle Information Center (EVIC) display, it indicates that
extreme steering maneuvers have occurred, which caused an over temperature
condition in the power steering system. You will lose power steering assistance
momentarily until the over temperature condition no longer exists. Once driving
conditions are safe, pull over and let the vehicle idle. After approximately five min-
utes, the system will cool and return to normal operation.
- Engine Temperature Warning Light
• This light warns of an overheated engine condition.
• If the light turns on or flashes continuously while driving, safely pull over and stop
the vehicle. If the A/C system is on, turn it off. Also, shift the transmission into
NEUTRAL and idle the vehicle. If the temperature reading does not return to nor-
mal, turn the engine off immediately.
• We recommend that you do not operate the vehicle or engine damage will occur.
Have the vehicle serviced immediately.
WARNING!
A hot engine cooling system is dangerous. You or others could be badly burned
by steam or boiling coolant. You may want to call an authorized studio for service
if your vehicle overheats.
WHAT TO DO IN EMERGENCIES
44
Page 48 of 84
- Tire Pressure Monitoring System (TPMS) Light
• Each tire should be checked monthly when it is cold and inflated to the tire pres-
sure recommended by the vehicle manufacturer. This can be found on the ve-
hicle placard or tire inflation pressure label on the driver's door. (If your vehicle
has tires of a different size than the size indicated on the vehicle placard or tire
inflation pressure label, you should determine the proper tire inflation pressure for
those tires.)
• As an added safety feature, your vehicle has been equipped with a Tire Pressure
Monitoring System (TPMS) that illuminates a low tire pressure telltale when one or
more of your tires is significantly under-inflated. Accordingly, when the low tire
pressure telltale illuminates, you should stop and check your tires as soon as
possible, and inflate them to the proper pressure. Driving on a significantly under-
inflated tire causes the tire to overheat and can lead to tire failure. Under-inflation
also reduces fuel efficiency and tire tread life, and may affect the vehicle’s han-
dling and stopping ability.
•IF THE LIGHT STARTS FLASHING INDICATING A LOW TIRE PRES-
SURE, ADJUST THE AIR PRESSURE IN THE LOW TIRE TO THE AIR
PRESSURE SHOWN ON THE VEHICLE PLACARD OR TIRE INFLATION
PRESSURE LABEL LOCATED ON THE DRIVER'S DOOR. NOTE: AFTER
INFLATION, THE VEHICLE MAY NEED TO BE DRIVEN FOR 20 MIN-
UTES BEFORE THE FLASHING LIGHT WILL TURN OFF.
• Please note that the TPMS is not a substitute for proper tire maintenance, and it
is the driver’s responsibility to maintain correct tire pressure, even if under-
inflation has not reached the level to trigger illumination of the TPMS low tire pres-
sure telltale.
• Your vehicle has also been equipped with a TPMS malfunction indicator to indi-
cate when the system is not operating properly. The TPMS malfunction indicator
is combined with the low tire pressure telltale. When the system detects a mal-
function, the telltale will flash for approximately one minute and then remain con-
tinuously illuminated. This sequence will continue each time the vehicle is re-
started as long as the malfunction exists.
• When the malfunction indicator is illuminated, the system may not be able to de-
tect or signal low tire pressure as intended. TPMS malfunctions may occur for a
variety of reasons, including the installation of replacement or alternate tires or
wheels on the vehicle that prevent the TPMS from functioning properly. Always
check the TPMS malfunction telltale after replacing one or more tires or wheels
on your vehicle, to ensure that the replacement or alternate tires and wheels al-
low the TPMS to continue to function properly.
WHAT TO DO IN EMERGENCIES
46
Page 49 of 84
NOTE:
Tire pressures change by approximately 1 psi (7 kPa) per 12° F (7° C) of air tem-
perature change. Keep this in mind when checking tire pressure inside a garage,
especially in the winter. Example: If garage temperature is 68°F (20°C) and the out-
side temperature is 32°F (0°C), then the cold tire inflation pressure should be in-
creased by 3 psi (21 kPa), which equals 1 psi (7 kPa) for every 12°F (7°C) for this
outside temperature condition.
CAUTION!
The TPMS has been optimized for the original equipment tires and wheels. TPMS
pressures and warning have been established for the tire size equipped on your
vehicle. Undesirable system operation or sensor damage may result when using
replacement equipment that is not of the same size, type, and/or style. Aftermar-
ket wheels can cause sensor damage. Do not use tire sealant from a can, or bal-
ance beads if your vehicle is equipped with a TPMS, as damage to the sensors
may result.
BRAKE- Brake Warning Light
• The Brake Warning light illuminates when there is either a system malfunction or
the parking brake is applied. If the light is on and the parking brake is not applied,
it indicates a possible brake hydraulic malfunction, brake booster problem or an
Anti-Lock Brake System problem.
• Please have your vehicle serviced immediately.
WARNING!
Driving a vehicle with the red brake light on is dangerous. Part of the brake sys-
tem may have failed. It will take longer to stop the vehicle. You could have a colli-
sion. Have the vehicle checked immediately.
- Malfunction Indicator Light (MIL)
• Certain conditions, such as a loose or missing gas cap, poor fuel quality, etc.,
may illuminate the MIL after engine start. The vehicle should be serviced if the
light stays on through several typical driving cycles. In most situations, the vehicle
will drive normally and not require towing.
• If the MIL flashes when the engine is running, serious conditions may exist that
could lead to immediate loss of power or severe catalytic converter damage.
We recommend you do not operate the vehicle. Have the vehicle serviced
immediately.
WHAT TO DO IN EMERGENCIES
47
Page 50 of 84
- Charging System Light
• This light shows the status of the electrical charging system. If the charging sys-
tem light remains on, it means that the vehicle is experiencing a problem with the
charging system.
• We recommend you do not continue driving if the charging system light is on.
Have the vehicle serviced immediately.
- Oil Pressure Warning Light
• This light indicates low engine oil pressure. If the light turns on while driving, stop
the vehicle and shut off the engine as soon as possible. A chime will sound when
this light turns on.
• We recommend you do not operate the vehicle or engine damage will occur.
Have the vehicle serviced immediately.
- Anti-Lock Brake (ABS) Light
• This light monitors the Anti-Lock Brake System (ABS).
• If the light is not on during starting, stays on, or turns on while driving, we recom-
mend you drive to the nearest authorized studio immediately and have the vehicle
serviced immediately.
- Air Bag Warning Light
• If the light is not on during starting, stays on, or turns on while driving, have the
vehicle serviced by an authorized studio immediately.
IF YOUR ENGINE OVERHEATS
• In any of the following situations, you can reduce the potential for overheating by
taking the appropriate action.
• On the highways — slow down.
• In city traffic — while stopped, shift transmission into NEUTRAL, but do not in-
crease engine idle speed.
NOTE:There are steps that you can take to slow down an overheat condition:
• If your air conditioner (A/C) is on, turn it off. The A/C system adds heat to the en-
gine cooling system and turning the A/C off can help remove this heat.
• You can also turn the Temperature control to maximum heat, the Mode control to
floor and the Fan control to high. This allows the heater core to act as a supple-
ment to the radiator and aids in removing heat from the engine cooling system.
• If the temperature reading does not return to normal, turn the engine off immedi-
ately.
• We recommend that you do not operate the vehicle or engine damage will occur.
Have the vehicle serviced immediately.
WHAT TO DO IN EMERGENCIES
48
Page 53 of 84
Sealing A Tire With TIREFIT
(A) Whenever You Stop To Use TIREFIT:
1. Pull over to a safe location and turn on the vehicle’s Hazard Warning flashers.
2. Verify that the valve stem (on the wheel with the deflated tire) is in a position that
is near to the ground. This will allow the TIREFIT Hoses (6) and (7) to reach the
valve stem and keep the TIREFIT kit flat on the ground. This will provide the best
positioning of the kit when injecting the sealant into the deflated tire and running
the air pump. Move the vehicle as necessary to place the valve stem in this posi-
tion before proceeding.
3. Place the transmission in PARK (auto transmission) or in Gear (manual transmis-
sion) and cycle the ignition to the OFF position.
4. Set the parking brake.
(B) Setting Up To Use TIREFIT:
1. Turn the Mode Select Knob (5) to the Sealant Mode position.
2. Uncoil the Sealant Hose (6) and then remove the cap from the fitting at the end
of the hose.
3. Place the TIREFIT kit flat on the ground next to the deflated tire.
4. Remove the cap from the valve stem and then screw the fitting at the end of the
Sealant Hose (6) onto the valve stem.
5. Uncoil the Power Plug (8) and insert the plug into the vehicle’s 12 Volt power
outlet.
6. Do not remove foreign objects (e.g., screws or nails) from the tire.
(C) Injecting TIREFIT Sealant Into The Deflated Tire:
• Always start the engine before turning ON the TIREFIT kit.
NOTE:Manual transmission vehicles must have the parking brake engaged and the shift lever inNEUTRAL.
• After pressing the Power Button (4), the sealant (white fluid) will flow from the
Sealant Bottle (1) through the Sealant Hose (6) and into the tire.
NOTE:Sealant may leak out through the puncture in the tire.
•If the sealant (white fluid) does not flow within 0 – 10seconds
through the Sealant Hose (6):
1.Press the Power Button (4) to turn Off the TIREFIT kit. Disconnect the Sealant Hose
(6) from the valve stem. Make sure the valve stem is free of debris. Reconnect the
Sealant Hose (6) to the valve stem. Check that the Mode Select Knob (5) is in the
Sealant Mode position and not Air Mode. Press the Power Button (4) to turn On the
TIREFIT kit.
WHAT TO DO IN EMERGENCIES
51