first FIAT 500E 2016 2.G Owner's Manual
[x] Cancel search | Manufacturer: FIAT, Model Year: 2016, Model line: 500E, Model: FIAT 500E 2016 2.GPages: 132, PDF Size: 4.59 MB
Page 71 of 132
NOTE:
•The Uconnect Phone requires a mobile phone equipped with the Bluetooth Hands-
Free Profile, Version 1.0 or higher.
•Most mobile phones/devices are compatible with the Uconnect system, however some
mobile phones/devices may not be equipped with all of the required features to utilize
all of the Uconnect system features.
•For Uconnect Customer Care:
•U.S.residents visit UconnectPhone.com or call 1-877-855-8400.
•Canadian Residents visit UconnectPhone.com or call, 1-800-465-2001 (English) or
1-800-387-9983 (French).
Pairing (Wirelessly Connecting) Your Mobile Phone To The Uconnect
System
Mobile phone pairing is the process of establishing a wireless connection between a cellu-
lar phone and the Uconnect system.
NOTE:
•To use the Uconnect Phone feature, you first must determine if your mobile phone
and software are compatible with the Uconnect system.Please visit
UconnectPhone.com for complete mobile phone compatibility information.
•Mobile phone pairing is not available while the vehicle is in motion.
•A maximum of 10 mobile phones can be paired to the Uconnect system.
Start Pairing Procedure On The Radio
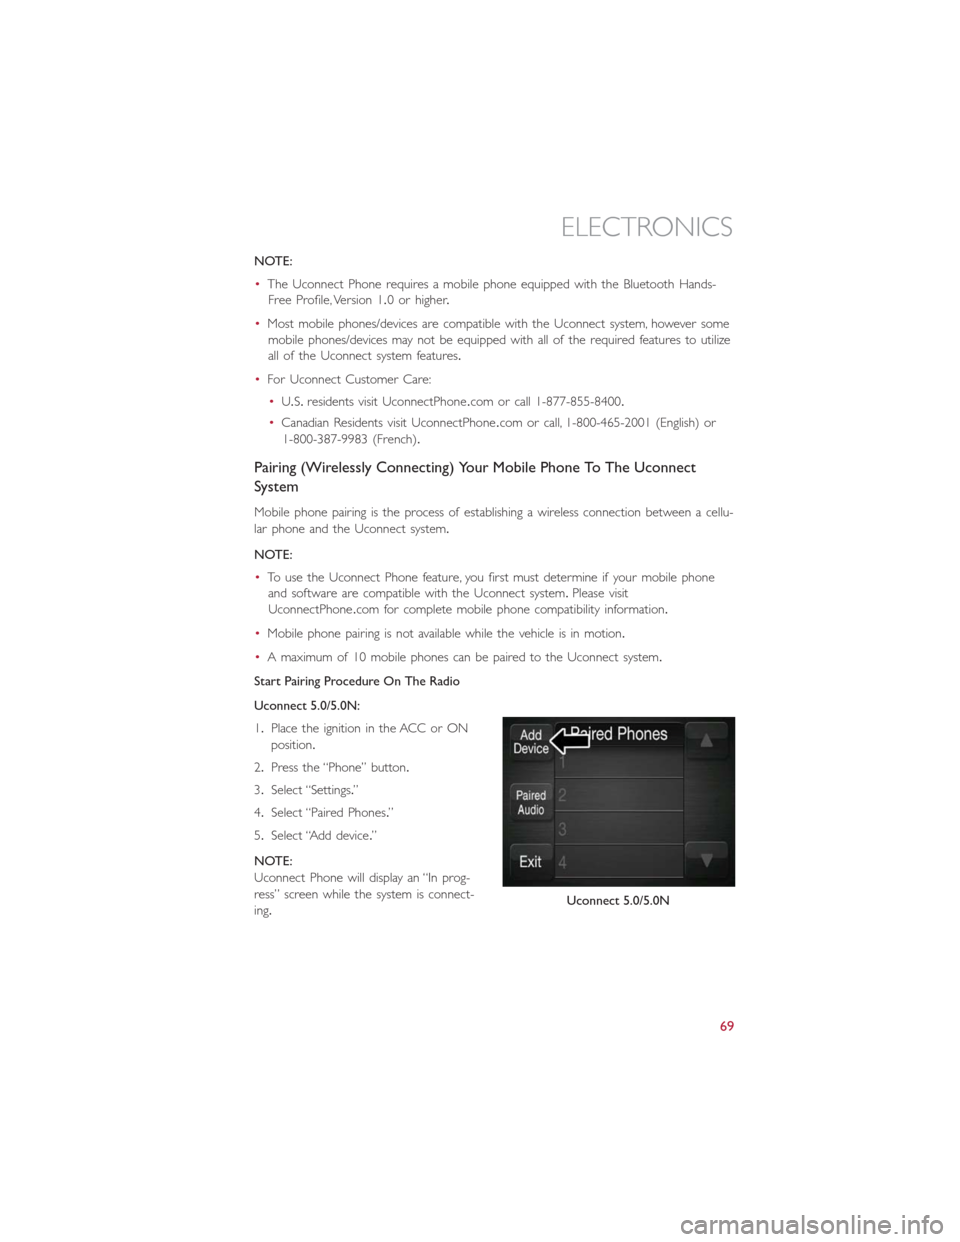
Uconnect 5.0/5.0N:
1.Place the ignition in the ACC or ON
position.
2.Press the “Phone” button.
3.Select “Settings.”
4.Select “Paired Phones.”
5.Select “Add device.”
NOTE:
Uconnect Phone will display an “In prog-
ress” screen while the system is connect-
ing.
Uconnect 5.0/5.0N
ELECTRONICS
69
Page 80 of 132
PROGRAMMABLE FEATURES
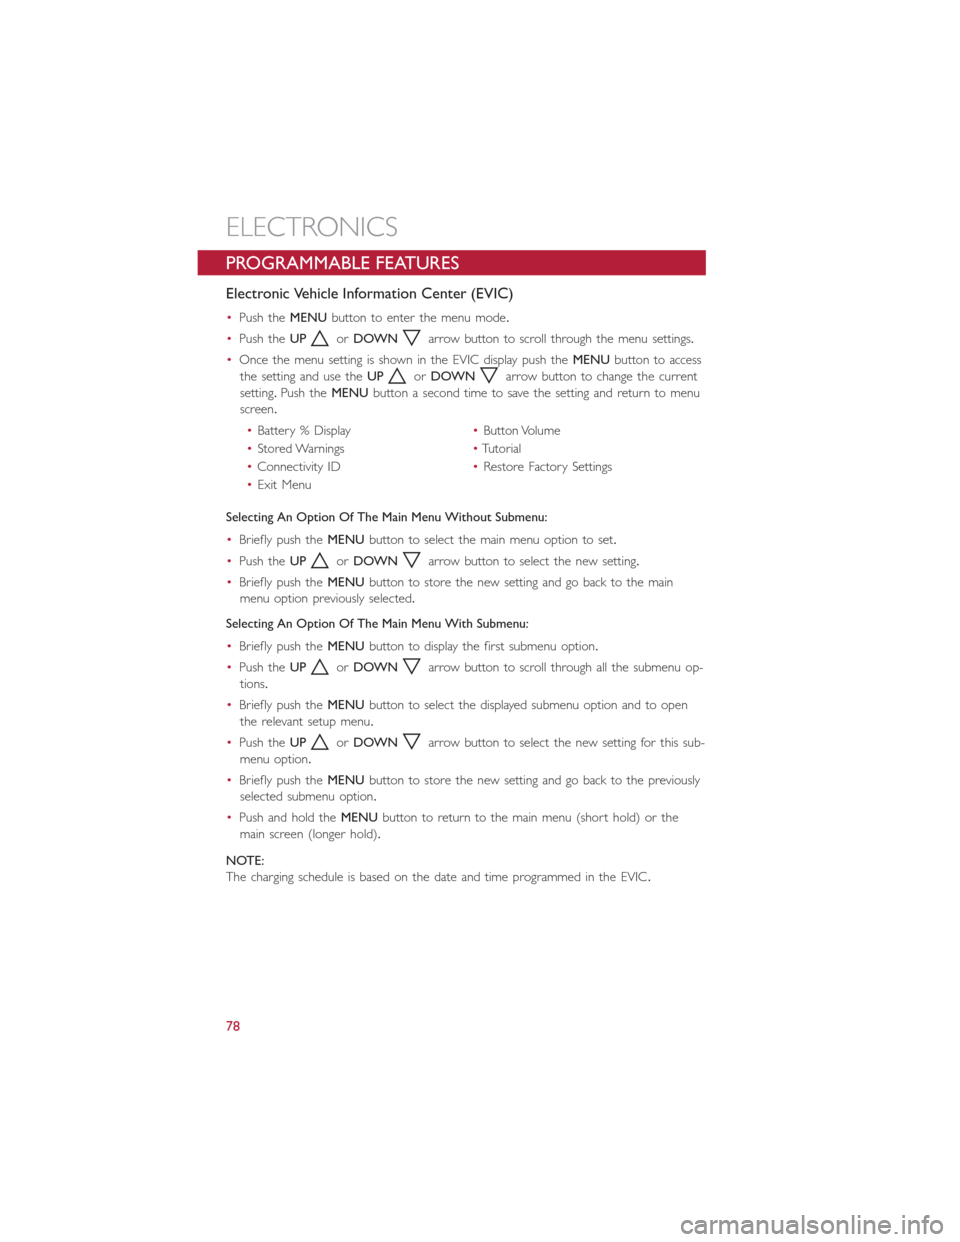
Electronic Vehicle Information Center (EVIC)
•Push theMENUbutton to enter the menu mode.
•Push theUP
orDOWNarrow button to scroll through the menu settings.
•Once the menu setting is shown in the EVIC display push theMENUbutton to access
the setting and use theUP
orDOWNarrow button to change the current
setting.Push theMENUbutton a second time to save the setting and return to menu
screen.
•Battery % Display•Button Volume
•Stored Warnings•Tutorial
•Connectivity ID•Restore Factory Settings
•Exit Menu
Selecting An Option Of The Main Menu Without Submenu:
•Briefly push theMENUbutton to select the main menu option to set.
•Push theUP
orDOWNarrow button to select the new setting.
•Briefly push theMENUbutton to store the new setting and go back to the main
menu option previously selected.
Selecting An Option Of The Main Menu With Submenu:
•Briefly push theMENUbutton to display the first submenu option.
•Push theUP
orDOWNarrow button to scroll through all the submenu op-
tions.
•Briefly push theMENUbutton to select the displayed submenu option and to open
the relevant setup menu.
•Push theUP
orDOWNarrow button to select the new setting for this sub-
menu option.
•Briefly push theMENUbutton to store the new setting and go back to the previously
selected submenu option.
•Push and hold theMENUbutton to return to the main menu (short hold) or the
main screen (longer hold).
NOTE:
The charging schedule is based on the date and time programmed in the EVIC.
ELECTRONICS
78
Page 85 of 132
ROADSIDE ASSISTANCE
•If your FIAT 500e requires jump start assistance, tire service, lockout service or towing
due to a defect covered under the Basic Limited Warranty, dial toll-free
1-888-242-6342.See your Warranty booklet for further details.
•Provide your name, vehicle identification number and license plate number.
•Provide your location, including telephone number, from which you are calling.
•Briefly describe the nature of the problem and answer a few simple questions.
•You will be given the name of the service provider and an estimated time of arrival.If
you feel you are in an “unsafe situation”, please let us know.With your consent, we will
contact local police or safety authorities.
WARNING AND INDICATOR LIGHTS
IMPORTANT:The warning / indicator lights switch on in the instrument panel together
with a dedicated message and/or acoustic signal when applicable.These indications are
indicative and precautionary and as such must not be considered as exhaustive and/or
alternative to the information contained in the Owner’s Manual, which you are advised to
read carefully in all cases.Always refer to the information in this chapter in the event of a
failure indication.
All active telltales will display first if applicable.The system check menu may appear differ-
ent based upon equipment options and current vehicle status.
This guide illustrates and describes the operation of warning and indicator telltales that
are either standard or optional based on the vehicle build.FCA reserves the right to
make changes in design and specifications and/or make additions to or improvements to
its products without imposing any obligation upon itself to install them on products previ-
ously manufactured.
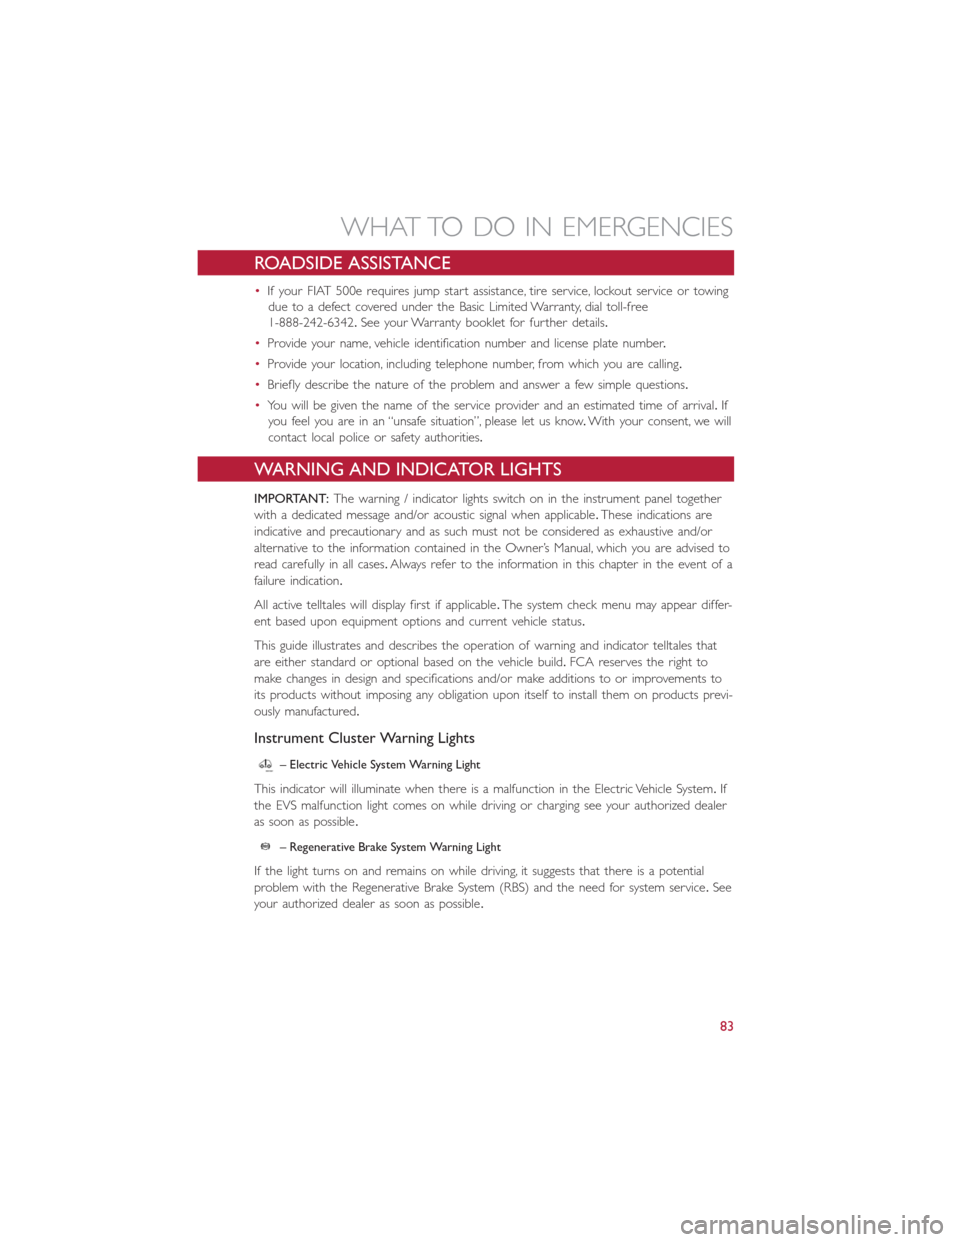
Instrument Cluster Warning Lights
– Electric Vehicle System Warning Light
This indicator will illuminate when there is a malfunction in the Electric Vehicle System.If
the EVS malfunction light comes on while driving or charging see your authorized dealer
as soon as possible.
– Regenerative Brake System Warning Light
If the light turns on and remains on while driving, it suggests that there is a potential
problem with the Regenerative Brake System (RBS) and the need for system service.See
your authorized dealer as soon as possible.
WHAT TO DO IN EMERGENCIES
83
Page 86 of 132
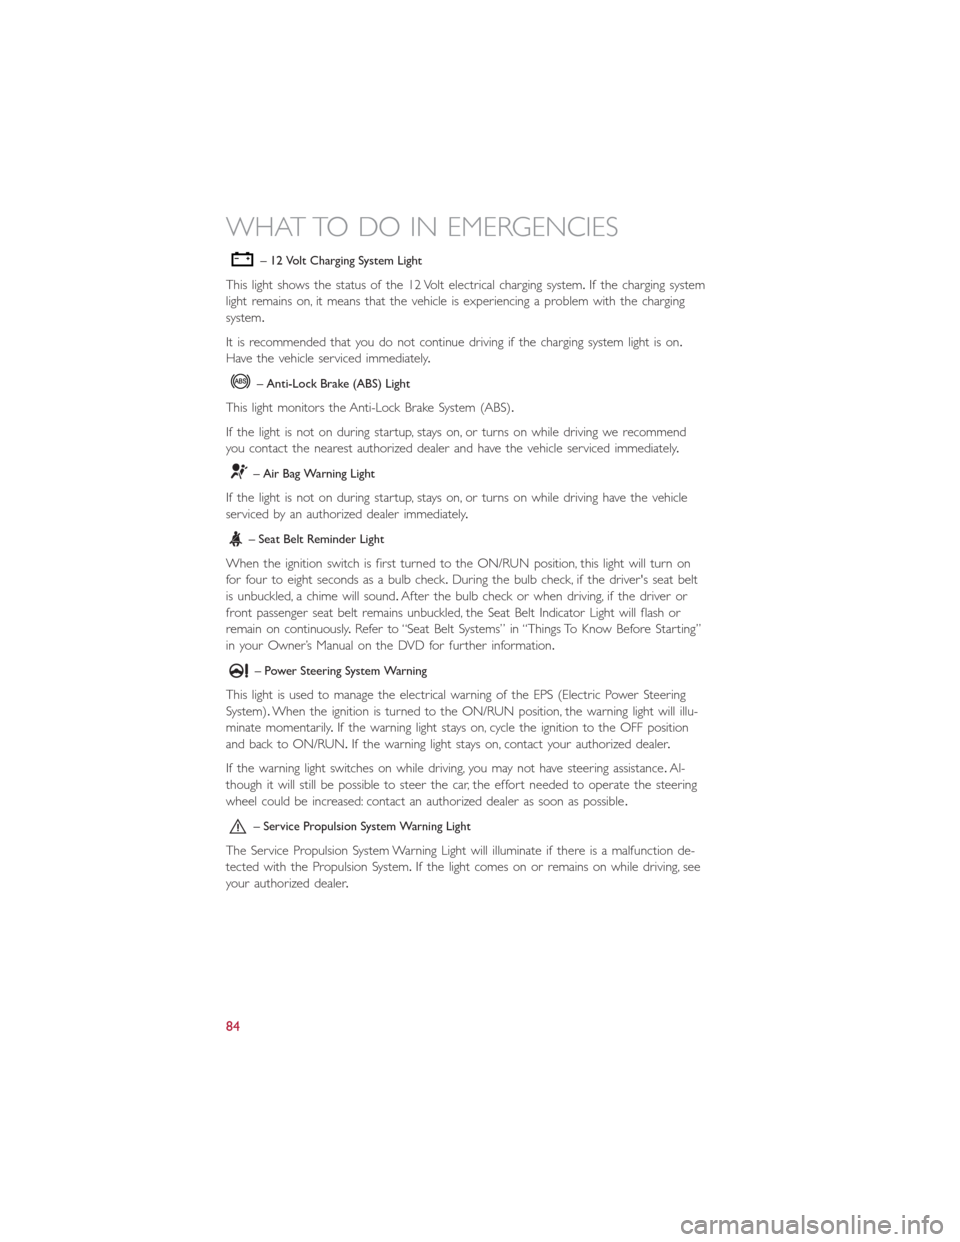
– 12 Volt Charging System Light
This light shows the status of the 12 Volt electrical charging system.If the charging system
light remains on, it means that the vehicle is experiencing a problem with the charging
system.
It is recommended that you do not continue driving if the charging system light is on.
Have the vehicle serviced immediately.
– Anti-Lock Brake (ABS) Light
This light monitors the Anti-Lock Brake System (ABS).
If the light is not on during startup, stays on, or turns on while driving we recommend
you contact the nearest authorized dealer and have the vehicle serviced immediately.
– Air Bag Warning Light
If the light is not on during startup, stays on, or turns on while driving have the vehicle
serviced by an authorized dealer immediately.
– Seat Belt Reminder Light
When the ignition switch is first turned to the ON/RUN position, this light will turn on
for four to eight seconds as a bulb check.During the bulb check, if the driver's seat belt
is unbuckled, a chime will sound.After the bulb check or when driving, if the driver or
front passenger seat belt remains unbuckled, the Seat Belt Indicator Light will flash or
remain on continuously.Refer to “Seat Belt Systems” in “Things To Know Before Starting”
in your Owner’s Manual on the DVD for further information.
– Power Steering System Warning
This light is used to manage the electrical warning of the EPS (Electric Power Steering
System).When the ignition is turned to the ON/RUN position, the warning light will illu-
minate momentarily.If the warning light stays on, cycle the ignition to the OFF position
and back to ON/RUN.If the warning light stays on, contact your authorized dealer.
If the warning light switches on while driving, you may not have steering assistance.Al-
though it will still be possible to steer the car, the effort needed to operate the steering
wheel could be increased: contact an authorized dealer as soon as possible.
– Service Propulsion System Warning Light
The Service Propulsion System Warning Light will illuminate if there is a malfunction de-
tected with the Propulsion System.If the light comes on or remains on while driving, see
your authorized dealer.
WHAT TO DO IN EMERGENCIES
84
Page 90 of 132
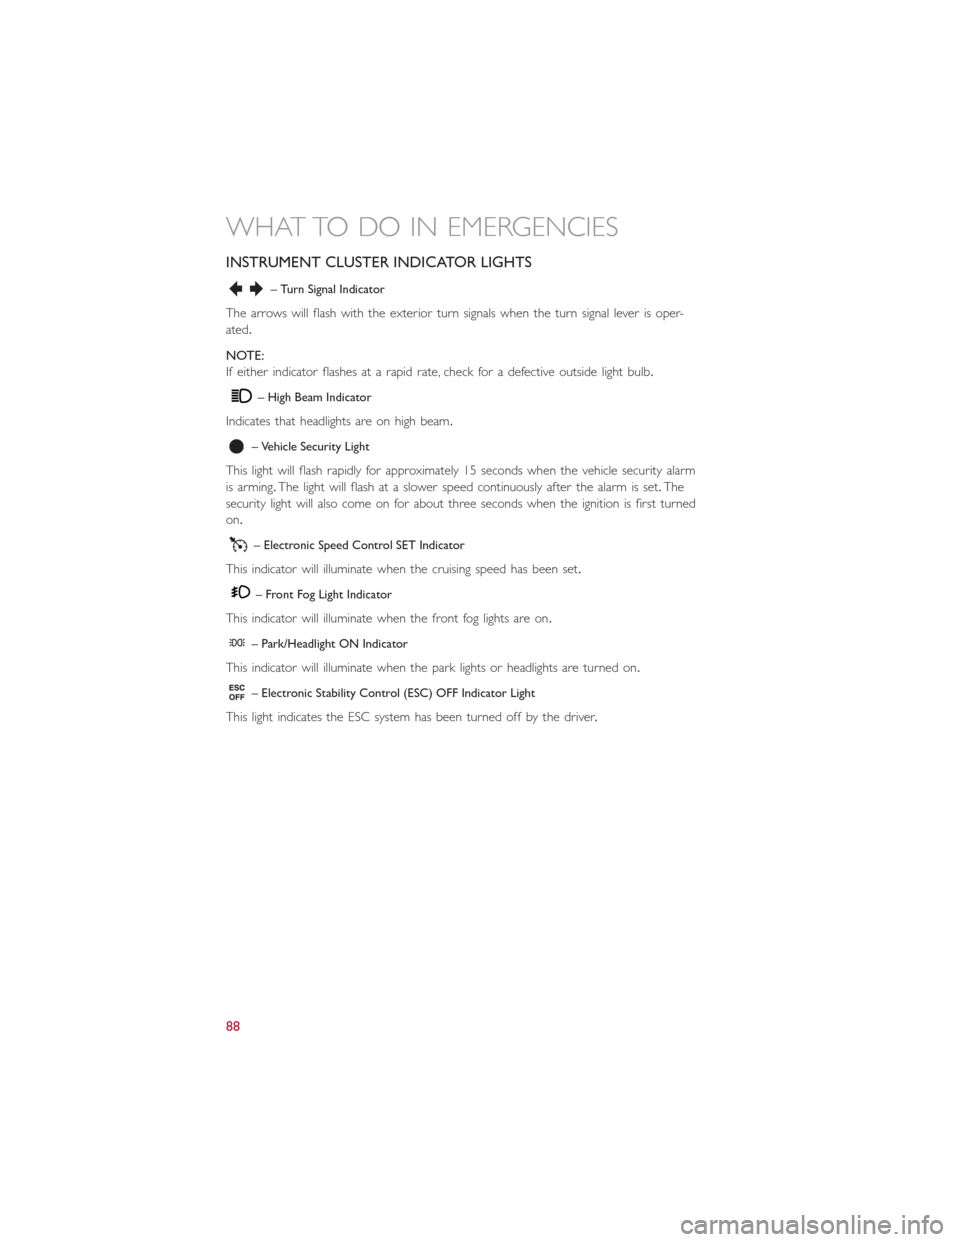
INSTRUMENT CLUSTER INDICATOR LIGHTS
– Turn Signal Indicator
The arrows will flash with the exterior turn signals when the turn signal lever is oper-
ated.
NOTE:
If either indicator flashes at a rapid rate, check for a defective outside light bulb.
– High Beam Indicator
Indicates that headlights are on high beam.
– Vehicle Security Light
This light will flash rapidly for approximately 15 seconds when the vehicle security alarm
is arming.The light will flash at a slower speed continuously after the alarm is set.The
security light will also come on for about three seconds when the ignition is first turned
on.
– Electronic Speed Control SET Indicator
This indicator will illuminate when the cruising speed has been set.
– Front Fog Light Indicator
This indicator will illuminate when the front fog lights are on.
– Park/Headlight ON Indicator
This indicator will illuminate when the park lights or headlights are turned on.
– Electronic Stability Control (ESC) OFF Indicator Light
This light indicates the ESC system has been turned off by the driver.
WHAT TO DO IN EMERGENCIES
88
Page 109 of 132
MAINTENANCE PROCEDURES
For information on the maintenance procedures for your vehicle, please refer to “Mainte-
nance Procedures” in “Maintaining Your Vehicle” in your Owner’s Manual or applicable
supplement on the DVD for further details.
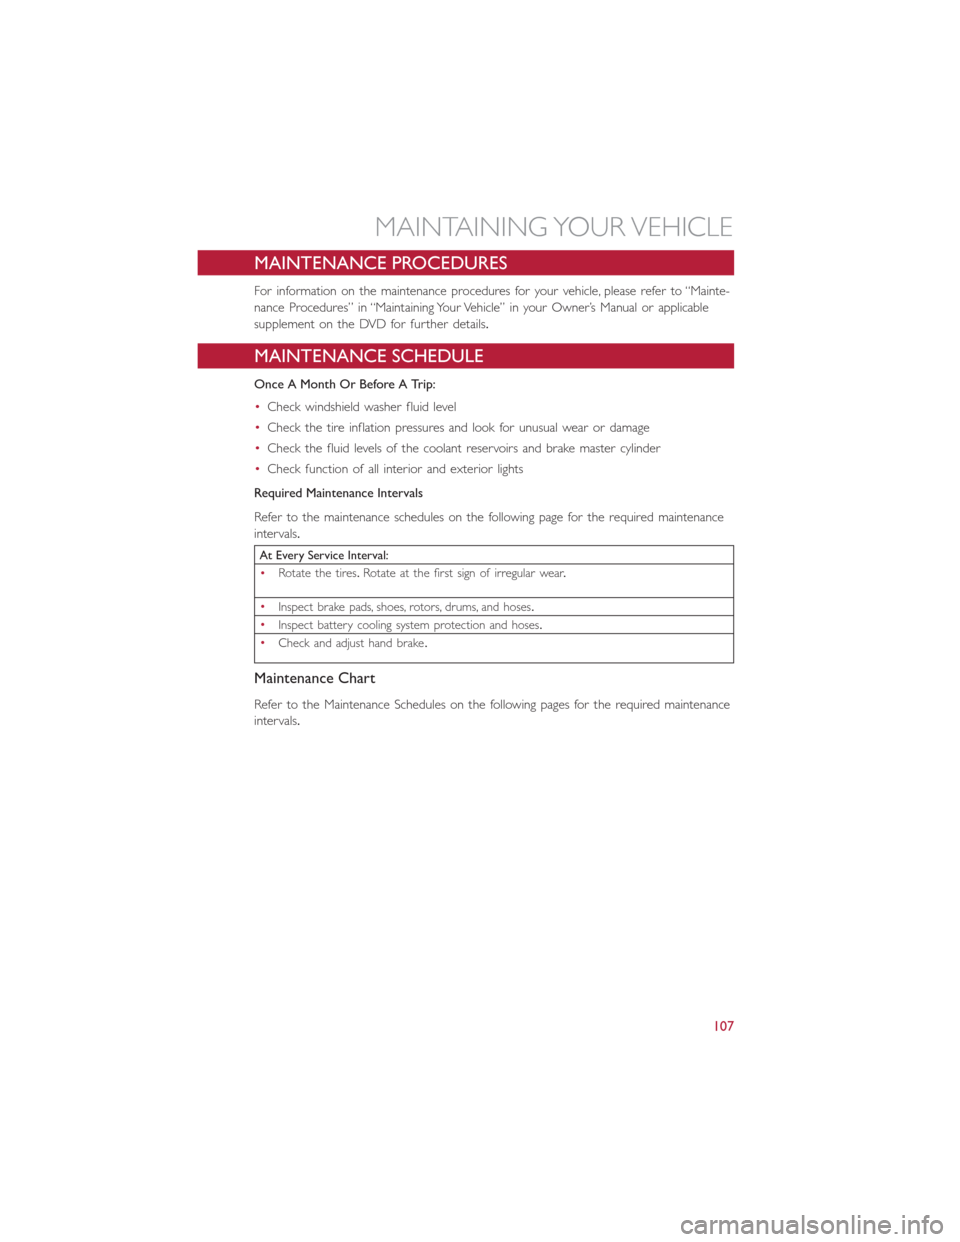
MAINTENANCE SCHEDULE
Once A Month Or Before A Trip:
•Check windshield washer fluid level
•Check the tire inflation pressures and look for unusual wear or damage
•Check the fluid levels of the coolant reservoirs and brake master cylinder
•Check function of all interior and exterior lights
Required Maintenance Intervals
Refer to the maintenance schedules on the following page for the required maintenance
intervals.
At Every Service Interval:
•Rotate the tires.Rotate at the first sign of irregular wear.
•
Inspect brake pads, shoes, rotors, drums, and hoses.
•
Inspect battery cooling system protection and hoses.
•
Check and adjust hand brake.
Maintenance Chart
Refer to the Maintenance Schedules on the following pages for the required maintenance
intervals.
MAINTAINING YOUR VEHICLE
107
Page 110 of 132
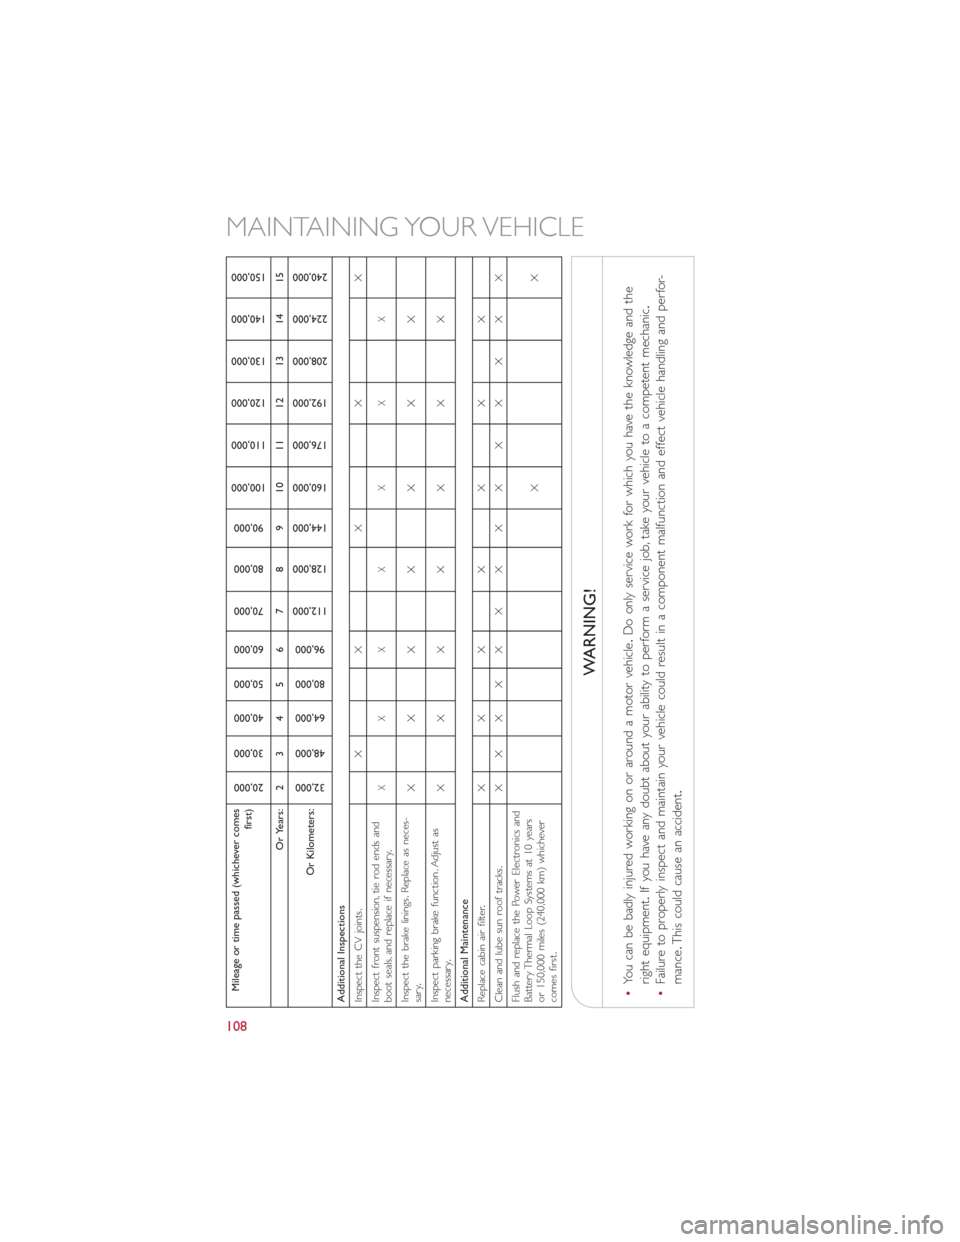
Mileage or time passed (whichever comes
first)
20,000
30,000
40,000
50,000
60,000
70,000
80,000
90,000
100,000
110,000
120,000
130,000
140,000
150,000
Or Years: 2 3 4 5 6 7 8 9 10 11 12 13 14 15
Or Kilometers:
32,000
48,000
64,000
80,000
96,000
112,000
128,000
144,000
160,000
176,000
192,000
208,000
224,000
240,000
Additional Inspections
Inspect the CV joints.XX X X X
Inspect front suspension, tie rod ends and
boot seals, and replace if necessary.
XXX X X X X
Inspect the brake linings.Replace as neces-
sary.XXX X X X X
Inspect parking brake function.Adjust as
necessary.XXX X X X X
Additional Maintenance
Replace cabin air filter.XXX X X X X
Clean and lube sun roof tracks.XX XX X X X X X X X X X X
Flush and replace the Power Electronics and
Battery Thermal Loop Systems at 10 years
or 150,000 miles (240,000 km) whichever
comes first.XX
WARNING!
•You can be badly injured working on or around a motor vehicle.Do only service work for which you have the knowledge and the
right equipment.If you have any doubt about your ability to perform a service job, take your vehicle to a competent mechanic.
•Failure to properly inspect and maintain your vehicle could result in a component malfunction and effect vehicle handling and perfor-
mance.This could cause an accident.
MAINTAINING YOUR VEHICLE
108
Page 116 of 132
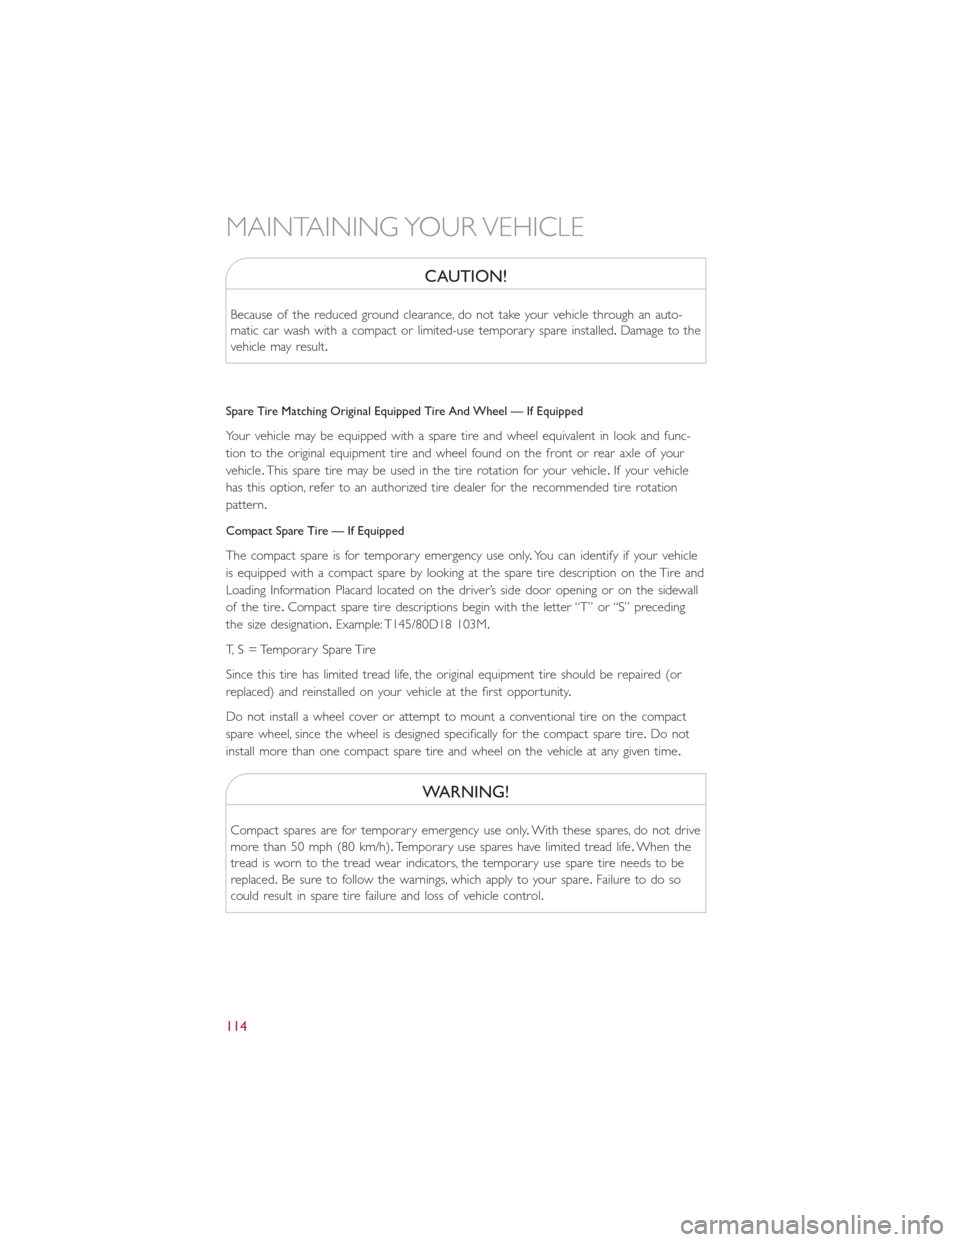
CAUTION!
Because of the reduced ground clearance, do not take your vehicle through an auto-
matic car wash with a compact or limited-use temporary spare installed.Damage to the
vehicle may result.
Spare Tire Matching Original Equipped Tire And Wheel — If Equipped
Your vehicle may be equipped with a spare tire and wheel equivalent in look and func-
tion to the original equipment tire and wheel found on the front or rear axle of your
vehicle.This spare tire may be used in the tire rotation for your vehicle.If your vehicle
has this option, refer to an authorized tire dealer for the recommended tire rotation
pattern.
Compact Spare Tire — If Equipped
The compact spare is for temporary emergency use only.You can identify if your vehicle
is equipped with a compact spare by looking at the spare tire description on the Tire and
Loading Information Placard located on the driver’s side door opening or on the sidewall
of the tire.Compact spare tire descriptions begin with the letter “T” or “S” preceding
the size designation.Example: T145/80D18 103M.
T, S = Temporary Spare Tire
Since this tire has limited tread life, the original equipment tire should be repaired (or
replaced) and reinstalled on your vehicle at the first opportunity.
Do not install a wheel cover or attempt to mount a conventional tire on the compact
spare wheel, since the wheel is designed specifically for the compact spare tire.Do not
install more than one compact spare tire and wheel on the vehicle at any given time.
WARNING!
Compact spares are for temporary emergency use only.With these spares, do not drive
more than 50 mph (80 km/h).Temporary use spares have limited tread life.When the
tread is worn to the tread wear indicators, the temporary use spare tire needs to be
replaced.Be sure to follow the warnings, which apply to your spare.Failure to do so
could result in spare tire failure and loss of vehicle control.
MAINTAINING YOUR VEHICLE
114
Page 117 of 132
Full Size Spare — If Equipped
The full size spare is for temporary emergency use only.This tire may look like the origi-
nally equipped tire on the front or rear axle of your vehicle, but it is not.This spare tire
may have limited tread life.When the tread is worn to the tread wear indicators, the
temporary use full size spare tire needs to be replaced.Since it is not the same as your
original equipment tire, replace (or repair) the original equipment tire and reinstall on the
vehicle at the first opportunity.
Limited Use Spare — If Equipped
The limited-use spare tire is for temporary emergency use only.This tire is identified by a
label located on the limited-use spare wheel.This label contains the driving limitations for
this spare.This tire may look like the original equipped tire on the front or rear axle of
your vehicle, but it is not.Installation of this limited-use spare tire affects vehicle handling.
Since it is not the same as your original equipment tire, replace (or repair) the original
equipment tire and reinstall on the vehicle at the first opportunity.
WARNING!
Limited-use spares are for emergency use only.Installation of this limited-use spare tire
affects vehicle handling.With this tire, do not drive more than the speed listed on the
limit-use spare wheel.Keep inflated to the cold tire inflation pressures listed on your
Tire and Loading Information Placard located on the driver’s side B-Pillar or the rear
edge of the driver’s side door.Replace (or repair) the original equipment tire at the
first opportunity and reinstall it on your vehicle.Failure to do so could result in loss of
vehicle control.
MAINTAINING YOUR VEHICLE
115
Page 120 of 132
FIAT CUSTOMER CENTER
P.O.Box 21–8004 Auburn Hills, MI 48321–8004 Phone: 1-888-242-6342
ASSISTANCE FOR THE HEARING IMPAIRED
•To assist customers who have hearing difficulties, the manufacturer has installed special
TDD (Telecommunication Devices for the Deaf ) equipment at its customer center.
Any hearing or speech impaired customer, who has access to a TDD or a conventional
teletypewriter (TTY) in the United States, can communicate with the manufacturer by
dialing 1–800–380–CHRY.
PUBLICATIONS ORDERING
•If you are the first registered retail owner of your vehicle,you may obtain one free
printed copy of the Owner's Manual, Warranty Booklet or Radio Manuals on your
DVD by calling 1–888–242–6342 or by contacting your authorized dealer.
•Replacement English User Guide kits or DVDs may be purchased by visiting
www.techauthority.com or by calling 1–800–890–4038.Visa, Master Card, American
Express and Discover orders are accepted.If you prefer mailing your order, please call
the above numbers for an order form.
NOTE:
A street address is required when ordering manuals (no P.O.Boxes).
REPORTING SAFETY DEFECTS IN THE UNITED STATES
If you believe that your vehicle has a defect that could cause a collision or cause injury or
death, you should immediately inform the National Highway Traffic Safety Administration
(NHTSA) in addition to notifying the manufacturer.
If NHTSA receives similar complaints, it may open an investigation, and if it finds that a
safety defect exists in a group of vehicles, it may order a recall and remedy campaign.
However, NHTSA cannot become involved in individual problems between you, your au-
thorized dealer and the manufacturer.
To contact NHTSA, you may either call the Auto Safety Hotline toll free at
1-888-327-4236 (TTY: 1-800-424-9153), or go to http://www.safercar.gov; or write to:
Administrator, NHTSA, 1200 New Jersey Avenue, SE., West Building, Washington, D.C.
20590.You can also obtain other information about motor vehicle safety from
http://www.safercar.gov.
CUSTOMER ASSISTANCE
118