refuelling FIAT 500L LIVING 2014 2.G Owners Manual
[x] Cancel search | Manufacturer: FIAT, Model Year: 2014, Model line: 500L LIVING, Model: FIAT 500L LIVING 2014 2.GPages: 420, PDF Size: 9.77 MB
Page 6 of 420
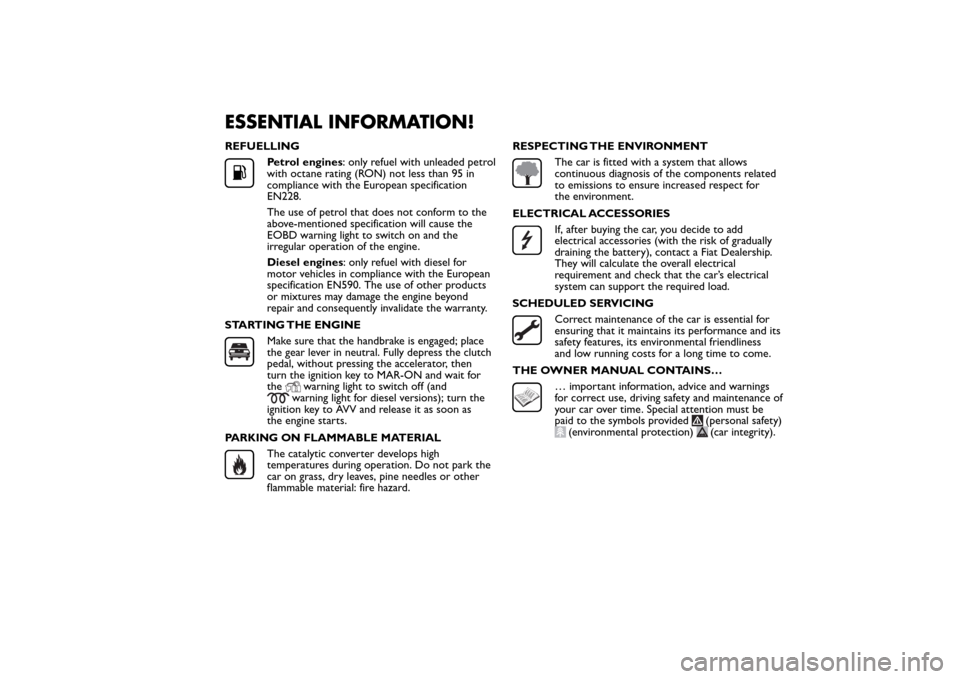
ESSENTIAL INFORMATION!REFUELLING
Petrol engines: only refuel with unleaded petrol
with octane rating (RON) not less than 95 in
compliance with the European specification
EN228.
The use of petrol that does not conform to the
above-mentioned specification will cause the
EOBD warning light to switch on and the
irregular operation of the engine.
Diesel engines: only refuel with diesel for
motor vehicles in compliance with the European
specification EN590. The use of other products
or mixtures may damage the engine beyond
repair and consequently invalidate the warranty.
STARTING THE ENGINEMake sure that the handbrake is engaged; place
the gear lever in neutral. Fully depress the clutch
pedal, without pressing the accelerator, then
turn the ignition key to MAR-ON and wait for
the
warning light to switch off (and
warning light for diesel versions); turn the
ignition key to AVV and release it as soon as
the engine starts.
PARKING ON FLAMMABLE MATERIAL
The catalytic converter develops high
temperatures during operation. Do not park the
car on grass, dry leaves, pine needles or other
flammable material: fire hazard.RESPECTING THE ENVIRONMENT
The car is fitted with a system that allows
continuous diagnosis of the components related
to emissions to ensure increased respect for
the environment.
ELECTRICAL ACCESSORIESIf, after buying the car, you decide to add
electrical accessories (with the risk of gradually
draining the battery), contact a Fiat Dealership.
They will calculate the overall electrical
requirement and check that the car’s electrical
system can support the required load.
SCHEDULED SERVICINGCorrect maintenance of the car is essential for
ensuring that it maintains its performance and its
safety features, its environmental friendliness
and low running costs for a long time to come.
THE OWNER MANUAL CONTAINS…… important information, advice and warnings
for correct use, driving safety and maintenance of
your car over time. Special attention must be
paid to the symbols provided
(personal safety)
(environmental protection)
(car integrity).
Page 124 of 420
IMPORTANT After turning the ignition key to STOP,
wait at least 1 minute before disconnecting the
electrical supply to the battery.
JUMP STARTING
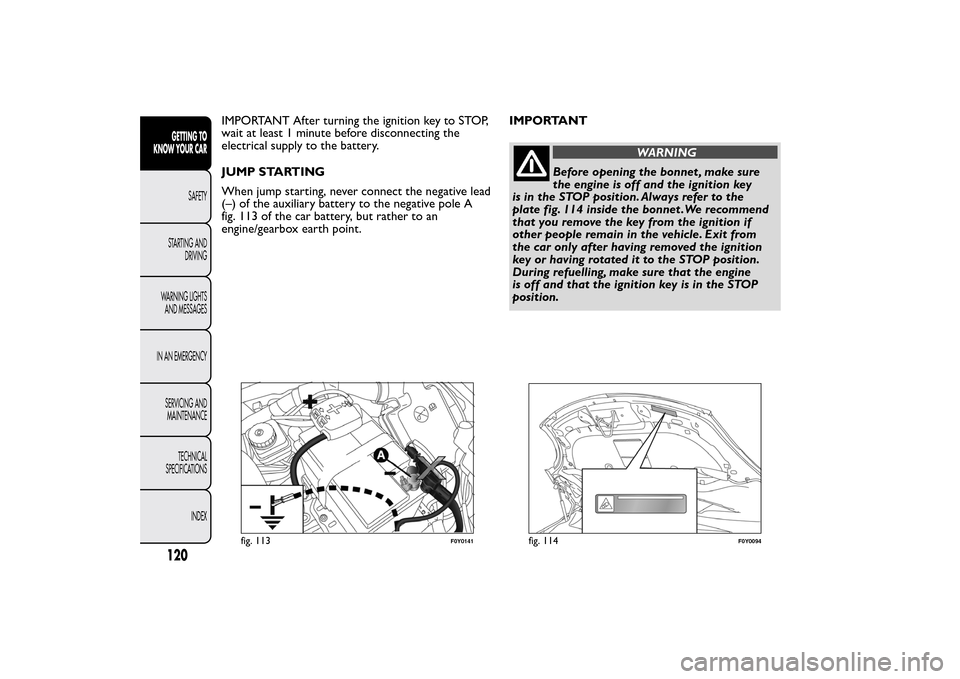
When jump starting, never connect the negative lead
(–) of the auxiliary battery to the negative pole A
fig. 113 of the car battery, but rather to an
engine/gearbox earth point.IMPORTANT
WARNING
Before opening the bonnet , make sure
the engine is off and the ignition key
is in the STOP position. Always refer to the
plate fig. 114 inside the bonnet .We recommend
that you remove the key from the ignition if
other people remain in the vehicle. Exit from
the car only after having removed the ignition
key or having rotated it to the STOP position.
During refuelling, make sure that the engine
is off and that the ignition key is in the STOP
position.
fig. 113
F0Y0141
fig. 114
F0Y0094
120GETTING TO
KNOW YOUR CAR
SAFETY
STARTING AND
DRIVING
WARNING LIGHTS
AND MESSAGES
IN AN EMERGENCY
SERVICING AND
MAINTENANCE
TECHNICAL
SPECIFICATIONS
INDEX
Page 140 of 420
REFUELLING THE CARBefore refuelling, make sure that the fuel type is
correct. Also stop the engine before refuelling.
PETROL ENGINES
Use unleaded petrol only, with octane number
(RON) no lower than 95.
IMPORTANT An inefficient catalytic converter leads
to harmful exhaust emissions, thus contributing to
air pollution.
IMPORTANT Never use leaded petrol, even in small
amounts or in an emergency, as this would damage
the catalytic converter beyond repair.
DIESEL ENGINES
Operation at low temperatures
If the outside temperature is very low, diesel
thickens due to the formation of paraffin clots with
consequent defective operation of the fuel supply
system.
In order to avoid these problems, different types of
diesel fuel are distributed according to the season:
summer type, winter type and arctic type
(cold/mountain areas).If refuelling with diesel fuel whose specifications are
not suitable for the usage temperature, it is advisable
to mix TUTELA DIESEL ART additive in the
proportions shown on the container with the diesel
fuel. Pour the additive into the tank before the
diesel fuel.
When using or parking the car for a long time in the
mountains or cold areas, it is advisable to refuel
using locally available diesel. In this case, it is also
advisable to keep the tank over 50% full.
For diesel engines, use only diesel fuel for
motor vehicles in accordance with EN590
European specifications.The use of other
products or mixtures may damage the engine
beyond repair and consequently invalidate the
warranty, depending on the damage caused.
If you accidentally refuel with another type of
fuel, do not start the engine, and drain the fuel
tank. If the engine has been run, even for only
a ver y shor t time, you will need to have the entire
fuel system emptied in addition to the tank.
REFUELLING CAPACITY
To fill the tank completely, top up twice after the
pump switches off.
Further top-ups could cause faults in the fuel supply
system.
136GETTING TO
KNOW YOUR CAR
SAFETY
STARTING AND
DRIVING
WARNING LIGHTS
AND MESSAGES
IN AN EMERGENCY
SERVICING AND
MAINTENANCE
TECHNICAL
SPECIFICATIONS
INDEX
Page 141 of 420
REFUELLING PROCEDURE
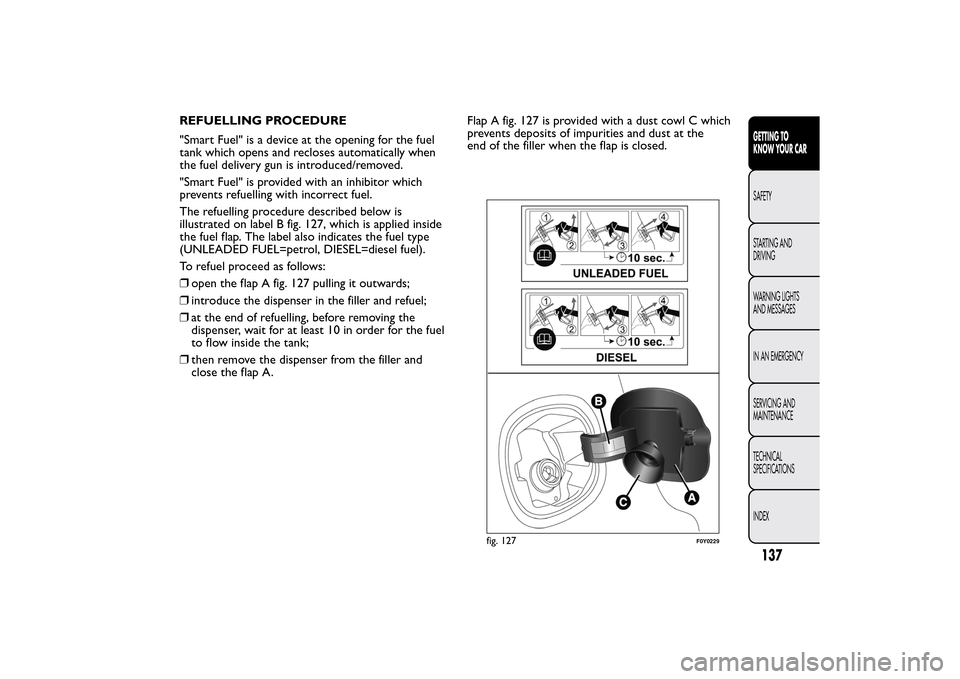
"Smart Fuel" is a device at the opening for the fuel
tank which opens and recloses automatically when
the fuel delivery gun is introduced/removed.
"Smart Fuel" is provided with an inhibitor which
prevents refuelling with incorrect fuel.
The refuelling procedure described below is
illustrated on label B fig. 127, which is applied inside
the fuel flap. The label also indicates the fuel type
(UNLEADED FUEL=petrol, DIESEL=diesel fuel).
To refuel proceed as follows:
❒open the flap A fig. 127 pulling it outwards;
❒introduce the dispenser in the filler and refuel;
❒at the end of refuelling, before removing the
dispenser, wait for at least 10 in order for the fuel
to flow inside the tank;
❒then remove the dispenser from the filler and
close the flap A.Flap A fig. 127 is provided with a dust cowl C which
prevents deposits of impurities and dust at the
end of the filler when the flap is closed.
fig. 127
F0Y0229
137GETTING TO
KNOW YOUR CARSAFETY
STARTING AND
DRIVING
WARNING LIGHTS
AND MESSAGES
IN AN EMERGENCY
SERVICING AND
MAINTENANCE
TECHNICAL
SPECIFICATIONS
INDEX
Page 142 of 420
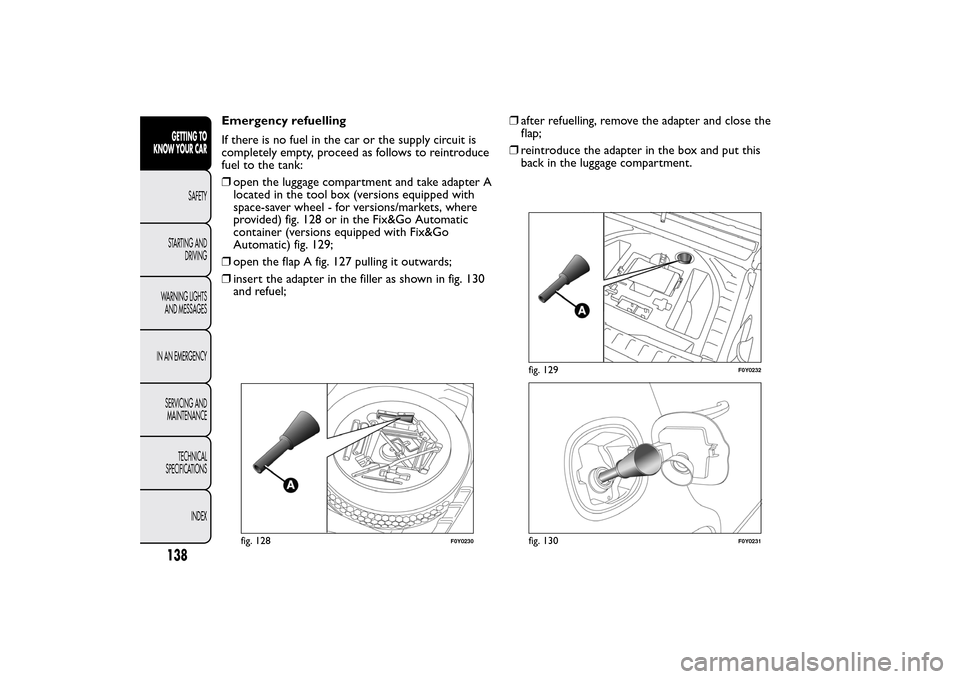
Emergency refuelling
If there is no fuel in the car or the supply circuit is
completely empty, proceed as follows to reintroduce
fuel to the tank:
❒open the luggage compartment and take adapter A
located in the tool box (versions equipped with
space-saver wheel - for versions/markets, where
provided) fig. 128 or in the Fix&Go Automatic
container (versions equipped with Fix&Go
Automatic) fig. 129;
❒open the flap A fig. 127 pulling it outwards;
❒insert the adapter in the filler as shown in fig. 130
and refuel;❒after refuelling, remove the adapter and close the
flap;
❒reintroduce the adapter in the box and put this
back in the luggage compartment.
fig. 128
F0Y0230
fig. 129
F0Y0232
fig. 130
F0Y0231
138GETTING TO
KNOW YOUR CAR
SAFETY
STARTING AND
DRIVING
WARNING LIGHTS
AND MESSAGES
IN AN EMERGENCY
SERVICING AND
MAINTENANCE
TECHNICAL
SPECIFICATIONS
INDEX
Page 143 of 420
IMPORTANT
WARNING
Do not apply any object/plug to the end
of the filler which is not provided for
the car.The use of non-compliant objects/plugs
could cause a pressure increase inside the
tank, resulting in dangerous situations.
WARNING
Do not bring naked flames or lit
cigarettes near to the fuel filler: fire risk.
Keep your face away from the fuel filler to
prevent breathing in harmful vapours.IMPORTANT If the filler compartment is washed
with a high pressure jet, keep it at a distance of
at least 20 cm.
WARNING
Do not use a mobile phone near the
refuelling pump: risk of fire.
139GETTING TO
KNOW YOUR CARSAFETY
STARTING AND
DRIVING
WARNING LIGHTS
AND MESSAGES
IN AN EMERGENCY
SERVICING AND
MAINTENANCE
TECHNICAL
SPECIFICATIONS
INDEX
Page 190 of 420
Remember that the deterioration of the engine oil is
accelerated by:
❒mainly town use of the car which makes the DPF
regeneration process more frequent;
❒use of the car for short drives, in which the engine
does not have time to reach its regular operating
temperature;
❒repeated interruption of the regeneration process,
signalled by the DPF warning light coming on.
WARNING
If the warning light switches on, the
deteriorated engine oil must be changed
as soon as possible, and never more than 500
km from the first time that the warning light
switches on. Failure to observe the above may
result in severe damage to the engine and
invalidate the warranty.The activation of this
warning light is not related to the amount of oil
in the engine.Therefore, never top up with oil
when the warning light starts flashing.
HOT ENGINE COOLANT
(red)
Turning the key to the MAR-ON position illuminates
the warning light, but it should switch off after a
few seconds.The warning light switches on (on some versions
together with a message and a symbol on the display)
when the engine is overheated.
If the warning light comes on when driving, proceed
as follows:
❒when driving normally:stop the car, switch off
the engine and check that the water level in the
reservoir is not below the MIN mark. If it is, wait
for the engine to cool down, then slowly and
carefully open the cap, top up with coolant and
check that the level is between the MIN and MAX
marks on the reservoir. Also check visually for
any fluid leaks. If, when restarting, the warning
light comes on again, contact a Fiat Dealership;
❒if the vehicle is used under demanding
conditions(e.g. towing trailers uphill or fully
loaded): slow down and, if the light stays on, stop
the car. Wait for 2 or 3 minutes with the engine
running and slightly accelerated to further favour
the coolant circulation. Then stop the engine.
Check the correct coolant level as described
above. Should the level of fluid be too low, top up
(for the quantity and type of fluid to use, see
the description in the "Refuelling" paragraph in the
"Technical specifications" chapter).
IMPORTANT Over demanding routes, it is advisable
to keep the engine on and slightly accelerated for
a few minutes before switching it off.
186GETTING TO KNOW
YOUR CAR
SAFETY
STARTING AND
DRIVINGWARNING LIGHTS
AND MESSAGESIN AN EMERGENCY
SERVICING AND
MAINTENANCE
TECHNICAL
SPECIFICATIONS
INDEX
Page 287 of 420
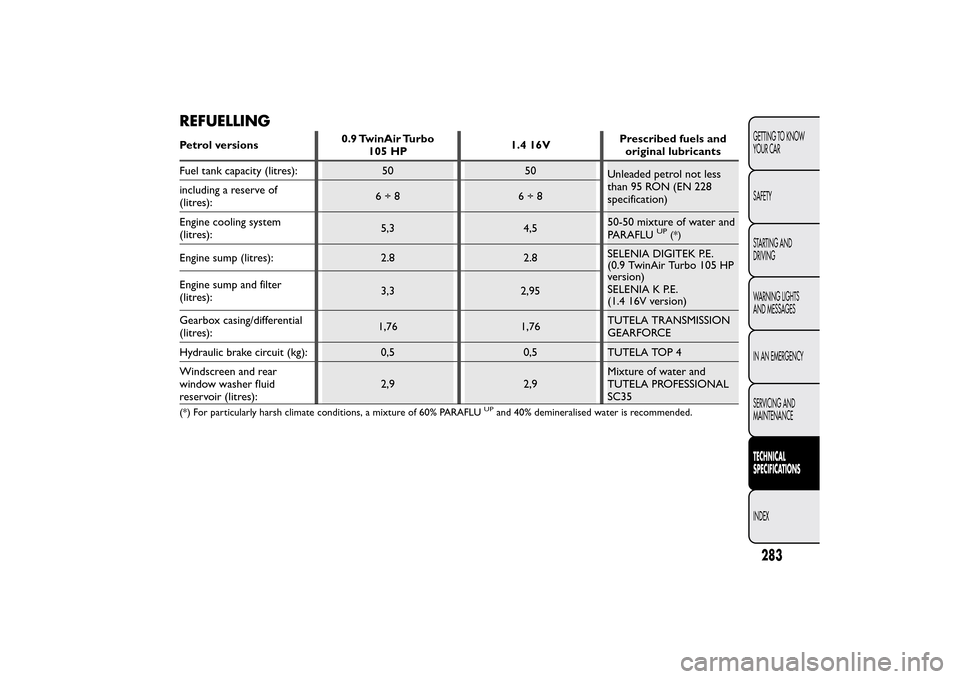
REFUELLINGPetrol versions0.9 TwinAir Turbo
105 HP1.4 16VPrescribed fuels and
original lubricants
Fuel tank capacity (litres): 50 50
Unleaded petrol not less
than 95 RON (EN 228
specification) including a reserve of
(litres):6÷8 6÷8
Engine cooling system
(litres):5,3 4,550-50 mixture of water and
PARAFLU
UP
(*)
Engine sump (litres): 2.8 2.8SELENIA DIGITEK P.E.
(0.9 TwinAir Turbo 105 HP
version)
SELENIA K P.E.
(1.4 16V version) Engine sump and filter
(litres):3,3 2,95
Gearbox casing/differential
(litres):1,76 1,76TUTELA TRANSMISSION
GEARFORCE
Hydraulic brake circuit (kg): 0,5 0,5 TUTELA TOP 4
Windscreen and rear
window washer fluid
reservoir (litres):2,9 2,9Mixture of water and
TUTELA PROFESSIONAL
SC35(*) For particularly harsh climate conditions, a mixture of 60% PARAFLU
UP
and 40% demineralised water is recommended.
283GETTING TO KNOW
YOUR CAR
SAFETY
STARTING AND
DRIVING
WARNING LIGHTS
AND MESSAGES
IN AN EMERGENCY
SERVICING AND
MAINTENANCETECHNICAL
SPECIFICATIONSINDEX
Page 323 of 420
JACK
Please note that:
❒the jack weight is 1.76 kg;
❒the jack requires no adjustment;
❒the jack cannot be repaired and in the event of a
fault it must be replaced by another original one;
❒no tool other than its cranking device may be fitted
on the jack.
WHEEL REPLACEMENT PROCEDURE
To change a wheel, proceed as follows:
❒stop the car in a position that is not dangerous for
oncoming traffic where you can change the wheel
safely. The ground should be flat if possible, and
sufficiently firm;
❒switch off the engine, pull up the handbrake and
engage the 1
stgear or reverse. Wear the reflective
safety jacket (compulsory by law) before getting
out of the car;
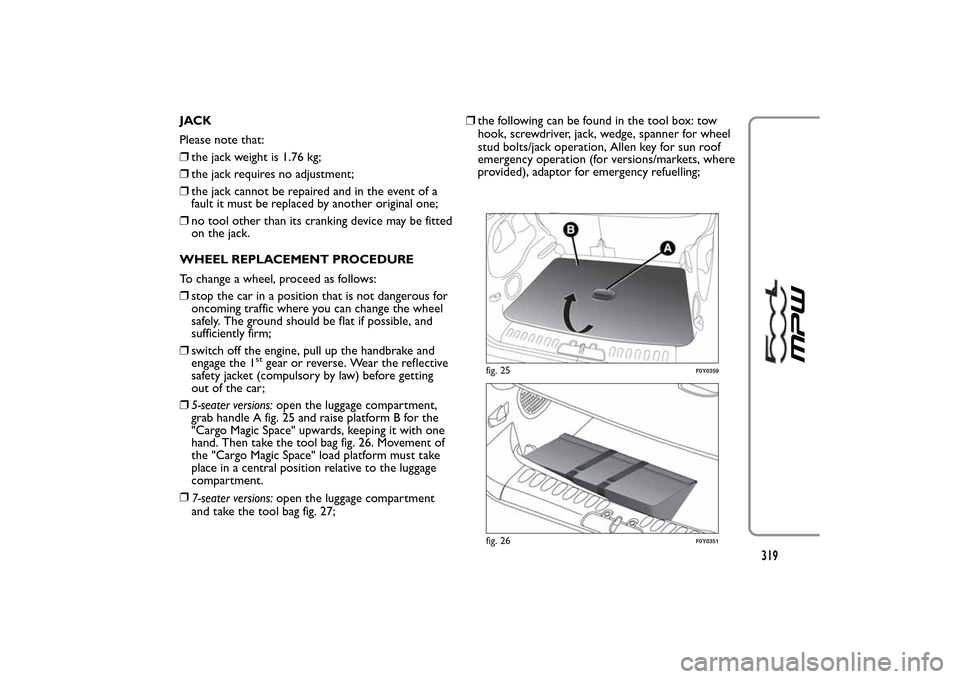
❒5-seater versions:open the luggage compartment,
grab handle A fig. 25 and raise platform B for the
"Cargo Magic Space" upwards, keeping it with one
hand. Then take the tool bag fig. 26. Movement of
the "Cargo Magic Space" load platform must take
place in a central position relative to the luggage
compartment.
❒
7-seater versions:open the luggage compartment
and take the tool bag fig. 27;❒the following can be found in the tool box: tow
hook, screwdriver, jack, wedge, spanner for wheel
stud bolts/jack operation, Allen key for sun roof
emergency operation (for versions/markets, where
provided), adaptor for emergency refuelling;
fig. 25
F0Y0359
fig. 26
F0Y0351
319
Page 415 of 420
– control ..................................... 63
Maintenance and care
– scheduled servicing plan ..... 239
Manual climate control
system ......................................... 47
Menu items................................... 12
MSR system ................................. 111
MSR (system) .............................. 111
Multifunction display .................. 7N
umber plate lights (bulb
replacement)............................. 220
O
n board instruments
– engine coolant
temperature indicator.......... 6
– multifunction display............. 4
On-board instruments
– On-board instruments ......... 4
On board instruments
– reconfigurable
multifunction display............. 5
Parking......................................... 171
Parking sensors .......................... 133
Particulate filter (DPF) ............. 140
Performance (top speed) ......... 280
Pollen filter .................................. 252
Power sockets ............................. 82Power supply............................... 268
Preparation to install a
portable navigation system.... 130
Pretensioners .............................. 143
Protecting the environment .... 140
Radiofrequency remote
control: ministerial
approvals.................................... 292
Radio setup system ................... 130
Rain sensor................................... 66
Raising the car ............................ 234
Rear armrest ................................ 36
Rear camera ................................ 125
Rear light clusters ...................... 217
Rear roof light
– bulb replacement.................. 222
Rear seat surveillance
mirror .......................................... 84
Rear view mirrors ....................... 39
Rear window washer jets......... 259
Rear window washer
– rear window washer fluid
level ......................................... 251
Rear window washer/wiper ..... 68
Rear window wiper
– blade replacement ................ 258
– blades ...................................... 256– level check .... 246-247-248-249
Reconfigurable multifunction
display .......................................... 8
Refuelling...................................... 283
Refuelling the car ....................... 136
Replacing fuses............................ 225
Rev counter.................................. 6
Rim Protector............................. 277
Roof lights .................................... 73
– courtesy lights........................ 75
– front roof light ....................... 73
– glove compartment light ..... 76
– luggage compartment
roof light.................................. 75
– rear roof light ......................... 74
Roof rack/ski rack ...................... 108
Safety ........................................... 141
– carrying children safely........ 147
– "Isofix" child restraint
system (fitting) ...................... 154
– seat belts ................................ 141
Saving fuel .................................... 173
SBR system .................................. 142
Scheduled Servicing Plan .......... 239
Seat belts
– load limiters ........................... 144
411GETTING TO KNOW
YOUR CAR
SAFETY
STARTING AND
DRIVING
WARNING LIGHTS
AND MESSAGES
IN AN EMERGENCY
SERVICING AND
MAINTENANCE
TECHNICAL
SPECIFICATIONSINDEX