sensor FIAT BRAVO 2007 2.G Owners Manual
[x] Cancel search | Manufacturer: FIAT, Model Year: 2007, Model line: BRAVO, Model: FIAT BRAVO 2007 2.GPages: 246, PDF Size: 3.75 MB
Page 5 of 246
4
SAFETY
DEVICES
CORRECT USE
OF THE CAR
WARNING
LIGHTS AND
MESSAGES
IN AN
EMERGENCY
CAR
MAINTENANCE
TECHNICAL
SPECIFICATIONS
INDEX
DASHBOARD
AND CONTROLSDASHBOARD ........................................................................ 5
INSTRUMENT PANEL ......................................................... 6
SYMBOLS ................................................................................. 8
THE FIAT CODE SYSTEM ................................................... 8
THE KEYS ................................................................................ 10
ALARM ..................................................................................... 16
IGNITION DEVICE ................................................................ 19
INSTRUMENTS ....................................................................... 20
MULTIFUNCTION DISPLAY ............................................. 22
RECONFIGURABLE MULTIFUNCTION DISPLAY...... 23
TRIP COMPUTER ................................................................. 35
SEATS ........................................................................................ 37
HEAD RESTRAINTS .............................................................. 39
STEERING WHEEL ............................................................... 40
REARVIEW MIRRORS ........................................................... 40
HEATING/CLIMATE CONTROL SYSTEM .................... 42
HEATING AND VENTILATION ....................................... 44
MANUAL CLIMATE CONTROL SYSTEM .................... 46
AUTOMATIC TWO-ZONE
CLIMATE CONTROL SYSTEM ......................................... 49
EXTERNAL LIGHTS .............................................................. 55
WINDOW WASHING......................................................... 57
CRUISE CONTROL ............................................................. 61CEILING LIGHTS.................................................................... 63
CONTROLS ............................................................................. 65
INTERIOR FITTINGS ............................................................ 67
SUNROOF................................................................................ 72
DOORS .................................................................................... 75
POWER WINDOWS ........................................................... 77
BOOT ........................................................................................ 79
BONNET .................................................................................. 83
ROOF RACK/SKI RACK ..................................................... 84
HEADLIGHTS .......................................................................... 85
ABS SYSTEM ........................................................................... 86
ESP SYSTEM ............................................................................ 88
EOBD SYSTEM ....................................................................... 91
SOUND SYSTEM .................................................................... 92
INSTALLATION OF
ELECTRIC/ELECTRONIC DEVICES ................................. 93
“DUALDRIVE” ELECTRIC POWER
STEERING SYSTEM .............................................................. 94
TYRE PRESSURE MONITORING SYSTEM
(T.P.M.S.) ................................................................................... 96
PARKING SENSORS ............................................................ 99
AT THE FILLING STATION .............................................. 102
PROTECTING THE ENVIRONMENT ............................ 103
D D
A A
S S
H H
B B
O O
A A
R R
D D
A A
N N
D D
C C
O O
N N
T T
R R
O O
L L
S S
001-022 BRAVO GB 10-05-2007 8:57 Pagina 4
Page 6 of 246
DASHBOARD
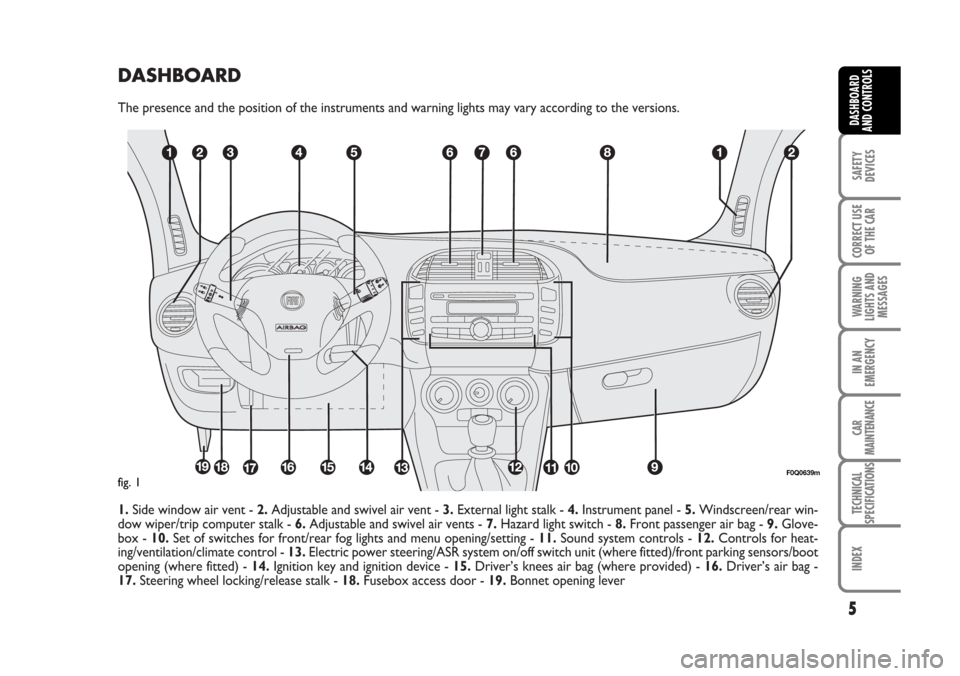
The presence and the position of the instruments and warning lights may vary according to the versions.
1.Side window air vent - 2.Adjustable and swivel air vent - 3.External light stalk - 4.Instrument panel - 5.Windscreen/rear win-
dow wiper/trip computer stalk - 6.Adjustable and swivel air vents - 7.Hazard light switch - 8.Front passenger air bag - 9.Glove-
box - 10.Set of switches for front/rear fog lights and menu opening/setting - 11.Sound system controls - 12.Controls for heat-
ing/ventilation/climate control - 13.Electric power steering/ASR system on/off switch unit (where fitted)/front parking sensors/boot
opening (where fitted) - 14.Ignition key and ignition device - 15.Driver’s knees air bag (where provided) - 16.Driver’s air bag -
17.Steering wheel locking/release stalk - 18.Fusebox access door - 19.Bonnet opening lever
5
SAFETY
DEVICES
CORRECT USE
OF THE CAR
WARNING
LIGHTS AND
MESSAGES
IN AN
EMERGENCY
CAR
MAINTENANCE
TECHNICAL
SPECIFICATIONS
INDEX
DASHBOARD
AND CONTROLS
F0Q0639mfig. 1
001-022 BRAVO GB 10-05-2007 8:57 Pagina 5
Page 13 of 246
12
SAFETY
DEVICES
CORRECT USE
OF THE CAR
WARNING
LIGHTS AND
MESSAGES
IN AN
EMERGENCY
CAR
MAINTENANCE
TECHNICAL
SPECIFICATIONS
INDEX
DASHBOARD
AND CONTROLS
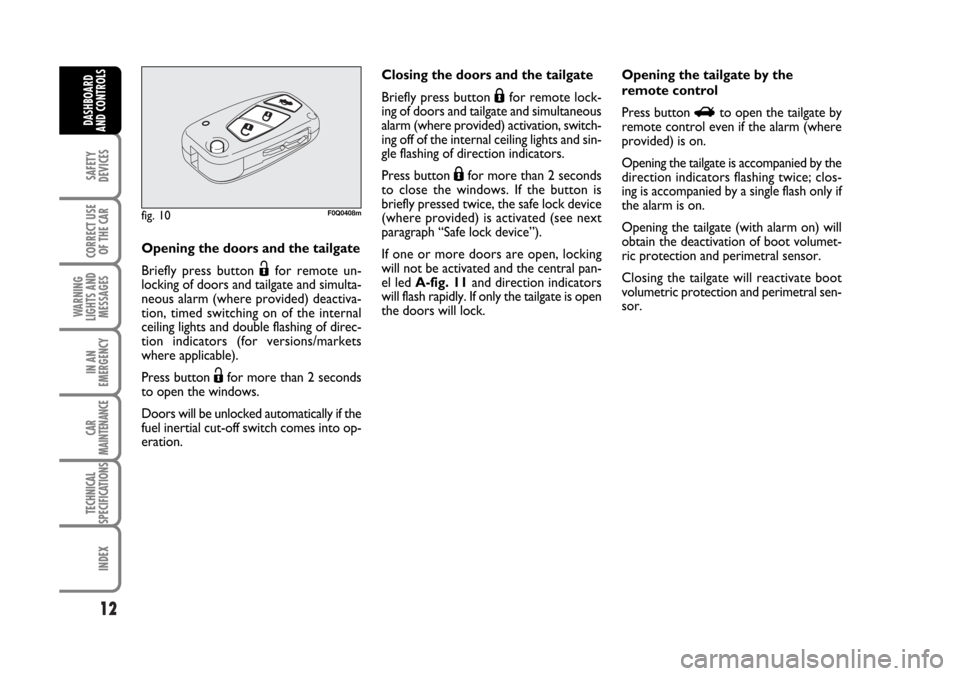
Opening the doors and the tailgate
Briefly press button
Ëfor remote un-
locking of doors and tailgate and simulta-
neous alarm (where provided) deactiva-
tion, timed switching on of the internal
ceiling lights and double flashing of direc-
tion indicators (for versions/markets
where applicable).
Press button
Ëfor more than 2 seconds
to open the windows.
Doors will be unlocked automatically if the
fuel inertial cut-off switch comes into op-
eration.Closing the doors and the tailgate
Briefly press button
Áfor remote lock-
ing of doors and tailgate and simultaneous
alarm (where provided) activation, switch-
ing off of the internal ceiling lights and sin-
gle flashing of direction indicators.
Press button
Áfor more than 2 seconds
to close the windows. If the button is
briefly pressed twice, the safe lock device
(where provided) is activated (see next
paragraph “Safe lock device”).
If one or more doors are open, locking
will not be activated and the central pan-
el led A-fig. 11and direction indicators
will flash rapidly. If only the tailgate is open
the doors will lock.Opening the tailgate by the
remote control
Press button
Rto open the tailgate by
remote control even if the alarm (where
provided) is on.
Opening the tailgate is accompanied by the
direction indicators flashing twice; clos-
ing is accompanied by a single flash only if
the alarm is on.
Opening the tailgate (with alarm on) will
obtain the deactivation of boot volumet-
ric protection and perimetral sensor.
Closing the tailgate will reactivate boot
volumetric protection and perimetral sen-
sor.
fig. 10F0Q0408m
001-022 BRAVO GB 10-05-2007 8:57 Pagina 12
Page 25 of 246

24
SAFETY
DEVICES
CORRECT USE
OF THE CAR
WARNING
LIGHTS AND
MESSAGES
IN AN
EMERGENCY
CAR
MAINTENANCE
TECHNICAL
SPECIFICATIONS
INDEX
DASHBOARD
AND CONTROLS
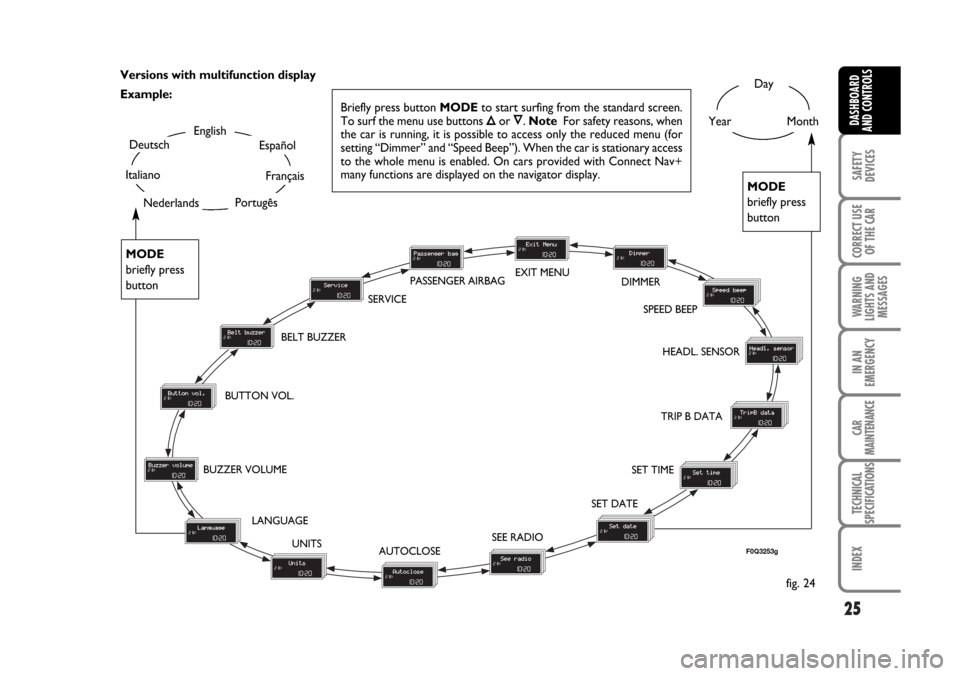
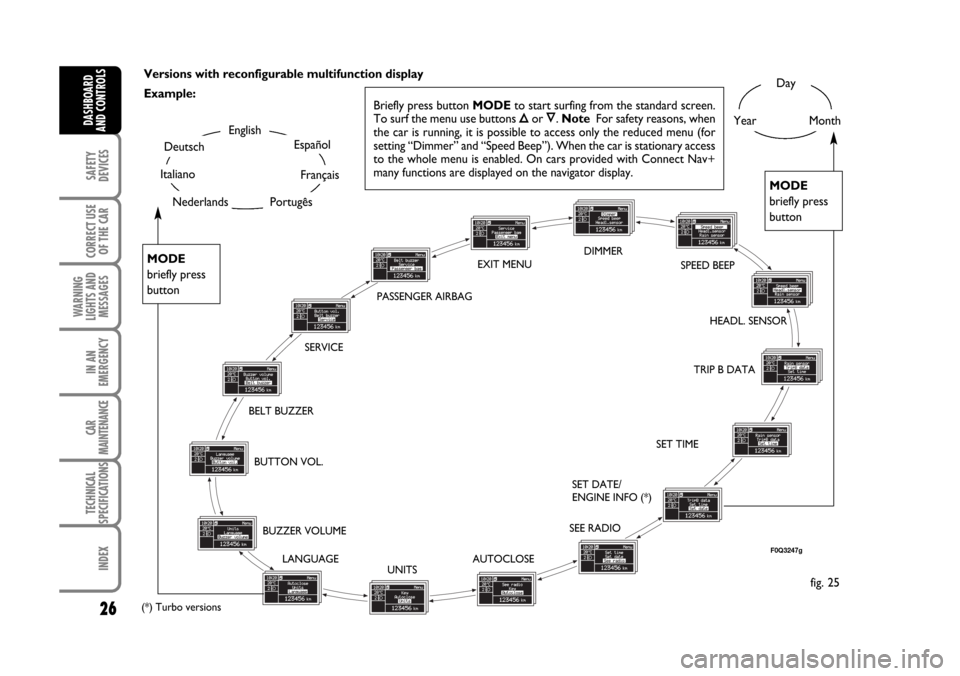
SETUP MENU fig. 24-25
The menu comprises a series of functions
arranged in a “circular fashion” which can
be selected through buttons
Õand Ôto
access the different select operations and
settings (setup) given below. For certain
options (Set time and Units) there is a sub-
menu.
The setup menu can be activated by press-
ing briefly button MODE.
Single presses on buttons
Õor Ôwill
scroll the setup menu options. Handling
modes differ with each other according to
the characteristic of the option selected.
If the car is equipped with Connect Nav+,
the only functions that can be adjusted/set
through the instrument panel display are
the following: “Dimmer”, “Speed Beep”,
“Headl. sensor” (where provided), “Belt
buzzer” and “Passenger bag”. The other
functions are displayed by and can be ad-
justed/set through the Connect Nav+ sys-
tem display.Selecting an option in the main menu
without submenu:
– press briefly button MODEto select
the menu option to set;
– press buttons
Õor Ô(by single press-
es) to select the new setting;
– press briefly button MODEto store the
new setting and to go back to the previ-
ously selected menu option.Selecting an option in the main menu with
submenu:
– press briefly button MODEto display
the first submenu option;
– press buttons Õor Ô(by single press-
es) to scroll all submenu options;
– press briefly button MODEto select
the displayed submenu option and to en-
ter the relevant setup menu;
– press buttons
Õor Ô(by single press-
es) to select the new setting;
– press briefly button MODEto store the
new setting and to go back to the previ-
ously selected submenu option.
023-036 BRAVO GB 10-05-2007 10:05 Pagina 24
Page 26 of 246
25
SAFETY
DEVICES
CORRECT USE
OF THE CAR
WARNING
LIGHTS AND
MESSAGES
IN AN
EMERGENCY
CAR
MAINTENANCE
TECHNICAL
SPECIFICATIONS
INDEX
DASHBOARD
AND CONTROLS
Day
YearMonthEnglish
Portugês
Español
Français
Deutsch
Italiano
BELT BUZZER
HEADL. SENSOR
SET TIME
SET DATE
SEE RADIO
AUTOCLOSE UNITS LANGUAGE BUZZER VOLUMEBUTTON VOL. SERVICE
Briefly press button MODEto start surfing from the standard screen.
To surf the menu use buttons Õor Ô. Note For safety reasons, when
the car is running, it is possible to access only the reduced menu (for
setting “Dimmer” and “Speed Beep”). When the car is stationary access
to the whole menu is enabled. On cars provided with Connect Nav+
many functions are displayed on the navigator display.
MODE
briefly press
button
Versions with multifunction display
Example:
fig. 24
F0Q3253g
TRIP B DATA SPEED BEEP DIMMER EXIT MENU
Nederlands
MODE
briefly press
button
PASSENGER AIRBAG
023-036 BRAVO GB 10-05-2007 10:05 Pagina 25
Page 27 of 246
26
SAFETY
DEVICES
CORRECT USE
OF THE CAR
WARNING
LIGHTS AND
MESSAGES
IN AN
EMERGENCY
CAR
MAINTENANCE
TECHNICAL
SPECIFICATIONS
INDEX
DASHBOARD
AND CONTROLS
Versions with reconfigurable multifunction display
Example:Day
YearMonthEnglish
Portugês
Español
Français
Deutsch
Italiano
BELT BUZZERSPEED BEEP
HEADL. SENSOR
SET TIME
SET DATE/
ENGINE INFO (*)
SEE RADIO
AUTOCLOSE
UNITS LANGUAGE BUZZER VOLUME BUTTON VOL.
MODE
briefly press
button
MODE
briefly press
button
fig. 25
SERVICE
F0Q3247g
TRIP B DATA DIMMER
EXIT MENU
PASSENGER AIRBAG
NederlandsBriefly press button MODEto start surfing from the standard screen.
To surf the menu use buttons Õor Ô. Note For safety reasons, when
the car is running, it is possible to access only the reduced menu (for
setting “Dimmer” and “Speed Beep”). When the car is stationary access
to the whole menu is enabled. On cars provided with Connect Nav+
many functions are displayed on the navigator display.
(*) Turbo versions
023-036 BRAVO GB 10-05-2007 10:05 Pagina 26
Page 29 of 246

28
SAFETY
DEVICES
CORRECT USE
OF THE CAR
WARNING
LIGHTS AND
MESSAGES
IN AN
EMERGENCY
CAR
MAINTENANCE
TECHNICAL
SPECIFICATIONS
INDEX
DASHBOARD
AND CONTROLS
Headl. sensor
(Automatic headlight sensor
sensitivity adjustment)
(where provided)
With this function it is possible to adjust
the light sensor sensitivity according to 3
levels (level 1 = min. level, level 2 = av-
erage level, level 3 = max. level); the high-
er the sensitivity is, the lower is the ex-
ternal light intensity required to switch on
the lights.
To set the light level required, proceed as
follows:
– briefly press button MODE, the previ-
ously set level will flash on the display;
– press button
Õor Ôto select the re-
quired level;
– briefly press button MODEto go back
to the menu screen or press the button
for long to go back to the standard screen
without storing settings.Trip B data (Trip On/Off)
Through this option it is possible to acti-
vate (On) or deactivate (Off) the Trip B
(partial trip).
For further information see “Trip com-
puter”.
For activation / deactivation, proceed as
follows:
– briefly press button MODE: On or Off
will flash on the display according to pre-
vious setting;
– press button
Õor Ôto select the re-
quired level;
– briefly press button MODEto go back
to the menu screen or press the button
for long to go back to the standard screen
without storing settings.Set time (Setting the clock)
This function enables to set the clock
through two sub-menus: “Time” and
“Mode”.
Proceed as follows:
– briefly press button MODE, the display
will show the two submenus “Time” and
“Mode”;
– press button
Õor Ôto scroll the two
submenus;
– select the required submenu and then
press briefly MODE;
– if selecting “Time”: briefly press button
MODE, “hours” will flash on the display;
– press button
Õor Ôfor setting;
– press button MODE, “minutes” will
flash on the display;
– press button
Õor Ôfor setting.
023-036 BRAVO GB 10-05-2007 10:05 Pagina 28
Page 50 of 246
49
SAFETY
DEVICES
CORRECT USE
OF THE CAR
WARNING
LIGHTS AND
MESSAGES
IN AN
EMERGENCY
CAR
MAINTENANCE
TECHNICAL
SPECIFICATIONS
INDEX
DASHBOARD
AND CONTROLS
F0Q0611mfig. 44
AUTOMATIC
TWO-ZONE CLIMATE
CONTROL SYSTEM
(where provided)
DESCRIPTION
The car is fitted with a two-zone climate
control system which makes it possible to
separately adjust the air temperature on
the driver’s side and on the passenger’s
side.
The system is fitted with the AQS func-
tion (Air Quality System) that turns on in-
side air recirculation automatically when
the antipollution sensor detects the pres-
ence of outside polluted air (for example
when driving in the city, queues and tun-
nels).
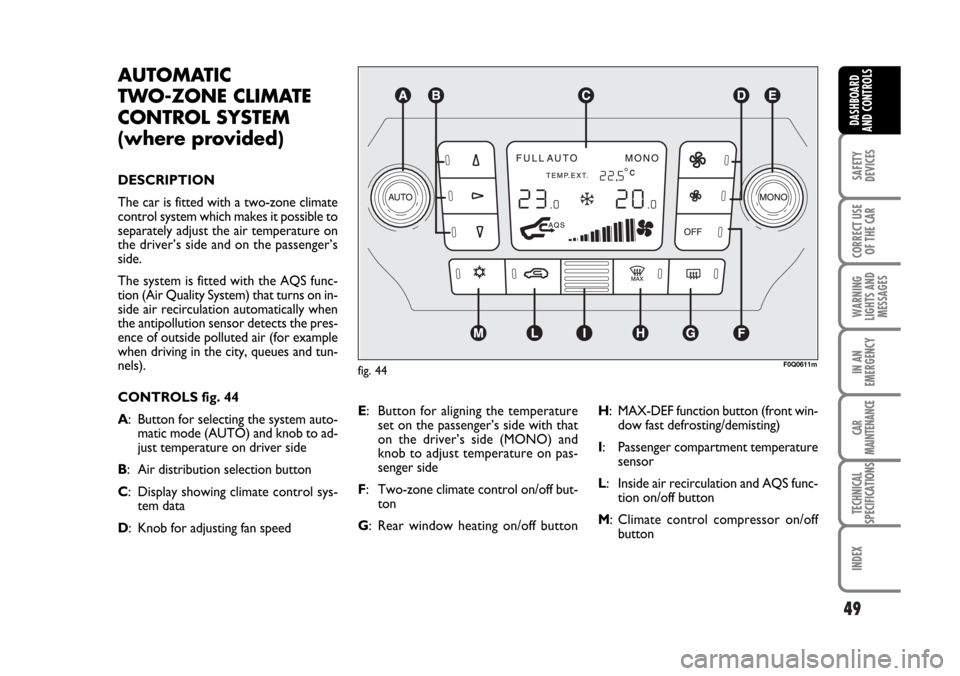
CONTROLS fig. 44
A: Button for selecting the system auto-
matic mode (AUTO) and knob to ad-
just temperature on driver side
B: Air distribution selection button
C: Display showing climate control sys-
tem data
D: Knob for adjusting fan speedE: Button for aligning the temperature
set on the passenger’s side with that
on the driver’s side (MONO) and
knob to adjust temperature on pas-
senger side
F: Two-zone climate control on/off but-
ton
G: Rear window heating on/off buttonH: MAX-DEF function button (front win-
dow fast defrosting/demisting)
I: Passenger compartment temperature
sensor
L: Inside air recirculation and AQS func-
tion on/off button
M: Climate control compressor on/off
button
037-056 BRAVO GB 10-05-2007 9:00 Pagina 49
Page 57 of 246
56
SAFETY
DEVICES
CORRECT USE
OF THE CAR
WARNING
LIGHTS AND
MESSAGES
IN AN
EMERGENCY
CAR
MAINTENANCE
TECHNICAL
SPECIFICATIONS
INDEX
DASHBOARD
AND CONTROLS
AUTOMATIC HEADLIGHTS
SENSOR (daylight sensor) fig. 48
(where provided)
It detects the changes of the external light
intensity of the car according to the light
sensitivity set: greater is the sensitivity,
smaller is the amount of external light nec-
essary to control the switching-on of the
exterior headlights. The daylight sensor
sensitivity can be adjusted with the “Set-
up Menu” of the instrument panel.
Activation
Turn the knurled ring to
2A: in this way,
the automatic activation of the side/tail-
lights and dipped beam headlights are si-
multaneously enabled according to the ex-
ternal luminosity.
During the sensor operation lights can on-
ly be made flashing.
Deactivation
As a result of the sensor deactivation, the
main beam headlights will switch off and,
after about 10 seconds, sidelights will
switch off too.
The light sensor is not able to detect the
fog presence, lights shall therefore be
switched on manually.
fig. 48F0Q0652m
“Cornering lights”
With low beams on at a speed of less than
40 km/h, when the steering wheel is
turned through a large angle or upon ac-
tivation of the direction indicator, a light
(incorporated in the fog lamp) will come
on to expand the angle of night-time visi-
bility on the side to which the vehicle is
turned.
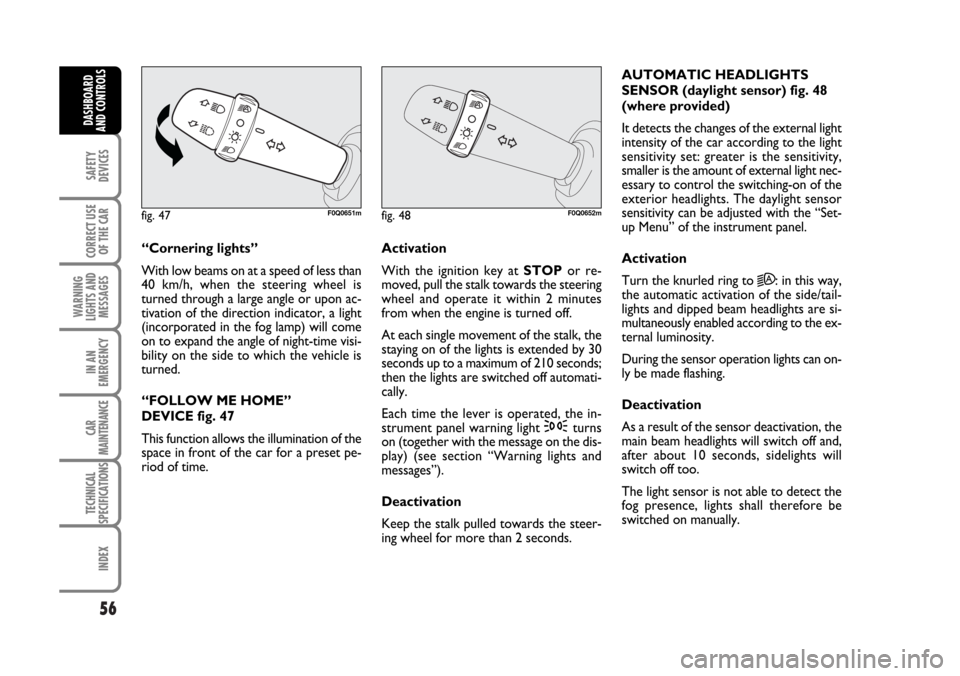
“FOLLOW ME HOME”
DEVICE fig. 47
This function allows the illumination of the
space in front of the car for a preset pe-
riod of time.Activation
With the ignition key at STOPor re-
moved, pull the stalk towards the steering
wheel and operate it within 2 minutes
from when the engine is turned off.
At each single movement of the stalk, the
staying on of the lights is extended by 30
seconds up to a maximum of 210 seconds;
then the lights are switched off automati-
cally.
Each time the lever is operated, the in-
strument panel warning light
3turns
on (together with the message on the dis-
play) (see section “Warning lights and
messages”).
Deactivation
Keep the stalk pulled towards the steer-
ing wheel for more than 2 seconds.
fig. 47F0Q0651m
037-056 BRAVO GB 10-05-2007 9:00 Pagina 56
Page 59 of 246
58
SAFETY
DEVICES
CORRECT USE
OF THE CAR
WARNING
LIGHTS AND
MESSAGES
IN AN
EMERGENCY
CAR
MAINTENANCE
TECHNICAL
SPECIFICATIONS
INDEX
DASHBOARD
AND CONTROLS
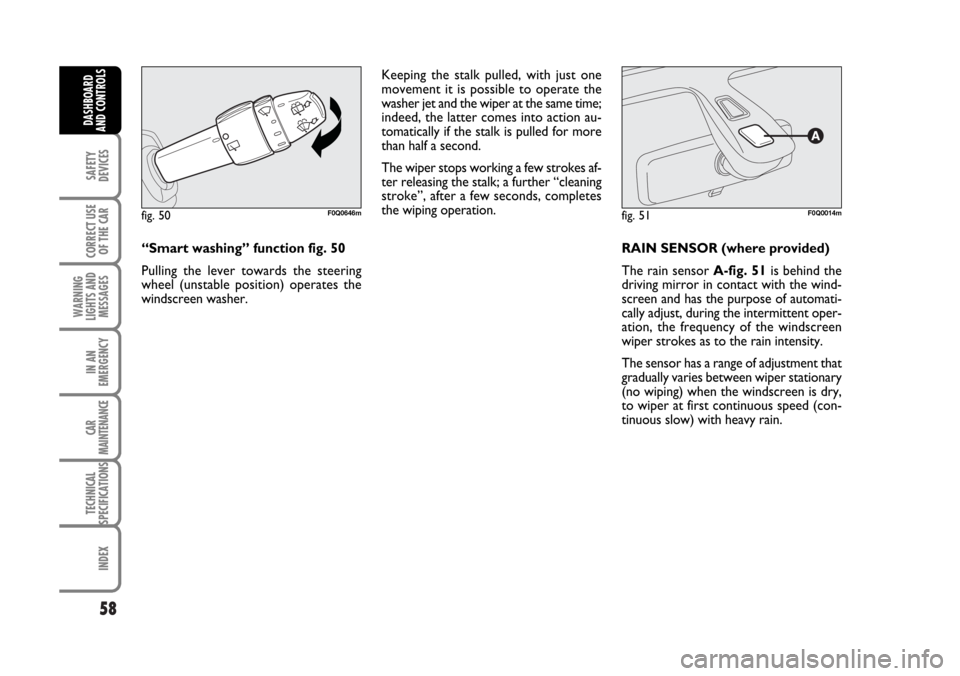
“Smart washing” function fig. 50
Pulling the lever towards the steering
wheel (unstable position) operates the
windscreen washer.Keeping the stalk pulled, with just one
movement it is possible to operate the
washer jet and the wiper at the same time;
indeed, the latter comes into action au-
tomatically if the stalk is pulled for more
than half a second.
The wiper stops working a few strokes af-
ter releasing the stalk; a further “cleaning
stroke”, after a few seconds, completes
the wiping operation.
RAIN SENSOR (where provided)
The rain sensor A-fig. 51is behind the
driving mirror in contact with the wind-
screen and has the purpose of automati-
cally adjust, during the intermittent oper-
ation, the frequency of the windscreen
wiper strokes as to the rain intensity.
The sensor has a range of adjustment that
gradually varies between wiper stationary
(no wiping) when the windscreen is dry,
to wiper at first continuous speed (con-
tinuous slow) with heavy rain.
fig. 50F0Q0646mfig. 51F0Q0014m
057-082 BRAVO GB 10-05-2007 9:09 Pagina 58