FIAT DOBLO COMBI 2016 2.G Workshop Manual
Manufacturer: FIAT, Model Year: 2016, Model line: DOBLO COMBI, Model: FIAT DOBLO COMBI 2016 2.GPages: 298, PDF Size: 25.92 MB
Page 51 of 298
AUTOMATIC CLIMATE CONTROL SYSTEM
(for versions/markets, where provided).
CONTROLS
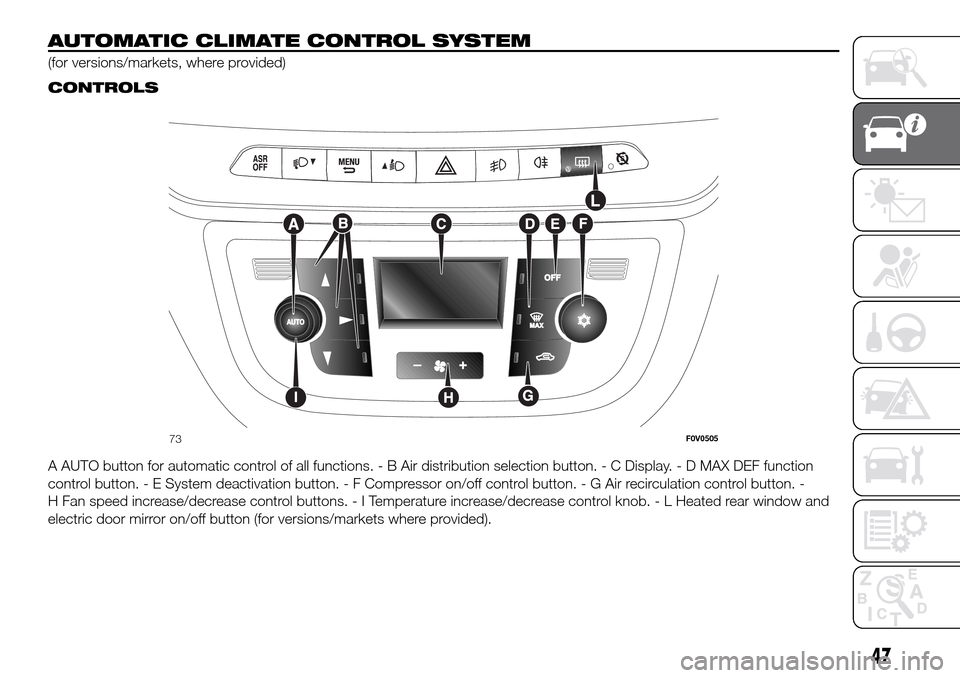
A AUTO button for automatic control of all functions. - B Air distribution selection button. - C Display. - D MAX DEF function
control button. - E System deactivation button. - F Compressor on/off control button. - G Air recirculation control button. -
H Fan speed increase/decrease control buttons.-ITemperature increase/decrease control knob. - L Heated rear window and
electric door mirror on/off button (for versions/markets where provided).
73F0V0505
47
Page 52 of 298
INTRODUCTION
The automatic climate control system
adjusts the temperature, the quantity
and the distribution of the air in the
passenger compartment. The
temperature control is based on the
"equivalent temperature": in other
words, the system continuously works
to keep the comfort level inside the
vehicle constant and to compensate for
possible variations in outside
conditions, including the sun's rays
detected by a dedicated sensor. The
automatically controlled parameters
and functions are:
air temperature at the vents;
air distribution at the vents;
fan speed (continuous variation of
the air flow);
compressor activation (for
cooling/dehumidifying the air);
air recirculation.
All functions may be changed manually.
In other words, you may select one or
more functions and change the
parameters as required. Automatic
control of the manually changed
functions will be suspended: the
system will override your settings only
for safety-related reasons (e.g. risk
of misting).Manual selections will always take
priority over automatic settings and will
be stored until the user switches the
system back to automatic operation by
pressing the AUTO button again except
for the cases in which the system will
intervene for particular, safety-related
reasons. You can adjust one function
manually without affecting the
automatic control of the others.
The temperature of the air sent is
always controlled automatically,
depending on the temperature set in
the display (except when the system is
off or in certain conditions when the
compressor is switched off).
The system allows the following
parameters and functions to be set or
altered manually: air temperature,
fan speed (continuous variation); air
distribution in seven positions;
compressor enablement; fast
defrosting/demisting function; air
recirculation; switching off the system.USING THE CLIMATE
CONTROL SYSTEM
The system can be started in different
ways, but it is advisable to start by
pressing the AUTO button and then
turning the knob to set the temperature
required on the display. The system
will start running automatically in this
way and the set temperature will be
reached as quickly as possible. The
system will adjust the temperature, the
quantity and the distribution of the air
introduced into the passenger
compartment and will manage the
recirculation function and the
compressor engagement. During fully
automatic operation, the only manual
intervention required is the possible
activation of the following functions:
air recirculation, to keep the
function always either on or off;
to speed up demisting/
defrosting of windscreen, rear window
and external rear view mirrors.
During fully automatic system
operation, you can change the set
temperature, air distribution and fan
speed at any time by using the relevant
buttons or knobs: the system will
automatically change its settings to
adjust to the new requirements.
48
KNOWING YOUR CAR
Page 53 of 298
During fully automatic operation (FULL
AUTO), the word FULL will disappear
if the air distribution and/or flow rate
and/or engagement of the compressor
and/or recirculation settings are
changed. In this way, the functions will
switch from automatic to manual
control until the AUTO button is
pressed again. With one or more
functions turned on manually,
the adjustment of the intake air
temperature continues to be managed
automatically, except with the
compressor switched off: if this is the
case, the temperature of the air sent
into the passenger compartment
cannot be lower than that of the
outside air.
CONTROLS
Air temperature adjustment knob (I)
Turn the knob either clockwise or
anticlockwise to increase or lower the
requested temperature in the
passenger compartment.
The set temperature is shown on the
display.
Turn the knob either fully to the right or
fully to the left to the extreme HI or
LO position to turn the maximum
heating or maximum cooling functions
on:
HI function (maximum heating):select by turning the temperature knob
clockwise beyond the maximum value
(32°C).
This function may be used to heat up
the passenger compartment exploiting
the system potential to the maximum.
In this condition, the system stops
controlling the temperature
automatically and sets the air mixing to
maximum heating. The air speed and
distribution are fixed.
In particular, if the heating fluid is not
sufficiently hot, the maximum fan speed
does not come on straight away in
order to limit the intake of insufficiently
hot air to the passenger compartment.
All manual settings will be allowed when
this function is on.
To switch the function off, simply turn
the temperature knob anticlockwise
and set the required temperature.
LO function (maximum cooling):
select by turning the temperature knob
anticlockwise beyond the minimum
value (16°C).This function may be used to cool
down the passenger compartment by
exploiting the system's potential to
the full. In this condition, the system
stops controlling the temperature
automatically and sets the air mixing to
maximum cooling. The air speed and
distribution are fixed. All manual
settings will be allowed when this
function is on.
To switch the function off, simply turn
the temperature knob clockwise and
set the required temperature.
Air distribution buttons (B)
By pressing these buttons, it is possible
to set one of the 5 possible air
distributions manually:
Air flow to the windscreen and
front side window vents to demist
or defrost them.
Air flow at central and side
dashboard vents to ventilate the
chest and the face during the hot
season.
Air flow to the front and rear
footwell vents. Thanks to the
natural tendency of hot air to rise,
this distribution pattern allows
the passenger compartment to
warm up as quickly as possible,
providing an immediate feeling of
warmth.
49
Page 54 of 298
Air flow distributed between
footwell diffusers (hotter air)
and central and side
dashboard vents (cooler air).
This distribution mode is
particularly useful in spring and
autumn on sunny days.
Air flow distributed between
the footwell vents and the
windscreen and front
side window defrosting/
demisting vents. This allows an
adequate warming of the
passenger compartment and
prevents the windows from
misting up.
The distribution set is shown by the
corresponding LEDs in the selected
buttons coming on.
To restore automatic control of the air
distribution after a manual selection,
press the AUTO button.
Fan speed adjustment buttons (H)
Press the H button at its ends to
increase or to decrease the fan speed
and therefore the amount of air sent
into the passenger compartment,
though the required temperature
remains set.
The fan speed is shown by the lit bars
on the display:
Maximum fan speed = all the bars lit
up
Minimum fan speed = one bar lit up.
The fan can only be excluded if the
climate control system compressor has
been switched off by pressing the F
button fig. 73.
IMPORTANT To restore automatic fan
speed control after a manual
adjustment, press the AUTO button.
IMPORTANT At high vehicle speeds,
the dynamic effect may increase the
flow of air into the passenger
compartment which in this case will not
directly correspond to the fan speed
bar display.
AUTO button (A) (automatic
operation)
Press AUTO to make the system
automatically adjust the quantity and
distribution of the air introduced into the
passenger compartment. All previous
manual settings will be cancelled.
The message FULL AUTO will appear
on the front display in this condition.
By manually adjusting at least one
of the functions automatically managed
by the system (air recirculation, air
distribution, fan speed or switching off
the compressor), the word FULL will
disappear from the display, indicating
that the system is no longer
automatically controlling all the
functions (the temperature will still be
controlled automatically).IMPORTANT Should the system (after
manual intervention) no longer be
able to guarantee the target
temperature for the passenger
compartment, the set temperature
value will start flashing to indicate the
difficulties the system is experiencing
and then the word AUTO will go out.
To restore system automatic control at
any time, after one or more manual
adjustments, press the AUTO button.
Air recirculation on/off button (G)
The air recirculation is managed
according to the following operating
logic:
override on (inside air recirculation
always on), indicated by the LED on
button G and the
symbol on the
display;
override off (air recirculation
constantly off with air intake from the
outside), signalled by the LED in the
button switching off and by the
symbol in the display disappearing.
These operating conditions are
obtained by pressing air recirculation
button G in sequence.
IMPORTANT The engagement of the air
recirculation system makes it possible
to reach the required heating or cooling
conditions faster.
50
KNOWING YOUR CAR
Page 55 of 298
It is however inadvisable to use it on
rainy/cold days as it would considerably
increase the possibility of the windows
misting inside, especially if the climate
control compressor is off.
To prevent the windows from misting
up, the recirculation is forced off (i.e. air
is drawn in from the outside) when
the outside temperature is cold.
It is advisable not to use the air
recirculation function when the outside
temperature is low to prevent the
windows from rapidly misting up.
Climate control compressor
enablement/off button (F)
Press button
to switch the climate
control compressor off (if on). The icon
on the display will go out.
Press the button when the LED is off to
automatically restore system control
and use of the compressor. The icon
will light up in the display in this case.
The system will switch recirculation
off when the compressor is switched off
to prevent windows from misting up.
Although the system is capable of
maintaining the required temperature,
the word FULL will disappear from
the display. If, on the other hand, it is no
longer capable of maintaining the
temperature, the letters flash and the
word AUTO goes out.IMPORTANT With the compressor off, it
is not possible to introduce air cooler
than ambient temperature into the
passenger compartment. Furthermore,
in certain conditions, the windows
could mist up rapidly because the air is
not dehumidified.
The system remembers that the
compressor has been switched off,
even after the engine has stopped.
To restore automatic compressor
control, press the
button again (in
this case, the system will only work as a
heater) or press the AUTO button.
With the compressor switched off, if the
outside temperature is higher than the
one set, the system is not capable
of satisfying this request and signals it
by the digits for the temperature setting
flashing after which the word AUTO
goes out.
With the climate control compressor
off, the fan speed can be set to zero
manually (no bar shown).
With the compressor enabled and the
engine started, the fan speed may
be reduced to the minimum setting
(only one bar shown).Button for rapid window demisting/
defrosting (D)
Pressing this button, the climate control
system will automatically switch on all
the functions required for fast
windscreen and front side window
demisting/defrosting:
switches on climate control
compressor when climatic conditions
are suitable;
sets air recirculation off;
sets maximum air temperature HI in
both areas;
sets the fan speed according to the
engine coolant temperature to limit
the flow of air that is not sufficiently
warm to demist the windows;
directs air flow to windscreen and
front side windows vents;
sets heated rear window on.
IMPORTANT The rapid demisting/
defrosting function for the windows
remains on for about 3 minutes from
when the engine coolant reaches the
appropriate temperature for a rapid
demisting of the windows.
When this function is active, the LED on
the corresponding button and the one
on the heated rear window button
switch on. The message FULL AUTO
goes off on the display.
51
Page 56 of 298
You can only adjust the fan speed and
switch off the heated rear window
manually when this function is active.
To restore the previous operating
conditions, simply press button B, air
recirculation button G, compressor
button F or AUTO button A.
Heated rear window and door
mirrors electric control demisting/
defrosting button (L)
(for versions/markets, where provided)
Push this button to activate the
demisting/defrosting of the heated rear
window and electric door mirrors
When this function is active, the button
LED is on.
This function switches off automatically
after about 20 minutes or when you
push the button again, or when the
engine is turned off. It will not be
switched on automatically when the
engine is restarted.
IMPORTANT Do not affix decals to the
inside of the heated rear window over
the heating filaments, to avoid damage
that might cause them to stop working
properly.
Switching the system OFF (E)
Press button E to switch the climate
control system off. The display will go
out.With the system off, the climate control
system conditions are as follows:
display off, temperature setting not
display, air recirculation on thereby
insulating the passenger compartment
from the outside (recirculation LED
on), climate control compressor off, fan
off. Press the AUTO button to switch
the climate control system back on
in full automatic mode.ELECTRIC WINDOWS
FRONT ELECTRIC
WINDOWS
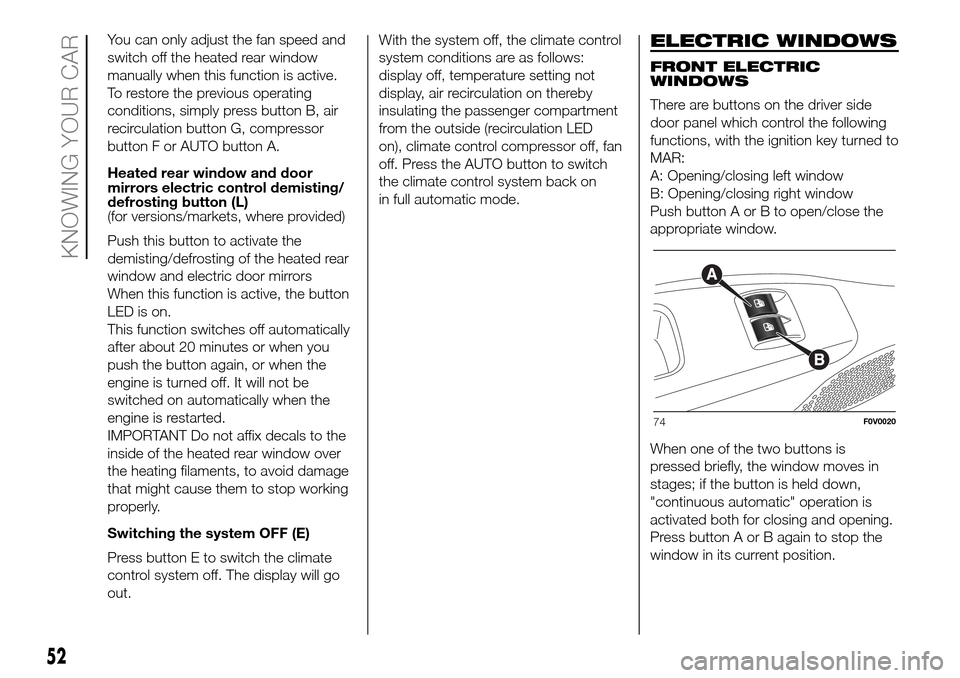
There are buttons on the driver side
door panel which control the following
functions, with the ignition key turned to
MAR:
A: Opening/closing left window
B: Opening/closing right window
Push button A or B to open/close the
appropriate window.
When one of the two buttons is
pressed briefly, the window moves in
stages; if the button is held down,
"continuous automatic" operation is
activated both for closing and opening.
Press button A or B again to stop the
window in its current position.
74F0V0020
52
KNOWING YOUR CAR
Page 57 of 298
The electric windows are fitted with a
security system (where provided) that
can detect the presence of an obstacle
whilst the window is closing; when
this happens, the system kicks in and
the movement of the glass is
immediately reversed.
IMPORTANT In the event that the
anti-crushing function is activated 5
times in only 1 minute, the system will
automatically enter the "recovery" mode
(self-protection). This condition is
apparent from the window closing in
stages.
If this occurs, restore the system as
follows:
open the windows.
If no malfunction is present, the window
returns to its normal operation
automatically.
IMPORTANT With the ignition key at
STOP or removed, the electric windows
remain activated for about two minutes
and are deactivated as soon as a
door is opened.
28) 29)
FRONT AND REAR
ELECTRIC WINDOWS
(for versions/markets, where provided)
Driver side door
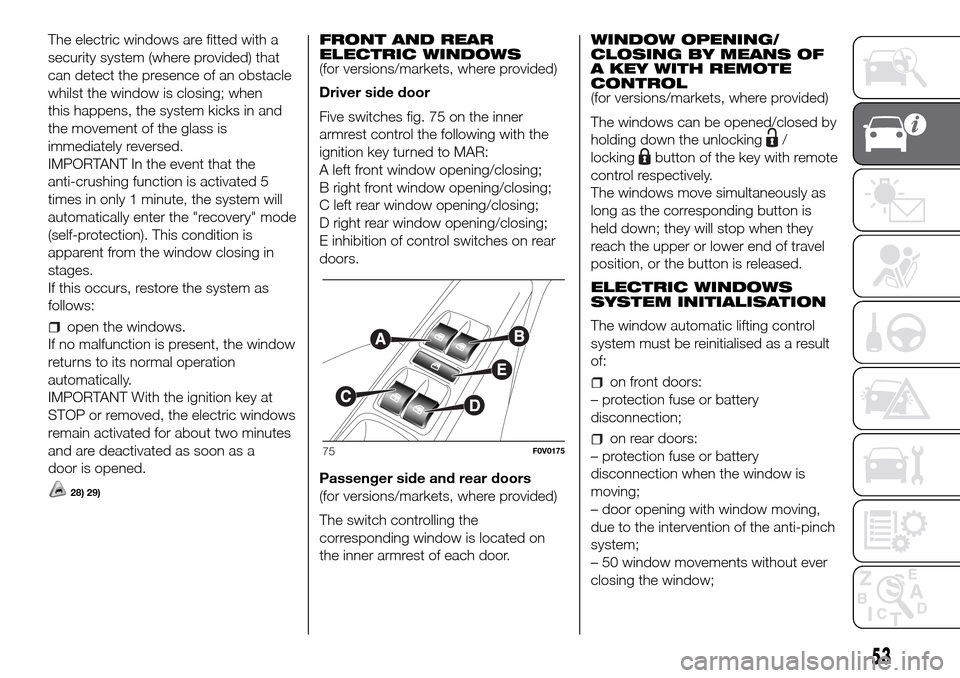
Five switches fig. 75 on the inner
armrest control the following with the
ignition key turned to MAR:
A left front window opening/closing;
B right front window opening/closing;
C left rear window opening/closing;
D right rear window opening/closing;
E inhibition of control switches on rear
doors.
Passenger side and rear doors
(for versions/markets, where provided)
The switch controlling the
corresponding window is located on
the inner armrest of each door.WINDOW OPENING/
CLOSING BY MEANS OF
A KEY WITH REMOTE
CONTROL
(for versions/markets, where provided)
The windows can be opened/closed by
holding down the unlocking
/
locking
button of the key with remote
control respectively.
The windows move simultaneously as
long as the corresponding button is
held down; they will stop when they
reach the upper or lower end of travel
position, or the button is released.
ELECTRIC WINDOWS
SYSTEM INITIALISATION
The window automatic lifting control
system must be reinitialised as a result
of:
on front doors:
– protection fuse or battery
disconnection;
on rear doors:
– protection fuse or battery
disconnection when the window is
moving;
– door opening with window moving,
due to the intervention of the anti-pinch
system;
– 50 window movements without ever
closing the window;75F0V0175
53
Page 58 of 298
– 3 door opening movements, with
moving window, without ever closing
the window.
Proceed as follows for the initialisation:
1. completely close the driver's door
window, keeping the operating button
pressed for at least 5 seconds after the
(upper) end of travel position
2. proceed in the same way on the
passenger's side door button and on
the buttons of rear doors.
WARNING
28)Incorrect use of the electric windows
may be dangerous. Before and during their
operation, ensure that any passengers
are not at risk from the moving glass either
by personal objects getting caught in the
mechanism or by being hit by it directly.
29)When leaving the vehicle, always
remove the ignition key to avoid the risk of
injury due to accidental operation of the
electric windows.
CONTROLS
FOG LIGHTS
(for versions/markets, where provided)
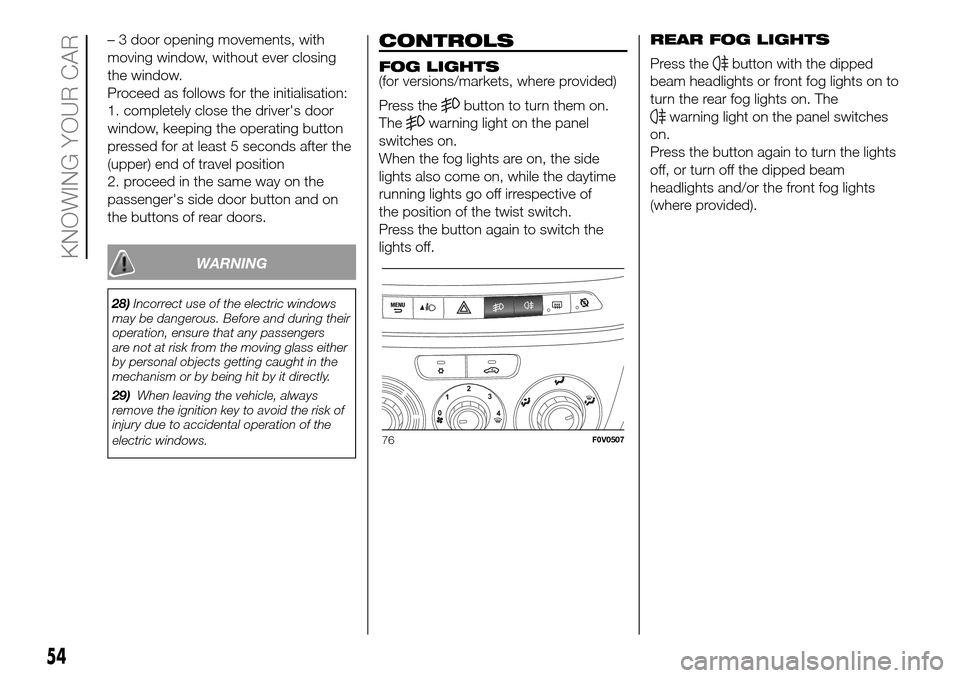
Press the
button to turn them on.
The
warning light on the panel
switches on.
When the fog lights are on, the side
lights also come on, while the daytime
running lights go off irrespective of
the position of the twist switch.
Press the button again to switch the
lights off.REAR FOG LIGHTS
Press the
button with the dipped
beam headlights or front fog lights on to
turn the rear fog lights on. The
warning light on the panel switches
on.
Press the button again to turn the lights
off, or turn off the dipped beam
headlights and/or the front fog lights
(where provided).
76F0V0507
54
KNOWING YOUR CAR
Page 59 of 298
BONNET
Opening
Proceed as follows:
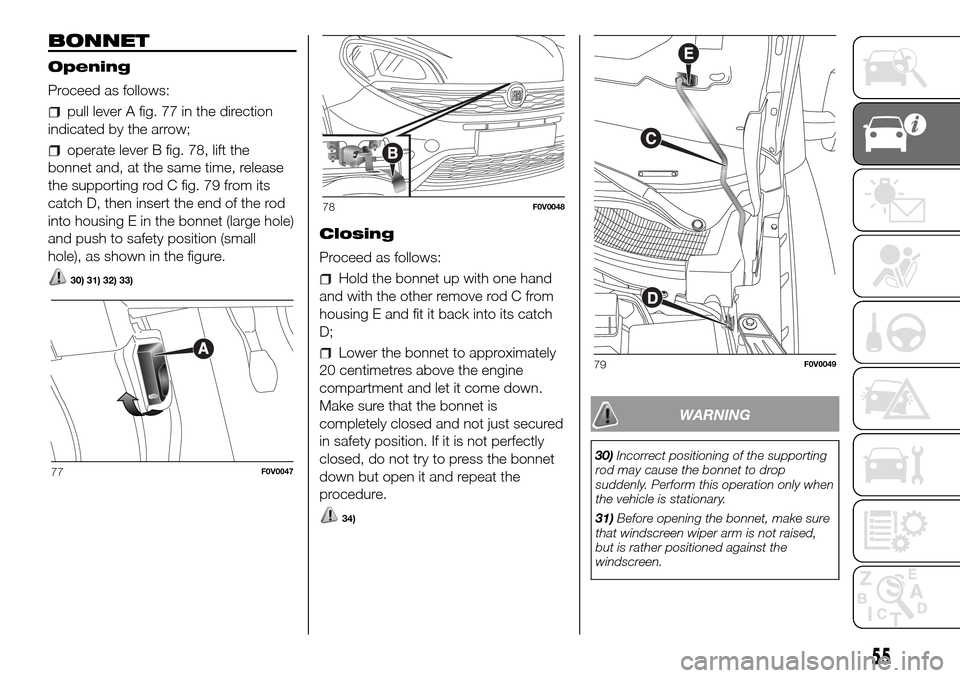
pull lever A fig. 77 in the direction
indicated by the arrow;
operate lever B fig. 78, lift the
bonnet and, at the same time, release
the supporting rod C fig. 79 from its
catch D, then insert the end of the rod
into housing E in the bonnet (large hole)
and push to safety position (small
hole), as shown in the figure.
30) 31) 32) 33)
Closing
Proceed as follows:
Hold the bonnet up with one hand
and with the other remove rod C from
housing E and fit it back into its catch
D;
Lower the bonnet to approximately
20 centimetres above the engine
compartment and let it come down.
Make sure that the bonnet is
completely closed and not just secured
in safety position. If it is not perfectly
closed, do not try to press the bonnet
down but open it and repeat the
procedure.
34)
WARNING
30)Incorrect positioning of the supporting
rod may cause the bonnet to drop
suddenly. Perform this operation only when
the vehicle is stationary.
31)Before opening the bonnet, make sure
that windscreen wiper arm is not raised,
but is rather positioned against the
windscreen.77F0V0047
78F0V0048
79F0V0049
55
Page 60 of 298
32)When the engine is warm, work
carefully inside the engine compartment to
avoid getting burnt. Do not place your
hands near the fan as it may be activated
even when the key is removed. Wait for the
engine to cool down.
33)Pay attention to scarves, ties and other
loose-fitting garments. If they accidentally
come into contact with moving parts,
they may get caught up and dragged with
serious risks for those wearing them.
34)For safety reasons, the bonnet must
always be properly closed while driving.
Make sure that the bonnet is perfectly
closed and that the lock is engaged. If you
notice when driving that the bonnet has
not been properly locked, stop immediately
and close the bonnet correctly.BOOT
35) 36) 37) 38) 39) 40)
OPENING/CLOSING THE
BOOT FROM THE
OUTSIDE
The tailgate (when unlocked) can only
be opened from the outside of the
vehicle using the electric opening
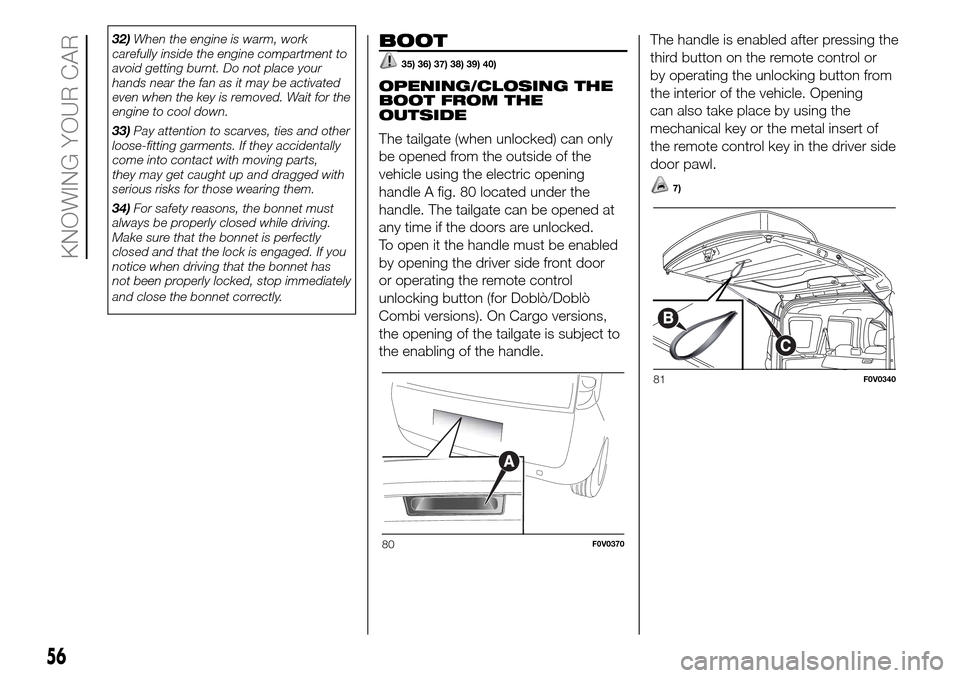
handle A fig. 80 located under the
handle. The tailgate can be opened at
any time if the doors are unlocked.
To open it the handle must be enabled
by opening the driver side front door
or operating the remote control
unlocking button (for Doblò/Doblò
Combi versions). On Cargo versions,
the opening of the tailgate is subject to
the enabling of the handle.The handle is enabled after pressing the
third button on the remote control or
by operating the unlocking button from
the interior of the vehicle. Opening
can also take place by using the
mechanical key or the metal insert of
the remote control key in the driver side
door pawl.
7)
80F0V0370
81F0V0340
56
KNOWING YOUR CAR