spare wheel FIAT DOBLO COMBI 2018 Owner handbook (in English)
[x] Cancel search | Manufacturer: FIAT, Model Year: 2018, Model line: DOBLO COMBI, Model: FIAT DOBLO COMBI 2018Pages: 272, PDF Size: 23.75 MB
Page 114 of 272
The cold tyre inflation pressure must
not exceed the maximum inflation
pressure value printed on the side of
the tyre.
NOTE
The TPMS does not replace the
normal tyre maintenance service and
does not indicate any fault in a tyre.
Therefore, the TPMS should not be
used as pressure switch while adjusting
the tyre inflation pressure.
Driving with insufficient tyre pressure
causes their overheating and can
result in tyre failure. The low inflation
pressure reduces fuel efficiency and
tyre tread life and may also affect
handling and braking performance of
the vehicle.
The TPMS does not replace the
correct tyre maintenance. It is up to the
driver to maintain the correct tyre
pressure level measuring it with
a suitable pressure switch. This is
necessary even if the decrease in the
inflation pressure value does not cause
the tyre pressure control warning light
to switch on.
The TPMS warns the driver of any
condition of insufficient tyre pressure. If
this drops below the insufficient
pressure limit for any reason including
low temperature and normal pressure
loss of the tyre.
The seasonal temperature changes
affect tyre pressure.
IMPORTANT Monitoring and
maintaining the correct pressure in all
four tyres are particularly important.
Tyre pressure monitoring system
low pressure warning
IMPORTANT In the case of deflation of
more than one tyre sequentially, without
switching off and on the engine, from
the second tyre involved the acoustic
signal is not activated, only the
dedicated signal is shown on the
display.
To prevent the signal from being stored
in the event of pressure loss of a
subsequent tyre (with deactivation of
the acoustic signal), the ignition key
must be turned to MAR and then to
STOP, each time pressure is restored.
TPMS operation faults
The system fault is indicated by the
warning light
which first flashes for
75 seconds and then stays on steadily.
WARNING
101)The TPMS is optimised for the original
tyres and wheels provided. TPMS
pressures and alerts have been defined
according to the size of the tyres mounted
on the vehicle. Using equipment with
different size, type or kind may cause
irregular system operation or sensor
damage. Non-original spare wheels can
damage the sensor. Do not use tyre
sealant or balancing weights if the vehicle
is equipped with TPMS as these may
damage the sensors.
102)If the system signals a pressure
decrease on a specific tyre, it is
recommended to check the pressure on all
four tyres.
103)The TPMS does not relieve the driver
from the obligation to check the tyre
pressure every month; it is not even to be
considered a replacing system for
maintenance or a safety system
104)Tyre pressure must be checked with
tyres cold. Should it become necessary for
whatever reason to check pressure with
warm tyres, do not reduce pressure even
though it is higher than the prescribed
value, but repeat the check when tyres are
cold.
105)The TPMS cannot indicate sudden
tyre pressure drops (for example when
a tyre bursts). In this case, stop the vehicle,
braking with caution and avoiding abrupt
steering.
112
STARTING AND DRIVING
Page 136 of 272
REPLACING A
WHEEL
The vehicle is originally equipped with
the Fix&Go automatic quick tyre repair
kit (see instructions in the next section).
As an alternative, the vehicle may
have a normal-sized spare wheel.
Wheel changing and correct use of the
jack and spare wheel call for some
precautions, as listed below.
121) 122) 123) 124)
Note for one-way tyres
One-way tyres have a few arrows on
the side indicating the rotation direction.
If a wheel is changed (when punctured,
for example) the direction of the arrows
on the spare wheel tyre may not
coincide with the rotation direction of
the wheel to be replaced.
In these conditions, too, the tyre still
maintains its safety features.
Anyway, it is recommended to have the
wheel repaired and refitted as soon as
possible, as the best performance is
achieved when the rotation direction of
all tyres coincides with the one
indicated by the arrows.JACK
Please note that:
the jack weight is 4 kg;
the jack requires no adjustment;
the jack cannot be repaired and in
the event of a fault it must be replaced
by another genuine one;
no tool other than its cranking
device may be fitted on the jack.
WHEEL REPLACEMENT
PROCEDURE
To change a wheel, proceed as follows:
stop the vehicle in a position that is
not dangerous for oncoming traffic
where you can change the wheel safely.
The ground must be flat and sufficiently
compact;
switch off the engine and pull the
handbrake;
engage first gear or reverse;
wear the reflective safety jacket
(compulsory by law in certain countries)
before getting out of the vehicle;
indicate that the vehicle has broken
down using the devices required by
the law in the current country (e.g.
warning triangle, hazard lights, etc.);
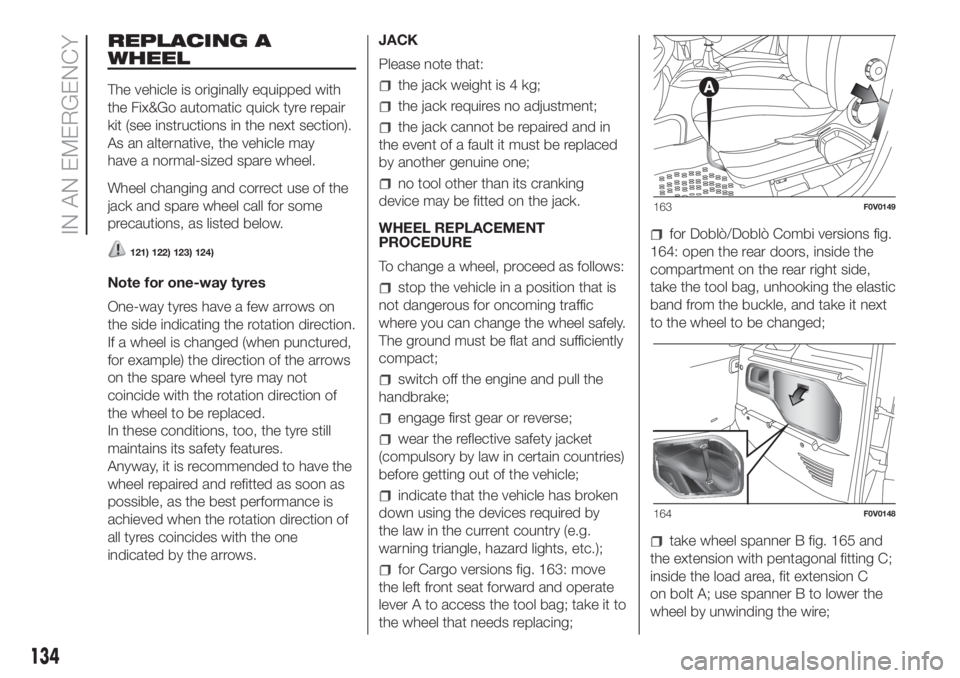
for Cargo versions fig. 163: move
the left front seat forward and operate
lever A to access the tool bag; take it to
the wheel that needs replacing;
for Doblò/Doblò Combi versions fig.
164: open the rear doors, inside the
compartment on the rear right side,
take the tool bag, unhooking the elastic
band from the buckle, and take it next
to the wheel to be changed;
take wheel spanner B fig. 165 and
the extension with pentagonal fitting C;
inside the load area, fit extension C
on bolt A; use spanner B to lower the
wheel by unwinding the wire;
163F0V0149
164F0V0148
134
IN AN EMERGENCY
Page 137 of 272
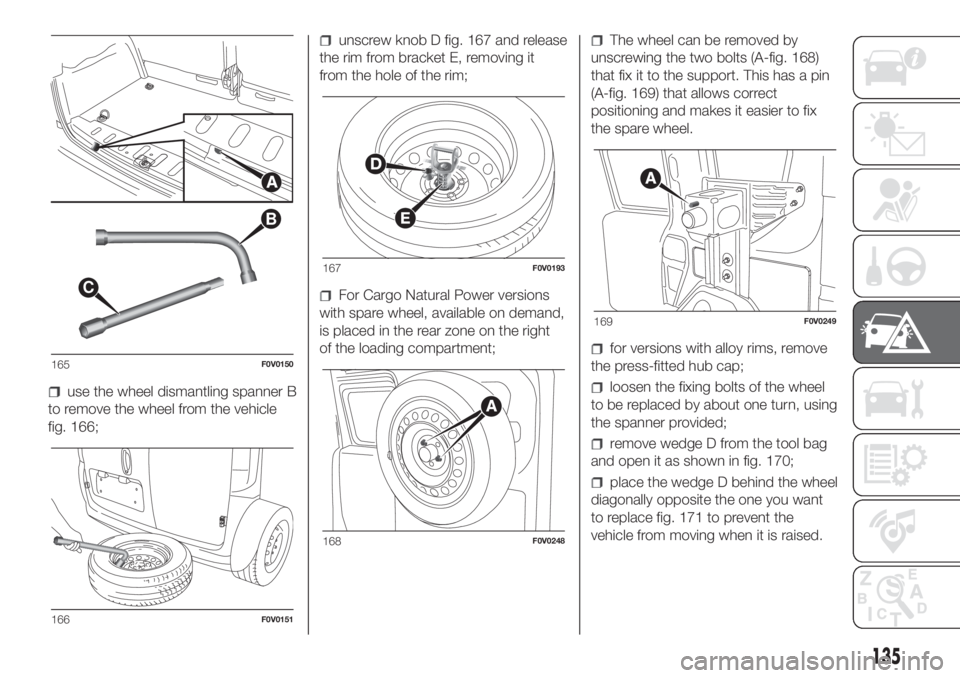
use the wheel dismantling spanner B
to remove the wheel from the vehicle
fig. 166;
unscrew knob D fig. 167 and release
the rim from bracket E, removing it
from the hole of the rim;
For Cargo Natural Power versions
with spare wheel, available on demand,
is placed in the rear zone on the right
of the loading compartment;
The wheel can be removed by
unscrewing the two bolts (A-fig. 168)
that fix it to the support. This has a pin
(A-fig. 169) that allows correct
positioning and makes it easier to fix
the spare wheel.
for versions with alloy rims, remove
the press-fitted hub cap;
loosen the fixing bolts of the wheel
to be replaced by about one turn, using
the spanner provided;
remove wedge D from the tool bag
and open it as shown in fig. 170;
place the wedge D behind the wheel
diagonally opposite the one you want
to replace fig. 171 to prevent the
vehicle from moving when it is raised.
B
C
165F0V0150
166F0V0151
167F0V0193
168F0V0248
169F0V0249
135
Page 138 of 272
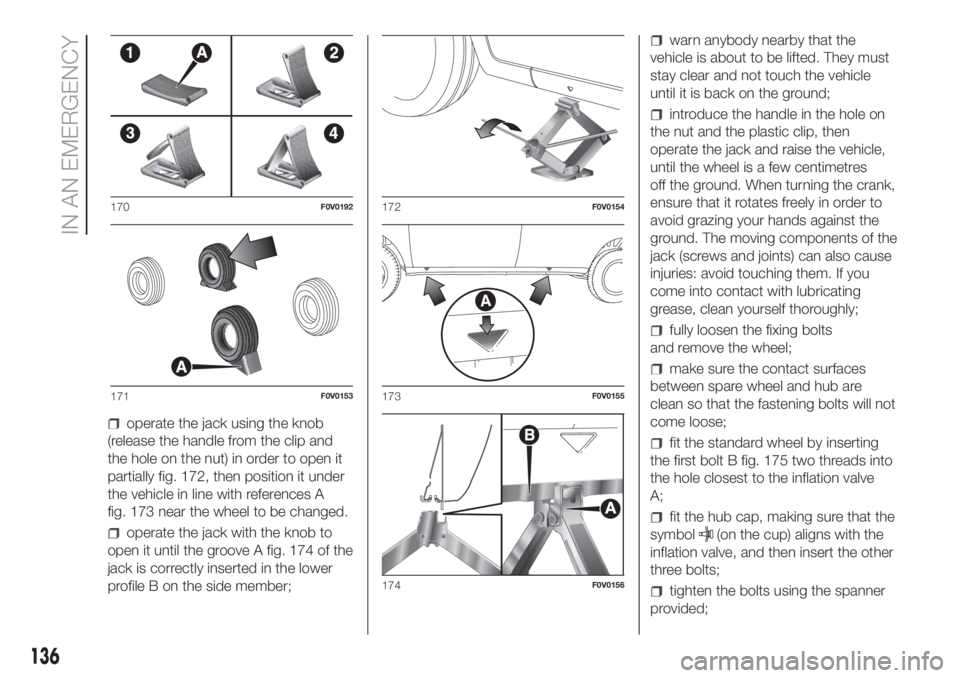
operate the jack using the knob
(release the handle from the clip and
the hole on the nut) in order to open it
partially fig. 172, then position it under
the vehicle in line with references A
fig. 173 near the wheel to be changed.
operate the jack with the knob to
open it until the groove A fig. 174 of the
jack is correctly inserted in the lower
profile B on the side member;
warn anybody nearby that the
vehicle is about to be lifted. They must
stay clear and not touch the vehicle
until it is back on the ground;
introduce the handle in the hole on
the nut and the plastic clip, then
operate the jack and raise the vehicle,
until the wheel is a few centimetres
off the ground. When turning the crank,
ensure that it rotates freely in order to
avoid grazing your hands against the
ground. The moving components of the
jack (screws and joints) can also cause
injuries: avoid touching them. If you
come into contact with lubricating
grease, clean yourself thoroughly;
fully loosen the fixing bolts
and remove the wheel;
make sure the contact surfaces
between spare wheel and hub are
clean so that the fastening bolts will not
come loose;
fit the standard wheel by inserting
the first bolt B fig. 175 two threads into
the hole closest to the inflation valve
A;
fit the hub cap, making sure that the
symbol
(on the cup) aligns with the
inflation valve, and then insert the other
three bolts;
tighten the bolts using the spanner
provided;
170F0V0192
171F0V0153
172F0V0154
173F0V0155
174F0V0156
136
IN AN EMERGENCY
Page 139 of 272
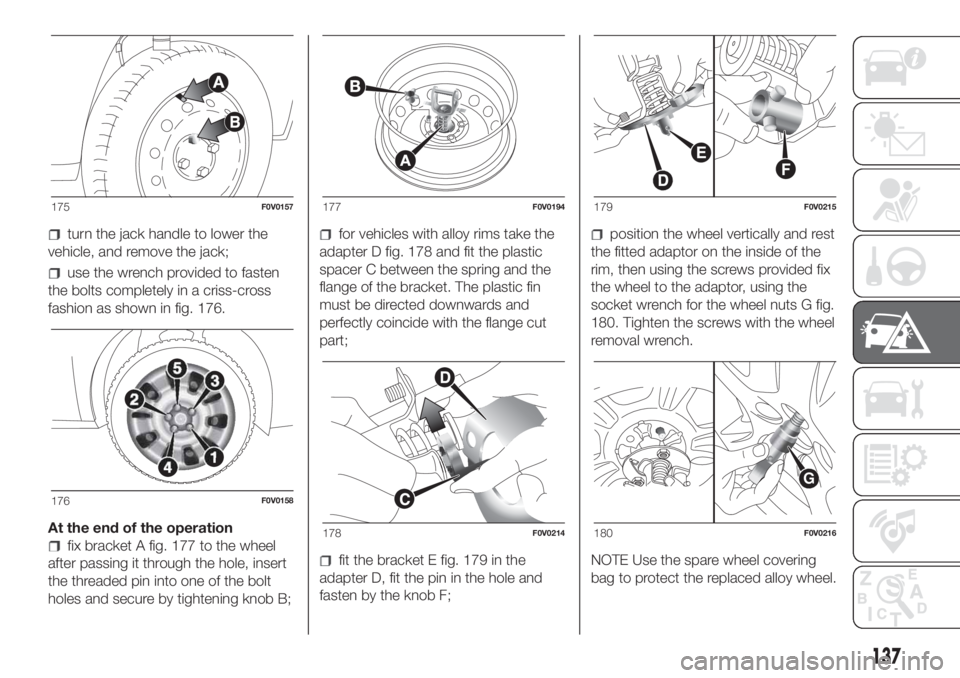
turn the jack handle to lower the
vehicle, and remove the jack;
use the wrench provided to fasten
the bolts completely in a criss-cross
fashion as shown in fig. 176.
At the end of the operation
fix bracket A fig. 177 to the wheel
after passing it through the hole, insert
the threaded pin into one of the bolt
holes and secure by tightening knob B;
for vehicles with alloy rims take the
adapter D fig. 178 and fit the plastic
spacer C between the spring and the
flange of the bracket. The plastic fin
must be directed downwards and
perfectly coincide with the flange cut
part;
fit the bracket E fig. 179 in the
adapter D, fit the pin in the hole and
fasten by the knob F;
position the wheel vertically and rest
the fitted adaptor on the inside of the
rim, then using the screws provided fix
the wheel to the adaptor, using the
socket wrench for the wheel nuts G fig.
180. Tighten the screws with the wheel
removal wrench.
NOTE Use the spare wheel covering
bag to protect the replaced alloy wheel.
175F0V0157
176F0V0158
177F0V0194
178F0V0214
179F0V0215
G
180F0V0216
137
Page 140 of 272
check that the position of the
replaced wheel under the platform is
correct (the lifting system is equipped
with a clutch to limit the end of the
stroke, incorrect positioning may
jeopardise safety;)
put the jack and the tools back in
the dedicated tool bag;
reposition the tool bag behind the
left side seat (Cargo versions) or, resting
the bottom of the bag against the side
panel, in the compartment inside the
rear right side (Doblò/Doblò Combi
versions).
WARNING
121)The spare wheel (where provided) is
specifically for your vehicle. Therefore, it
must not be used on other models. Do not
use spare wheels of other models on
your vehicle. The spare wheel must be
used only in an emergency. Use of the
spare wheel must kept to the minimum
necessary.122)Use your hazard lights, warning
triangle, etc to show that your vehicle is
stationary. Passengers should get out
of the vehicle, particularly if it is heavily
loaded, and wait for the wheel to be
changed away from the traffic. If you are on
a slope or uneven surface, place wedges
or other suitable objects under the wheels
to secure the vehicle. Have the wheel
repaired and refitted as soon as possible.
Do not apply grease to the bolt threads
before fitting: they could come unscrewed.
123)Use the jack only to replace wheels
on the vehicle with which it is supplied
or on other vehicles of the same model.
Never use the jack for other purposes,
such as lifting other models. Never use the
jack to carry out repairs under the vehicle.
Incorrect positioning of the jack may cause
the lifted vehicle to fall. Do not use the
jack for loads higher than the one shown
on its label.
124)Incorrect hub cap assembly may
cause it to come off when the vehicle is
moving. Never tamper with the inflation
valve. Never introduce tools of any kind
between rim and tyre. Check tyre and
space-saver wheel pressures regularly,
complying with the values given in the
"Technical specifications" chapter.
FIX&GO AUTOMATIC
KIT
125) 126)
37)
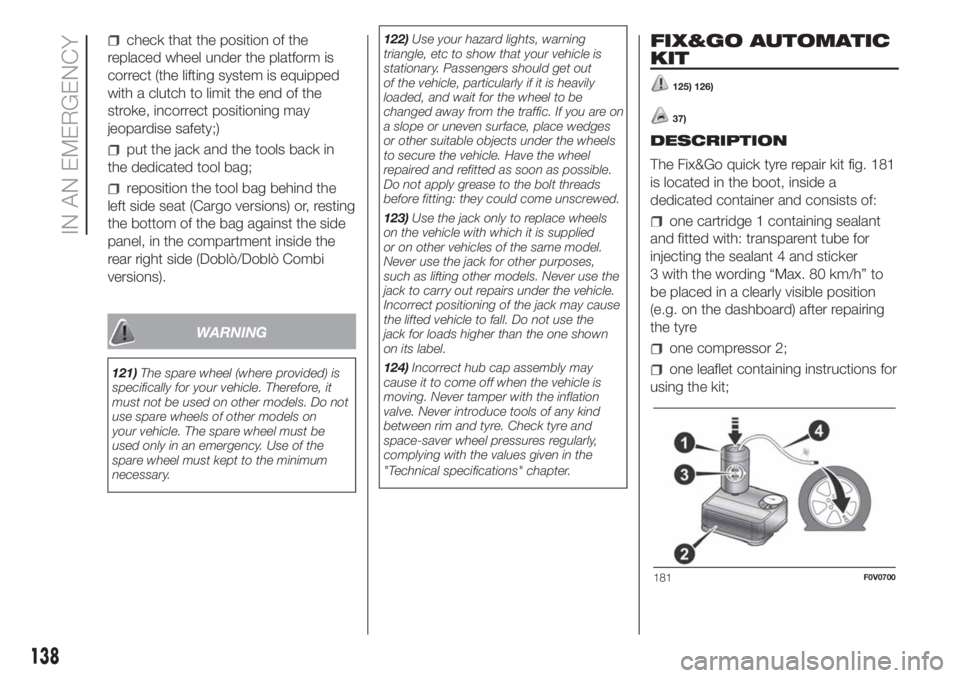
DESCRIPTION
The Fix&Go quick tyre repair kit fig. 181
is located in the boot, inside a
dedicated container and consists of:
one cartridge 1 containing sealant
and fitted with: transparent tube for
injecting the sealant 4 and sticker
3 with the wording “Max. 80 km/h” to
be placed in a clearly visible position
(e.g. on the dashboard) after repairing
the tyre
one compressor 2;
one leaflet containing instructions for
using the kit;
181F0V0700
138
IN AN EMERGENCY
Page 171 of 272
if a tyre is punctured, stop
immediately and replace it to avoid
damage to the tyre, the rim, suspension
and steering system;
tyres age even if they are not used
much. Cracks in the tread and on
the sidewalls are a sign of ageing. In
any event, have the tyres checked
by specialised technicians if they have
been fitted for longer than 6 years.
Remember to check the spare wheel
very carefully;
in the case of replacement, always
fit new tyres, avoiding those of
unknown origin;
if a tyre is changed, also change the
inflation valve;
to allow even wear between the
front and rear tyres, it is advisable to
change them over every 10–15
thousand kilometres, keeping them on
the same side of the vehicle so as
not to reverse the direction of rotation.
142) 143) 144) 145) 146)
WARNING
142)Remember that the road holding
qualities of your vehicle also depend on the
correct inflation pressure of the tyres.
143)If tyre pressure is too low, the tyre
may overheat and be severely damaged as
a result.
144)Do not switch tyres from the
righthand side of the vehicle to the
lefthand side, and vice versa.
145)Never submit alloy rims to repainting
treatments requiring the use of
temperatures exceeding 150°C. The
mechanical properties of the wheels could
be impaired.
146)Keep the vehicle's speed down when
snow chains are fitted; never exceed 50
km/h. Avoid potholes, do not drive over
steps or pavements, and do not drive long
distances over roads without snow, to
avoid damaging both your vehicle and the
road surface.
169
Page 179 of 272
.
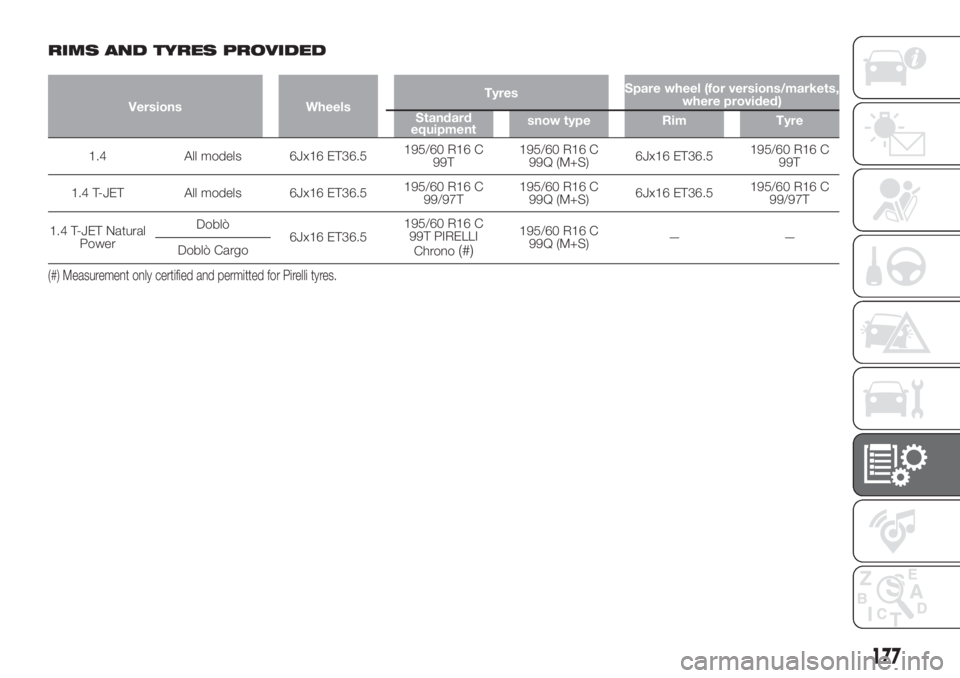
RIMS AND TYRES PROVIDED
Versions WheelsTyresSpare wheel (for versions/markets,
where provided)
Standard
equipmentsnow type Rim Tyre
1.4 All models 6Jx16 ET36.5195/60 R16 C
99T195/60 R16 C
99Q (M+S)6Jx16 ET36.5195/60 R16 C
99T
1.4 T-JET All models 6Jx16 ET36.5195/60 R16 C
99/97T195/60 R16 C
99Q (M+S)6Jx16 ET36.5195/60 R16 C
99/97T
1.4 T-JET Natural
PowerDoblò
6Jx16 ET36.5195/60 R16 C
99T PIRELLI
Chrono
(#)
195/60 R16 C
99Q (M+S)——
Doblò Cargo
(#) Measurement only certified and permitted for Pirelli tyres.
177
Page 180 of 272
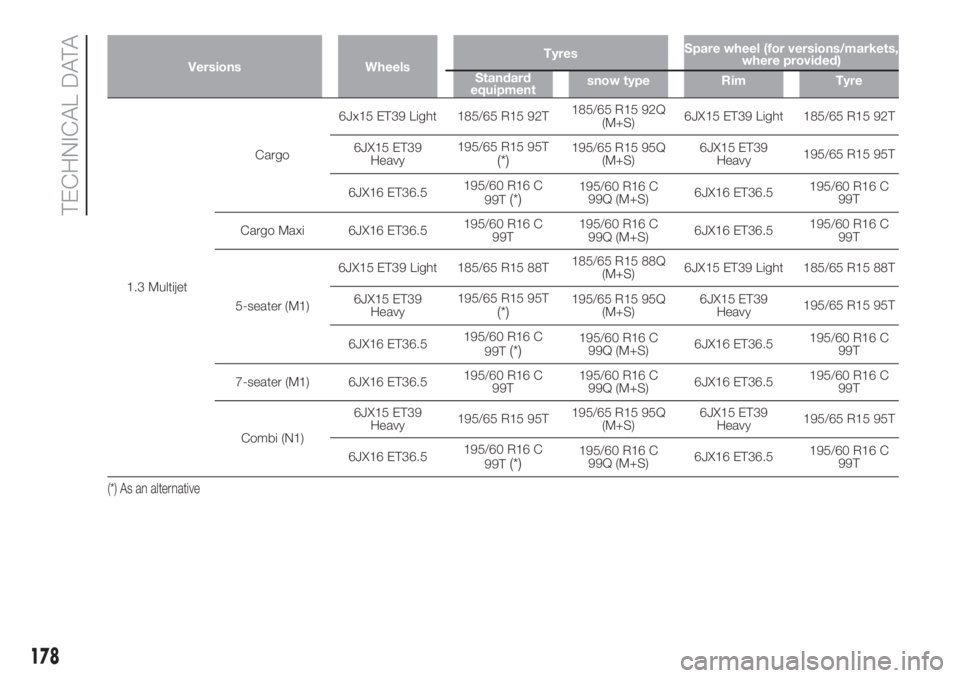
Versions WheelsTyresSpare wheel (for versions/markets,
where provided)
Standard
equipmentsnow type Rim Tyre
1.3 MultijetCargo6Jx15 ET39 Light 185/65 R15 92T185/65 R15 92Q
(M+S)6JX15 ET39 Light 185/65 R15 92T
6JX15 ET39
Heavy195/65 R15 95T
(*)195/65 R15 95Q
(M+S)6JX15 ET39
Heavy195/65 R15 95T
6JX16 ET36.5195/60 R16 C
99T
(*)195/60 R16 C
99Q (M+S)6JX16 ET36.5195/60 R16 C
99T
Cargo Maxi 6JX16 ET36.5195/60 R16 C
99T195/60 R16 C
99Q (M+S)6JX16 ET36.5195/60 R16 C
99T
5-seater (M1)6JX15 ET39 Light 185/65 R15 88T185/65 R15 88Q
(M+S)6JX15 ET39 Light 185/65 R15 88T
6JX15 ET39
Heavy195/65 R15 95T
(*)195/65 R15 95Q
(M+S)6JX15 ET39
Heavy195/65 R15 95T
6JX16 ET36.5195/60 R16 C
99T
(*)195/60 R16 C
99Q (M+S)6JX16 ET36.5195/60 R16 C
99T
7-seater (M1) 6JX16 ET36.5195/60 R16 C
99T195/60 R16 C
99Q (M+S)6JX16 ET36.5195/60 R16 C
99T
Combi (N1)6JX15 ET39
Heavy195/65 R15 95T195/65 R15 95Q
(M+S)6JX15 ET39
Heavy195/65 R15 95T
6JX16 ET36.5195/60 R16 C
99T
(*)195/60 R16 C
99Q (M+S)6JX16 ET36.5195/60 R16 C
99T
(*) As an alternative
178
TECHNICAL DATA
Page 181 of 272
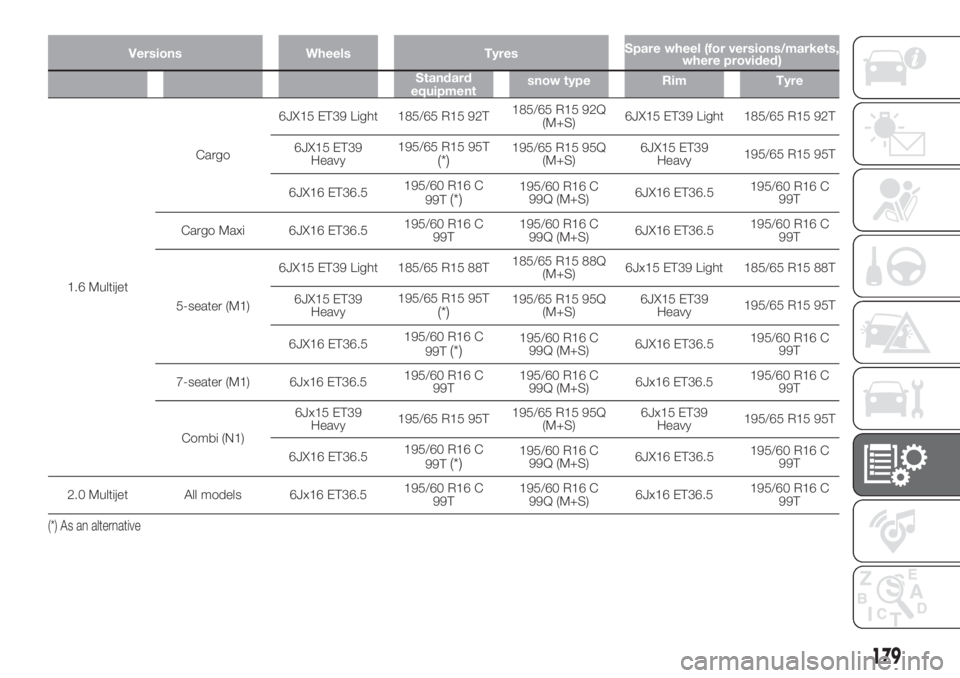
Versions Wheels TyresSpare wheel (for versions/markets,
where provided)
Standard
equipmentsnow type Rim Tyre
1.6 MultijetCargo6JX15 ET39 Light 185/65 R15 92T185/65 R15 92Q
(M+S)6JX15 ET39 Light 185/65 R15 92T
6JX15 ET39
Heavy195/65 R15 95T
(*)195/65 R15 95Q
(M+S)6JX15 ET39
Heavy195/65 R15 95T
6JX16 ET36.5195/60 R16 C
99T
(*)195/60 R16 C
99Q (M+S)6JX16 ET36.5195/60 R16 C
99T
Cargo Maxi 6JX16 ET36.5195/60 R16 C
99T195/60 R16 C
99Q (M+S)6JX16 ET36.5195/60 R16 C
99T
5-seater (M1)6JX15 ET39 Light 185/65 R15 88T185/65 R15 88Q
(M+S)6Jx15 ET39 Light 185/65 R15 88T
6JX15 ET39
Heavy195/65 R15 95T
(*)195/65 R15 95Q
(M+S)6JX15 ET39
Heavy195/65 R15 95T
6JX16 ET36.5195/60 R16 C
99T
(*)195/60 R16 C
99Q (M+S)6JX16 ET36.5195/60 R16 C
99T
7-seater (M1) 6Jx16 ET36.5195/60 R16 C
99T195/60 R16 C
99Q (M+S)6Jx16 ET36.5195/60 R16 C
99T
Combi (N1)6Jx15 ET39
Heavy195/65 R15 95T195/65 R15 95Q
(M+S)6Jx15 ET39
Heavy195/65 R15 95T
6JX16 ET36.5195/60 R16 C
99T
(*)195/60 R16 C
99Q (M+S)6JX16 ET36.5195/60 R16 C
99T
2.0 Multijet All models 6Jx16 ET36.5195/60 R16 C
99T195/60 R16 C
99Q (M+S)6Jx16 ET36.5195/60 R16 C
99T
(*) As an alternative
179