window FIAT DOBLO COMBI 2018 Owner handbook (in English)
[x] Cancel search | Manufacturer: FIAT, Model Year: 2018, Model line: DOBLO COMBI, Model: FIAT DOBLO COMBI 2018Pages: 272, PDF Size: 23.75 MB
Page 11 of 272
KNOWING YOUR VEHICLE
In-depth knowledge of your new vehicle
starts here.
The booklet that you are reading simply
and directly explains how it is made
and how it works.
That’s why we advise you to read it
seated comfortably on board, so that
you can see what is described here for
yourself.KEYS .............................................. 10
IGNITION DEVICE ........................... 11
THE FIAT CODE SYSTEM ............... 12
DOORS ........................................... 13
SEATS ............................................ 17
PARTITIONS ................................... 23
HEADRESTS ................................... 25
STEERING WHEEL ......................... 26
REAR VIEW MIRRORS .................... 27
EXTERIOR LIGHTS ......................... 28
INTERIOR LIGHTS .......................... 30
WINDSCREEN / REAR WINDOW
WIPERS .......................................... 32
HEATING AND VENTILATION.......... 34
MANUAL CLIMATE CONTROL
SYSTEM ......................................... 36
AUTOMATIC CLIMATE CONTROL
SYSTEM ......................................... 38
ELECTRIC WINDOWS .................... 40
BONNET ......................................... 41
LUGGAGE COMPARTMENT ........... 42
HEADLIGHTS.................................. 46
VERSION WITH METHANE
SYSTEM (NATURAL POWER) ......... 47
9
Page 12 of 272
KEYS
MECHANICAL KEY
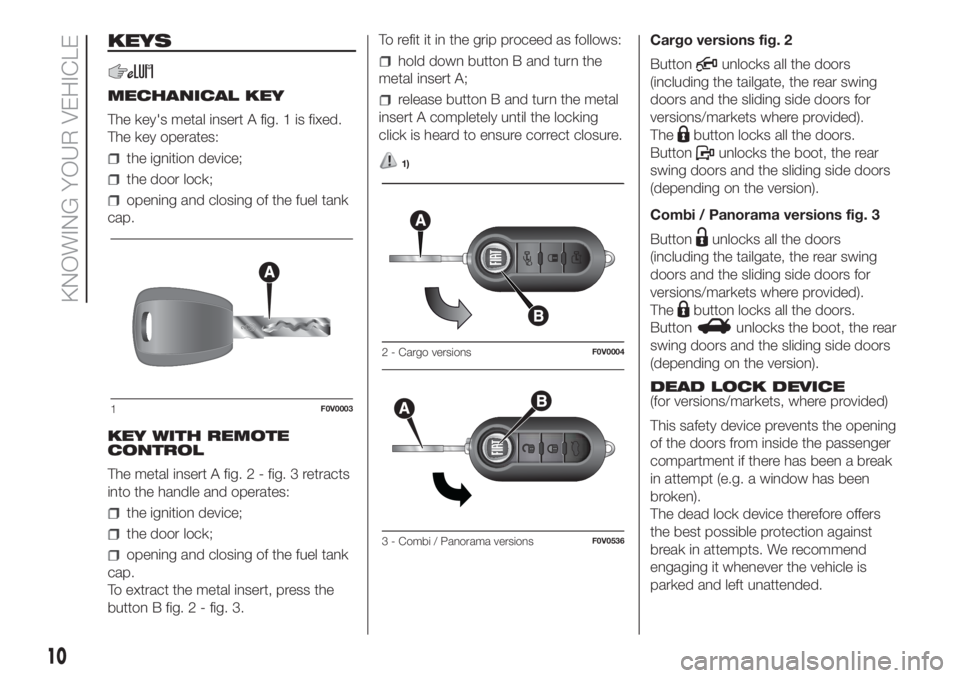
The key's metal insert A fig. 1 is fixed.
The key operates:
the ignition device;
the door lock;
opening and closing of the fuel tank
cap.
KEY WITH REMOTE
CONTROL
The metal insert A fig. 2 - fig. 3 retracts
into the handle and operates:
the ignition device;
the door lock;
opening and closing of the fuel tank
cap.
To extract the metal insert, press the
button B fig. 2 - fig. 3.To refit it in the grip proceed as follows:
hold down button B and turn the
metal insert A;
release button B and turn the metal
insert A completely until the locking
click is heard to ensure correct closure.
1)
Cargo versions fig. 2
Button
unlocks all the doors
(including the tailgate, the rear swing
doors and the sliding side doors for
versions/markets where provided).
The
button locks all the doors.
Button
unlocks the boot, the rear
swing doors and the sliding side doors
(depending on the version).
Combi / Panorama versions fig. 3
Button
unlocks all the doors
(including the tailgate, the rear swing
doors and the sliding side doors for
versions/markets where provided).
The
button locks all the doors.
Button
unlocks the boot, the rear
swing doors and the sliding side doors
(depending on the version).
DEAD LOCK DEVICE
(for versions/markets, where provided)
This safety device prevents the opening
of the doors from inside the passenger
compartment if there has been a break
in attempt (e.g. a window has been
broken).
The dead lock device therefore offers
the best possible protection against
break in attempts. We recommend
engaging it whenever the vehicle is
parked and left unattended.
1F0V0003
2 - Cargo versionsF0V0004
3 - Combi / Panorama versionsF0V0536
10
KNOWING YOUR VEHICLE
Page 18 of 272
Opening/closing the first
swing door from the
outside
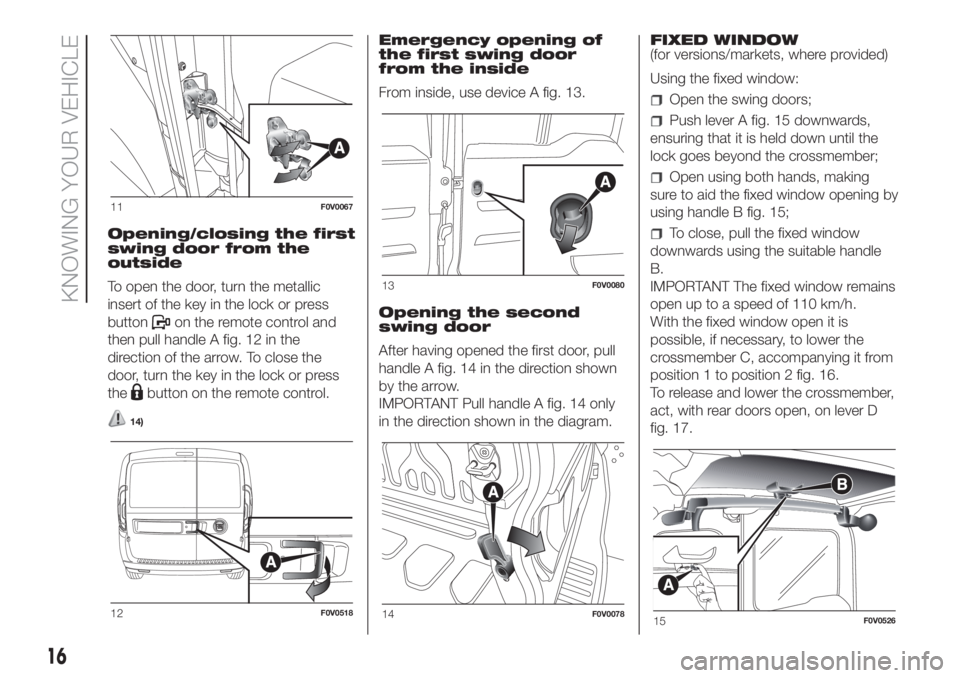
To open the door, turn the metallic
insert of the key in the lock or press
button
on the remote control and
then pull handle A fig. 12 in the
direction of the arrow. To close the
door, turn the key in the lock or press
the
button on the remote control.
14)
Emergency opening of
the first swing door
from the inside
From inside, use device A fig. 13.
Opening the second
swing door
After having opened the first door, pull
handle A fig. 14 in the direction shown
by the arrow.
IMPORTANT Pull handle A fig. 14 only
in the direction shown in the diagram.FIXED WINDOW
(for versions/markets, where provided)
Using the fixed window:
Open the swing doors;
Push lever A fig. 15 downwards,
ensuring that it is held down until the
lock goes beyond the crossmember;
Open using both hands, making
sure to aid the fixed window opening by
using handle B fig. 15;
To close, pull the fixed window
downwards using the suitable handle
B.
IMPORTANT The fixed window remains
open up to a speed of 110 km/h.
With the fixed window open it is
possible, if necessary, to lower the
crossmember C, accompanying it from
position 1 to position 2 fig. 16.
To release and lower the crossmember,
act, with rear doors open, on lever D
fig. 17.
11F0V0067
12F0V0518
13F0V0080
14F0V007815F0V0526
16
KNOWING YOUR VEHICLE
Page 25 of 272
WARNING
15)All adjustments must be made with the
vehicle stationary.
16)Once you have released the
adjustment lever, always check that the
seat is locked on the guides by trying
to move it back and forth. If it is not locked,
the seat may move unexpectedly and
make you lose control of the vehicle.
17)Close the dashboard console before
folding the retractable front passenger seat
to avoid damage.
18)When the passenger seat is folded
away, the space created cannot be used
for loading. When the vehicle is in motion,
you are therefore advised to remove or
secure any objects that might interfere with
the driver.
19)If there is no partition between the cab
and the load compartment, tall objects
or packages may take up part of the
passenger area. Make sure that these
items are well secured by using the
available hooks and that they cannot
interfere with the driver.
20)Close the dashboard console before
folding the front passenger seat to form
a table to avoid damage.
21)While travelling, before using the third
row seats, make sure that the second
row seats are in running position and well
anchored (see the specific label fig. 28.
PARTITIONS
FIXED PANEL PARTITION
(for versions/markets, where provided)
Separates the passenger area from
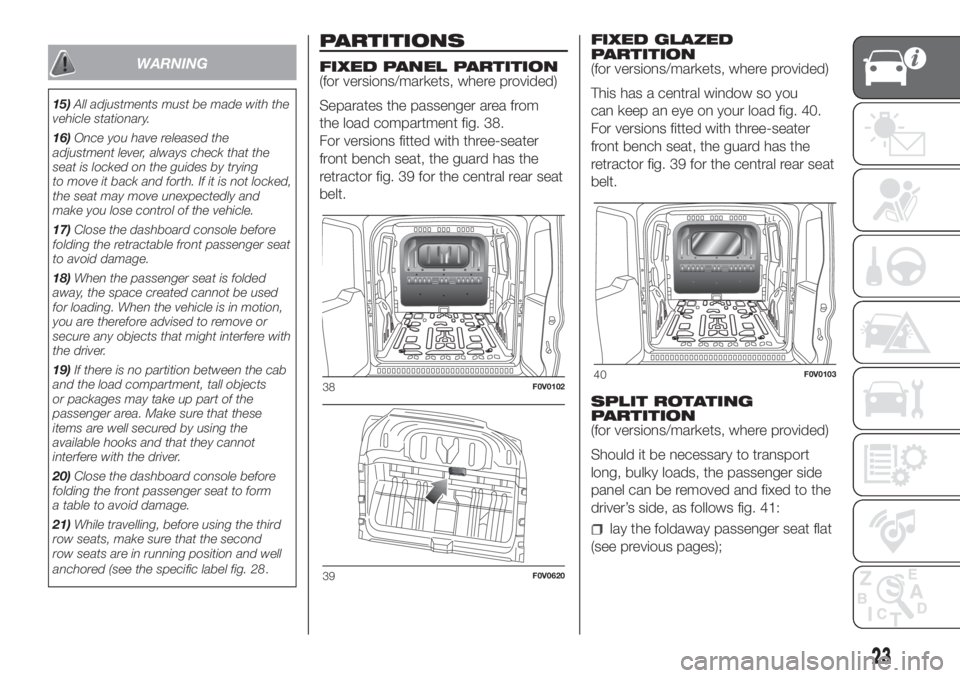
the load compartment fig. 38.
For versions fitted with three-seater
front bench seat, the guard has the
retractor fig. 39 for the central rear seat
belt.FIXED GLAZED
PARTITION
(for versions/markets, where provided)
This has a central window so you
can keep an eye on your load fig. 40.
For versions fitted with three-seater
front bench seat, the guard has the
retractor fig. 39 for the central rear seat
belt.
SPLIT ROTATING
PARTITION
(for versions/markets, where provided)
Should it be necessary to transport
long, bulky loads, the passenger side
panel can be removed and fixed to the
driver’s side, as follows fig. 41:
lay the foldaway passenger seat flat
(see previous pages);
38F0V0102
39F0V0620
40F0V0103
23
Page 33 of 272
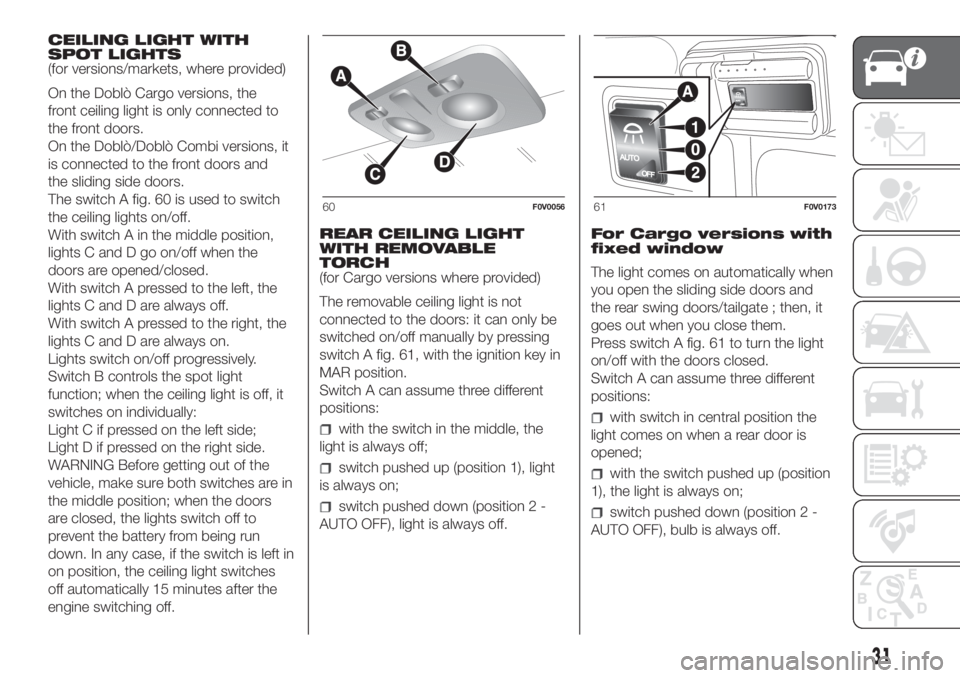
CEILING LIGHT WITH
SPOT LIGHTS
(for versions/markets, where provided)
On the Doblò Cargo versions, the
front ceiling light is only connected to
the front doors.
On the Doblò/Doblò Combi versions, it
is connected to the front doors and
the sliding side doors.
The switch A fig. 60 is used to switch
the ceiling lights on/off.
With switch A in the middle position,
lights C and D go on/off when the
doors are opened/closed.
With switch A pressed to the left, the
lights C and D are always off.
With switch A pressed to the right, the
lights C and D are always on.
Lights switch on/off progressively.
Switch B controls the spot light
function; when the ceiling light is off, it
switches on individually:
Light C if pressed on the left side;
Light D if pressed on the right side.
WARNING Before getting out of the
vehicle, make sure both switches are in
the middle position; when the doors
are closed, the lights switch off to
prevent the battery from being run
down. In any case, if the switch is left in
on position, the ceiling light switches
off automatically 15 minutes after the
engine switching off.REAR CEILING LIGHT
WITH REMOVABLE
TORCH
(for Cargo versions where provided)
The removable ceiling light is not
connected to the doors: it can only be
switched on/off manually by pressing
switch A fig. 61, with the ignition key in
MAR position.
Switch A can assume three different
positions:
with the switch in the middle, the
light is always off;
switch pushed up (position 1), light
is always on;
switch pushed down (position 2 -
AUTO OFF), light is always off.For Cargo versions with
fixed window
The light comes on automatically when
you open the sliding side doors and
the rear swing doors/tailgate ; then, it
goes out when you close them.
Press switch A fig. 61 to turn the light
on/off with the doors closed.
Switch A can assume three different
positions:
with switch in central position the
light comes on when a rear door is
opened;
with the switch pushed up (position
1), the light is always on;
switch pushed down (position 2 -
AUTO OFF), bulb is always off.
60F0V005661F0V0173
31
Page 34 of 272
TORCH FUNCTION
(for Cargo versions where provided)
This is located on the right side of the
load compartment. It is a removable
electric torch.
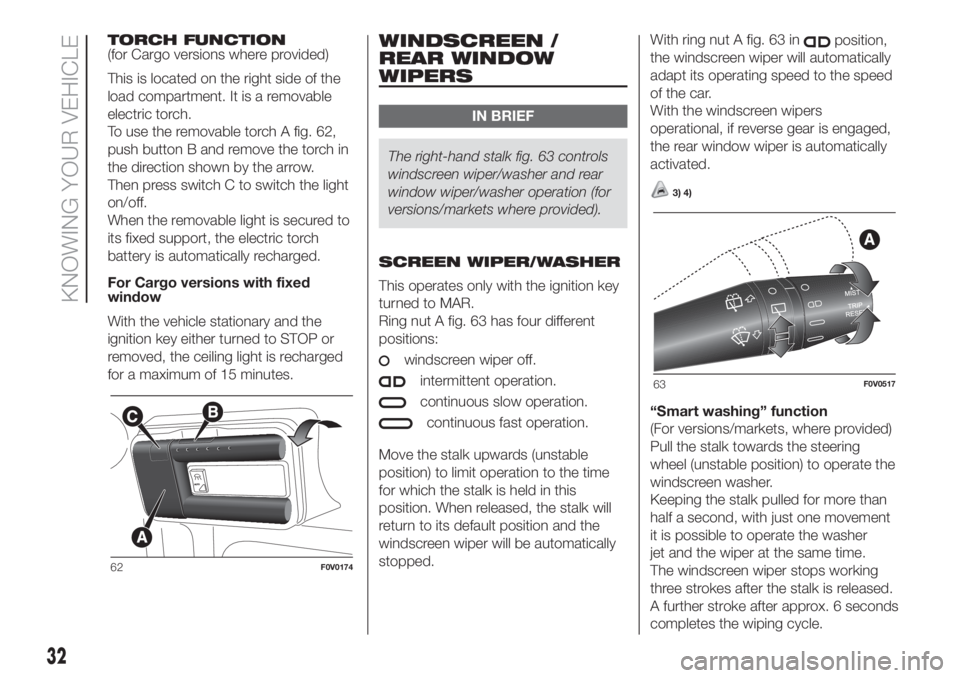
To use the removable torch A fig. 62,
push button B and remove the torch in
the direction shown by the arrow.
Then press switch C to switch the light
on/off.
When the removable light is secured to
its fixed support, the electric torch
battery is automatically recharged.
For Cargo versions with fixed
window
With the vehicle stationary and the
ignition key either turned to STOP or
removed, the ceiling light is recharged
for a maximum of 15 minutes.WINDSCREEN /
REAR WINDOW
WIPERS
IN BRIEF
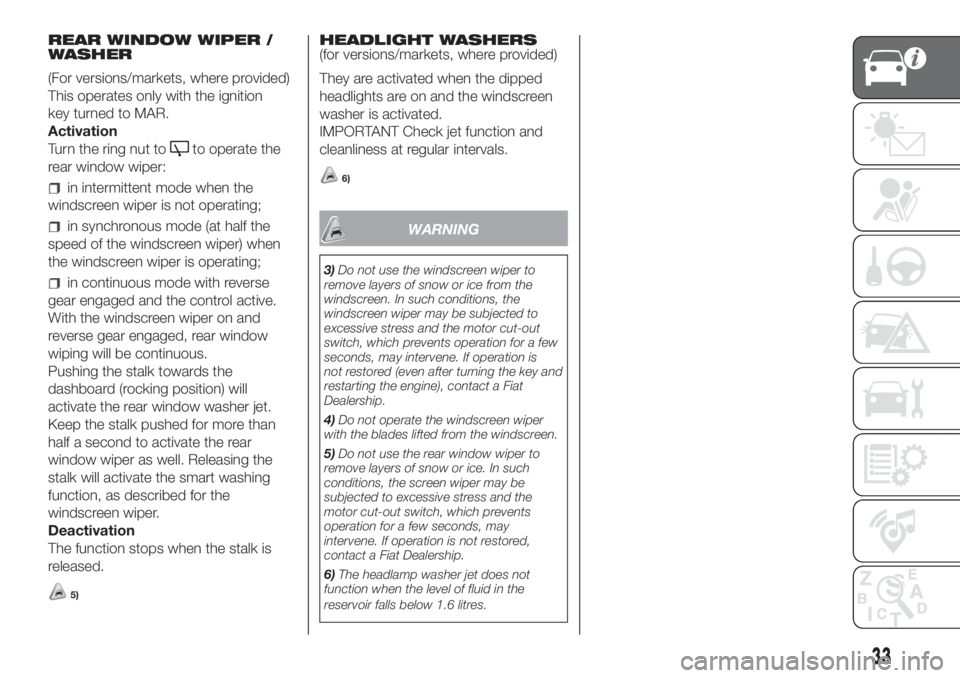
The right-hand stalk fig. 63 controls
windscreen wiper/washer and rear
window wiper/washer operation (for
versions/markets where provided).
SCREEN WIPER/WASHER
This operates only with the ignition key
turned to MAR.
Ring nut A fig. 63 has four different
positions:
windscreen wiper off.
intermittent operation.
continuous slow operation.
continuous fast operation.
Move the stalk upwards (unstable
position) to limit operation to the time
for which the stalk is held in this
position. When released, the stalk will
return to its default position and the
windscreen wiper will be automatically
stopped.With ring nut A fig. 63 in
position,
the windscreen wiper will automatically
adapt its operating speed to the speed
of the car.
With the windscreen wipers
operational, if reverse gear is engaged,
the rear window wiper is automatically
activated.
3) 4)
“Smart washing” function
(For versions/markets, where provided)
Pull the stalk towards the steering
wheel (unstable position) to operate the
windscreen washer.
Keeping the stalk pulled for more than
half a second, with just one movement
it is possible to operate the washer
jet and the wiper at the same time.
The windscreen wiper stops working
three strokes after the stalk is released.
A further stroke after approx. 6 seconds
completes the wiping cycle.
62F0V0174
63F0V0517
32
KNOWING YOUR VEHICLE
Page 35 of 272
REAR WINDOW WIPER /
WASHER
(For versions/markets, where provided)
This operates only with the ignition
key turned to MAR.
Activation
Turn the ring nut to
to operate the
rear window wiper:
in intermittent mode when the
windscreen wiper is not operating;
in synchronous mode (at half the
speed of the windscreen wiper) when
the windscreen wiper is operating;
in continuous mode with reverse
gear engaged and the control active.
With the windscreen wiper on and
reverse gear engaged, rear window
wiping will be continuous.
Pushing the stalk towards the
dashboard (rocking position) will
activate the rear window washer jet.
Keep the stalk pushed for more than
half a second to activate the rear
window wiper as well. Releasing the
stalk will activate the smart washing
function, as described for the
windscreen wiper.
Deactivation
The function stops when the stalk is
released.
5)
HEADLIGHT WASHERS
(for versions/markets, where provided)
They are activated when the dipped
headlights are on and the windscreen
washer is activated.
IMPORTANT Check jet function and
cleanliness at regular intervals.
6)
WARNING
3)Do not use the windscreen wiper to
remove layers of snow or ice from the
windscreen. In such conditions, the
windscreen wiper may be subjected to
excessive stress and the motor cut-out
switch, which prevents operation for a few
seconds, may intervene. If operation is
not restored (even after turning the key and
restarting the engine), contact a Fiat
Dealership.
4)Do not operate the windscreen wiper
with the blades lifted from the windscreen.
5)Do not use the rear window wiper to
remove layers of snow or ice. In such
conditions, the screen wiper may be
subjected to excessive stress and the
motor cut-out switch, which prevents
operation for a few seconds, may
intervene. If operation is not restored,
contact a Fiat Dealership.
6)The headlamp washer jet does not
function when the level of fluid in the
reservoir falls below 1.6 litres.
33
Page 37 of 272
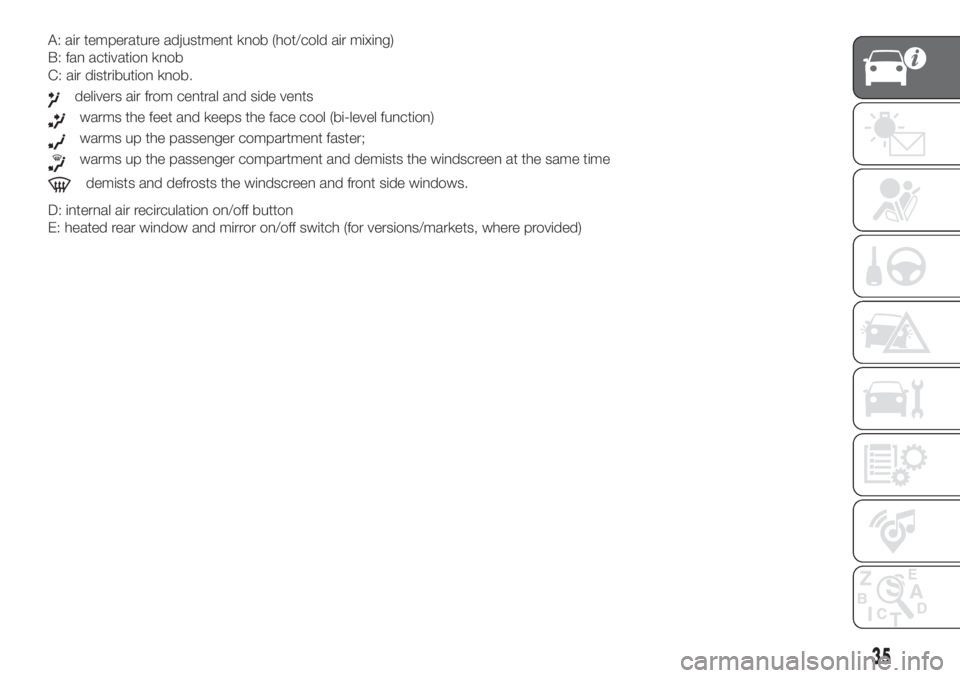
A: air temperature adjustment knob (hot/cold air mixing)
B: fan activation knob
C: air distribution knob.
delivers air from central and side vents
warms the feet and keeps the face cool (bi-level function)
warms up the passenger compartment faster;
warms up the passenger compartment and demists the windscreen at the same time
demists and defrosts the windscreen and front side windows.
D: internal air recirculation on/off button
E: heated rear window and mirror on/off switch (for versions/markets, where provided)
35
Page 39 of 272
warms the feet and keeps the face cool (bi-level function)
to warm the feet of those in the front and rear seats.
D: climate control system compressor on/off button
E: internal air recirculation on/off button
F: heated rear window and mirror on/off switch (for versions/markets, where provided)
.
WARNING
2)The air conditioning system uses refrigerant R134a or R1234yf compatible with the current regulations in the countries where the vehicle is
marketed. When charging, only use the gas indicated on the dedicated plate in the engine compartment . The use of other coolants affects
the efficiency and condition of the system. The lubricant used for the compressor is also strictly linked to the type of cooling gas, please refer
to a Fiat Dealership.
37
Page 40 of 272
AUTOMATIC CLIMATE CONTROL SYSTEM
(for versions/markets, where provided)
.
CONTROLS
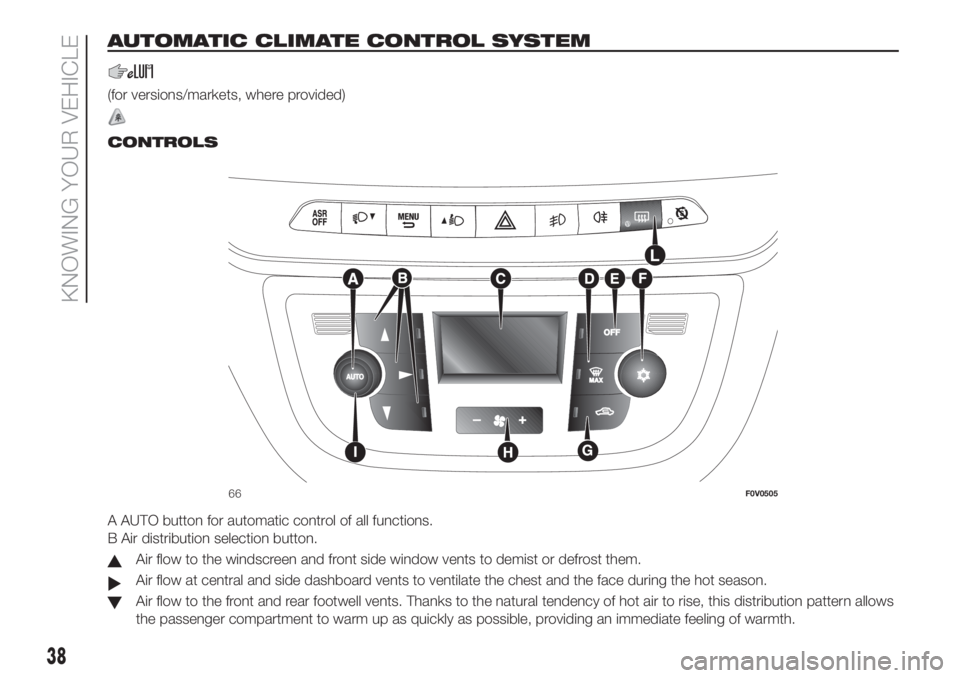
A AUTO button for automatic control of all functions.
B Air distribution selection button.
Air flow to the windscreen and front side window vents to demist or defrost them.
Air flow at central and side dashboard vents to ventilate the chest and the face during the hot season.
Air flow to the front and rear footwell vents. Thanks to the natural tendency of hot air to rise, this distribution pattern allows
the passenger compartment to warm up as quickly as possible, providing an immediate feeling of warmth.
66F0V0505
38
KNOWING YOUR VEHICLE