display FIAT DUCATO 2006 Owner handbook (in English)
[x] Cancel search | Manufacturer: FIAT, Model Year: 2006, Model line: DUCATO, Model: FIAT DUCATO 2006Pages: 238, PDF Size: 3.29 MB
Page 34 of 238

33
SAFETY
DEVICES
CORRECT USE
OF THE
VEHICLE
WARNING
LIGHTS AND
MESSAGES
IN AN
EMERGENCY
VEHICLE
MAINTENANCE
TECHNICAL
SPECIFICATIONS
INDEX
DASHBOARD
AND CONTROLS
TRIP COMPUTER
General features
The “Trip computer” displays information
(with ignition key at MAR), relating to the
operating status of the vehicle. This func-
tion comprises two separate and inde-
pendent trips: “Trip A” and “Trip B” con-
cerning the “complete mission” of the ve-
hicle (journey).
Both functions are resettable (reset - start
of new mission).
“Trip A” shall be used to display the fig-
ures relating to:
– Range
– Trip distance
– Average consumption
– Instant consumption
– Average speed
– Travel time (driving time).“Trip B”, available on multifunction display
only, shall be used to display the figures
relating to:
– Trip distance B
– Average consumption B
– Average speed B
– Travel time B (driving time).
Note“Trip B” function can be excluded
(see paragraph “Trip B On/Off”). “Range”
and “Instant consumption” cannot be re-
set.
Values displayed
Range
This value shows the distance in km (or
mi) that the vehicle can still cover before
needing fuel, assuming that driving condi-
tions are kept unvaried. The display will
show “----” in the following cases:
– value lower than 50 km (or 30 mi)
– vehicle left parked with engine running
for long.
Trip distance
This value shows the distance covered
from the start of the new mission. Exit Menu
This is the last function that closes the cir-
cular setting cycle listed in the initial menu
screen.
Briefly press button MODEto go back to
the standard screen without storing set-
tings.
Press button â–Ľto return to the first menu
option (Speed Beep).
Page 35 of 238
34
SAFETY
DEVICES
CORRECT USE
OF THE
VEHICLE
WARNING
LIGHTS AND
MESSAGES
IN AN
EMERGENCY
VEHICLE
MAINTENANCE
TECHNICAL
SPECIFICATIONS
INDEX
DASHBOARD
AND CONTROLS
Average consumption
This value shows the average consump-
tion from the start of the new mission.
Instant consumption
This value shows instant fuel consumption
(this value is updated second by second).
If parking the vehicle with engine on,
the display will show “----”.
Average speed
This value shows the vehicle average
speed as a function of the overall time
elapsed since the start of the new mission.
Travel time
This value shows the time elapsed since
the start of the new mission.
IMPORTANT Lacking information, Trip
computer values are displayed with “----”.
When normal operating condition is re-
set, calculation of different units will
restart regularly. Values displayed before
the failure will not be reset.
fig. 22F0N0019m
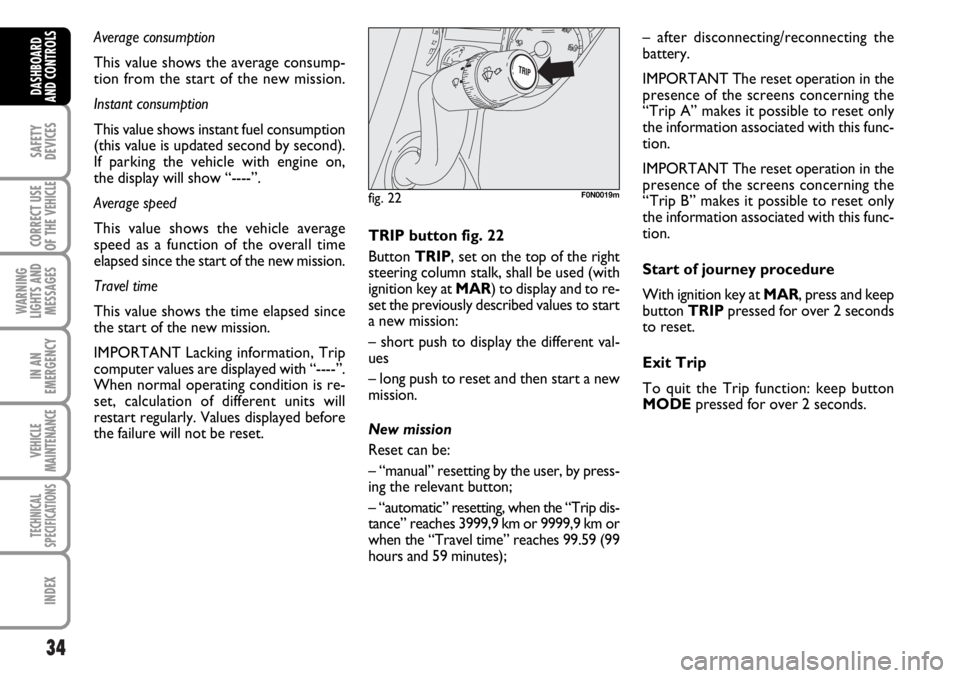
TRIP button fig. 22
Button TRIP, set on the top of the right
steering column stalk, shall be used (with
ignition key at MAR) to display and to re-
set the previously described values to start
a new mission:
– short push to display the different val-
ues
– long push to reset and then start a new
mission.
New mission
Reset can be:
– “manual” resetting by the user, by press-
ing the relevant button;
– “automatic” resetting, when the “Trip dis-
tance” reaches 3999,9 km or 9999,9 km or
when the “Travel time” reaches 99.59 (99
hours and 59 minutes);– after disconnecting/reconnecting the
battery.
IMPORTANT The reset operation in the
presence of the screens concerning the
“Trip A” makes it possible to reset only
the information associated with this func-
tion.
IMPORTANT The reset operation in the
presence of the screens concerning the
“Trip B” makes it possible to reset only
the information associated with this func-
tion.
Start of journey procedure
With ignition key at MAR, press and keep
button TRIPpressed for over 2 seconds
to reset.
Exit Trip
To quit the Trip function: keep button
MODEpressed for over 2 seconds.
Page 55 of 238

54
SAFETY
DEVICES
CORRECT USE
OF THE
VEHICLE
WARNING
LIGHTS AND
MESSAGES
IN AN
EMERGENCY
VEHICLE
MAINTENANCE
TECHNICAL
SPECIFICATIONS
INDEX
DASHBOARD
AND CONTROLS
IMPORTANT The heater is equipped with
a thermal switch which cuts off the heater
in the event of overheating caused by low
or leaking coolant. In this case, press the
program selection button to start the
heater again after repairing the cooling sys-
tem fault and/or topping up the fluid.
The heater can turn itself off after engine
ignition or if the flame goes out. In this
case, turn the heater off manually and at-
tempt to turn it back on again. If you can-
not turn the heater on, contact a Fiat
Dealership.Turning the heater on
To obtain max. performance from the
heater unit check that he heating/ventila-
tion unit knob is turned to “warm air”.
Digital timer fig. 46
1) Heater cycle warning light
2) Display light
3) Clock pre-set recall number
4) Clock button
5) Hour “forward” button
6) Program selection button
7) Hour “back” button
8) Heat now button
9) Display/adjust time warning light
fig. 46F0N0151m
Page 56 of 238
55
SAFETY
DEVICES
CORRECT USE
OF THE
VEHICLE
WARNING
LIGHTS AND
MESSAGES
IN AN
EMERGENCY
VEHICLE
MAINTENANCE
TECHNICAL
SPECIFICATIONS
INDEX
DASHBOARD
AND CONTROLS
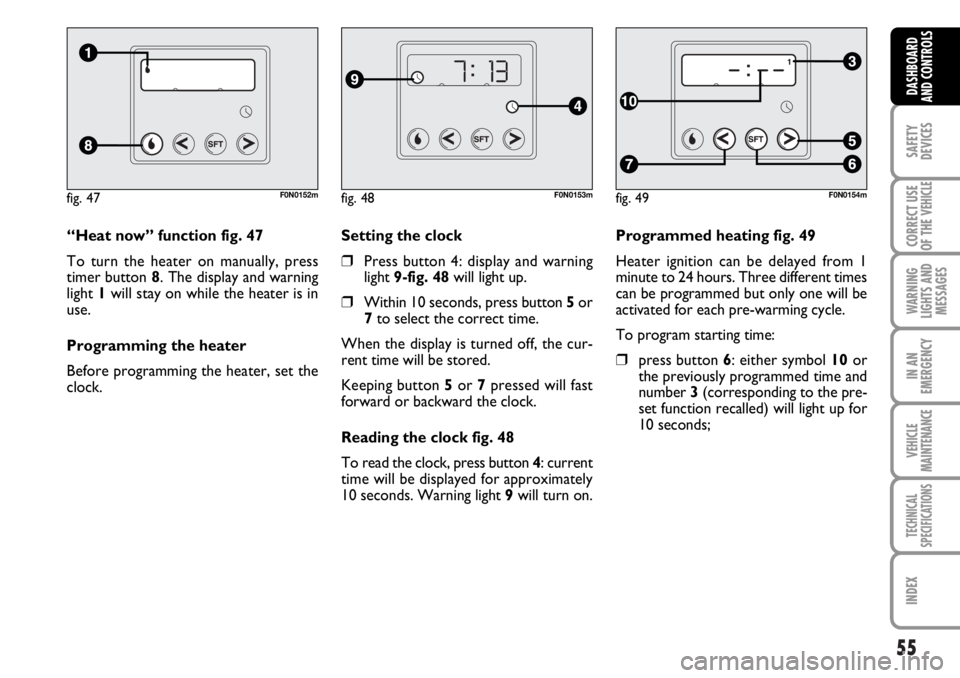
Programmed heating fig. 49
Heater ignition can be delayed from 1
minute to 24 hours. Three different times
can be programmed but only one will be
activated for each pre-warming cycle.
To program starting time:
âť’press button 6: either symbol 10 or
the previously programmed time and
number 3 (corresponding to the pre-
set function recalled) will light up for
10 seconds; Setting the clock
âť’Press button 4: display and warning
light 9-fig. 48will light up.
âť’Within 10 seconds, press button 5or
7to select the correct time.
When the display is turned off, the cur-
rent time will be stored.
Keeping button 5or 7pressed will fast
forward or backward the clock.
Reading the clock fig. 48
To read the clock, press button 4: current
time will be displayed for approximately
10 seconds. Warning light 9will turn on. “Heat now” function fig. 47
To turn the heater on manually, press
timer button 8. The display and warning
light 1will stay on while the heater is in
use.
Programming the heater
Before programming the heater, set the
clock.
fig. 47F0N0152mfig. 48F0N0153mfig. 49F0N0154m
Page 57 of 238
56
SAFETY
DEVICES
CORRECT USE
OF THE
VEHICLE
WARNING
LIGHTS AND
MESSAGES
IN AN
EMERGENCY
VEHICLE
MAINTENANCE
TECHNICAL
SPECIFICATIONS
INDEX
DASHBOARD
AND CONTROLS
IMPORTANT To recall other preset
times, press button 6within 10 seconds.
– press button 5or 7within 10 seconds
to select the starting time required.
IMPORTANT Time is stored when:
âť’starting time goes off;
âť’number 3 is displayed;
âť’the display turns on.
IMPORTANT At turning on:
âť’warning light corresponding to flame
1 on the display will turn on;
âť’number 3 will turn off.
Deleting a programmed
starting time fig. 49
To delete the programmed starting time,
press button 6briefly: the display light will
go off and number 3corresponding to the
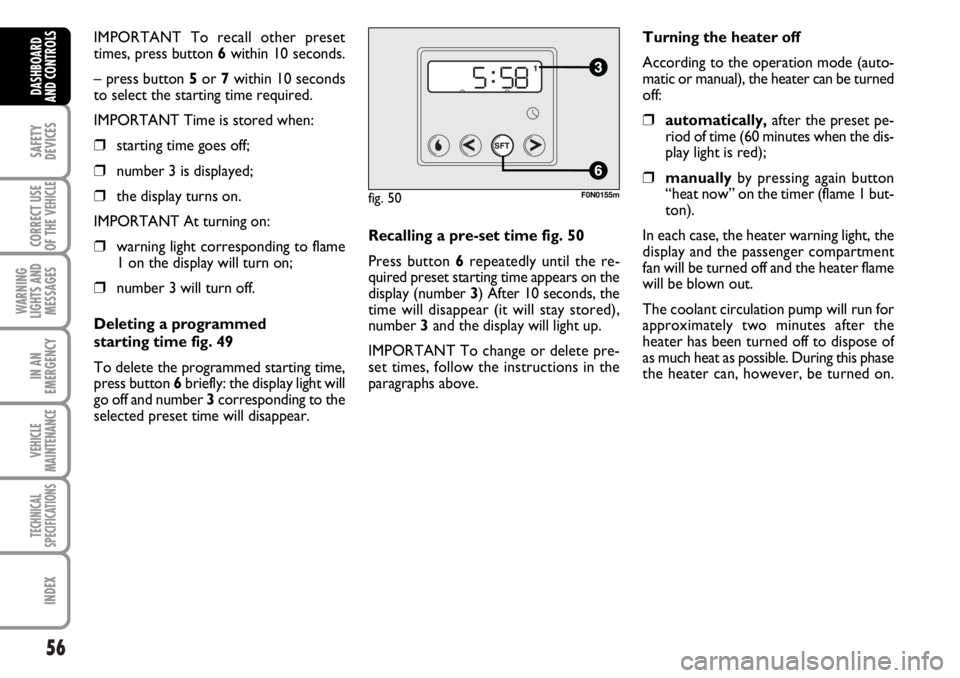
selected preset time will disappear.Recalling a pre-set time fig. 50
Press button 6repeatedly until the re-
quired preset starting time appears on the
display (number 3) After 10 seconds, the
time will disappear (it will stay stored),
number 3 and the display will light up.
IMPORTANT To change or delete pre-
set times, follow the instructions in the
paragraphs above.Turning the heater off
According to the operation mode (auto-
matic or manual), the heater can be turned
off:
âť’automatically,after the preset pe-
riod of time (60 minutes when the dis-
play light is red);
âť’manuallyby pressing again button
“heat now” on the timer (flame 1 but-
ton).
In each case, the heater warning light, the
display and the passenger compartment
fan will be turned off and the heater flame
will be blown out.
The coolant circulation pump will run for
approximately two minutes after the
heater has been turned off to dispose of
as much heat as possible. During this phase
the heater can, however, be turned on.
fig. 50F0N0155m
Page 61 of 238
60
SAFETY
DEVICES
CORRECT USE
OF THE
VEHICLE
WARNING
LIGHTS AND
MESSAGES
IN AN
EMERGENCY
VEHICLE
MAINTENANCE
TECHNICAL
SPECIFICATIONS
INDEX
DASHBOARD
AND CONTROLS
“FOLLOW ME HOME”
DEVICE
This function allows the illumination of the
space in front of the vehicle for a preset
period of time.
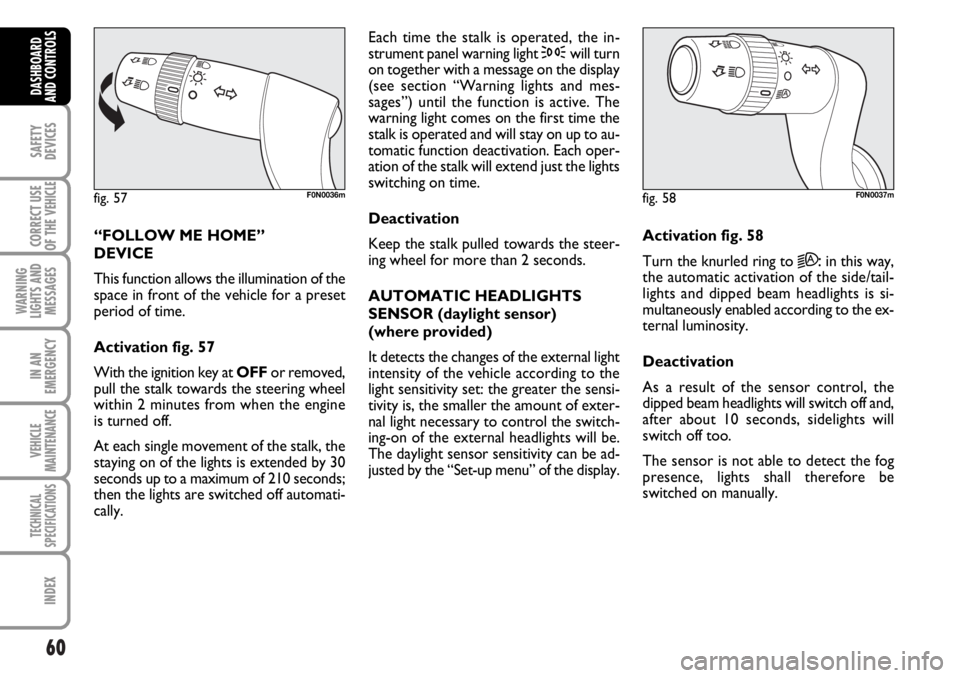
Activation fig. 57
With the ignition key at OFFor removed,
pull the stalk towards the steering wheel
within 2 minutes from when the engine
is turned off.
At each single movement of the stalk, the
staying on of the lights is extended by 30
seconds up to a maximum of 210 seconds;
then the lights are switched off automati-
cally. Each time the stalk is operated, the in-
strument panel warning light 3will turn
on together with a message on the display
(see section “Warning lights and mes-
sages”) until the function is active. The
warning light comes on the first time the
stalk is operated and will stay on up to au-
tomatic function deactivation. Each oper-
ation of the stalk will extend just the lights
switching on time.
Deactivation
Keep the stalk pulled towards the steer-
ing wheel for more than 2 seconds.
AUTOMATIC HEADLIGHTS
SENSOR (daylight sensor)
(where provided)
It detects the changes of the external light
intensity of the vehicle according to the
light sensitivity set: the greater the sensi-
tivity is, the smaller the amount of exter-
nal light necessary to control the switch-
ing-on of the external headlights will be.
The daylight sensor sensitivity can be ad-
justed by the “Set-up menu” of the display.Activation fig. 58
Turn the knurled ring to
2A:in this way,
the automatic activation of the side/tail-
lights and dipped beam headlights is si-
multaneously enabled according to the ex-
ternal luminosity.
Deactivation
As a result of the sensor control, the
dipped beam headlights will switch off and,
after about 10 seconds, sidelights will
switch off too.
The sensor is not able to detect the fog
presence, lights shall therefore be
switched on manually.
fig. 57F0N0036mfig. 58F0N0037m
Page 76 of 238
75
SAFETY
DEVICES
CORRECT USE
OF THE
VEHICLE
WARNING
LIGHTS AND
MESSAGES
IN AN
EMERGENCY
VEHICLE
MAINTENANCE
TECHNICAL
SPECIFICATIONS
INDEX
DASHBOARD
AND CONTROLS
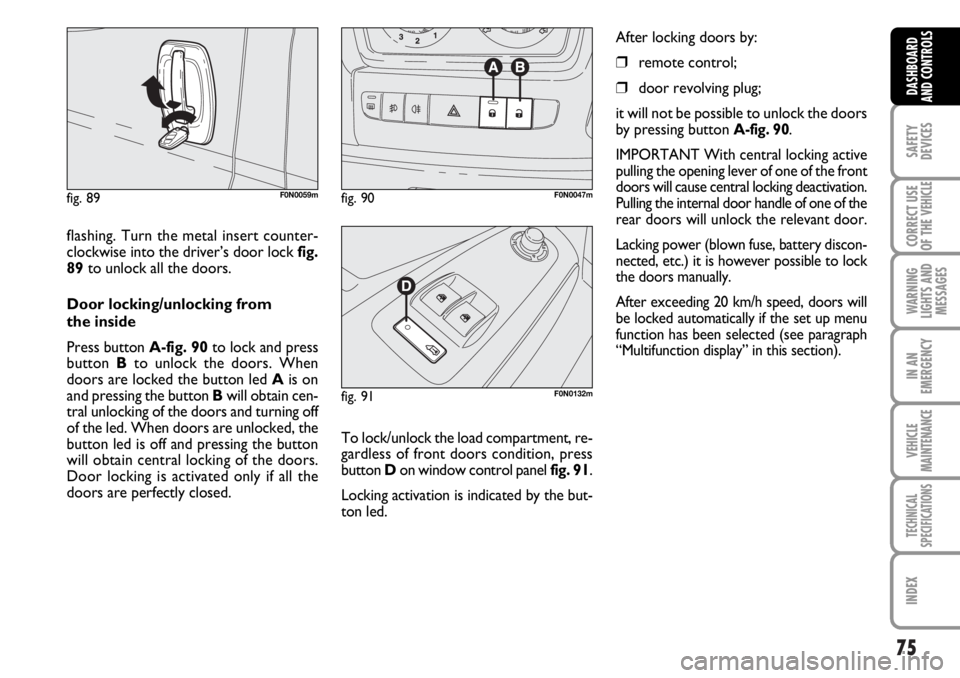
flashing. Turn the metal insert counter-
clockwise into the driver’s door lock fig.
89to unlock all the doors.
Door locking/unlocking from
the inside
Press button A-fig. 90to lock and press
button Bto unlock the doors. When
doors are locked the button led Ais on
and pressing the button Bwill obtain cen-
tral unlocking of the doors and turning off
of the led. When doors are unlocked, the
button led is off and pressing the button
will obtain central locking of the doors.
Door locking is activated only if all the
doors are perfectly closed.
fig. 89F0N0059mfig. 90F0N0047m
fig. 91F0N0132m
After locking doors by:
âť’remote control;
âť’door revolving plug;
it will not be possible to unlock the doors
by pressing button
A-fig. 90.
IMPORTANT With central locking active
pulling the opening lever of one of the front
doors will cause central locking deactivation.
Pulling the internal door handle of one of the
rear doors will unlock the relevant door.
Lacking power (blown fuse, battery discon-
nected, etc.) it is however possible to lock
the doors manually.
After exceeding 20 km/h speed, doors will
be locked automatically if the set up menu
function has been selected (see paragraph
“Multifunction display” in this section).
To lock/unlock the load compartment, re-
gardless of front doors condition, press
button Don window control panel fig. 91.
Locking activation is indicated by the but-
ton led.
Page 84 of 238
83
SAFETY
DEVICES
CORRECT USE
OF THE
VEHICLE
WARNING
LIGHTS AND
MESSAGES
IN AN
EMERGENCY
VEHICLE
MAINTENANCE
TECHNICAL
SPECIFICATIONS
INDEX
DASHBOARD
AND CONTROLS
HEADLIGHTS
ADJUSTING THE HEADLIGHT
BEAM
Proper adjustment of the headlight beams
is of vital importance for your safety and
comfort and also for the other road users.
To ensure you and other drivers have the
best visibility conditions when travelling
with the headlights on, the headlights must
be set properly. Contact Fiat Dealership
to have the headlights properly adjusted.
fig. 105F0N0067m
HEADLIGHT AIMING DEVICE
It works with ignition key at MARand
dipped beams on. When the vehicle is
loaded, it slopes backwards. This means
that the headlight beam rises. In this case,
it is necessary to return it to the correct
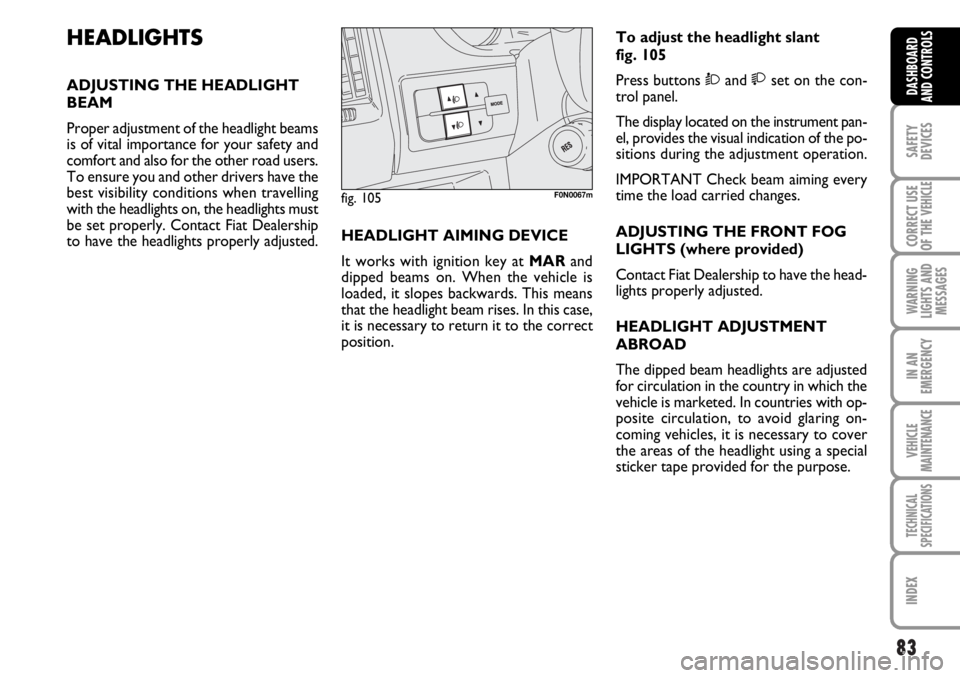
position.To adjust the headlight slant
fig. 105
Press buttons Òand set on the con-
trol panel.
The display located on the instrument pan-
el, provides the visual indication of the po-
sitions during the adjustment operation.
IMPORTANT Check beam aiming every
time the load carried changes.
ADJUSTING THE FRONT FOG
LIGHTS (where provided)
Contact Fiat Dealership to have the head-
lights properly adjusted.
HEADLIGHT ADJUSTMENT
ABROAD
The dipped beam headlights are adjusted
for circulation in the country in which the
vehicle is marketed. In countries with op-
posite circulation, to avoid glaring on-
coming vehicles, it is necessary to cover
the areas of the headlight using a special
sticker tape provided for the purpose.
Page 85 of 238
84
SAFETY
DEVICES
CORRECT USE
OF THE
VEHICLE
WARNING
LIGHTS AND
MESSAGES
IN AN
EMERGENCY
VEHICLE
MAINTENANCE
TECHNICAL
SPECIFICATIONS
INDEX
DASHBOARD
AND CONTROLS
ABS SYSTEM INTERVENTION
The driver can tell the ABS system has
come into action because the brake pedal
pulsates slightly and the system gets noisi-
er: it means that the vehicle speed should
be altered to fit the type of road surface.
If the ABS system cuts in, it
is a sign that the grip be-
tween tyre and the road surface has
reached the limit: you must slow
down to match the speed to the road
grip available.
WARNING
ABS SYSTEM
If you have never driven a vehicle with ABS
before, you should practice using the sys-
tem on slippery terrain, obviously with the
necessary safety precautions and keeping
to the Highway Code of the country you
are in. It is also a good idea to read the fol-
lowing information carefully.
The ABS system, integral with the braking
system, prevents the wheels from locking
when braking, makes the most of road grip
and gives the best control when emergency
braking under difficult road conditions.
System is completed by EBD (Electronic
Braking force Distribution), which dis-
tributes the braking action between front
and rear wheels.
IMPORTANT To have the maximum ef-
ficiency of the braking system, it is neces-
sary a setting period of about 500 km
(with new vehicle after replacing brake
pads/discs): during this period it is better
to avoid sharp, repeated and prolonged
brakes.The ABS exploits the tyre-
road grip at the best, but it
cannot improve it; you should there-
fore take every care when driving on
slippery surfaces without taking un-
necessary risks.
WARNINGFAILURE INDICATIONS
ABS failure
ABS failure is indicated by the turning on
of warning light
>on the instrument pan-
el together with the dedicated message on
the multifunction display (where provid-
ed), (see section “Warning lights and mes-
sages”).
In this case the braking system is still effi-
cient, though without the aid of the ABS
system. Drive carefully to the closest Fiat
Dealership to have the system checked.
Page 86 of 238
85
SAFETY
DEVICES
CORRECT USE
OF THE
VEHICLE
WARNING
LIGHTS AND
MESSAGES
IN AN
EMERGENCY
VEHICLE
MAINTENANCE
TECHNICAL
SPECIFICATIONS
INDEX
DASHBOARD
AND CONTROLS
BRAKE ASSIST
(emergency braking assistance
integral with ESP) (where provided)
The system, which cannot be cut out, rec-
ognizes emergency braking (on the ground
of the brake pedal operation speed) and
considerably increases the pressure in the
brake circuit.
Brake Assist is deactivated on the versions
equipped with ESP, in the event of ESP sys-
tem failure (indicated by warning light
áswitching on together with the message
on the multifunction display, where pro-
vided).
ESP SYSTEM
(Electronic Stability
Program)
(where provided)
The ESP system is an electronic system
controlling the vehicle stability in the event
of tyre grip loss.
The ESP system is therefore particularly
useful when grip conditions of the road sur-
faces changes.
In addition to the ESP system, ASR system
and Hill Holder, (where provided) also the
MSR system (adjusting the engine braking
torque) and the HBA system (improving
the braking force during emergency brak-
ing) are provided.
ESP SYSTEM INTERVENTION
It is signalled by the blinking of the warn-
ing light áon the instrument panel, to in-
form the driver that the vehicle is in crit-
ical stability and grip conditions.
When the ABS cuts in, and
you feel the brake pedal pul-
sating, do not remove your foot, but
keep it pressed; in doing so you will
stop in the shortest amount of space
possible under the current road con-
ditions.
WARNING
EBD failure
EBD failure is indicated by the turning on
of warning lights
>and xon the in-
strument panel together with the dedi-
cated message on the multifunction dis-
play (where provided), (see section
“Warning lights and messages”).
In this case with sharp braking the rear
wheels might lock too early, with the pos-
sibility of skidding. Drive extremely care-
fully to the nearest Fiat Dealership to have
the system checked.
If warning light xalone
comes on (together with the
message on the multifunction display,
where provided), stop the vehicle im-
mediately and contact the nearest Fi-
at Dealership. Fluid leaks from the hy-
draulic system, in fact, can compro-
mise the braking system, both tradi-
tional systems and systems with ABS.
WARNING