display FIAT DUCATO 2011 Owner handbook (in English)
[x] Cancel search | Manufacturer: FIAT, Model Year: 2011, Model line: DUCATO, Model: FIAT DUCATO 2011Pages: 287, PDF Size: 4.42 MB
Page 27 of 287
23
KNOWING
YOUR CAR
SAFETY
STARTING
AND
DRIVING
WARNING
LIGHTS AND
MESSAGES
IN AN
EMERGENCY
MAINTENANCE
AND CARE
TECHNICAL
SPECIFICATIONS
INDEX
– once you have selected the submenu to be changed,
press the button MODE briefly;
– when accessing the “Time” submenu:briefly press the
button MODE, “hours” will flash on the display;
– press button
▲or ▼to adjust;
– briefly press button MODE: “minutes” starts flashing
on the display;
– press button
▲or ▼to adjust;
– when accessing the “Format” submenu:briefly press
button MODE : the previously set display format will
flash on the display;
– press
▲or ▼to select 24h or 12h.
When you have made the required settings, briefly press
the MODE button to go back to the submenu screen or
hold the button down to go back to the main menu
screen without storing the new settings.
– press the MODE button again for a while to return to
the standard screen or to the main menu according to
where you are in the menu. Trip B On/Off (trip B data)
This function can be used to activate (On) or deactivate
(Off) the Trip B display (partial trip).
For further information see “Trip computer”.
Proceed as follows to switch the function on and off:
– briefly press button MODE: ON or OFF flashes on
the display (according to the previous setting);
– press button
▲or ▼to select;
– press the MODE button briefly to return to the menu
screen or press the button for longer to return to the
standard screen without memorising.
Setting the clock (Set time)
This function enables the clock to be set through two
submenus: “Time” and “Format”.
To carry out the adjustment, proceed as follows:
– briefly press the MODE button and two submenus,
“Time” and “Format”, are displayed;
– press
▲or ▼to move between the two submenus;
Page 28 of 287
Audio information (See sound system)
With this function the display shows information about
the sound system.
– Radio: selected radio station frequency or RDS
message, automatic tuning activation or AutoSTore;
– audio CD, MP3 CD: track number;
– CD Changer: CD number and track number;
To show the sound system information on the display
(On) or clear it (Off), proceed as follows:
– briefly press the button MODE: (On) or (Off) will
flash on the display (depending on the previous setting);
– press button
▲or ▼to select;
– press the MODE button briefly to return to the menu
screen or press the button for longer to return to the
standard screen without memorising.
Automatic central door locking
with vehicle
running (Autoclose)
When activated (On), this function locks the doors
automatically when the vehicle speed exceeds 20 km/h.
Proceed as follows to activate (On) or deactivate (Off)
this function:
– briefly press the button MODE to display one
submenu;
– briefly press the button MODE : “On” or “Off” flash
on the display (depending on the previous setting);
– press button
▲or ▼to select; Set date (Set Date)
Using this function you can update the date
(day – month – year).
Proceed as follows to update:
– briefly press button MODE: the day starts flashing on
the display (dd);
– press button
▲or ▼to adjust;
– briefly press button MODE: the month starts flashing
on the display (mm);
– press button
▲or ▼to adjust;
– briefly press button MODE: the year starts flashing on
the display (yyyy);
– press
▲or ▼to adjust the value.
NOTE The setting increases or decreases by one unit
each time button
▲or ▼is pressed. Hold the button
pressed to increase/decrease the setting rapidly and
automatically. Complete the setting by briefly pressing
the button when you approach the required value.
– press the MODE button briefly to return to the menu
screen or press the button for longer to return to the
standard screen without memorising.
24
KNOWING
YOUR CAR
SAFETY
STARTING
AND
DRIVING
WARNING
LIGHTS AND
MESSAGES
IN AN
EMERGENCY
MAINTENANCE
AND CARE
TECHNICAL
SPECIFICATIONS
INDEX
Page 29 of 287
25
KNOWING
YOUR CAR
SAFETY
STARTING
AND
DRIVING
WARNING
LIGHTS AND
MESSAGES
IN AN
EMERGENCY
MAINTENANCE
AND CARE
TECHNICAL
SPECIFICATIONS
INDEX
– when accessing the “Distance” submenu: briefly press the
button MODE and the display will show “km” or “mi”
(depending on the previous setting);
– press button
▲or ▼to select;
– when accessing the “Consumption” submenu: briefly
press button MODE: the display will show “km/l”,
“l/100 km” or “mpg” (according to previous setting);
If the distance unit is set to km, you can set the fuel
consumption unit to km/l or l/100 km.
If the distance unit is set to mi, fuel consumption is
displayed in mpg.
– press button
▲or ▼to select;
– when accessing the “Temperature” submenu: briefly
press button MODE: the display will show “°C” or “°F”
(according to previous setting);
– press button
▲or ▼to select;
When you have made the required settings, briefly press
the MODE button to go back to the submenu screen or
hold the button down to go back to the main menu
screen without storing the new settings.
– press the MODE button again for a while to return to
the standard screen or to the main menu according to
where you are in the menu. – press the MODE button briefly to return to the
submenu screen or give the button a long press to
return to the main menu screen without storing;
– press the MODE button again for a while to return to
the standard screen or to the main menu according to
where you are in the menu.
Set units (Measurement units)
With this function is possible to set the unit of
measurement in three submenus: “Distance”,
“Consumption” and “Temperature”.
To set the required unit proceed as follows:
– briefly press MODE to display the three submenus;
– press
▲or ▼to move between the three submenus;
– once you have selected the submenu to be changed,
press the button MODE briefly;
Page 30 of 287
Adjust the button volume (Button Vol.)
This function is used to set the volume of the roger-
beep accompanying the activation of buttons MODE,
▲and ▼to 8 levels.
To set the desired volume, proceed as follows:
– press the MODE button briefly, making the display
flash the previously set volume level;
– press button
▲or ▼to adjust;
– press the MODE button briefly to return to the menu
screen or press the button for longer to return to the
standard screen without memorising.
S.B.R. buzzer reactivation (Belt Buzzer)
This function can be displayed only after a Fiat
Dealership has deactivated the SBR system (see “SBR
system” in the “Safety” section). Selecting the language (Language)
Display messages can be shown in different languages:
Italian, German, English, Spanish, French, Portuguese
and Dutch.
To set the desired language, proceed as follows:
– briefly press button MODE: the previously set
language starts flashing on the display;
– press button ▲or ▼to select;
– press the MODE button briefly to return to the menu
screen or press the button for longer to return to the
standard screen without memorising.
Adjust the failure/warning buzzer volume
(Buzzer Volume)
With this function the volume of the buzzer which
accompanies the display of any failure/warning can be
adjusted according to 8 levels.
To set the desired volume, proceed as follows:
– press the MODE button briefly, making the display
flash the previously set volume level;
– press button
▲or ▼to adjust;
– press the MODE button briefly to return to the menu
screen or press the button for longer to return to the
standard screen without memorising.
26
KNOWING
YOUR CAR
SAFETY
STARTING
AND
DRIVING
WARNING
LIGHTS AND
MESSAGES
IN AN
EMERGENCY
MAINTENANCE
AND CARE
TECHNICAL
SPECIFICATIONS
INDEX
Page 31 of 287
27
KNOWING
YOUR CAR
SAFETY
STARTING
AND
DRIVING
WARNING
LIGHTS AND
MESSAGES
IN AN
EMERGENCY
MAINTENANCE
AND CARE
TECHNICAL
SPECIFICATIONS
INDEX
NOTE The “Scheduled Maintenance Plan” sets out
different service intervals depending on the engine type.
This indication will appear automatically with the key at
MAR-ONstarting from 2,000 km (or 1240 mi) and will
be presented automatically every 200 km (or 124 mi).
Oil change notification messages are displayed in the
same way. Use keys
▲and ▼to display service and oil
change due dates alternately. Below 200 km servicing
indications are more frequent. The display will be in
kilometres or miles depending on the measurement unit
settings. When the next scheduled service is
approaching, the message “Service” will appear on the
display followed by the number of kilometres or miles
left when the key is turned to
MAR-ON. Contact a Fiat
Dealership to carry out any service operation in the
“Scheduled servicing plan” and to reset the display. Scheduled Servicing (Service)
Using this function you can display information about
the mileage intervals for car servicing.
To consult this display, proceed as follows:
– briefly press button MODE: the display shows service
requirements in km or mi according to the previous
setting (see paragraph “Unit of measure”);
– briefly press button MODE to go back to the menu
screen or press the button for longer to go back to the
standard screen.
Page 32 of 287
28
KNOWING
YOUR CAR
SAFETY
STARTING
AND
DRIVING
WARNING
LIGHTS AND
MESSAGES
IN AN
EMERGENCY
MAINTENANCE
AND CARE
TECHNICAL
SPECIFICATIONS
INDEX
MODE
MODE
MODE
▼ ▲
▼ ▲
▼ ▲
▼ ▲
F0N1022g F0N1023g
F0N1024g F0N1025g
F0N1026g F0N1022gF0N1022g
F0N1027gF0N1028g
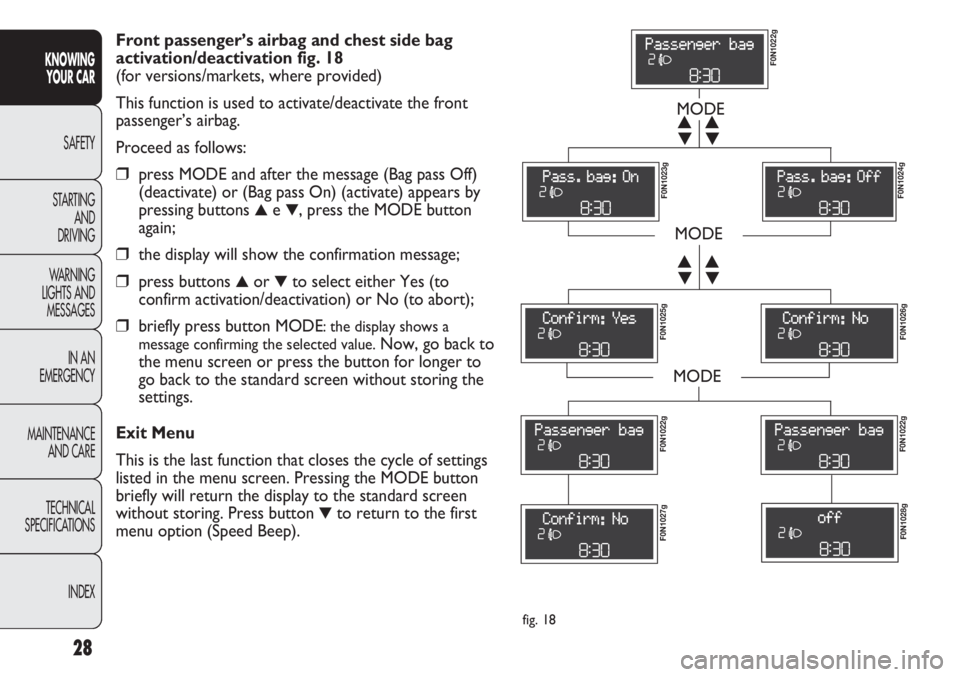
Front passenger’s airbag and chest side bag
activation/deactivation fig. 18
(for versions/markets, where provided)
This function is used to activate/deactivate the front
passenger’s airbag.
Proceed as follows:
❒press MODE and after the message (Bag pass Off)
(deactivate) or (Bag pass On) (activate) appears by
pressing buttons
▲e ▼, press the MODE button
again;
❒the display will show the confirmation message;
❒press buttons ▲or ▼to select either Yes (to
confirm activation/deactivation) or No (to abort);
❒briefly press button MODE: the display shows a
message confirming the selected value.
Now, go back to
the menu screen or press the button for longer to
go back to the standard screen without storing the
settings.
Exit Menu
This is the last function that closes the cycle of settings
listed in the menu screen. Pressing the MODE button
briefly will return the display to the standard screen
without storing. Press button
▼to return to the first
menu option (Speed Beep).
fig. 18
Page 33 of 287
29
KNOWING
YOUR CAR
SAFETY
STARTING
AND
DRIVING
WARNING
LIGHTS AND
MESSAGES
IN AN
EMERGENCY
MAINTENANCE
AND CARE
TECHNICAL
SPECIFICATIONS
INDEX
Values displayed
External temperature
Indicates the temperature outside the vehicle passenger
compartment.
Range (for versions/markets where provided)
It indicates the distance that can still be travelled based
on the fuel in the tank assuming that driving conditions
will not change. The message “---” will appear on the
display in the following cases:
– range value lower than 50 km (or 30 mi)
– vehicle left parked with engine running for long
period.
Trip distance
This value shows the distance covered from the start of
the new mission.
Average consumption (for versions/markets where provided)
This value shows the average consumption from the
start of the new mission.
Instant consumption (for versions/markets where provided)
This indicates instant fuel consumption and it is
constantly updated. The message “---” will appear on
the display if the vehicle is parked with the engine
running.
Average speed
Represents the average vehicle speed as a function of
the overall time elapsed since the start of a new mission.TRIP COMPUTER
General information
The “Trip computer” is used to display information on
vehicle operation when the key is turned to
MAR-ON.
This function allows you to define two separate trips,
called “Trip A” and “Trip B”, for monitoring the
vehicle’s “complete mission” (journey) in a reciprocally
independent manner. Both functions can be reset (reset
means start of a new journey).
“Trip A” is used to display the figures relating to:
– Outside temperature
– Range
– Trip distance
– Average consumption
– Current consumption
– Average speed
– Trip time (driving time).
“Trip B”, available on multifunction display only, is used
to display the figures relating to:
– Trip distance B
– Average consumption B
– Average speed B
– Trip time B (driving time).
NOTE “Trip B” function can be excluded (see paragraph
“Trip B on”). “Range” and “Instant consumption”
parameters cannot be reset.
Page 34 of 287
F0N0019mfig. 19
IMPORTANT If the reset operation is carried out when
“Trip B” is being displayed, only the information
associated with this function is reset.
Start of journey procedure
With the ignition key in the MAR-ON position, reset by
pressing the TRIP button and keeping it pressed for
more than 2 seconds.
Exit Trip
To quit the Trip function: keep button MODE pressed
for over 2 seconds. Trip time
This value shows the time elapsed since the start of the
new mission.
IMPORTANT In the absence of information, Trip
Computer values are displayed with “----”. When
normal operating conditions are restarted, calculation of
different units will restart regularly. The values displayed
before the failure will not be reset nor will a new
mission be started.
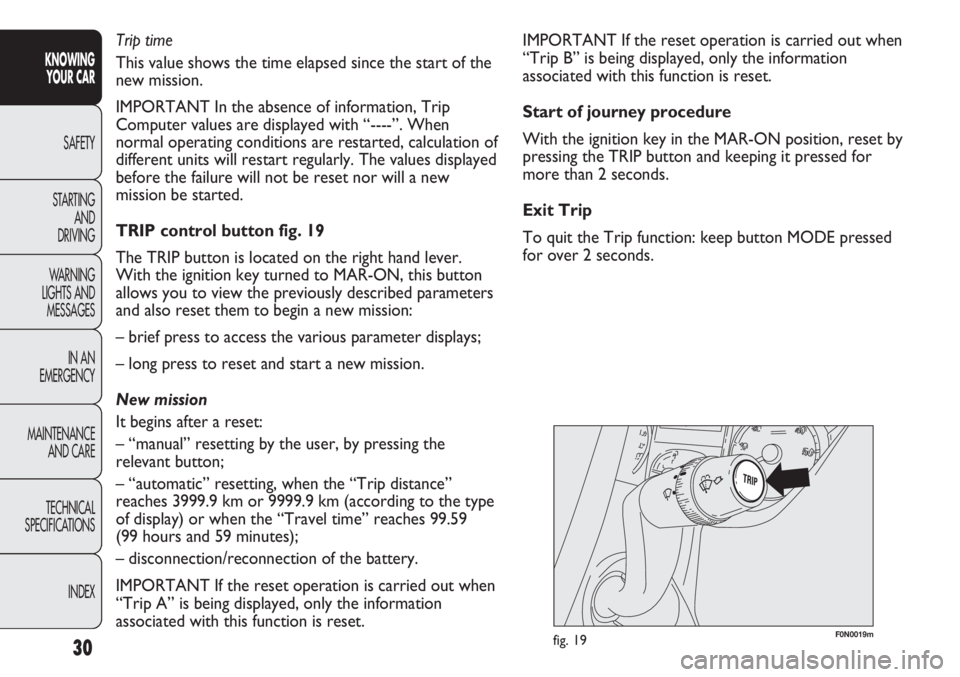
TRIP control button fig. 19
The TRIP button is located on the right hand lever.
With the ignition key turned to MAR-ON, this button
allows you to view the previously described parameters
and also reset them to begin a new mission:
– brief press to access the various parameter displays;
– long press to reset and start a new mission.
New mission
It begins after a reset:
– “manual” resetting by the user, by pressing the
relevant button;
– “automatic” resetting, when the “Trip distance”
reaches 3999.9 km or 9999.9 km (according to the type
of display) or when the “Travel time” reaches 99.59
(99 hours and 59 minutes);
– disconnection/reconnection of the battery.
IMPORTANT If the reset operation is carried out when
“Trip A” is being displayed, only the information
associated with this function is reset.
30
KNOWING
YOUR CAR
SAFETY
STARTING
AND
DRIVING
WARNING
LIGHTS AND
MESSAGES
IN AN
EMERGENCY
MAINTENANCE
AND CARE
TECHNICAL
SPECIFICATIONS
INDEX
Page 58 of 287
54
KNOWING
YOUR CAR
SAFETY
STARTING
AND
DRIVING
WARNING
LIGHTS AND
MESSAGES
IN AN
EMERGENCY
MAINTENANCE
AND CARE
TECHNICAL
SPECIFICATIONS
INDEX
The intake air temperature is always automatically
controlled according to the temperature set on the display
(except for when the system is off or in certain conditions
when the compressor is not running).
The system allows the following parameters and
functions to be set or altered manually: air temperature,
fan speed (continuous variation); air distribution in
seven positions; compressor enablement, fast
defrosting/demisting function; air recirculation; switching
off of the system;
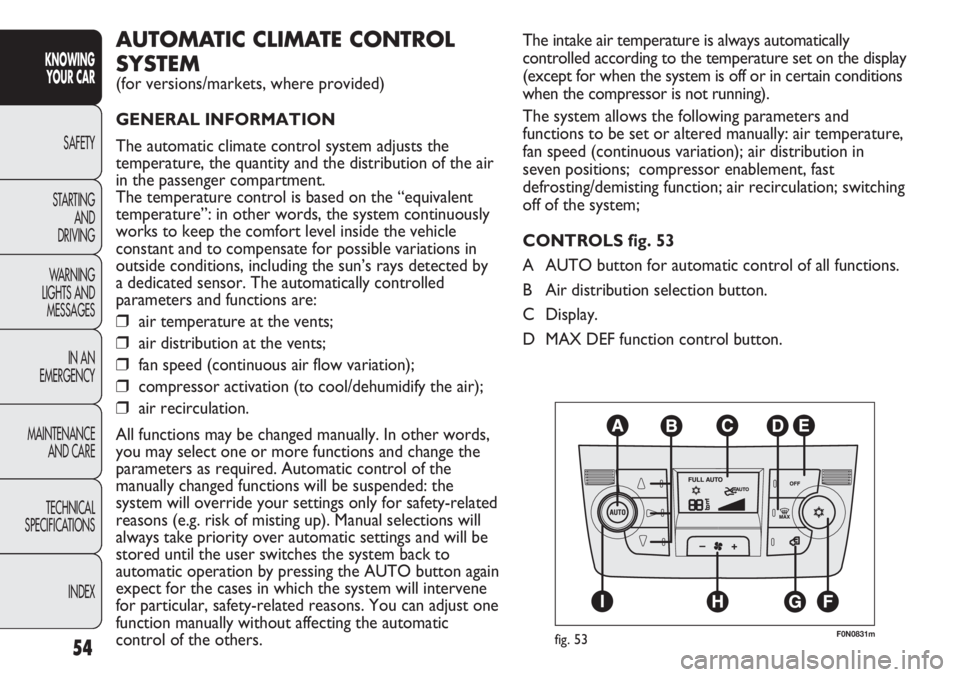
CONTROLS fig. 53
A AUTO button for automatic control of all functions.
B Air distribution selection button.
C Display.
D MAX DEF function control button.AUTOMATIC CLIMATE CONTROL
SYSTEM
(for versions/markets, where provided)
GENERAL INFORMATION
The automatic climate control system adjusts the
temperature, the quantity and the distribution of the air
in the passenger compartment.
The temperature control is based on the “equivalent
temperature”: in other words, the system continuously
works to keep the comfort level inside the vehicle
constant and to compensate for possible variations in
outside conditions, including the sun’s rays detected by
a dedicated sensor. The automatically controlled
parameters and functions are:
❒air temperature at the vents;
❒air distribution at the vents;
❒fan speed (continuous air flow variation);
❒compressor activation (to cool/dehumidify the air);
❒air recirculation.
All functions may be changed manually. In other words,
you may select one or more functions and change the
parameters as required. Automatic control of the
manually changed functions will be suspended: the
system will override your settings only for safety-related
reasons (e.g. risk of misting up). Manual selections will
always take priority over automatic settings and will be
stored until the user switches the system back to
automatic operation by pressing the AUTO button again
expect for the cases in which the system will intervene
for particular, safety-related reasons. You can adjust one
function manually without affecting the automatic
control of the others.
F0N0831mfig. 53
Page 59 of 287
55
KNOWING
YOUR CAR
SAFETY
STARTING
AND
DRIVING
WARNING
LIGHTS AND
MESSAGES
IN AN
EMERGENCY
MAINTENANCE
AND CARE
TECHNICAL
SPECIFICATIONS
INDEX
E System off button.
F Compressor enabling/disabling button.
G Air recirculation control button.
H Fan speed increase/decrease control buttons.
I Temperature increase/decrease control knob.
USING THE CLIMATE CONTROL SYSTEM
The system can be started in different ways, but it is
advisable to start by pressing the AUTO button and
then turning the knob to set the temperature required
on the display. The system will start running
automatically in this way and the set temperature will be
reached as quickly as possible. The system will adjust
the temperature, the quantity and the distribution of the
air introduced into the passenger compartment and, by
managing the recirculation function, the activation of the
compressor. During fully automatic operation, the only
manual intervention required is the possible activation
of the following functions:
❒Òair recirculation, to keep it always on or off;
❒Zto speed up demisting/defrosting of the front
windows, rear window and door mirrors.During fully automatic system operation, you can change
the set temperature, air distribution and fan speed at
any time by using the relevant buttons or knobs: the
system will automatically change its settings to adjust to
the new requirements. During fully automatic operation
(FULL AUTO), the word FULL will disappear if the air
distribution and/or flow rate and/or engagement of the
compressor and/or recirculation settings are changed.
In this way, the functions will switch from automatic to
manual control until the AUTO button is pressed again.
With one or more functions turned on manually, the
adjustment of the intake air temperature continues to
be managed automatically, except with the compressor
switched off: if this is the case, the temperature of the
air introduced into the passenger compartment cannot
be lower than that of the outside air.
CONTROLS
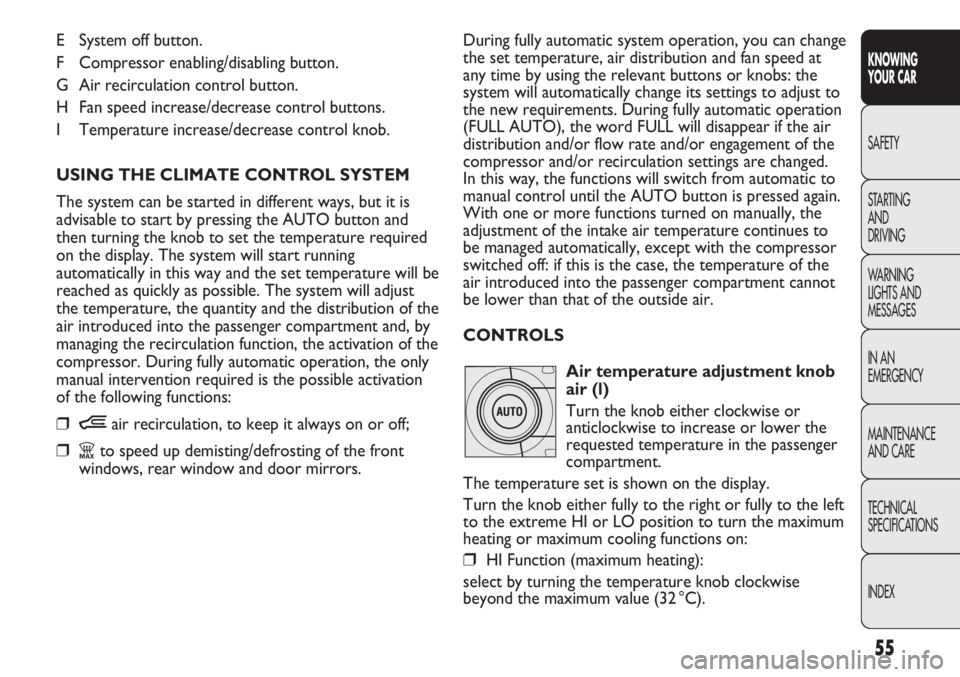
Air temperature adjustment knob
air (l)
Turn the knob either clockwise or
anticlockwise to increase or lower the
requested temperature in the passenger
compartment.
The temperature set is shown on the display.
Turn the knob either fully to the right or fully to the left
to the extreme HI or LO position to turn the maximum
heating or maximum cooling functions on:
❒HI Function (maximum heating):
select by turning the temperature knob clockwise
beyond the maximum value (32 °C).