display FIAT DUCATO 2011 Owner handbook (in English)
[x] Cancel search | Manufacturer: FIAT, Model Year: 2011, Model line: DUCATO, Model: FIAT DUCATO 2011Pages: 287, PDF Size: 4.42 MB
Page 7 of 287
3
KNOWING
YOUR CAR
SAFETY
STARTING
AND
DRIVING
WARNING
LIGHTS AND
MESSAGES
IN AN
EMERGENCY
MAINTENANCE
AND CARE
TECHNICAL
SPECIFICATIONS
INDEX
KNOWING YOUR CAR
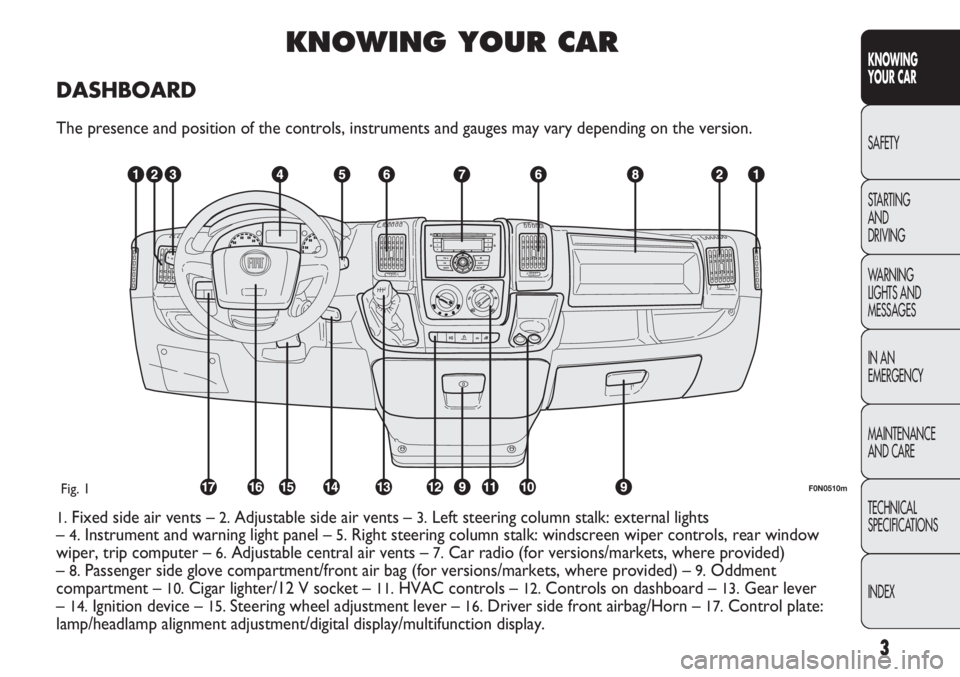
DASHBOARD
The presence and position of the controls, instruments and gauges may vary depending on the version.
1.Fixed side air vents –2.Adjustable side air vents – 3.Left steering column stalk: external lights
–
4.Instrument and warning light panel – 5.Right steering column stalk: windscreen wiper controls, rear window
wiper, trip computer –
6.Adjustable central air vents – 7.Car radio (for versions/markets, where provided)
–
8.Passenger side glove compartment/front air bag (for versions/markets, where provided) – 9.Oddment
compartment –
10.Cigar lighter/12 V socket – 11.HVAC controls – 12.Controls on dashboard – 13.Gear lever
–
14.Ignition device – 15. Steering wheel adjustment lever – 16.Driver side front airbag/Horn – 17.Control plate:
lamp/headlamp alignment adjustment/digital display/multifunction display.
F0N0510mFig. 1
Page 8 of 287
4
KNOWING
YOUR CAR
SAFETY
STARTING
AND
DRIVING
WARNING
LIGHTS AND
MESSAGES
IN AN
EMERGENCY
MAINTENANCE
AND CARE
TECHNICAL
SPECIFICATIONS
INDEX
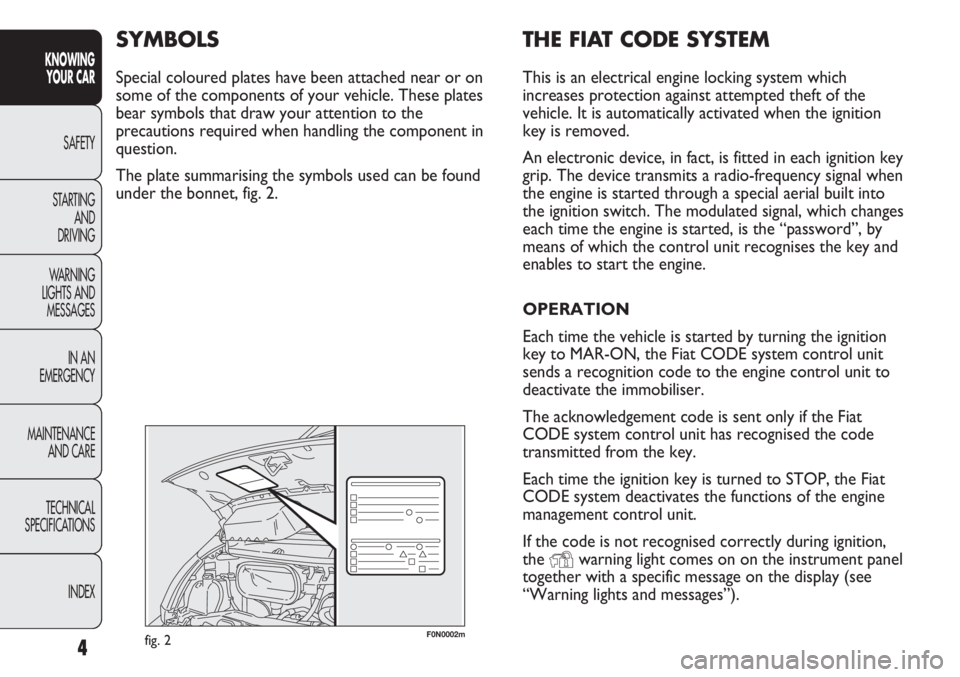
F0N0002mfig. 2
THE FIAT CODE SYSTEM
This is an electrical engine locking system which
increases protection against attempted theft of the
vehicle. It is automatically activated when the ignition
key is removed.
An electronic device, in fact, is fitted in each ignition key
grip. The device transmits a radio-frequency signal when
the engine is started through a special aerial built into
the ignition switch. The modulated signal, which changes
each time the engine is started, is the “password”, by
means of which the control unit recognises the key and
enables to start the engine.
OPERATION
Each time the vehicle is started by turning the ignition
key to MAR-ON, the Fiat CODE system control unit
sends a recognition code to the engine control unit to
deactivate the immobiliser.
The acknowledgement code is sent only if the Fiat
CODE system control unit has recognised the code
transmitted from the key.
Each time the ignition key is turned to STOP, the Fiat
CODE system deactivates the functions of the engine
management control unit.
If the code is not recognised correctly during ignition,
the
Ywarning light comes on on the instrument panel
together with a specific message on the display (see
“Warning lights and messages”).
SYMBOLS
Special coloured plates have been attached near or on
some of the components of your vehicle. These plates
bear symbols that draw your attention to the
precautions required when handling the component in
question.
The plate summarising the symbols used can be found
under the bonnet, fig. 2.
Page 16 of 287
BREAK IN ATTEMPT INDICATION
Any break in attempt is indicated by the turning on of
warning light
Yon the instrument panel together with
the message on the multifunction display (where
provided), (see section “Warning lights and messages”).
DISABLING THE ALARM
To permanently disable the alarm (e.g. during a lengthy
period of idleness), simply lock the vehicle by turning
the metal insert of the key with remote control in the
lock.
IMPORTANT If the battery of the key with the remote
control goes flat or the system fails, the alarm can be
switched off by placing the key in the ignition switch and
turning it to MAR-ON.
12
KNOWING
YOUR CAR
SAFETY
STARTING
AND
DRIVING
WARNING
LIGHTS AND
MESSAGES
IN AN
EMERGENCY
MAINTENANCE
AND CARE
TECHNICAL
SPECIFICATIONS
INDEX
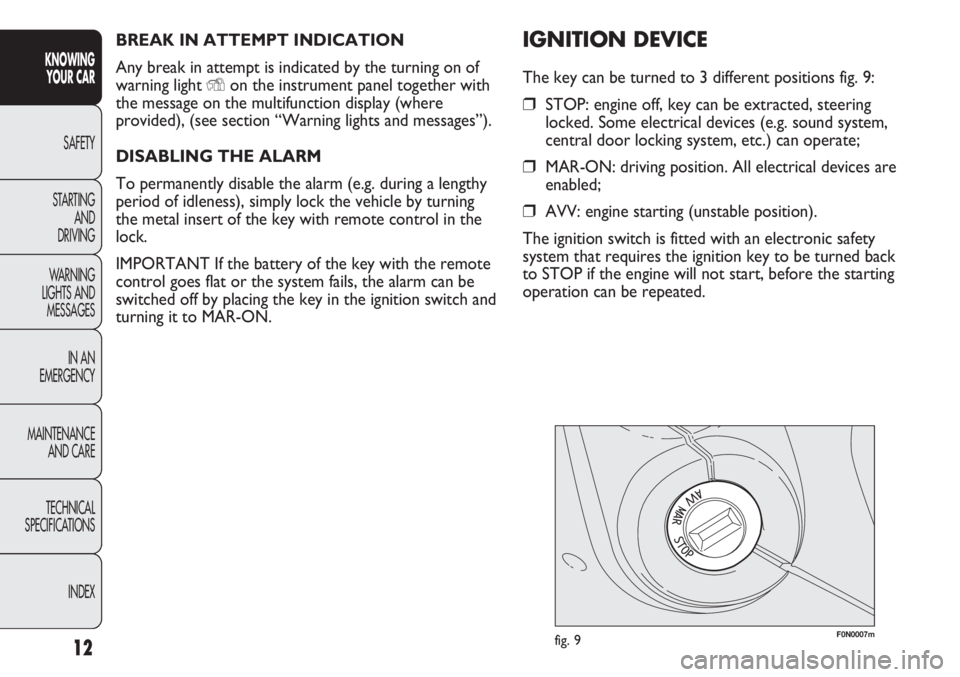
IGNITION DEVICE
The key can be turned to 3 different positions fig. 9:
❒STOP: engine off, key can be extracted, steering
locked. Some electrical devices (e.g. sound system,
central door locking system, etc.) can operate;
❒MAR-ON: driving position. All electrical devices are
enabled;
❒AVV: engine starting (unstable position).
The ignition switch is fitted with an electronic safety
system that requires the ignition key to be turned back
to STOP if the engine will not start, before the starting
operation can be repeated.
F0N0007mfig. 9
Page 18 of 287
14
KNOWING
YOUR CAR
SAFETY
STARTING
AND
DRIVING
WARNING
LIGHTS AND
MESSAGES
IN AN
EMERGENCY
MAINTENANCE
AND CARE
TECHNICAL
SPECIFICATIONS
INDEX
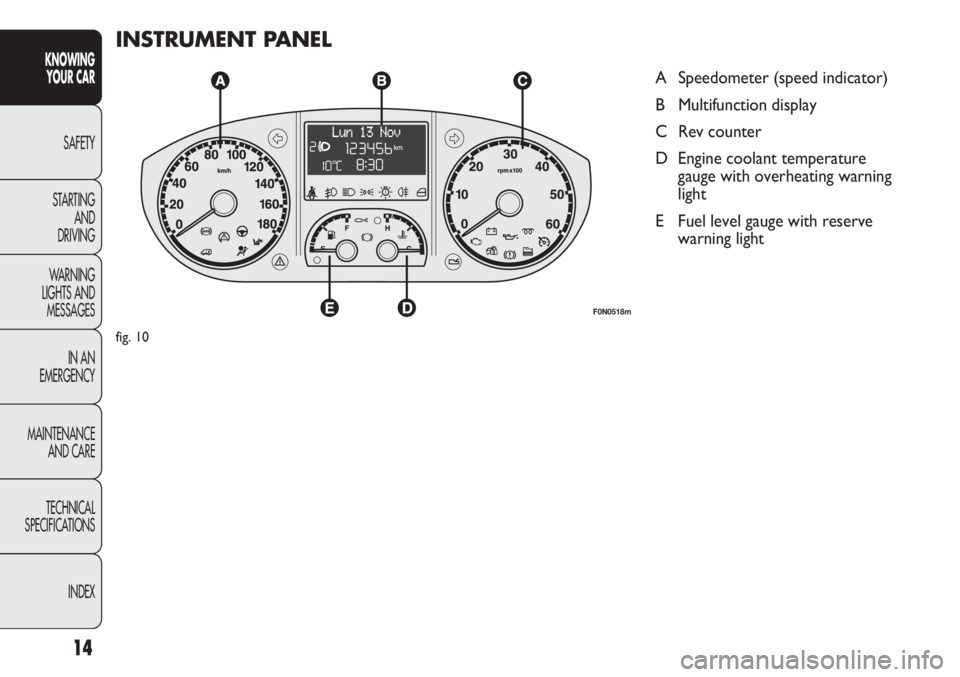
INSTRUMENT PANEL
A Speedometer (speed indicator)
B Multifunction display
C Rev counter
D Engine coolant temperature
gauge with overheating warning
light
E Fuel level gauge with reserve
warning light
F0N0518m
fig. 10
Page 20 of 287
F0N0014mfig. 13F0N0015mfig. 14
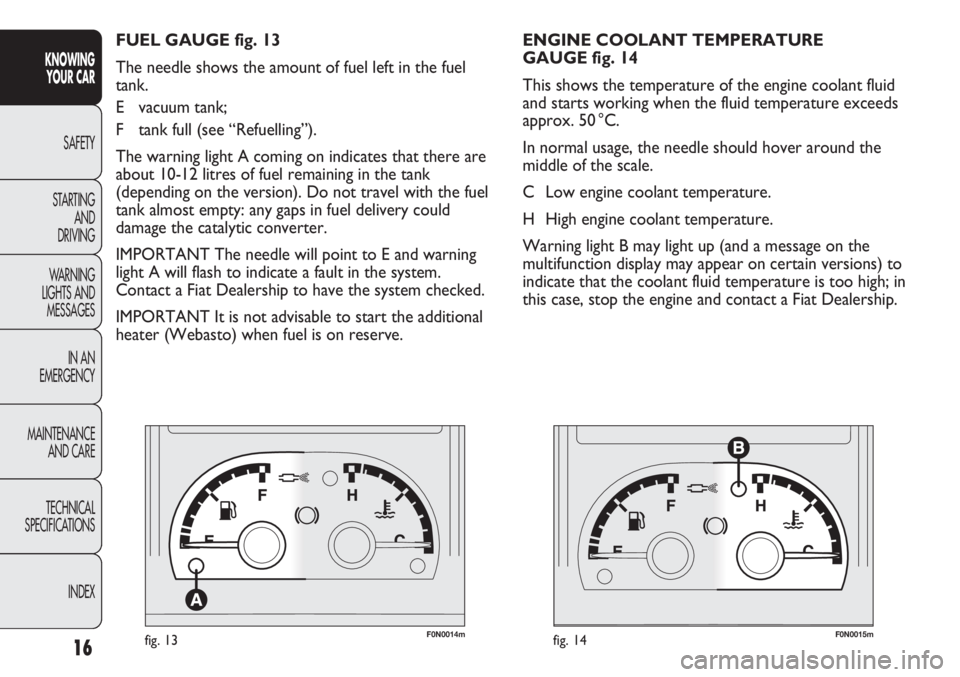
ENGINE COOLANT TEMPERATURE
GAUGE fig. 14
This shows the temperature of the engine coolant fluid
and starts working when the fluid temperature exceeds
approx. 50 °C.
In normal usage, the needle should hover around the
middle of the scale.
C Low engine coolant temperature.
H High engine coolant temperature.
Warning light B may light up (and a message on the
multifunction display may appear on certain versions) to
indicate that the coolant fluid temperature is too high; in
this case, stop the engine and contact a Fiat Dealership. FUEL GAUGE fig. 13
The needle shows the amount of fuel left in the fuel
tank.
E vacuum tank;
F tank full (see “Refuelling”).
The warning light A coming on indicates that there are
about 10-12 litres of fuel remaining in the tank
(depending on the version). Do not travel with the fuel
tank almost empty: any gaps in fuel delivery could
damage the catalytic converter.
IMPORTANT The needle will point to E and warning
light A will flash to indicate a fault in the system.
Contact a Fiat Dealership to have the system checked.
IMPORTANT It is not advisable to start the additional
heater (Webasto) when fuel is on reserve.
16
KNOWING
YOUR CAR
SAFETY
STARTING
AND
DRIVING
WARNING
LIGHTS AND
MESSAGES
IN AN
EMERGENCY
MAINTENANCE
AND CARE
TECHNICAL
SPECIFICATIONS
INDEX
Page 21 of 287
17
KNOWING
YOUR CAR
SAFETY
STARTING
AND
DRIVING
WARNING
LIGHTS AND
MESSAGES
IN AN
EMERGENCY
MAINTENANCE
AND CARE
TECHNICAL
SPECIFICATIONS
INDEX
If the needle reaches the red area, stop
the engine immediately and contact
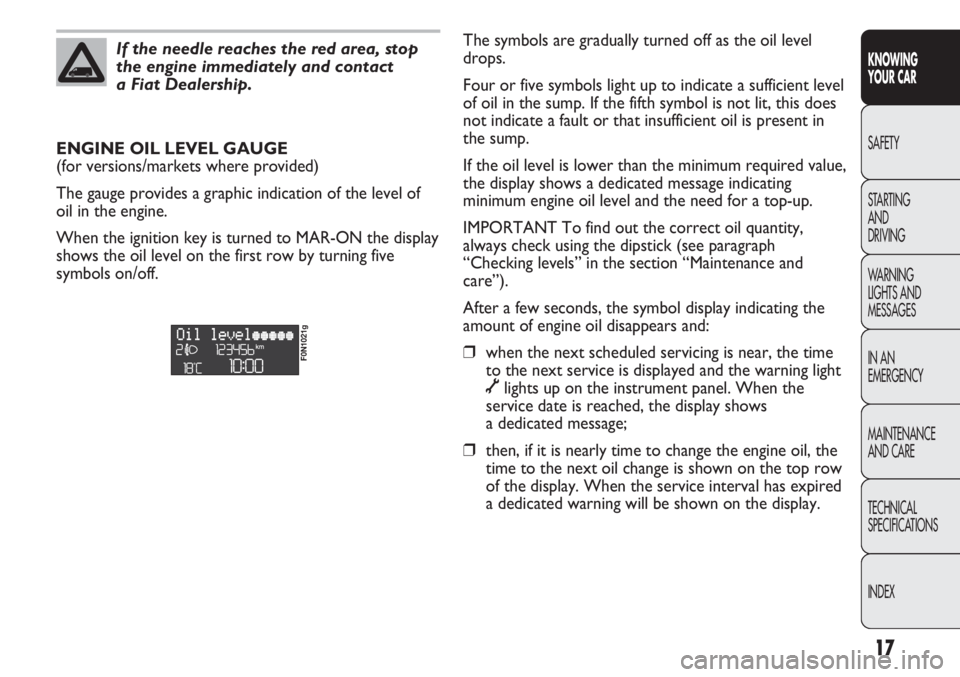
a Fiat Dealership.The symbols are gradually turned off as the oil level
drops.
Four or five symbols light up to indicate a sufficient level
of oil in the sump. If the fifth symbol is not lit, this does
not indicate a fault or that insufficient oil is present in
the sump.
If the oil level is lower than the minimum required value,
the display shows a dedicated message indicating
minimum engine oil level and the need for a top-up.
IMPORTANT To find out the correct oil quantity,
always check using the dipstick (see paragraph
“Checking levels” in the section “Maintenance and
care”).
After a few seconds, the symbol display indicating the
amount of engine oil disappears and:
❒when the next scheduled servicing is near, the time
to the next service is displayed and the warning light
õlights up on the instrument panel. When the
service date is reached, the display shows
a dedicated message;
❒then, if it is nearly time to change the engine oil, the
time to the next oil change is shown on the top row
of the display. When the service interval has expired
a dedicated warning will be shown on the display. ENGINE OIL LEVEL GAUGE
(for versions/markets where provided)
The gauge provides a graphic indication of the level of
oil in the engine.
When the ignition key is turned to MAR-ON the display
shows the oil level on the first row by turning five
symbols on/off.
F0N1021g
Page 22 of 287
F0N0519mfig. 15F0N0017mfig. 16
NOTE When opening one of the front doors, the
display will turn on and show for a few seconds the
clock and the kilometres or miles covered.
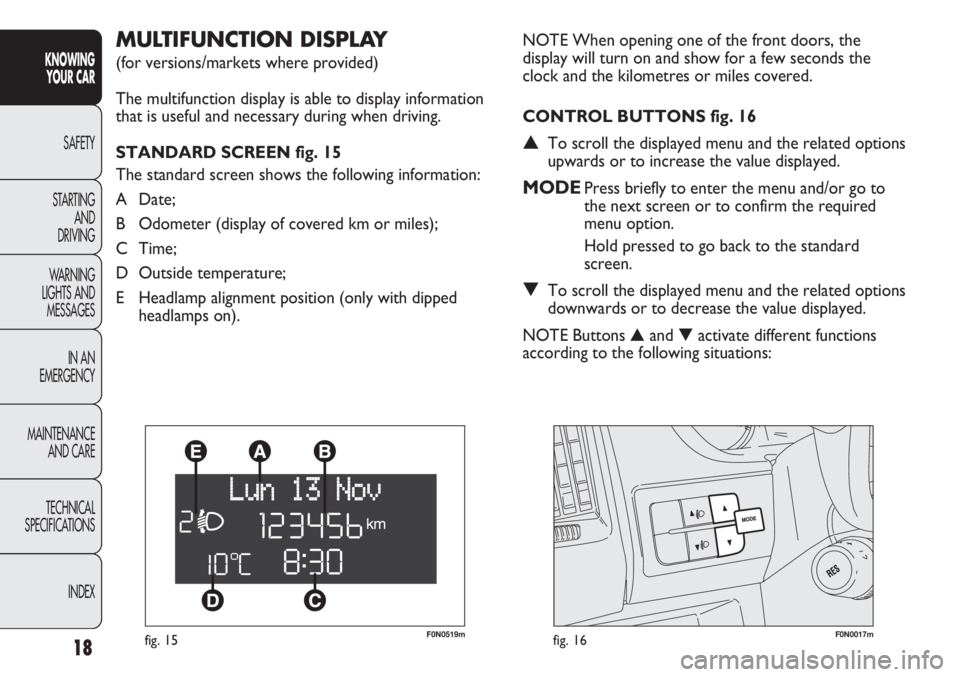
CONTROL BUTTONS fig. 16
▲To scroll the displayed menu and the related options
upwards or to increase the value displayed.
MODEPress briefly to enter the menu and/or go to
the next screen or to confirm the required
menu option.
Hold pressed to go back to the standard
screen.
▼To scroll the displayed menu and the related options
downwards or to decrease the value displayed.
NOTE Buttons ▲and ▼activate different functions
according to the following situations:
MULTIFUNCTION DISPLAY
(for versions/markets where provided)
The multifunction display is able to display information
that is useful and necessary during when driving.
STANDARD SCREEN fig. 15
The standard screen shows the following information:
A Date;
B Odometer (display of covered km or miles);
C Time;
D Outside temperature;
E Headlamp alignment position (only with dipped
headlamps on).
18
KNOWING
YOUR CAR
SAFETY
STARTING
AND
DRIVING
WARNING
LIGHTS AND
MESSAGES
IN AN
EMERGENCY
MAINTENANCE
AND CARE
TECHNICAL
SPECIFICATIONS
INDEX
Page 24 of 287
Hold down the MODE button:
– to return to the set up menu if you are in the main
menu;
– to return to the main menu if you are at another point
of the menu (e.g.: at submenu option setting level, at
submenu level or at main menu option setting level);
– to save only the changes stored by the user (and
confirmed by pressing button MODE).
The environment of the Set Up menu is timed; when
the menu is exited due to expiry of the time allowed,
only the changes already stored by the user (confirmed
beforehand by a brief press of the button) will be saved. Selecting an option from the main menu with
a submenu:
– a short press on the button will display the first
submenu option;
– press buttons ▲or ▼(with single presses) to scroll
through all the submenu options;
– briefly press the MODE button to select the displayed
submenu option and to open the relevant set-up menu;
– press buttons ▲or ▼(with single presses) to select
the new setting for this submenu option;
– briefly press button MODE to store the new setting
and at the same time go back to the previously selected
menu option.
Selecting “Date” and “Set Clock”:
– briefly press button MODE to select the first value to
be changed (e.g. hours/minutes or year/month/day);
– Press buttons ▲or ▼(with single presses) to select
the new setting;
– briefly press MODE to store the new setting and go
to the next setup menu option; if this is the last one you
will go back to the previous menu option.
20
KNOWING
YOUR CAR
SAFETY
STARTING
AND
DRIVING
WARNING
LIGHTS AND
MESSAGES
IN AN
EMERGENCY
MAINTENANCE
AND CARE
TECHNICAL
SPECIFICATIONS
INDEX
Page 25 of 287
21
KNOWING
YOUR CAR
SAFETY
STARTING
AND
DRIVING
WARNING
LIGHTS AND
MESSAGES
IN AN
EMERGENCY
MAINTENANCE
AND CARE
TECHNICAL
SPECIFICATIONS
INDEX
Day
YearMonth
Deutsch
Français
English
Español
Italiano
Nederland
Português Example:
fig. 17 Example:
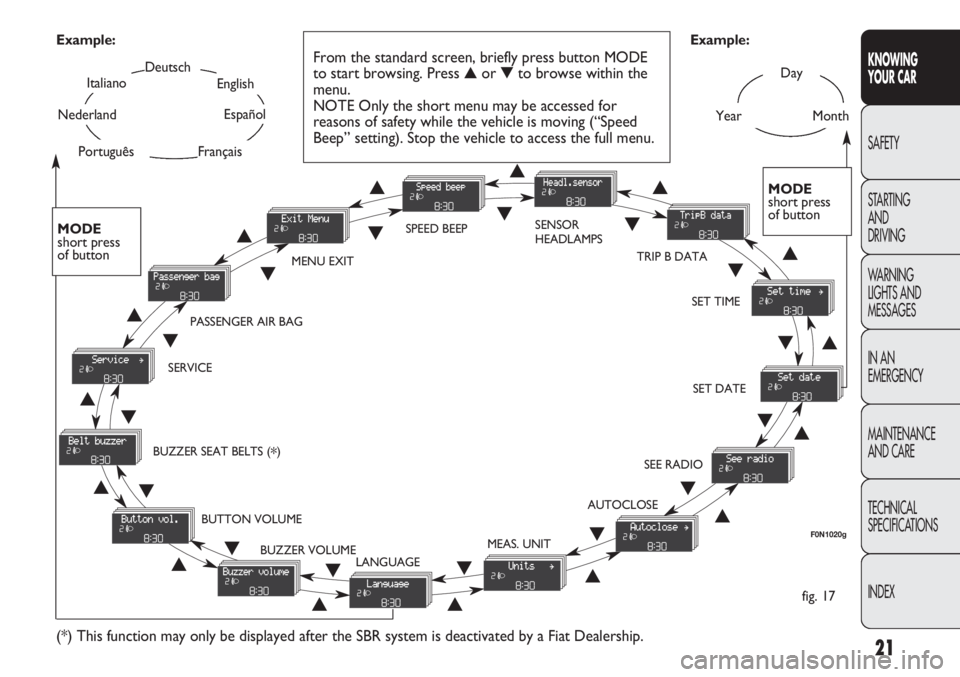
From the standard screen, briefly press button MODE
to start browsing. Press ▲or ▼to browse within the
menu.
NOTE Only the short menu may be accessed for
reasons of safety while the vehicle is moving (“Speed
Beep” setting). Stop the vehicle to access the full menu.
F0N1020g
MODE
short press
of button
▲
▼
MENU EXITSPEED BEEPSENSOR
HEADLAMPS
SET TIME
SET DATE
SEE RADIO
AUTOCLOSE
MEAS. UNIT
LANGUAGE BUZZER VOLUME BUTTON VOLUME BUZZER SEAT BELTS (
*) SERVICEPASSENGER AIR BAG
(*) This function may only be displayed after the SBR system is deactivated by a Fiat Dealership.
TRIP B DATA
MODE
short press
of button
▲
▼▲
▼▲
▼
▲
▼
▲ ▼
▲ ▼ ▲
▼
▲
▼
▲
▼
▲▼
▲▼
▲▼
▲▼▼
▲
Page 26 of 287
To cancel the setting, proceed as follows:
– briefly press button MODE: ON flashes on the display;
– press button
▼: OFF flashes on the display;
– press the MODE button briefly to return to the menu
screen or press the button for longer to return to the
standard screen without memorising.
Headlight sensor sensitivity adjustment
(for versions/markets where provided)
With this function it is possible to adjust the rain
headlight sensitivity according to 3 levels.
To set the required sensitivity level, proceed as follows:
– briefly press button MODE: the previously set
sensitivity “level” start to flash on the display;
– press button
▲or ▼to adjust;
– press the MODE button briefly to return to the menu
screen or press the button for longer to return to the
standard screen without memorising. Speed limit (Speed Beep)
This function enables setting of the vehicle speed limit
(km/h or mph). When this limit is exceeded the driver is
immediately alerted (see section “Warning lights and
messages”).
To set the desired speed limit, proceed as follows:
– briefly press button MODE: the display will show the
wording “Speed Beep”;
– press button
▲or ▼to activate (On) or deactivate
(Off) the speed limit;
– if the function has been activated (On), press buttons
▲or ▼to select the required speed limit and then
press MODE to confirm.
NOTE.
The speed may be set in the range from 30 to
200 km/h, or from 20 to 125 mph according to the
previously chosen unit (see “Setting the distance unit”
paragraph ) described below. The setting will increase/
decrease by five units each time button
▲/▼is pressed.
Hold down button
▲/▼to increase/decrease the setting
rapidly. Complete the setting by briefly pressing the
button when you approach the required value.
– press the MODE button briefly to return to the menu
screen or press the button for longer to return to the
standard screen without memorising.
22
KNOWING
YOUR CAR
SAFETY
STARTING
AND
DRIVING
WARNING
LIGHTS AND
MESSAGES
IN AN
EMERGENCY
MAINTENANCE
AND CARE
TECHNICAL
SPECIFICATIONS
INDEX