FIAT DUCATO 244 2002 3.G Connect NavPlus Manual
Manufacturer: FIAT, Model Year: 2002, Model line: DUCATO 244, Model: FIAT DUCATO 244 2002 3.GPages: 246, PDF Size: 3.39 MB
Page 11 of 246
CONNECT Nav
10
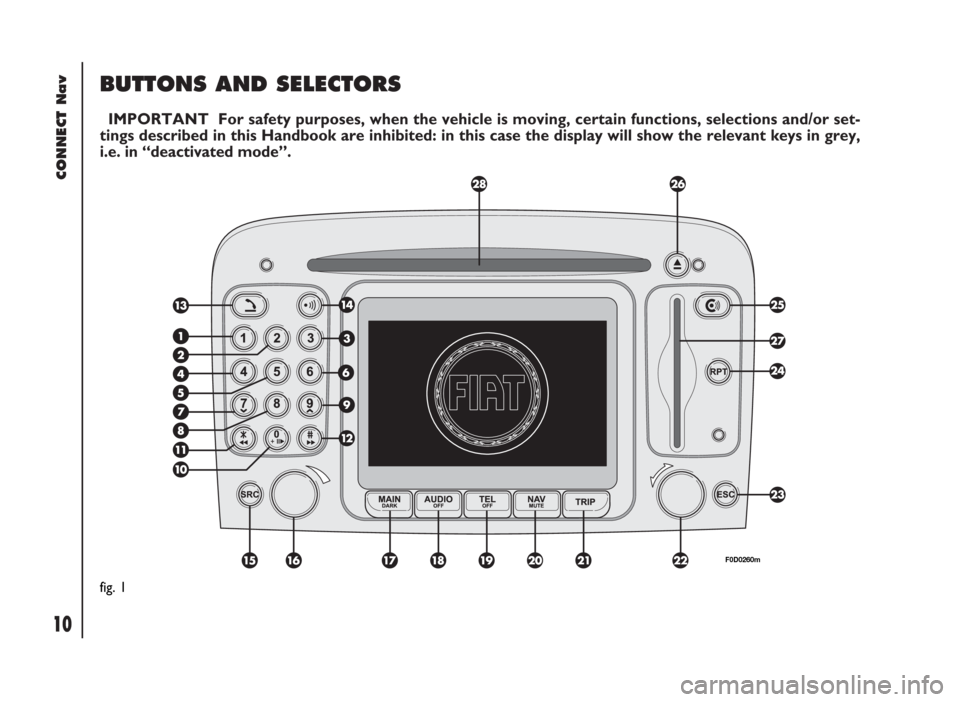
BUTTONS AND SELECTORS
IMPORTANT For safety purposes, when the vehicle is moving, certain functions, selections and/or set-
tings described in this Handbook are inhibited: in this case the display will show the relevant keys in grey,
i.e. in “deactivated mode”.
fig. 1
F0D0260m
Page 12 of 246
CONNECT Nav
11
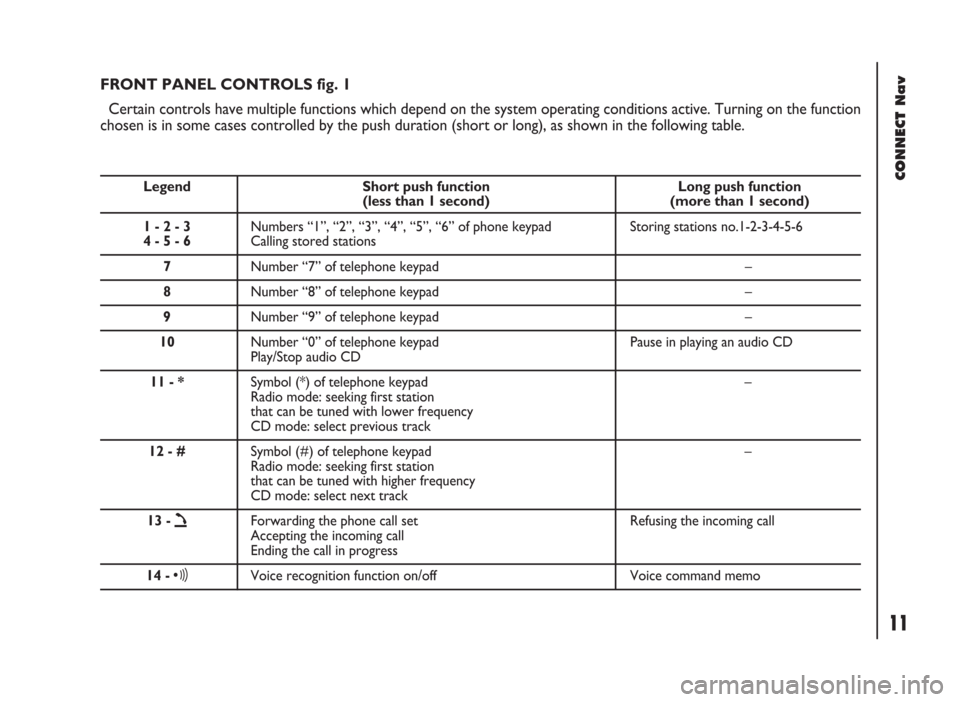
FRONT PANEL CONTROLS fig. 1
Certain controls have multiple functions which depend on the system operating conditions active. Turning on the function
chosen is in some cases controlled by the push duration (short or long), as shown in the following table.
Legend Short push function Long push function (less than 1 second) (more than 1 second)
1 - 2 - 3 Numbers “1”, “2”, “3”, “4”, “5”, “6” of phone keypad Storing stations no.1-2-3-4-5-6
4 - 5 - 6Calling stored stations
7Number “7” of telephone keypad –
8Number “8” of telephone keypad –
9Number “9” of telephone keypad –
10Number “0” of telephone keypad Pause in playing an audio CD
Play/Stop audio CD
11 - *Symbol (*) of telephone keypad –
Radio mode: seeking first station
that can be tuned with lower frequency
CD mode: select previous track
12 - #Symbol (#) of telephone keypad –
Radio mode: seeking first station
that can be tuned with higher frequency
CD mode: select next track
13 -
òForwarding the phone call set Refusing the incoming call
Accepting the incoming call
Ending the call in progress
14 -ôVoice recognition function on/off Voice command memo
Page 13 of 246
CONNECT Nav
12
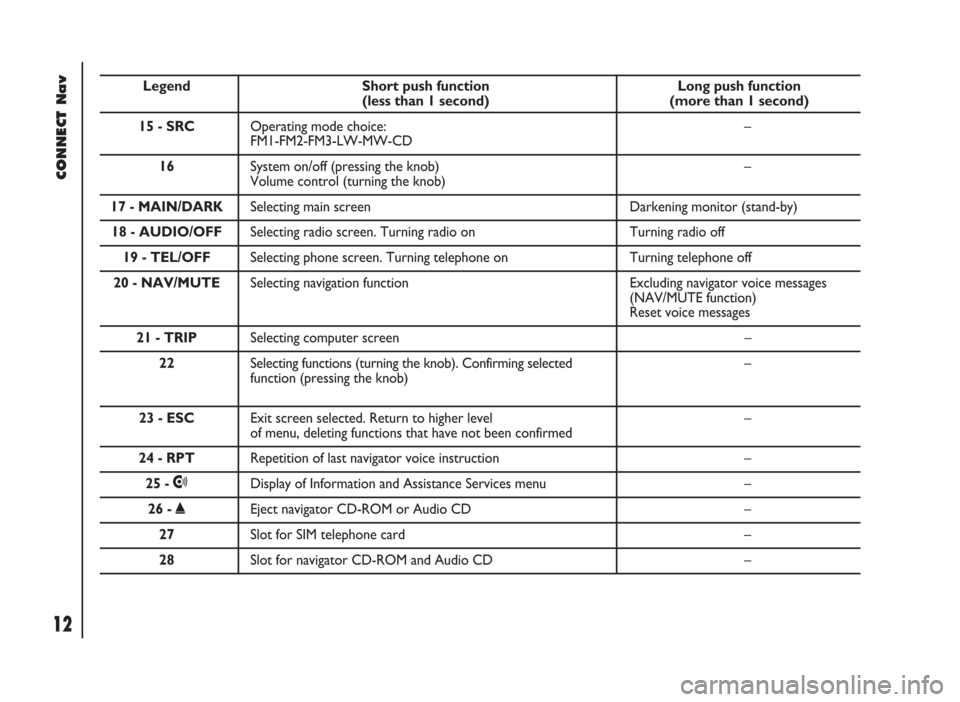
Legend Short push function Long push function (less than 1 second) (more than 1 second)
15 - SRCOperating mode choice: –
FM1-FM2-FM3-LW-MW-CD
16 System on/off (pressing the knob) –
Volume control (turning the knob)
17 - MAIN/DARKSelecting main screen Darkening monitor (stand-by)
18 - AUDIO/OFFSelecting radio screen. Turning radio on Turning radio off
19 - TEL/OFFSelecting phone screen. Turning telephone on Turning telephone off
20 - NAV/MUTESelecting navigation function Excluding navigator voice messages
(NAV/MUTE function)
Reset voice messages
21 - TRIPSelecting computer screen –
22 Selecting functions (turning the knob). Confirming selected –
function (pressing the knob)
23 - ESCExit screen selected. Return to higher level –of menu, deleting functions that have not been confirmed
24 - RPTRepetition of last navigator voice instruction –
25 -•Display of Information and Assistance Services menu –
26 -˚Eject navigator CD-ROM or Audio CD –
27Slot for SIM telephone card –
28Slot for navigator CD-ROM and Audio CD –
Page 14 of 246
CONNECT Nav
13
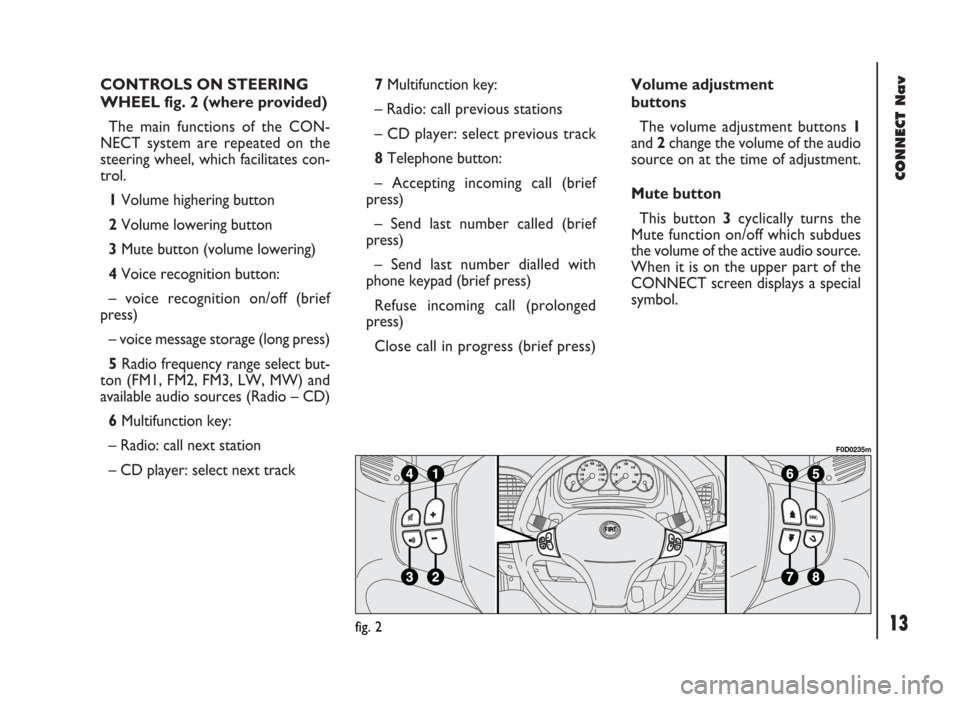
CONTROLS ON STEERING
WHEEL fig. 2 (where provided)
The main functions of the CON-
NECT system are repeated on the
steering wheel, which facilitates con-
trol.
1Volume highering button
2Volume lowering button
3Mute button (volume lowering)
4Voice recognition button:
– voice recognition on/off (brief
press)
– voice message storage (long press)
5Radio frequency range select but-
ton (FM1, FM2, FM3, LW, MW) and
available audio sources (Radio – CD)
6Multifunction key:
– Radio: call next station
– CD player: select next track 7Multifunction key:
– Radio: call previous stations
– CD player: select previous track
8Telephone button:
– Accepting incoming call (brief
press)
– Send last number called (brief
press)
– Send last number dialled with
phone keypad (brief press)
Refuse incoming call (prolonged
press)
Close call in progress (brief press)Volume adjustment
buttons
The volume adjustment buttons 1
and 2change the volume of the audio
source on at the time of adjustment.
Mute button
This button 3cyclically turns the
Mute function on/off which subdues
the volume of the active audio source.
When it is on the upper part of the
CONNECT screen displays a special
symbol.
fig. 2
F0D0235m
Page 15 of 246
CONNECT Nav
14
Voice recognition button
Button 4turns on voice recognition
as follows:
– brief press on the button: voice
recognition on/off
– prolonged press on the button:
voice message storage.
Frequency range and audio
source select button
To cyclically select the frequency
ranges and audio sources available,
briefly and repeatedly press the “SRC”
button 5.
The available frequencies and audio
sources are: FM1, FM2, FM3, LW,
MW, CD.Multifunction keys
Multifunction keys 6and 7makes it
possible to call the preset radio sta-
tions in the frequency band set and se-
lect the next or previous track when
playing a CD.
Press key 6to choose the next sta-
tions or to play the next CD track.
Press key 7to choose the previous
stations or to play the previous CD
track.Telephone button
Button 8activates the main functions
of the telephone, depending on the
conditions active when the button is
pressed and the length of the press
(short or long).
Short push:
– taking an incoming call
– sending a call to the last number di-
alled previously
– sending a call to the number dialled
using the phone keypad.
Long push:
– reject incoming call.
Page 16 of 246
CONNECT Nav
15
GENERAL
INFORMATION
IMPORTANT NOTES FOR
USE AND ROAD SAFETY
The CONNECT system makes it
possible to easily control the main
functions of the vehicle.
To avoid creating dangerous situa-
tions for yourself and others in use of
the system, please pay attention to the
following points:
– the system must be used keeping
full control of the vehicle; in the case
of doubt in the use of the functions,
it is necessary to stop before per-
forming the various operations;
– use of the cell phone is prohibited
near explosive substances.
The navigation system allows you to
reach your destination, indicating each
route change stored on the navigation
CD-ROM. In fact, in calculating the
route, the system takes into account
of all the information stored concern-
ing the roads, advising the best route.
However it cannot take account of the
traffic, sudden interruptions or any
other inconvenience.In carrying out any manoeuvre it is
always necessary to follow the rules of
the road, regardless of the advice giv-
en by the navigation system. If you
leave the suggested route, the naviga-
tion system will calculate a new one
and suggest it to you.SYSTEM POWER ON
The system can be switched on ac-
cording to two different methods:
automatic switching onwith ig-
nition key to MAR;
manual switching on:
– by pressing knob 16-fig. 1;
– with direct access to SOS menu by
pressing button
•25-fig. 1.
Automatic switching on
Turning the ignition key to MARwill
turn the system on automatically, thus
activating or making available all the
functions described in this manual.
The navigation system
helps the driver while dri-
ving by suggesting, vocally and
graphically, the best route to be fol-
lowed to reach the preset destina-
tion. The suggestions given by the
navigation system do not exempt
the driver from full responsibility
due to driving behaviour and com-
pliance with road and other traffic
regulations. The responsibility for
road safety always and anyway lies
with the vehicle’s driver.
WARNING
Page 17 of 246
CONNECT Nav
16
Manual switching on
With ignition key at STOPpress
knob 16-fig. 1, to switch the system
on, thus making available the following
modules:
– MAIN,
– AUDIO,
– NAV,
– TEL,
– Targasys
•.
IMPORTANTIn this mode, the
SETUP and TRIP modules can be ac-
tivated; however, it will not be possi-
ble to validate any operation con-
cerning parameter change, language
change, units change and any other
type of adjustment provided by the
system. These limitations are normal
when switching the system on manu-
ally by the knob 16-fig. 1, since with
engine off (key at STOP) the vehicle
data transmission devices are not op-
erating.
Turning the ignition key to MAR, will
make all system functions active.SYSTEM POWER OFF
The CONNECT system can be
switched off according to two differ-
ent modes:
– deactivation independentof ig-
nition key
– deactivation dependenton ig-
nition key
To choose the power-off mode, see
the Power OFF submenu in the SET-
UP menu.
Deactivation independent
of ignition key
With this mode active, the system
can be turned off by pressing the knob
16-fig. 1.
The display will show the message
“PLEASE WAIT WHILE SYSTEM
TURNS OFF”.
IMPORTANTWith ignition key at
STOP, deactivation is delayed and will
take place after 20 minutes if the sys-
tem has a destination set or a phone
call is in progress.Deactivation dependent
on ignition key
With this mode active, the system
can be switched off by turning the ig-
nition key to STOPor pressing the
knob 16-fig. 1.
IMPORTANTDeactivation with
ignition key to STOPis delayed and
will take place after 20 minutes if the
system has a destination set or a
phone call is in progress.
Page 18 of 246
CONNECT Nav
17
With ignition key at MAR, if au-
thentication fails, system starts work-
ing as usual, but the user is asked to
enter the 4-digit “Master Code” to al-
low access to the standard functions.
Master code is unique for each sys-
tem, and is stored in its memory and
can not be reset.
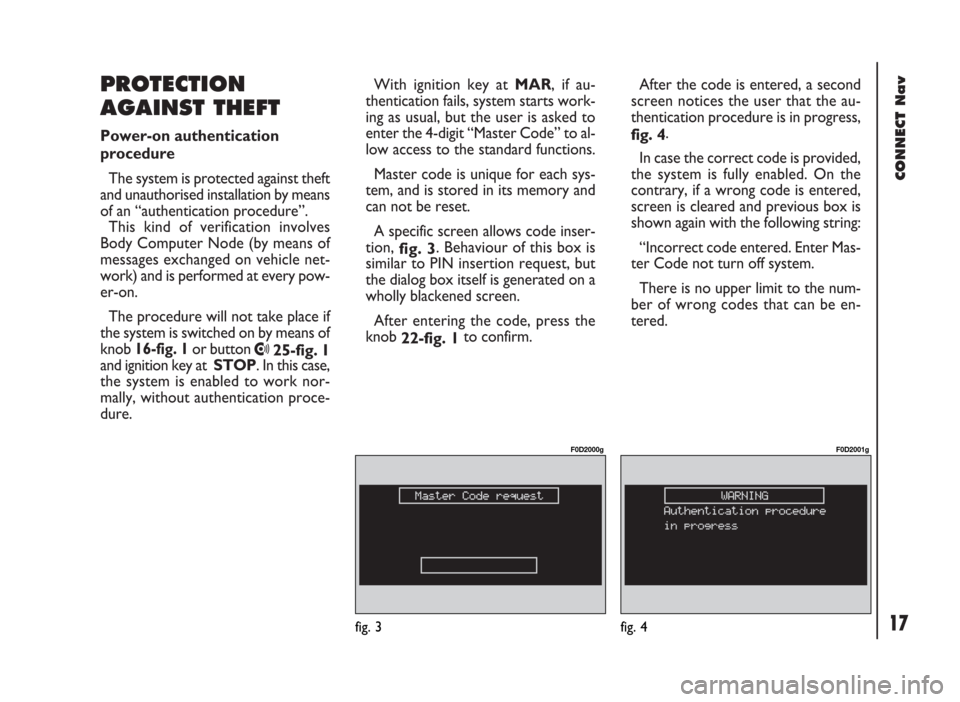
A specific screen allows code inser-
tion,
fig. 3. Behaviour of this box is
similar to PIN insertion request, but
the dialog box itself is generated on a
wholly blackened screen.
After entering the code, press the
knob
22-fig. 1to confirm.
PROTECTION
AGAINST THEFT
Power-on authentication
procedure
The system is protected against theft
and unauthorised installation by means
of an “authentication procedure”.
This kind of verification involves
Body Computer Node (by means of
messages exchanged on vehicle net-
work) and is performed at every pow-
er-on.
The procedure will not take place if
the system is switched on by means of
knob 16-fig. 1or button
•25-fig. 1
and ignition key at STOP. In this case,
the system is enabled to work nor-
mally, without authentication proce-
dure.After the code is entered, a second
screen notices the user that the au-
thentication procedure is in progress,
fig. 4.
In case the correct code is provided,
the system is fully enabled. On the
contrary, if a wrong code is entered,
screen is cleared and previous box is
shown again with the following string:
“Incorrect code entered. Enter Mas-
ter Code not turn off system.
There is no upper limit to the num-
ber of wrong codes that can be en-
tered.
fig. 3
F0D2000g
fig. 4
F0D2001g
Page 19 of 246
CONNECT Nav
18
MAIN MODE
The MAIN mode is activated by
pushing the “MAIN” button 17-fig. 1
on the front panel.
It is possible to access the Set-up
menu from the MAIN mode.
To access the Set-up menu, display
the page MAIN then push on knob 22-
fig.1. Set-up functions will be ac-
cessed (refer to the SET-UP chapter).
Depress several times “ESC” 23-
fig.1 for returning to the display of
MAIN.STANDARD INFORMATION
The display shows information rele-
vant to the main system modules:
– AUDIO
– TELEPHONE
– NAVIGATOR
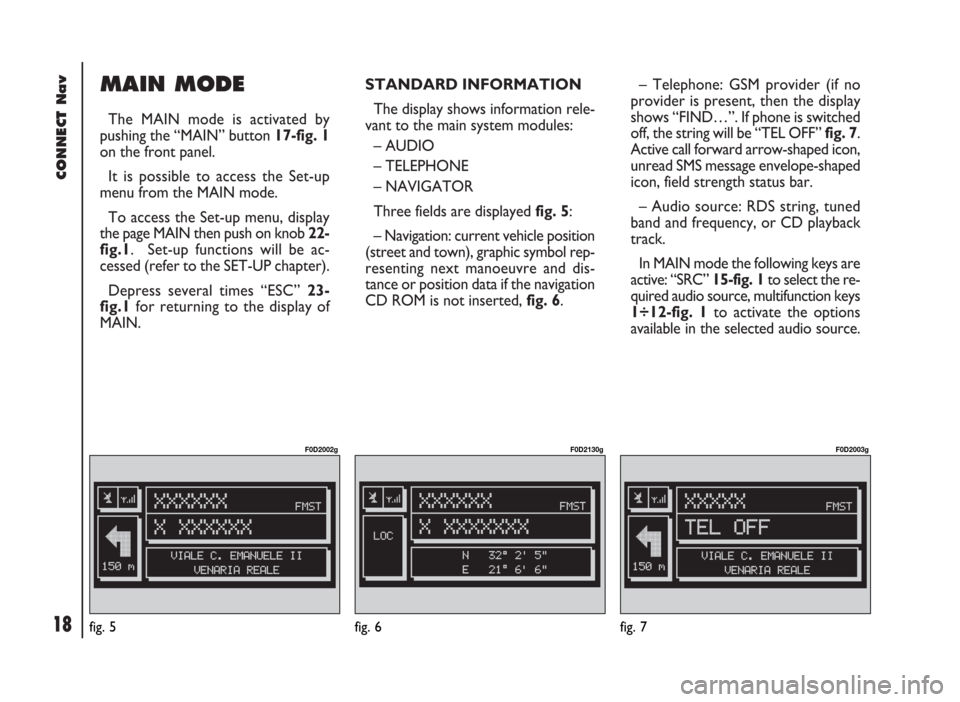
Three fields are displayed fig. 5:
– Navigation: current vehicle position
(street and town), graphic symbol rep-
resenting next manoeuvre and dis-
tance or position data if the navigation
CD ROM is not inserted, fig. 6.– Telephone: GSM provider (if no
provider is present, then the display
shows “FIND…”. If phone is switched
off, the string will be “TEL OFF” fig. 7.
Active call forward arrow-shaped icon,
unread SMS message envelope-shaped
icon, field strength status bar.
– Audio source: RDS string, tuned
band and frequency, or CD playback
track.
In MAIN mode the following keys are
active: “SRC” 15-fig. 1to select the re-
quired audio source, multifunction keys
1÷12-fig. 1to activate the options
available in the selected audio source.
fig. 5
F0D2002g
fig. 6
F0D2130g
fig. 7
F0D2003g
Page 20 of 246
CONNECT Nav
19
“SETUP” FUNCTION
The SETUP mode enables to set dif-
ferent vehicle and CONNECT system
operating modes and parameters.
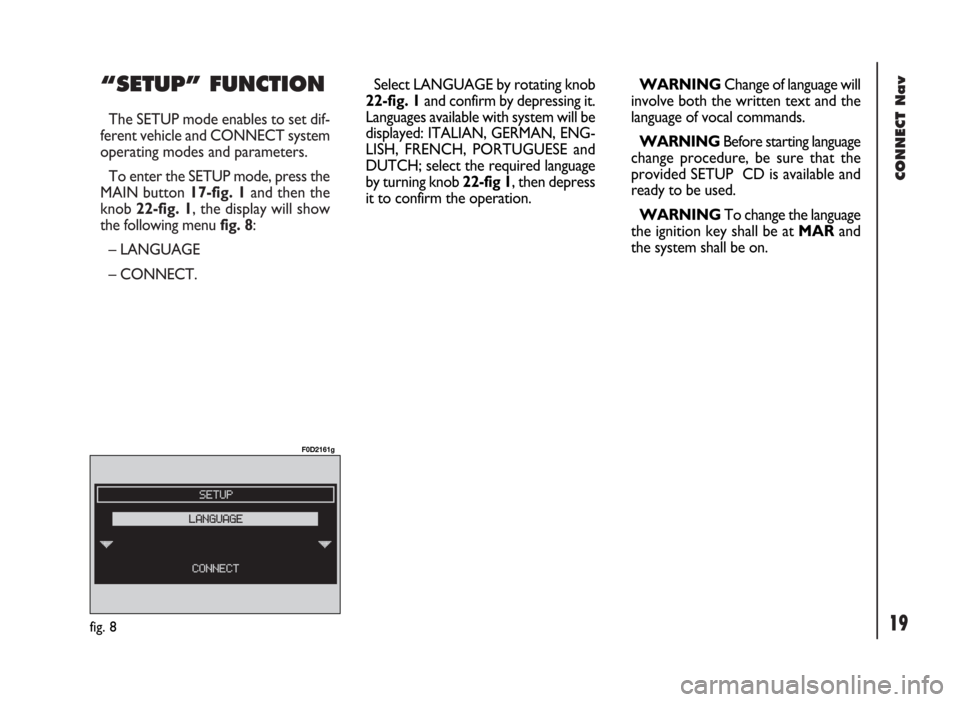
To enter the SETUP mode, press the
MAIN button 17-fig. 1and then the
knob 22-fig. 1, the display will show
the following menu fig. 8:
– LANGUAGE
– CONNECT.
fig. 8
F0D2161g
Select LANGUAGE by rotating knob
22-fig. 1and confirm by depressing it.
Languages available with system will be
displayed: ITALIAN, GERMAN, ENG-
LISH, FRENCH, PORTUGUESE and
DUTCH; select the required language
by turning knob 22-fig 1, then depress
it to confirm the operation.WARNINGChange of language will
involve both the written text and the
language of vocal commands.
WARNINGBefore starting language
change procedure, be sure that the
provided SETUP CD is available and
ready to be used.
WARNINGTo change the language
the ignition key shall be at MARand
the system shall be on.