FIAT DUCATO 244 2005 3.G Manual Online
Manufacturer: FIAT, Model Year: 2005, Model line: DUCATO 244, Model: FIAT DUCATO 244 2005 3.GPages: 258, PDF Size: 4.05 MB
Page 81 of 258
80GETTING TO KNOW YOUR VEHICLE
SIDE SLIDING DOOR
When leaving the vehicle
parked with the sliding
doors open, always check that the
door hooks are properly fastened
into the retaining device.
WARNING
fig. 123
F0D0084m
Do not move the vehicle
with side doors open.
WARNING
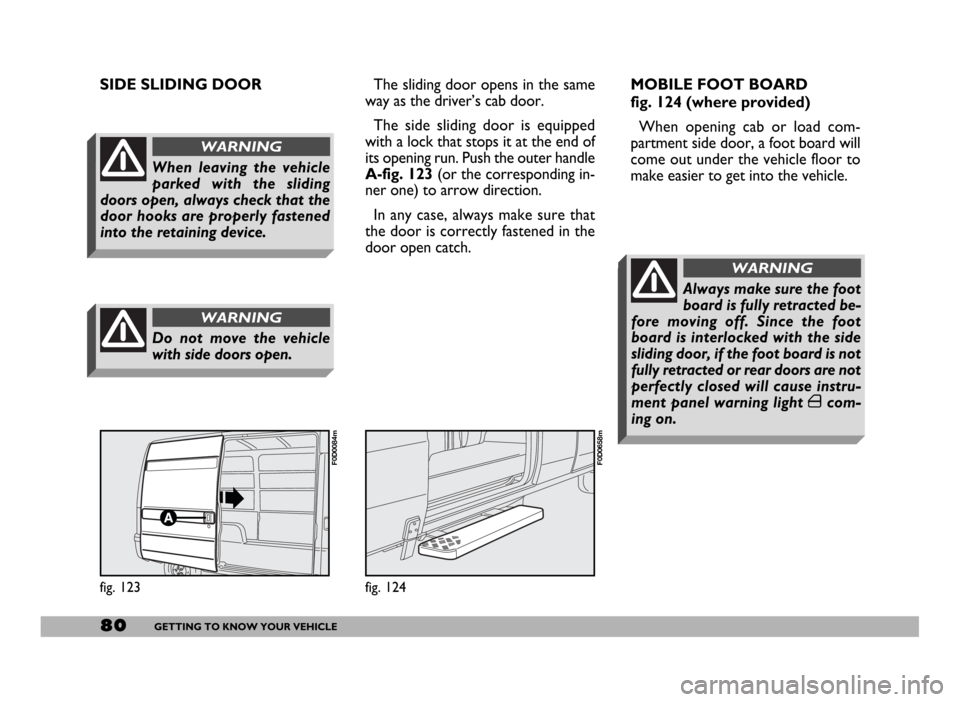
The sliding door opens in the same
way as the driver’s cab door.
The side sliding door is equipped
with a lock that stops it at the end of
its opening run. Push the outer handle
A-fig. 123(or the corresponding in-
ner one) to arrow direction.
In any case, always make sure that
the door is correctly fastened in the
door open catch.
fig. 124
F0D0658m
MOBILE FOOT BOARD
fig. 124 (where provided)
When opening cab or load com-
partment side door, a foot board will
come out under the vehicle floor to
make easier to get into the vehicle.
Always make sure the foot
board is fully retracted be-
fore moving off. Since the foot
board is interlocked with the side
sliding door, if the foot board is not
fully retracted or rear doors are not
perfectly closed will cause instru-
ment panel warning light ´com-
ing on.
WARNING
Page 82 of 258
81GETTING TO KNOW YOUR VEHICLE
REAR DOUBLE DOORS
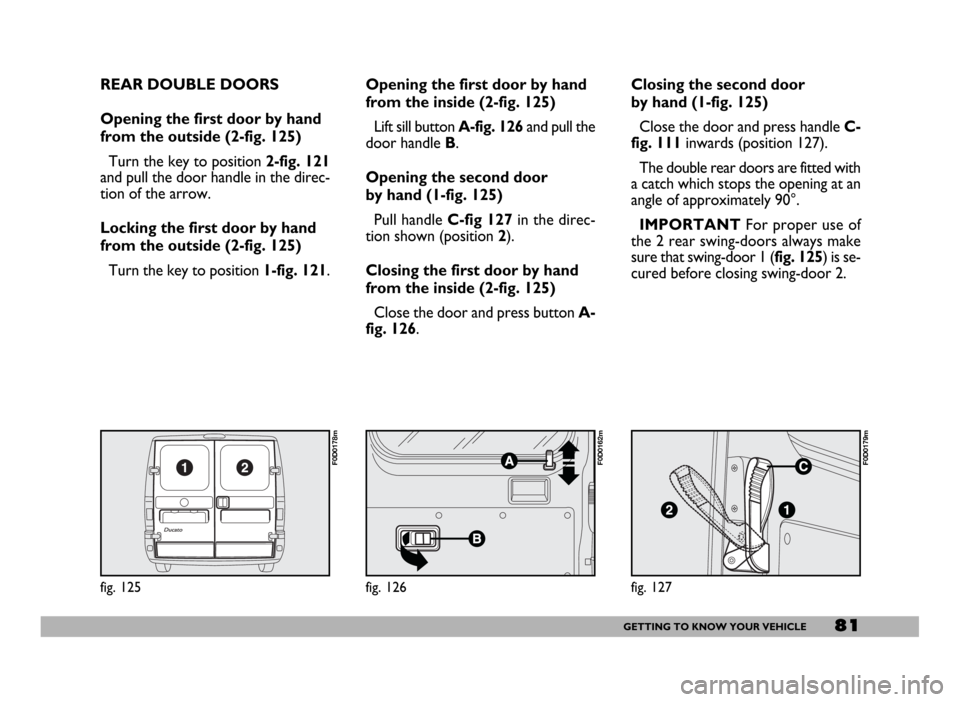
Opening the first door by hand
from the outside (2-fig. 125)
Turn the key to position 2-fig. 121
and pull the door handle in the direc-
tion of the arrow.
Locking the first door by hand
from the outside (2-fig. 125)
Turn the key to position 1-fig. 121.
fig. 125
F0D0178m
Opening the first door by hand
from the inside (2-fig. 125)
Lift sill button A-fig. 126and pull the
door handle B.
Opening the second door
by hand (1-fig. 125)
Pull handle C-fig 127in the direc-
tion shown (position2).
Closing the first door by hand
from the inside (2-fig. 125)
Close the door and press button A-
fig. 126.Closing the second door
by hand (1-fig. 125)
Close the door and press handle C-
fig. 111inwards (position 127).
The double rear doors are fitted with
a catch which stops the opening at an
angle of approximately 90°.
IMPORTANTFor proper use of
the 2 rear swing-doors always make
sure that swing-door 1 (fig. 125) is se-
cured before closing swing-door 2.
fig. 127
F0D0179m
fig. 126
F0D0162m
Page 83 of 258
82GETTING TO KNOW YOUR VEHICLE
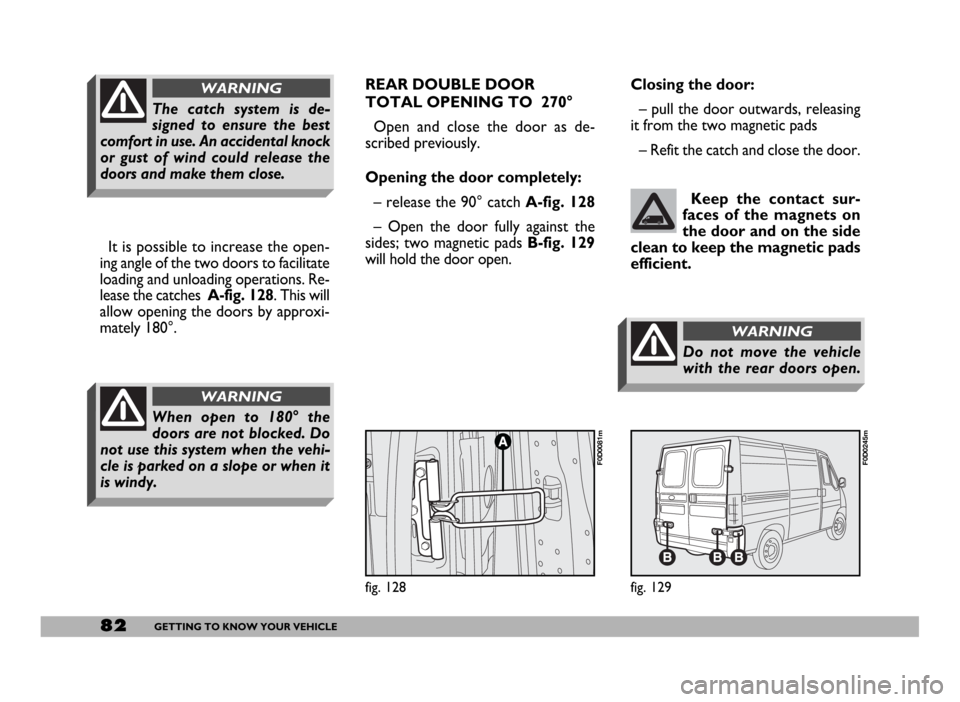
It is possible to increase the open-
ing angle of the two doors to facilitate
loading and unloading operations. Re-
lease the catches A-fig. 128. This will
allow opening the doors by approxi-
mately 180°.
When open to 180° the
doors are not blocked. Do
not use this system when the vehi-
cle is parked on a slope or when it
is windy.
WARNING
The catch system is de-
signed to ensure the best
comfort in use. An accidental knock
or gust of wind could release the
doors and make them close.
WARNINGREAR DOUBLE DOOR
TOTAL OPENING TO 270°
Open and close the door as de-
scribed previously.
Opening the door completely:
– release the 90° catch A-fig. 128
– Open the door fully against the
sides; two magnetic pads B-fig. 129
will hold the door open. Closing the door:
– pull the door outwards, releasing
it from the two magnetic pads
– Refit the catch and close the door.
Keep the contact sur-
faces of the magnets on
the door and on the side
clean to keep the magnetic pads
efficient.
fig. 129
F0D0245m
fig. 128
F0D0081m
Do not move the vehicle
with the rear doors open.
WARNING
Page 84 of 258
83GETTING TO KNOW YOUR VEHICLE
CENTRAL DOOR LOCKING
IMPORTANTCentral door locking
is active on all doors if front doors (cab
doors) are used for opening/closing.
When operating one of the rear or
side door lock, only that door will be
locked/unlocked.
From the outside
When the doors are closed, insert
and turn the key in the lock of one of
the driver’s cab doors.
From the inside
When the doors are closed, press
(to lock) or lift (to unlock) one of the
driver’s cab door safety sill buttons.
IMPORTANT If one of the cab
doors is not shut properly or there is
a failure in the system, the central
locking feature will not work and, af-
ter some attempts, the device will stop
working for about 2 minutes. In these
two minutes, the doors can be locked
or unlocked manually without the
electrical system coming into play.After the two minutes, the control
unit is ready to receive commands
once more. If the reason for the mal-
functioning has been removed, the de-
vice will start to work properly again.
If not, it will cut once more.
FRONT DOOR WINDOW
REGULATORS
Manual control
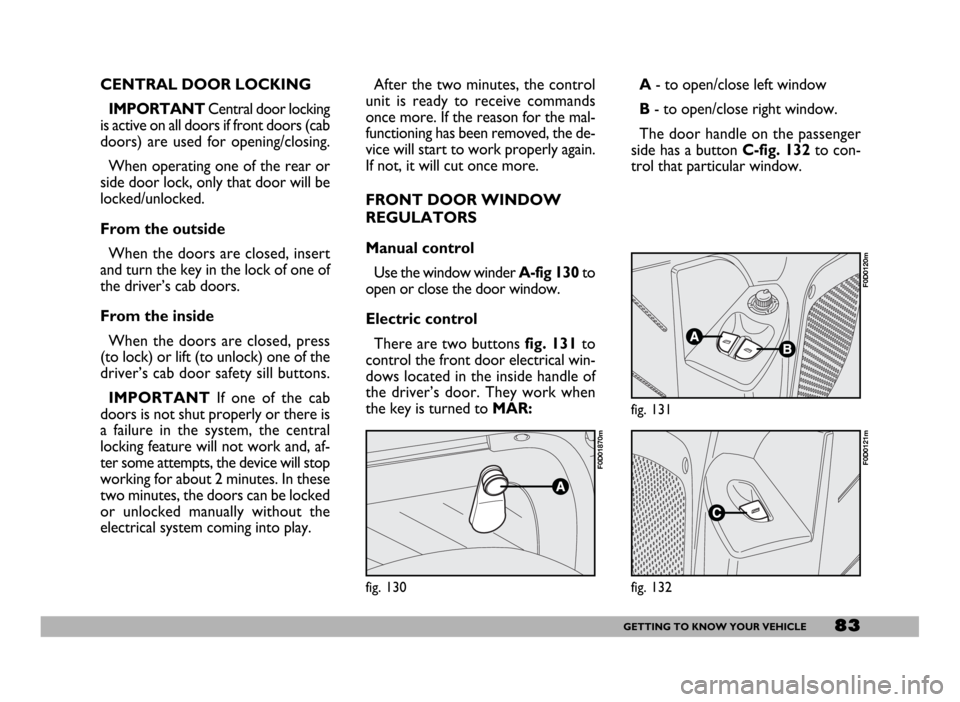
Use the window winderA-fig 130to
open or close the door window.
Electric control
There are two buttons fig. 131to
control the front door electrical win-
dows located in the inside handle of
the driver’s door. They work when
the key is turned to MAR:A- to open/close left window
B- to open/close right window.
The door handle on the passenger
side has a button C-fig. 132to con-
trol that particular window.
fig. 130
F0D01870m
fig. 131
F0D0120m
fig. 132
F0D0121m
Page 85 of 258
84GETTING TO KNOW YOUR VEHICLE
Improper use of the electri-
cal windows can be danger-
ous. Before and during their oper-
ation ensure that any passengers in
the vehicle are not at risk from the
moving glass either by personal ob-
jects getting caught in the mecha-
nism or by being injured by it di-
rectly.
WARNING
Always remove the ignition
key when you get out of the
vehicle to prevent the electric win-
dows being operated accidentally
and constituting a danger to the
people left in the vehicle
WARNING
BONNET
OPENING
Proceed as follows:
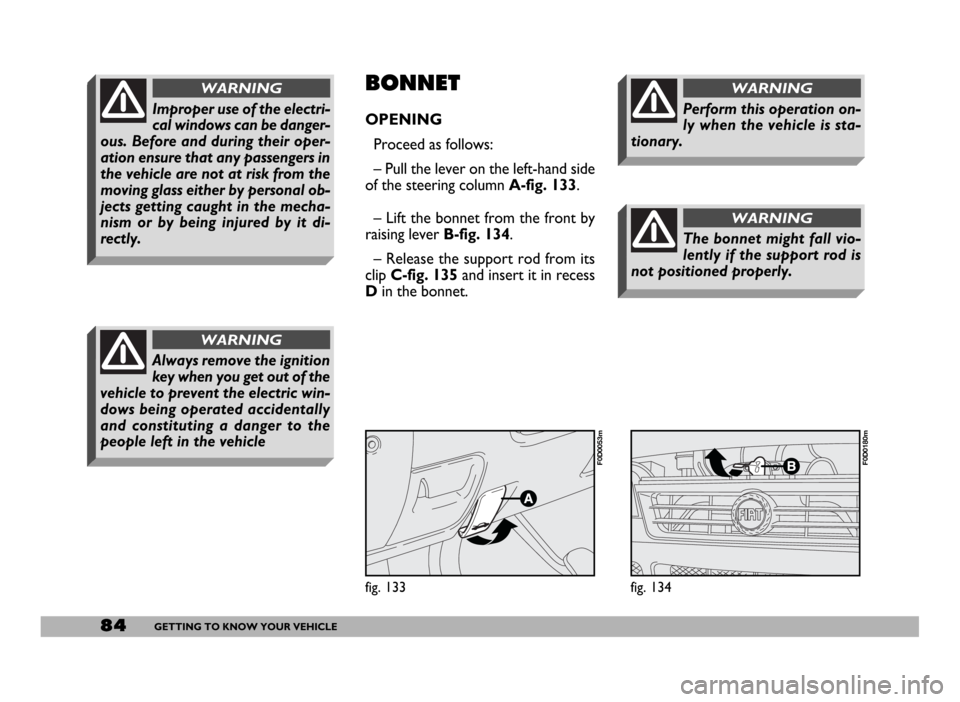
– Pull the lever on the left-hand side
of the steering column A-fig. 133.
– Lift the bonnet from the front by
raising lever B-fig. 134.
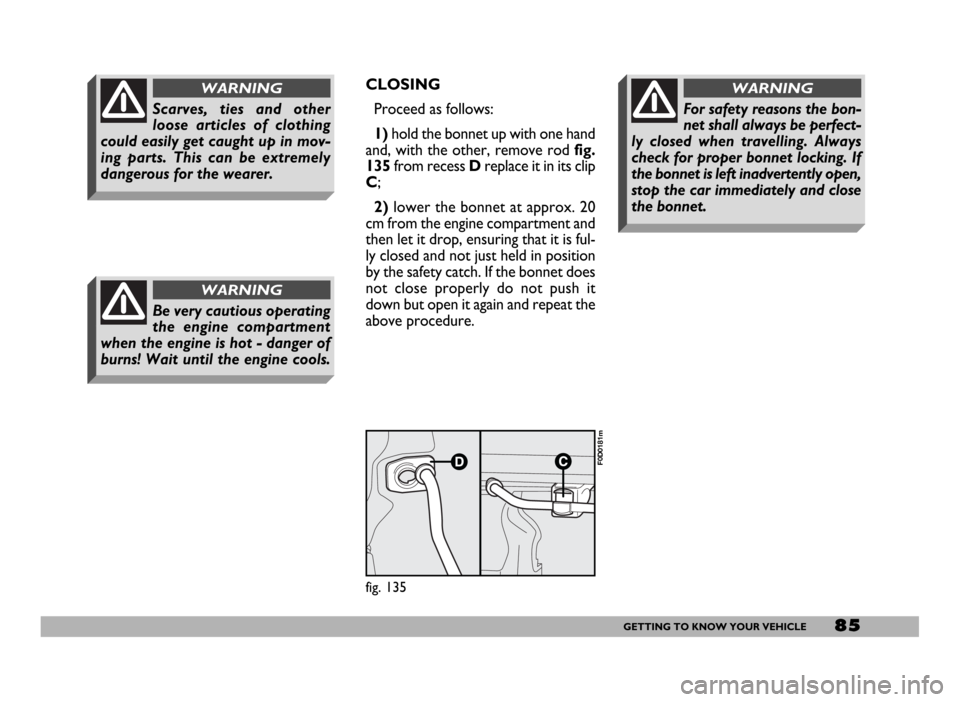
– Release the support rod from its
clipC-fig. 135and insert it in recess
Din the bonnet.
fig. 133
F0D0053m
fig. 134
F0D0180m
The bonnet might fall vio-
lently if the support rod is
not positioned properly.
WARNING
Perform this operation on-
ly when the vehicle is sta-
tionary.
WARNING
Page 86 of 258
85GETTING TO KNOW YOUR VEHICLE
Be very cautious operating
the engine compartment
when the engine is hot - danger of
burns! Wait until the engine cools.
WARNING
Scarves, ties and other
loose articles of clothing
could easily get caught up in mov-
ing parts. This can be extremely
dangerous for the wearer.
WARNINGCLOSING
Proceed as follows:
1)hold the bonnet up with one hand
and, with the other, remove rodfig.
135from recess Dreplace it in its clip
C;
2)lower the bonnet at approx. 20
cm from the engine compartment and
then let it drop, ensuring that it is ful-
ly closed and not just held in position
by the safety catch. If the bonnet does
not close properly do not push it
down but open it again and repeat the
above procedure.
For safety reasons the bon-
net shall always be perfect-
ly closed when travelling. Always
check for proper bonnet locking. If
the bonnet is left inadvertently open,
stop the car immediately and close
the bonnet.
WARNING
fig. 135
F0D0181m
Page 87 of 258
86GETTING TO KNOW YOUR VEHICLE
HEADLIGHTS
ADJUSTING THE FRONT
HEADLIGHT BEAM
The correct positioning of the head-
light beams is very important for the
comfort and safety, not only of the
person driving the vehicle but also all
other road users.
This is also covered by a specific law.
To ensure you and other drivers
have the best visibility conditions when
travelling with the headlights on, the
headlights must be set properly.
fig. 136
F0D00043m
Check the positioning of
the headlight beams every
time you change the load to be car-
ried.
WARNINGHave the headlight positioning
checked at aFiat Dealership and
adjusted if necessary.
When the vehicle is loaded, it
“slopes” backwards. This means that
the headlight beam rises. In this case,
it is necessary to return it to the cor-
rect position.
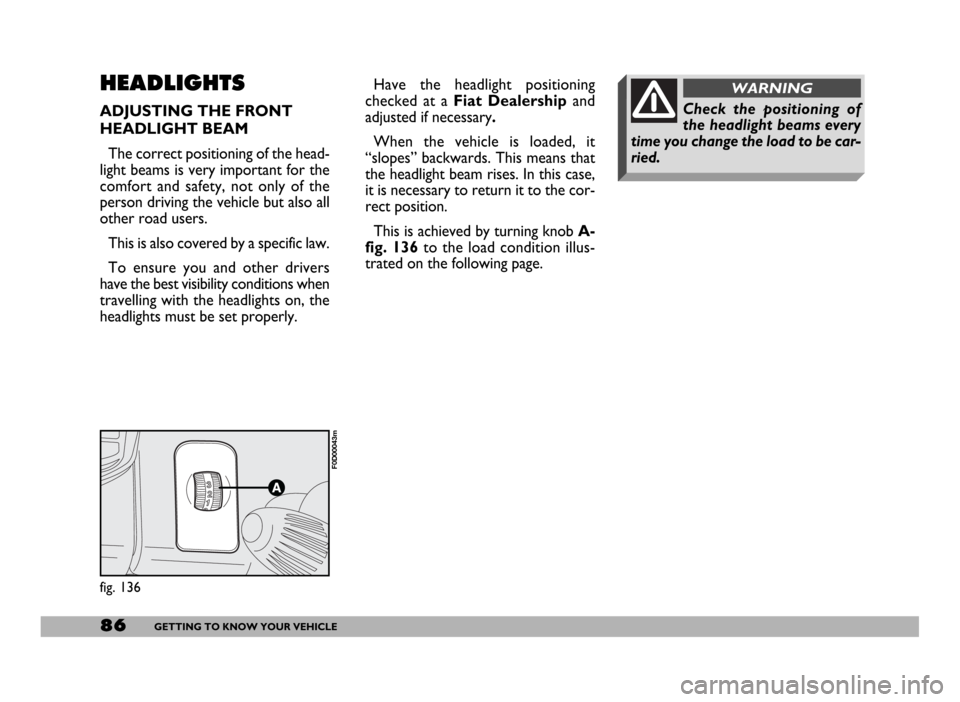
This is achieved by turning knob A-
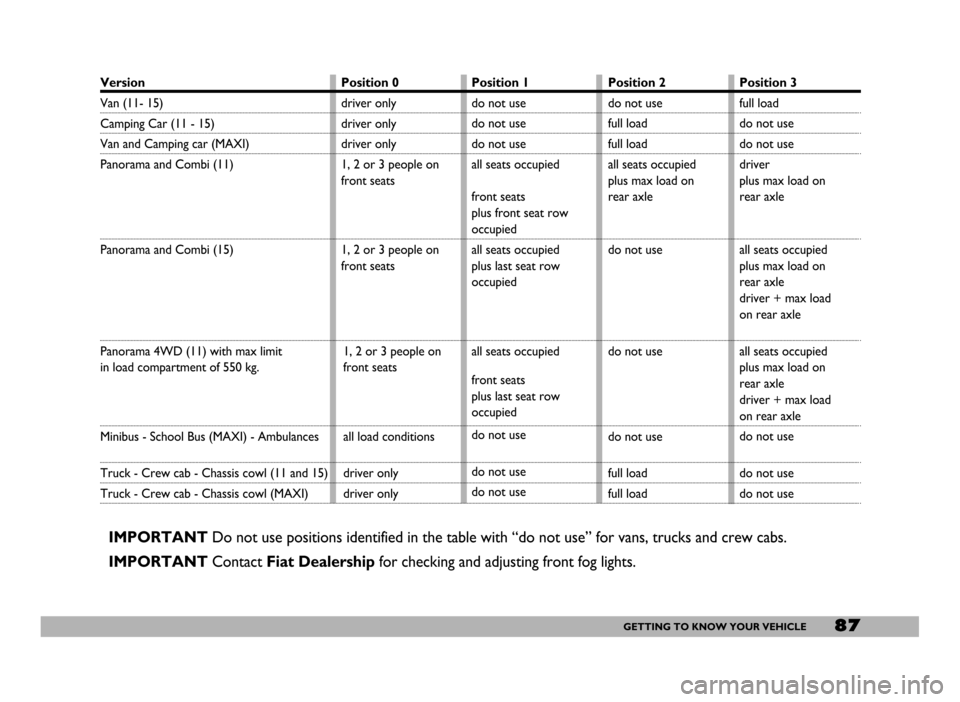
fig. 136to the load condition illus-
trated on the following page.
Page 88 of 258
87GETTING TO KNOW YOUR VEHICLE
Version
Van (11- 15)
Camping Car (11 - 15)
Van and Camping car (MAXI)
Panorama and Combi (11)
Panorama and Combi (15)
Panorama 4WD (11) with max limit
in load compartment of 550 kg.
Minibus - School Bus (MAXI) - Ambulances
Truck - Crew cab - Chassis cowl (11 and 15)
Truck - Crew cab - Chassis cowl (MAXI)Position 0
driver only
driver only
driver only
1, 2 or 3 people on
front seats
1, 2 or 3 people on
front seats
1, 2 or 3 people on
front seats
all load conditions
driver only
driver onlyPosition 1
do not use
do not use
do not use
all seats occupied
front seats
plus front seat row
occupied
all seats occupied
plus last seat row
occupied
all seats occupied
front seats
plus last seat row
occupied
do not use
do not use
do not usePosition 2
do not use
full load
full load
all seats occupied
plus max load on
rear axle
do not use
do not use
do not use
full load
full loadPosition 3
full load
do not use
do not use
driver
plus max load on
rear axle
all seats occupied
plus max load on
rear axle
driver + max load
on rear axle
all seats occupied
plus max load on
rear axle
driver + max load
on rear axle
do not use
do not use
do not use
IMPORTANTDo not use positions identified in the table with “do not use” for vans, trucks and crew cabs.
IMPORTANTContact Fiat Dealershipfor checking and adjusting front fog lights.
Page 89 of 258
88GETTING TO KNOW YOUR VEHICLE
If you have never driven a vehicle
with ABS before, you should practice
using the system on slippery terrain,
obviously with the necessary safety
precautions and keeping to the High-
way Code of the country you are in.
It is also a good idea to read the fol-
lowing information carefully.
The advantage in using the ABS sys-
tem is that it continues to give you
maximum manoeuvrability even when
braking hard in conditions of poor grip
by preventing the wheels locking.
You should, however, not expect the
braking distance to always decrease:
for example surfaces with gravel or
fresh snow on a slippery road will in
fact increase the braking distance.
To exploit the ABS system to the full
in the event of necessity, you should
take heed of the following advice:ABS
The vehicle is fitted with an ABS
braking system (optional), which pre-
vents the wheels from locking when
braking, makes the most of road grip
and gives the best control when emer-
gency braking under difficult road con-
ditions.
The driver can tell the ABS system
has come into play when he feels the
brake pedal pulsating slightly and the
system gets noiser.
This should not be interpreted as a
fault in the brakes; on the contrary it
is a sign that the ABS system is work-
ing: it tells the driver that the vehicle
is travelling at the limit of its road grip
and that he should alter his speed to
fit the type of road surface.
The ABS system is an addition to the
basic braking system. If there is a mal-
function, the system turns off auto-
matically and only the ordinary brakes
continue to work.
If a failure occurs, and consequently
the anti-lock function is not effective,
the braking system will continue to
work as usual.
If the ABS system cuts in it
is a sign that the grip be-
tween the tyre and the road surface
has reached the limit: you must
slow down to match the speed to
the road grip available.
WARNING
If there is a fault, the warn-
ing light >will light up on
the dashboard. At this point, reduce
speed and go to a Fiat Dealership
to have your vehicle checked and
put right immediately.
WARNING
The ABS exploits the tyre-
road grip available to the
full, but it cannot improve it; you
should therefore take every care
when driving on slippery surfaces,
and not take unnecessary risks.
WARNING
Page 90 of 258
89GETTING TO KNOW YOUR VEHICLE
Warning light >alone,
with the engine running,
normally indicates a fault in the
ABS system only. In this case, the
braking system is still efficient,
though without the anti-locking de-
vice. Under these conditions, per-
formance of the EBD system may
be reduced. In this case too, you are
advised to go immediately to the
nearest Fiat Dealership, driving in
such a way to avoid sharp braking
to have the system checked over.
WARNING
If the xbrake fluid low
warning light comes on,
stop the vehicle immediately and
contact the nearest Fiat Dealership.
Fluid leaks from the hydraulic sys-
tem, in fact, can compromise brake
system operation, both traditional
systems and systems with ABS.
WARNING
Braking while cornering always re-
quires extreme care even when using
ABS.
The most important advice to follow
is this:
If you follow these tips you will be
able to brake better in any situation.
IMPORTANTVehicles fitted with
ABS shall only be fitted with wheel rims,
tyres and brake pads of the make and
model approved by the vehicle manu-
facturer.The system is completed with an elec-
tronic brakeforce distributor called
EBD which improves braking system
performance by means of the ABSsys-
tem control unit and sensors.
When the ABS cuts in, and
you feel the brake pedal
pulsating, do not remove your foot,
but keep it pressed. In doing so you
will stop in the shortest amount of
space possible under the current
road conditions.
WARNING
The vehicle is fitted with an
electronic brakeforce dis-
tributor (EBD). The >and x
warning lights come on at the same
time when the engine is running to
indicate that there is an EBD sys-
tem failure. In this case violent
braking may be accompanied by
early rear wheel locking with the
possibility of skidding. Drive ex-
tremely carefully to the nearest Fi-
at Dealership to have the system
checked.
WARNING