FIAT DUCATO 244 2005 3.G Workshop Manual
Manufacturer: FIAT, Model Year: 2005, Model line: DUCATO 244, Model: FIAT DUCATO 244 2005 3.GPages: 258, PDF Size: 4.05 MB
Page 51 of 258
50GETTING TO KNOW YOUR VEHICLE
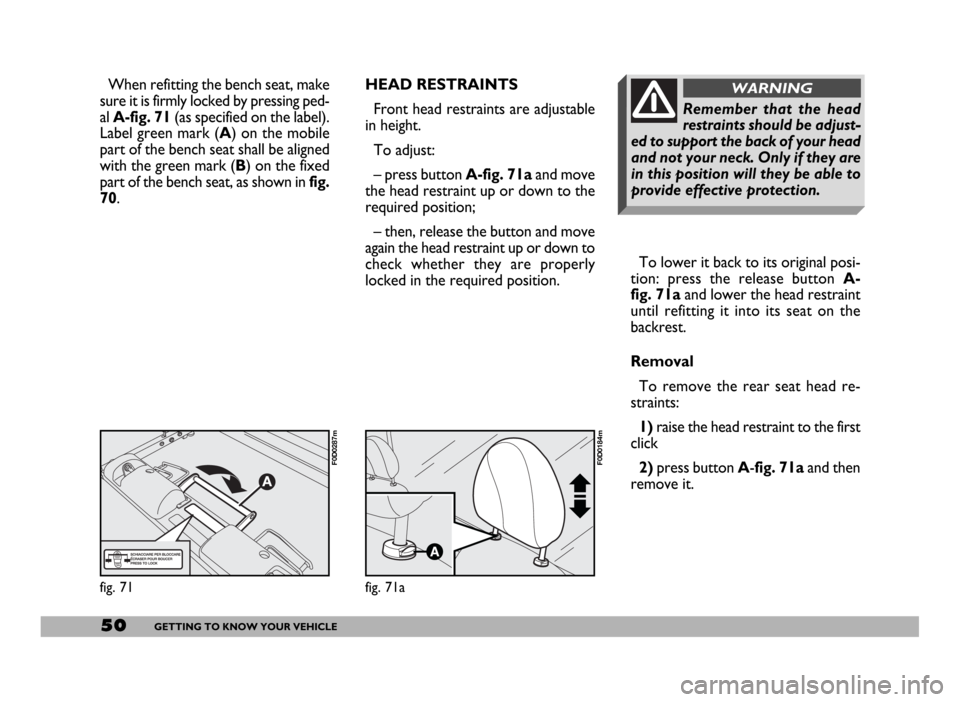
To lower it back to its original posi-
tion: press the release button A-
fig. 71aand lower the head restraint
until refitting it into its seat on the
backrest.
Removal
To remove the rear seat head re-
straints:
1) raise the head restraint to the first
click
2)press button A-fig. 71a and then
remove it.
Remember that the head
restraints should be adjust-
ed to support the back of your head
and not your neck. Only if they are
in this position will they be able to
provide effective protection.
WARNINGHEAD RESTRAINTS
Front head restraints are adjustable
in height.
To adjust:
– press button A-fig. 71aand move
the head restraint up or down to the
required position;
– then, release the button and move
again the head restraint up or down to
check whether they are properly
locked in the required position.
fig. 71
F0D0287m
fig. 71a
F0D0184m
When refitting the bench seat, make
sure it is firmly locked by pressing ped-
al A-fig. 71(as specified on the label).
Label green mark (A) on the mobile
part of the bench seat shall be aligned
with the green mark (B) on the fixed
part of the bench seat, as shown in fig.
70.
Page 52 of 258
51GETTING TO KNOW YOUR VEHICLE
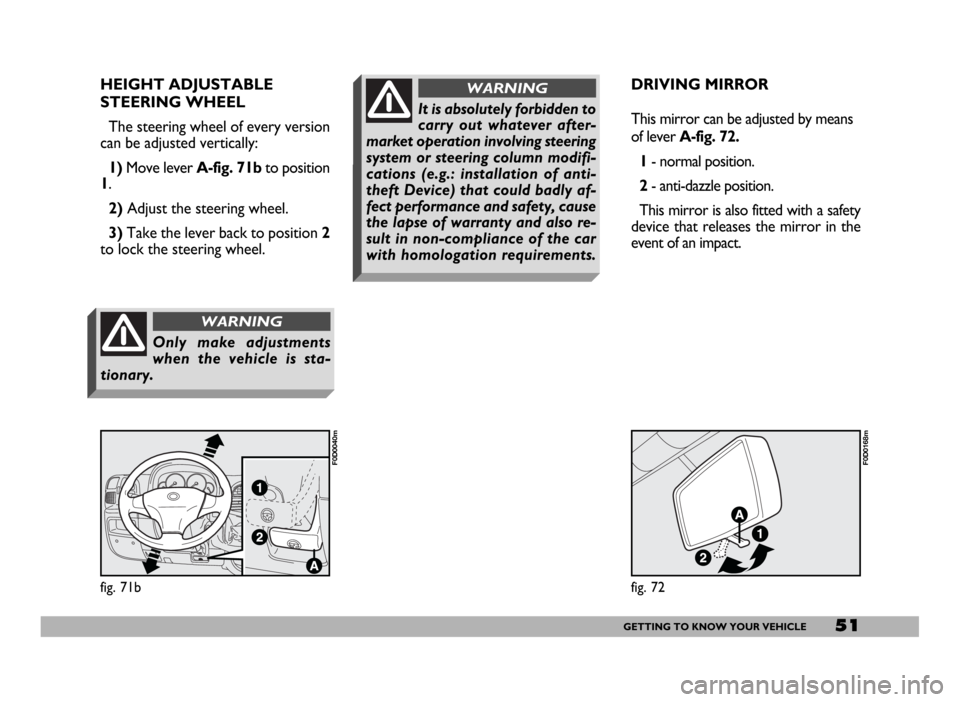
HEIGHT ADJUSTABLE
STEERING WHEEL
The steering wheel of every version
can be adjusted vertically:
1)Move lever A-fig. 71b to position
1.
2)Adjust the steering wheel.
3)Take the lever back to position 2
to lock the steering wheel.
fig. 71b
F0D0040m
Only make adjustments
when the vehicle is sta-
tionary.
WARNING
DRIVING MIRROR
This mirror can be adjusted by means
of lever A-fig. 72.
1- normal position.
2- anti-dazzle position.
This mirror is also fitted with a safety
device that releases the mirror in the
event of an impact.
fig. 72
F0D0168m
It is absolutely forbidden to
carry out whatever after-
market operation involving steering
system or steering column modifi-
cations (e.g.: installation of anti-
theft Device) that could badly af-
fect performance and safety, cause
the lapse of warranty and also re-
sult in non-compliance of the car
with homologation requirements.
WARNING
Page 53 of 258
52GETTING TO KNOW YOUR VEHICLE
fig. 73
F0D0048m
fig. 74
F0D0041m
If the mirror makes it
difficult to get through
narrow gaps, fold it from
position 1 to position 2.
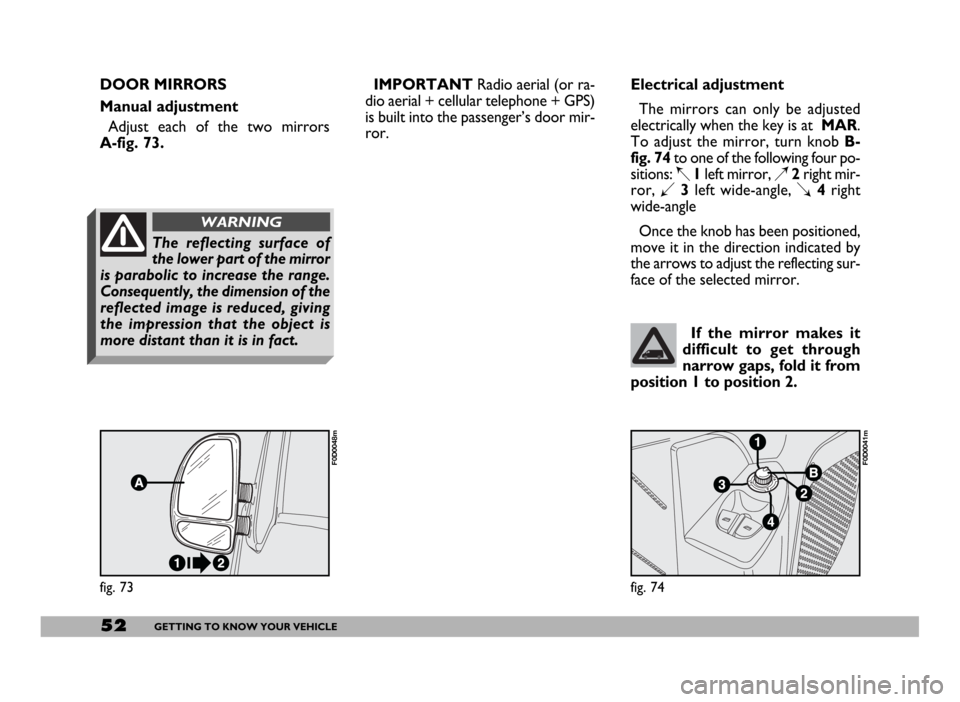
Electrical adjustment
The mirrors can only be adjusted
electrically when the key is at MAR.
To adjust the mirror, turn knob B-
fig. 74to one of the following four po-
sitions: Í1left mirror, È2right mir-
ror, Î3left wide-angle, Ï4right
wide-angle
Once the knob has been positioned,
move it in the direction indicated by
the arrows to adjust the reflecting sur-
face of the selected mirror.
The reflecting surface of
the lower part of the mirror
is parabolic to increase the range.
Consequently, the dimension of the
reflected image is reduced, giving
the impression that the object is
more distant than it is in fact.
WARNING
DOOR MIRRORS
Manual adjustment
Adjust each of the two mirrors
A-fig. 73.IMPORTANTRadio aerial (or ra-
dio aerial + cellular telephone + GPS)
is built into the passenger’s door mir-
ror.
Page 54 of 258
53GETTING TO KNOW YOUR VEHICLE
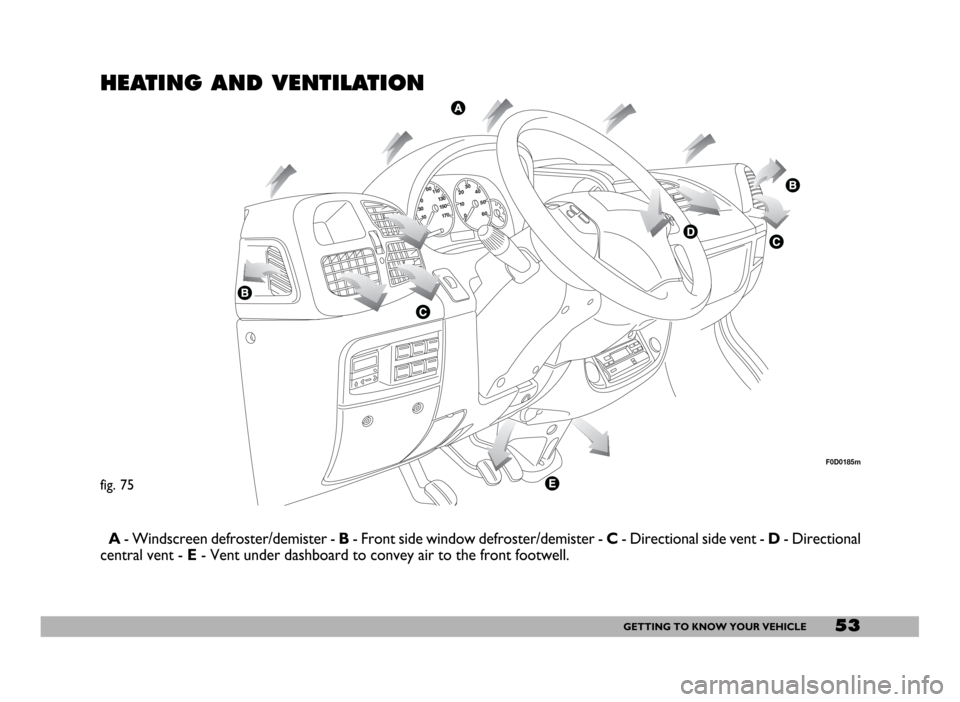
HEATING AND VENTILATION
A- Windscreen defroster/demister - B- Front side window defroster/demister - C- Directional side vent - D- Directional
central vent - E- Vent under dashboard to convey air to the front footwell.
fig. 75
F0D0185m
Page 55 of 258
54GETTING TO KNOW YOUR VEHICLE
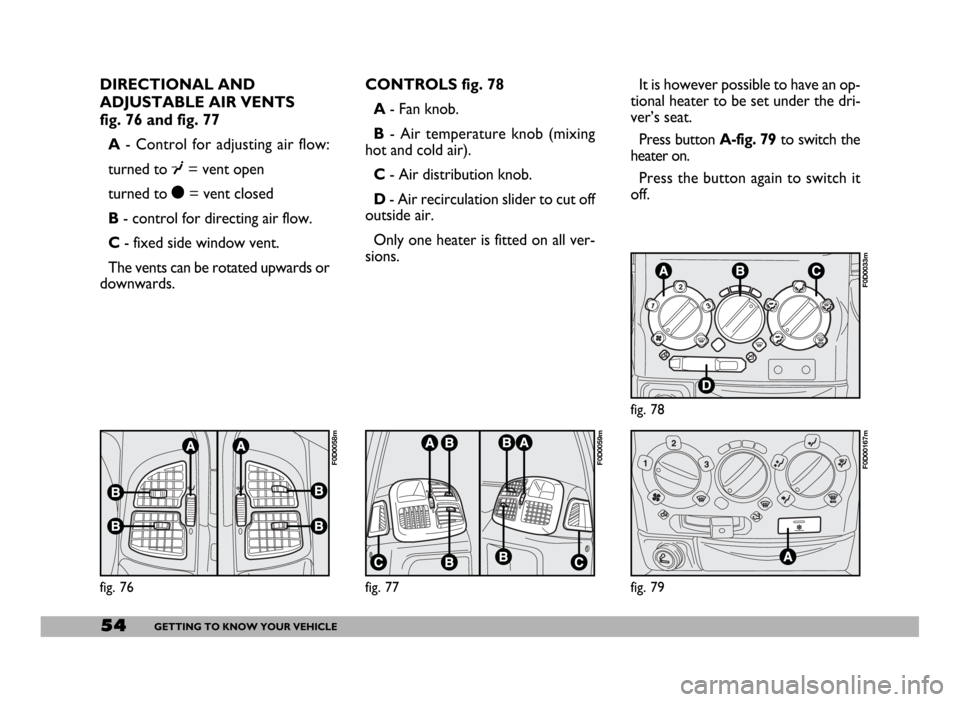
DIRECTIONAL AND
ADJUSTABLE AIR VENTS
fig. 76 and fig. 77
A- Control for adjusting air flow:
turned to ¥= vent open
turned to ç= vent closed
B- control for directing air flow.
C- fixed side window vent.
The vents can be rotated upwards or
downwards.CONTROLS fig. 78
A- Fan knob.
B- Air temperature knob (mixing
hot and cold air).
C- Air distribution knob.
D- Air recirculation slider to cut off
outside air.
Only one heater is fitted on all ver-
sions.It is however possible to have an op-
tional heater to be set under the dri-
ver’s seat.
Press button A-fig. 79to switch the
heater on.
Press the button again to switch it
off.
fig. 76
F0D0058m
fig. 77
F0D0059m
fig. 79
F0D00167m
fig. 78
F0D0033m
Page 56 of 258
55GETTING TO KNOW YOUR VEHICLE
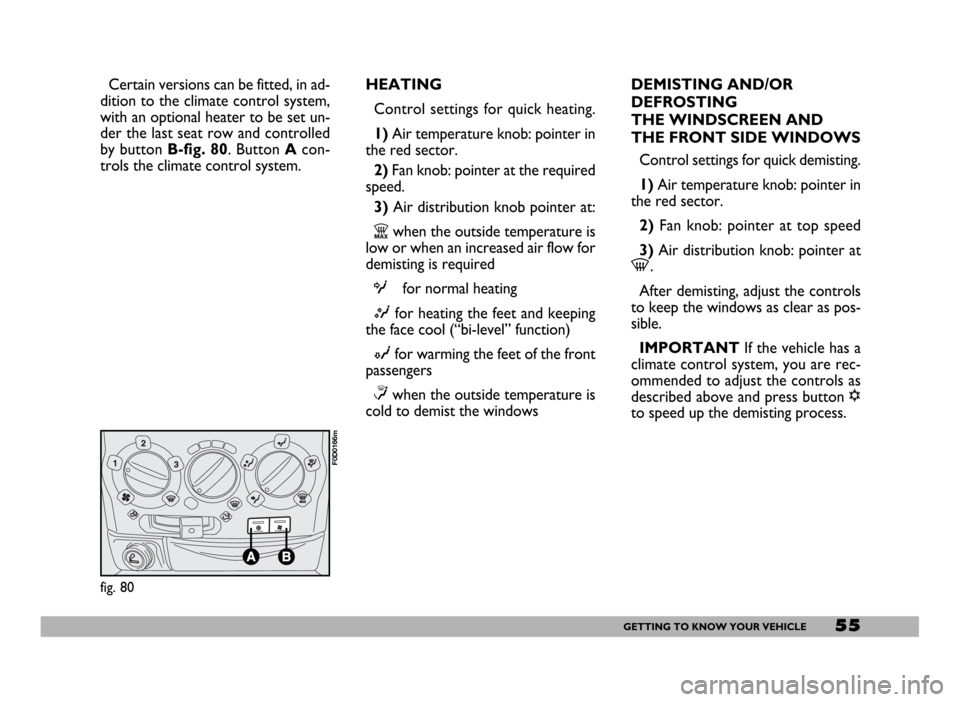
Certain versions can be fitted, in ad-
dition to the climate control system,
with an optional heater to be set un-
der the last seat row and controlled
by button B-fig. 80. Button Acon-
trols the climate control system.HEATING
Control settings for quick heating.
1)Air temperature knob: pointer in
the red sector.
2) Fan knob: pointer at the required
speed.
3) Air distribution knob pointer at:
Zwhen the outside temperature is
low or when an increased air flow for
demisting is required
Ofor normal heating
Mfor heating the feet and keeping
the face cool (“bi-level” function)
Nfor warming the feet of the front
passengers
≤when the outside temperature is
cold to demist the windowsDEMISTING AND/OR
DEFROSTING
THE WINDSCREEN AND
THE FRONT SIDE WINDOWS
Control settings for quick demisting.
1) Air temperature knob: pointer in
the red sector.
2) Fan knob: pointer at top speed
3) Air distribution knob: pointer at
-.
After demisting, adjust the controls
to keep the windows as clear as pos-
sible.
IMPORTANT If the vehicle has a
climate control system, you are rec-
ommended to adjust the controls as
described above and press button √
to speed up the demisting process.
fig. 80
F0D0166m
Page 57 of 258

56GETTING TO KNOW YOUR VEHICLE
DEMISTING AND/OR
DEFROSTING THE REAR
WINDOWS
Press button (.
You are advised to switch the button
off as soon as the rear windows are
clear.VENTILATION
Control settings to obtain the re-
quired ventilation.
1)Centre and side vents: complete-
ly open.
2) Air temperature knob: pointer in
the blue sector.
3) Air recirculation slider: pointer at
Ú.
4)Fan knob: pointer at the required
speed.
5)Air distribution knob: pointer at
O.AIR RECIRCULATION
With the slider at Òthe internal
air is recirculated.
IMPORTANT This function is par-
ticularly useful when the outside air
is heavily polluted (in a traffic jam, tun-
nel, etc.). You are advised against us-
ing this function for long periods, how-
ever, especially if there are a lot of pas-
sengers in the vehicle as it could lead
to the windows misting up.
Page 58 of 258
57GETTING TO KNOW YOUR VEHICLE
CLIMATE CONTROL
SYSTEM
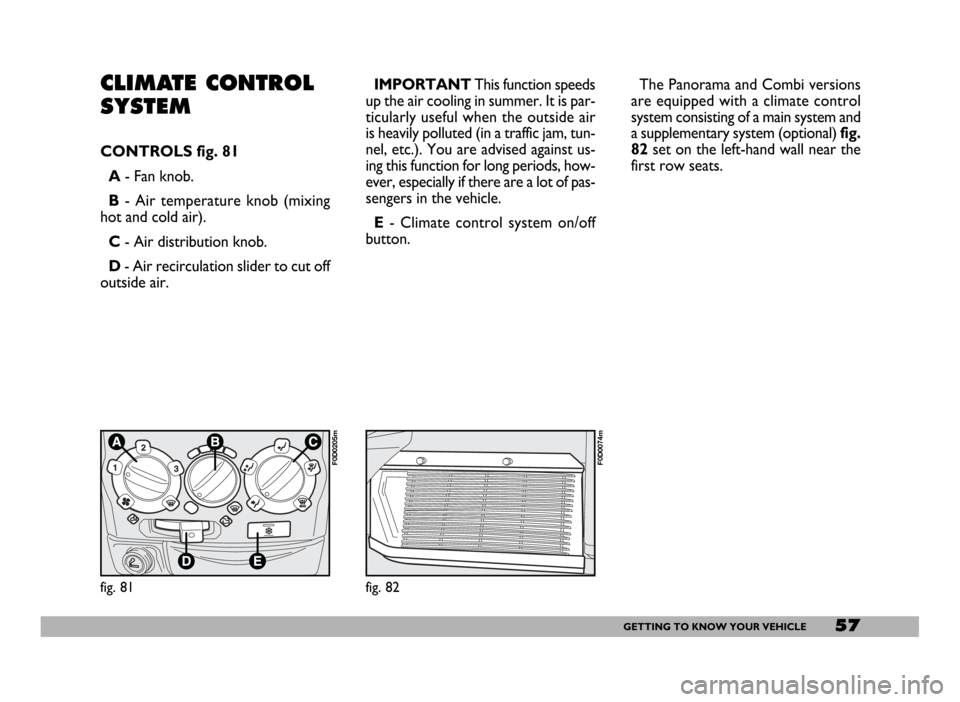
CONTROLS fig. 81
A- Fan knob.
B- Air temperature knob (mixing
hot and cold air).
C- Air distribution knob.
D- Air recirculation slider to cut off
outside air.IMPORTANTThis function speeds
up the air cooling in summer. It is par-
ticularly useful when the outside air
is heavily polluted (in a traffic jam, tun-
nel, etc.). You are advised against us-
ing this function for long periods, how-
ever, especially if there are a lot of pas-
sengers in the vehicle.
E- Climate control system on/off
button.The Panorama and Combi versions
are equipped with a climate control
system consisting of a main system and
a supplementary system (optional) fig.
82set on the left-hand wall near the
first row seats.
fig. 81
F0D0205m
fig. 82
F0D0074m
Page 59 of 258
58GETTING TO KNOW YOUR VEHICLE
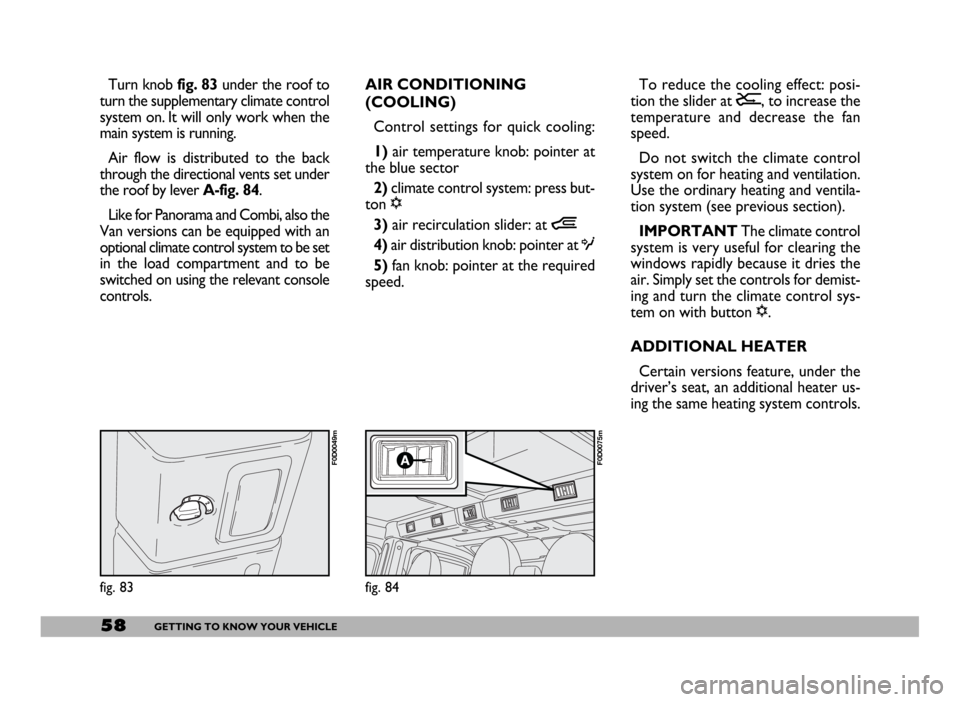
Turn knob fig. 83 under the roof to
turn the supplementary climate control
system on. It will only work when the
main system is running.
Air flow is distributed to the back
through the directional vents set under
the roof by lever A-fig. 84.
Like for Panorama and Combi, also the
Van versions can be equipped with an
optional climate control system to be set
in the load compartment and to be
switched on using the relevant console
controls.AIR CONDITIONING
(COOLING)
Control settings for quick cooling:
1)air temperature knob: pointer at
the blue sector
2)climate control system: press but-
ton √
3)air recirculation slider: at Ò
4) air distribution knob: pointer at O
5)fan knob: pointer at the required
speed.To reduce the cooling effect: posi-
tion the slider at Ú, to increase the
temperature and decrease the fan
speed.
Do not switch the climate control
system on for heating and ventilation.
Use the ordinary heating and ventila-
tion system (see previous section).
IMPORTANT The climate control
system is very useful for clearing the
windows rapidly because it dries the
air. Simply set the controls for demist-
ing and turn the climate control sys-
tem on with button √.
ADDITIONAL HEATER
Certain versions feature, under the
driver’s seat, an additional heater us-
ing the same heating system controls.
fig. 83
F0D0049m
fig. 84
F0D0075m
Page 60 of 258
59GETTING TO KNOW YOUR VEHICLE
SELF-STANDING SUPPLEMENTARY
HEATER (where provided)
The vehicle can be equipped, upon re-
quest, with two different self-standing
heaters:one is totally automatic
whereas the other is programmable.
AUTOMATIC VERSION
The supplementary heater is totally in-
dependent from the engine.
This heater is switched on automat-
ically (if required) when turning the ig-
nition key to MAR. LOOKING AFTER THE
SYSTEM
During the winter, the climate con-
trol system must be turned on at least
once a month for about ten minutes.
Before summer, have the system
checked at a Fiat Dealership.PROGRAMMABLE VERSION
The supplementary heater is totally
independent from the engine and can
be used to:
– heat the passenger compartment
when the engine is off;
– defrost the windows;
– heat the engine coolant and con-
sequently the engine before starting.
The system consists of:
– a diesel burner to heat coolant with
exhaust fume muffler;
– a metering pump connected to the
vehicle fuel pipes to feed the burner;
– a heat exchanger connected to the
engine cooling system pipes; The system is filled with
R134a refrigerant which
will not pollute the envi-
ronment in the event of leakage.
Under no circumstances should
R12 fluid be used as it is incom-
patible with the system compo-
nents and contains CFC.
The heater burns fuel in the
same way as the engine,
though, of course, to a lesser degree
and therefore to avoid intoxication
and suffocation, never use the sup-
plementary heater in closed areas,
garages or workshops not equipped
with specific exhaust evacuation
devices even for short periods of
time.
WARNING