tyre pressure FIAT DUCATO BASE CAMPER 2014 Owner handbook (in English)
[x] Cancel search | Manufacturer: FIAT, Model Year: 2014, Model line: DUCATO BASE CAMPER, Model: FIAT DUCATO BASE CAMPER 2014Pages: 367, PDF Size: 20.39 MB
Page 9 of 367
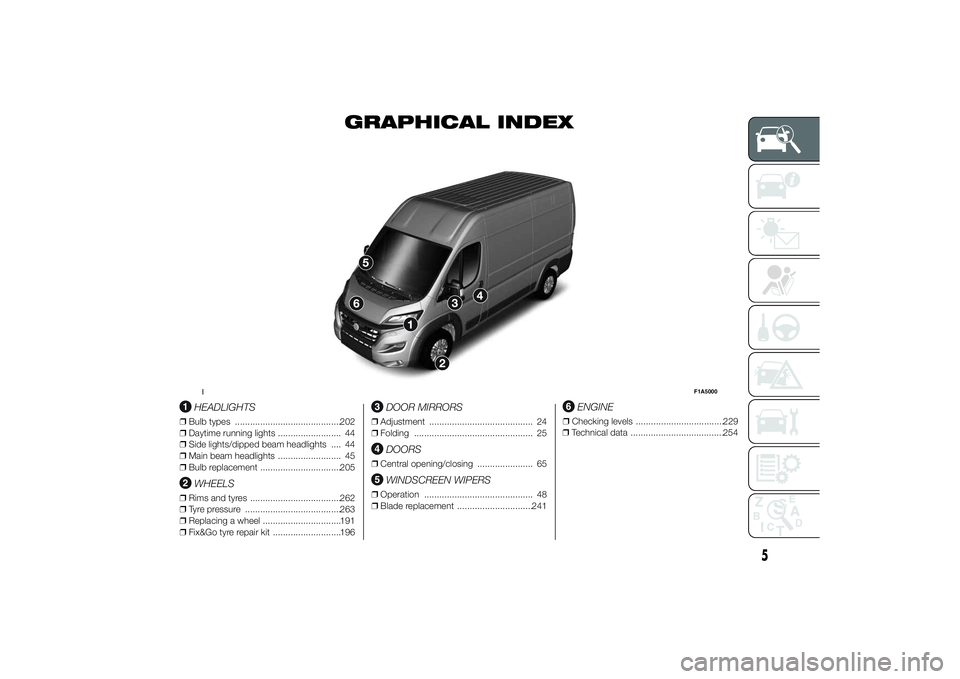
GRAPHICAL INDEX
.
HEADLIGHTS
❒Bulb types ..........................................202
❒Daytime running lights ......................... 44
❒Side lights/dipped beam headlights .... 44
❒Main beam headlights ......................... 45
❒Bulb replacement ................................205
WHEELS
❒Rims and tyres ....................................262
❒Tyre pressure ......................................263
❒Replacing a wheel ...............................191
❒Fix&Go tyre repair kit ...........................196
DOOR MIRRORS
❒Adjustment ......................................... 24
❒Folding ............................................... 25
DOORS
❒Central opening/closing ...................... 65
WINDSCREEN WIPERS
❒Operation ........................................... 48
❒Blade replacement ..............................241
ENGINE
❒Checking levels ...................................229
❒Technical data .....................................254
1
F1A5000
5
Page 13 of 367
KNOW YOUR VEHICLE
In-depth knowledge of your new vehicle
starts here.
The booklet that you are reading simply
and directly explains how it is made
and how it works.
That’s why we advise you to read it
seated comfortably on board, so that
you can see what is described here for
yourself.SYMBOLS ...................................... 10
THE FIAT CODE SYSTEM ............... 10
THE KEYS....................................... 11
ELECTRONIC ALARM..................... 13
IGNITION SWITCH .......................... 14
SEATS ............................................ 15
HEAD RESTRAINTS ........................ 23
STEERING WHEEL ......................... 24
REAR VIEW MIRRORS .................... 24
HEATING AND VENTILATION.......... 27
DIFFUSERS..................................... 28
HEATING AND VENTILATION
CONTROLS .................................... 28
MANUAL CLIMATE CONTROL
SYSTEM ......................................... 30
AUTOMATIC CLIMATE CONTROL
SYSTEM ......................................... 33
ADDITIONAL HEATER ..................... 38
INDEPENDENT ADDITIONAL
HEATER .......................................... 39
EXTERNAL LIGHTS......................... 44
WINDOW CLEANING ...................... 48
CRUISE CONTROL ......................... 50
ROOF LIGHTS ................................ 53
CONTROLS .................................... 54
FUEL CUT-OFF SWITCH ................ 57
INTERIOR FITTINGS ...................... 58
TACHOGRAPH ............................... 63SPEED BLOCK ............................... 64
SELF-LEVELLING AIR
SUSPENSION ................................. 64
DOORS ........................................... 65
ELECTRIC WINDOWS .................... 70
BONNET ......................................... 71
ROOF RACK/SKI RACK .................. 72
HEADLIGHTS.................................. 73
ABS ................................................ 74
ESC (ELECTRONIC STABILITY
CONTROL) SYSTEM ....................... 75
TRACTION PLUS SYSTEM ............. 79
TPMS (TYRE PRESSURE
MONITORING SYSTEM) ................. 80
DRIVING ADVISOR ......................... 83
REAR CAMERA (PARKVIEW®
REAR BACK UP CAMERA) ............. 89
TRAFFIC SIGN RECOGNITION ....... 90
EOBD SYSTEM............................... 92
PARKING SENSORS....................... 93
START&STOP SYSTEM .................. 95
RADIO............................................. 98
ACCESSORIES PURCHASED BY
THE OWNER................................... 99
REFUELLING THE VEHICLE ...........100
PROTECTING THE
ENVIRONMENT ..............................101
9
Page 84 of 367
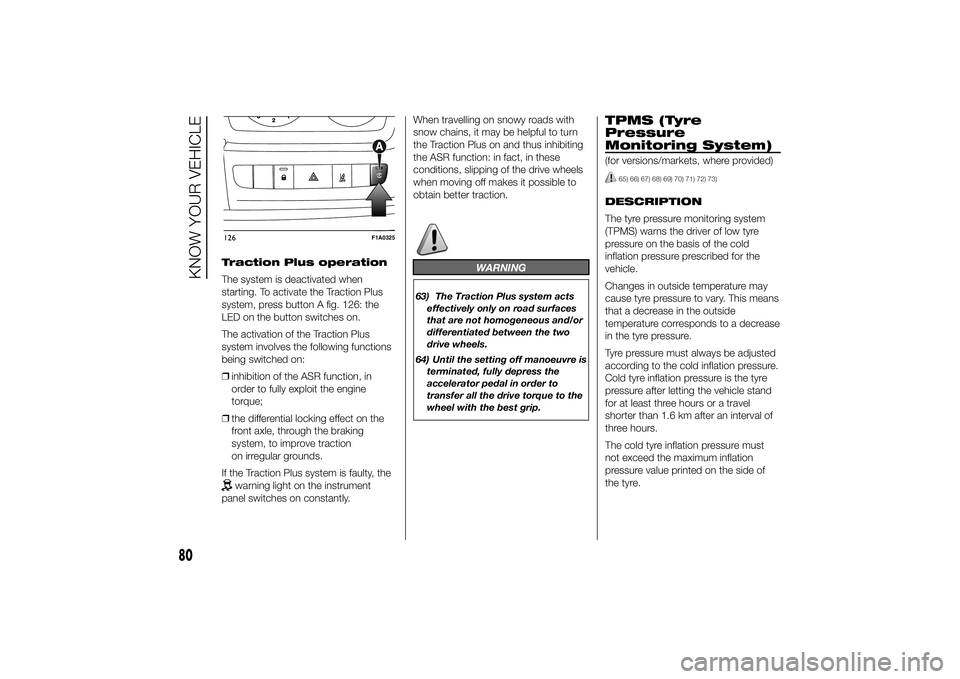
Traction Plus operation
The system is deactivated when
starting. To activate the Traction Plus
system, press button A fig. 126: the
LED on the button switches on.
The activation of the Traction Plus
system involves the following functions
being switched on:
❒inhibition of the ASR function, in
order to fully exploit the engine
torque;
❒the differential locking effect on the
front axle, through the braking
system, to improve traction
on irregular grounds.
If the Traction Plus system is faulty, the
warning light on the instrument
panel switches on constantly.When travelling on snowy roads with
snow chains, it may be helpful to turn
the Traction Plus on and thus inhibiting
the ASR function: in fact, in these
conditions, slipping of the drive wheels
when moving off makes it possible to
obtain better traction.
WARNING
63) The Traction Plus system acts
effectively only on road surfaces
that are not homogeneous and/or
differentiated between the two
drive wheels.
64) Until the setting off manoeuvre is
terminated, fully depress the
accelerator pedal in order to
transfer all the drive torque to the
wheel with the best grip.
TPMS (Tyre
Pressure
Monitoring System)(for versions/markets, where provided)
65) 66) 67) 68) 69) 70) 71) 72) 73)
DESCRIPTION
The tyre pressure monitoring system
(TPMS) warns the driver of low tyre
pressure on the basis of the cold
inflation pressure prescribed for the
vehicle.
Changes in outside temperature may
cause tyre pressure to vary. This means
that a decrease in the outside
temperature corresponds to a decrease
in the tyre pressure.
Tyre pressure must always be adjusted
according to the cold inflation pressure.
Cold tyre inflation pressure is the tyre
pressure after letting the vehicle stand
for at least three hours or a travel
shorter than 1.6 km after an interval of
three hours.
The cold tyre inflation pressure must
not exceed the maximum inflation
pressure value printed on the side of
the tyre.
126
F1A0325
80
KNOW YOUR VEHICLE
Page 85 of 367
The tyre pressure also increases while
driving the vehicle: this is a normal
condition and does not require any
adjustment of the pressure.
The TPMS continues to advise the
driver of the low tyre pressure condition
until this is corrected; the warning
continues until the pressure
corresponds or exceeds the pressure
prescribed for the cold tyres. When the
tyre low pressure control warning
light
switches on constantly, the
inflation pressure must be adjusted until
it reaches the pressure prescribed for
cold tyres. After the automatic update
of the system, the tyre pressure control
warning light switches off. You may
need to drive the vehicle for about 20
minutes at a speed higher than 20
km/h to allow the TPMS to receive this
information.
NOTE
❒The TPMS does not replace the
normal tyre maintenance service and
does not indicate any fault in a tyre.
❒Therefore, the TPMS should not be
used as pressure switch while
adjusting the tyre inflation pressure.❒Driving with insufficient tyre pressure
causes their overheating and can
result in tyre failure. The low inflation
pressure reduces fuel efficiency
and tyre tread life and may also affect
handling and braking performance
of the vehicle.
❒The TPMS does not replace the
correct tyre maintenance. It is up to
the driver to maintain the correct tyre
pressure level measuring it with a
suitable pressure switch. This is
necessary even if the decrease in the
inflation pressure value does not
cause the tyre pressure control
warning light to switch on.
❒The TPMS warns the driver of any
condition of insufficient tyre pressure
If this drops below the insufficient
pressure limit for any reason including
low temperature and normal
pressure loss of the tyre.
❒The seasonal temperature changes
affect tyre pressure.
The TPMS uses wireless devices with
electronic sensors mounted on the
wheel rims to constantly monitor the
value of tyre pressure. The sensors
mounted on each wheel as part of the
valve stem transmit various information
of the tyres to the receiver module, in
order to calculate the pressure.WARNING Monitoring and maintaining
the correct pressure in all four tyres
are particularly important.
Tyre pressure
monitoring system low
pressure warnings
The system warns the driver if one or
more tyres are flat by switching on
the warning light
on the instrument
panel (together with a warning message
and an acoustic signal).
In this case, stop the vehicle as soon as
possible, check the inflation pressure
of each tyre and inflate to the cold tyre
pressure value prescribed for the
vehicle. The system will automatically
update and after receiving the tyre
pressure update the tyre pressure
control warning light switches off. You
may need to drive the vehicle for about
20 minutes at a speed higher than 20
km/h to allow the system to receive this
information.
TPMS operation faults
The system fault is indicated by
warning light
which first flashes for
75 seconds and then stays on steadily.
This can occur in any of the following
situations:
81
Page 86 of 367
❒interference caused by electronic
devices or radio frequency emissions
similar to those of the TPM sensors.
❒Application of tinted films which
interfere with the signals of the radio
waves.
❒Presence of snow or ice on the
wheels or the wheel arches.
❒Use of snow chains.
❒Use of wheels/tyres not equipped
with TPM sensors.
❒The space-saver wheel is not
equipped with the tyre pressure
control sensor. Therefore, the tyre
pressure is not controlled by the
system.
❒If the space-saver wheel replaces a
tyre with a pressure lower than the
insufficient pressure limit, an acoustic
signal will be emitted and the warning
light
will switch on at the next
ignition cycle.❒When the original tyre is repaired or
replaced and it is mounted back on
the vehicle to replace the space-
saver wheel, the TPMS will update
automatically and the warning light
will switch off, provided that the
pressure of none of the four tyres is
below the insufficient pressure limit.
You may need to drive the vehicle for
about 20 minutes at a speed higher
than 20 km/h to allow the TPMS
to receive this information.IMPORTANT
INFORMATION
WARNING
65) The TPMS is optimised for the
original tyres and wheels
provided. TPMS pressures and
alerts have been defined
according to the size of the tyres
mounted on the vehicle. Using
equipment with different size,
type or kind may cause irregular
system operation or sensor
damage. Non-original spare
wheels can damage the sensor.
Do not use tyre sealant or
balancing weights if the vehicle is
equipped with TPMS as these
may damage the sensors.
66) If the system signals a pressure
decrease on a specific tyre, it is
recommended to check the
pressure on all four tyres.
67) TPMS does not relieve the driver
from the obligation to check the
tyre pressure every month; it is
not even to be considered a
replacing system for maintenance
or a safety system.
82
KNOW YOUR VEHICLE
Page 87 of 367
68) Tyre pressure must be checked
with tyres cold. Should it become
necessary for whatever reason
to check pressure with warm
tyres, do not reduce pressure
even if it is higher than the
prescribed value, but repeat the
check when tyres are cold.
69) The TPMS cannot indicate
sudden tyre pressure drops (for
example when a tyre bursts).
In this case, stop the car, braking
with caution and avoiding abrupt
steering.
70) The system only warns that the
tyre pressure is low: it is not able
to inflate them.
71) An insufficient tyre inflation
increases fuel consumption,
reduces the tread duration and
may affect the capacity of driving
safely.
72) Always refit the valve stem cap
after inspecting or adjusting tyre
pressure. This prevents dampness
or dirt from entering the valve
stem and thus the pressure
control sensor from being
damaged.73) The tyre repair kit (Fix&Go)
provided with the car (for
versions/markets, where
provided) is compatible with the
TPMS sensors; using sealants not
equivalent with that in the original
kit may adversely affect its
operation. If sealants not
equivalent with the original one
are used, it is recommended to
have the TPMS sensor operation
checked by a qualified repair
centre.
DRIVING ADVISOR(lane crossing warning)
(for versions/markets, where provided)
78) 75) 76)
The Driving Advisor is a warning system
that notifies the driver if he/she crosses
the lane because he/she has been
distracted.
A video sensor, fitted on the windscreen
near the interior rear view mirror,
detects the lane demarcation lines and
the position of the car in relation to
them.
IMPORTANT On cars with Driving
Advisor, it is advisable to contact a Fiat
Dealership should the windscreen
need to be replaced. If the repair is
carried out at a specialist window
replacement centre, it is still necessary
to go to a Fiat Dealership to have the
camera calibrated.
OPERATION
The system is always active when the
vehicle is started. It can be deactivated
or re-activated by pressing button A
fig. 127 on the dashboard (see
following description).
83
Page 123 of 367
❒Distance travelled B
❒Average consumption B
❒Average speed B
❒Trip time B (driving time).
20)
Values displayed
Outside temperature
Indicates the temperature outside the
vehicle passenger compartment.
Range (for versions/markets, where
provided)
This indicates the distance that can still
be travelled with the fuel in the tank,
assuming that driving style remains
unvaried. The display will show the
reading '-----' when the following
events take place:
❒range value lower than 50 km (or 30
mi)
❒vehicle is left parked with the engine
running for a long time.IMPORTANT The range can be affected
by several factors: driving style (see
paragraph “Driving style” in the
“Starting and driving” section), type of
route (motorway, towns and cities,
mountain roads, etc…), usage
conditions (load, tyre pressures, etc…).
Trip planning must therefore take the
above into account.
Distance travelled
This value shows the distance covered
from the start of the new journey.
Average consumption (for versions/
markets, where provided)
This value shows the approximate
average fuel consumption from the start
of the new journey.
Instant consumption (for versions/
markets where provided)
This value shows the fuel consumption.
The value is constantly updated. The
display will show “----”ifthecar
is parked with the engine running.Average speed
This value shows the car's average
speed based on the overall time
elapsed since the start of the new
journey.
Trip time
Time elapsed since the start of the new
journey.
IMPORTANT If there is no information,
the Trip computer displays "----" in
place of the value. When normal
operating conditions are restored, the
counting of the various values is
resumed, without either zeroing the
values displayed prior to the problem,
or starting a new mission.
TRIP control button
The TRIP button is located on the right
stalk fig. 150. With the ignition key
turned to MAR-ON, this button allows
you to view the previously described
values and also zero them to begin
a new journey:
❒brief press to access the various
values displays;
❒long press to reset and then start a
new mission.
119
Page 140 of 367
Warning lights on
panelWhat it means What to do
amberTPMS
TPMS failure
The warning light switches on when a fault is
detected in the TPMS.In this case, contact a Fiat Dealership as soon
as possible.
Tyre pressure low
The warning light switches on to indicate that the
tyre pressure is lower than the recommended value
and/or that slow pressure loss is occurring. In
these circumstances, optimal tyre duration and fuel
consumption may not be guaranteed.
IMPORTANT
22) If, when the ignition key is turned to MAR-ON, the
warning light does not switch on or if it stays on steadily or
flashing when travelling (on certain versions together with the message on the display), contact a Fiat Dealership as
soon as possible.
23) The presence of water in the supply circuit may cause severe damage to the injection system and irregular engine
operation. If the warning light
switches on (on some versions together with the dedicated message on the
display), contact a Fiat Dealership as soon as possible to have the system bled. If the above indication occurs
immediately after refuelling, water may have entered the tank: turn the engine off immediately and contact a Fiat
Dealership.
24) During regeneration, the fan may be activated.
136
KNOWING THE INSTRUMENT PANEL
Page 180 of 367
SAVING FUELSome useful tips are given below for
fuel saving and reducing harmful
emissions of CO2 and other pollutants
(nitrogen oxides, unburnt
hydrocarbons, Particulate Matter (PM),
etc.).
GENERAL
CONSIDERATIONS
The general factors that affect fuel
consumption are listed below.
Vehicle maintenance
Have checks and adjustments carried
out in accordance with the “Scheduled
Servicing Plan”.Tyres
Check the tyre pressures at least once
every four weeks: if the pressure is
too low, consumption levels increase as
resistance to rolling is higher.
Unnecessary loads
Do not travel with an overloaded
luggage compartment. The weight of
the vehicle (especially when driving
in town) and its geometry greatly affect
fuel consumption and stability.
Roof rack/ski rack
Remove the roof rack or the ski rack
from the roof after use. These
accessories decrease aerodynamic
penetration of the vehicle and have a
negative effect on fuel consumption.
When transporting particularly large
objects, use a trailer if possible.Electric devices
Use electrical devices only for the
amount of time needed. The heated
rear window, additional headlights,
windscreen/rear window wipers and
heater fan need a considerable amount
of energy, therefore increasing fuel
consumption (by up to 25% in
the urban cycle).
Climate control system
Air conditioning leads to higher fuel
consumption (on average up to +20%).
If the temperature outside permits, try
and use the ventilation only.
Devices for
aerodynamic control
The use of non-certified spoilers may
adversely affect air drag and fuel
consumption.
176
STARTING AND DRIVING
Page 192 of 367
❒cover the vehicle with a piece of
fabric or perforated plastic sheet. Do
not use compact plastic tarpaulins,
which prevent humidity from
evaporating from the surface of the
vehicle;
❒inflate tyres to +0.5 bar above the
standard specified pressure and
check it at intervals;
❒do not drain the engine cooling
system.
IMPORTANT If the vehicle is equipped
with an alarm system, switch off the
vehicle alarm with the remote control.
IMPORTANT After turning the ignition
key to STOP and having closed the
driver side door, wait at least one
minute before disconnecting the
electrical supply from the battery. When
reconnecting the electrical supply to
the battery, make sure that the ignition
key is in the STOP position and the
driver side door is closed.
188
STARTING AND DRIVING