stop start FIAT DUCATO BASE CAMPER 2014 Owner handbook (in English)
[x] Cancel search | Manufacturer: FIAT, Model Year: 2014, Model line: DUCATO BASE CAMPER, Model: FIAT DUCATO BASE CAMPER 2014Pages: 367, PDF Size: 20.39 MB
Page 13 of 367
KNOW YOUR VEHICLE
In-depth knowledge of your new vehicle
starts here.
The booklet that you are reading simply
and directly explains how it is made
and how it works.
That’s why we advise you to read it
seated comfortably on board, so that
you can see what is described here for
yourself.SYMBOLS ...................................... 10
THE FIAT CODE SYSTEM ............... 10
THE KEYS....................................... 11
ELECTRONIC ALARM..................... 13
IGNITION SWITCH .......................... 14
SEATS ............................................ 15
HEAD RESTRAINTS ........................ 23
STEERING WHEEL ......................... 24
REAR VIEW MIRRORS .................... 24
HEATING AND VENTILATION.......... 27
DIFFUSERS..................................... 28
HEATING AND VENTILATION
CONTROLS .................................... 28
MANUAL CLIMATE CONTROL
SYSTEM ......................................... 30
AUTOMATIC CLIMATE CONTROL
SYSTEM ......................................... 33
ADDITIONAL HEATER ..................... 38
INDEPENDENT ADDITIONAL
HEATER .......................................... 39
EXTERNAL LIGHTS......................... 44
WINDOW CLEANING ...................... 48
CRUISE CONTROL ......................... 50
ROOF LIGHTS ................................ 53
CONTROLS .................................... 54
FUEL CUT-OFF SWITCH ................ 57
INTERIOR FITTINGS ...................... 58
TACHOGRAPH ............................... 63SPEED BLOCK ............................... 64
SELF-LEVELLING AIR
SUSPENSION ................................. 64
DOORS ........................................... 65
ELECTRIC WINDOWS .................... 70
BONNET ......................................... 71
ROOF RACK/SKI RACK .................. 72
HEADLIGHTS.................................. 73
ABS ................................................ 74
ESC (ELECTRONIC STABILITY
CONTROL) SYSTEM ....................... 75
TRACTION PLUS SYSTEM ............. 79
TPMS (TYRE PRESSURE
MONITORING SYSTEM) ................. 80
DRIVING ADVISOR ......................... 83
REAR CAMERA (PARKVIEW®
REAR BACK UP CAMERA) ............. 89
TRAFFIC SIGN RECOGNITION ....... 90
EOBD SYSTEM............................... 92
PARKING SENSORS....................... 93
START&STOP SYSTEM .................. 95
RADIO............................................. 98
ACCESSORIES PURCHASED BY
THE OWNER................................... 99
REFUELLING THE VEHICLE ...........100
PROTECTING THE
ENVIRONMENT ..............................101
9
Page 14 of 367
SYMBOLSSome vehicle components have
coloured labels whose symbols indicate
precautions to be observed when
using this component. Under the
bonnet there is also a label that
summarises all the symbols.
THE FIAT CODE
SYSTEM
IN BRIEF
This is an electrical engine locking
system which increases protection
against attempted theft of the vehicle.
It is automatically activated when
the ignition key is removed.
Each key contains an electronic
device which modulates the signal
emitted during ignition by an antenna
built into the ignition device. The
signal, which changes each time the
engine is started, is the “password”,
by means of which the control unit
recognises the key and enables
starting.
1)
Operation
Each time the vehicle is started turning
the ignition key toMAR-ON, the Fiat
CODE system control unit sends a
recognition code to the Powertrain
Control Module to deactivate the
immobiliser.The acknowledgement code is sent
only if the Fiat CODE system control
unit has recognised the code
transmitted from the key.
Each time the ignition key is turned to
STOP, the Fiat CODE system
deactivates the functions of the
Powertrain Control Module.
Irregular operation
If, during starting, the code has not
been recognised correctly the warning
light
on the instrument panel turns
on accompanied by the related
message on the display (see section
“Warning lights and messages”).
In this case, turn the key toSTOPand
then back toMAR-ON; if the lock
continues, try with the other keys
provided with the vehicle. Contact a
Fiat Dealership if you still cannot start
the engine.
IMPORTANT Each key has its own
code which must be stored by the
system's control unit. Contact the Fiat
Dealership to have new keys (up to
eight) stored with the code.
10
KNOW YOUR VEHICLE
Page 17 of 367
IMPORTANT
1) Used batteries are harmful to the
environment. You can dispose of
them either in the correct
containers as specified by law or
by taking them to a Fiat
Dealership, which will deal with
their disposal.
ELECTRONIC ALARM(for versions/markets, where provided)
The alarm, in addition to all the remote
control functions described previously,
is controlled by the receiver located
under the dashboard near the fuse box.
Operation
The alarm intervenes in the following
cases:
❒wrongful opening of a door or the
bonnet (perimeter protection);
❒when the ignition system is started
up (ignition key turned to MAR-ON);
❒cutting of the battery leads.
Depending on the market, the
activation of the alarm causes the
activation of the siren and the direction
indicators (for about 26 seconds).
Alarm tripping and the number of
cycles depend on the sales market.
There is a maximum number of
acoustic/visual cycles. When this is
reached the system returns to normal
operation.
IMPORTANT The engine stop function
is guaranteed by the Fiat CODE, which
is automatically activated when the
ignition key is extracted from the
ignition switch.Activation
With the doors and bonnet closed and
the ignition key either turned to STOP
or removed, point the key with the
remote control towards the vehicle and
press and release the lock button.
Excluding some markets, the system
produces an acoustic warning (beep)
and enables door locking.
The switching on of the alarm is
preceded by an self-diagnosis stage: if
a fault is detected, the system
produces another acoustic signal.
In this case, turn the alarm off by
pressing the "release doors/release
load compartment" button, check that
the doors and bonnet are properly
closed and turn the alarm back on by
pressing the lock button.
If a door or the bonnet is not properly
shut, it will be excluded from the testing
by the alarm system.
If the alarm produces an acoustic signal
even when the doors and bonnet are
correctly closed, a fault has occurred in
the operation of the system. Contact
a Fiat Dealership.
IMPORTANT The alarm does not come
on when the central locking is activated
using the metal insert in the key.
13
Page 18 of 367
IMPORTANT The alarm is adapted to
meet requirements in various countries.
Disengagement
Press the door release/load
compartment release button on the key
with remote control.
The following operations are performed
(excluding some markets):
❒direction indicators flash twice;
❒there are two short acoustic signals
(beeps);
❒unlocking of the doors.
IMPORTANT The alarm does not switch
off when the central opening is
activated using the metal insert in the
key.
Break-in attempt
indication
Any break-in attempt is indicated by the
turning on of warning light
on the
instrument panel together with the
message on the display (where
provided, see paragraph “Warning
lights and messages” in the “Knowing
the instrument panel” section).Disabling
To permanently disable the alarm (e.g.
during a long period of inactivity), simply
lock the vehicle by turning the metal
insert of the key with remote control in
the lock.
IMPORTANT If the batteries of the key
with the remote control run out or
the system fails, the alarm can
be switched off by placing the key in
the ignition switch and turning it to
MAR-ON.
IGNITION SWITCHThe key can be turned to 3 different
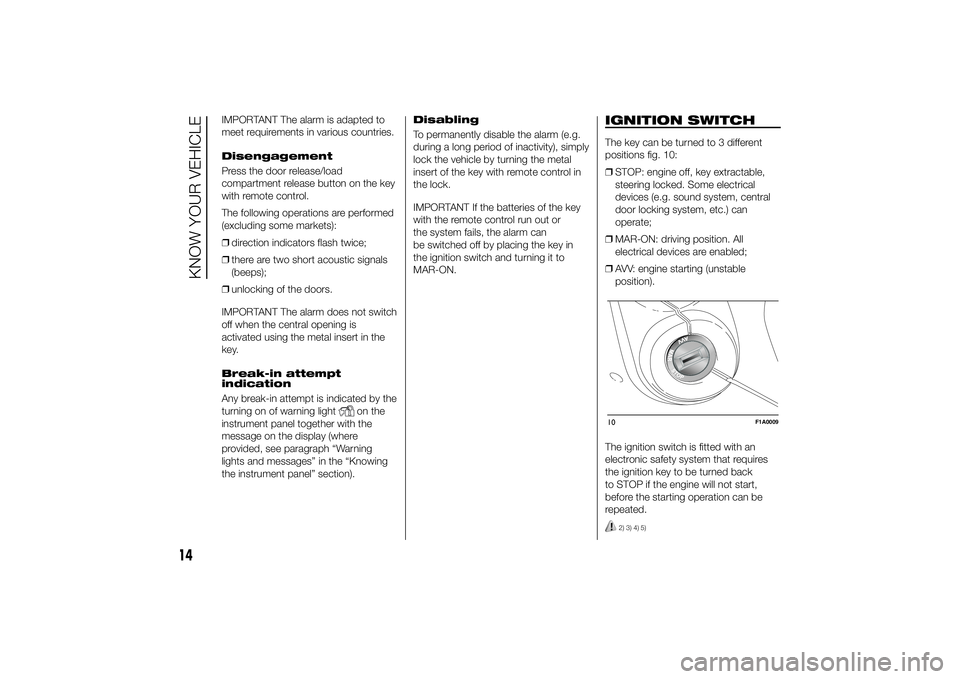
positions fig. 10:
❒STOP: engine off, key extractable,
steering locked. Some electrical
devices (e.g. sound system, central
door locking system, etc.) can
operate;
❒MAR-ON: driving position. All
electrical devices are enabled;
❒AVV: engine starting (unstable
position).
The ignition switch is fitted with an
electronic safety system that requires
the ignition key to be turned back
to STOP if the engine will not start,
before the starting operation can be
repeated.
2) 3) 4) 5)
10
F1A0009
14
KNOW YOUR VEHICLE
Page 33 of 367
❒turn ring nut C to
;
❒turn knob B to the required speed.
PASSENGER
COMPARTMENT HEATING
Proceed as follows:
❒turn ring nut A to the red section;
❒turn ring nut C to the required
position;
❒turn knob B to the required speed.
FAST PASSENGER
COMPARTMENT HEATING
For the fast heating of the passenger
compartment, proceed as follows:
❒turn ring nut A to the red section;
❒start internal air recirculation by
placing knob D on;
❒turn ring nut C to;
❒turn knob B to 4(max. fan
speed).
Then use the controls to maintain the
required comfort conditions and turn
knob D to
to turn the air
recirculation off and to prevent windows
from misting up.
IMPORTANT With a cold engine, you
have to wait for a few minutes to let the
system fluid reach optimum operating
temperature.FRONT WINDOW FAST
DEMISTING/DEFROSTING
(WINDSCREEN AND SIDE
WINDOWS)
Proceed as follows:
❒turn ring nut A to the red section;
❒stop internal air recirculation by
placing knob D on
;
❒turn ring nut C to;
❒turn knob B to 4(max. fan
speed).
IMPORTANT To guarantee rapid
demisting/defrosting, if an additional
heater is present (under the front or rear
seat on Panorama and Combi
versions), if activated, deactivate it
using the F button (LED off) located in
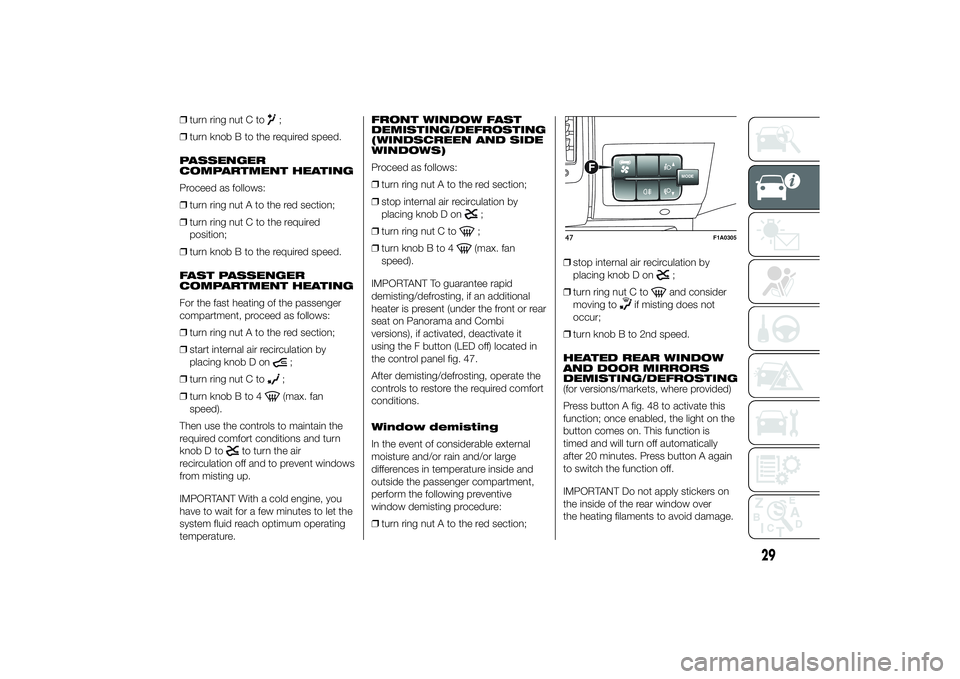
the control panel fig. 47.
After demisting/defrosting, operate the
controls to restore the required comfort
conditions.
Window demisting
In the event of considerable external
moisture and/or rain and/or large
differences in temperature inside and
outside the passenger compartment,
perform the following preventive
window demisting procedure:
❒turn ring nut A to the red section;❒stop internal air recirculation by
placing knob D on
;
❒turn ring nut C toand consider
moving to
if misting does not
occur;
❒turn knob B to 2nd speed.
HEATED REAR WINDOW
AND DOOR MIRRORS
DEMISTING/DEFROSTING
(for versions/markets, where provided)
Press button A fig. 48 to activate this
function; once enabled, the light on the
button comes on. This function is
timed and will turn off automatically
after 20 minutes. Press button A again
to switch the function off.
IMPORTANT Do not apply stickers on
the inside of the rear window over
the heating filaments to avoid damage.
MODE
F
47
F1A0305
29
Page 35 of 367
PASSENGER
COMPARTMENT
VENTILATION
To ventilate the passenger
compartment well, proceed as follows:
❒turn ring nut A to the blue section;
❒stop internal air recirculation by
placing knob D on
;
❒turn ring nut C to;
❒turn knob B to the required speed.
CLIMATE CONTROL
SYSTEM (cooling)
For fast cooling of the passenger
compartment, proceed as follows:
❒turn ring nut A to the blue section;
❒start internal air recirculation by
placing knob D on;
❒turn ring nut C to;
❒press button E to turn the climate
control system on; the LED on the
button will come on;
❒turn knob B to 4(maximum fan
speed).Cooling adjustment
❒turn ring nut A to the right to increase
the temperature;
❒stop internal air recirculation by
placing knob D on
;
❒turn knob B to reduce fan speed.
IMPORTANT When air conditioner
compressor button E is pressed, the
function is only activated if at least the
first fan speed is selected (knob B).
PASSENGER
COMPARTMENT HEATING
Proceed as follows:
❒turn ring nut A to the red section;
❒turn ring nut C to the required
position;
❒turn knob B to the required speed.
FAST PASSENGER
COMPARTMENT HEATING
For the fast heating of the passenger
compartment, proceed as follows:
❒turn ring nut A to the red section;
❒start internal air recirculation by
placing knob D on;
❒turn ring nut C to;
❒turn knob B to 4(max. fan
speed).Then use the controls to maintain the
required comfort conditions and turn
knob D to
to turn the air
recirculation off and to prevent windows
from misting up.
IMPORTANT With a cold engine, you
have to wait for a few minutes to let the
system fluid reach optimum operating
temperature.
FRONT WINDOW FAST
DEMISTING/DEFROSTING
(WINDSCREEN AND SIDE
WINDOWS)
Proceed as follows:
❒turn ring nut A to the red section;
❒turn knob B to 4
(max. fan
speed).
❒turn ring nut C to;
❒stop internal air recirculation by
placing knob D on;
IMPORTANT To guarantee rapid
demisting/defrosting, if an additional
heater/air conditioner is present (under
the front or rear seat on Panorama
and Combi versions), if activated,
deactivate it using F button fig. 50 (LED
off) located in the control panel.
After demisting/defrosting, operate the
controls to restore the required comfort
conditions.
31
Page 41 of 367
IMPORTANT The engagement of the air
recirculation system makes it possible
to reach the required heating or cooling
conditions faster.
It is however inadvisable to use it on
rainy/cold days as it would considerably
increase the possibility of the windows
misting inside, especially if the climate
control compressor is off.
To prevent the windows from misting
up, the recirculation is forced off (i.e. air
is drawn in from the outside) when
the outside temperature is cold.
It is advisable not to use the air
recirculation function when the outside
temperature is low to prevent the
windows from rapidly misting up.
Climate control
compressor
enablement/off button
(F)
Press button
to switch the climate
control compressor off (if on). The icon
on the display will go out.
Press the button when the LED is off to
restore automatic system control of
compressor activation. The icon will
light up on the display.The system will switch recirculation off
when the compressor is switched off to
prevent windows from misting up.
Although the system is capable
of maintaining the required
temperature, the word FULL will
disappear from the display. If, on the
other hand, it is no longer capable
of maintaining the temperature, the
letters flash and the word AUTO goes
out.
IMPORTANT With the compressor off, it
is not possible to introduce air cooler
than ambient temperature into the
passenger compartment. Furthermore,
in certain conditions, the windows
could mist up rapidly because the air is
not dehumidified.
The system remembers that the
compressor has been switched off,
even after the engine has stopped.
To restore automatic compressor
control, press the
button again (in
this case, the system will only work as a
heater) or press the AUTO button.
With the compressor switched off, if the
outside temperature is higher than the
one set, the system is not capable
of satisfying this request. This is
signalled by the target temperature
flashing, after which the word AUTO
goes out.With the climate control compressor
off, the fan speed can be set to zero
manually (no bar shown).
With the compressor enabled and the
engine started, the fan speed may
be reduced to the minimum setting
(only one bar shown).
Button for rapid window
demisting/defrosting (D)
Press this button and the climate
control system will automatically switch
on all the functions required for fast
windscreen and side window
demisting/defrosting:
❒switches on climate control
compressor when climatic conditions
are suitable;
❒switches air recirculation off;
❒maximum air temperature HI in both
areas;
❒sets the fan speed according to the
engine coolant temperature to limit
the flow of air that is not sufficiently
warm to demist the windows;
❒directs air flow to windscreen and
front side windows vents;
❒heated rear window on.
37
Page 46 of 367
IMPORTANT The programmed
switching on time can be altered or
cancelled by following the instructions
given previously.
Operation duration
setting
Hold the button pressed. At the same
time press button 3 or 8.
The time and warning light 7 are
displayed.
Hold button 4 pressed again. At the
same time press button 3 or 8.
The preset activation duration is
displayed and warning light 9 or 2
flashes.
Set the activation duration with button
3or8.
The set activation duration is stored as
soon as the text in the display
disappears, or pressing button 4.
Switching the heating
system off
Deactivation of the system, depending
on the type of activation (automatic
or manual), may be:
❒automaticwhen the programmed
duration is over; when the set time
is over, the display switches off.❒manualpressing the “immediate
heating” button on the timer again
(flame button 6).
In both cases, the heating warning light,
the display lighting and the passenger
compartment heater fan go off and
burning stops.
The fluid circulation pump continues to
work for around two minutes to
dissipate as much heat as possible; the
heater can be turned back on during
this stage.
22)
IMPORTANT The parking heater goes
off when battery voltage is low to allow
the vehicle to be started.
IMPORTANT Before turning on the
device, ensure that the fuel level is
above the reserve. Otherwise the
device could lock and require
the assistance of a Fiat Dealership.
❒Always turn off the heater when
refuelling and near service stations to
avoid the risk of explosion or fire
hazards.
❒Do not park the vehicle on
inflammable material such as paper,
grass or dry leaves: fire hazard!❒The temperature near the heater
should not exceed 120°C (e.g. during
oven painting in a body shop). The
electronic control unit components
may be damaged at higher
temperatures.
❒Whilst the heater is operating with the
engine switched off, it absorbs
energy from the battery; the engine
should therefore be left running
for a while to make sure that the
battery is properly recharged.
❒To check the coolant level, follow the
instructions in the "Vehicle
maintenance" chapter, "Engine
coolant system fluid" paragraph. The
water in the heating circuit must
contain a minimum percentage of
10% antifreeze.
❒For maintenance and repairs, consult
only a Fiat Dealership and use only
original parts.
MAINTENANCE
Have the additional heater checked
regularly at a Fiat Dealership (and
always at the start of every winter). This
will guarantee safe and economic
operation of the heater as well as a long
duration.
42
KNOW YOUR VEHICLE
Page 87 of 367
68) Tyre pressure must be checked
with tyres cold. Should it become
necessary for whatever reason
to check pressure with warm
tyres, do not reduce pressure
even if it is higher than the
prescribed value, but repeat the
check when tyres are cold.
69) The TPMS cannot indicate
sudden tyre pressure drops (for
example when a tyre bursts).
In this case, stop the car, braking
with caution and avoiding abrupt
steering.
70) The system only warns that the
tyre pressure is low: it is not able
to inflate them.
71) An insufficient tyre inflation
increases fuel consumption,
reduces the tread duration and
may affect the capacity of driving
safely.
72) Always refit the valve stem cap
after inspecting or adjusting tyre
pressure. This prevents dampness
or dirt from entering the valve
stem and thus the pressure
control sensor from being
damaged.73) The tyre repair kit (Fix&Go)
provided with the car (for
versions/markets, where
provided) is compatible with the
TPMS sensors; using sealants not
equivalent with that in the original
kit may adversely affect its
operation. If sealants not
equivalent with the original one
are used, it is recommended to
have the TPMS sensor operation
checked by a qualified repair
centre.
DRIVING ADVISOR(lane crossing warning)
(for versions/markets, where provided)
78) 75) 76)
The Driving Advisor is a warning system
that notifies the driver if he/she crosses
the lane because he/she has been
distracted.
A video sensor, fitted on the windscreen
near the interior rear view mirror,
detects the lane demarcation lines and
the position of the car in relation to
them.
IMPORTANT On cars with Driving
Advisor, it is advisable to contact a Fiat
Dealership should the windscreen
need to be replaced. If the repair is
carried out at a specialist window
replacement centre, it is still necessary
to go to a Fiat Dealership to have the
camera calibrated.
OPERATION
The system is always active when the
vehicle is started. It can be deactivated
or re-activated by pressing button A
fig. 127 on the dashboard (see
following description).
83
Page 89 of 367
If the driver keeps deliberately with the
lane change manoeuvre, the system
interrupts the warning, remaining
enabled if the operating conditions are
not satisfied or active if the operating
conditions are exceeded (see the
dedicated paragraph).
SWITCHING OFF THE
SYSTEM
Manual mode
The system can be switched off by
pressing button A fig. 127 on the
dashboard.
The LED on the button switches on and
a message appears on the display to
confirm that the system has been
switched off.
Automatic mode
If the Start&Stop is active the system
deactivates automatically. The system
will reactivate and check its operating
conditions again after the vehicle has
been started.SYSTEM FAILURE
In the case of malfunction the system
signals the fault to the driver with a
message on the display, an acoustic
warning and switching on of the icon
on the display (for versions/markets,
where provided).
IMPORTANT INFORMATION
The Driving Advisor cannot operate due
to a not perfectly balanced and
excessive load.
The operation of the system can be
adversely affected in some cases
by the morphology of the territory/road
being driven on (e.g. driving over
humps), poor visibility conditions (e.g.
fog, rain, snow), extreme light
conditions (e.g. glare of the sun,
darkness), lack of cleanliness
or damage, even partial, to the
windscreen in the area in front of the
camera.
The Driving Advisor cannot operate
following a malfunction of the following
safety systems: ABS, ESP, ASR and
Traction Plus.The operation of the system can be
adversely affected by poor visibility
conditions (e.g. fog, rain, snow),
extreme light conditions (glare of the
sun, darkness), lack of cleaning or
damage, even partial, to the
windscreen in the area in front the
camera.
The area of the windscreen by the
camera must not be partly or totally
obscured by objects (e.g. stickers,
protective film, etc.).
WARNING
74) If the camera loses its position
due to a load variation, the system
may not work temporarily to allow
the camera to perform an
autocalibration.
75) The Driving Advisor is not an
automatic driving system and
does not replace the driver in
controlling the trajectory of the
car. The driver is personally
responsible for maintaining a
sufficient level of attention to the
traffic and road conditions and
for controlling the trajectory of the
car safely.
85