wheel FIAT DUCATO BASE CAMPER 2015 Owner handbook (in English)
[x] Cancel search | Manufacturer: FIAT, Model Year: 2015, Model line: DUCATO BASE CAMPER, Model: FIAT DUCATO BASE CAMPER 2015Pages: 367, PDF Size: 19.73 MB
Page 2 of 367
We really know your vehicle because we invented,
designed and built it: we really know every single detail. At Fiat Professional Service authorised workshops
you can find technicians directly trained by us, offering quality and professionalism for all service operations.
Fiat Professional workshops are always close to you for the regular servicing operations, season checks and practical recommendations by our experts.
With Fiat Professional Genuine Parts you keep the reliability, comfort and performance features of your new vehicle unchanged in time: that's why you bought it for.
Always ask for Genuine Parts for the components used on our vehicles; we recommend them because they come from our steady commitment in research and development of highly innovative technologies. For all these reasons: rely on Genuine Parts,
because they are the only ones designed by Fiat Professional for your vehicle.
SAFETY: BRAKING SYSTEMENVIRONMENT: PARTICULATE FILTERS,
CLIMATE CONTROL SYSTEM MAINTENANCECOMFORT:
SUSPENSION AND WINDSCREEN WIPERSPERFORMANCE:
SPARK PLUGS, INJECTORS AND BATTERIESLINEACCESSORI:
ROOF RACK BARS, WHEEL RIMS
WHY CHOOSING GENUINE PARTS
COP DUCATO LUM GB 20/01/14 09.58 Pagina 2
Page 9 of 367
GRAPHICAL INDEX
.
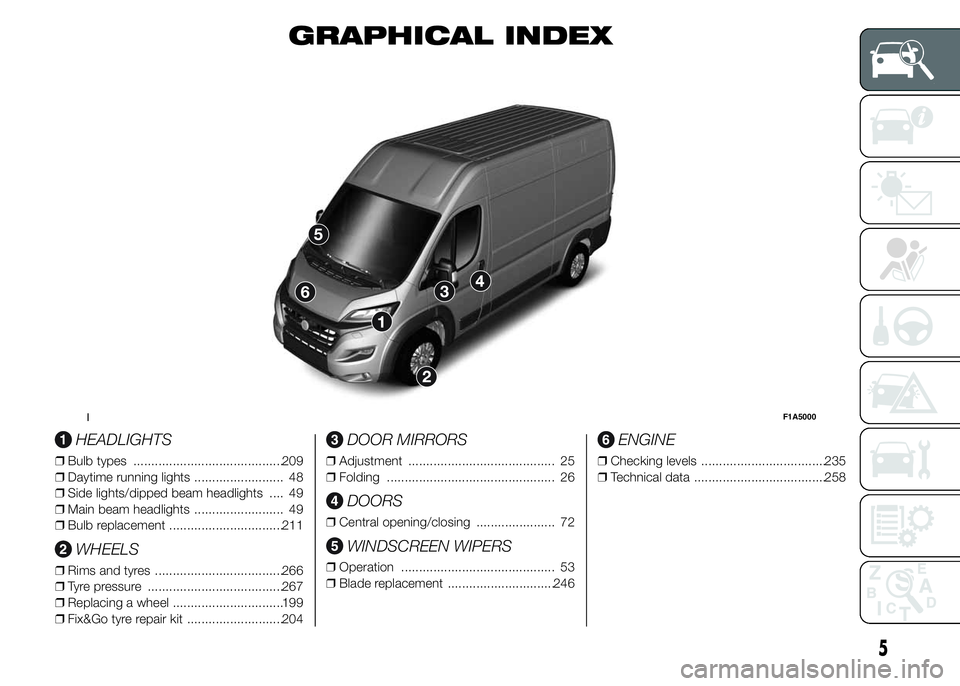
HEADLIGHTS
❒Bulb types ..........................................209
❒Daytime running lights ......................... 48
❒Side lights/dipped beam headlights .... 49
❒Main beam headlights ......................... 49
❒Bulb replacement ................................211
WHEELS
❒Rims and tyres ....................................266
❒Tyre pressure ......................................267
❒Replacing a wheel ...............................199
❒Fix&Go tyre repair kit ...........................204
DOOR MIRRORS
❒Adjustment ......................................... 25
❒Folding ............................................... 26
DOORS
❒Central opening/closing ...................... 72
WINDSCREEN WIPERS
❒Operation ........................................... 53
❒Blade replacement ..............................246
ENGINE
❒Checking levels ...................................235
❒Technical data .....................................258
1F1A5000
5
Page 11 of 367
.
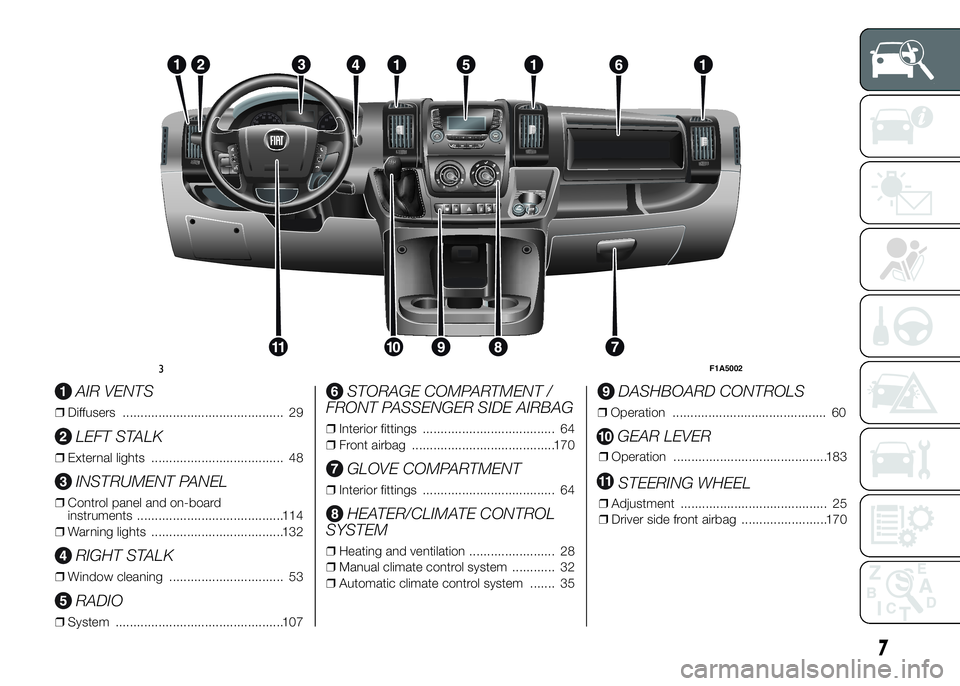
AIR VENTS
❒Diffusers ............................................. 29
LEFT STALK
❒External lights ..................................... 48
INSTRUMENT PANEL
❒Control panel and on-board
instruments .........................................114
❒Warning lights .....................................132
RIGHT STALK
❒Window cleaning ................................ 53
RADIO
❒System ...............................................107
STORAGE COMPARTMENT /
FRONT PASSENGER SIDE AIRBAG
❒Interior fittings ..................................... 64
❒Front airbag ........................................170
GLOVE COMPARTMENT
❒Interior fittings ..................................... 64
HEATER/CLIMATE CONTROL
SYSTEM
❒Heating and ventilation ........................ 28
❒Manual climate control system ............ 32
❒Automatic climate control system ....... 35
DASHBOARD CONTROLS
❒Operation ........................................... 60
GEAR LEVER
❒Operation ...........................................183
STEERING WHEEL
❒Adjustment ......................................... 25
❒Driver side front airbag ........................170
RADIO
MEDIA
PHONEINFO
A-B-C
MENU
123 4 56
3F1A5002
7
Page 13 of 367
KNOW YOUR VEHICLE
In-depth knowledge of your new
vehicle starts here.
The booklet that you are reading
simply and directly explains how it
is made and how it works.
That’s why we advise you to read it
seated comfortably on board, so
that you can see what is described
here for yourself.SYMBOLS ...................................... 10
THE FIAT CODE SYSTEM ............... 10
THE KEYS....................................... 11
ELECTRONIC ALARM..................... 13
IGNITION SWITCH .......................... 15
SEATS ............................................ 16
HEAD RESTRAINTS ........................ 24
STEERING WHEEL ......................... 25
REAR VIEW MIRRORS .................... 25
HEATING AND VENTILATION.......... 28
DIFFUSERS..................................... 29
HEATING AND VENTILATION
CONTROLS .................................... 29
MANUAL CLIMATE CONTROL
SYSTEM ......................................... 32
AUTOMATIC CLIMATE CONTROL
SYSTEM ......................................... 35
ADDITIONAL HEATER ..................... 42
INDEPENDENT ADDITIONAL
HEATER .......................................... 42
EXTERNAL LIGHTS......................... 48
WINDOW CLEANING ...................... 53
CRUISE CONTROL ......................... 55
ROOF LIGHTS ................................ 59
CONTROLS .................................... 60
FUEL CUT-OFF SWITCH ................ 63
INTERIOR FITTINGS ...................... 64
TACHOGRAPH ............................... 69SPEED BLOCK ............................... 70
SELF-LEVELLING AIR
SUSPENSION ................................. 70
DOORS ........................................... 72
ELECTRIC WINDOWS .................... 78
BONNET ......................................... 79
ROOF RACK/SKI RACK .................. 80
HEADLIGHTS.................................. 81
ABS ................................................ 82
ESC (ELECTRONIC STABILITY
CONTROL) SYSTEM ....................... 83
TRACTION PLUS SYSTEM ............. 88
TPMS (TYRE PRESSURE
MONITORING SYSTEM) ................. 89
DRIVING ADVISOR ......................... 92
REAR CAMERA (PARKVIEW®
REAR BACK UP CAMERA) ............. 97
TRAFFIC SIGN RECOGNITION ....... 99
EOBD SYSTEM...............................100
PARKING SENSORS.......................101
START&STOP SYSTEM ..................103
RADIO.............................................107
ACCESSORIES PURCHASED BY
THE OWNER...................................108
REFUELLING THE VEHICLE ...........109
PROTECTING THE
ENVIRONMENT ..............................111
9
Page 19 of 367
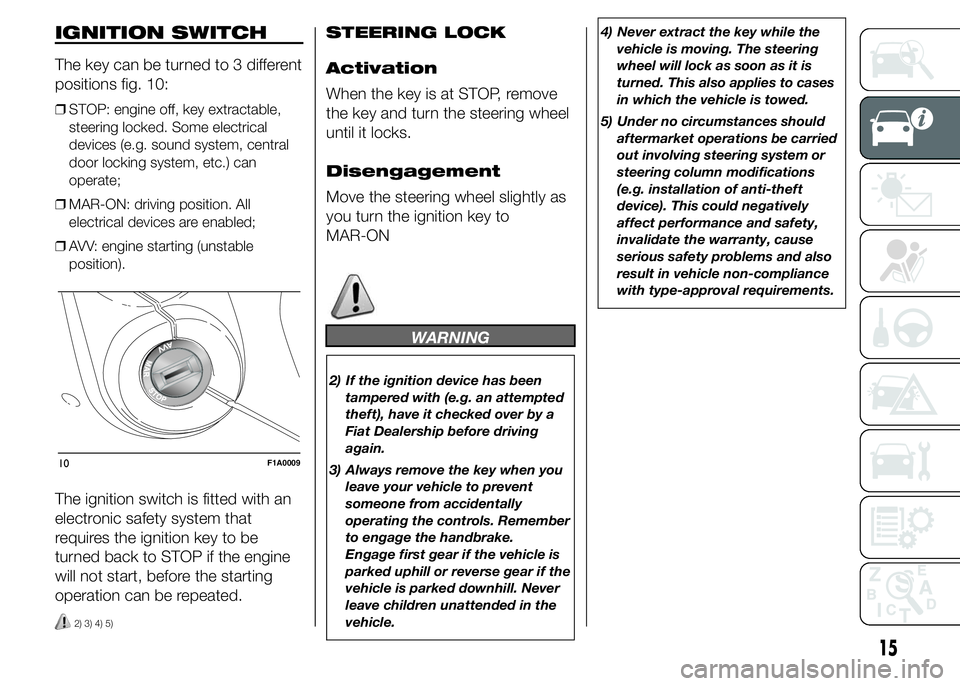
IGNITION SWITCH
The key can be turned to 3 different
positions fig. 10:
❒STOP: engine off, key extractable,
steering locked. Some electrical
devices (e.g. sound system, central
door locking system, etc.) can
operate;
❒MAR-ON: driving position. All
electrical devices are enabled;
❒AVV: engine starting (unstable
position).
The ignition switch is fitted with an
electronic safety system that
requires the ignition key to be
turned back to STOP if the engine
will not start, before the starting
operation can be repeated.
2) 3) 4) 5)
STEERING LOCK
Activation
When the key is at STOP, remove
the key and turn the steering wheel
until it locks.
Disengagement
Move the steering wheel slightly as
you turn the ignition key to
MAR-ON
WARNING
2) If the ignition device has been
tampered with (e.g. an attempted
theft), have it checked over by a
Fiat Dealership before driving
again.
3) Always remove the key when you
leave your vehicle to prevent
someone from accidentally
operating the controls. Remember
to engage the handbrake.
Engage first gear if the vehicle is
parked uphill or reverse gear if the
vehicle is parked downhill. Never
leave children unattended in the
vehicle.4) Never extract the key while the
vehicle is moving. The steering
wheel will lock as soon as it is
turned. This also applies to cases
in which the vehicle is towed.
5) Under no circumstances should
aftermarket operations be carried
out involving steering system or
steering column modifications
(e.g. installation of anti-theft
device). This could negatively
affect performance and safety,
invalidate the warranty, cause
serious safety problems and also
result in vehicle non-compliance
with type-approval requirements.
10F1A0009
15
Page 20 of 367
SEATS
6)
2)
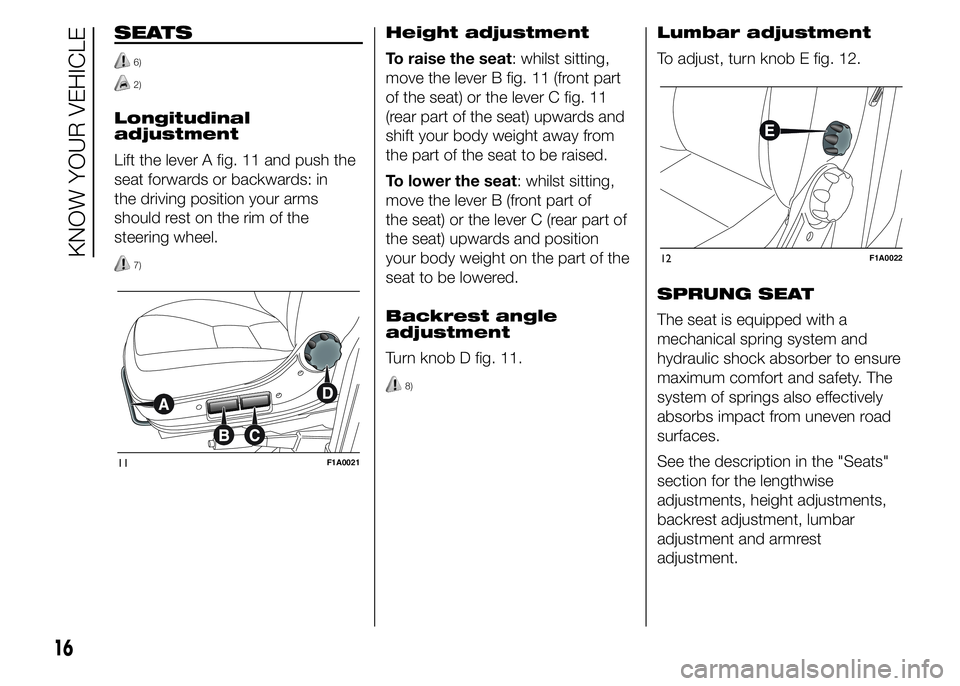
Longitudinal
adjustment
Lift the lever A fig. 11 and push the
seat forwards or backwards: in
the driving position your arms
should rest on the rim of the
steering wheel.
7)
Height adjustment
To raise the seat: whilst sitting,
move the lever B fig. 11 (front part
of the seat) or the lever C fig. 11
(rear part of the seat) upwards and
shift your body weight away from
the part of the seat to be raised.
To lower the seat: whilst sitting,
move the lever B (front part of
the seat) or the lever C (rear part of
the seat) upwards and position
your body weight on the part of the
seat to be lowered.
Backrest angle
adjustment
Turn knob D fig. 11.
8)
Lumbar adjustment
To adjust, turn knob E fig. 12.
SPRUNG SEAT
The seat is equipped with a
mechanical spring system and
hydraulic shock absorber to ensure
maximum comfort and safety. The
system of springs also effectively
absorbs impact from uneven road
surfaces.
See the description in the "Seats"
section for the lengthwise
adjustments, height adjustments,
backrest adjustment, lumbar
adjustment and armrest
adjustment.
11F1A0021
12F1A0022
16
KNOW YOUR VEHICLE
Page 21 of 367
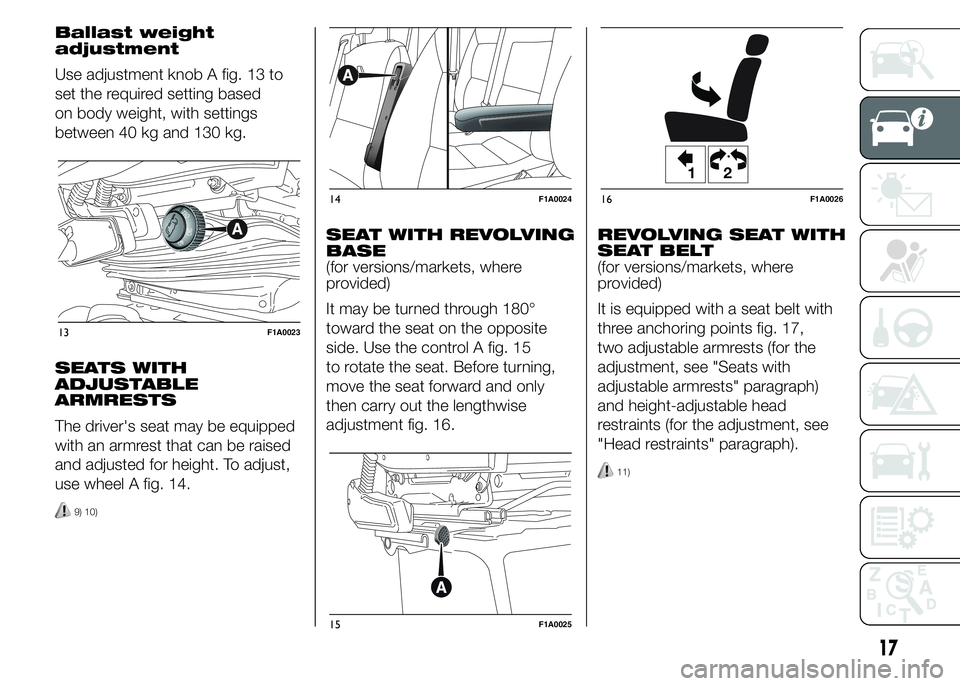
Ballast weight
adjustment
Use adjustment knob A fig. 13 to
set the required setting based
on body weight, with settings
between 40 kg and 130 kg.
SEATS WITH
ADJUSTABLE
ARMRESTS
The driver's seat may be equipped
with an armrest that can be raised
and adjusted for height. To adjust,
use wheel A fig. 14.
9) 10)
SEAT WITH REVOLVING
BASE
(for versions/markets, where
provided)
It may be turned through 180°
toward the seat on the opposite
side. Use the control A fig. 15
to rotate the seat. Before turning,
move the seat forward and only
then carry out the lengthwise
adjustment fig. 16.REVOLVING SEAT WITH
SEAT BELT
(for versions/markets, where
provided)
It is equipped with a seat belt with
three anchoring points fig. 17,
two adjustable armrests (for the
adjustment, see "Seats with
adjustable armrests" paragraph)
and height-adjustable head
restraints (for the adjustment, see
"Head restraints" paragraph).
11)
13F1A0023
14F1A0024
15F1A0025
12
16F1A0026
17
Page 29 of 367
STEERING WHEEL
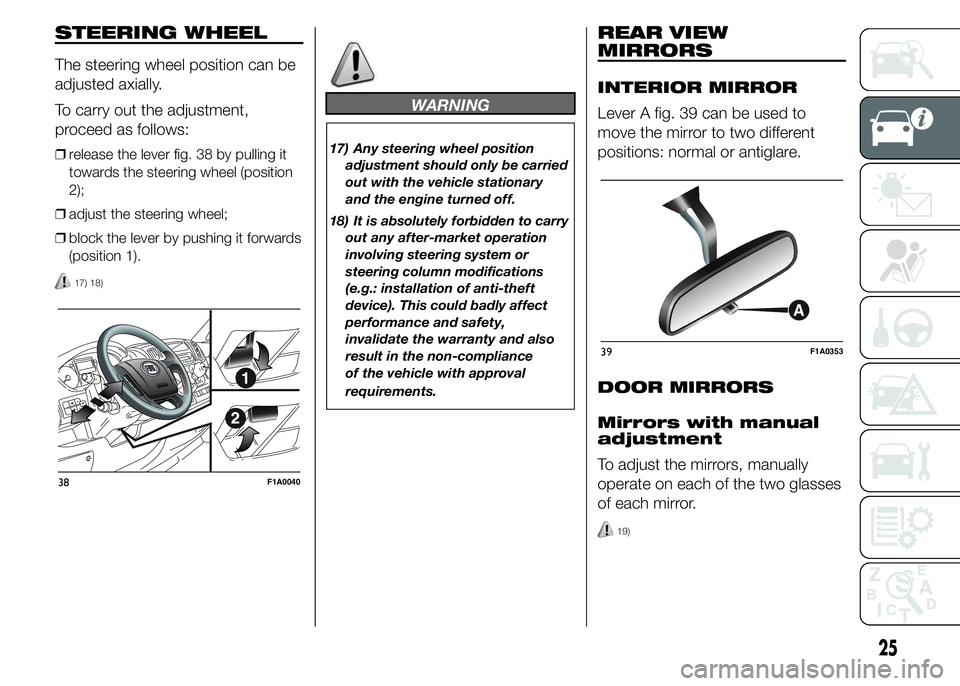
The steering wheel position can be
adjusted axially.
To carry out the adjustment,
proceed as follows:
❒release the lever fig. 38 by pulling it
towards the steering wheel (position
2);
❒adjust the steering wheel;
❒block the lever by pushing it forwards
(position 1).
17) 18)
WARNING
17) Any steering wheel position
adjustment should only be carried
out with the vehicle stationary
and the engine turned off.
18) It is absolutely forbidden to carry
out any after-market operation
involving steering system or
steering column modifications
(e.g.: installation of anti-theft
device). This could badly affect
performance and safety,
invalidate the warranty and also
result in the non-compliance
of the vehicle with approval
requirements.
REAR VIEW
MIRRORS
INTERIOR MIRROR
Lever A fig. 39 can be used to
move the mirror to two different
positions: normal or antiglare.
DOOR MIRRORS
Mirrors with manual
adjustment
To adjust the mirrors, manually
operate on each of the two glasses
of each mirror.
19)
38F1A0040
39F1A0353
25
Page 51 of 367
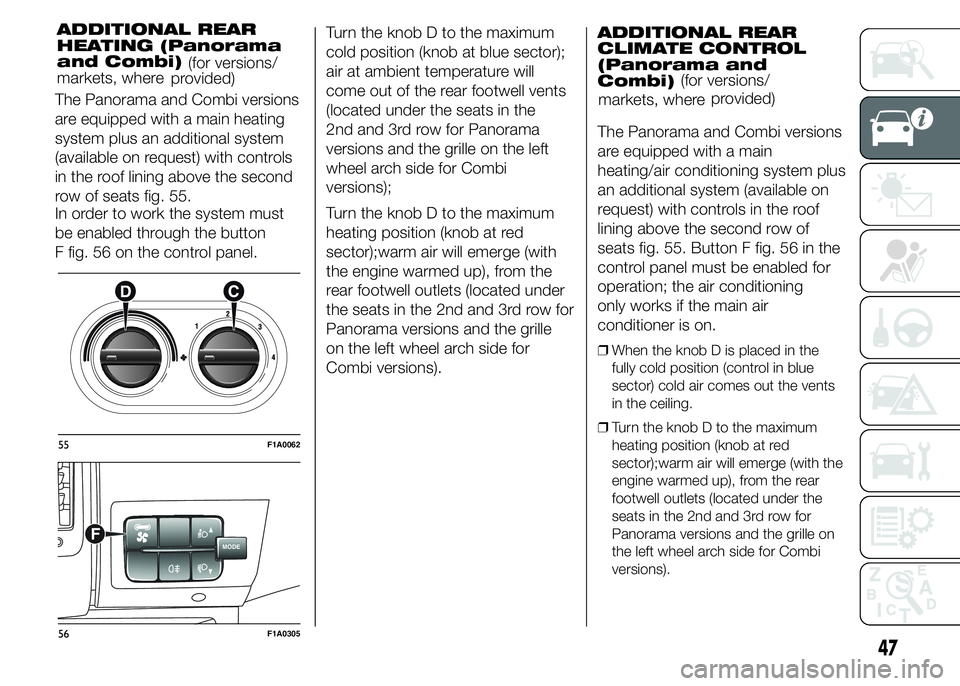
The Panorama and Combi versions
are equipped with a main heating
system plus an additional system
(available on request) with controls
in the roof lining above the second
row of seats fig. 55.
In order to work the system must
be enabled through the button
F fig. 56 on the control panel.Turn the knob D to the maximum
cold position (knob at blue sector);
air at ambient temperature will
come out of the rear footwell vents
(located under the seats in the
2nd and 3rd row for Panorama
versions and the grille on the left
wheel arch side for Combi
versions);
Turn the knob D to the maximum
heating position (knob at red
sector);warm air will emerge (with
the engine warmed up), from the
rear footwell outlets (located under
the seats in the 2nd and 3rd row for
Panorama versions and the grille
on the left wheel arch side for
Combi versions).ADDITIONAL REAR
CLIMATE CONTROL
(Panorama and
Combi)
The Panorama and Combi versions
are equipped with a main
heating/air conditioning system plus
an additional system (available on
request) with controls in the roof
lining above the second row of
seats fig. 55. Button F fig. 56 in the
control panel must be enabled for
operation; the air conditioning
only works if the main air
conditioner is on.
❒When the knob D is placed in the
fully cold position (control in blue
sector) cold air comes out the vents
in the ceiling.
❒Turn the knob D to the maximum
heating position (knob at red
sector);warm air will emerge (with the
engine warmed up), from the rear
footwell outlets (located under the
seats in the 2nd and 3rd row for
Panorama versions and the grille on
the left wheel arch side for Combi
versions).
55F1A0062
MODEF
56F1A0305
47
ADDITIONAL REAR
HEATING (Panorama
and Combi)
markets, where
provided)(for versions/
markets, whereprovided) (for versions/
Page 53 of 367
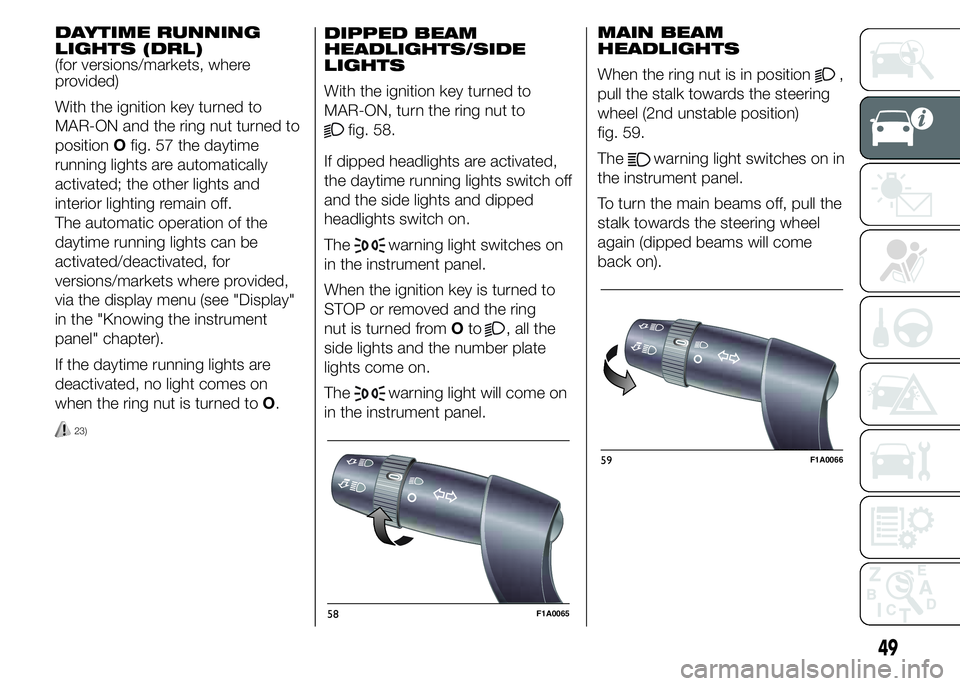
DAYTIME RUNNING
LIGHTS (DRL)
(for versions/markets, where
provided)
With the ignition key turned to
MAR-ON and the ring nut turned to
positionOfig. 57 the daytime
running lights are automatically
activated; the other lights and
interior lighting remain off.
The automatic operation of the
daytime running lights can be
activated/deactivated, for
versions/markets where provided,
via the display menu (see "Display"
in the "Knowing the instrument
panel" chapter).
If the daytime running lights are
deactivated, no light comes on
when the ring nut is turned toO.
23)
DIPPED BEAM
HEADLIGHTS/SIDE
LIGHTS
With the ignition key turned to
MAR-ON, turn the ring nut to
fig. 58.
If dipped headlights are activated,
the daytime running lights switch off
and the side lights and dipped
headlights switch on.
The
warning light switches on
in the instrument panel.
When the ignition key is turned to
STOP or removed and the ring
nut is turned fromOto
, all the
side lights and the number plate
lights come on.
The
warning light will come on
in the instrument panel.MAIN BEAM
HEADLIGHTS
When the ring nut is in position
,
pull the stalk towards the steering
wheel (2nd unstable position)
fig. 59.
The
warning light switches on in
the instrument panel.
To turn the main beams off, pull the
stalk towards the steering wheel
again (dipped beams will come
back on).
58F1A0065
59F1A0066
49