ESC FIAT DUCATO BASE CAMPER 2016 Owner handbook (in English)
[x] Cancel search | Manufacturer: FIAT, Model Year: 2016, Model line: DUCATO BASE CAMPER, Model: FIAT DUCATO BASE CAMPER 2016Pages: 387, PDF Size: 20.76 MB
Page 195 of 387
For the electric connection a standard
connector should be used which is
generally placed on a special bracket
normally fastened to the towing device,
and a special ECU for external trailer
light control must be installed on the
vehicle. For the electrical connection, 7
or 13 pin 12 V DC connections are to
be used (CUNA/UNI and ISO/DIN
Standards). Follow the instructions
provided by the vehicle manufacturer
and/or the tow hitch manufacturer.
An electric brake (or electric winch)
should be supplied directly by the
battery through a cable with a cross
section of no less than 2.5 mm
2.
IMPORTANT Electric brakes or other
devices must be used with engine
running.
In addition to the electrical branches,
the vehicle's electric system can only
be connected to the supply cable for an
electric brake and to the cable for an
internal light, though not above 15
W. For connections use the preset
control unit with battery cable no less
than 2.5 mm
2.IMPORTANT The trailer tow hook
contributes to the length of the vehicle.
When installing on long wheelbase
versions, it is only possible to install
removable tow hooks because the total
vehicle length limit of 6 metres is
exceeded.
If no trailer is fitted, the hook must be
removed from the attachment base and
it must not exceed the vehicle's
original length.
IMPORTANT If you wish to leave the
tow hook fitted without towing a trailer,
it is advisable to contact a Fiat
Dealership for the relevant system
update operations because the tow
hook could be detected as an obstacle
by the central sensors.Installation diagram for
Van versions fig. 174
The tow hook structure must be
fastened in the points shown by the
symbol Ø using a total of 6 M10x1.25
screws and 4 M12 screws.
The internal back plates must be at
least 5 mm thick. MAX LOAD ON
BALL: 100/120 kg according to the
payload (see “Weights” table in the
“Technical data” section).
142)
To install a tow hook, the bumpers
must be trimmed as described in the
supplier's installation kit.
191
Page 203 of 387
IMPORTANT
43) Keep your speed down when
snow chains are fitted; do not
exceed 50 km/h. Avoid potholes,
steps and pavements and avoid
driving for long distances on
roads not covered with snow to
prevent damaging the vehicle and
the roadbed.
PROLONGED
VEHICLE INACTIVITY
If the vehicle needs to be off the road
for longer than one month, the following
precautions must be taken:
❒park the vehicle indoors in a dry and,
if possible, well-ventilated place;
❒engage a gear;
❒check that the handbrake is not
engaged;
❒disconnect the negative battery
terminal; if the vehicle is equipped
with a battery disconnection function
(disconnector), see the description
of the procedure in the "Controls"
paragraph in the "Dashboard and
controls" section;
❒clean and protect the painted parts
using protective wax;
❒clean and protect the shiny metal
parts using special compounds
available commercially;
❒sprinkle talcum powder on the
windscreen and rear window wiper
rubber blades and lift them off the
glass;
❒slightly open the windows;❒cover the vehicle with a piece of
fabric or perforated plastic sheet. Do
not use compact plastic tarpaulins,
which prevent humidity from
evaporating from the surface of the
vehicle;
❒inflate tyres to +0.5 bar above the
standard specified pressure and
check it at intervals;
❒do not drain the engine cooling
system.
IMPORTANT If the vehicle is equipped
with an alarm system, switch off the
vehicle alarm with the remote control.
IMPORTANT After turning the ignition
key to STOP and having closed the
driver side door, wait at least one
minute before disconnecting the
electrical supply from the battery. When
reconnecting the electrical supply to
the battery, make sure that the ignition
key is in the STOP position and the
driver side door is closed.
199
Page 210 of 387
At the end of the operation:
❒take the removed wheel, re-attach it
to the mount E fig. 187 and tighten
the knob D;
❒introduce the assembled tool fig. 186
with the suitable extension B fig. 185
on the screw A fig. 185 of the spare
wheel housing manoeuvring device
and turn clockwise to lift the spare
wheel back up until it is fully
supported in its housing under the
platform, checking that the
attachment reference D fig. 186
appears in the window on the device;
155)
For vehicles with alloy rims, proceed as
follows:
❒carry out the above described
operations for changing the wheel
until loading the punctured wheel on
the spare wheel lifting device;❒take the kit from the tool bag, located
in the glove compartment;
❒the kit includes one bracket, three
special screws and one Allen
spanner, 10 size;
❒go to the rear side of the vehicle
where the spare wheel is located;
❒make sure to have fully unwound the
cable of the spare wheel lifting
device; take the bell and position it
inside the circular bracket fig. 191;
❒tighten the knob on the screw to
secure the bracket fig. 192.
❒lay the bracket on the inside of the
alloy rim fig. 193.
❒use the Allen spanner and tighten the
three special screws on the nuts of
the bracket fig. 194 locking the rim;
G
H
189F1A0176190F1A0430191F1A0424
192F1A0425
193F1A0426
206
IN AN EMERGENCY
Page 214 of 387
❒if after this operation you still cannot
reach at least 3 bar after 10 minutes,
do not resume driving because the
tyre is too damaged and the quick
tyre repair kit cannot guarantee
suitable sealing. Contact a Fiat
Dealership;
❒if the tyre reaches the pressure
specified in “Inflation pressure”
paragraph in the "Technical Data"
section, start driving immediately;
❒after having driven for about
10 minutes, stop and recheck the
tyre pressure; remember to apply the
handbrake;❒if a pressure value of at least 3 bar is
detected, restore the correct
pressure prescribed in the paragraph
“Inflation pressure” in “Technical
specification” (with the engine
running and the handbrake
engaged), resume driving and drive
with care to nearest Fiat Dealership.
FOR CHECKING AND
RESTORING PRESSURE
ONLY
The compressor can also be used
solely for restoring pressure.
❒Pull the handbrake.
❒Undo the cap for the tyre valve,
extract the pipe C fig. 200 with the
quick coupling and connect it directly
to the valve of the tyre to be inflated.
❒Insert the plug in the nearest 12
V power socket and start the engine.
❒Rotate the selector clockwise to the
pressure renewal position.
❒Activate the kit by pressing the on/off
switch. Inflate the tyre to the pressure
specified in the "Inflation pressure"
paragraph, in the "Technical Data"
chapter.NOTE If the tyre has to be deflated,
press the dedicated button B illustrated
in fig. 201. For a more accurate
reading, it is advisable to check the
pressure reading on the pressure gauge
with the compressor off and without
moving the centre selector from the
pressure renewal position.
199F1A0335
200F1A0185
201F1A0186
210
IN AN EMERGENCY
Page 220 of 387
REPLACING AN
EXTERIOR BULB
For the type of bulb and power rating,
see “Replacing a bulb”.
FRONT LIGHT CLUSTERS
The front light clusters contain the side
lights and DRLs (where the LED
solution is not provided), dipped beam,
main beam and direction indicator
bulbs.
Bulbs must be replaced with the
headlight removed and placed on a
work surface.
To remove the headlight, operate as
follows:
❒open the bonnet following the
procedure in the "Bonnet/Luggage
Compartment" paragraph in the
"Knowing your car" chapter;
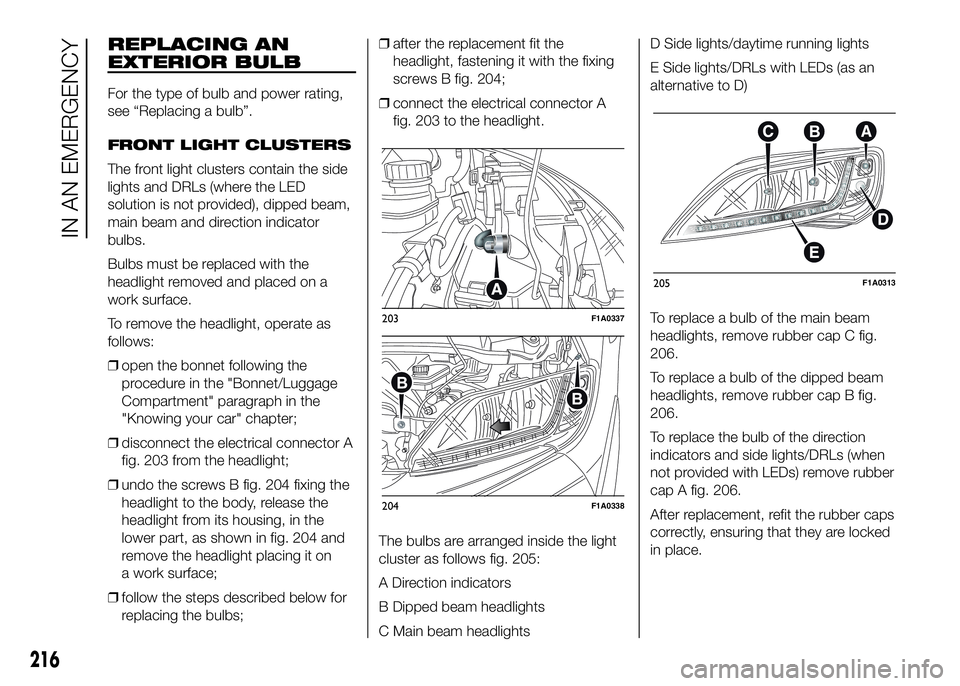
❒disconnect the electrical connector A
fig. 203 from the headlight;
❒undo the screws B fig. 204 fixing the
headlight to the body, release the
headlight from its housing, in the
lower part, as shown in fig. 204 and
remove the headlight placing it on
a work surface;
❒follow the steps described below for
replacing the bulbs;❒after the replacement fit the
headlight, fastening it with the fixing
screws B fig. 204;
❒connect the electrical connector A
fig. 203 to the headlight.
The bulbs are arranged inside the light
cluster as follows fig. 205:
A Direction indicators
B Dipped beam headlights
C Main beam headlightsD Side lights/daytime running lights
E Side lights/DRLs with LEDs (as an
alternative to D)
To replace a bulb of the main beam
headlights, remove rubber cap C fig.
206.
To replace a bulb of the dipped beam
headlights, remove rubber cap B fig.
206.
To replace the bulb of the direction
indicators and side lights/DRLs (when
not provided with LEDs) remove rubber
cap A fig. 206.
After replacement, refit the rubber caps
correctly, ensuring that they are locked
in place.
203F1A0337
204F1A0338
205F1A0313
216
IN AN EMERGENCY
Page 221 of 387
SIDE LIGHTS/DAYTIME
RUNNING LIGHTS (LEDs)
These are LEDs. For replacement,
contact a Fiat Dealership.
SIDE LIGHTS/DAYTIME
RUNNING LIGHTS
To replace the bulb, proceed as follows:
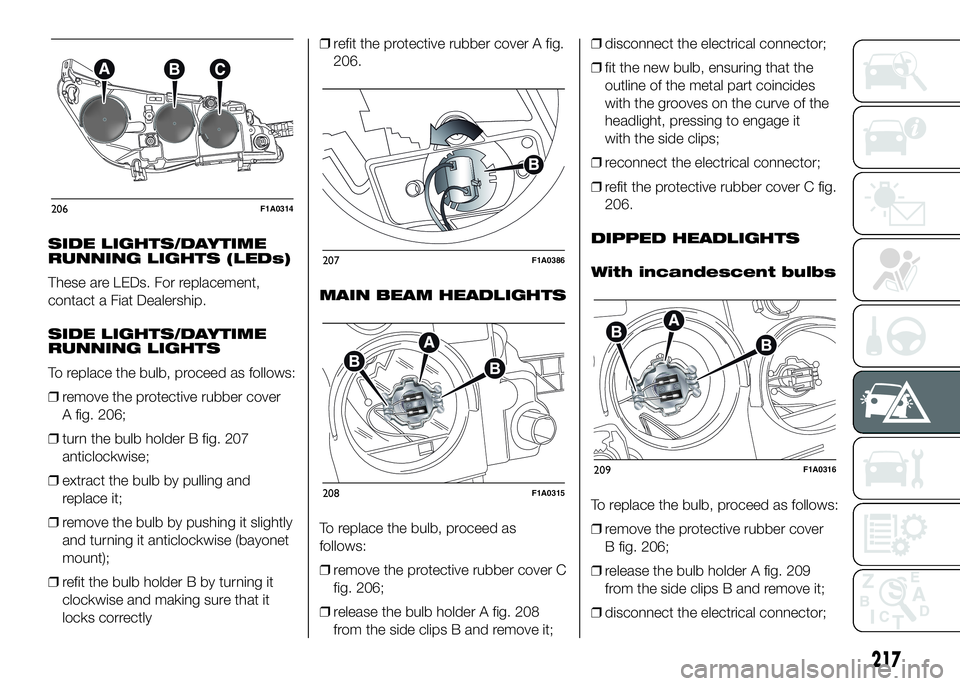
❒remove the protective rubber cover
A fig. 206;
❒turn the bulb holder B fig. 207
anticlockwise;
❒extract the bulb by pulling and
replace it;
❒remove the bulb by pushing it slightly
and turning it anticlockwise (bayonet
mount);
❒refit the bulb holder B by turning it
clockwise and making sure that it
locks correctly❒refit the protective rubber cover A fig.
206.
MAIN BEAM HEADLIGHTS
To replace the bulb, proceed as
follows:
❒remove the protective rubber cover C
fig. 206;
❒release the bulb holder A fig. 208
from the side clips B and remove it;❒disconnect the electrical connector;
❒fit the new bulb, ensuring that the
outline of the metal part coincides
with the grooves on the curve of the
headlight, pressing to engage it
with the side clips;
❒reconnect the electrical connector;
❒refit the protective rubber cover C fig.
206.
DIPPED HEADLIGHTS
With incandescent bulbs
To replace the bulb, proceed as follows:
❒remove the protective rubber cover
B fig. 206;
❒release the bulb holder A fig. 209
from the side clips B and remove it;
❒disconnect the electrical connector;
206F1A0314
207F1A0386
208F1A0315
209F1A0316
217
Page 222 of 387
❒fit the new bulb, ensuring that the
outline of the metal part coincides
with the grooves on the curve of the
headlight, pressing to engage it
with the side clips;
❒reconnect the electrical connector;
❒refit the protective rubber cover B fig.
206.
DIRECTION INDICATORS
To replace the bulb, proceed as follows:
❒remove the protective rubber cover
A fig. 206;
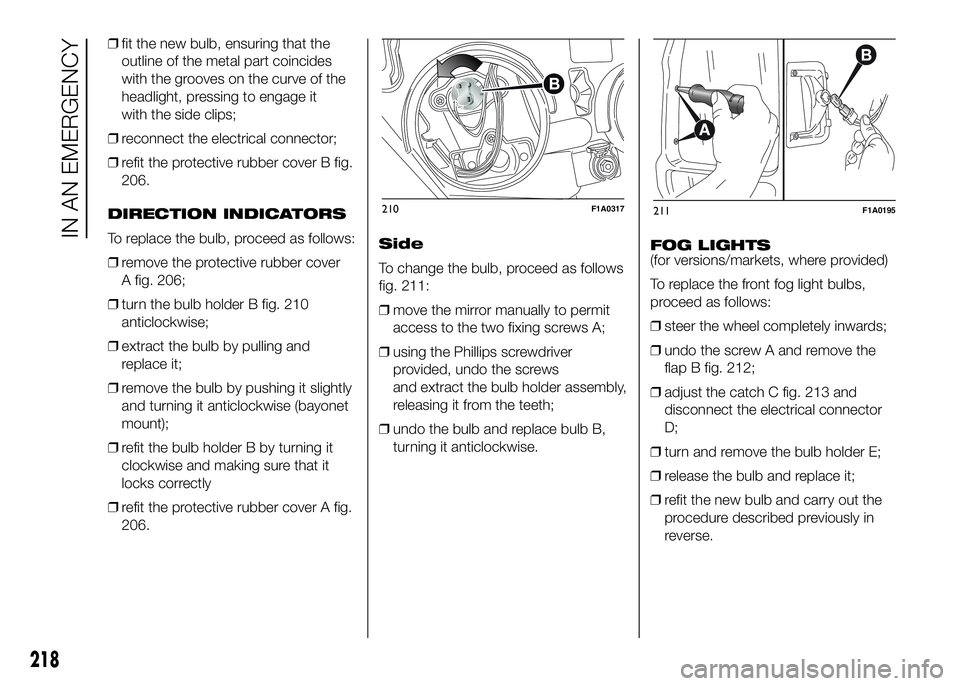
❒turn the bulb holder B fig. 210
anticlockwise;
❒extract the bulb by pulling and
replace it;
❒remove the bulb by pushing it slightly
and turning it anticlockwise (bayonet
mount);
❒refit the bulb holder B by turning it
clockwise and making sure that it
locks correctly
❒refit the protective rubber cover A fig.
206.Side
To change the bulb, proceed as follows
fig. 211:
❒move the mirror manually to permit
access to the two fixing screws A;
❒using the Phillips screwdriver
provided, undo the screws
and extract the bulb holder assembly,
releasing it from the teeth;
❒undo the bulb and replace bulb B,
turning it anticlockwise.FOG LIGHTS
(for versions/markets, where provided)
To replace the front fog light bulbs,
proceed as follows:
❒steer the wheel completely inwards;
❒undo the screw A and remove the
flap B fig. 212;
❒adjust the catch C fig. 213 and
disconnect the electrical connector
D;
❒turn and remove the bulb holder E;
❒release the bulb and replace it;
❒refit the new bulb and carry out the
procedure described previously in
reverse.
210F1A0317211F1A0195
218
IN AN EMERGENCY
Page 252 of 387
❒check that the fluid level is up to the
MAX mark on the dipstick attached
to the reservoir cap F fig. 241 -
fig. 242 - fig. 243 - fig. 244 (use the
level shown on the 20°C side of
the dipstick to check when cold).
If the level of the fluid in the tank is
lower than the specified level, top up
using only one of the products
indicated in the "Fluid and lubricants"
table in the "Technical specifications"
section, proceeding as follows:
❒Start the engine and wait for the fluid
level in the tank to stabilise.
❒With the engine running, turn the
steering wheel from right to left
fully several times.
❒Top up the fuel to the MAX level and
then retighten the cap.
WINDSCREEN/REAR
WINDOW WASHER FLUID
188) 189)
To add fluid:
❒remove cap D fig. 241 - fig. 242 - fig.
243 - fig. 244, pulling the retaining
tooth outward;
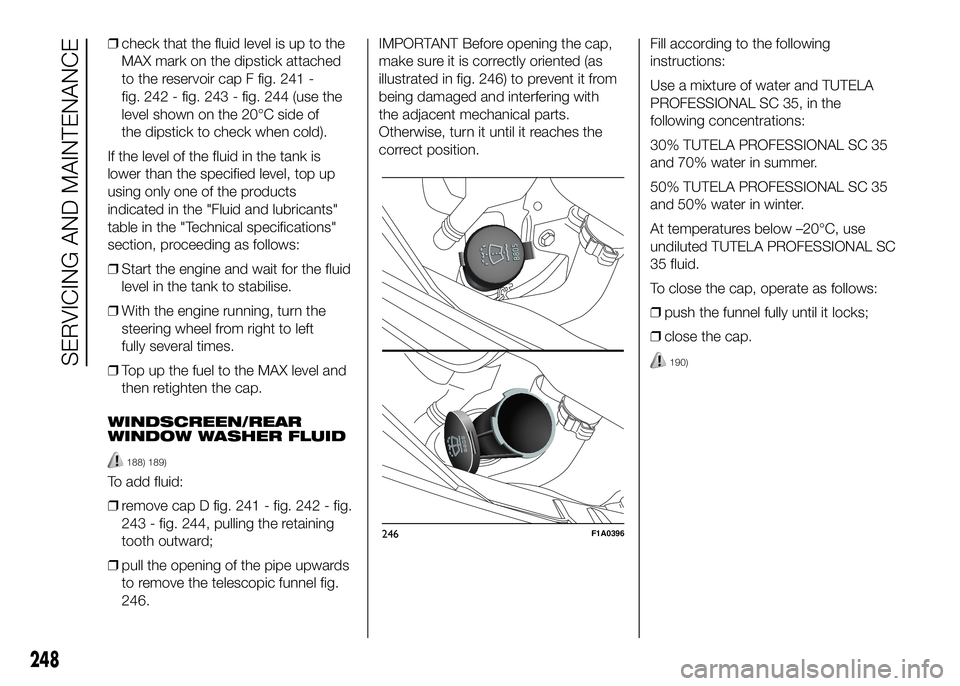
❒pull the opening of the pipe upwards
to remove the telescopic funnel fig.
246.IMPORTANT Before opening the cap,
make sure it is correctly oriented (as
illustrated in fig. 246) to prevent it from
being damaged and interfering with
the adjacent mechanical parts.
Otherwise, turn it until it reaches the
correct position.Fill according to the following
instructions:
Use a mixture of water and TUTELA
PROFESSIONAL SC 35, in the
following concentrations:
30% TUTELA PROFESSIONAL SC 35
and 70% water in summer.
50% TUTELA PROFESSIONAL SC 35
and 50% water in winter.
At temperatures below –20°C, use
undiluted TUTELA PROFESSIONAL SC
35 fluid.
To close the cap, operate as follows:
❒push the funnel fully until it locks;
❒close the cap.
190)
246F1A0396
248
SERVICING AND MAINTENANCE
Page 256 of 387
USEFUL ADVICE FOR
EXTENDING THE LIFE OF
YOUR BATTERY
To avoid draining your battery and
make it last longer, observe the
following instructions:
❒when you park the vehicle, ensure
that the doors, tailgate and bonnet
are closed properly, to prevent any
roof lights from remaining on inside
the passenger's compartment;
❒switch off all roof lights inside the
vehicle: the vehicle is however
equipped with a system which
switches all internal lights off
automatically;
❒do not keep accessories (e.g. sound
system, hazard lights, etc.) switched
on for a long time when the engine
is not running;
❒before carrying out any operation on
the electrical system, disconnect the
negative battery cable through the
suitable terminal;
❒Completely tighten the battery
terminals.IMPORTANT After turning the ignition
key to STOP and having closed the
driver side door, wait at least one
minute before disconnecting the
electrical supply from the battery. When
reconnecting the electrical supply to
the battery, make sure that the ignition
key is in the STOP position and the
driver side door is closed.
IMPORTANT If the charge level remains
under 50% for a long time, the battery
is damaged by sulphation, reducing
its capacity and efficiency at start-up.
The battery is also more prone to the
risk of freezing (at temperatures as high
as -10°C).
Refer to the paragraph "Car inactivity"
in "Starting and driving" if the car is
left parked for a long time.If, after buying the vehicle, you want to
install electrical accessories which
require permanent electric supply
(alarm, etc.) or accessories that in any
case burden the electrical supply,
contact a Fiat Dealership, whose
qualified personnel, in addition
to suggesting the most suitable devices
from Lineaccessori Fiat, will evaluate
the overall electrical consumption,
checking whether the vehicle’s electrical
system is capable of withstanding the
load required, or whether it should
be integrated with a more powerful
battery.
Since some of these devices continue
to consume electricity even when
the engine is off, they gradually run
down the battery.
IMPORTANT If a tachograph is fitted, if
the vehicle is parked for a long period
of 5 days, it is advisable to disconnect
the negative battery terminal to
maintain its charge.
If the vehicle is equipped with a battery
disconnection function (disconnector),
see the description of the procedure
in the "Controls" paragraph in the
"Dashboard and controls" section.
252
SERVICING AND MAINTENANCE
Page 265 of 387
TECHNICAL SPECIFICATIONS
Everything you may find useful for
understanding how your vehicle
is made and works is contained in this
chapter and illustrated with data, tables
and graphics. For the enthusiasts and
the technician, but also just for those
who want to know every detail of their
vehicle.IDENTIFICATION DATA....................262
ENGINE CODES - BODYWORK
VERSION ........................................264
ENGINE ..........................................266
POWER SUPPLY ............................267
TRANSMISSION .............................268
SUSPENSION .................................268
BRAKES .........................................269
STEERING ......................................269
WHEELS .........................................270
DIMENSIONS ..................................274
PERFORMANCE .............................284
WEIGHTS........................................286
SUPPLIES .......................................327
FLUIDS AND LUBRICANTS ............329
FUEL CONSUMPTION ....................333
CO2 EMISSIONS ............................345
OFFICIAL TYPE APPROVALS .........356
PRESCRIPTIONS FOR HANDLING
THE VEHICLE AT THE END OF ITS
LIFE ................................................360
261