automatic FIAT DUCATO BASE CAMPER 2016 Owner handbook (in English)
[x] Cancel search | Manufacturer: FIAT, Model Year: 2016, Model line: DUCATO BASE CAMPER, Model: FIAT DUCATO BASE CAMPER 2016Pages: 387, PDF Size: 20.76 MB
Page 106 of 387
WARNING
86) The responsibility for parking
and other dangerous manoeuvres
always and in every case lies
with the driver. While carrying out
these manoeuvres, always make
sure that no people (especially
children) or animals are in the
area concerned. The parking
sensors are used to assist the
driver, who must never allow his
attention to lapse during
potentially dangerous
manoeuvres, even those executed
at low speeds.
START&STOP
SYSTEM
IN BRIEF
The Start&Stop device automatically
stopsthe engine each time the
vehicle is stationary and starts it
again when the driver wants to move
off. This improves the efficiency of
the vehicle by reducing fuel
consumption, the emission of harmful
gases and noise pollution.
OPERATING MODES
Engine stopping mode
WITH MANUAL GEARBOX
With the vehicle stationary, the engine
stops with the gearbox in neutral and
the clutch pedal released.
NoteThe engine can only be stopped
automatically after exceeding a speed
of about 10 km/h, to prevent the engine
from being repeatedly stopped when
driving at walking pace.
Engine stopping is signalled by the
icon on the display.Engine restarting mode
WITH MANUAL GEARBOX
Depress the clutch pedal to restart the
engine.
MANUAL ACTIVATION
AND DEACTIVATION OF
THE SYSTEM
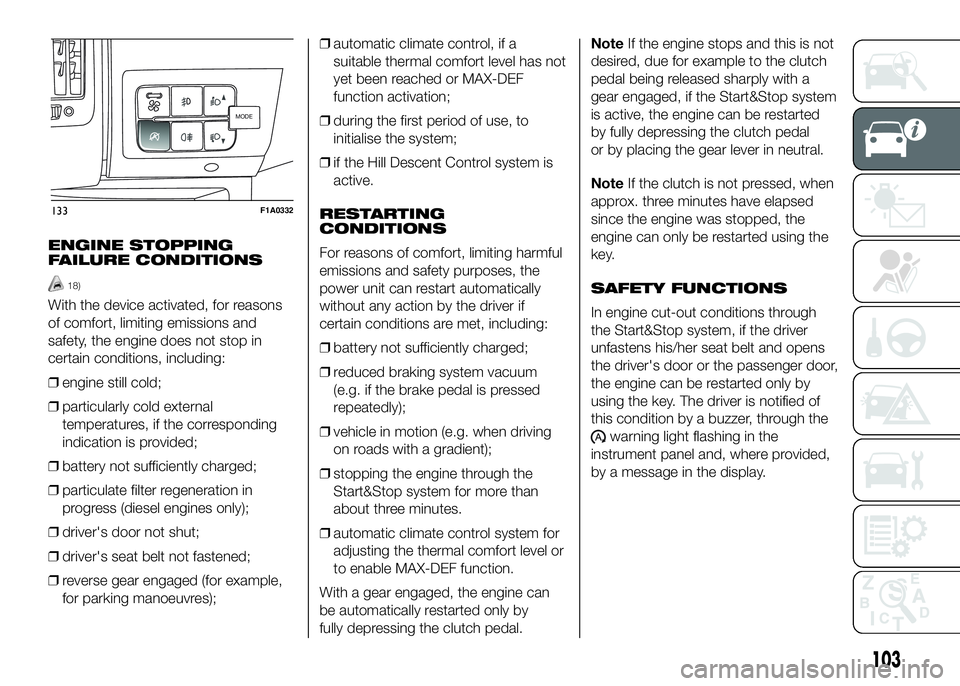
To activate/deactivate the system
manually, press the
fig. 133 button
on the dashboard control trim.
Start&Stop system
activation
A message will appear on the display
when the Start&Stop system is
activated. In this condition, the LED on
the
button is off.
Start&Stop system
deactivation
A message will appear on the display
when the Start&Stop system is
deactivated.
The LED on the
button is on when
the system is deactivated.
102
KNOW YOUR VEHICLE
Page 107 of 387
ENGINE STOPPING
FAILURE CONDITIONS
18)
With the device activated, for reasons
of comfort, limiting emissions and
safety, the engine does not stop in
certain conditions, including:
❒engine still cold;
❒particularly cold external
temperatures, if the corresponding
indication is provided;
❒battery not sufficiently charged;
❒particulate filter regeneration in
progress (diesel engines only);
❒driver's door not shut;
❒driver's seat belt not fastened;
❒reverse gear engaged (for example,
for parking manoeuvres);❒automatic climate control, if a
suitable thermal comfort level has not
yet been reached or MAX-DEF
function activation;
❒during the first period of use, to
initialise the system;
❒if the Hill Descent Control system is
active.
RESTARTING
CONDITIONS
For reasons of comfort, limiting harmful
emissions and safety purposes, the
power unit can restart automatically
without any action by the driver if
certain conditions are met, including:
❒battery not sufficiently charged;
❒reduced braking system vacuum
(e.g. if the brake pedal is pressed
repeatedly);
❒vehicle in motion (e.g. when driving
on roads with a gradient);
❒stopping the engine through the
Start&Stop system for more than
about three minutes.
❒automatic climate control system for
adjusting the thermal comfort level or
to enable MAX-DEF function.
With a gear engaged, the engine can
be automatically restarted only by
fully depressing the clutch pedal.NoteIf the engine stops and this is not
desired, due for example to the clutch
pedal being released sharply with a
gear engaged, if the Start&Stop system
is active, the engine can be restarted
by fully depressing the clutch pedal
or by placing the gear lever in neutral.
NoteIf the clutch is not pressed, when
approx. three minutes have elapsed
since the engine was stopped, the
engine can only be restarted using the
key.
SAFETY FUNCTIONS
In engine cut-out conditions through
the Start&Stop system, if the driver
unfastens his/her seat belt and opens
the driver's door or the passenger door,
the engine can be restarted only by
using the key. The driver is notified of
this condition by a buzzer, through the
warning light flashing in the
instrument panel and, where provided,
by a message in the display.
MODEMODE
133F1A0332
103
Page 108 of 387
"ENERGY SAVING"
FUNCTION
(for versions/markets, where provided)
If, after the engine has been
automatically restarted, the driver does
not take any action for a period of
about 3 minutes, the Start&Stop
system will definitively stop the engine
to avoid fuel consumption. The engine
can only be started using the key in
such cases.
NoteIn any case, it is possible to keep
the engine running by deactivating
the Start&Stop system.
IRREGULAR OPERATION
In the event of malfunction, the
Start&Stop system is deactivated. The
driver is informed about the fault
through the switching on of the
icon
together with a message on the
display. In this case, contact a Fiat
Dealership.VEHICLE INACTIVITY
In the event of vehicle inactivity, special
attention must be paid to the
disconnection of the battery power
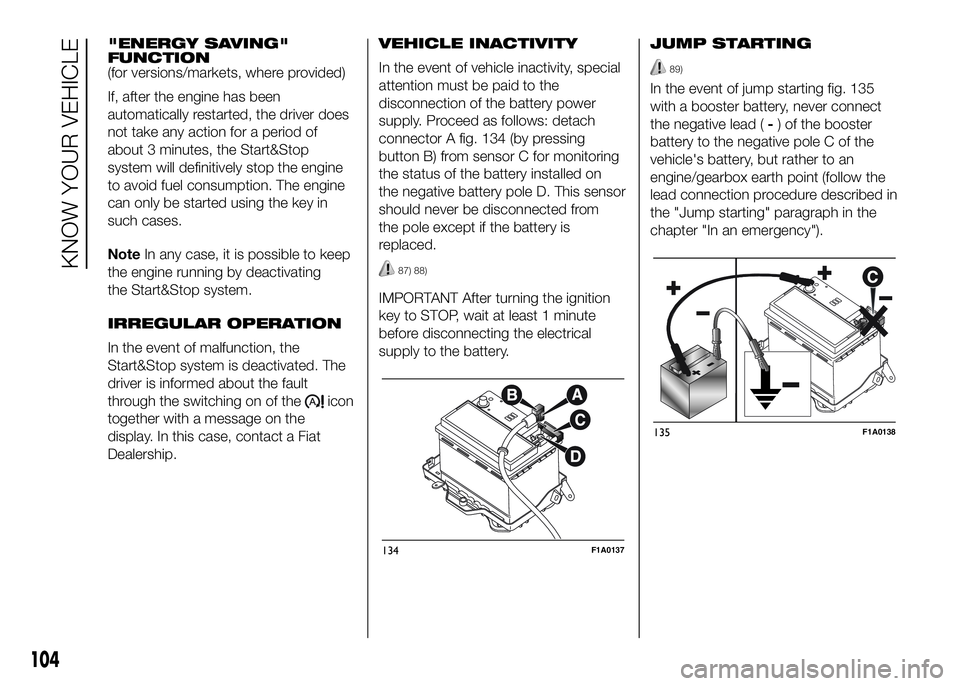
supply. Proceed as follows: detach
connector A fig. 134 (by pressing
button B) from sensor C for monitoring
the status of the battery installed on
the negative battery pole D. This sensor
should never be disconnected from
the pole except if the battery is
replaced.
87) 88)
IMPORTANT After turning the ignition
key to STOP, wait at least 1 minute
before disconnecting the electrical
supply to the battery.JUMP STARTING
89)
In the event of jump starting fig. 135
with a booster battery, never connect
the negative lead (-) of the booster
battery to the negative pole C of the
vehicle's battery, but rather to an
engine/gearbox earth point (follow the
lead connection procedure described in
the "Jump starting" paragraph in the
chapter "In an emergency").
134F1A0137
135F1A0138
104
KNOW YOUR VEHICLE
Page 114 of 387
IMPORTANT
❒When the gun distributor fuel "snaps"
or interrupts the supply, the tank is
nearly full and you can run two
additional top-ups after shooting
automatic.
92) 93) 94)
Topping for additive Diesel
Emissions AdBlue (UREA)
96)
When refuelling the additive for Diesel
Emissions AdBlue (UREA) with
dispensing gun:
❒park the vehicle on ground level;
❒turn off the engine by turning the key
in the OFF position;
❒open the door to fuel A fig. 141 and
then unscrew and remove the cap C
fig. 141 from the filler neck of UREA;
❒insert the dispensing gun for topping
up UREA in the filler neck;
❒immediately stop filling the tank
UREA if it shows one of the cases
listed below:
- If AdBlue is spilled out of the filler
neck, clean up well the area and
proceed to filling up again;- If during filling the dispensing gun
clicks, it indicates that the UREA tank is
full. Do not proceed with the
replacement, to prevent spillage of
AdBlue (UREA).
❒When you finished topping, remount
cap C fig. 141 on the filler neck
UREA, turning it clockwise until it
stops;
❒turn the key in the pawl starter in the
ON position (no need to start the
engine);
❒wait for the signal on the instrument
panel to power off before moving the
vehicle, the warning light may stay
on for a few seconds to half a
minute. In case of motor start-up and
movement of the vehicle, the
warning sign will remain on for a
longer period of time, but there are
no problems on the engine
functionality. If topping up is done
with the UREA tank empty, you have
to wait two minutes before starting
the vehicle.
When refuelling the additive for Diesel
Emissions AdBlue (UREA) with bottle:
❒park the vehicle on ground level;
❒turn off the engine by turning the key
in the OFF position;❒open the door to fuel A fig. 141 and
then unscrew and remove the cap C
fig. 141 from the filler neck of UREA;
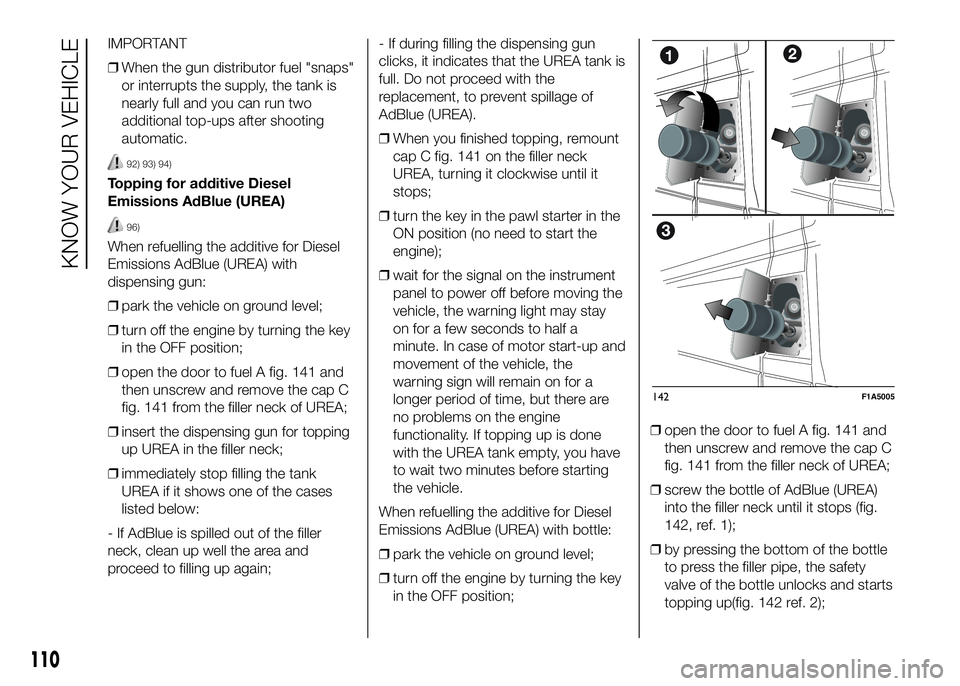
❒screw the bottle of AdBlue (UREA)
into the filler neck until it stops (fig.
142, ref. 1);
❒by pressing the bottom of the bottle
to press the filler pipe, the safety
valve of the bottle unlocks and starts
topping up(fig. 142 ref. 2);
110
KNOW YOUR VEHICLE
142F1A5005
Page 116 of 387
❒In case of damage to the sewage
system of exhaust gas resulting
from the use of additives / tap
water, the introduction of diesel
fuel, or at least by not fulfilling the
requirements, the warranty
expires.
AdBlue tank topping
(UREA) in cold
environments
Since AdBlue (UREA) starts to freeze
around the -11 ° C, the vehicle is
equipped with an automatic system of
heating UREA that allows the system to
function properly at temperatures
below -11 ° C.
If the vehicle remains idle for a long
period at temperatures below the -11 °
C, the UREA in the tank might freeze.
If the tank UREA was filled beyond
the maximum level and freezes, it can
be damaged; for this reason it is
advisable not to exceed the maximum
level of the tank.
Pay extra attention to avoid exceeding
the maximum level when you use
portable containers for topping up.Fuel storage - Diesel
Fuel
95)
In case of the storage of massive
amounts of fuel, good maintenance is
essential. The fuel contaminated with
water favours the proliferation of
"microbes". These microbes create a
"slime" that can clog the filter system
and fuel pipes. Remove water from the
supply tank and regularly replace the
filter pipe.
NoteWhen a diesel engine runs out of
fuel, air is blown through the fuel
system.
AdBlue storage (UREA)
AdBlue (UREA) is considered a very
stable product with a long shelf life. If is
stored at temperatures between -12 °
and 32 ° C, it can be stored at least for
a year.
Since UREA can freeze at temperatures
at or below -11 ° C, the system was
designed to operate also in these cold
environments, thanks to an automatic
heating system which operates when
the engine is started.
NoteWhen you need to keep the
AdBlue (UREA), it is important to know
that:❒any container or part that comes in
contact with the UREA must be
compatible with it (plastic or stainless
steel). Materials such as copper,
brass, aluminium, iron or stainless
steel is not as susceptible to
corrosion by UREA are to be
avoided;
❒if UREA is spilled from a container,
completely clean the area.
IMPORTANT
19) Only refuel with automotive
diesel complying with the
European specification EN 590.
The use of other products or
mixtures may damage the engine
beyond repair and consequently
invalidate the warranty, due to the
damage caused. If you
accidentally introduce other types
of fuel into the tank, do not start
the engine. Empty the tank. If the
engine has been run for even an
extremely limited amount of time,
you must not only drain the fuel
tank, but the rest of the supply
circuit as well.
112
KNOW YOUR VEHICLE
Page 118 of 387
Since this filter physically traps
particulate, it should be regenerated
(cleaned) at regular intervals by burning
carbon particles.
The regeneration procedure is
controlled automatically by the
Powertrain Control Module according
to the filter conditions and vehicle
usage conditions.
During regeneration, the following may
occur: a limited increase in the engine
speed, activation of the fan, a limited
increase in fumes and high
temperatures at the exhaust.These are not faults; they do not impair
vehicle performance or damage the
environment. If the dedicated message
is displayed, refer to paragraph
"Warning lights and messages".
WARNING
97) The diesel particulate filter (DPF)
reaches high temperatures during
normal operation. Do not park
the vehicle on flammable material
(grass, dry leaves, pine needles
etc.): fire hazard.
114
KNOW YOUR VEHICLE
Page 119 of 387
KNOWING THE INSTRUMENT PANEL
This section of the booklet gives you all
the information you need to
understand, interpret and use the
instrument panel correctly.CONTROL PANEL AND
INSTRUMENTS ...............................116
DISPLAY ........................................122
TRIP COMPUTER ...........................131
WARNING LIGHTS AND
MESSAGES ....................................134
- LOW BRAKE FLUID/HANDBRAKE
ENGAGED .......................................... 134
- EBD FAILURE .................................. 135
- AIRBAG FAILURE ............................. 135
- SEAT BELTS NOT FASTENED .......... 136
- ENGINE COOLANT TEMPERATURE
TOO HIGH .......................................... 137
- LOW BATTERY CHARGE ................. 137
- LOW ENGINE OIL PRESSURE ......... 138
-ENGINE OIL DETERIORATED ........... 138
-INCOMPLETE DOOR/LOAD
COMPARTMENT CLOSURE ............... 139
- POWER STEERING FAILURE ........... 139
-SELF-LEVELLING SUSPENSION
FAILURE ............................................. 139
- INJECTION/EOBD SYSTEM
FAILURE ............................................. 141
-UREA INJECTION SYSTEM FAILURE
............................................................ 142
- ABS FAILURE ................................... 142
-FUEL RESERVE ................................ 143
-GLOW PLUG PREHEATING / GLOW
PLUG PREHEATING FAILURE ............ 143
-INDICATION OF DIESEL EMISSIONS
ADDITIVE LOW LEVEL (UREA) ........... 144
-VEHICLE PROTECTION SYSTEM
FAILURE - FIAT CODE ........................ 144
- REAR FOG LIGHTS .......................... 144
- GENERAL FAILURE INDICATION ..... 145
-DPF (PARTICULATE FILTER)
CLEANING UNDERWAY ..................... 146
-WORN BRAKE PADS ........................ 147-DRIVING ADVISOR ........................... 147
- TPMS ............................................... 148
- DIPPED HEADLIGHTS ..................... 149
- FOLLOW ME HOME ........................ 149
- LEFT-HAND DIRECTION INDICATOR
............................................................ 149
- RIGHT-HAND DIRECTION
INDICATOR ........................................ 150
-FOG LIGHTS ..................................... 150
- CRUISE CONTROL .......................... 150
-SPEED LIMITER ................................ 150
- AUTOMATIC MAIN BEAM
HEADLIGHTS ..................................... 151
- MAIN BEAM HEADLIGHTS .............. 151
-"UP" FUNCTION ............................... 151
-EXTERIOR LIGHTS FAULT ................ 152
-BRAKE LIGHT FAILURE .................... 152
-MAIN BEAM AUTOMATISM FAULT ... 153
-POSSIBLE ICE ON ROAD ................. 153
-SPEED LIMIT EXCEEDED ................. 153
-SCHEDULED SERVICING ................. 153
-FUEL CUT-OFF DEVICE INERTIA
SWITCH TRIPPED .............................. 154
-PARKING SENSOR FAILURE ............ 154
-DRIVING ADVISOR SYSTEM
FAILURE ............................................. 154
-TRAFFIC SIGN RECOGNITION
FAILURE ............................................. 154
-LIMITED RANGE ............................... 154
-START&STOP SYSTEM
ACTIVATION/DEACTIVATION .............. 155
-START&STOP FAILURE .................... 155
-INDICATION OF DIESEL EMISSIONS
ADDITIVE LOW LEVEL (UREA) ........... 156
-WATER IN DIESEL FILTER (diesel
versions) ............................................. 156
115
Page 127 of 387
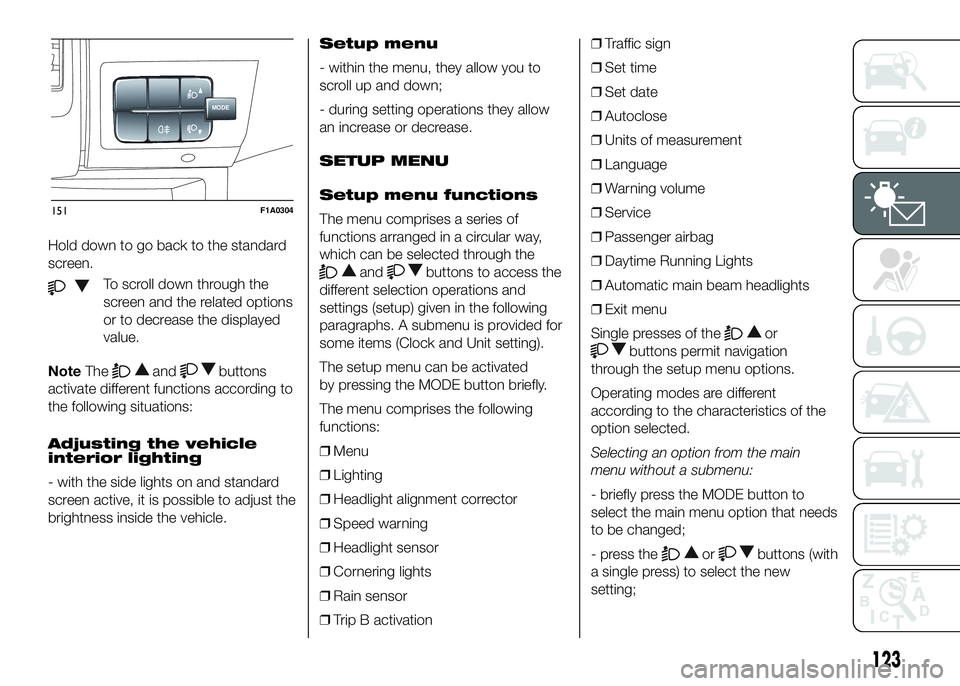
Hold down to go back to the standard
screen.
To scroll down through the
screen and the related options
or to decrease the displayed
value.
NoteThe
andbuttons
activate different functions according to
the following situations:
Adjusting the vehicle
interior lighting
- with the side lights on and standard
screen active, it is possible to adjust the
brightness inside the vehicle.Setup menu
- within the menu, they allow you to
scroll up and down;
- during setting operations they allow
an increase or decrease.
SETUP MENU
Setup menu functions
The menu comprises a series of
functions arranged in a circular way,
which can be selected through the
andbuttons to access the
different selection operations and
settings (setup) given in the following
paragraphs. A submenu is provided for
some items (Clock and Unit setting).
The setup menu can be activated
by pressing the MODE button briefly.
The menu comprises the following
functions:
❒Menu
❒Lighting
❒Headlight alignment corrector
❒Speed warning
❒Headlight sensor
❒Cornering lights
❒Rain sensor
❒Trip B activation❒Traffic sign
❒Set time
❒Set date
❒Autoclose
❒Units of measurement
❒Language
❒Warning volume
❒Service
❒Passenger airbag
❒Daytime Running Lights
❒Automatic main beam headlights
❒Exit menu
Single presses of the
or
buttons permit navigation
through the setup menu options.
Operating modes are different
according to the characteristics of the
option selected.
Selecting an option from the main
menu without a submenu:
- briefly press the MODE button to
select the main menu option that needs
to be changed;
- press the
orbuttons (with
a single press) to select the new
setting;
MODE
151F1A0304
123
Page 128 of 387
- briefly press the MODE button to
store the new setting and at the same
time go back to the previously selected
menu option.
Selecting an option from the main
menu with a submenu:
- briefly press the MODE button to
display the first submenu option;
- press the
orbuttons (with
a single press) to scroll through all
submenu options;
- briefly press the MODE button to
select the displayed submenu option
and to open the relevant settings menu;
- press the
orbuttons
(with a single press) to choose the new
setting for this submenu option;
- briefly press the MODE button to
store the setting and return to the
previously selected submenu option.
Selecting “Date” and “Set Clock”:
- briefly press the MODE button to
select the first value to be changed (e.g.
hours / minutes or year / month / day);
- press the
orbuttons (with
a single press) to select the new
setting;- briefly press the MODE button to
store the new setting and go to the
next settings menu option. If this is the
last one, the system brings you back
to the previously selected menu option.
Press the button MODE for long:
- to exit the set-up menu if you are in
the main menu;
- to exit the main menu if you are in
another point of the menu (e.g.: at
submenu option setting level, at
submenu level or at main menu option
setting level);
- to save only the changes stored by
the user (and confirmed by pressing the
MODE button).
The setup menu environment is timed;
when the menu is exited due to expiry
of the time allowed, only the changes
already stored by the user (confirmed
beforehand by a brief press of the
MODE button) will be saved.
From the standard screen, briefly press
button MODE to start navigation.
Press theorbuttons to
navigate within the menu.NoteOnly the reduced menu can be
accessed while the vehicle is moving
for safety reasons ("Speed Beep"
setting). Stop the vehicle to access the
full menu.
Lighting
(Passenger compartment light
adjustment)
(only with side lights on)
This function is used to set the
brightness of the instrument panel,
uconnect™system controls (for
versions/markets where provided) and
automatic climate control system
controls (for versions/markets where
provided) to 8 levels.
Proceed as follows to adjust the light
intensity:
❒briefly press the MODE button. The
level set previously flashes on the
display;
❒press button
orto set
the required brightness level;
❒briefly press the MODE button to
return to the menu screen or hold the
button down to return to the
standard screen without storing.
124
KNOWING THE INSTRUMENT PANEL
Page 129 of 387
NoteOn versions with reconfigurable
multifunction display adjustment can be
made both with lights off ("daytime"
mode brightness level) and with lights
on ("nighttime" mode brightness level).
Headlight alignment
(Headlight alignment
corrector position
adjustment)
(for versions/markets, where provided)
This function permits the adjustment (to
4 levels) of the headlight alignment
corrector position.
To carry out the adjustment, proceed as
follows:
❒briefly press the MODE button. The
level set previously flashes on the
display;
❒press button
orto adjust
the position;
❒briefly press the MODE button to
return to the menu screen or hold the
button down to return to the
standard screen without storing.Speed limit (Speed
Beep)
This function makes it possible to set
the vehicle speed limit (km/h or mph).
When this limit is exceeded the driver is
immediately alerted (see “Warning
lights and messages” section).
To set the desired speed limit, proceed
as follows:
- briefly press the MODE button: the
display will show the wording (Speed
Beep);
press button
orto select
speed limit activation (On) or
deactivation (Off);
- if the function has been activated (On),
press the
orbutton to
select the desired speed limit and then
press MODE to confirm.NoteSetting is possible between 30
and 200 km/h, or 20 and 125 mph,
according to the previously set unit.
See the "Setting the unit of
measurement (Measurement unit)"
paragraph described below. The setting
will increase/decrease by 5 units each
time button
/is pressed.
Hold down the
/button to
automatically increase/decrease the
setting rapidly. Complete the
adjustment with single presses of the
button when you approach the desired
value.
- press the MODE button briefly to
return to the menu screen or hold the
button down to return to the standard
screen without storing.
To cancel the setting, proceed as
follows:
- briefly press button MODE, (On) will
flash on the display;
- press button
, (Off) will flash on
the display;
- press the MODE button briefly to
return to the menu screen or hold the
button down to return to the standard
screen without storing.
125