ESC FIAT DUCATO BASE CAMPER 2016 Owner handbook (in English)
[x] Cancel search | Manufacturer: FIAT, Model Year: 2016, Model line: DUCATO BASE CAMPER, Model: FIAT DUCATO BASE CAMPER 2016Pages: 387, PDF Size: 20.76 MB
Page 1 of 387

The data contained in this publication is intended merely as a guide. Fi\
at Chrysler Automobiles reserves the right to modify the models and versions described in this booklet at any time for techni\
cal and commercial reasons. If you have any further questions please consult your FIAT dealer. Printed in recycled paper without chlorine.
OWNER HANDBOOK
FIATDUCATO
ENGLISH
COP DUCATO LUM GB 10/06/15 09:28 Pagina 1
Page 5 of 387
Dear Customer,
We would like to congratulate and thank you for choosing a Fiat Ducato. We have written this handbook to help you get to know all the
features of your vehicle and use it in the best possible way. You should read it right through before taking to the road for the first time.
You will find information, tips and important warnings regarding the use of your vehicle to help you get the most from the technological features
of your Fiat Ducato. It also provides a description of special features and essential information for the care and maintenance of your vehicle
over time as well as for safe driving.
We urge you to read the warnings and indications found throughout the text with care, marked with the following symbols:
personal safety;
vehicle integrity;
environmental protection.
NOTE These symbols, when necessary, are reported at the end of each paragraph and are followed by a number. That number recalls the
corresponding warning at the end of the relevant section.
In the attached Warranty Booklet you will also find a description of the Services that Fiat offers to its customers, the Warranty Certificate and
the detail of the terms and conditions for maintaining its validity.
We are sure that these will help you to get in touch with and appreciate your new vehicle and the service provided by the people at Fiat.
Enjoy reading. Happy motoring!
This Owner Handbook describes all Fiat Ducato versions. As a consequence, you should only consider the information
which is related to the trim level, engine and version that you have purchased. All data contained in this publication are
purely indicative. FCA Italy S.p.A. can modify the specifications of the vehicle model described in this publication at any
time, for technical or marketing purposes. For further information, contact a Fiat Dealership.
Page 13 of 387
KNOW YOUR VEHICLE
In-depth knowledge of your new vehicle
starts here.
The booklet that you are reading simply
and directly explains how it is made
and how it works.
That’s why we advise you to read it
seated comfortably on board, so that
you can see what is described here for
yourself.SYMBOLS ...................................... 11
THE FIAT CODE SYSTEM ............... 11
THE KEYS....................................... 12
ELECTRONIC ALARM..................... 14
IGNITION SWITCH .......................... 15
SEATS ............................................ 16
HEAD RESTRAINTS ........................ 24
STEERING WHEEL ......................... 25
REAR VIEW MIRRORS .................... 25
HEATING AND VENTILATION.......... 28
DIFFUSERS..................................... 29
HEATING AND VENTILATION
CONTROLS .................................... 29
MANUAL CLIMATE CONTROL
SYSTEM ......................................... 32
AUTOMATIC CLIMATE CONTROL
SYSTEM ......................................... 35
ADDITIONAL HEATER ..................... 41
INDEPENDENT ADDITIONAL
HEATER .......................................... 41
EXTERNAL LIGHTS......................... 47
WINDOW CLEANING ...................... 51
CRUISE CONTROL ......................... 54
ROOF LIGHTS ................................ 57
CONTROLS .................................... 59
FUEL CUT-OFF SWITCH ................ 62INTERIOR FITTINGS ...................... 63
TACHOGRAPH ............................... 68
SPEED BLOCK ............................... 69
SELF-LEVELLING AIR
SUSPENSION ................................. 69
DOORS ........................................... 70
ELECTRIC WINDOWS .................... 76
BONNET ......................................... 77
ROOF RACK/SKI RACK .................. 79
HEADLIGHTS.................................. 79
ABS ................................................ 80
ESC (ELECTRONIC STABILITY
CONTROL) SYSTEM ....................... 82
TRACTION PLUS SYSTEM ............. 86
TPMS (TYRE PRESSURE
MONITORING SYSTEM) ................. 87
DRIVING ADVISOR ......................... 90
REAR CAMERA (PARKVIEW®
REAR BACK UP CAMERA) ............. 95
TRAFFIC SIGN RECOGNITION ....... 97
EOBD SYSTEM............................... 98
PARKING SENSORS....................... 99
START&STOP SYSTEM ..................101
ADDITIVE FOR DIESEL EMISSIONS
ADBLUE (UREA)..............................104
9
Page 18 of 387
IMPORTANT
1) Used batteries are harmful to the
environment. You can dispose of
them either in the correct
containers as specified by law or
by taking them to a Fiat
Dealership, which will deal with
their disposal.
ELECTRONIC ALARM
(for versions/markets, where provided)
The alarm, in addition to all the remote
control functions described previously,
is controlled by the receiver located
under the dashboard near the fuse box.
Operation
The alarm intervenes in the following
cases:
❒wrongful opening of a door or the
bonnet (perimeter protection);
❒when the ignition system is started
up (ignition key turned to MAR-ON);
❒cutting of the battery leads.
Depending on the market, the
activation of the alarm causes the
activation of the siren and the direction
indicators (for about 26 seconds).
Alarm tripping and the number of
cycles depend on the sales market.
There is a maximum number of
acoustic/visual cycles. When this is
reached the system returns to normal
operation.
IMPORTANT The engine stop function
is guaranteed by the Fiat CODE, which
is automatically activated when the
ignition key is extracted from the
ignition switch.Activation
With the doors and bonnet closed and
the ignition key either turned to STOP
or removed, point the key with the
remote control towards the vehicle and
press and release the lock button.
Excluding some markets, the system
produces an acoustic warning (beep)
and enables door locking.
The switching on of the alarm is
preceded by an self-diagnosis stage: if
a fault is detected, the system
produces another acoustic signal.
In this case, turn the alarm off by
pressing the "release doors/release
load compartment" button, check that
the doors and bonnet are properly
closed and turn the alarm back on by
pressing the lock button.
If a door or the bonnet is not properly
shut, it will be excluded from the testing
by the alarm system.
If the alarm produces an acoustic signal
even when the doors and bonnet are
correctly closed, a fault has occurred in
the operation of the system. Contact
a Fiat Dealership.
IMPORTANT The alarm does not come
on when the central locking is activated
using the metal insert in the key.
14
KNOW YOUR VEHICLE
Page 21 of 387
To lower the seat: whilst sitting, move
the lever B (front part of the seat) or
the lever C (rear part of the seat)
upwards and position your body weight
on the part of the seat to be lowered.
Backrest angle
adjustment
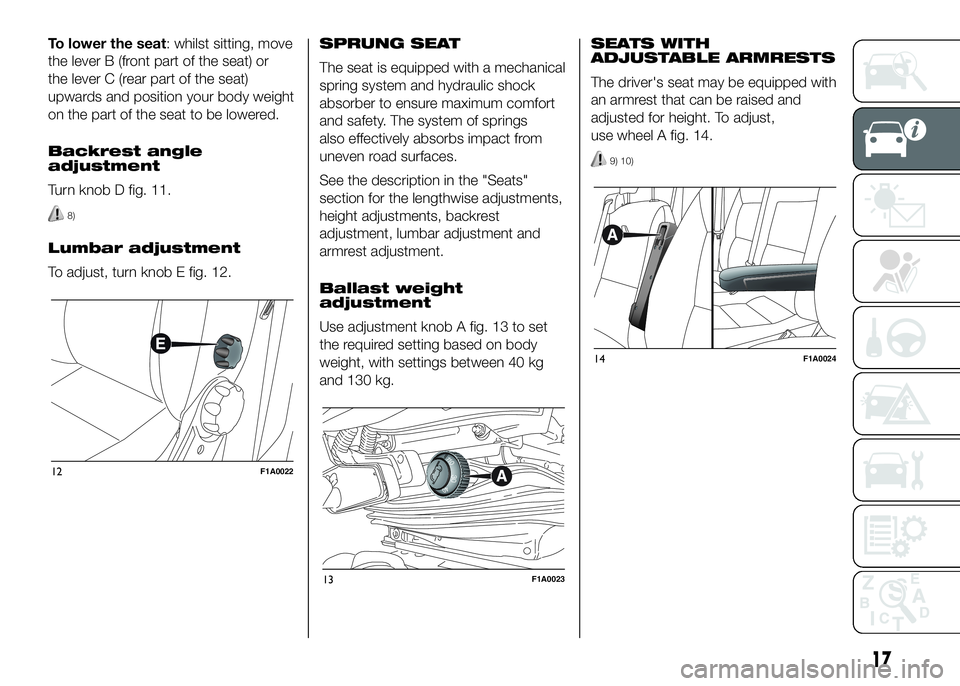
Turn knob D fig. 11.
8)
Lumbar adjustment
To adjust, turn knob E fig. 12.SPRUNG SEAT
The seat is equipped with a mechanical
spring system and hydraulic shock
absorber to ensure maximum comfort
and safety. The system of springs
also effectively absorbs impact from
uneven road surfaces.
See the description in the "Seats"
section for the lengthwise adjustments,
height adjustments, backrest
adjustment, lumbar adjustment and
armrest adjustment.
Ballast weight
adjustment
Use adjustment knob A fig. 13 to set
the required setting based on body
weight, with settings between 40 kg
and 130 kg.SEATS WITH
ADJUSTABLE ARMRESTS
The driver's seat may be equipped with
an armrest that can be raised and
adjusted for height. To adjust,
use wheel A fig. 14.
9) 10)
12F1A0022
13F1A0023
14F1A0024
17
Page 23 of 387
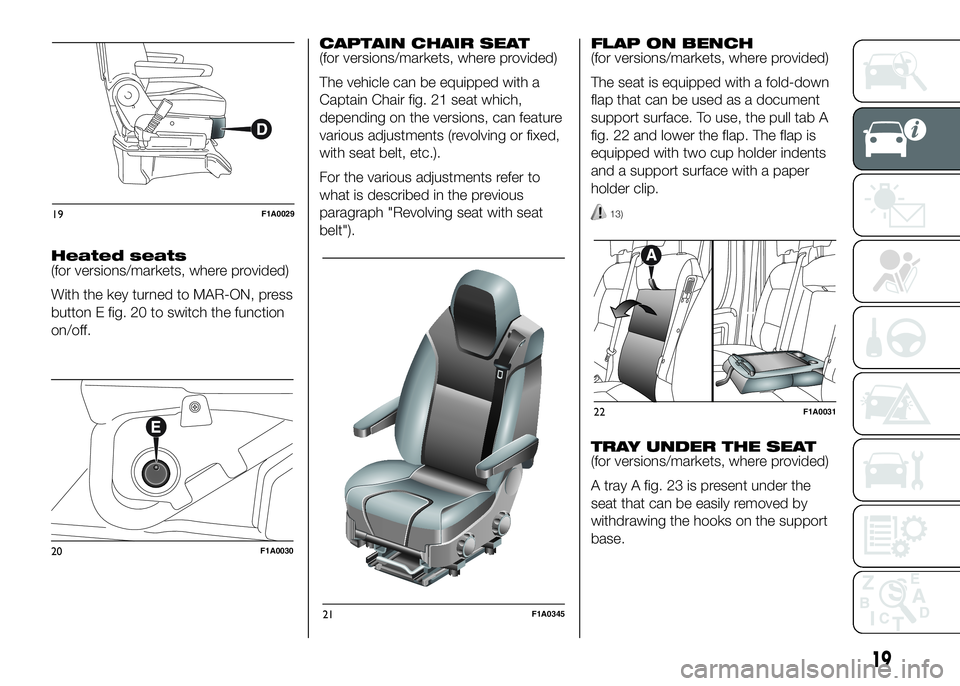
Heated seats
(for versions/markets, where provided)
With the key turned to MAR-ON, press
button E fig. 20 to switch the function
on/off.CAPTAIN CHAIR SEAT
(for versions/markets, where provided)
The vehicle can be equipped with a
Captain Chair fig. 21 seat which,
depending on the versions, can feature
various adjustments (revolving or fixed,
with seat belt, etc.).
For the various adjustments refer to
what is described in the previous
paragraph "Revolving seat with seat
belt").FLAP ON BENCH
(for versions/markets, where provided)
The seat is equipped with a fold-down
flap that can be used as a document
support surface. To use, the pull tab A
fig. 22 and lower the flap. The flap is
equipped with two cup holder indents
and a support surface with a paper
holder clip.
13)
TRAY UNDER THE SEAT
(for versions/markets, where provided)
A tray A fig. 23 is present under the
seat that can be easily removed by
withdrawing the hooks on the support
base.
19F1A0029
20F1A0030
21F1A0345
22F1A0031
19
Page 37 of 387
CLIMATE CONTROL
SYSTEM (cooling)
For fast cooling of the passenger
compartment, proceed as follows:
❒turn ring nut A to the blue section;
❒start internal air recirculation by
placing knob D on
;
❒turn ring nut C to
;
❒press button E to turn the climate
control system on; the LED on the
button will come on;
❒turn knob B to 4
(maximum fan
speed).
Cooling adjustment
❒turn ring nut A to the right to increase
the temperature;
❒stop internal air recirculation by
placing knob D on
;
❒turn knob B to reduce fan speed.
IMPORTANT When air conditioner
compressor button E is pressed, the
function is only activated if at least the
first fan speed is selected (knob B).PASSENGER
COMPARTMENT HEATING
Proceed as follows:
❒turn ring nut A to the red section;
❒turn ring nut C to the required
position;
❒turn knob B to the required speed.
FAST PASSENGER
COMPARTMENT HEATING
For the fast heating of the passenger
compartment, proceed as follows:
❒turn ring nut A to the red section;
❒start internal air recirculation by
placing knob D on
;
❒turn ring nut C to
;
❒turn knob B to 4
(max. fan
speed).
Then use the controls to maintain the
required comfort conditions and turn
knob D to
to turn the air
recirculation off and to prevent windows
from misting up.
IMPORTANT With a cold engine, you
have to wait for a few minutes to let the
system fluid reach optimum operating
temperature.FRONT WINDOW FAST
DEMISTING/DEFROSTING
(WINDSCREEN AND SIDE
WINDOWS)
Proceed as follows:
❒turn ring nut A to the red section;
❒turn knob B to 4
(max. fan
speed).
❒turn ring nut C to
;
❒stop internal air recirculation by
placing knob D on
;
IMPORTANT To guarantee rapid
demisting/defrosting, if an additional
heater/air conditioner is present (under
the front or rear seat on Panorama
and Combi versions), if activated,
deactivate it using F button fig. 50 (LED
off) located in the control panel.
After demisting/defrosting, operate the
controls to restore the required comfort
conditions.
IMPORTANT The climate control
system is very useful for speeding up
demisting since it dehumidifies the
air. Adjust the controls as described
above and press button E to switch the
climate control system on; the LED on
the button will light up.
33
Page 66 of 387
.
FUEL CUT-OFF
SWITCH
The vehicle is fitted with a safety switch
that, in the event of a crash, comes
into operation by cutting off the fuel
supply and turning off the engine as a
consequence.
When the inertia switch cuts in, it cuts
off the fuel supply and also activates
the hazard warning lights, side lights
and courtesy lights while releasing
all the doors and displaying the relevant
message; they are deactivated by
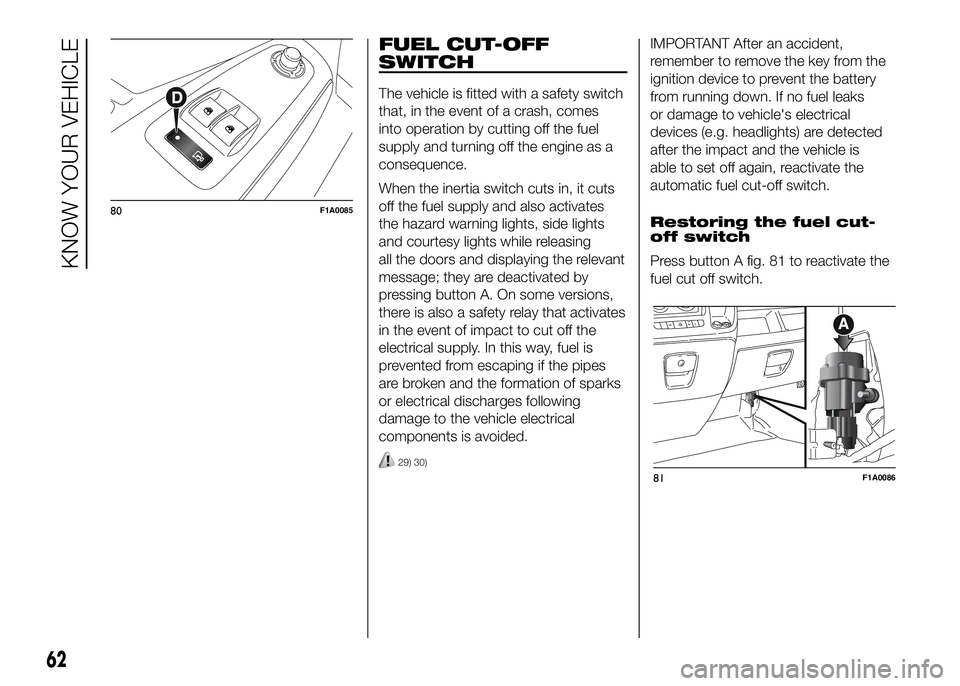
pressing button A. On some versions,
there is also a safety relay that activates
in the event of impact to cut off the
electrical supply. In this way, fuel is
prevented from escaping if the pipes
are broken and the formation of sparks
or electrical discharges following
damage to the vehicle electrical
components is avoided.
29) 30)
IMPORTANT After an accident,
remember to remove the key from the
ignition device to prevent the battery
from running down. If no fuel leaks
or damage to vehicle's electrical
devices (e.g. headlights) are detected
after the impact and the vehicle is
able to set off again, reactivate the
automatic fuel cut-off switch.
Restoring the fuel cut-
off switch
Press button A fig. 81 to reactivate the
fuel cut off switch.
80F1A0085
81F1A0086
62
KNOW YOUR VEHICLE
Page 80 of 387
WARNING
34) Once the dead lock system is
engaged it is impossible to open
the doors from inside the vehicle.
Therefore, before engaging the
system check that there is no one
left inside. If the remote control
battery is flat, the system can be
disengaged only by inserting
the key metal insert in either of
the door locks as described
previously: in this case the device
remains active only for the rear
doors.
35) Before leaving the vehicle
parked with sliding doors open,
always check that the latch is
engaged.
36) Do not move the vehicle with
side doors open.37) Before setting off after parking
or before moving the vehicle in
any way, ensure that the
footboard is fully stowed away. As
the movement of the platform is
linked to that of the sliding side
door, thewarning light in the
instrument panel comes on if it is
not fully retracted in the same
way as when the rear doors are
not shut.
38) This spring loaded system has
activation forces that were
designed for optimum comfort.
Accidental knocks or a strong
gust of wind may release the
springs and close the doors
spontaneously.
39) With the doors opened to 180
degrees, no locking system is
effective. Do not use this opening
with the vehicle parked on a
gradient or when it is windy.
40) It is forbidden to drive the
vehicle with the footboard open.
41) Do not use the retracted
footboard for getting up or down
the load compartment.42) Make sure that the footboard is
suitably locked by the provided
retaining systems before, after
and during its use. An incomplete
opening or closing might cause
an improper movement of the
footboard with risks arising for the
operator and external users.
43) The footboard lightly projects
from the vehicle even if retracted;
therefore, when rear parking
sensors are provided, their
operating range is lightly reduced.
IMPORTANT
5) The footboard presence may
reduce the ramp approach angles;
it is therefore recommended, in
case of a very steep ramp, to
be very careful in order not to
damage the footboard.
76
KNOW YOUR VEHICLE
Page 86 of 387
57) If the space-saver wheel (for
versions/markets, where
provided) is used, the ABS keeps
operating. Always remember
that the space-saver wheel, being
smaller than the original wheel,
provides less grip.ESC (Electronic
Stability Control)
SYSTEM
(for versions/markets, where provided)
The ESC system improves the
directional control and stability of the
vehicle in various driving conditions.
The ESC system corrects the vehicle’s
understeer and oversteer, distributing
the brake force on the appropriate
wheels. The torque supplied by the
engine can also be reduced in order to
maintain control of the vehicle.
The ESC system uses the sensors in
the vehicle to determine the trajectory
required by the driver through steering
and compares it with the real trajectory
of the vehicle. When the real trajectory
deviates from the desired trajectory, the
ESC system intervenes to counter the
car’s understeer or oversteer.
❒Oversteer: occurs when the vehicle is
turning more than it should according
to the angle of the steering wheel.
❒Understeer: occurs when the vehicle
is turning less than it should
according to the angle of the steering
wheelThe ESC system also includes the
following subsystems:
❒Hill Holder
❒ASR
❒HBA
❒ERM
❒HDC
58) 59) 60)
SYSTEM INTERVENTION
This is signalled by the flashing of
warning light
in the instrument panel,
to inform the driver that the vehicle is
in critical stability and grip conditions.
SYSTEM ACTIVATION
The ESC system switches on
automatically when the engine is
started and cannot be switched off.
82
KNOW YOUR VEHICLE