technical specifications FIAT FIORINO 2010 Owner handbook (in English)
[x] Cancel search | Manufacturer: FIAT, Model Year: 2010, Model line: FIORINO, Model: FIAT FIORINO 2010Pages: 210, PDF Size: 4.9 MB
Page 125 of 210
124
SAFETY
MAINTENANCE
AND CARE
TECHNICAL
SPECIFICATIONS
INDEX
DASHBOARDAND CONTROLS
STARTING
AND DRIVING
WARNING
LIGHTS AND
MESSAGES
IN AN
EMERGENCY
STARTING
THE ENGINE
EMERGENCY START
Go to a Fiat Dealership immediately if
warning light Ycomes on steady on the
instrument panel.
STARTING THE ENGINE
WITH THE AUXILIARY
BATTERY
If the battery is down, the engine can be
started using an auxiliary battery having
the same capacity, or higher.
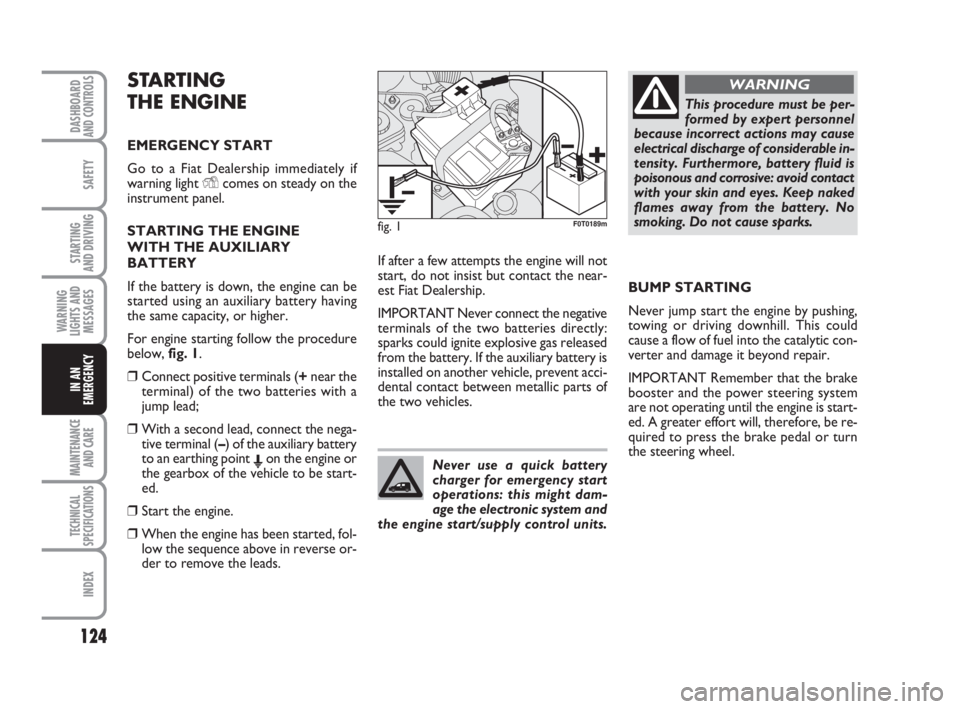
For engine starting follow the procedure
below, fig. 1.
❒Connect positive terminals (+near the
terminal) of the two batteries with a
jump lead;
❒With a second lead, connect the nega-
tive terminal (–) of the auxiliary battery
to an earthing point Eon the engine or
the gearbox of the vehicle to be start-
ed.
❒Start the engine.
❒When the engine has been started, fol-
low the sequence above in reverse or-
der to remove the leads.If after a few attempts the engine will not
start, do not insist but contact the near-
est Fiat Dealership.
IMPORTANT Never connect the negative
terminals of the two batteries directly:
sparks could ignite explosive gas released
from the battery. If the auxiliary battery is
installed on another vehicle, prevent acci-
dental contact between metallic parts of
the two vehicles.BUMP STARTING
Never jump start the engine by pushing,
towing or driving downhill. This could
cause a flow of fuel into the catalytic con-
verter and damage it beyond repair.
IMPORTANT Remember that the brake
booster and the power steering system
are not operating until the engine is start-
ed. A greater effort will, therefore, be re-
quired to press the brake pedal or turn
the steering wheel.
Never use a quick battery
charger for emergency start
operations: this might dam-
age the electronic system and
the engine start/supply control units.
This procedure must be per-
formed by expert personnel
because incorrect actions may cause
electrical discharge of considerable in-
tensity. Furthermore, battery fluid is
poisonous and corrosive: avoid contact
with your skin and eyes. Keep naked
flames away from the battery. No
smoking. Do not cause sparks.
WARNING
fig. 1F0T0189m
123-154 Fiorino GB 1ed:123-154 Fiorino GB 1ed 3-12-2009 15:33 Pagina 124
Page 126 of 210
125
SAFETY
MAINTENANCE
AND CARE
TECHNICAL
SPECIFICATIONS
INDEX
DASHBOARDAND CONTROLS
STARTING
AND DRIVING
WARNING
LIGHTS AND
MESSAGES
IN AN
EMERGENCY
IF A TYRE
IS PUNCTURED
Cargo versions
The vehicle is supplied with a regular size
spare wheel. Alternatively, the vehicle may
be equipped with a “Fix&Go fast tyre re-
pair kit” (see instructions in next section).
Combi versions
The vehicle is supplied with a “Fix&Go fast
tyre repair kit” (see instructions in next
section). As an alternative to the Fix&Go
kit, the vehicle may be equipped with a
regular size spare wheel.
Wheel changing and correct use of the jack
and spare wheel call for some precautions
as listed below.
The spare wheel (for ver-
sions/markets, where provid-
ed) is specific for your vehicle. There-
fore, it must not be used on vehicles
of a different model. Do not use spare
wheels of different models on your ve-
hicle. The spare wheel must only be
used in an emergency. Use it as short-
ly as possible.
WARNING
Indicate that the vehicle is
stationary according to the
laws in force: emergency lights, re-
fracting warning triangle, etc. Pas-
sengers should leave the vehicle, par-
ticularly if it is very loaded, and wait
for the wheel to be changed away
from on-coming traffic. In case of
steep slopes or rough slopes, place
wedges or other materials suitable to
stop the vehicle under the wheels. Re-
pair and refit the standard wheel as
soon as possible. Do not apply grease
to the bolt threading before assem-
bly: the bolts could come loose un-
expectedly.
WARNING
Use the jack only to replace
wheels on the vehicle with
which it is supplied or on other vehi-
cles of the same model. Never use the
jack for other purposes, such as lift-
ing other vehicle models. Never use the
jack to carry out repairs under the ve-
hicle. Incorrect positioning of the jack
may cause the lifted vehicle to fall. Do
not use the jack for loads higher than
those shown on the label.
WARNING
Incorrect wheel cap assem-
bly may cause it to come off
when the vehicle is travelling. Never
tamper with the inflation valve. Nev-
er introduce tools of any kind be-
tween rim and tyre. Regularly check
the pressure of the tyres and small
spare wheel referring to the values
shown in the “Technical Specifica-
tions” section.
WARNING
123-154 Fiorino GB 1ed:123-154 Fiorino GB 1ed 3-12-2009 15:33 Pagina 125
Page 127 of 210
126
SAFETY
MAINTENANCE
AND CARE
TECHNICAL
SPECIFICATIONS
INDEX
DASHBOARDAND CONTROLS
STARTING
AND DRIVING
WARNING
LIGHTS AND
MESSAGES
IN AN
EMERGENCY
Important notes:
❒the jack weight is 1.76 kg;
❒the jack requires no adjustment;
❒the jack cannot be repaired. If it breaks
it must be replaced with a new jack;
❒no tool other than the cranking device
has to be fitted on the jack.To replace a tyre proceed as follows:
❒stop the vehicle in a position so that it
is not a danger for on-coming traffic in
a location where you can replace the
wheel safely. The ground must be flat
and compact.
❒Turn the engine off and pull up the
handbrake.
❒Engage first gear or reverse.
fig. 2F0T0119mfig. 3F0T0122m
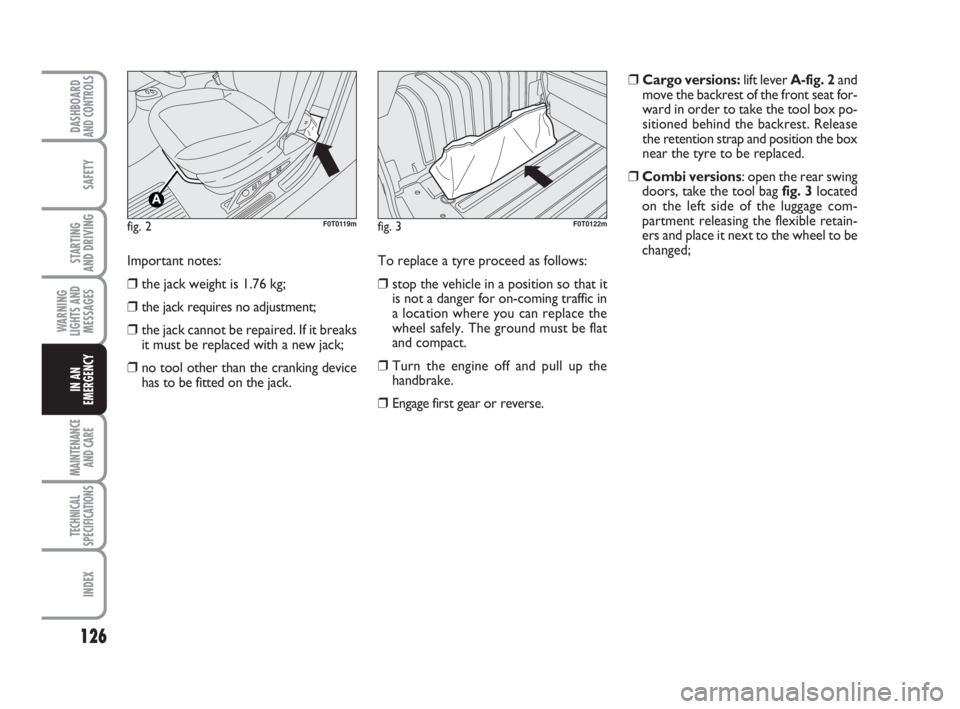
❒Cargo versions:lift lever A-fig. 2and
move the backrest of the front seat for-
ward in order to take the tool box po-
sitioned behind the backrest. Release
the retention strap and position the box
near the tyre to be replaced.
❒Combi versions: open the rear swing
doors, take the tool bag fig. 3located
on the left side of the luggage com-
partment releasing the flexible retain-
ers and place it next to the wheel to be
changed;
123-154 Fiorino GB 1ed:123-154 Fiorino GB 1ed 3-12-2009 15:33 Pagina 126
Page 128 of 210
127
SAFETY
MAINTENANCE
AND CARE
TECHNICAL
SPECIFICATIONS
INDEX
DASHBOARDAND CONTROLS
STARTING
AND DRIVING
WARNING
LIGHTS AND
MESSAGES
IN AN
EMERGENCY
fig. 4F0T0120m
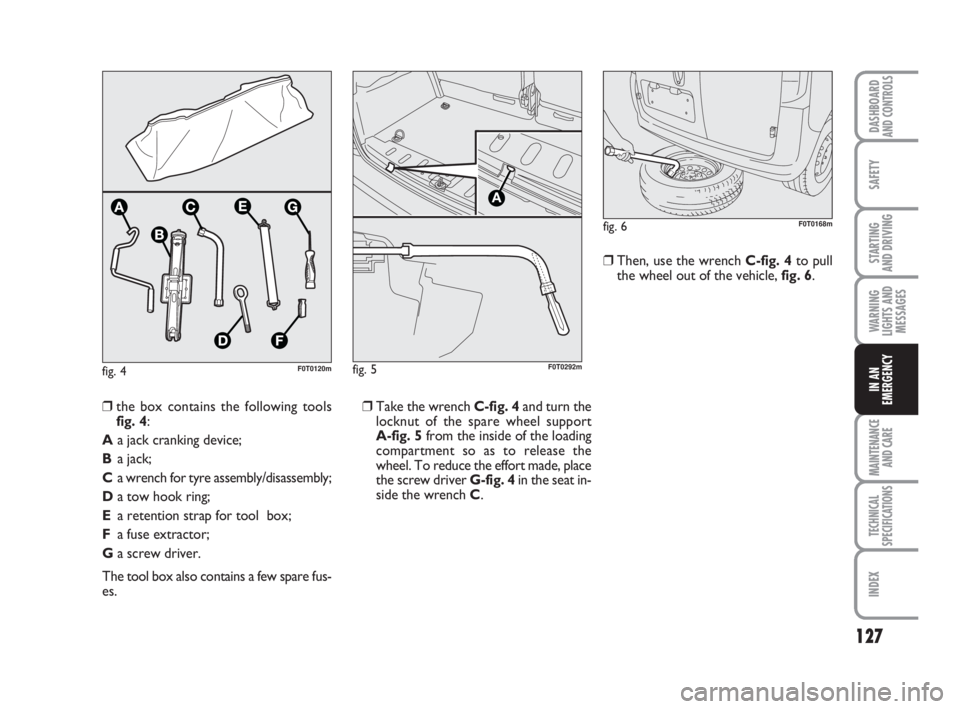
❒Take the wrench C-fig. 4and turn the
locknut of the spare wheel support
A-fig. 5from the inside of the loading
compartment so as to release the
wheel. To reduce the effort made, place
the screw driver G-fig. 4in the seat in-
side the wrench C.❒Then, use the wrench C-fig. 4to pull
the wheel out of the vehicle, fig. 6.
❒the box contains the following tools
fig. 4:
Aa jack cranking device;
Ba jack;
Ca wrench for tyre assembly/disassembly;
Da tow hook ring;
Ea retention strap for tool box;
Fa fuse extractor;
Ga screw driver.
The tool box also contains a few spare fus-
es.
fig. 6F0T0168m
fig. 5
A
F0T0292m
123-154 Fiorino GB 1ed:123-154 Fiorino GB 1ed 3-12-2009 15:33 Pagina 127
Page 129 of 210
128
SAFETY
MAINTENANCE
AND CARE
TECHNICAL
SPECIFICATIONS
INDEX
DASHBOARDAND CONTROLS
STARTING
AND DRIVING
WARNING
LIGHTS AND
MESSAGES
IN AN
EMERGENCY
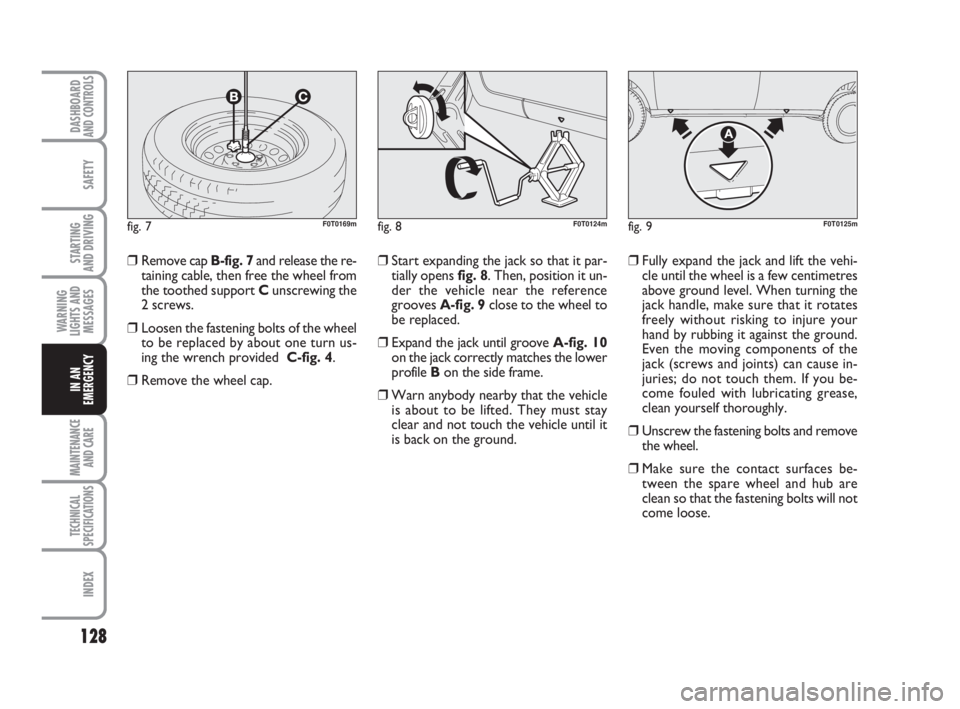
❒Start expanding the jack so that it par-
tially opens fig. 8. Then, position it un-
der the vehicle near the reference
grooves A-fig. 9close to the wheel to
be replaced.
❒Expand the jack until groove A-fig. 10
on the jack correctly matches the lower
profile Bon the side frame.
❒Warn anybody nearby that the vehicle
is about to be lifted. They must stay
clear and not touch the vehicle until it
is back on the ground.❒Fully expand the jack and lift the vehi-
cle until the wheel is a few centimetres
above ground level. When turning the
jack handle, make sure that it rotates
freely without risking to injure your
hand by rubbing it against the ground.
Even the moving components of the
jack (screws and joints) can cause in-
juries; do not touch them. If you be-
come fouled with lubricating grease,
clean yourself thoroughly.
❒Unscrew the fastening bolts and remove
the wheel.
❒Make sure the contact surfaces be-
tween the spare wheel and hub are
clean so that the fastening bolts will not
come loose.
fig. 8F0T0124mfig. 9F0T0125m
❒Remove cap B-fig. 7and release the re-
taining cable, then free the wheel from
the toothed support Cunscrewing the
2 screws.
❒Loosen the fastening bolts of the wheel
to be replaced by about one turn us-
ing the wrench provided C-fig. 4.
❒Remove the wheel cap.
fig. 7F0T0169m
123-154 Fiorino GB 1ed:123-154 Fiorino GB 1ed 3-12-2009 15:33 Pagina 128
Page 130 of 210
129
SAFETY
MAINTENANCE
AND CARE
TECHNICAL
SPECIFICATIONS
INDEX
DASHBOARDAND CONTROLS
STARTING
AND DRIVING
WARNING
LIGHTS AND
MESSAGES
IN AN
EMERGENCY
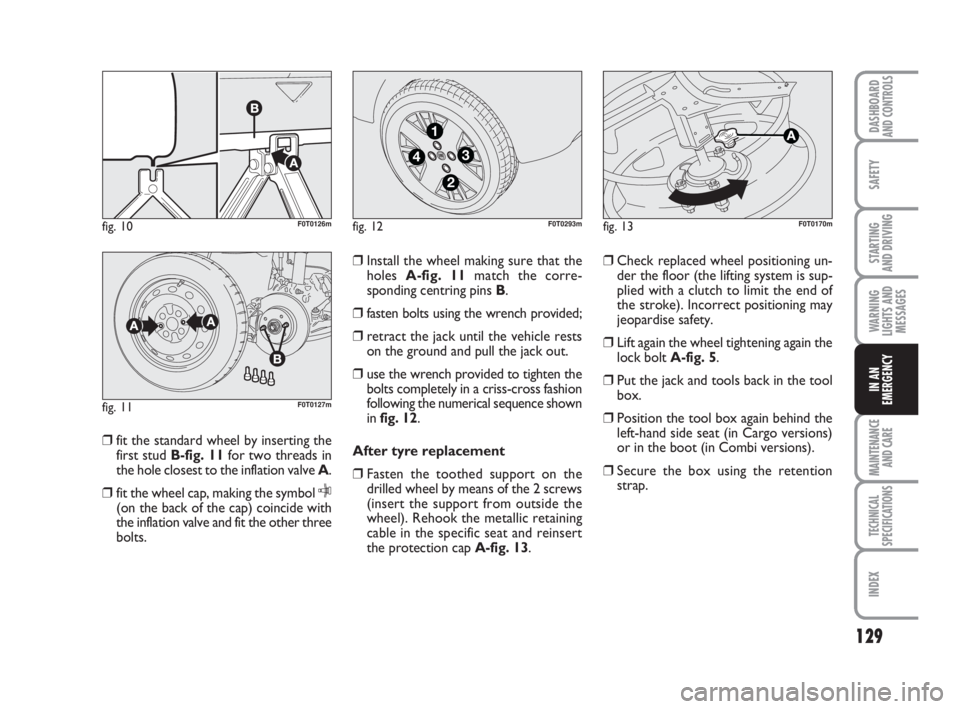
❒fit the standard wheel by inserting the
first stud B-fig. 11for two threads in
the hole closest to the inflation valve A.
❒fit the wheel cap, making the symbol
C(on the back of the cap) coincide with
the inflation valve and fit the other three
bolts.❒Install the wheel making sure that the
holes A-fig. 11match the corre-
sponding centring pins B.
❒fasten bolts using the wrench provided;
❒retract the jack until the vehicle rests
on the ground and pull the jack out.
❒use the wrench provided to tighten the
bolts completely in a criss-cross fashion
following the numerical sequence shown
in fig. 12.
After tyre replacement
❒Fasten the toothed support on the
drilled wheel by means of the 2 screws
(insert the support from outside the
wheel). Rehook the metallic retaining
cable in the specific seat and reinsert
the protection cap A-fig. 13.❒Check replaced wheel positioning un-
der the floor (the lifting system is sup-
plied with a clutch to limit the end of
the stroke). Incorrect positioning may
jeopardise safety.
❒Lift again the wheel tightening again the
lock boltA-fig. 5.
❒Put the jack and tools back in the tool
box.
❒Position the tool box again behind the
left-hand side seat (in Cargo versions)
or in the boot (in Combi versions).
❒Secure the box using the retention
strap.
fig. 10F0T0126m
fig. 11F0T0127m
fig. 12
4
1
3
2
F0T0293mfig. 13F0T0170m
123-154 Fiorino GB 1ed:123-154 Fiorino GB 1ed 3-12-2009 15:33 Pagina 129
Page 131 of 210
130
SAFETY
MAINTENANCE
AND CARE
TECHNICAL
SPECIFICATIONS
INDEX
DASHBOARDAND CONTROLS
STARTING
AND DRIVING
WARNING
LIGHTS AND
MESSAGES
IN AN
EMERGENCY
QUICK TYRE REPAIR
KIT FIX & GO automatic
The automatic fast tyre repair kit Fix & Go
automatic is placed in a container in the
boot.
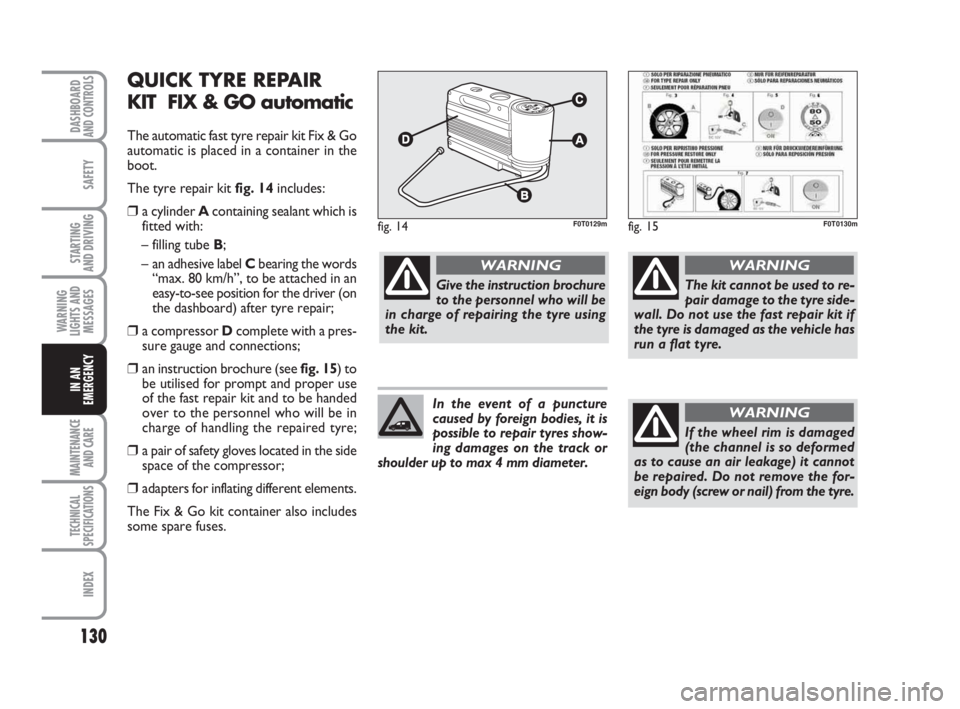
The tyre repair kit fig. 14includes:
❒a cylinder A containing sealant which is
fitted with:
– filling tube B;
– an adhesive label Cbearing the words
“max. 80 km/h”, to be attached in an
easy-to-see position for the driver (on
the dashboard) after tyre repair;
❒a compressor Dcomplete with a pres-
sure gauge and connections;
❒an instruction brochure (see fig. 15) to
be utilised for prompt and proper use
of the fast repair kit and to be handed
over to the personnel who will be in
charge of handling the repaired tyre;
❒a pair of safety gloves located in the side
space of the compressor;
❒adapters for inflating different elements.
The Fix & Go kit container also includes
some spare fuses.
fig. 14F0T0129mfig. 15F0T0130m
Give the instruction brochure
to the personnel who will be
in charge of repairing the tyre using
the kit.
WARNING
The kit cannot be used to re-
pair damage to the tyre side-
wall. Do not use the fast repair kit if
the tyre is damaged as the vehicle has
run a flat tyre.
WARNING
If the wheel rim is damaged
(the channel is so deformed
as to cause an air leakage) it cannot
be repaired. Do not remove the for-
eign body (screw or nail) from the tyre.
WARNINGIn the event of a puncture
caused by foreign bodies, it is
possible to repair tyres show-
ing damages on the track or
shoulder up to max 4 mm diameter.
123-154 Fiorino GB 1ed:123-154 Fiorino GB 1ed 3-12-2009 15:33 Pagina 130
Page 132 of 210
131
SAFETY
MAINTENANCE
AND CARE
TECHNICAL
SPECIFICATIONS
INDEX
DASHBOARDAND CONTROLS
STARTING
AND DRIVING
WARNING
LIGHTS AND
MESSAGES
IN AN
EMERGENCY
IMPORTANT INFORMATION:
The sealing fluid of the fast tyre repair kit
is effective with external temperatures be-
tween –20 °C and +50 °C.
INFLATION PROCEDURE
Do not operate the com-
pressor for longer than 20
consecutive minutes. Risk of over-
heating. The fast repair kit is not suit-
able for permanent repairs. The tyres
may only be repaired temporarily.
WARNING
Put on the safety gloves pro-
vided together with the fast
tyre repair kit.
WARNING
The cylinder contains ethyl-
ene glycol. Contains latex:
may cause an allergic reaction.
Harmful if swallowed. Irritates the
eyes. May cause sensitization by in-
halation or contact. Avoid contact
with your eyes, skin and clothes. In
the event of contact, wash immedi-
ately with plenty of water. Do not in-
duce vomiting if swallowed. Rinse
your mouth and drink plenty of wa-
ter. Call a doctor immediately. Keep
away from children. The product
must not be used by asthmatics. Do
not breath in the vapours during in-
sertion and suction. Call a doctor im-
mediately if allergic reactions are not-
ed. Store the cylinder in the specific
compartment, away from sources of
heat. The sealing fluid will expire. Re-
place the cylinder containing the
sealant after the expiration date.
WARNING
Do not dispose of the cylinder
and contained sealant in the
environment. Dispose of them
according to the national and
local laws in force.
fig. 16F0T0190m
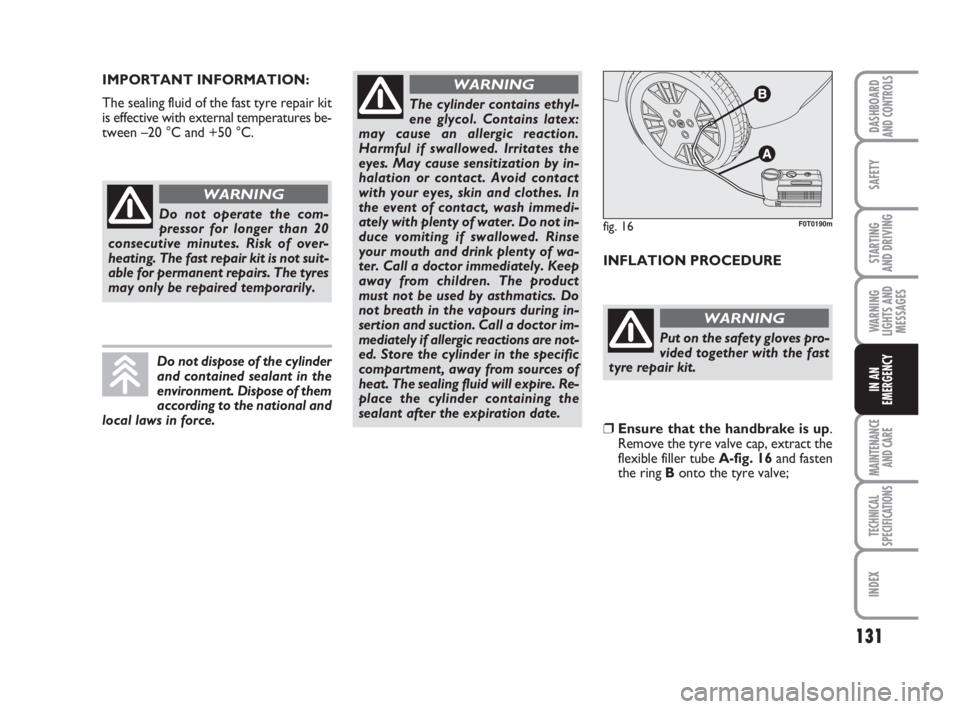
❒Ensure that the handbrake is up.
Remove the tyre valve cap, extract the
flexible filler tube A-fig. 16and fasten
the ring Bonto the tyre valve;
123-154 Fiorino GB 1ed:123-154 Fiorino GB 1ed 3-12-2009 15:33 Pagina 131
Page 133 of 210
132
SAFETY
MAINTENANCE
AND CARE
TECHNICAL
SPECIFICATIONS
INDEX
DASHBOARDAND CONTROLS
STARTING
AND DRIVING
WARNING
LIGHTS AND
MESSAGES
IN AN
EMERGENCY
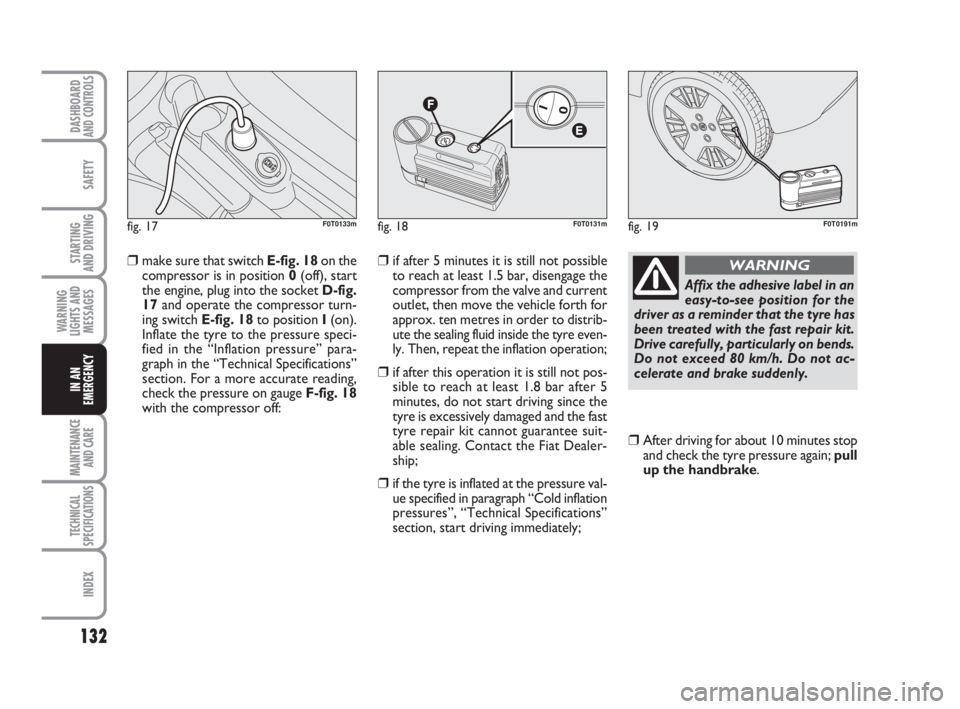
❒make sure that switch E-fig. 18on the
compressor is in position 0(off), start
the engine, plug into the socket D-fig.
17and operate the compressor turn-
ing switch E-fig. 18to position I(on).
Inflate the tyre to the pressure speci-
fied in the “Inflation pressure” para-
graph in the “Technical Specifications”
section. For a more accurate reading,
check the pressure on gauge F-fig. 18
with the compressor off: ❒if after 5 minutes it is still not possible
to reach at least 1.5 bar, disengage the
compressor from the valve and current
outlet, then move the vehicle forth for
approx. ten metres in order to distrib-
ute the sealing fluid inside the tyre even-
ly. Then, repeat the inflation operation;
❒if after this operation it is still not pos-
sible to reach at least 1.8 bar after 5
minutes, do not start driving since the
tyre is excessively damaged and the fast
tyre repair kit cannot guarantee suit-
able sealing. Contact the Fiat Dealer-
ship;
❒if the tyre is inflated at the pressure val-
ue specified in paragraph “Cold inflation
pressures”, “Technical Specifications”
section, start driving immediately;
❒After driving for about 10 minutes stop
and check the tyre pressure again; pull
up the handbrake.
fig. 17F0T0133mfig. 18F0T0131mfig. 19F0T0191m
Affix the adhesive label in an
easy-to-see position for the
driver as a reminder that the tyre has
been treated with the fast repair kit.
Drive carefully, particularly on bends.
Do not exceed 80 km/h. Do not ac-
celerate and brake suddenly.
WARNING
123-154 Fiorino GB 1ed:123-154 Fiorino GB 1ed 3-12-2009 15:33 Pagina 132
Page 134 of 210
133
SAFETY
MAINTENANCE
AND CARE
TECHNICAL
SPECIFICATIONS
INDEX
DASHBOARDAND CONTROLS
STARTING
AND DRIVING
WARNING
LIGHTS AND
MESSAGES
IN AN
EMERGENCY
❒If at least 1.8 bar pressure is read, re-
store proper pressure (with engine
running and handbrake on) and restart.
❒Drive with the utmost care to the near-
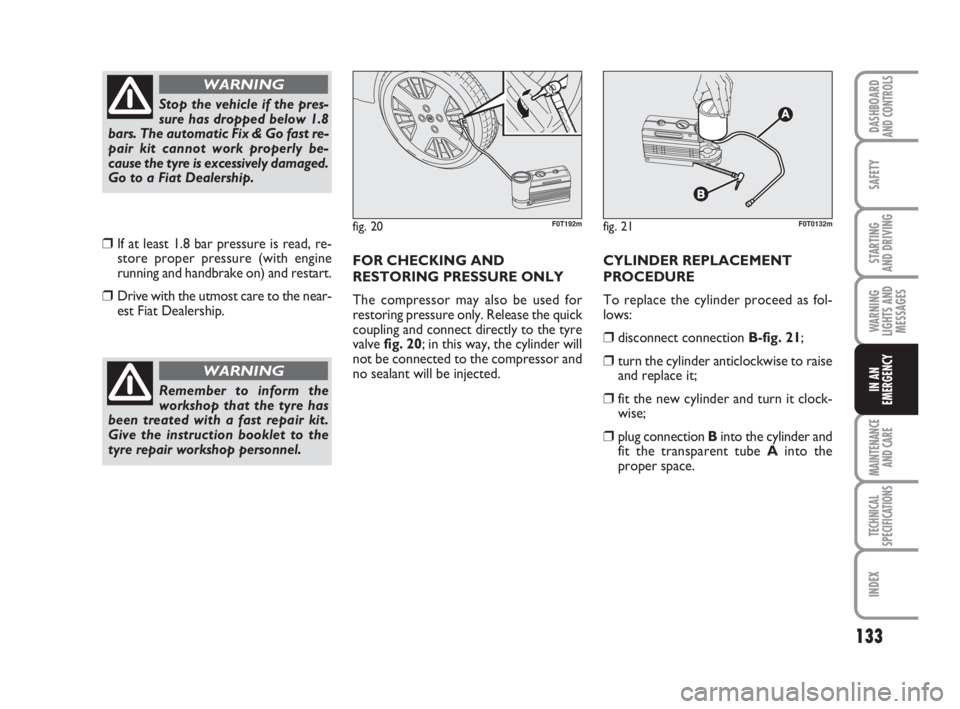
est Fiat Dealership.FOR CHECKING AND
RESTORING PRESSURE ONLY
The compressor may also be used for
restoring pressure only. Release the quick
coupling and connect directly to the tyre
valve fig. 20; in this way, the cylinder will
not be connected to the compressor and
no sealant will be injected. CYLINDER REPLACEMENT
PROCEDURE
To replace the cylinder proceed as fol-
lows:
❒disconnect connection B-fig. 21;
❒turn the cylinder anticlockwise to raise
and replace it;
❒fit the new cylinder and turn it clock-
wise;
❒plug connection Binto the cylinder and
fit the transparent tube Ainto the
proper space.
Stop the vehicle if the pres-
sure has dropped below 1.8
bars. The automatic Fix & Go fast re-
pair kit cannot work properly be-
cause the tyre is excessively damaged.
Go to a Fiat Dealership.
WARNING
Remember to inform the
workshop that the tyre has
been treated with a fast repair kit.
Give the instruction booklet to the
tyre repair workshop personnel.
WARNING
fig. 20F0T192mfig. 21F0T0132m
123-154 Fiorino GB 1ed:123-154 Fiorino GB 1ed 3-12-2009 15:33 Pagina 133