technical specifications FIAT FIORINO 2010 Owner handbook (in English)
[x] Cancel search | Manufacturer: FIAT, Model Year: 2010, Model line: FIORINO, Model: FIAT FIORINO 2010Pages: 210, PDF Size: 4.9 MB
Page 135 of 210
134
SAFETY
MAINTENANCE
AND CARE
TECHNICAL
SPECIFICATIONS
INDEX
DASHBOARDAND CONTROLS
STARTING
AND DRIVING
WARNING
LIGHTS AND
MESSAGES
IN AN
EMERGENCY
WHEN NEEDING
TO CHANGE A BULB
GENERAL INSTRUCTIONS
❒Before changing a bulb check the con-
tacts for oxidation.
❒Burnt bulbs must be replaced by oth-
ers of the same type and power.
❒Always check the height of the head-
light beam after changing a bulb.
❒When a bulb is not working, check that
the corresponding fuse is intact before
replacing it: refer to the “If a fuse
blows” paragraph in this section for the
location of fuses.IMPORTANT A slight misting may appear
on the internal surface of the headlight:
this does not indicate a fault. It is a natur-
al event caused by the low temperature
and the degree of humidity in the air. It will
rapidly disappear when the headlights are
switched on. The presence of drops inside
the headlights indicates infiltration of wa-
ter. Go to a Fiat Dealership.
Modifications or repairs to
the electrical system that are
not carried out properly or do not
take the system technical specifica-
tions into account can cause mal-
functions leading to the risk of fire.
WARNING
Halogen bulbs contain pres-
surised gas which may cause
small fragments of glass to be pro-
jected outwards if the bulb is broken.
WARNING
Halogen lamps must be han-
dled holding the metallic part
only. Touching the transpar-
ent part of the bulb with your
fingers may reduce the intensity of the
emitted light and even compromise du-
ration of the lamp. In case of acciden-
tal contact, rub the lamp with a cloth
and spirit and leave to dry.
If possible, we recommend
that you let the Fiat Dealer-
ship replace the bulbs. Prop-
er operation and orientation
of the external lights are essential for
the safety of the running vehicle, and
for avoiding legal sanctions.
123-154 Fiorino GB 1ed:123-154 Fiorino GB 1ed 3-12-2009 15:33 Pagina 134
Page 136 of 210
135
SAFETY
MAINTENANCE
AND CARE
TECHNICAL
SPECIFICATIONS
INDEX
DASHBOARDAND CONTROLS
STARTING
AND DRIVING
WARNING
LIGHTS AND
MESSAGES
IN AN
EMERGENCY
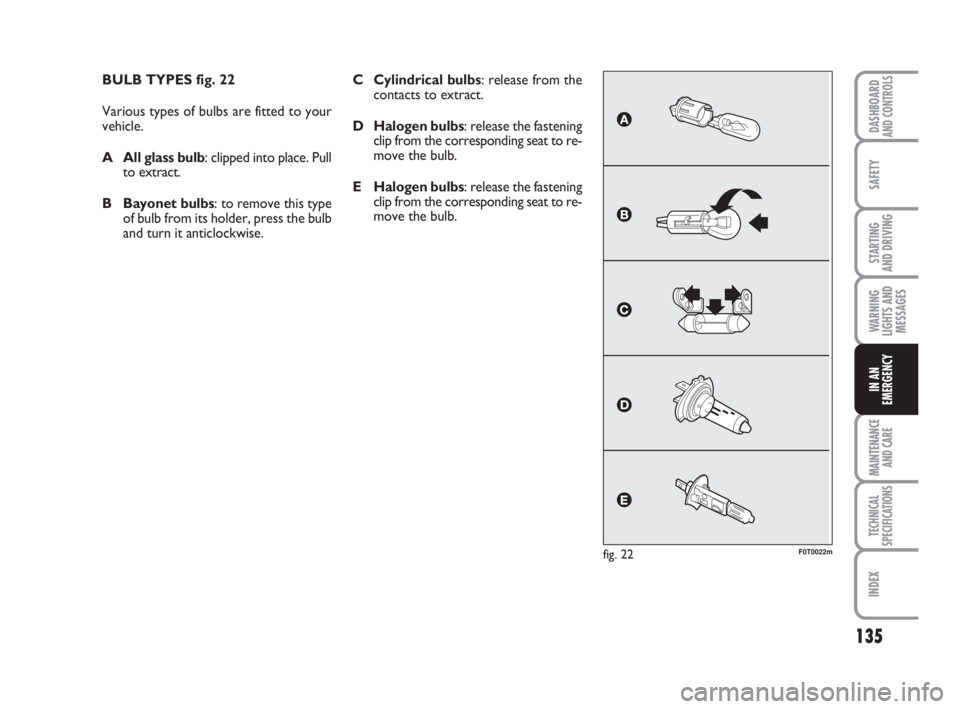
BULB TYPES fig. 22
Various types of bulbs are fitted to your
vehicle.
A All glass bulb: clipped into place. Pull
to extract.
B Bayonet bulbs: to remove this type
of bulb from its holder, press the bulb
and turn it anticlockwise.
fig. 22F0T0022m
C Cylindrical bulbs: release from the
contacts to extract.
D Halogen bulbs: release the fastening
clip from the corresponding seat to re-
move the bulb.
E Halogen bulbs: release the fastening
clip from the corresponding seat to re-
move the bulb.
123-154 Fiorino GB 1ed:123-154 Fiorino GB 1ed 3-12-2009 15:33 Pagina 135
Page 137 of 210
136
SAFETY
MAINTENANCE
AND CARE
TECHNICAL
SPECIFICATIONS
INDEX
DASHBOARDAND CONTROLS
STARTING
AND DRIVING
WARNING
LIGHTS AND
MESSAGES
IN AN
EMERGENCY
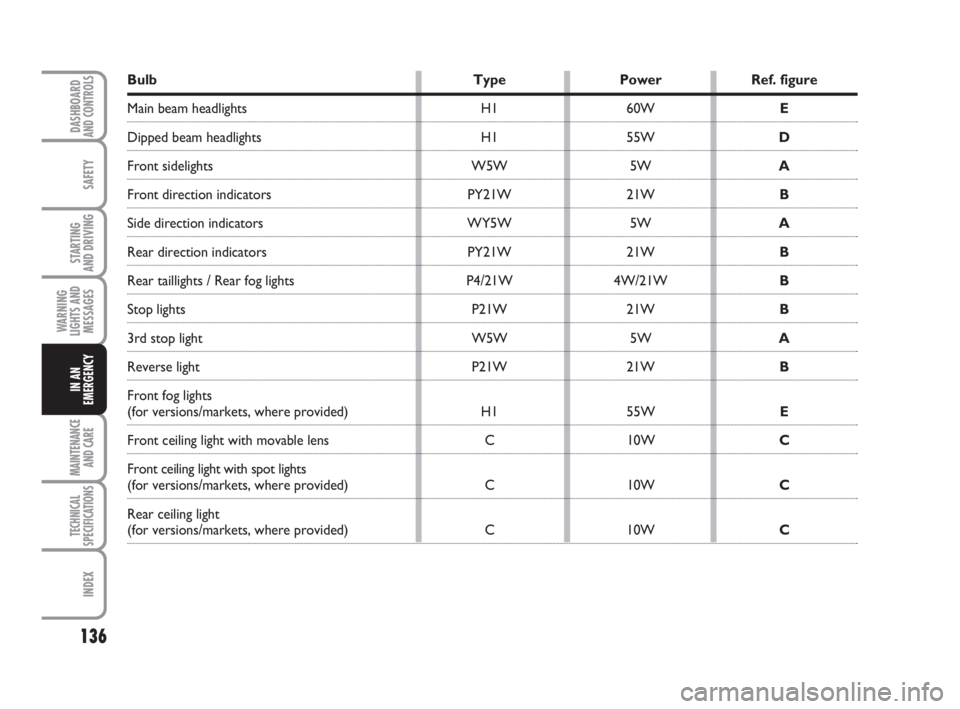
Bulb Type Power Ref. figure
Main beam headlights H1 60W E
Dipped beam headlights H1 55WD
Front sidelights W5W 5WA
Front direction indicators PY21W 21WB
Side direction indicators WY5W 5WA
Rear direction indicators PY21W 21WB
Rear taillights / Rear fog lights P4/21W 4W/21WB
Stop lights P21W 21WB
3rd stop light W5W 5WA
Reverse light P21W 21WB
Front fog lights
(for versions/markets, where provided) H1 55WE
Front ceiling light with movable lens C 10WC
Front ceiling light with spot lights
(for versions/markets, where provided) C 10WC
Rear ceiling light
(for versions/markets, where provided) C 10WC
123-154 Fiorino GB 1ed:123-154 Fiorino GB 1ed 3-12-2009 15:33 Pagina 136
Page 138 of 210
137
SAFETY
MAINTENANCE
AND CARE
TECHNICAL
SPECIFICATIONS
INDEX
DASHBOARDAND CONTROLS
STARTING
AND DRIVING
WARNING
LIGHTS AND
MESSAGES
IN AN
EMERGENCY
IF AN EXTERIOR
LIGHT BURNS OUT
For the type of bulb and power rating, see
“When needing to change a bulb”.
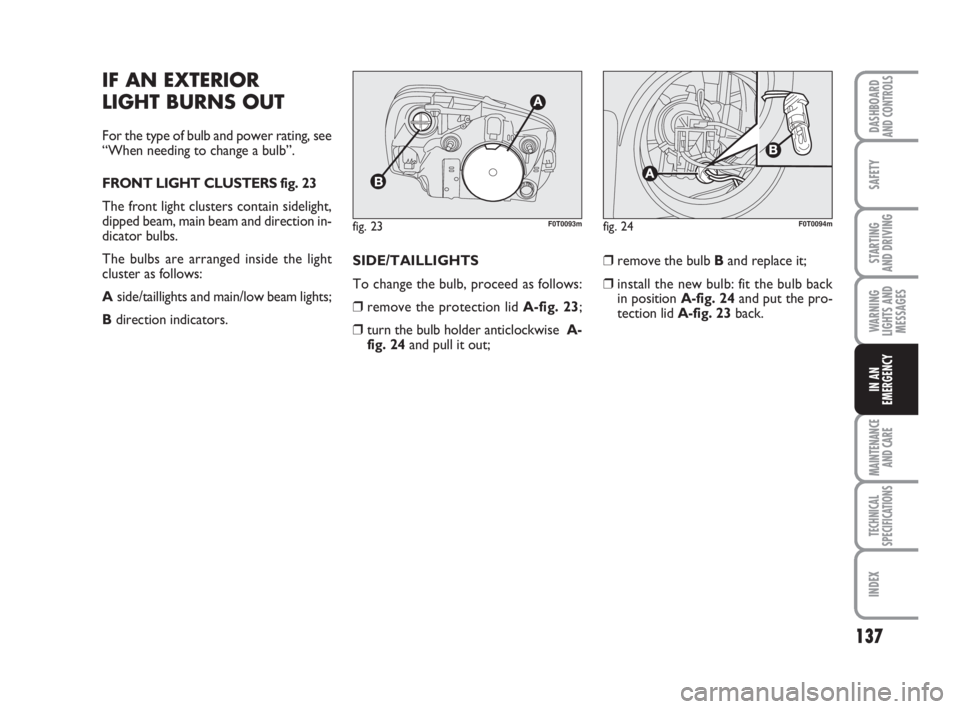
FRONT LIGHT CLUSTERS fig. 23
The front light clusters contain sidelight,
dipped beam, main beam and direction in-
dicator bulbs.
The bulbs are arranged inside the light
cluster as follows:
Aside/taillights and main/low beam lights;
Bdirection indicators.SIDE/TAILLIGHTS
To change the bulb, proceed as follows:
❒remove the protection lid A-fig. 23;
❒turn the bulb holder anticlockwise A-
fig. 24and pull it out;❒remove the bulb Band replace it;
❒install the new bulb: fit the bulb back
in position A-fig. 24and put the pro-
tection lid A-fig. 23back.
fig. 23F0T0093mfig. 24F0T0094m
123-154 Fiorino GB 1ed:123-154 Fiorino GB 1ed 3-12-2009 15:33 Pagina 137
Page 139 of 210
138
SAFETY
MAINTENANCE
AND CARE
TECHNICAL
SPECIFICATIONS
INDEX
DASHBOARDAND CONTROLS
STARTING
AND DRIVING
WARNING
LIGHTS AND
MESSAGES
IN AN
EMERGENCY
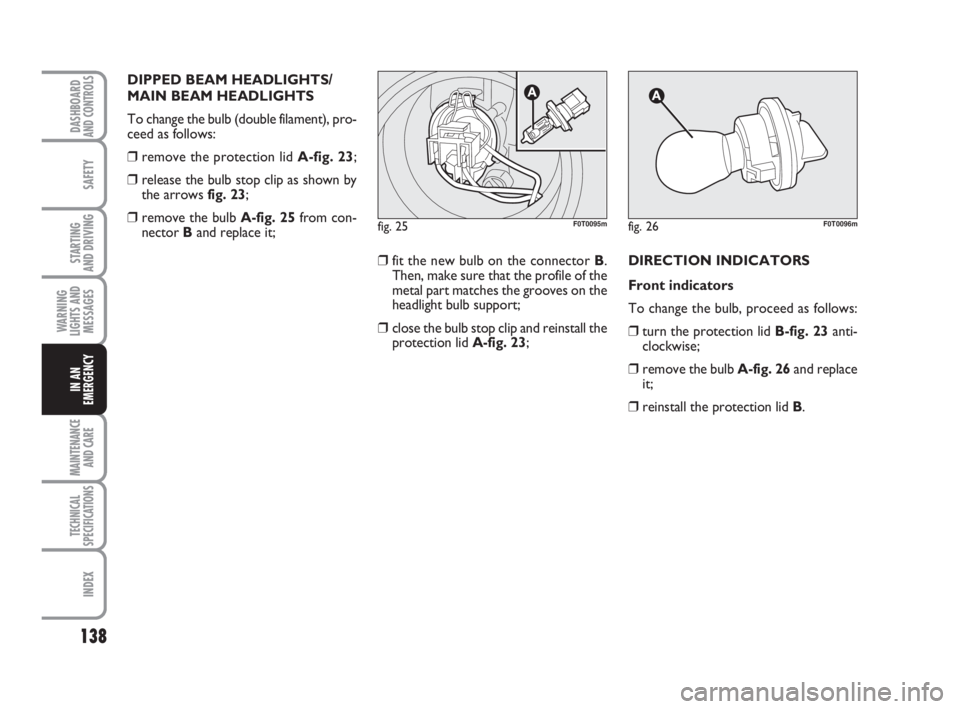
DIPPED BEAM HEADLIGHTS/
MAIN BEAM HEADLIGHTS
To change the bulb (double filament), pro-
ceed as follows:
❒remove the protection lid A-fig. 23;
❒release the bulb stop clip as shown by
the arrows fig. 23;
❒remove the bulb A-fig. 25from con-
nector Band replace it;
❒fit the new bulb on the connector B.
Then, make sure that the profile of the
metal part matches the grooves on the
headlight bulb support;
❒close the bulb stop clip and reinstall the
protection lid A-fig. 23;DIRECTION INDICATORS
Front indicators
To change the bulb, proceed as follows:
❒turn the protection lid B-fig. 23anti-
clockwise;
❒remove the bulb A-fig. 26and replace
it;
❒reinstall the protection lid B.
fig. 25F0T0095mfig. 26F0T0096m
123-154 Fiorino GB 1ed:123-154 Fiorino GB 1ed 3-12-2009 15:33 Pagina 138
Page 140 of 210
139
SAFETY
MAINTENANCE
AND CARE
TECHNICAL
SPECIFICATIONS
INDEX
DASHBOARDAND CONTROLS
STARTING
AND DRIVING
WARNING
LIGHTS AND
MESSAGES
IN AN
EMERGENCY
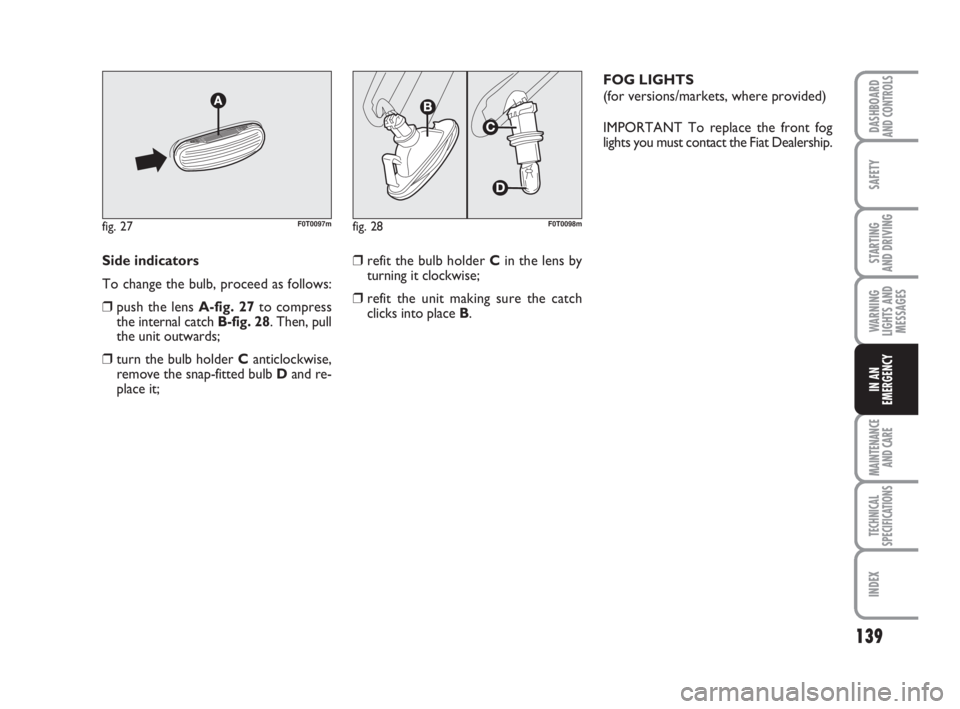
Side indicators
To change the bulb, proceed as follows:
❒push the lens A-fig. 27to compress
the internal catch B-fig. 28. Then, pull
the unit outwards;
❒turn the bulb holder C anticlockwise,
remove the snap-fitted bulb Dand re-
place it;
fig. 27F0T0097mfig. 28F0T0098m
❒refit the bulb holder Cin the lens by
turning it clockwise;
❒refit the unit making sure the catch
clicks into place B.FOG LIGHTS
(for versions/markets, where provided)
IMPORTANT To replace the front fog
lights you must contact the Fiat Dealership.
123-154 Fiorino GB 1ed:123-154 Fiorino GB 1ed 3-12-2009 15:33 Pagina 139
Page 141 of 210
140
SAFETY
MAINTENANCE
AND CARE
TECHNICAL
SPECIFICATIONS
INDEX
DASHBOARDAND CONTROLS
STARTING
AND DRIVING
WARNING
LIGHTS AND
MESSAGES
IN AN
EMERGENCY
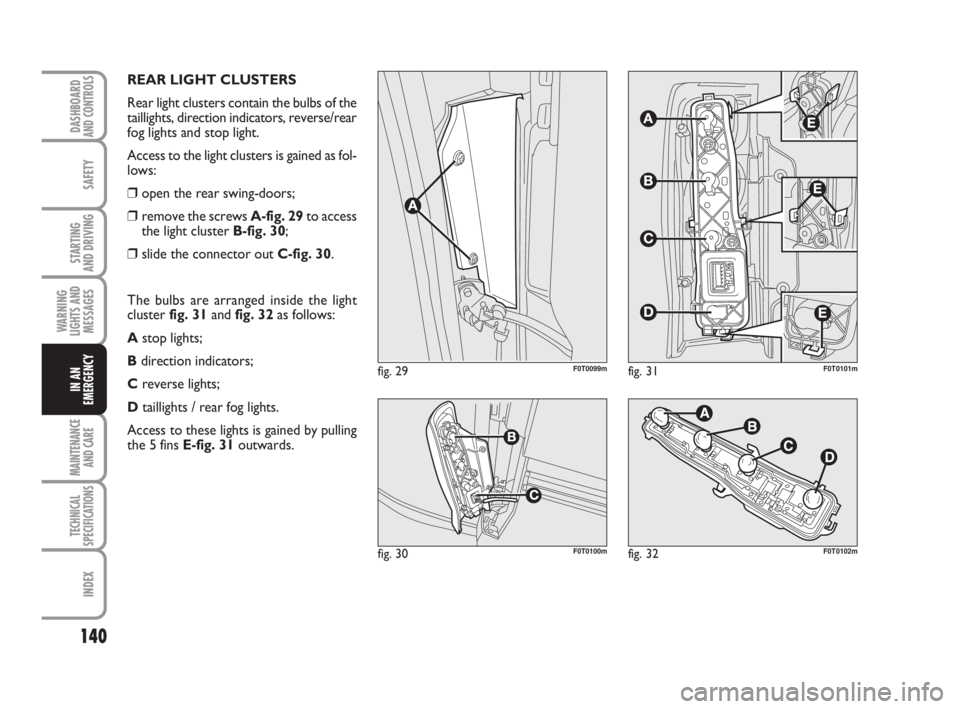
REAR LIGHT CLUSTERS
Rear light clusters contain the bulbs of the
taillights, direction indicators, reverse/rear
fog lights and stop light.
Access to the light clusters is gained as fol-
lows:
❒open the rear swing-doors;
❒remove the screws A-fig. 29to access
the light cluster B-fig. 30;
❒slide the connector out C-fig. 30.
The bulbs are arranged inside the light
cluster fig. 31and fig. 32as follows:
Astop lights;
Bdirection indicators;
Creverse lights;
Dtaillights / rear fog lights.
Access to these lights is gained by pulling
the 5 fins E-fig. 31outwards.
fig. 29F0T0099m
fig. 30F0T0100mfig. 32F0T0102m
fig. 31F0T0101m
123-154 Fiorino GB 1ed:123-154 Fiorino GB 1ed 3-12-2009 15:33 Pagina 140
Page 142 of 210

141
SAFETY
MAINTENANCE
AND CARE
TECHNICAL
SPECIFICATIONS
INDEX
DASHBOARDAND CONTROLS
STARTING
AND DRIVING
WARNING
LIGHTS AND
MESSAGES
IN AN
EMERGENCY
3rdSTOP LIGHTS fig. 33
To replace the 3
rdstop lights you must
contact the Fiat Dealership.
fig. 33F0T0103mfig. 34F0T0104mfig. 35F0T0105m
PLATE LIGHTS
To replace the bulbs A-fig. 34proceed as
follows:
❒pull the tongues indicated by the arrows
and remove the bulb holders;
❒turn the bulb holder B-fig. 35clock-
wise and take the bulb Cout.
123-154 Fiorino GB 1ed:123-154 Fiorino GB 1ed 3-12-2009 15:33 Pagina 141
Page 143 of 210
142
SAFETY
MAINTENANCE
AND CARE
TECHNICAL
SPECIFICATIONS
INDEX
DASHBOARDAND CONTROLS
STARTING
AND DRIVING
WARNING
LIGHTS AND
MESSAGES
IN AN
EMERGENCY
IF THE INTERIOR
LIGHT BURNS OUT
For the type of bulb and power rating, see
“When needing to change a bulb”.
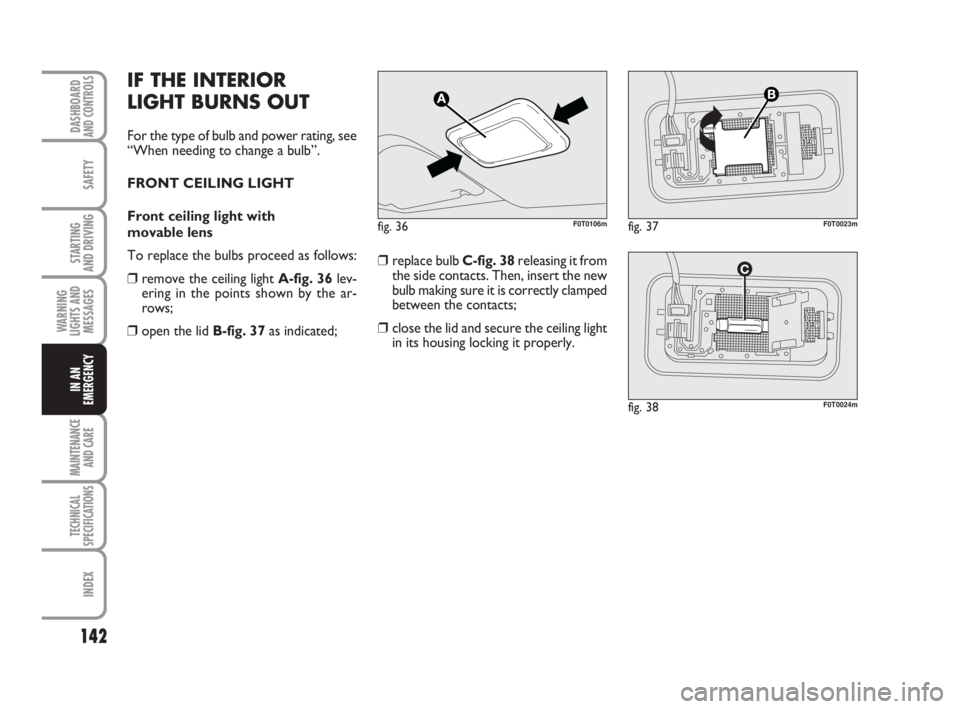
FRONT CEILING LIGHT
Front ceiling light with
movable lens
To replace the bulbs proceed as follows:
❒remove the ceiling light A-fig. 36lev-
ering in the points shown by the ar-
rows;
❒open the lid B-fig. 37as indicated;❒replace bulb C-fig. 38releasing it from
the side contacts. Then, insert the new
bulb making sure it is correctly clamped
between the contacts;
❒close the lid and secure the ceiling light
in its housing locking it properly.
fig. 36F0T0106mfig. 37F0T0023m
fig. 38F0T0024m
123-154 Fiorino GB 1ed:123-154 Fiorino GB 1ed 3-12-2009 15:33 Pagina 142
Page 144 of 210
143
SAFETY
MAINTENANCE
AND CARE
TECHNICAL
SPECIFICATIONS
INDEX
DASHBOARDAND CONTROLS
STARTING
AND DRIVING
WARNING
LIGHTS AND
MESSAGES
IN AN
EMERGENCY
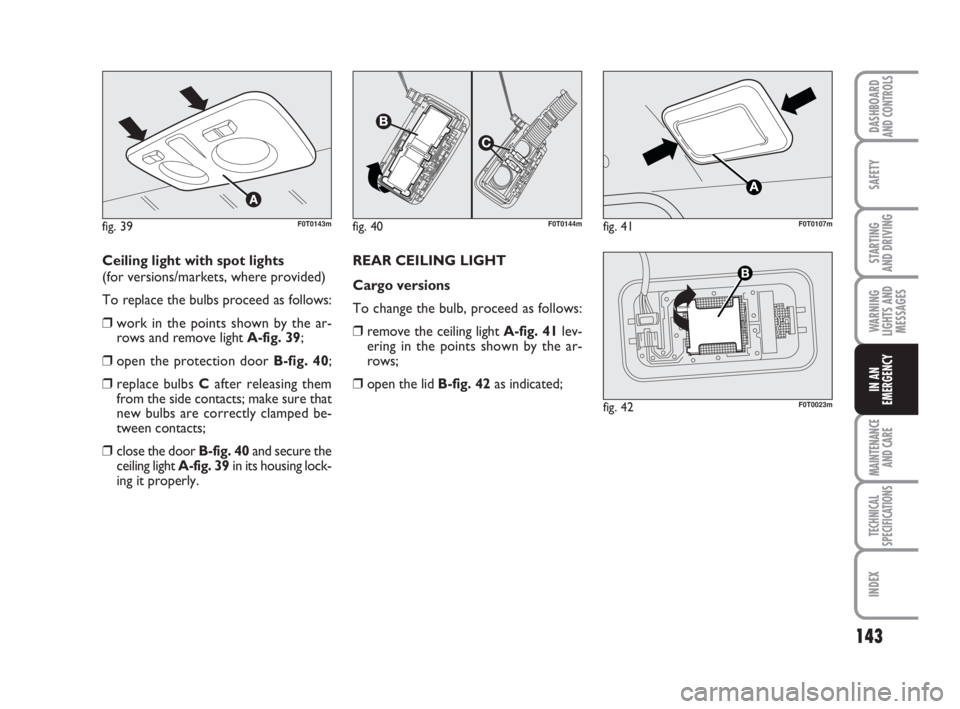
Ceiling light with spot lights
(for versions/markets, where provided)
To replace the bulbs proceed as follows:
❒work in the points shown by the ar-
rows and remove light A-fig. 39;
❒open the protection door B-fig. 40;
❒replace bulbs Cafter releasing them
from the side contacts; make sure that
new bulbs are correctly clamped be-
tween contacts;
❒close the door B-fig. 40and secure the
ceiling light A-fig. 39in its housing lock-
ing it properly.REAR CEILING LIGHT
Cargo versions
To change the bulb, proceed as follows:
❒remove the ceiling light A-fig. 41lev-
ering in the points shown by the ar-
rows;
❒open the lid B-fig. 42as indicated;
fig. 39F0T0143mfig. 40F0T0144mfig. 41F0T0107m
fig. 42F0T0023m
123-154 Fiorino GB 1ed:123-154 Fiorino GB 1ed 3-12-2009 15:33 Pagina 143