FIAT FREEMONT 2011 Owner handbook (in English)
Manufacturer: FIAT, Model Year: 2011, Model line: FREEMONT, Model: FIAT FREEMONT 2011Pages: 267, PDF Size: 5.16 MB
Page 131 of 267
WARNING!
Drivers must be careful when backing
up even when using the ParkSense
®
Rear Park Assist system. Always check carefully
behind your vehicle, look behind you, and be sure
to check for pedestrians, animals, other vehicles,
obstructions, and blind spots before backing up.
You are responsible for safety and must continue
to pay attention to your surroundings. Failure to
do so can result in serious injury or death.
Before using the ParkSense
®Rear Park Assist
system, it is strongly recommended that the ball
mount and hitch ball assembly is disconnected
from the vehicle when the vehicle is not used for
towing. Failure to do so can result in injury or
damage to vehicles or obstacles because the
hitch ball will be much closer to the obstacle than
the rear fascia when the warning display turns on
the single flashing arc and sounds the continuous
tone. Also, the sensors could detect the ball
mount and hitch ball assembly, depending on its
size and shape, giving a false indication that an
obstacle is behind the vehicle. PARKVIEW® REAR BACK UP
CAMERA — IF EQUIPPED
Your vehicle may be equipped with the ParkView
®
Rear Back Up Camera that allows you to see an
on-screen image of the rear surroundings of your
vehicle whenever the shift lever is put into REVERSE.
The image will be displayed on the radio touchscreen
display along with a caution note to “check entire
surroundings” across the top of the screen. After five
seconds this note will disappear. The ParkView
®cam-
era is located on the rear of the vehicle above the rear
License plate.
When the vehicle is shifted out of REVERSE, the rear
camera mode is exited and the navigation or audio
screen appears again.
When displayed, static grid lines will illustrate the
width of the vehicle while a dashed center-line will
indicate the center of the vehicle to assist with parking
or aligning to a hitch/receiver. The static grid lines will
show separate zones that will help indicate the dis-
tance to the rear of the vehicle. The following table
shows the approximate distances for each zone:
Zone Distance to the rear of the vehicle
Red 0 - 30 cm
Yellow 30 cm - 1 m
Green 1 m or greater
124
KNOWING YOUR
VEHICLE
SAFETY
STARTING AND
DRIVING
WARNING
LIGHTS AND
MESSAGES
IN AN
EMERGENCY
SERVICING AND
CARETECHNICAL
SPECIFICATIONSCONTENTS
Page 132 of 267
WARNING!
Drivers must be careful when backing up
even when using the ParkView
®
Rear
Back Up Camera. Always check carefully behind
your vehicle, and be sure to check for pedestri-
ans, animals, other vehicles, obstructions, or blind
spots before backing up. You are responsible for
the safety of your surroundings and must con-
tinue to pay attention while backing up. Failure
to do so can result in serious injury or death.
To avoid vehicle damage, ParkView
®
should only be used as a parking aid.The
ParkView
®camera is unable to view ev-
ery obstacle or object in your drive path.
To avoid vehicle damage, the vehicle must be
driven slowly when using ParkView
®to be able to
stop in time when an obstacle is seen. It is recom-
mended that the driver look frequently over his/
her shoulder when using ParkView®. NOTE:
If snow, ice, mud, or any foreign substance
builds up on the camera lens, clean the lens, rinse with
water, and dry with a soft cloth. Do not cover the lens.
TURNING PARKVIEW
®ON OR OFF —
WITH TOUCH SCREEN RADIO
1. Turn the Radio on.
2. Press the “More” soft-key.
3. Press the “Settings” soft-key.
4. Press the “Safety & Driving Assistance” soft-key.
5. Press the check box soft key next to “Parkview
®
Backup Camera” to enable/disable.
125
KNOWING
YOURVEHICLESAFETY
STARTING ANDDRIVING
WARNING
LIGHTS AND
MESSAGES
IN AN
EMERGENCY
SERVICING AND
CARETECHNICAL
SPECIFICATIONSCONTENTS
Page 133 of 267
SOUND SYSTEMS
Refer to your Uconnect Touch™ User Manual.NAVIGATION SYSTEM — IF EQUIPPED
Refer to your Navigation User's Manual.
126
KNOWING YOUR
VEHICLE
SAFETY
STARTING AND
DRIVING
WARNING
LIGHTS AND
MESSAGES
IN AN
EMERGENCY
SERVICING AND
CARETECHNICAL
SPECIFICATIONSCONTENTS
Page 134 of 267

STEERING WHEEL AUDIO
CONTROLS — IF EQUIPPED
The remote sound system controls are located on the
rear surface of the steering wheel. The left and right-
hand controls are rocker-type switches with a pushbut-
ton in the center of each switch. Reach behind the
steering wheel to access the switches. (fig. 108)
RIGHT-HAND SWITCH FUNCTIONS
• Press the top of the switch to increase the volume.
• Press the bottom of the switch to decrease thevolume.
• Press the button in the center of the switch to change modes (i.e., AM, FM, etc.). LEFT-HAND SWITCH FUNCTIONS FOR
RADIO OPERATION
• Press the top of the switch to SEEK the next listen-
able station up from the current setting.
• Press the bottom of the switch to SEEK the next listenable station down from the current setting.
• Press the button in the center of the switch to tune to the next preset that you have programmed.
LEFT-HAND SWITCH FUNCTIONS FOR
MEDIA (I.E., CD) OPERATION
• Press the top of the switch once to listen to the next track.
• Press the bottom of the switch once either to listen to the beginning of the current track or to listen to
the beginning of the previous track if it is within one
second after the current track begins to play.
• Press the switch up or down twice to listen to the second track, three times to listen to the third track,
and so forth.
• Press the button located in the center of the switch to change to the next preset that you have
programmed.(fig. 108)Remote Sound Controls (Back View Of Steering Wheel) 127
KNOWING
YOURVEHICLESAFETY
STARTING ANDDRIVING
WARNING
LIGHTS AND
MESSAGES
IN AN
EMERGENCY
SERVICING AND
CARETECHNICAL
SPECIFICATIONSCONTENTS
Page 135 of 267
VIDEO ENTERTAINMENT SYSTEM
(VES)™ — IF EQUIPPED
The optional Video Entertainment System (VES)™
includes the following components for rear seat enter-
tainment:
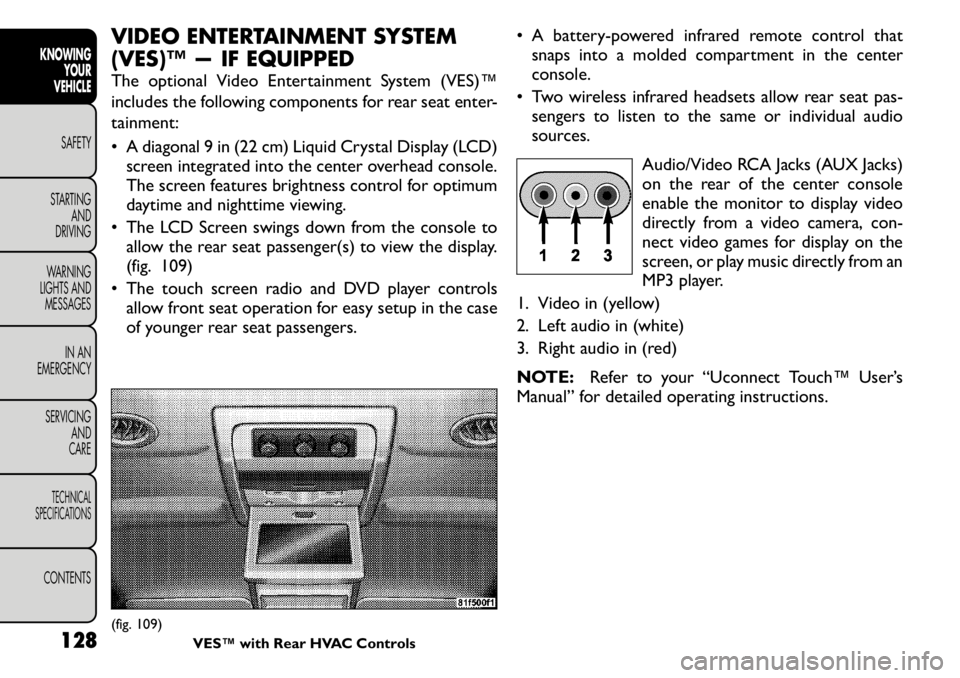
• A diagonal 9 in (22 cm) Liquid Crystal Display (LCD)screen integrated into the center overhead console.
The screen features brightness control for optimum
daytime and nighttime viewing.
• The LCD Screen swings down from the console to allow the rear seat passenger(s) to view the display.
(fig. 109)
• The touch screen radio and DVD player controls allow front seat operation for easy setup in the case
of younger rear seat passengers. • A battery-powered infrared remote control that
snaps into a molded compartment in the center
console.
• Two wireless infrared headsets allow rear seat pas- sengers to listen to the same or individual audio
sources.
Audio/Video RCA Jacks (AUX Jacks)
on the rear of the center console
enable the monitor to display video
directly from a video camera, con-
nect video games for display on the
screen, or play music directly from an
MP3 player.
1. Video in (yellow)
2. Left audio in (white)
3. Right audio in (red)
NOTE: Refer to your “Uconnect Touch™ User’s
Manual” for detailed operating instructions.(fig. 109) VES™ with Rear HVAC Controls
128
KNOWINGYOUR
VEHICLE
SAFETY
STARTING AND
DRIVING
WARNING
LIGHTS AND
MESSAGES
IN AN
EMERGENCY
SERVICING AND
CARETECHNICAL
SPECIFICATIONSCONTENTS
Page 136 of 267
iPod®/USB/MP3 CONTROL — IF EQUIPPED
This feature allows an iPod
®or external USB device to
be plugged into the USB port.
iPod
®
control supports Mini, 4G, Photo, Nano, 5G
iPod
®
and iPhone
®
devices. Some iPod
®
software
versions may not fully support the iPod®
control
features. Please visit Apple’s website for software up-
dates.
For further information, refer to the Uconnect
Touch™ User’s Manual. CD/DVD DISC MAINTENANCE
To keep a CD/DVD in good condition, take the follow-
ing precautions:
1. Handle the disc by its edge; avoid touching the
surface.
2. If the disc is stained, clean the surface with a soft cloth, wiping from center to edge.
3. Do not apply paper or tape to the disc; avoid scratching the disc.
4. Do not use solvents such as benzene, thinner, clean- ers, or anti-static sprays.
5. Store the disc in its case after playing.
6. Do not expose the disc to direct sunlight.
7. Do not store the disc where temperatures may become too high.
NOTE: If you experience difficulty in playing a par-
ticular disc, it may be damaged (i.e., scratched, reflec-
tive coating removed, a hair, moisture or dew on the
disc) oversized, or have protection encoding. Try a
known good disc before considering disc player ser-
vice.
129
KNOWING
YOURVEHICLESAFETY
STARTING ANDDRIVING
WARNING
LIGHTS AND
MESSAGES
IN AN
EMERGENCY
SERVICING AND
CARETECHNICAL
SPECIFICATIONSCONTENTS
Page 137 of 267
RADIO OPERATION AND MOBILE PHONES
Under certain conditions, the mobile phone being on in
your vehicle can cause erratic or noisy performance
from your radio. This condition may be lessened or
eliminated by relocating the mobile phone antenna.
This condition is not harmful to the radio. If your radio
performance does not satisfactorily “clear” by the
repositioning of the antenna, it is recommended that
the radio volume be turned down or off during mobile
phone operation when not using Uconnect™ (ifequipped).ADDING FUEL
LOCKING FUEL FILLER CAP (GAS CAP)
The locking gas cap is behind the fuel filler door, on the
left side of the vehicle. If the gas cap is lost or damaged,
be sure the replacement cap is for use with this vehicle.
1. Turn off the engine.
2. Insert the ignition key into the fuel cap and turn the
key one-quarter turn to the right, then rotate the
fuel cap to the left to remove.
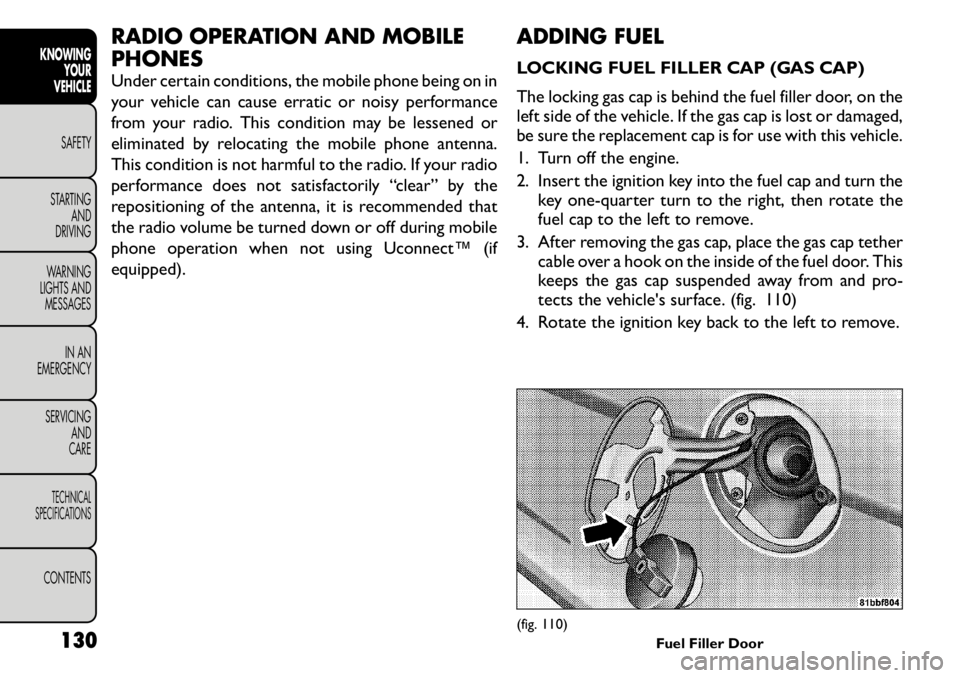
3. After removing the gas cap, place the gas cap tether cable over a hook on the inside of the fuel door. This
keeps the gas cap suspended away from and pro-
tects the vehicle's surface. (fig. 110)
4. Rotate the ignition key back to the left to remove.
(fig. 110) Fuel Filler Door
130
KNOWING
YOUR
VEHICLE
SAFETY
STARTING AND
DRIVING
WARNING
LIGHTS AND
MESSAGES
IN AN
EMERGENCY
SERVICING AND
CARETECHNICAL
SPECIFICATIONSCONTENTS
Page 138 of 267
5. To replace the cap, insert it into the filler neck andtighten to the right until at least three clicks are
heard.
Damage to the fuel system or emission
control system could result from using an
improper fuel tank filler tube cap (gas
cap).
A poorly fitting gas cap could let impurities into
the fuel system.
A poorly fitting gas cap may cause the “Mal-
function Indicator Light” to turn on.
To avoid fuel spillage and overfilling, do not “top
off ” the fuel tank after filling. When the fuel
nozzle “clicks” or shuts off, the fuel tank is full.
NOTE: When the fuel nozzle “clicks” or shuts off,
the fuel tank is full.
WARNING!
The volatility of some gasoline may
cause a buildup of pressure in the fuel
tank that may increase while you drive. This
pressure can result in a spray of gasoline and/or
vapors when the cap is removed from a hot
vehicle. Removing the cap slowly allows the pres-
sure to vent and prevents fuel spray.
(Continued)(Continued)
Remove the fuel cap (gas cap) slowly to prevent
fuel spray from the filler neck which may cause
injury.
Never have any smoking materials lit in or near
the vehicle when the fuel cap is removed or the
tank is being filled.
Never add fuel to the vehicle when the engine is
running.
A fire may result if gasoline is pumped into a
portable container that is inside of a vehicle.You
could be burned. Always place gas containers on
the ground while filling.
LOOSE FUEL FILLER CAP MESSAGE
If the vehicle diagnostic system determines that the
fuel filler cap is loose, improperly installed, or damaged,
the word “gASCAP” will display in the odometer. If this
occurs, tighten the fuel filler cap until a “clicking” sound
is heard and press the TRIP ODOMETER button to
turn off the message. If the problem persists, the
message will appear the next time the vehicle is
started.
131
KNOWING
YOURVEHICLESAFETY
STARTING ANDDRIVING
WARNING
LIGHTS AND
MESSAGES
IN AN
EMERGENCY
SERVICING AND
CARETECHNICAL
SPECIFICATIONSCONTENTS
Page 139 of 267
SAFETY
OCCUPANT RESTRAINTS
Some of the most important safety features in your
vehicle are the restraint systems:
• Three-point lap and shoulder belts for all seating positions
• Advanced Front Air Bags for driver and front passen- ger
• Supplemental Active Head Restraints (AHR) located on top of the front seats (integrated into the head
restraint)
• Supplemental Side Air Bag Inflatable Curtains (SABIC) that span the front, second, and third row
seating for the driver and passengers seated next to
a window
• Supplemental Seat-Mounted Side Air Bags
• An energy-absorbing steering column and steering wheel
• Knee bolsters/blockers for front seat occupants
• Front seat belts incorporate pretensioners that may enhance occupant protection by managing occupant
energy during an impact event
• All seat belt systems (except the driver’s) include Automatic Locking Retractors (ALRs), which lock
the seat belt webbing into position by extending the
belt all the way out and then adjusting the belt to the
desired length to restrain a child seat or secure a
large item in a seat — if equipped If you will be carrying children too small for adult-sized
seat belts, the seat belts or ISOFIX feature also can be
used to hold infant and child restraint systems. For
more information, refer to ISOFIX — Child Seat An-
chorage System.
NOTE:
The Advanced Front Air Bags have a multi-
stage inflator design. This allows the air bag to have
different rates of inflation based on the severity and
type of collision.
Please pay close attention to the information in this
section. It tells you how to use your restraint system
properly, to keep you and your passengers as safe as
possible.
WARNING!
In an accident , you and your passengers
can suffer much greater injuries if you
are not properly buckled up. You can strike the
interior of your vehicle or other passengers, or
you can be thrown out of the vehicle. Always be
sure you and others in your vehicle are buckled
up properly.
Buckle up even though you are an excellent driver, even
on short trips. Someone on the road may be a poor
driver and cause an accident that includes you. This can
happen far away from home or on your own street.
132
KNOWING YOUR
VEHICLESAFETYSTARTING AND
DRIVING
WARNING
LIGHTS AND
MESSAGES
IN AN
EMERGENCY
SERVICING AND
CARETECHNICAL
SPECIFICATIONSCONTENTS
Page 140 of 267
Research has shown that seat belts save lives, and they
can reduce the seriousness of injuries in an accident.
Some of the worst injuries happen when people are
thrown from the vehicle. Seat belts reduce the possi-
bility of ejection and the risk of injury caused by striking
the inside of the vehicle. Everyone in a motor vehicle
should be belted at all times.
LAP/SHOULDER BELTS
All seating positions in your vehicle are equipped with
a combination lap/shoulder belts.
The belt webbing retractor is designed to lock during
very sudden stops or impacts. This feature allows the
shoulder part of the belt to move freely with you under
normal conditions. However, in an accident, the belt
will lock and reduce your risk of striking the inside of
the vehicle or being thrown out.
WARNING!
It is dangerous to ride in a cargo area,
inside or outside of a vehicle. In an acci-
dent , people riding in these areas are more likely
to be seriously injured or killed.
Do not allow people to ride in any area of your
vehicle that is not equipped with seats and seat
belts.
Be sure everyone in your vehicle is in a seat and
using a seat belt properly.
(Continued)(Continued)
No modifications or additions should be made
by the user, which will either prevent the seat belt
adjusting devices from operating to remove
slack, or prevent the seat belt assembly from
being adjusted to remove slack.
Seat belts are designed to bear upon the bony
structure of the body, and should be worn low
across the front of the pelvis or the pelvis, chest
and shoulders, as applicable; wearing the lap
section of the belt across the abdominal area
must be avoided.
Seat belts should be adjusted as firmly as pos-
sible, consistent with comfort , to provide the
protection for which they have been designed. A
slack belt will greatly reduce the protection af-
forded to the wearer.
Each belt assembly must only be used by one
occupant ; it is dangerous to put a belt around a
child being carried on an occupant's lap.
Two people should never be belted into a single
seat belt . People belted together can crash into
one another in an accident , hurting one another
badly. Never use a lap/shoulder belt or a lap belt
for more than one person, no matter what their
size.
Belts should not be worn with straps twisted.
(Continued)
133
KNOWING
YOURVEHICLESAFETYSTARTING ANDDRIVING
WARNING
LIGHTS AND
MESSAGES
IN AN
EMERGENCY
SERVICING AND
CARETECHNICAL
SPECIFICATIONSCONTENTS