stop start FIAT FREEMONT 2011 Owner handbook (in English)
[x] Cancel search | Manufacturer: FIAT, Model Year: 2011, Model line: FREEMONT, Model: FIAT FREEMONT 2011Pages: 267, PDF Size: 5.16 MB
Page 53 of 267
WARNING!
Do not place items over the top of the
Active Head Restraint , such as coats,
seat covers or portable DVD players.These items
may interfere with the operation of the Active
Head Restraint in the event of a collision and
could result in serious injury or death.
Active Head Restraints may be deployed if they
are struck by an object such as a hand, foot or
loose cargo. To avoid accidental deployment of
the Active Head Restraint ensure that all cargo is
secured, as loose cargo could contact the Active
Head Restraint during sudden stops. Failure to
follow this warning could cause personal injury if
the Active Head Restraint is deployed.
Head Restraints — Second Row Seats
The rear seats are equipped with adjustable head re-
straints. To raise the head restraint, pull upward on the
head restraint. To lower the head restraint, press the
adjustment button, located on the base of the head
restraint, and push downward on the head restraint.
(fig. 27)
NOTE:
• The head restraints should only be removed by
qualified technicians, for service purposes only. If any of
the head restraints require removal, see your autho-
rized dealer. • For proper routing of a Child Seat Tether, refer to
“Occupant Restraints” in “Safety”.
WARNING!
Driving a vehicle with the head re-
straints removed or improperly adjusted
could cause serious injury or death in the event of
a collision.The head restraints should be checked
prior to operating the vehicle and never adjusted
while the vehicle is in motion.
THIRD ROW PASSENGER SEATS — SEVEN
PASSENGER MODELS
These head restraints are non-adjustable and non-
removable. However, you can fold them forward when
they are not in use by passengers.
(fig. 27) Adjustment Button
46
KNOWING
YOUR
VEHICLE
SAFETY
STARTING AND
DRIVING
WARNING
LIGHTS AND
MESSAGES
IN AN
EMERGENCY
SERVICING AND
CARETECHNICAL
SPECIFICATIONSCONTENTS
Page 94 of 267
POWER SUNROOF — IF EQUIPPED
The power sunroof switch is located between the sun
visors on the overhead console. (fig. 80)
WARNING!
Never leave children in a vehicle with
the key in the ignition switch. Occu-
pants, particularly unattended children, can be-
come entrapped by the power sunroof while op-
erating the power sunroof switch. Such
entrapment may result in serious injury or death.
(Continued)(Continued)
In a collision, there is a greater risk of being
thrown from a vehicle with an open sunroof.You
could also be seriously injured or killed. Always
fasten your seat belt properly and make sure all
passengers are also properly secured.
Do not allow small children to operate the
sunroof. Never allow your fingers, other body
parts, or any object to project through the sun-
roof opening. Injury may result .
OPENING SUNROOF — EXPRESS
Press the switch rearward and release it within one-half
second and the sunroof will open automatically from
any position. The sunroof will open fully and stop
automatically. This is called “Express Open”. During
Express Open operation, any movement of the sunroof
switch will stop the sunroof.
OPENING SUNROOF — MANUAL MODE
To open the sunroof, press and hold the switch rear-
ward to full open. Any release of the switch will stop
the movement and the sunroof will remain in a partially
opened condition until the switch is pushed and held
rearward again.
(fig. 80) Power Sunroof Switch 87
KNOWING
YOURVEHICLESAFETY
STARTING ANDDRIVING
WARNING
LIGHTS AND
MESSAGES
IN AN
EMERGENCY
SERVICING AND
CARETECHNICAL
SPECIFICATIONSCONTENTS
Page 95 of 267
CLOSING SUNROOF — EXPRESS
Press the switch forward and release it within one-half
second and the sunroof will close automatically from
any position. The sunroof will close fully and stop
automatically. This is called “Express Close”. During
Express Close operation, any movement of the switch
will stop the sunroof.
CLOSING SUNROOF — MANUAL MODE
To close the sunroof, press and hold the switch in the
forward position. Any release of the switch will stop
the movement and the sunroof will remain in a partially
closed condition until the switch is pushed and held
forward again.
PINCH PROTECT FEATURE
This feature will detect an obstruction in the opening
of the sunroof during Express Close operation. If an
obstruction is detected, the sunroof will automatically
retract. Remove the obstruction if this occurs. Next,
press the switch forward and release to Express Close.
NOTE:If three consecutive sunroof close attempts
result in Pinch Protect reversals, the fourth close at-
tempt will be a Manual Close movement with Pinch
Protect disabled.
PINCH PROTECT OVERRIDE
If a known obstruction (ice, debris, etc.) prevents
closing the sunroof, press the switch forward and hold
for two seconds after the reversal occurs. This allows
the sunroof to move toward the closed position. NOTE:
Pinch protection is disabled while the switch
is pressed.
VENTING SUNROOF — EXPRESS
Press and release the “Vent” button, and the sunroof
will open to the vent position. This is called “Express
Vent”, and will occur regardless of sunroof position.
During Express Vent operation, any movement of the
switch will stop the sunroof.
SUNSHADE OPERATION
The sunshade can be opened manually. However, the
sunshade will open automatically as the sunroof opens.
NOTE: The sunshade cannot be closed if the sunroof
is open.
WIND BUFFETING
Wind buffeting can be described as the perception of
pressure on the ears or a helicopter-type sound in the
ears. Your vehicle may exhibit wind buffeting with the
windows down, or the sunroof (if equipped) is in
certain open or partially open positions. This is a
normal occurrence and can be minimized. If the buffet-
ing occurs with the rear windows open, open the front
and rear windows together to minimize the buffeting. If
the buffeting occurs with the sunroof open, adjust the
sunroof opening to minimize the buffeting or open any
window.
88
KNOWING YOUR
VEHICLE
SAFETY
STARTING AND
DRIVING
WARNING
LIGHTS AND
MESSAGES
IN AN
EMERGENCY
SERVICING AND
CARETECHNICAL
SPECIFICATIONSCONTENTS
Page 103 of 267

WINDOWS
POWER WINDOWS
The window controls on the driver's door trim panel
control all of the door windows. (fig. 89)
There are single window controls on each passenger
door trim panel, which operate the passenger door
windows. The window controls will operate when the
ignition is in the ON/RUN or ACC position.
NOTE:For vehicles equipped with the Uconnect
Touch™, the power window switches will remain ac-
tive for up to 10 minutes after the ignition is cycled to
the OFF position. Opening either front door will cancel
this feature. The time is programmable. Refer to
“Uconnect Touch™ Settings” in “Knowing Your Ve-
hicle” for further information.
WARNING!
Never leave children in a vehicle with
the Key Fob. Occupants, particularly un-
attended children, can become entrapped by the
windows while operating the power window
switches. Such entrapment may result in serious
injury or death.
Auto-Down Feature
The driver's power window switch has an Auto-down
feature. Press the window switch past the first detent,
release, and the window will go down automatically.
To open the window part way, press the window
switch to the first detent and release it when you want
the window to stop.
To stop the window from going all the way down during
the Auto-down operation, pull up on the switch briefly.
Auto-Up Feature With Anti-Pinch Protection
— If Equipped
On some models, the driver's and front passenger's
power window switch has an Auto-up feature. Pull the
window switch up to the second detent, release, and
the window will go up automatically.
To stop the window from going all the way up during
the Auto-up operation, push down on the switch
briefly.
(fig. 89) Power Window Switches
96
KNOWING
YOUR
VEHICLE
SAFETY
STARTING AND
DRIVING
WARNING
LIGHTS AND
MESSAGES
IN AN
EMERGENCY
SERVICING AND
CARETECHNICAL
SPECIFICATIONSCONTENTS
Page 104 of 267
To close the window part way, pull the window switch
up to the first detent and release it when you want the
window to stop.
NOTE:
• If the window runs into any obstacle during Auto-
closure, it will reverse direction and then go back
down. Remove the obstacle and use the window switch
again to close the window.
• Any impact due to rough road conditions may trigger
the auto-reverse function unexpectedly during auto-
closure. If this happens, pull the switch lightly to the
first detent and hold to close window manually.
WARNING!
There is no anti-pinch protection when
the window is almost closed. To avoid
personal injury, be sure to clear your arms, hands,
fingers, and objects from the window path before
closing the window. Such entrapment may result
in serious injury.
Reset
It may be necessary at some point in time to reactivate
the Auto-up/Auto-down feature. To do so, perform
the following steps:
1. Pull the window switch up to close the window completely and continue to hold the switch up for
an additional two seconds after the window isclosed. 2. Push the window switch down firmly to the second
detent to open the window completely and con-
tinue to hold the switch down for an additional two
seconds after the window is fully open.
Window Lockout Switch
The window lockout switch on the driver's door trim
panel allows you to disable the window control on the
other doors. To disable the window controls, press and
release the window lockout button (setting it in the
down position). To enable the window controls, press
and release the window lockout button again (setting it
in the up position). (fig. 90)
(fig. 90) Window Lockout Switch 97
KNOWING
YOURVEHICLESAFETY
STARTING ANDDRIVING
WARNING
LIGHTS AND
MESSAGES
IN AN
EMERGENCY
SERVICING AND
CARETECHNICAL
SPECIFICATIONSCONTENTS
Page 107 of 267
CARGO MANAGEMENT SYSTEM
FIVE PASSENGER SYSTEM FEATURES
• A raised load floor that sits on top of a large built-instorage bin.
• A tri-fold door built into the load floor that allows easy access to items in the built-in storage bin.
• 60/40 split second-row passenger seats with fold flat feature, which allows for extended cargo space. Re-
fer to “Seats” for further information.
• An optional front passenger seat with fold flat fea- ture, which extends cargo space even further. Refer
to “Seats” for further information.
• Cargo tie-downs.
• A retractable cargo area cover (if equipped). SEVEN PASSENGER SYSTEM FEATURES
• A large built-in storage bin with a hinged hardcover
located in the floor behind the third-row passenger seats.
• 60/40 split second-row passenger seats with fold flat feature, which allows for extended cargo space. Re-
fer to “Seats” in “Understanding The Features of
Your Vehicle” for further information.
• 50/50 split third-row passenger seats with fold flat feature, which allows for extended cargo space. Re-
fer to “Seats” for further information.
• An optional front passenger seat with fold flat fea- ture, which extends cargo space even further. Refer
to “Seats” for further information.
• Cargo tie-downs.
CARGO TIE-DOWNS
WARNING!
Cargo tie-downs are not safe anchors for
a child seat tether strap. In a sudden stop
or collision, a tie-down could pull loose and allow
the child seat to come loose. A child could be
badly injured. Use only the anchors provided for
child seat tethers.
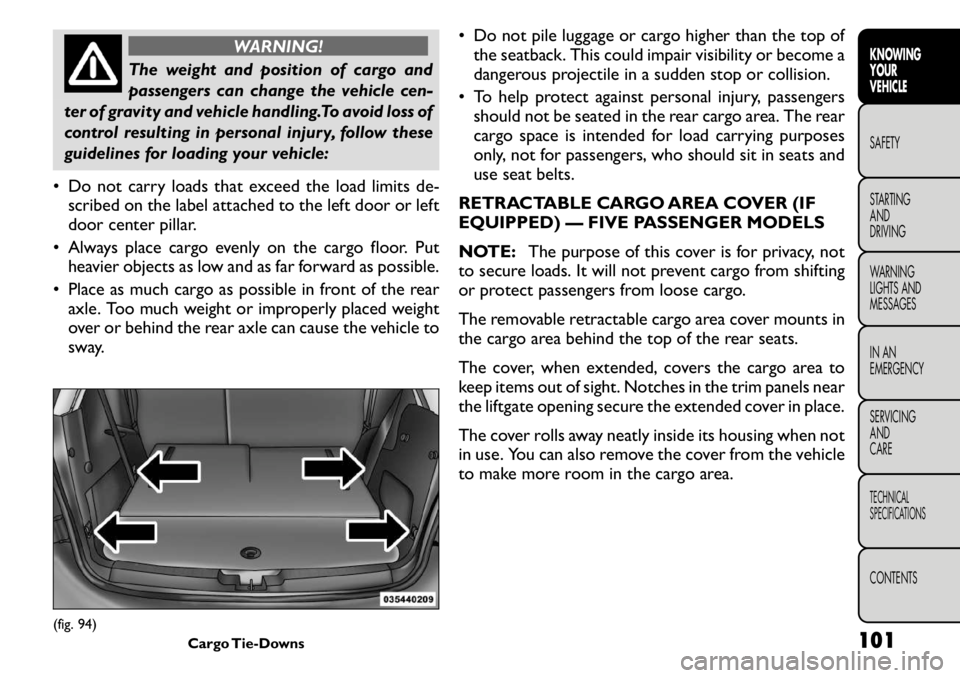
Cargo tie-downs are located on both rear trim panels.
These tie-downs should be used to secure loads safely
when the vehicle is moving. (fig. 94)
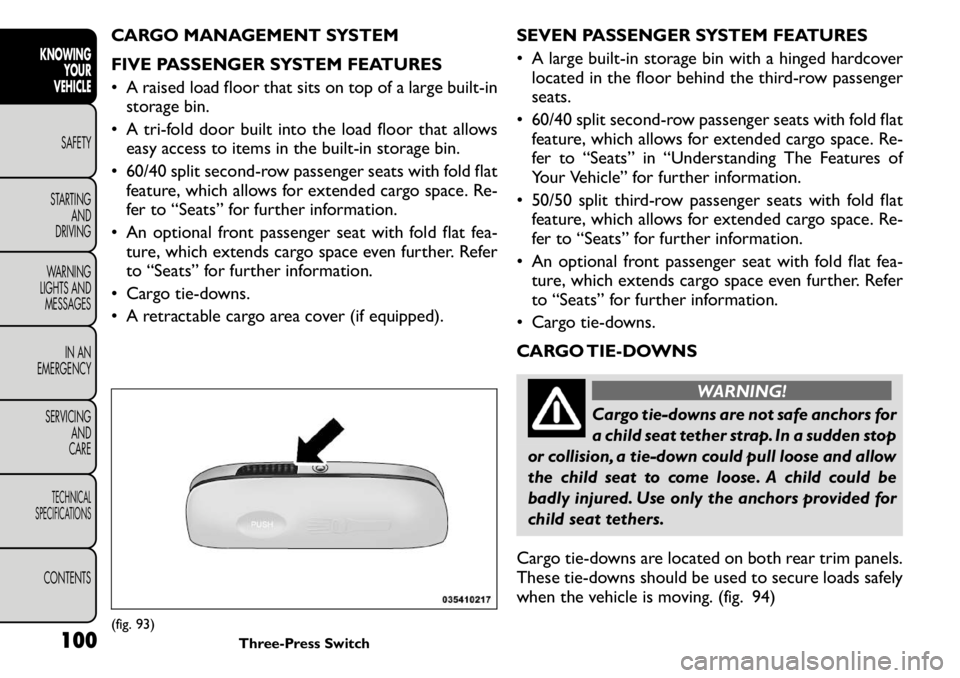
(fig. 93) Three-Press Switch
100
KNOWING
YOUR
VEHICLE
SAFETY
STARTING AND
DRIVING
WARNING
LIGHTS AND
MESSAGES
IN AN
EMERGENCY
SERVICING AND
CARETECHNICAL
SPECIFICATIONSCONTENTS
Page 108 of 267
WARNING!
The weight and position of cargo and
passengers can change the vehicle cen-
ter of gravity and vehicle handling.To avoid loss of
control resulting in personal injury, follow these
guidelines for loading your vehicle:
• Do not carry loads that exceed the load limits de- scribed on the label attached to the left door or left
door center pillar.
• Always place cargo evenly on the cargo floor. Put heavier objects as low and as far forward as possible.
• Place as much cargo as possible in front of the rear axle. Too much weight or improperly placed weight
over or behind the rear axle can cause the vehicle to
sway. • Do not pile luggage or cargo higher than the top of
the seatback. This could impair visibility or become a
dangerous projectile in a sudden stop or collision.
• To help protect against personal injury, passengers should not be seated in the rear cargo area. The rear
cargo space is intended for load carrying purposes
only, not for passengers, who should sit in seats and
use seat belts.
RETRACTABLE CARGO AREA COVER (IF
EQUIPPED) — FIVE PASSENGER MODELS
NOTE: The purpose of this cover is for privacy, not
to secure loads. It will not prevent cargo from shifting
or protect passengers from loose cargo.
The removable retractable cargo area cover mounts in
the cargo area behind the top of the rear seats.
The cover, when extended, covers the cargo area to
keep items out of sight. Notches in the trim panels near
the liftgate opening secure the extended cover in place.
The cover rolls away neatly inside its housing when not
in use. You can also remove the cover from the vehicle
to make more room in the cargo area.
(fig. 94) Cargo Tie-Downs 101
KNOWING
YOURVEHICLESAFETY
STARTING ANDDRIVING
WARNING
LIGHTS AND
MESSAGES
IN AN
EMERGENCY
SERVICING AND
CARETECHNICAL
SPECIFICATIONSCONTENTS
Page 109 of 267
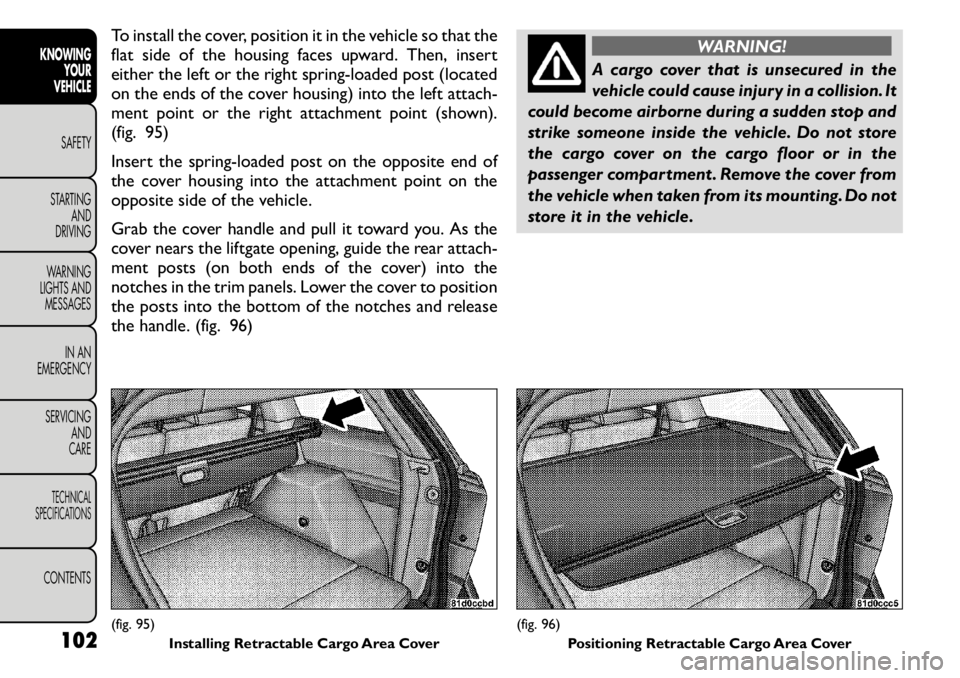
To install the cover, position it in the vehicle so that the
flat side of the housing faces upward. Then, insert
either the left or the right spring-loaded post (located
on the ends of the cover housing) into the left attach-
ment point or the right attachment point (shown).
(fig. 95)
Insert the spring-loaded post on the opposite end of
the cover housing into the attachment point on the
opposite side of the vehicle.
Grab the cover handle and pull it toward you. As the
cover nears the liftgate opening, guide the rear attach-
ment posts (on both ends of the cover) into the
notches in the trim panels. Lower the cover to position
the posts into the bottom of the notches and release
the handle. (fig. 96)
WARNING!
A cargo cover that is unsecured in the
vehicle could cause injury in a collision. It
could become airborne during a sudden stop and
strike someone inside the vehicle. Do not store
the cargo cover on the cargo floor or in the
passenger compartment . Remove the cover from
the vehicle when taken from its mounting. Do not
store it in the vehicle.
(fig. 95) Installing Retractable Cargo Area Cover
(fig. 96)Positioning Retractable Cargo Area Cover
102
KNOWING
YOUR
VEHICLE
SAFETY
STARTING AND
DRIVING
WARNING
LIGHTS AND
MESSAGES
IN AN
EMERGENCY
SERVICING AND
CARETECHNICAL
SPECIFICATIONSCONTENTS
Page 112 of 267
To avoid damage to the roof rack and
vehicle, do not exceed the maximum roof
rack load capacity of 68 kg. Always dis-
tribute loads as evenly as possible and secure the
load appropriately.
Long loads, which extend over the windshield,
such as wood panels or surfboards, or loads with
large frontal area should be secured to both the
front and rear of the vehicle.
Place a blanket or other protection between
the surface of the roof and the load.
Travel at reduced speeds and turn corners care-
fully when carrying large or heavy loads on the
roof rack. Wind forces, due to natural causes or
nearby truck traffic , can add sudden upward lift
to loads.This is especially true on large flat loads
and may result in damage to the cargo or your
vehicle.
WARNING!
Cargo must be securely tied before driv-
ing your vehicle. Improperly secured
loads can fly off the vehicle, particularly at high
speeds, resulting in personal injury or property
damage. Follow the Roof Rack Cautions when
carrying cargo on your roof rack. BRAKE SYSTEM
Your vehicle is equipped with dual hydraulic
brake systems. If either of the two hydraulic
systems loses normal capability, the remaining system
will still function. However, there will be some loss of
overall braking effectiveness. This will be evident by
increased pedal travel during application and greater
pedal force required to slow or stop the vehicle. In
addition, if the malfunction is caused by a leak in the
hydraulic system, the “Brake System Warning Light”
will turn on as the brake fluid level drops in the master
cylinder.
In the event power assist is lost for any reason (i.e.,
repeated brake applications with the engine OFF) the
brakes will still function. However, the effort required
to brake the vehicle will be much greater than that
required with the power system operating.
WARNING!
Riding the brakes can lead to brake
failure and possibly an accident . Driving
with your foot resting or riding on the brake
pedal can result in abnormally high brake tem-
peratures, excessive lining wear, and possible
brake damage.You wouldn't have your full brak-
ing capacity in an emergency.
(Continued)
105KNOWING
YOURVEHICLESAFETY
STARTING ANDDRIVING
WARNING
LIGHTS AND
MESSAGES
IN AN
EMERGENCY
SERVICING AND
CARETECHNICAL
SPECIFICATIONSCONTENTS
Page 113 of 267
(Continued)
Driving a vehicle with the “Brake System Warn-
ing Light” on is dangerous. A significant decrease
in braking performance or vehicle stability dur-
ing braking may occur. It will take you longer to
stop the vehicle or will make your vehicle harder
to control.You could have an accident . Have the
vehicle checked immediately.
ANTI-LOCK BRAKE SYSTEM (ABS)
This system aids the driver in maintaining vehicle con-
trol under adverse braking conditions. The system
controls hydraulic brake pressure to prevent wheel
lock-up to help avoid skidding on slippery surfaces
during braking. Refer to “Anti-Lock Brake System
(ABS)” under “Knowing Your Vehicle/Electronic Brake
Control System” for further information.
WARNING!
The ABS cannot prevent the natural laws
of physics from acting on the vehicle, nor
can it increase the traction afforded by prevailing
road conditions. ABS cannot prevent accidents,
including those resulting from excessive speed in
turns, driving on very slippery surfaces, or hydro-
planing.The capabilities of an ABS-equipped ve-
hicle must never be exploited in a reckless or
dangerous manner, which could jeopardize the
user's safety or the safety of others. ELECTRONIC BRAKE CONTROL
SYSTEM
Your vehicle is equipped with an advanced electronic
brake control system commonly referred to as ESC.
This system includes Anti-Lock Brake System (ABS),
Brake Assist System (BAS), Traction Control System
(TCS), Electronic Roll Mitigation (ERM), Electronic
Stability Control (ESC), and Trailer Sway Control
(TSC). These systems work together to enhance both
vehicle stability and control in various driving condi-tions.
ANTI-LOCK BRAKE SYSTEM (ABS)
The Anti-Lock Brake System (ABS) provides increased
vehicle stability and brake performance under most
braking conditions. The system automatically “pumps”
the brakes during severe braking conditions to prevent
wheel lock-up.
When the vehicle is driven over 11 km/h, you may also
hear a slight clicking sound as well as some related
motor noises. These noises are the system performing
its self check cycle to ensure that the ABS is working
properly. This self check occurs each time the vehicle is
started and accelerated past 11 km/h.
ABS is activated during braking under certain road or
stopping conditions. ABS-inducing conditions can in-
clude ice, snow, gravel, bumps, railroad tracks, loose
debris, or panic stops.
You also may experience the following when the brake
system goes into Anti-lock:
106
KNOWING
YOUR
VEHICLE
SAFETY
STARTING AND
DRIVING
WARNING
LIGHTS AND
MESSAGES
IN AN
EMERGENCY
SERVICING AND
CARETECHNICAL
SPECIFICATIONSCONTENTS