filter FIAT FREEMONT 2012 Owner handbook (in English)
[x] Cancel search | Manufacturer: FIAT, Model Year: 2012, Model line: FREEMONT, Model: FIAT FREEMONT 2012Pages: 332, PDF Size: 5.61 MB
Page 27 of 332
• Exhaust System — Regeneration Required Now.Under conditions of exclusive short duration and
low speed driving and low speed driving cycles, the
engine and exhaust after-treatment system may
never reach the conditions required to remove the
trapped PM. If this occurs the “Exhaust System Re-
generation Required Now” message will be displayed
on the EVIC. By driving your vehicle at highway
speeds for as little as 30 minutes, you can remedy the
condition in the particulate filter system by allowing
the trapped PM to be removed to restore the system
to normal operating condition.
• Exhaust Service Require — See Dealer Now. The engine will be de-rated to prevent permanent dam-
age to the after-treatment system. If this condition
occurs, it is necessary to have your vehicle serviced
by your local authorized dealer.
EVIC WHITE TELLTALE LIGHTS
This area will show reconfigurable white caution tell-
tales. These telltales include:
Shift Lever Status — Automatic Transmission Only
The shift lever status “P,R,N,D,L,5,4,3,2,1” are dis-
played indicating the shift lever position. Telltales
“5,4,3,2,1” indicate the Autostick™ feature has been
engaged and the gear selected is displayed. For further
information on Autostick™, refer to “Starting And
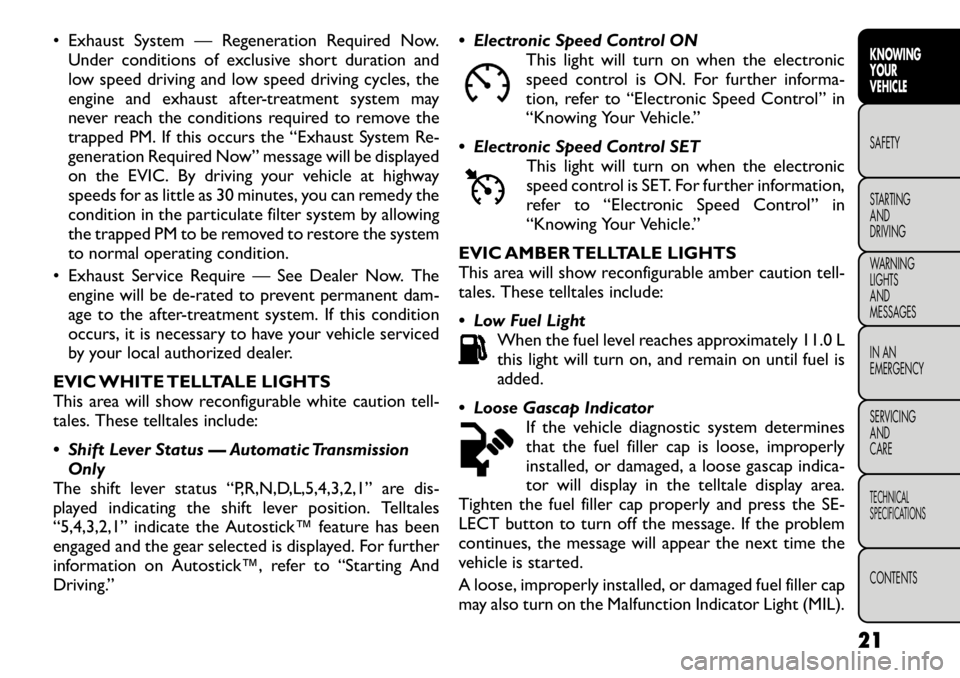
Driving.” Electronic Speed Control ON
This light will turn on when the electronic
speed control is ON. For further informa-
tion, refer to “Electronic Speed Control” in
“Knowing Your Vehicle.”
Electronic Speed Control SET This light will turn on when the electronic
speed control is SET. For further information,
refer to “Electronic Speed Control” in
“Knowing Your Vehicle.”
EVIC AMBER TELLTALE LIGHTS
This area will show reconfigurable amber caution tell-
tales. These telltales include:
Low Fuel Light When the fuel level reaches approximately 11.0 L
this light will turn on, and remain on until fuel is
added.
Loose Gascap Indicator If the vehicle diagnostic system determines
that the fuel filler cap is loose, improperly
installed, or damaged, a loose gascap indica-
tor will display in the telltale display area.
Tighten the fuel filler cap properly and press the SE-
LECT button to turn off the message. If the problem
continues, the message will appear the next time the
vehicle is started.
A loose, improperly installed, or damaged fuel filler cap
may also turn on the Malfunction Indicator Light (MIL).
21KNOWING
YOURVEHICLESAFETY
STARTING ANDDRIVING
WARNING LIGHTSAND
MESSAGES
IN AN
EMERGENCY
SERVICING AND
CARETECHNICAL
SPECIFICATIONSCONTENTS
Page 75 of 332
Window Fogging
Interior fogging on the windshield can be quickly re-
moved by turning the mode selector to Defrost. The
Defrost/Floor mode can be used to maintain a clear
windshield and provide sufficient heating. If side win-
dow fogging becomes a problem, increase the blower
speed. Vehicle windows tend to fog on the inside in
mild but rainy or humid weather.
NOTE:Recirculation mode without A/C should not
be used for long periods, as fogging may occur.
Outside Air Intake
Make sure the air intake, located directly in front of the
windshield, is free of obstructions such as leaves.
Leaves collected in the air intake may reduce airflow,
and if they enter the plenum, they could plug the water
drains. In winter months, make sure the air intake is
clear of ice, slush, and snow.
A/C Air Filter
The climate control system filters outside air contain-
ing dust, pollen and some odors. Strong odors cannot
be totally filtered out. Refer to “Maintenance Proce-
dures” in “Servicing And Care” for filter replacementinstructions.
69
KNOWING
YOURVEHICLESAFETY
STARTING ANDDRIVING
WARNING LIGHTSAND
MESSAGES
IN AN
EMERGENCY
SERVICING AND
CARETECHNICAL
SPECIFICATIONSCONTENTS
Page 227 of 332
Automatic Transmission (for versions/markets,
where provided)
The DRIVE range can be selected when towing. How-
ever, if frequent shifting occurs while in this range,
select a lower gear (using the AutoStick
®
shift con-
trol).
NOTE: Using a lower gear while operating the ve-
hicle under heavy operating conditions will improve
performance and extend transmission life by reducing
excessive shifting and heat build up. This action will also
provide better engine braking.
If you REGULARLY tow a trailer for more than 45 min-
utes of continuous operation, then change the trans-
mission fluid and automatic transmission filter accord-
ing to the interval specified for “police, taxi, fleet, or
frequent trailer towing.” Refer to the “Maintenance
Schedule” for the proper maintenance intervals.
Electronic Speed Control (for versions/
markets, where provided)
� Do not use in hilly terrain or with heavy loads.
� When using the speed control, if you experience speed drops greater than 16 km/h, disengage until you can get
back to cruising speed.
� Use speed control in flat terrain and with light loads to maximize fuel efficiency.
AutoStick
®
� By using the AutoStick
®shift control to select a specific
gear, frequent shifting can be avoided. Select the highest
gear that allows for adequate performance. For example,
choose “4” if the desired speed can be maintained.
Choose “3” or “2” if needed to maintain the desiredspeed.
� Extended driving at high RPM should be avoided to pr e-
vent excess heat generation. A reduction in vehicle speed
may be required to avoid extended driving at high RPM.
Return to a higher gear or vehicle speed when road
conditions and RPM level allows.
Cooling System
To reduce potential for engine and transmission over-
heating, take the following actions:� City DrivingWhen stopped for short periods, shift the transmission
into NEUTRAL and increase engine idle speed.� Highway DrivingReduce speed.� Air ConditioningTurn off temporarily.
TRAILER HITCH ATTACHING POINTS
Your vehicle will require extra equipment to tow a
trailer safely and efficiently. The trailer tow hitch must
be attached to your vehicle using the provided attach-
ing points on the vehicle's frame. Refer to the following
221
KNOWING
YOURVEHICLE SAFETYSTARTING ANDDRIVINGWARNING LIGHTSAND
MESSAGES
IN AN
EMERGENCY
SERVICING AND
CARETECHNICAL
SPECIFICATIONSCONTENTS
Page 255 of 332
BULB REPLACEMENT
LOW BEAM/HIGH BEAM/FRONT TURN
SIGNAL AND FRONT POSITION LAMP
1. Open the hood.
NOTE:It may be necessary to remove the air cleaner
filter housing and position the Totally Integrated Power
Module (TIPM) aside to replace certain lamps in the left
headlamp housing.
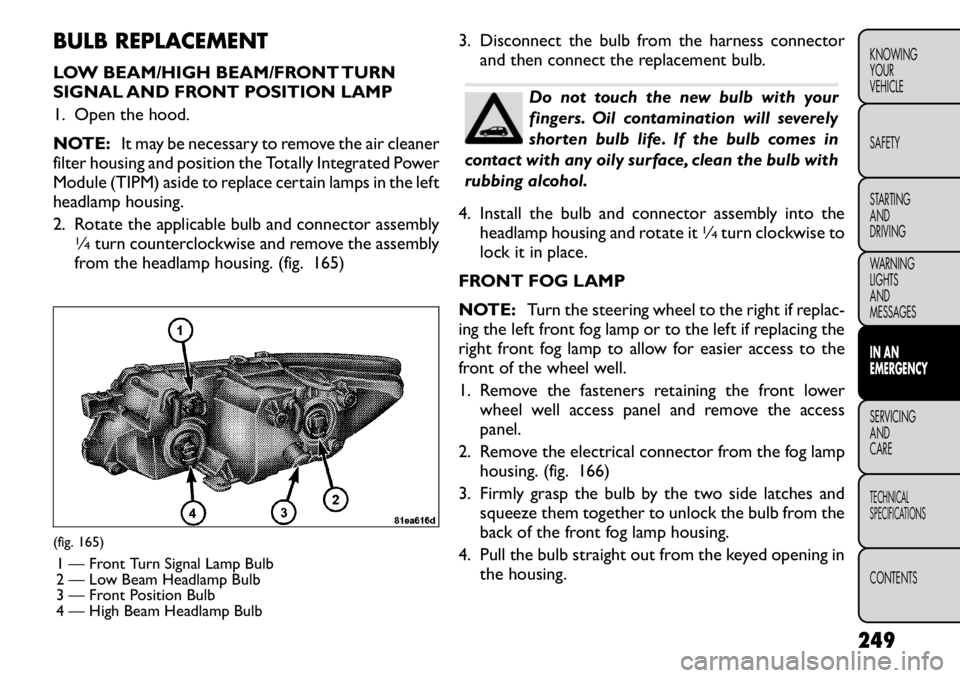
2. Rotate the applicable bulb and connector assembly
1∕4turn counterclockwise and remove the assembly
from the headlamp housing. (fig. 165) 3. Disconnect the bulb from the harness connector
and then connect the replacement bulb.
Do not touch the new bulb with your
fingers. Oil contamination will severely
shorten bulb life. If the bulb comes in
contact with any oily surface, clean the bulb with
rubbing alcohol.
4. Install the bulb and connector assembly into the headlamp housing and rotate it
1∕4turn clockwise to
lock it in place.
FRONT FOG LAMP
NOTE: Turn the steering wheel to the right if replac-
ing the left front fog lamp or to the left if replacing the
right front fog lamp to allow for easier access to the
front of the wheel well.
1. Remove the fasteners retaining the front lower wheel well access panel and remove the access panel.
2. Remove the electrical connector from the fog lamp housing. (fig. 166)
3. Firmly grasp the bulb by the two side latches and squeeze them together to unlock the bulb from the
back of the front fog lamp housing.
4. Pull the bulb straight out from the keyed opening in the housing.
(fig. 165)
1 — Front Turn Signal Lamp Bulb
2 — Low Beam Headlamp Bulb
3 — Front Position Bulb
4 — High Beam Headlamp Bulb
249
KNOWING
YOURVEHICLE SAFETY
STARTING ANDDRIVING
WARNING LIGHTSAND
MESSAGESIN AN
EMERGENCYSERVICING AND
CARETECHNICAL
SPECIFICATIONSCONTENTS
Page 271 of 332
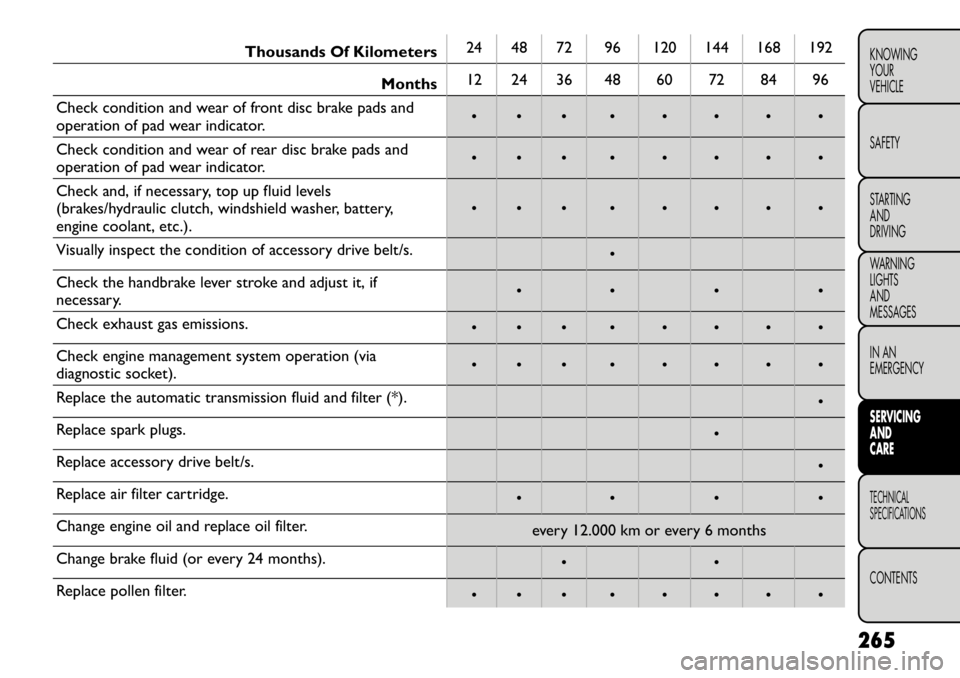
Thousands Of Kilometers24 48 72 96 120 144 168 192
Months 12 24 36 48 60 72 84 96
Check condition and wear of front disc brake pads and
operation of pad wear indicator. • • • • • • • •
Check condition and wear of rear disc brake pads and
operation of pad wear indicator. • • • • • • • •
Check and, if necessary, top up fluid levels
(brakes/hydraulic clutch, windshield washer, battery,
engine coolant, etc.). • • • • • • • •
Visually inspect the condition of accessory drive belt/s. •
Check the handbrake lever stroke and adjust it, if
necessary. • • • •
Check exhaust gas emissions. • • • • • • • •
Check engine management system operation (via
diagnostic socket). • • • • • • • •
Replace the automatic transmission fluid and filter (*). •
Replace spark plugs. •
Replace accessory drive belt/s. •
Replace air filter cartridge. • • • •
Change engine oil and replace oil filter. every 12.000 km or every 6 months
Change brake fluid (or every 24 months). • •
Replace pollen filter. • • • • • • • •
265
KNOWING
YOURVEHICLE SAFETY
STARTING ANDDRIVING
WARNING LIGHTSAND
MESSAGES
IN AN
EMERGENCYSERVICING AND
CARETECHNICAL
SPECIFICATIONSCONTENTS
Page 272 of 332
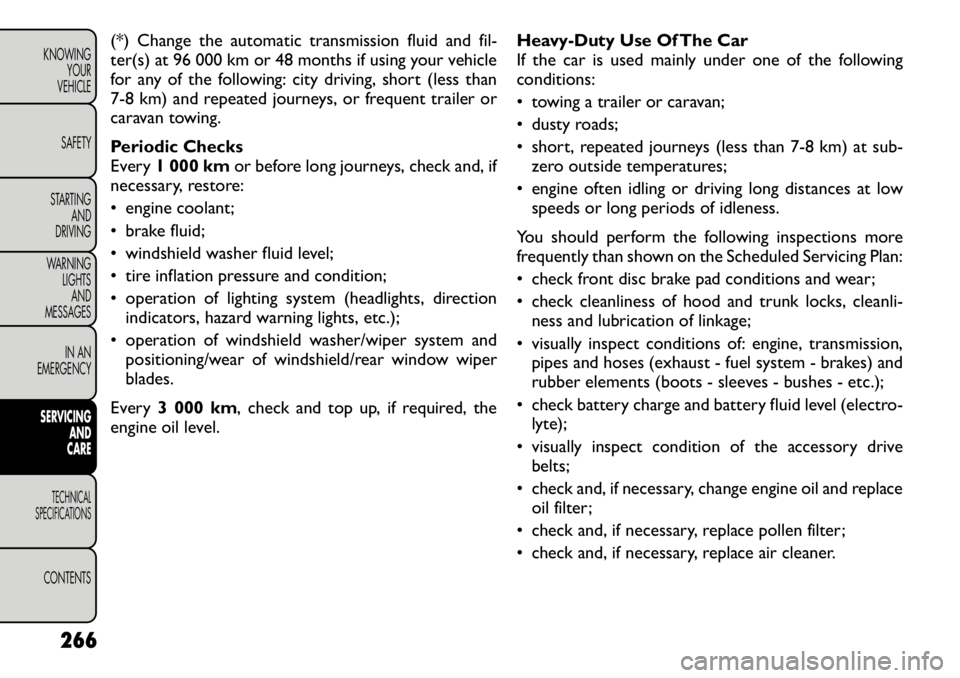
(*) Change the automatic transmission fluid and fil-
ter(s) at 96 000 km or 48 months if using your vehicle
for any of the following: city driving, short (less than
7-8 km) and repeated journeys, or frequent trailer or
caravan towing.
Periodic Checks
Every1 000 km or before long journeys, check and, if
necessary, restore:
• engine coolant;
• brake fluid;
• windshield washer fluid level;
• tire inflation pressure and condition;
• operation of lighting system (headlights, direction
indicators, hazard warning lights, etc.);
• operation of windshield washer/wiper system and positioning/wear of windshield/rear window wiper
blades.
Every 3 000 km , check and top up, if required, the
engine oil level. Heavy-Duty Use Of The Car
If the car is used mainly under one of the followingconditions:
• towing a trailer or caravan;
• dusty roads;
• short, repeated journeys (less than 7-8 km) at sub-
zero outside temperatures;
• engine often idling or driving long distances at low speeds or long periods of idleness.
You should perform the following inspections more
frequently than shown on the Scheduled Servicing Plan:
• check front disc brake pad conditions and wear;
• check cleanliness of hood and trunk locks, cleanli- ness and lubrication of linkage;
• visually inspect conditions of: engine, transmission, pipes and hoses (exhaust - fuel system - brakes) and
rubber elements (boots - sleeves - bushes - etc.);
• check battery charge and battery fluid level (electro- lyte);
• visually inspect condition of the accessory drive belts;
• check and, if necessary, change engine oil and replace oil filter;
• check and, if necessary, replace pollen filter;
• check and, if necessary, replace air cleaner.
266
KNOWING YOUR
VEHICLE
SAFETY
STARTING AND
DRIVING
WARNING LIGHTSAND
MESSAGES
IN AN
EMERGENCYSERVICING AND
CARETECHNICAL
SPECIFICATIONSCONTENTS
Page 274 of 332
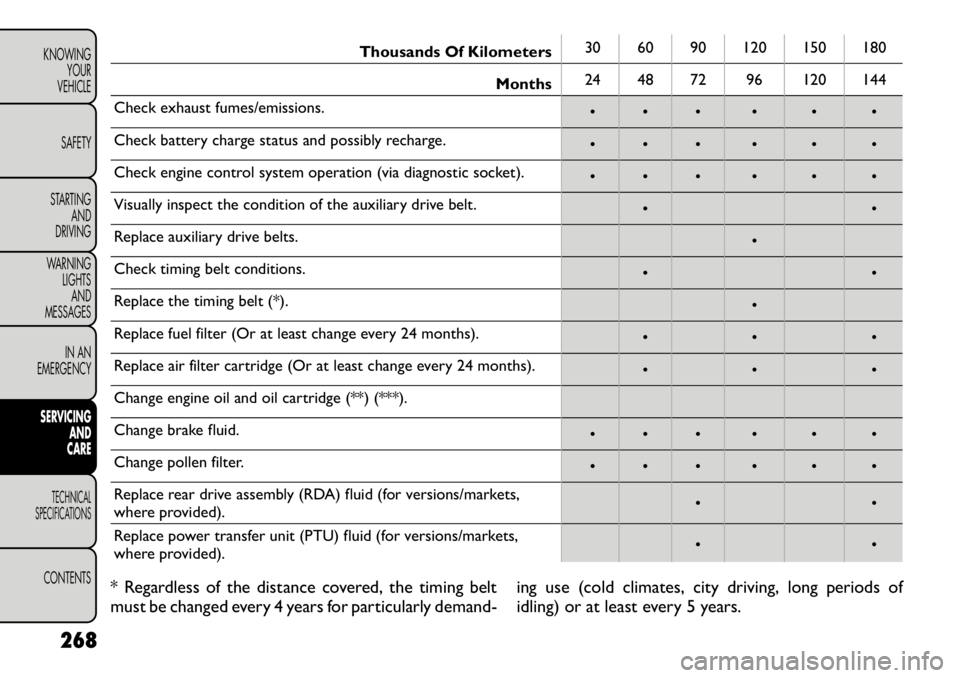
Thousands Of Kilometers30 60 90 120 150 180
Months 24 48 72 96 120 144
Check exhaust fumes/emissions. • • • • • •
Check battery charge status and possibly recharge. • • • • • •
Check engine control system operation (via diagnostic socket). • • • • • •
Visually inspect the condition of the auxiliary drive belt. • •
Replace auxiliary drive belts. •
Check timing belt conditions. • •
Replace the timing belt (*). •
Replace fuel filter (Or at least change every 24 months). • • •
Replace air filter cartridge (Or at least change every 24 months). • • •
Change engine oil and oil cartridge (**) (***).
Change brake fluid. • • • • • •
Change pollen filter. • • • • • •
Replace rear drive assembly (RDA) fluid (for versions/markets,
where provided). • •
Replace power transfer unit (PTU) fluid (for versions/markets,
where provided). • •
* Regardless of the distance covered, the timing belt
must be changed every 4 years for particularly demand- ing use (cold climates, city driving, long periods of
idling) or at least every 5 years.
268
KNOWING YOUR
VEHICLE
SAFETY
STARTING AND
DRIVING
WARNING LIGHTSAND
MESSAGES
IN AN
EMERGENCYSERVICING AND
CARETECHNICAL
SPECIFICATIONSCONTENTS
Page 275 of 332
** If the car is used for less than 10 000 km per year, it
is necessary to replace engine oil and cartridge every
12 months.
*** The actual interval for replacement of engine oil
and cartridge depends by vehicle usage conditions and
is shown through a gauge or a message (if available) on
the dashboard or at least every 24 months.
Failure to perform the required mainte-
nance items may result in damage to the
vehicle.
Regular Checks
Every 1,000 km or before long journeys, check and top
up the following if necessary:
• engine coolant fluid, brake fluid, windshield washer fluid and power steering fluid;
• tire pressure and condition;
• operation of lighting system (headlights, direction indicators, hazard lights, etc.);
• operation of the windshield wiper/washer system, position and wear of windshield/rear window wiper
blades;
• Check and add, if required, the engine oil level every 3,000 km. Use Of The Car Under Heavy Conditions
If you use the car mainly under one of the followingconditions:
• trailer or caravan towing;
• dusty roads;
• short (less than 7-8 km) and repeated journeys in
sub-zero temperatures;
• frequent engine idling, travelling long distances at low speeds or long term inactivity, perform the following
inspections more frequently than shown on the
Maintenance Schedule;
• check front disc brake pad condition and wear;
• check cleanliness of hood latches, as well as cleanli- ness and lubrication of linkages;
• visually inspect the conditions of: engine, transmis- sion, pipes and tubes (exhaust - fuel - brakes), rubber
parts (boots, sleeves, etc.);
• check battery charge and liquid level (electrolyte);
• visually inspect the condition of auxiliary drive belts;
• check and if necessary change engine oil and oil filter;
• check pollen filter and replace it, if required;
• check air filter and replace, if required;
• check fuel filter and replace, if required.
269
KNOWING
YOURVEHICLE SAFETY
STARTING ANDDRIVING
WARNING LIGHTSAND
MESSAGES
IN AN
EMERGENCYSERVICING AND
CARETECHNICAL
SPECIFICATIONSCONTENTS
Page 276 of 332
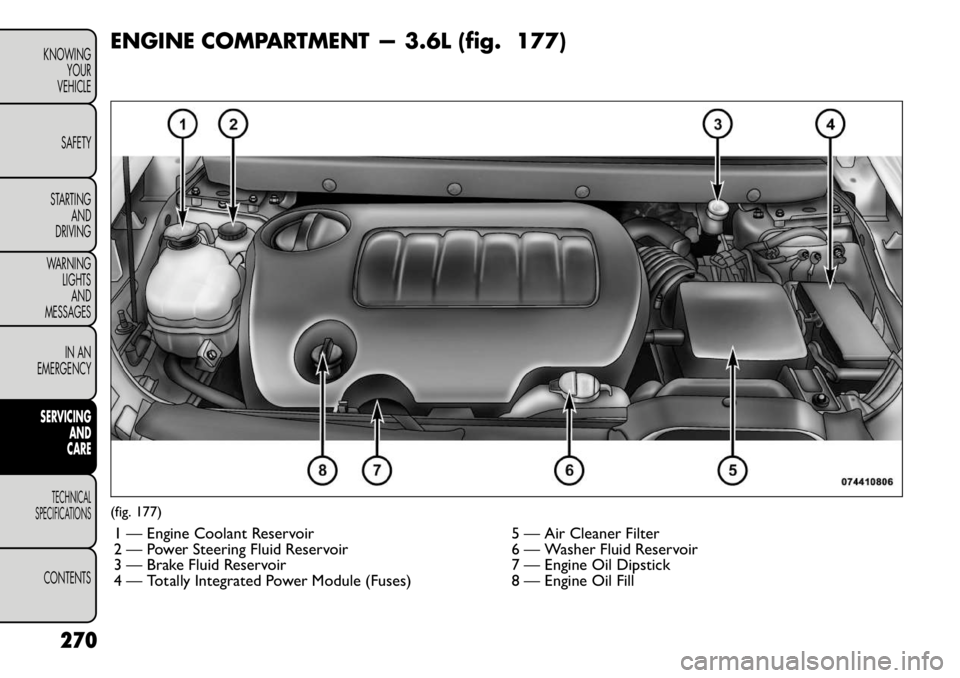
ENGINE COMPARTMENT — 3.6L (fig. 177)(fig. 177)1 — Engine Coolant Reservoir 5 — Air Cleaner Filter
2 — Power Steering Fluid Reservoir 6 — Washer Fluid Reservoir
3 — Brake Fluid Reservoir 7 — Engine Oil Dipstick
4 — Totally Integrated Power Module (Fuses) 8 — Engine Oil Fill
270
KNOWING YOUR
VEHICLE
SAFETY
STARTING AND
DRIVING
WARNING LIGHTSAND
MESSAGES
IN AN
EMERGENCYSERVICING AND
CARETECHNICAL
SPECIFICATIONSCONTENTS
Page 277 of 332
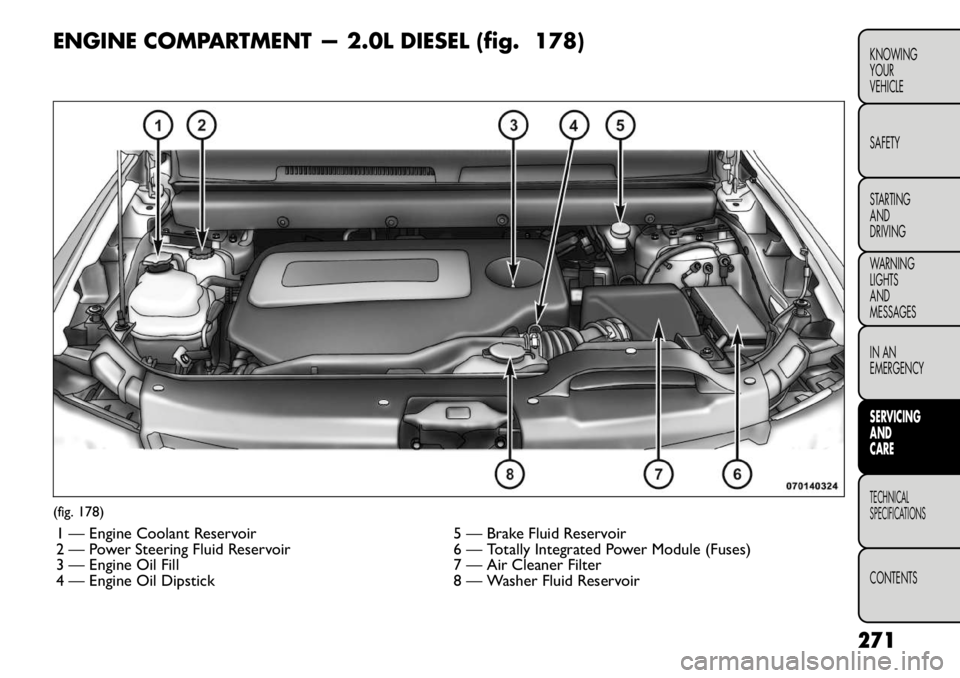
ENGINE COMPARTMENT — 2.0L DIESEL (fig. 178)(fig. 178)1 — Engine Coolant Reservoir 5 — Brake Fluid Reservoir
2 — Power Steering Fluid Reservoir 6 — Totally Integrated Power Module (Fuses)
3 — Engine Oil Fill 7 — Air Cleaner Filter
4 — Engine Oil Dipstick 8 — Washer Fluid Reservoir
271
KNOWING
YOURVEHICLE SAFETY
STARTING ANDDRIVING
WARNING LIGHTSAND
MESSAGES
IN AN
EMERGENCYSERVICING AND
CARETECHNICAL
SPECIFICATIONSCONTENTS