snow FIAT FREEMONT 2012 Owner handbook (in English)
[x] Cancel search | Manufacturer: FIAT, Model Year: 2012, Model line: FREEMONT, Model: FIAT FREEMONT 2012Pages: 332, PDF Size: 5.61 MB
Page 69 of 332

8. Climate Control OFF Button
Press and release this button to turn the Climate
Control ON/OFF.
9. AUTO Operation Button (for versions/markets,
where provided)
Automatically controls the interior cabin temperature
by adjusting airflow distribution and amount. Perform-
ing this function will cause the ATC to switch between
manual mode and automatic modes. Refer to “Auto-
matic Operation” for more information.
10. Driver Temperature Control Down Button
Provides the driver with independent temperature
control. Push the button for cooler temperature set-tings.
NOTE:In Sync mode, this button will also automati-
cally adjust the passenger and rear temperature setting
at the same time.
11. Driver Temperature Control Up Button
Provides the driver with independent temperature
control. Push the button for warmer temperaturesettings.
NOTE: In Sync mode, this button will also automati-
cally adjust the passenger and rear temperature setting
at the same time.
12. Modes
The airflow distribution mode can be adjusted so air
comes from the instrument panel outlets, floor outlets, demist outlets and defrost outlets. The Mode settings
are as follows:
Panel Mode
Air comes from the outlets in the instrument
panel. Each of these outlets can be individually
adjusted to direct the flow of air. The air vanes of the
center outlets and outboard outlets can be moved up
and down or side-to-side to regulate airflow direction.
There is a shut off wheel, located below the air vanes,
to shut off or adjust the amount of airflow from theseoutlets. Bi-Level Mode
Air comes from the instrument panel outlets and
floor outlets. A slight amount of air is directed
through the defrost and side window demister outlets.
NOTE: BI-LEVEL mode is designed under comfort
conditions to provide cooler air out of the panel
outlets and warmer air from the floor outlets. Floor Mode
Air comes from the floor outlets. A slight amount
of air is directed through the defrost and side
window demister outlets. Mix Mode
Air comes from the floor, defrost and side win-
dow demist outlets. This mode works best in
cold or snowy conditions.
63KNOWING
YOURVEHICLESAFETY
STARTING ANDDRIVING
WARNING LIGHTSAND
MESSAGES
IN AN
EMERGENCY
SERVICING AND
CARETECHNICAL
SPECIFICATIONSCONTENTS
Page 75 of 332

Window Fogging
Interior fogging on the windshield can be quickly re-
moved by turning the mode selector to Defrost. The
Defrost/Floor mode can be used to maintain a clear
windshield and provide sufficient heating. If side win-
dow fogging becomes a problem, increase the blower
speed. Vehicle windows tend to fog on the inside in
mild but rainy or humid weather.
NOTE:Recirculation mode without A/C should not
be used for long periods, as fogging may occur.
Outside Air Intake
Make sure the air intake, located directly in front of the
windshield, is free of obstructions such as leaves.
Leaves collected in the air intake may reduce airflow,
and if they enter the plenum, they could plug the water
drains. In winter months, make sure the air intake is
clear of ice, slush, and snow.
A/C Air Filter
The climate control system filters outside air contain-
ing dust, pollen and some odors. Strong odors cannot
be totally filtered out. Refer to “Maintenance Proce-
dures” in “Servicing And Care” for filter replacementinstructions.
69
KNOWING
YOURVEHICLESAFETY
STARTING ANDDRIVING
WARNING LIGHTSAND
MESSAGES
IN AN
EMERGENCY
SERVICING AND
CARETECHNICAL
SPECIFICATIONSCONTENTS
Page 83 of 332
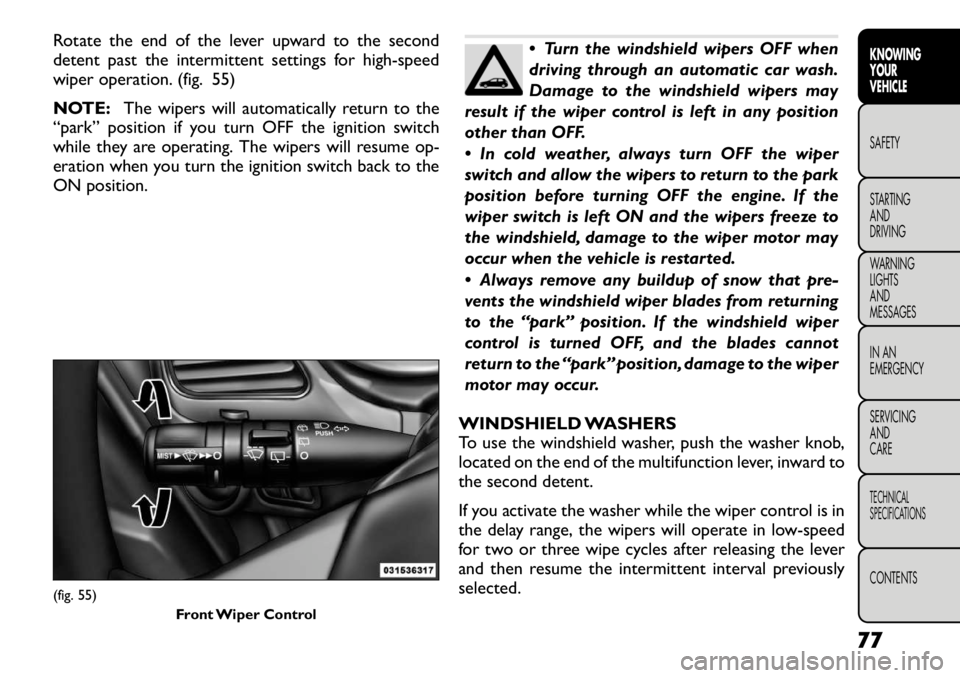
Rotate the end of the lever upward to the second
detent past the intermittent settings for high-speed
wiper operation. (fig. 55)
NOTE:The wipers will automatically return to the
“park” position if you turn OFF the ignition switch
while they are operating. The wipers will resume op-
eration when you turn the ignition switch back to the
ON position.
Turn the windshield wipers OFF when
driving through an automatic car wash.
Damage to the windshield wipers may
result if the wiper control is left in any position
other than OFF.
In cold weather, always turn OFF the wiper
switch and allow the wipers to return to the park
position before turning OFF the engine. If the
wiper switch is left ON and the wipers freeze to
the windshield, damage to the wiper motor may
occur when the vehicle is restarted.
Always remove any buildup of snow that pre-
vents the windshield wiper blades from returning
to the “park” position. If the windshield wiper
control is turned OFF, and the blades cannot
return to the “park” position, damage to the wiper
motor may occur.
WINDSHIELD WASHERS
To use the windshield washer, push the washer knob,
located on the end of the multifunction lever, inward to
the second detent.
If you activate the washer while the wiper control is in
the delay range, the wipers will operate in low-speed
for two or three wipe cycles after releasing the lever
and then resume the intermittent interval previously
selected.
(fig. 55) Front Wiper Control
77
KNOWING
YOURVEHICLESAFETY
STARTING ANDDRIVING
WARNING LIGHTSAND
MESSAGES
IN AN
EMERGENCY
SERVICING AND
CARETECHNICAL
SPECIFICATIONSCONTENTS
Page 86 of 332
Turn the rear wiper off when driving
through an automatic car wash. Damage
to the rear wiper may result if the rear
wiper switch is left in the on position.
In cold weather, always turn off the rear wiper
switch and allow the rear wiper to return to the
park position before turning off the engine. If the
rear wiper switch is left on and the rear wiper
freezes to the window, damage to the rear wiper
motor may occur when the vehicle is restarted.
Always remove any buildup of snow that pre-
vents the rear wiper blade from returning to the
park position. If the rear wiper control is turned
off and the blade cannot return to the park
position, damage to the rear wiper motor may
occur.
REAR WINDOW DEFROSTER The rear window defroster button is located on
the climate control panel. Press this button to
turn on the rear window defroster and the heated
outside mirrors (for versions/markets, where pro-
vided). An indicator in the button will illuminate when
the rear window defroster is on. The rear window
defroster automatically turns off after approximately
10 minutes. NOTE:
To prevent excessive battery drain, use the
rear window defroster only when the engine is oper-ating.
Failure to follow these cautions can
cause damage to the heating elements:
Use care when washing the inside of
the rear window. Do not use abrasive window
cleaners on the interior surface of the window.
Use a soft cloth and a mild washing solution,
wiping parallel to the heating elements. Labels
can be peeled off after soaking with warm water.
Do not use scrapers, sharp instruments, or abra-
sive window cleaners on the interior surface of
the window.
Keep all objects a safe distance from the
window.
80
KNOWING YOUR
VEHICLE
SAFETY
STARTING AND
DRIVING
WARNING LIGHTSAND
MESSAGES
IN AN
EMERGENCY
SERVICING AND
CARETECHNICAL
SPECIFICATIONSCONTENTS
Page 88 of 332
vehicle will deactivate Electronic Speed Control with-
out erasing the set speed memory. Pressing the ON/
OFF button or turning the ignition switch OFF erases
the set speed memory.
TO RESUME SPEED
To resume a previously set speed, push the RES (+)
button and release. Resume can be used at any speed
above 32 km/h.
TO VARY THE SPEED SETTING
When the Electronic Speed Control is set, you can
increase speed by pushing the RES (+) button. If the
button is continually pressed, the set speed will con-
tinue to increase until the button is released, then the
new set speed will be established.
Pressing the RES (+) button once will result in a 2 km/h
increase in set speed. Each subsequent tap of the
button results in an increase of 2 km/h.
To decrease speed while the Electronic Speed Control
is set, push the SET (-) button. If the button is continu-
ally held in the SET (-) position, the set speed will
continue to decrease until the button is released.
Release the button when the desired speed is reached,
and the new set speed will be established.
Pressing the SET (-) button once will result in a 2 km/h
decrease in set speed. Each subsequent tap of the
button results in a decrease of 2 km/h.TO ACCELERATE FOR PASSING
Press the accelerator as you would normally. When the
pedal is released, the vehicle will return to the setspeed.
Using Electronic Speed Control On Hills
The transmission may downshift on hills to maintain
the vehicle set speed.
NOTE:
The Electronic Speed Control system main-
tains speed up and down hills. A slight speed change on
moderate hills is normal.
On steep hills, a greater speed loss or gain may occur
so it may be preferable to drive without Electronic
Speed Control.
WARNING!
Electronic Speed Control can be danger-
ous where the system cannot maintain a
constant speed.Your vehicle could go too fast for
the conditions, and you could lose control and
have an accident . Do not use Electronic Speed
Control in heavy traffic or on roads that are
winding, icy, snow-covered or slippery.
82
KNOWING YOUR
VEHICLE
SAFETY
STARTING AND
DRIVING
WARNING LIGHTSAND
MESSAGES
IN AN
EMERGENCY
SERVICING AND
CARETECHNICAL
SPECIFICATIONSCONTENTS
Page 120 of 332
WARNING!
The ABS cannot prevent the natural laws
of physics from acting on the vehicle, nor
can it increase the traction afforded by prevailing
road conditions. ABS cannot prevent accidents,
including those resulting from excessive speed in
turns, driving on very slippery surfaces, or hydro-
planing.The capabilities of an ABS-equipped ve-
hicle must never be exploited in a reckless or
dangerous manner, which could jeopardize the
user's safety or the safety of others. ELECTRONIC BRAKE CONTROL
SYSTEM
Your vehicle is equipped with an advanced electronic
brake control system commonly referred to as ESC.
This system includes Anti-Lock Brake System (ABS),
Brake Assist System (BAS), Traction Control System
(TCS), Electronic Roll Mitigation (ERM), Electronic
Stability Control (ESC), and Trailer Sway Control
(TSC). These systems work together to enhance both
vehicle stability and control in various driving condi-tions.
ANTI-LOCK BRAKE SYSTEM (ABS)
The Anti-Lock Brake System (ABS) provides increased
vehicle stability and brake performance under most
braking conditions. The system automatically “pumps”
the brakes during severe braking conditions to prevent
wheel lock-up.
When the vehicle is driven over 11 km/h, you may also
hear a slight clicking sound as well as some related
motor noises. These noises are the system performing
its self check cycle to ensure that the ABS is working
properly. This self check occurs each time the vehicle is
started and accelerated past 11 km/h.
ABS is activated during braking under certain road or
stopping conditions. ABS-inducing conditions can in-
clude ice, snow, gravel, bumps, railroad tracks, loose
debris, or panic stops.
114
KNOWING YOUR
VEHICLE
SAFETY
STARTING AND
DRIVING
WARNING LIGHTSAND
MESSAGES
IN AN
EMERGENCY
SERVICING AND
CARETECHNICAL
SPECIFICATIONSCONTENTS
Page 124 of 332
(Continued)
ESC cannot prevent collisions, including those
resulting from excessive speed in turns, driving on
very slippery surfaces, or hydroplaning. ESC also
cannot prevent collisions resulting from loss of
vehicle control due to inappropriate driver input
for the conditions. Only a safe, attentive, and
skillful driver can prevent collisions.
The capabilities of an ESC equipped vehicle
must never be exploited in a reckless or danger-
ous manner which could jeopardize the user ’s
safety or the safety of others.
ESC Operating Modes
The ESC system has two available operating modes.
Full On
This is the normal operating mode for ESC. Whenever
the vehicle is started the system will be in this mode.
This mode should be used for most driving situations.
ESC should only be turned to “Partial Off ” for specific
reasons as noted. Refer to “Partial Off ” for additional
information.
Partial Off
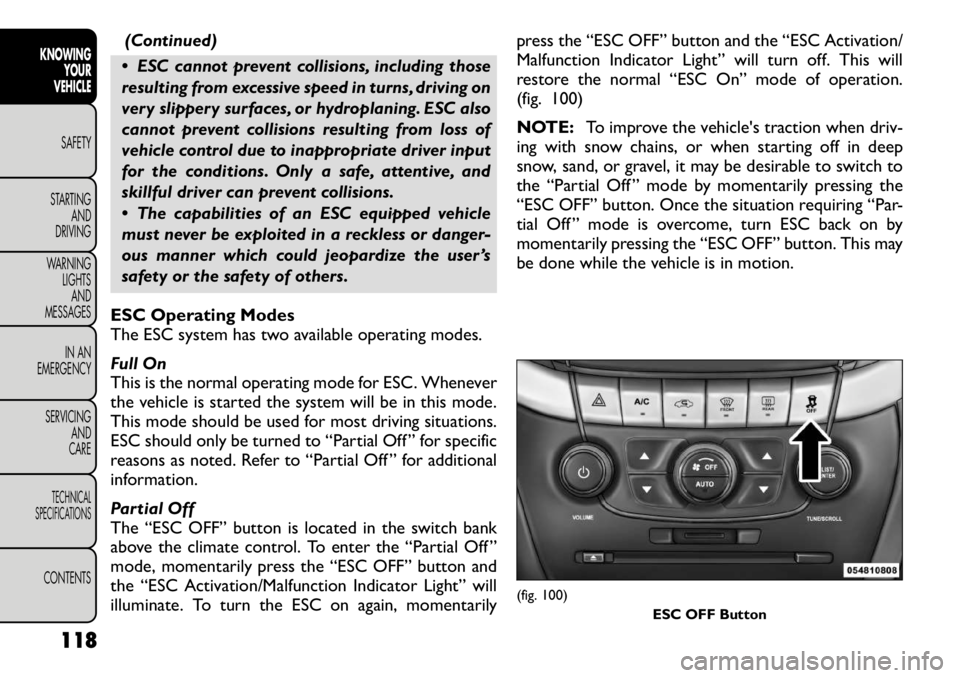
The “ESC OFF” button is located in the switch bank
above the climate control. To enter the “Partial Off ”
mode, momentarily press the “ESC OFF” button and
the “ESC Activation/Malfunction Indicator Light” will
illuminate. To turn the ESC on again, momentarily press the “ESC OFF” button and the “ESC Activation/
Malfunction Indicator Light” will turn off. This will
restore the normal “ESC On” mode of operation.
(fig. 100)
NOTE:
To improve the vehicle's traction when driv-
ing with snow chains, or when starting off in deep
snow, sand, or gravel, it may be desirable to switch to
the “Partial Off ” mode by momentarily pressing the
“ESC OFF” button. Once the situation requiring “Par-
tial Off ” mode is overcome, turn ESC back on by
momentarily pressing the “ESC OFF” button. This may
be done while the vehicle is in motion.
(fig. 100)
ESC OFF Button
118
KNOWING YOUR
VEHICLE
SAFETY
STARTING AND
DRIVING
WARNING LIGHTSAND
MESSAGES
IN AN
EMERGENCY
SERVICING AND
CARETECHNICAL
SPECIFICATIONSCONTENTS
Page 131 of 332

exists. The Tire Pressure Monitoring Telltale Light will
turn off when the fault condition no longer exists. A
system fault can occur due to any of the following:
1. Jamming due to electronic devices or driving next tofacilities emitting the same Radio Frequencies as the
TPMS sensors.
2. Installing some form of aftermarket window tinting that affects radio wave signals.
3. Lots of snow or ice around the wheels or wheel housings.
4. Using tire chains on the vehicle.
5. Using wheels/tires not equipped with TPMS sensors.
NOTE:
1. The compact spare tire does not have a tire pres-
sure monitoring sensor. Therefore, the TPMS will not
monitor the pressure in the compact spare tire.
2. If you install the compact spare tire in place of a road
tire that has a pressure below the low-pressure warn-
ing limit, a chime will sound and the TPMS Telltale Light
will turn on upon the next ignition switch cycle.
3. After driving the vehicle for up to 20 minutes above
25 km/h, the TPMS Telltale Light will flash on and off for
75 seconds and then remain on solid.
4. For each subsequent ignition switch cycle, a chime
will sound and the TPMS Telltale Light will flash on and
off for 75 seconds and then remain on solid. 5. Once you repair or replace the original road tire and
reinstall it on the vehicle in place of the compact spare,
the TPMS will update automatically and the TPMS
Telltale Light will turn off, as long as no tire pressure is
below the low-pressure warning limit in any of the four
active road tires. The vehicle may need to be driven for
up to 20 minutes above 25 km/h in order for the TPMS
to receive this information.
TPMS Deactivation And Reactivation
The TPMS can be deactivated if replacing all four wheel
and tire assemblies (road tires) with wheel and tire
assemblies that do not have TPMS Sensors, such as
when installing winter wheel and tire assemblies on
your vehicle.
To deactivate the TPMS, first, replace all four wheel and
tire assemblies (road tires) with those not equipped
with TPM Sensors. Then, drive the vehicle for at least
20 minutes above 25 km/h. The TPMS will chime and
the TPM Telltale Light will flash on and off for 75 sec-
onds and then remain on solid. Upon the next ignition
switch cycle, the TPMS will no longer chime or turn on
the Tire Pressure Monitoring Telltale Light.
To reactivate the TPMS, first, replace all four wheel and
tire assemblies (road tires) with those equipped with
TPM Sensors. Then, drive the vehicle for up to 20 min-
utes above 25 km/h. The TPMS will chime and the Tire
Pressure Monitoring Telltale Light will flash on and off
for 75 seconds.
125
KNOWING
YOURVEHICLESAFETY
STARTING ANDDRIVING
WARNING LIGHTSAND
MESSAGES
IN AN
EMERGENCY
SERVICING AND
CARETECHNICAL
SPECIFICATIONSCONTENTS
Page 133 of 332
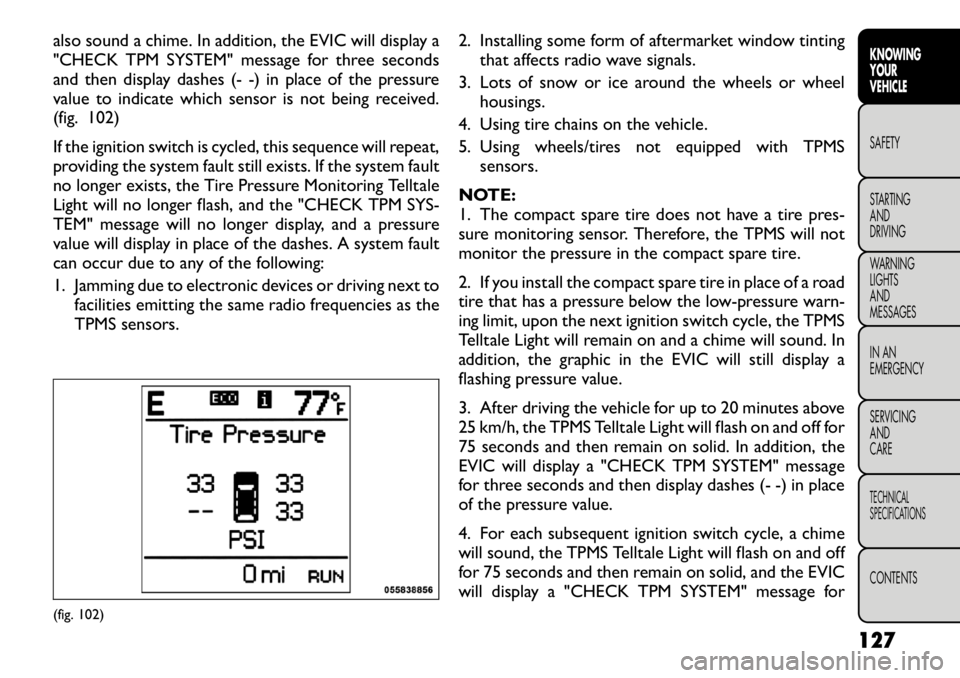
also sound a chime. In addition, the EVIC will display a
"CHECK TPM SYSTEM" message for three seconds
and then display dashes (- -) in place of the pressure
value to indicate which sensor is not being received.
(fig. 102)
If the ignition switch is cycled, this sequence will repeat,
providing the system fault still exists. If the system fault
no longer exists, the Tire Pressure Monitoring Telltale
Light will no longer flash, and the "CHECK TPM SYS-
TEM" message will no longer display, and a pressure
value will display in place of the dashes. A system fault
can occur due to any of the following:
1. Jamming due to electronic devices or driving next tofacilities emitting the same radio frequencies as the
TPMS sensors. 2. Installing some form of aftermarket window tinting
that affects radio wave signals.
3. Lots of snow or ice around the wheels or wheel housings.
4. Using tire chains on the vehicle.
5. Using wheels/tires not equipped with TPMS sensors.
NOTE:
1. The compact spare tire does not have a tire pres-
sure monitoring sensor. Therefore, the TPMS will not
monitor the pressure in the compact spare tire.
2. If you install the compact spare tire in place of a road
tire that has a pressure below the low-pressure warn-
ing limit, upon the next ignition switch cycle, the TPMS
Telltale Light will remain on and a chime will sound. In
addition, the graphic in the EVIC will still display a
flashing pressure value.
3. After driving the vehicle for up to 20 minutes above
25 km/h, the TPMS Telltale Light will flash on and off for
75 seconds and then remain on solid. In addition, the
EVIC will display a "CHECK TPM SYSTEM" message
for three seconds and then display dashes (- -) in place
of the pressure value.
4. For each subsequent ignition switch cycle, a chime
will sound, the TPMS Telltale Light will flash on and off
for 75 seconds and then remain on solid, and the EVIC
will display a "CHECK TPM SYSTEM" message for(fig. 102) 127
KNOWING
YOURVEHICLESAFETY
STARTING ANDDRIVING
WARNING LIGHTSAND
MESSAGES
IN AN
EMERGENCY
SERVICING AND
CARETECHNICAL
SPECIFICATIONSCONTENTS
Page 138 of 332

ENABLING AND DISABLING PARKSENSE
®
ParkSense
®
can be enabled and disabled using the
Uconnect Touch™ System. The available choices are:
Off, Sound Only, or Sound and Display. Refer to
“Uconnect Touch™ Settings” for further information.
When the ParkSense
®soft-key is pressed to disable
the system, the EVIC will display the “PARK ASSIST
OFF” message for approximately five seconds. Refer to
“Electronic Vehicle Information Center (EVIC)” for
further information. When the shift lever is moved to
REVERSE and the system is disabled, the EVIC will
display the “PARK ASSIST OFF” message for as long as
the vehicle is in REVERSE.
The ParkSense
®system uses four sensors located in
the rear bumper fascia to scan for obstacles up to
200 cm away from the rear bumper fascia. ParkSense
®
provides both visual and audible warnings to indicate
the range of the object.
SERVICE THE PARKSENSE
®REAR PARK
ASSIST SYSTEM
When the ParkSense
®
Rear Park Assist system is
malfunctioning, the Electronic Vehicle Information
Center (EVIC) will actuate a single chime, once per
ignition cycle, and it will display the “CLEAN PARK
ASSIST SENSORS” or the “SERVICE PARK ASSIST
SYSTEM” message. Refer to “Electronic Vehicle Infor-
mation Center (EVIC)” for further information. When
the shift lever is moved to REVERSE and the system has
detected a fault condition, the EVIC will display the “CLEAN PARK ASSIST SENSORS” or the “SERVICE
PARK ASSIST SYSTEM” message for as long as the
vehicle is in REVERSE. Under this condition, Park-Sense
®will not operate.
If “CLEAN PARK ASSIST SENSORS” appears in the
EVIC and the rear fascia/bumper is clean and clear of
snow, ice, mud, dirt or other obstruction, see your
authorized dealer.
If “SERVICE PARK ASSIST SYSTEM” appears in the
EVIC, see your authorized dealer.
CLEANING THE PARKSENSE
®SYSTEM
Clean the ParkSense
®
sensors with water, car wash
soap and a soft cloth. Do not use rough or hard cloths.
Do not scratch or poke the sensors. Otherwise, you
could damage the sensors.
PARKSENSE
®SYSTEM USAGE
PRECAUTIONS
NOTE:
• Ensure that the rear bumper is free of snow, ice,
mud, dirt and debris to keep the ParkSense
®system
operating properly.
• Jackhammers, large trucks, and other vibrations
could affect the performance of ParkSense
®.
• When you turn ParkSense
®off, the EVIC will display
“PARK ASSIST OFF.” Furthermore, once you turnParkSense
®off, it remains off until you turn it on again,
even if you cycle the ignition key.
132
KNOWING YOUR
VEHICLE
SAFETY
STARTING AND
DRIVING
WARNING LIGHTSAND
MESSAGES
IN AN
EMERGENCY
SERVICING AND
CARETECHNICAL
SPECIFICATIONSCONTENTS