FIAT FULLBACK 2016 1.G Owners Manual
Manufacturer: FIAT, Model Year: 2016, Model line: FULLBACK, Model: FIAT FULLBACK 2016 1.GPages: 312, PDF Size: 13.67 MB
Page 111 of 312
132)Do not move the front or rear seat if a
child is seated on it or on the dedicated
child restraint system.
133)A FORWARD FACING CHILD
RESTRAINT should be used in the rear
seat whenever possible; if it must be used
in the front passenger seat, adjust the seat
to the most rearward position. Failure to do
so could kill or cause serious injuries to the
child.
134)Always make sure that the diagonal
section of the seat belt does not pass
under the arms or behind the back of the
child. In the event of an accident the seat
belt will not be able to secure the child,
with the risk of injury, including fatal injury.
Therefore the child must always wear the
seat belt correctly.
135)Do not use the same lower
anchorage to install more than one child
restraint system.
136)If a Universal ISOFIX child seat system
is not fixed to all three anchorages, it will
not be able to protect the child correctly. In
a crash, the child could be seriously or
fatally injured. 86)
137)Fit the child restraint system when the
car is stationary. The child restraint system
is correctly fixed to the brackets when you
hear the click. Follow the instructions for
assembly, disassembly and positioning that
the Manufacturer must supply with the
child restraint system.
138)After installation, push and pull the
child restraint system back and forth, and
side to side, to see that it is positively
secured. If the child restraint system is not
installed securely, it may cause injury to the
child or other occupants in the case of
accident or sudden stops.139)When the child restraint system is not
in use, keep your child restraint system
secured with the seat belt or remove it
from the vehicle in order to prevent it from
being thrown around inside the vehicle
during an accident.
140)After installing a child restraint system,
do not move the seat: always remove the
child restraint system before making any
adjustment.
109
Page 112 of 312
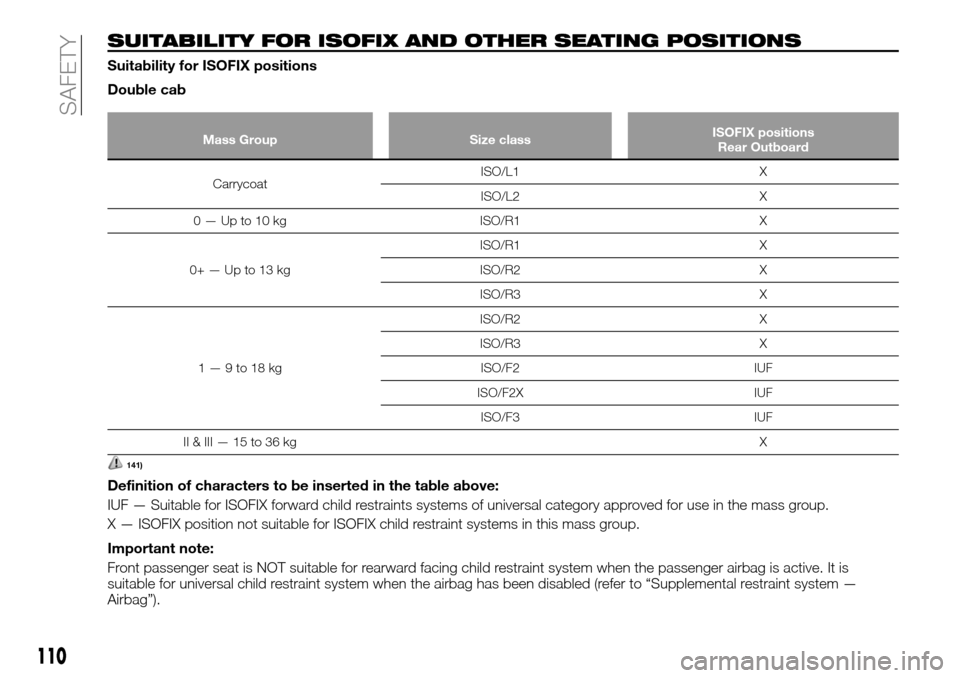
SUITABILITY FOR ISOFIX AND OTHER SEATING POSITIONS
Suitability for ISOFIX positions
Double cab
Mass Group Size classISOFIX positions
Rear Outboard
CarrycoatISO/L1 X
ISO/L2 X
0 — Up to 10 kg ISO/R1 X
0+—Upto13kgISO/R1 X
ISO/R2 X
ISO/R3 X
1—9to18kgISO/R2 X
ISO/R3 X
ISO/F2 IUF
ISO/F2X IUF
ISO/F3 IUF
II&III—15to36kgX
141)
Definition of characters to be inserted in the table above:
IUF — Suitable for ISOFIX forward child restraints systems of universal category approved for use in the mass group.
X — ISOFIX position not suitable for ISOFIX child restraint systems in this mass group.
Important note:
Front passenger seat is NOT suitable for rearward facing child restraint system when the passenger airbag is active. It is
suitable for universal child restraint system when the airbag has been disabled (refer to “Supplemental restraint system —
Airbag”).
110
SAFETY
Page 113 of 312
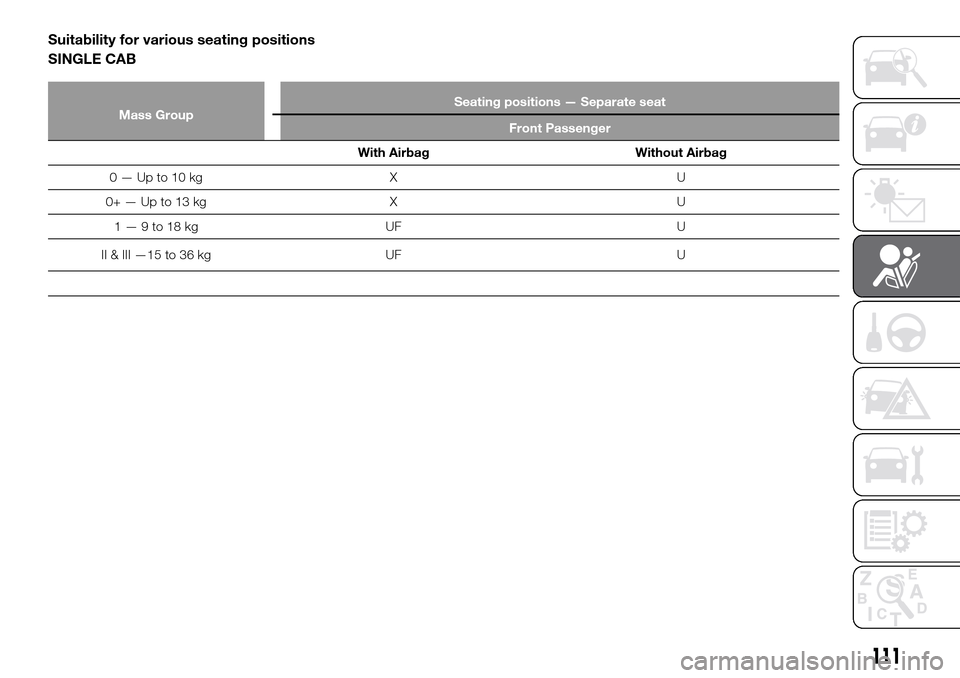
Suitability for various seating positions
SINGLE CAB
Mass GroupSeating positions — Separate seat
Front Passenger
With Airbag Without Airbag
0—Upto10kg X U
0+—Upto13kg X U
1—9to18kg UF U
II & III —15 to 36 kg UF U
111
Page 114 of 312
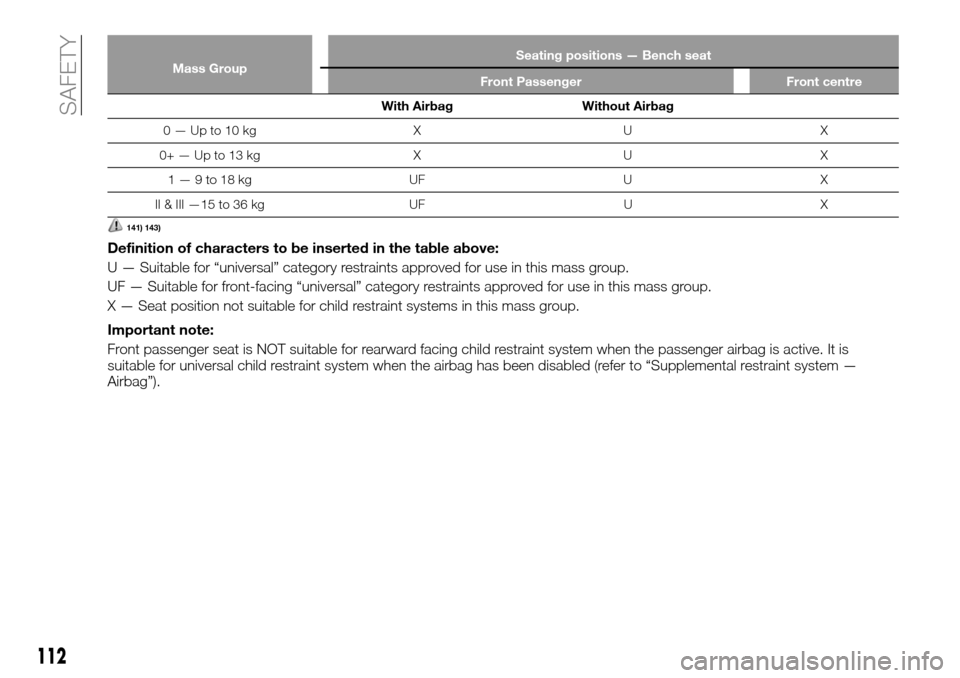
Mass GroupSeating positions — Bench seat
Front Passenger Front centre
With Airbag Without Airbag
0—Upto10kg X U X
0+—Upto13kg X U X
1—9to18kg UF U X
II & III —15 to 36 kg UF U X
141) 143)
Definition of characters to be inserted in the table above:
U — Suitable for “universal” category restraints approved for use in this mass group.
UF — Suitable for front-facing “universal” category restraints approved for use in this mass group.
X — Seat position not suitable for child restraint systems in this mass group.
Important note:
Front passenger seat is NOT suitable for rearward facing child restraint system when the passenger airbag is active. It is
suitable for universal child restraint system when the airbag has been disabled (refer to “Supplemental restraint system —
Airbag”).
112
SAFETY
Page 115 of 312
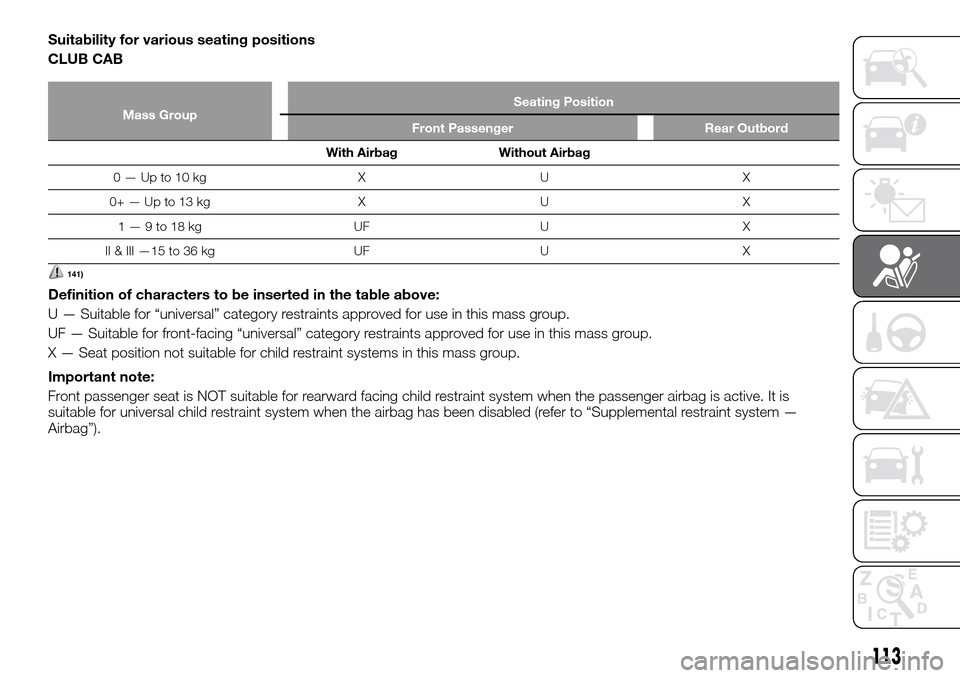
Suitability for various seating positions
CLUB CAB
Mass GroupSeating Position
Front Passenger Rear Outbord
With Airbag Without Airbag
0—Upto10kg X U X
0+—Upto13kg X U X
1—9to18kg UF U X
II & III —15 to 36 kg UF U X
141)
Definition of characters to be inserted in the table above:
U — Suitable for “universal” category restraints approved for use in this mass group.
UF — Suitable for front-facing “universal” category restraints approved for use in this mass group.
X — Seat position not suitable for child restraint systems in this mass group.
Important note:
Front passenger seat is NOT suitable for rearward facing child restraint system when the passenger airbag is active. It is
suitable for universal child restraint system when the airbag has been disabled (refer to “Supplemental restraint system —
Airbag”).
113
Page 116 of 312
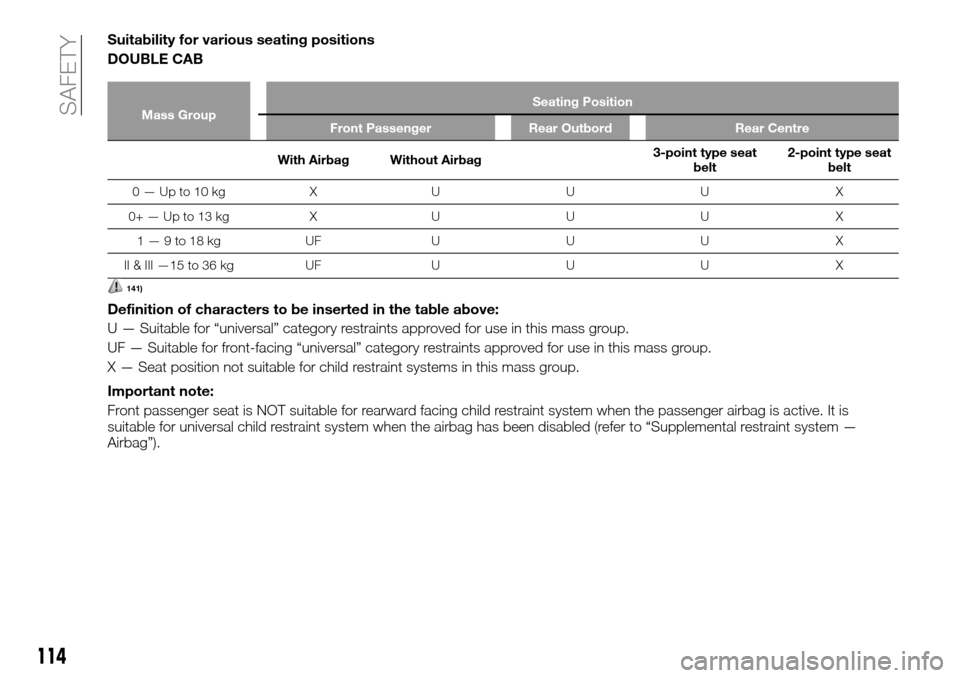
Suitability for various seating positions
DOUBLE CAB
Mass GroupSeating Position
Front Passenger Rear Outbord Rear Centre
With Airbag Without Airbag3-point type seat
belt2-point type seat
belt
0—Upto10kg X U U U X
0+—Upto13kg X U U U X
1—9to18kg UF U U U X
II & III —15 to 36 kg UF U U U X
141)
Definition of characters to be inserted in the table above:
U — Suitable for “universal” category restraints approved for use in this mass group.
UF — Suitable for front-facing “universal” category restraints approved for use in this mass group.
X — Seat position not suitable for child restraint systems in this mass group.
Important note:
Front passenger seat is NOT suitable for rearward facing child restraint system when the passenger airbag is active. It is
suitable for universal child restraint system when the airbag has been disabled (refer to “Supplemental restraint system —
Airbag”).
114
SAFETY
Page 117 of 312
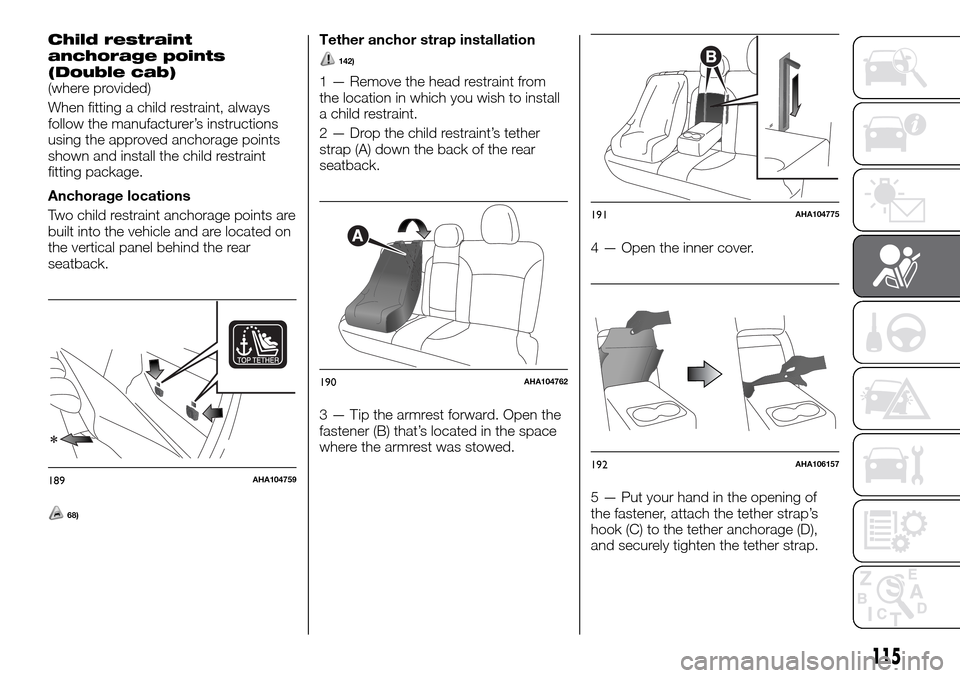
Child restraint
anchorage points
(Double cab)
(where provided)
When fitting a child restraint, always
follow the manufacturer’s instructions
using the approved anchorage points
shown and install the child restraint
fitting package.
Anchorage locations
Two child restraint anchorage points are
built into the vehicle and are located on
the vertical panel behind the rear
seatback.
68)
Tether anchor strap installation
142)
1 — Remove the head restraint from
the location in which you wish to install
a child restraint.
2 — Drop the child restraint’s tether
strap (A) down the back of the rear
seatback.
3 — Tip the armrest forward. Open the
fastener (B) that’s located in the space
where the armrest was stowed.4 — Open the inner cover.
5 — Put your hand in the opening of
the fastener, attach the tether strap’s
hook (C) to the tether anchorage (D),
and securely tighten the tether strap.
189AHA104759
A
190AHA104762
B
191AHA104775
192AHA106157
115
Page 118 of 312
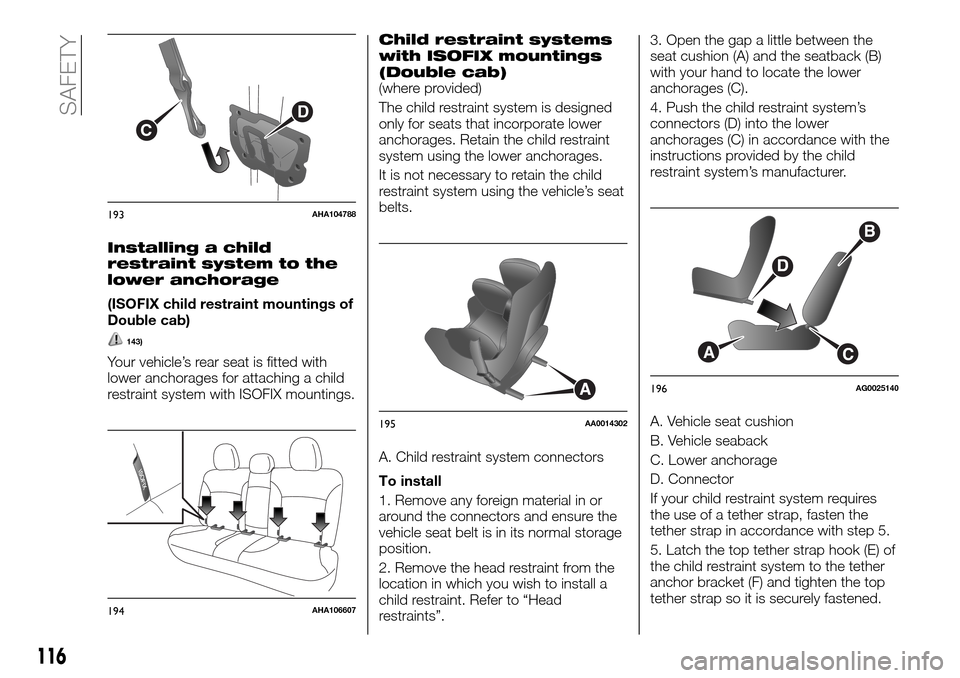
Installing a child
restraint system to the
lower anchorage
(ISOFIX child restraint mountings of
Double cab)
143)
Your vehicle’s rear seat is fitted with
lower anchorages for attaching a child
restraint system with ISOFIX mountings.
Child restraint systems
with ISOFIX mountings
(Double cab)
(where provided)
The child restraint system is designed
only for seats that incorporate lower
anchorages. Retain the child restraint
system using the lower anchorages.
It is not necessary to retain the child
restraint system using the vehicle’s seat
belts.
A. Child restraint system connectors
To install
1. Remove any foreign material in or
around the connectors and ensure the
vehicle seat belt is in its normal storage
position.
2. Remove the head restraint from the
location in which you wish to install a
child restraint. Refer to “Head
restraints”.3. Open the gap a little between the
seat cushion (A) and the seatback (B)
with your hand to locate the lower
anchorages (C).
4. Push the child restraint system’s
connectors (D) into the lower
anchorages (C) in accordance with the
instructions provided by the child
restraint system’s manufacturer.
A. Vehicle seat cushion
B. Vehicle seaback
C. Lower anchorage
D. Connector
If your child restraint system requires
the use of a tether strap, fasten the
tether strap in accordance with step 5.
5. Latch the top tether strap hook (E) of
the child restraint system to the tether
anchor bracket (F) and tighten the top
tether strap so it is securely fastened.
D
C
193AHA104788
194AHA106607
A
195AA0014302
CA
D
B
196AG0025140
116
SAFETY
Page 119 of 312
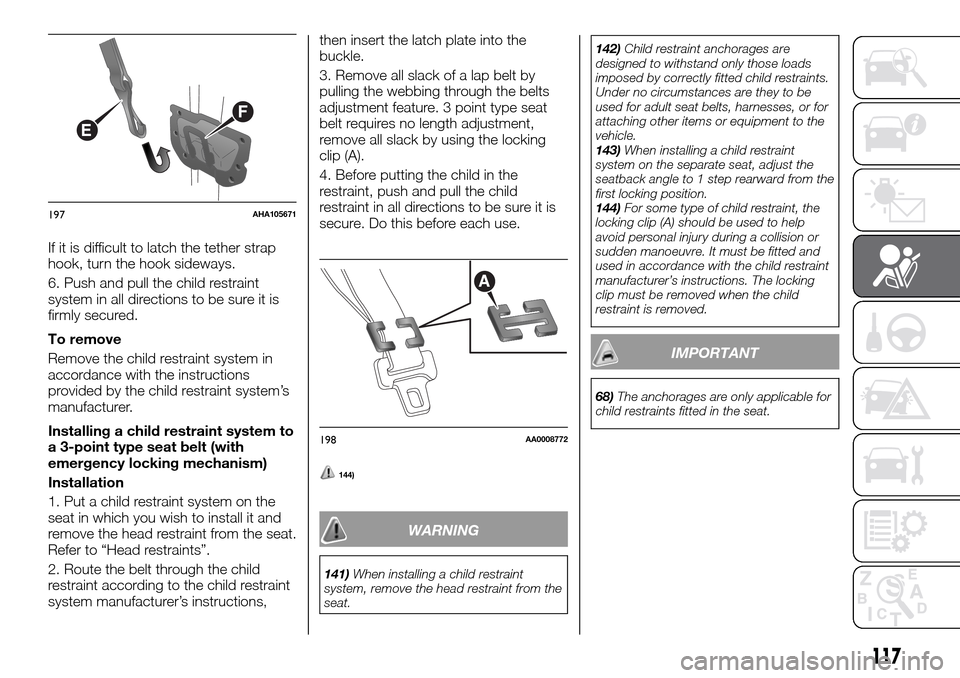
If it is difficult to latch the tether strap
hook, turn the hook sideways.
6. Push and pull the child restraint
system in all directions to be sure it is
firmly secured.
To remove
Remove the child restraint system in
accordance with the instructions
provided by the child restraint system’s
manufacturer.
Installing a child restraint system to
a 3-point type seat belt (with
emergency locking mechanism)
Installation
1. Put a child restraint system on the
seat in which you wish to install it and
remove the head restraint from the seat.
Refer to “Head restraints”.
2. Route the belt through the child
restraint according to the child restraint
system manufacturer’s instructions,then insert the latch plate into the
buckle.
3. Remove all slack of a lap belt by
pulling the webbing through the belts
adjustment feature. 3 point type seat
belt requires no length adjustment,
remove all slack by using the locking
clip (A).
4. Before putting the child in the
restraint, push and pull the child
restraint in all directions to be sure it is
secure. Do this before each use.
144)
WARNING
141)When installing a child restraint
system, remove the head restraint from the
seat.142)Child restraint anchorages are
designed to withstand only those loads
imposed by correctly fitted child restraints.
Under no circumstances are they to be
used for adult seat belts, harnesses, or for
attaching other items or equipment to the
vehicle.
143)When installing a child restraint
system on the separate seat, adjust the
seatback angle to 1 step rearward from the
first locking position.
144)For some type of child restraint, the
locking clip (A) should be used to help
avoid personal injury during a collision or
sudden manoeuvre. It must be fitted and
used in accordance with the child restraint
manufacturer’s instructions. The locking
clip must be removed when the child
restraint is removed.
IMPORTANT
68)The anchorages are only applicable for
child restraints fitted in the seat.
F
E
197AHA105671
A
198AA0008772
117
Page 120 of 312
SUPPLEMENTAL
RESTRAINT SYSTEM
AIRBAG
The information for SRS airbags
includes important information
concerning the driver’s and front
passenger’s airbags, the driver’s knee
airbag, the side airbags and the curtain
airbags.
The SRS driver’s and front passenger’s
airbags are designed to supplement the
primary protection of the driver and
front passenger side seat belt systems
by providing those occupants with
protection against head and chest
injuries in certain moderate-to-severe
frontal collisions.
The SRS driver airbag employ a dual
stage airbag system (if so equipped).
The SRS driver and front passenger
airbag is controlled by the impact
sensors (at the front of the vehicle) and
the control unit (near the centre of the
vehicle at floor level).
The SRS driver’s knee airbag (if so
equipped) is designed to supplement
the primary protection of the driver’s
seat belt system. It can reduce the
forward movement of the driver’s lower
legs and provide increased overall body
protection in certain moderate-to-
severe frontal collisions.
The SRS side airbags (if so equipped)
are designed to supplement properly
worn seat belts and provide the driver
and front passenger with protectionagainst chest injuries in certain
moderate-to-severe side impact
collisions.
The SRS curtain airbags (if so
equipped) are designed to supplement
properly worn seat belts and provide
the driver and passenger with
protection against head injuries in
certain moderate-to-severe side impact
collisions.
The SRS is NOT a substitute for the
seat belts. To ensure the maximum
protection during all types of collisions
and accidents, all occupants, including
the passengers as well as the driver,
must wear their seat belts.
How the supplemental restraint
system works
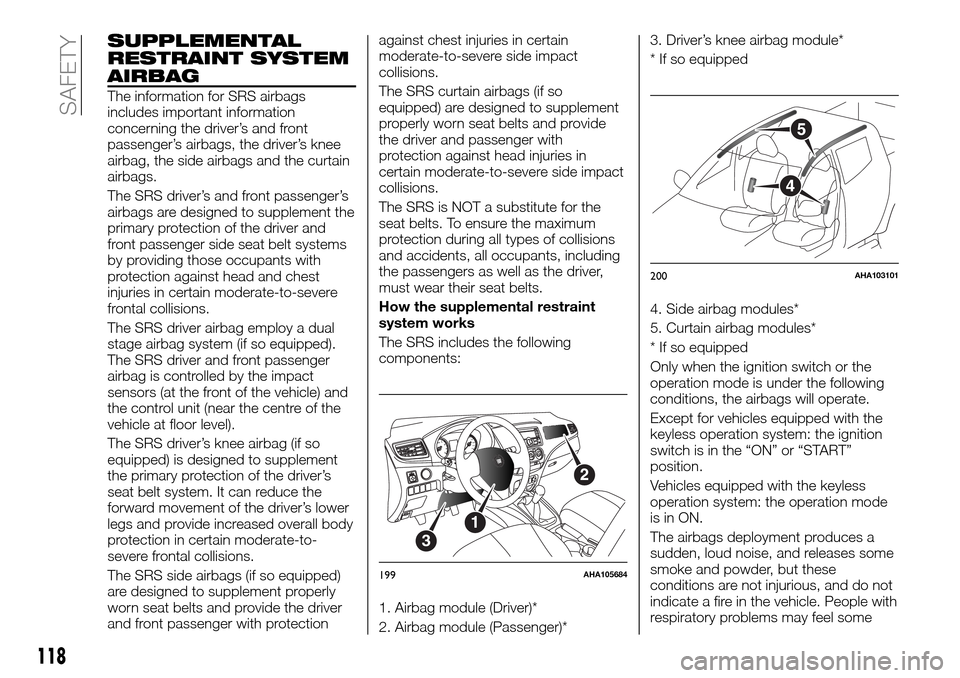
The SRS includes the following
components:
1. Airbag module (Driver)*
2. Airbag module (Passenger)*3. Driver’s knee airbag module*
* If so equipped
4. Side airbag modules*
5. Curtain airbag modules*
* If so equipped
Only when the ignition switch or the
operation mode is under the following
conditions, the airbags will operate.
Except for vehicles equipped with the
keyless operation system: the ignition
switch is in the “ON” or “START”
position.
Vehicles equipped with the keyless
operation system: the operation mode
is in ON.
The airbags deployment produces a
sudden, loud noise, and releases some
smoke and powder, but these
conditions are not injurious, and do not
indicate a fire in the vehicle. People with
respiratory problems may feel some
56
7
8120
140
160
180
200
LROFF3 2 14
3
2
1
199AHA105684
5
4
200AHA103101
118
SAFETY