ECO mode FIAT FULLBACK 2017 Owner handbook (in English)
[x] Cancel search | Manufacturer: FIAT, Model Year: 2017, Model line: FULLBACK, Model: FIAT FULLBACK 2017Pages: 312, PDF Size: 12.31 MB
Page 31 of 312
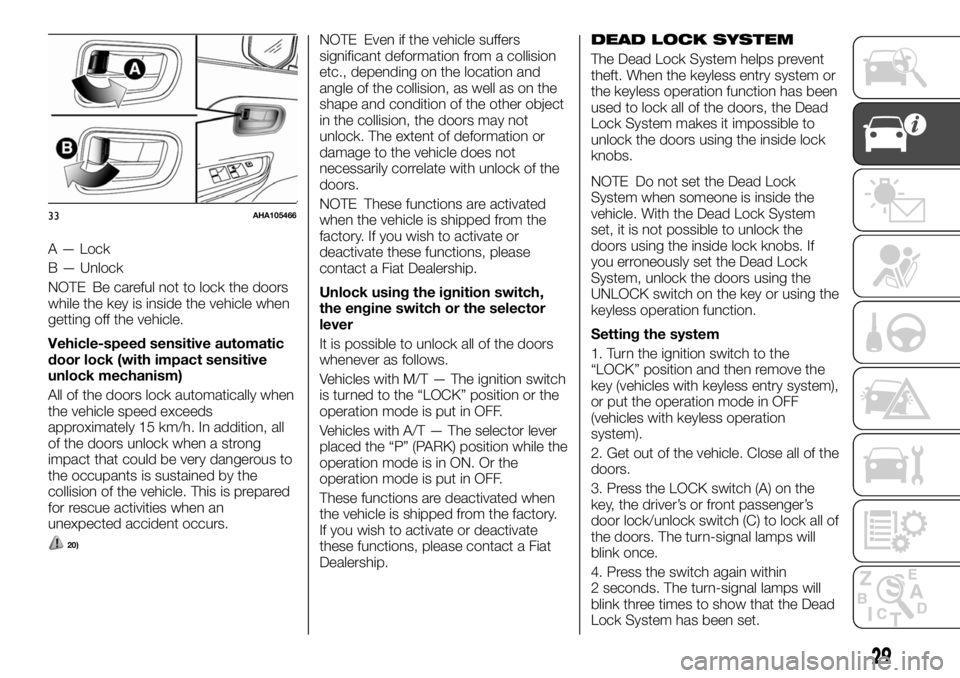
A — Lock
B — Unlock
NOTE Be careful not to lock the doors
while the key is inside the vehicle when
getting off the vehicle.
Vehicle-speed sensitive automatic
door lock (with impact sensitive
unlock mechanism)
All of the doors lock automatically when
the vehicle speed exceeds
approximately 15 km/h. In addition, all
of the doors unlock when a strong
impact that could be very dangerous to
the occupants is sustained by the
collision of the vehicle. This is prepared
for rescue activities when an
unexpected accident occurs.
20)
NOTE Even if the vehicle suffers
significant deformation from a collision
etc., depending on the location and
angle of the collision, as well as on the
shape and condition of the other object
in the collision, the doors may not
unlock. The extent of deformation or
damage to the vehicle does not
necessarily correlate with unlock of the
doors.
NOTE These functions are activated
when the vehicle is shipped from the
factory. If you wish to activate or
deactivate these functions, please
contact a Fiat Dealership.
Unlock using the ignition switch,
the engine switch or the selector
lever
It is possible to unlock all of the doors
whenever as follows.
Vehicles with M/T — The ignition switch
is turned to the “LOCK” position or the
operation mode is put in OFF.
Vehicles with A/T — The selector lever
placed the “P” (PARK) position while the
operation mode is in ON. Or the
operation mode is put in OFF.
These functions are deactivated when
the vehicle is shipped from the factory.
If you wish to activate or deactivate
these functions, please contact a Fiat
Dealership.DEAD LOCK SYSTEM
The Dead Lock System helps prevent
theft. When the keyless entry system or
the keyless operation function has been
used to lock all of the doors, the Dead
Lock System makes it impossible to
unlock the doors using the inside lock
knobs.
NOTE Do not set the Dead Lock
System when someone is inside the
vehicle. With the Dead Lock System
set, it is not possible to unlock the
doors using the inside lock knobs. If
you erroneously set the Dead Lock
System, unlock the doors using the
UNLOCK switch on the key or using the
keyless operation function.
Setting the system
1. Turn the ignition switch to the
“LOCK” position and then remove the
key (vehicles with keyless entry system),
or put the operation mode in OFF
(vehicles with keyless operation
system).
2. Get out of the vehicle. Close all of the
doors.
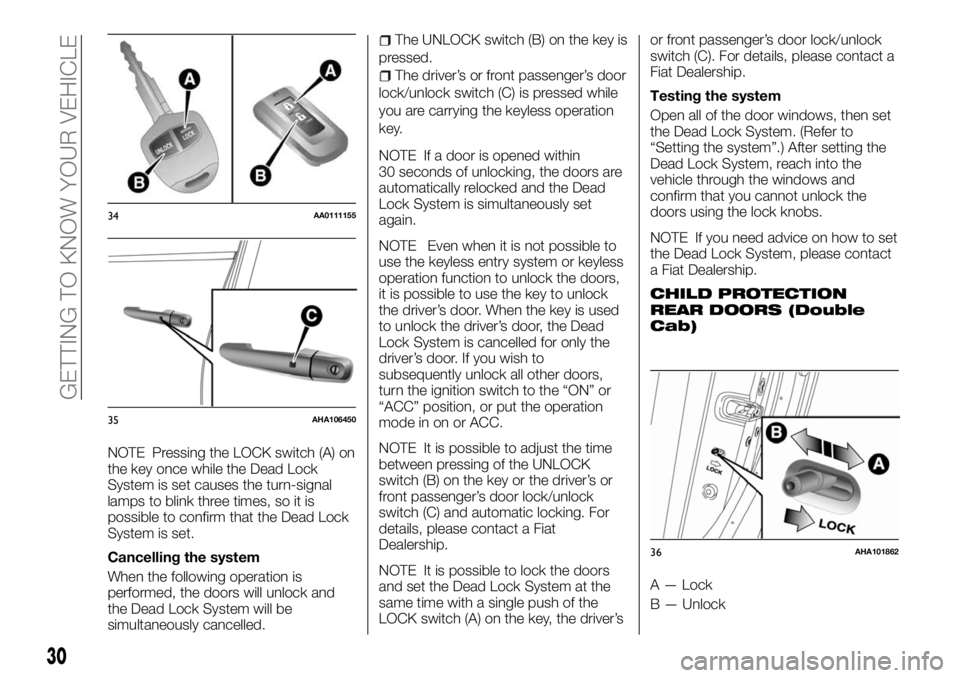
3. Press the LOCK switch (A) on the
key, the driver’s or front passenger’s
door lock/unlock switch (C) to lock all of
the doors. The turn-signal lamps will
blink once.
4. Press the switch again within
2 seconds. The turn-signal lamps will
blink three times to show that the Dead
Lock System has been set.
33AHA105466
29
Page 32 of 312
NOTE Pressing the LOCK switch (A) on
the key once while the Dead Lock
System is set causes the turn-signal
lamps to blink three times, so it is
possible to confirm that the Dead Lock
System is set.
Cancelling the system
When the following operation is
performed, the doors will unlock and
the Dead Lock System will be
simultaneously cancelled.
The UNLOCK switch (B) on the key is
pressed.
The driver’s or front passenger’s door
lock/unlock switch (C) is pressed while
you are carrying the keyless operation
key.
NOTE If a door is opened within
30 seconds of unlocking, the doors are
automatically relocked and the Dead
Lock System is simultaneously set
again.
NOTE Even when it is not possible to
use the keyless entry system or keyless
operation function to unlock the doors,
it is possible to use the key to unlock
the driver’s door. When the key is used
to unlock the driver’s door, the Dead
Lock System is cancelled for only the
driver’s door. If you wish to
subsequently unlock all other doors,
turn the ignition switch to the “ON” or
“ACC” position, or put the operation
mode in on or ACC.
NOTE It is possible to adjust the time
between pressing of the UNLOCK
switch (B) on the key or the driver’s or
front passenger’s door lock/unlock
switch (C) and automatic locking. For
details, please contact a Fiat
Dealership.
NOTE It is possible to lock the doors
and set the Dead Lock System at the
same time with a single push of the
LOCK switch (A) on the key, the driver’sor front passenger’s door lock/unlock
switch (C). For details, please contact a
Fiat Dealership.
Testing the system
Open all of the door windows, then set
the Dead Lock System. (Refer to
“Setting the system”.) After setting the
Dead Lock System, reach into the
vehicle through the windows and
confirm that you cannot unlock the
doors using the lock knobs.
NOTE If you need advice on how to set
the Dead Lock System, please contact
a Fiat Dealership.
CHILD PROTECTION
REAR DOORS (Double
Cab)
A — Lock
B — Unlock
34AA0111155
35AHA106450
36AHA101862
30
GETTING TO KNOW YOUR VEHICLE
Page 33 of 312
Child protection helps prevent doors
from being opened accidentally,
especially when small children are in the
rear seat.
A lever is provided on each rear door. If
the lever is set to the locked position,
the rear door cannot be opened using
the inside handle.
To open the rear door while the child
protection is in use, pull the outside
door handle. If the lever is set to the
“Unlock” position, the child protection
mechanism does not function.
21) 22) 23)
REAR GATE
To open
Lift up the handle and lower the rear
gate.To close
Raise the rear gate and close with
enough force to latch the assembly
securely into position.24) 25) 26) 27) 28) 29)
To swing down
30) 31)
The rear gate can be swung down in
two stages except some models. To
lower it to the second stage, proceed
as follows:
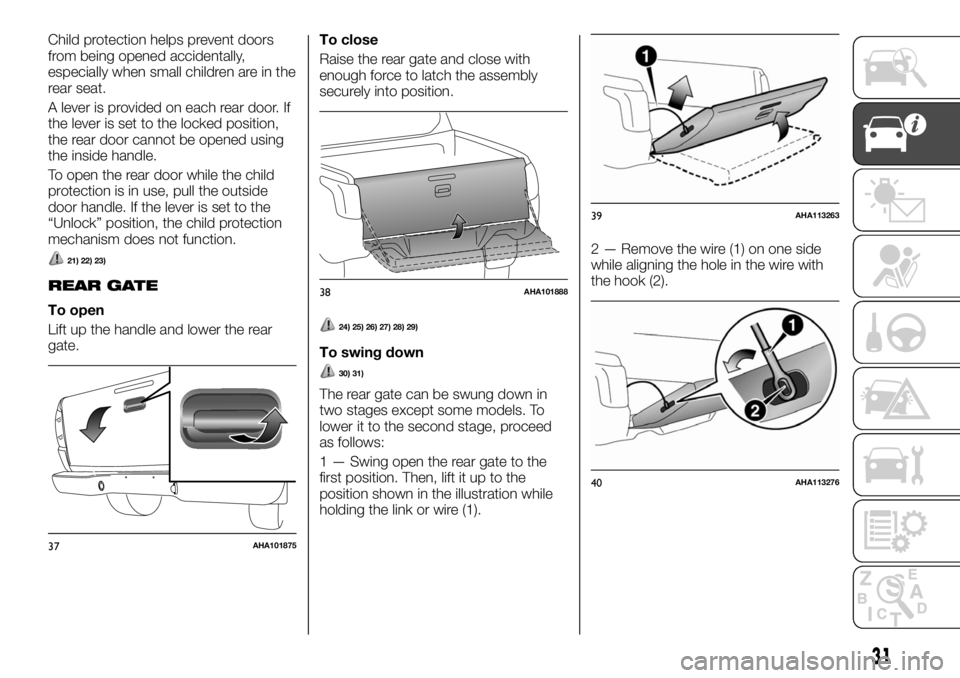
1 — Swing open the rear gate to the
first position. Then, lift it up to the
position shown in the illustration while
holding the link or wire (1).2 — Remove the wire (1) on one side
while aligning the hole in the wire with
the hook (2).
37AHA101875
38AHA101888
39AHA113263
40AHA113276
31
Page 44 of 312
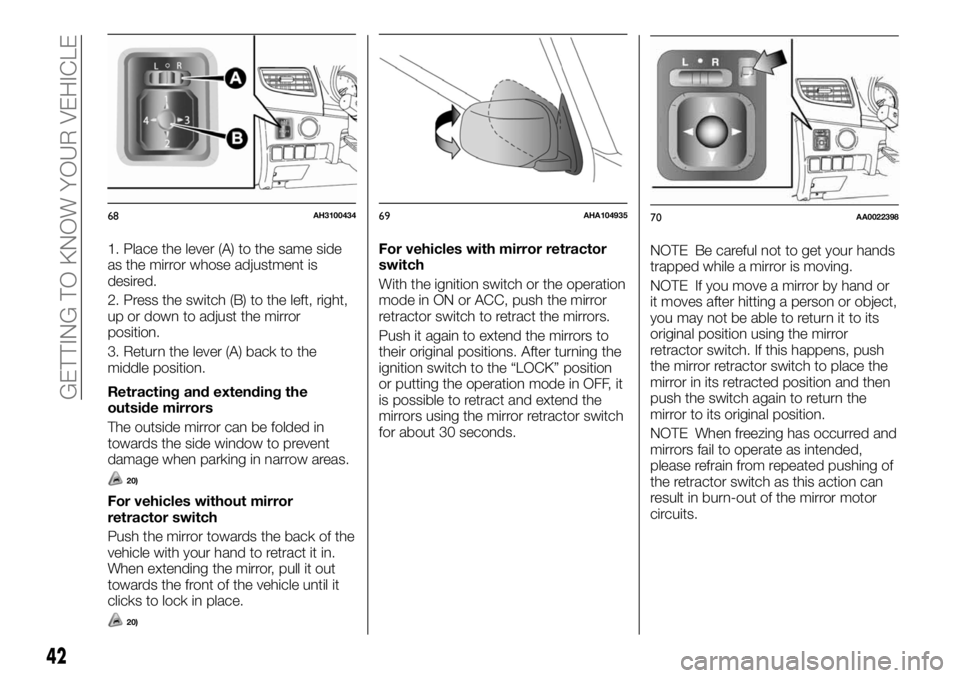
1. Place the lever (A) to the same side
as the mirror whose adjustment is
desired.
2. Press the switch (B) to the left, right,
up or down to adjust the mirror
position.
3. Return the lever (A) back to the
middle position.
Retracting and extending the
outside mirrors
The outside mirror can be folded in
towards the side window to prevent
damage when parking in narrow areas.
20)
For vehicles without mirror
retractor switch
Push the mirror towards the back of the
vehicle with your hand to retract it in.
When extending the mirror, pull it out
towards the front of the vehicle until it
clicks to lock in place.
20)
For vehicles with mirror retractor
switch
With the ignition switch or the operation
mode in ON or ACC, push the mirror
retractor switch to retract the mirrors.
Push it again to extend the mirrors to
their original positions. After turning the
ignition switch to the “LOCK” position
or putting the operation mode in OFF, it
is possible to retract and extend the
mirrors using the mirror retractor switch
for about 30 seconds.NOTE Be careful not to get your hands
trapped while a mirror is moving.
NOTE If you move a mirror by hand or
it moves after hitting a person or object,
you may not be able to return it to its
original position using the mirror
retractor switch. If this happens, push
the mirror retractor switch to place the
mirror in its retracted position and then
push the switch again to return the
mirror to its original position.
NOTE When freezing has occurred and
mirrors fail to operate as intended,
please refrain from repeated pushing of
the retractor switch as this action can
result in burn-out of the mirror motor
circuits.
68AH310043469AHA10493570AA0022398
42
GETTING TO KNOW YOUR VEHICLE
Page 45 of 312
Retracting and extending the
mirrors without using the mirror
retractor switch (where provided)
Except for vehicles equipped with
the keyless entry key or the keyless
operation key
The mirrors automatically extend when
the vehicle speed reaches 30 km/h.
Vehicles equipped with keyless
entry key
The mirrors automatically retract or
extend when the doors are locked or
unlocked using the key switches of the
keyless entry system. Refer to “Keyless
entry system”.
Vehicles equipped with the keyless
operation key
The mirrors automatically retract or
extend when the doors are locked or
unlocked using the key switches or the
keyless operation function of the
keyless operation system.
Refer to “Keyless entry system”.
Refer to “Keyless operation system: To
operate using the keyless operation
function”.
Functions can be modified as stated
below. Please consult a Fiat Dealership:
Automatically extend when the
driver’s door is closed, and then the
following operation is performed. 1 —
Except for vehicles equipped with the
keyless operation system: turn the
ignition switch to the “ON” or “ACC”
position.2—Vehicles equipped withthe keyless operation system: put the
operation mode in ON or ACC.
Automatically retract when the
ignition switch is turned to the “LOCK”
position or the operation mode is put in
OFF, and the driver’s door is then
opened.
Automatically extend when the
vehicle speed reaches 30 km/h (for
vehicles equipped with the keyless
entry key or the keyless operation key).
Deactivate the automatic extension
function.
Heated mirror (where provided)
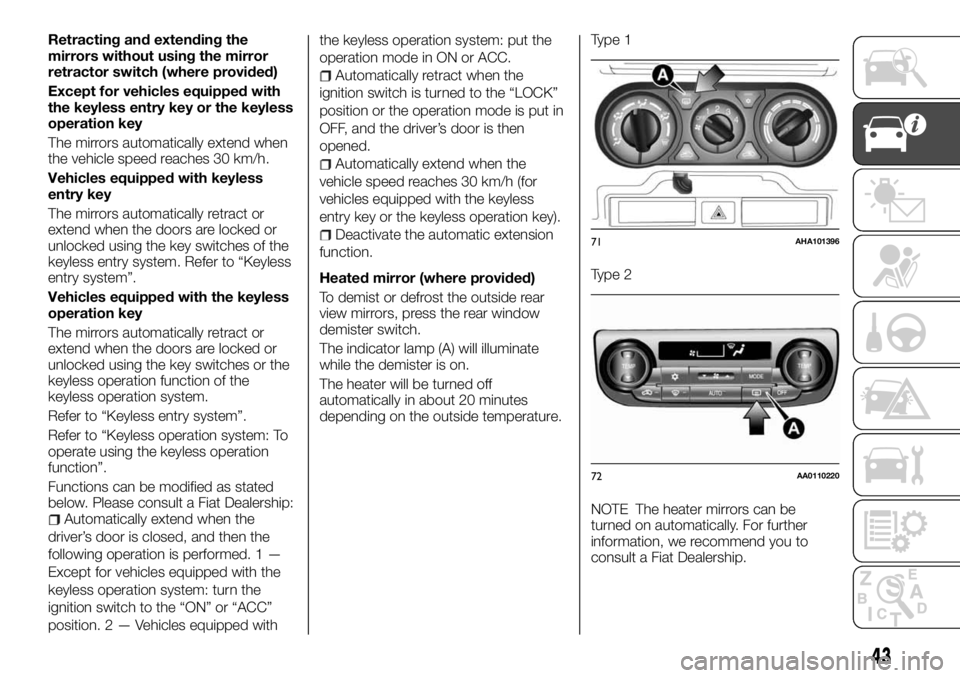
To demist or defrost the outside rear
view mirrors, press the rear window
demister switch.
The indicator lamp (A) will illuminate
while the demister is on.
The heater will be turned off
automatically in about 20 minutes
depending on the outside temperature.Type 1
Type 2
NOTE The heater mirrors can be
turned on automatically. For further
information, we recommend you to
consult a Fiat Dealership.71AHA101396
72AA0110220
43
Page 47 of 312
OFF— all lamps off
— position, tail, licence plate and
instrument panel lamps on
—headlamps and other lamps go on
Type 2
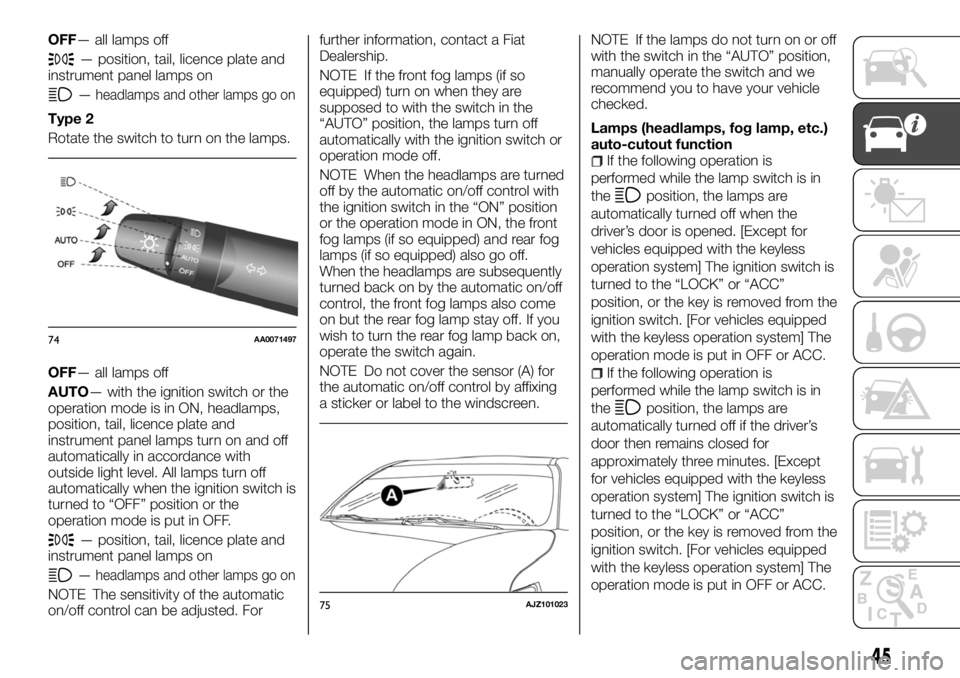
Rotate the switch to turn on the lamps.
OFF— all lamps off
AUTO— with the ignition switch or the
operation mode is in ON, headlamps,
position, tail, licence plate and
instrument panel lamps turn on and off
automatically in accordance with
outside light level. All lamps turn off
automatically when the ignition switch is
turned to “OFF” position or the
operation mode is put in OFF.
— position, tail, licence plate and
instrument panel lamps on
—headlamps and other lamps go on
NOTE The sensitivity of the automatic
on/off control can be adjusted. Forfurther information, contact a Fiat
Dealership.
NOTE If the front fog lamps (if so
equipped) turn on when they are
supposed to with the switch in the
“AUTO” position, the lamps turn off
automatically with the ignition switch or
operation mode off.
NOTE When the headlamps are turned
off by the automatic on/off control with
the ignition switch in the “ON” position
or the operation mode in ON, the front
fog lamps (if so equipped) and rear fog
lamps (if so equipped) also go off.
When the headlamps are subsequently
turned back on by the automatic on/off
control, the front fog lamps also come
on but the rear fog lamp stay off. If you
wish to turn the rear fog lamp back on,
operate the switch again.
NOTE Do not cover the sensor (A) for
the automatic on/off control by affixing
a sticker or label to the windscreen.NOTE If the lamps do not turn on or off
with the switch in the “AUTO” position,
manually operate the switch and we
recommend you to have your vehicle
checked.
Lamps (headlamps, fog lamp, etc.)
auto-cutout function
If the following operation is
performed while the lamp switch is in
the
position, the lamps are
automatically turned off when the
driver’s door is opened. [Except for
vehicles equipped with the keyless
operation system] The ignition switch is
turned to the “LOCK” or “ACC”
position, or the key is removed from the
ignition switch. [For vehicles equipped
with the keyless operation system] The
operation mode is put in OFF or ACC.
If the following operation is
performed while the lamp switch is in
the
position, the lamps are
automatically turned off if the driver’s
door then remains closed for
approximately three minutes. [Except
for vehicles equipped with the keyless
operation system] The ignition switch is
turned to the “LOCK” or “ACC”
position, or the key is removed from the
ignition switch. [For vehicles equipped
with the keyless operation system] The
operation mode is put in OFF or ACC.
74AA0071497
75AJZ101023
45
Page 48 of 312
NOTE The lamp auto-cutout function
can also be disabled. For further
information, we recommend you to
consult a Fiat Dealership.
Lamp monitor buzzer
If the following operation is performed,
a buzzer will sound to remind the driver
to turn off the lamps. [Except for
vehicles equipped with the keyless
operation system]
If the driver’s door is opened when the
key is in the “LOCK” or “ACC” position
or removed from the ignition switch
while the lamps are on. [For vehicles
equipped with the keyless operation
system] If the driver’s door is opened
when the operation mode is in ACC or
OFF while the lamps are on. In both
cases, the buzzer will automatically
stop if the auto-cutoff function is
activated, the lamp switch is turned off,
or the door is closed.
Daytime running lamp
The daytime running lamps comes on
when the engine is running and the
lamp switch is in the “OFF” or “AUTO”
position and the tail lamps are off.
60) 61)
Dipper (High/Low beam change)
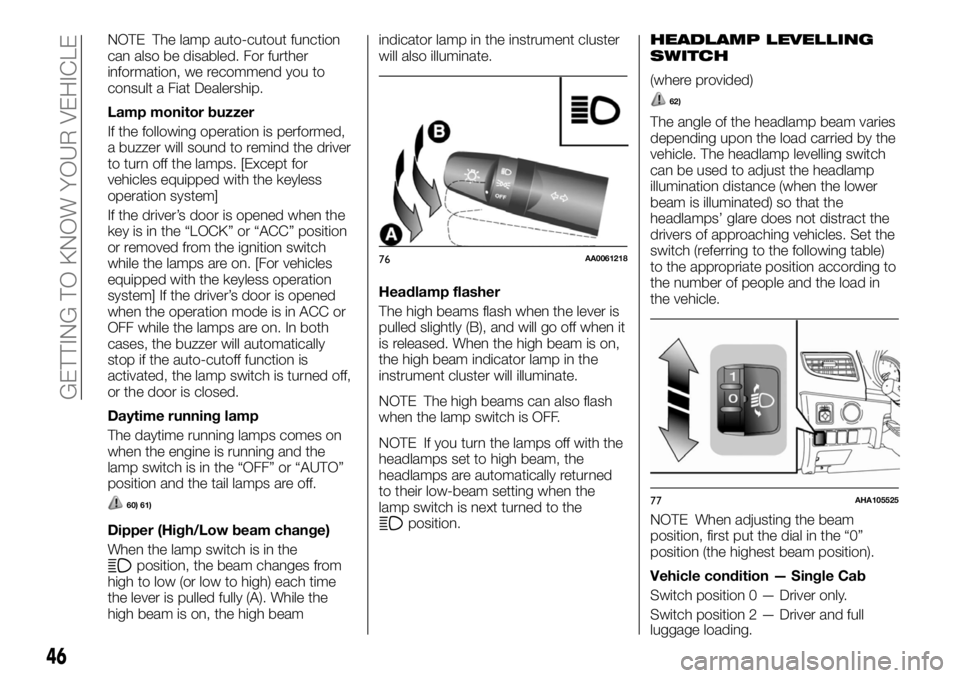
When the lamp switch is in the
position, the beam changes from
high to low (or low to high) each time
the lever is pulled fully (A). While the
high beam is on, the high beamindicator lamp in the instrument cluster
will also illuminate.
Headlamp flasher
The high beams flash when the lever is
pulled slightly (B), and will go off when it
is released. When the high beam is on,
the high beam indicator lamp in the
instrument cluster will illuminate.
NOTE The high beams can also flash
when the lamp switch is OFF.
NOTE If you turn the lamps off with the
headlamps set to high beam, the
headlamps are automatically returned
to their low-beam setting when the
lamp switch is next turned to the
position.
HEADLAMP LEVELLING
SWITCH
(where provided)
62)
The angle of the headlamp beam varies
depending upon the load carried by the
vehicle. The headlamp levelling switch
can be used to adjust the headlamp
illumination distance (when the lower
beam is illuminated) so that the
headlamps’ glare does not distract the
drivers of approaching vehicles. Set the
switch (referring to the following table)
to the appropriate position according to
the number of people and the load in
the vehicle.
NOTE When adjusting the beam
position, first put the dial in the “0”
position (the highest beam position).
Vehicle condition — Single Cab
Switch position 0 — Driver only.
Switch position 2 — Driver and full
76AA0061218
77AHA105525
46
GETTING TO KNOW YOUR VEHICLE
luggage loading.
Page 49 of 312
Vehicle condition — Club Cab and
Double Cab
Switch position 0 — Driver only.
Switch position 3 — Driver and full
luggage loading (except for vehicles
with high intensity discharge headlamps
and 16 inch tyre).
Switch position 4 — Driver and full
luggage loading (vehicles with high
intensity discharge headlamps and
16 inch tyre).
TURN SIGNAL LEVER
The turn-signal lamps flash when the
lever is operated (with the ignition
switch or the operation mode is in ON).
At the same time, the turn-signal
indicator flashes.
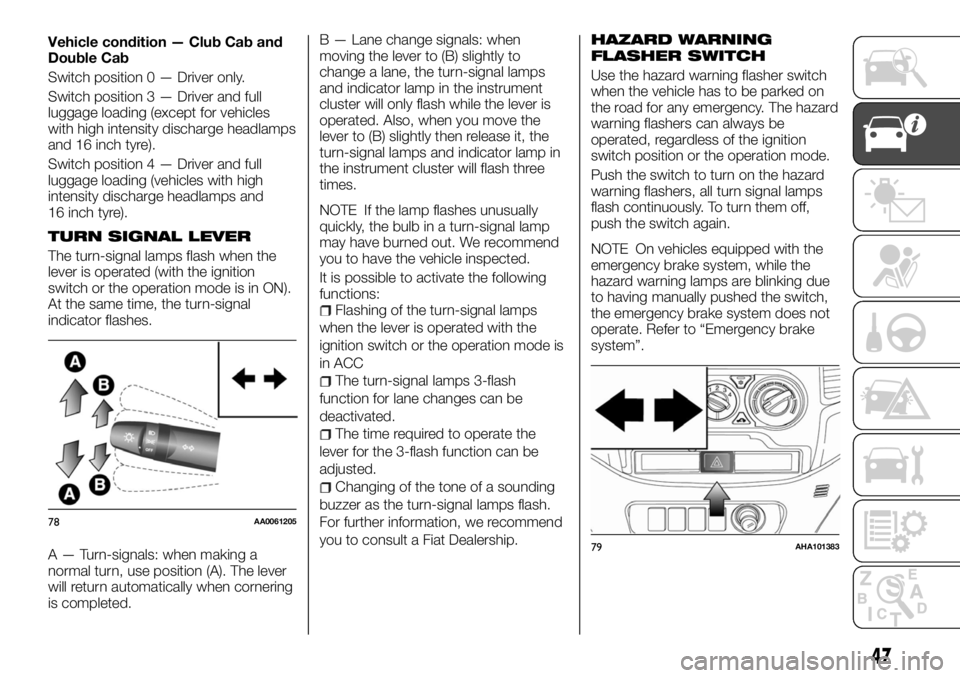
A — Turn-signals: when making a
normal turn, use position (A). The lever
will return automatically when cornering
is completed.B — Lane change signals: when
moving the lever to (B) slightly to
change a lane, the turn-signal lamps
and indicator lamp in the instrument
cluster will only flash while the lever is
operated. Also, when you move the
lever to (B) slightly then release it, the
turn-signal lamps and indicator lamp in
the instrument cluster will flash three
times.
NOTE If the lamp flashes unusually
quickly, the bulb in a turn-signal lamp
may have burned out. We recommend
you to have the vehicle inspected.
It is possible to activate the following
functions:
Flashing of the turn-signal lamps
when the lever is operated with the
ignition switch or the operation mode is
in ACC
The turn-signal lamps 3-flash
function for lane changes can be
deactivated.
The time required to operate the
lever for the 3-flash function can be
adjusted.
Changing of the tone of a sounding
buzzer as the turn-signal lamps flash.
For further information, we recommend
you to consult a Fiat Dealership.
HAZARD WARNING
FLASHER SWITCH
Use the hazard warning flasher switch
when the vehicle has to be parked on
the road for any emergency. The hazard
warning flashers can always be
operated, regardless of the ignition
switch position or the operation mode.
Push the switch to turn on the hazard
warning flashers, all turn signal lamps
flash continuously. To turn them off,
push the switch again.
NOTE On vehicles equipped with the
emergency brake system, while the
hazard warning lamps are blinking due
to having manually pushed the switch,
the emergency brake system does not
operate. Refer to “Emergency brake
system”.
78AA0061205
79AHA101383
47
Page 53 of 312
ignition switch is turned to the “ON”
position with all doors closed.
Vehicles with keyless entry system:
the lamp illuminates when a door is
opened. It goes off about 15 seconds
after the all doors are closed. However,
the lamp goes off immediately with all
doors closed in the following cases:
When the ignition switch is turned to
the “ON” position or the operation
mode is put in ON.
When the central door lock function
is used to lock the vehicle.
When the keyless entry key or the
keyless operation key is used to lock
the vehicle.
If the vehicle is equipped with the
keyless operation system, when the
keyless operation function is used to
lock the vehicle.
Auto cut-out function:
if the lamp is left switched on with the
ignition switch is in the “LOCK” or
“ACC” position or the operation mode
is in OFF or ACC, and a door is
opened, it goes off automatically after
approximately 30 minutes. The lamp will
illuminate again after it automatically
goes off in the following cases:
When the ignition switch is turned to
the “ON” position or the operation
mode is put in ON.
When the keyless entry system or
the keyless operation system is
operated.
When all doors are closed.
C — OFF
The lamp goes off regardless of
whether a door is open or closed.
NOTE When the key was used to start
the engine, if the key is removed while
the doors are closed, the lamp is
illuminated and after a few seconds it
goes off.
NOTE When the keyless operation
function was used to start the engine, if
the operation mode is put in OFF while
the door are closed, the lamp
illuminates and after about 15 seconds
it goes off (if so equipped).
NOTE The time until the lamp goes off
(delayed off) can be adjusted. For
details, please consult a Fiat Dealership.
NOTE The auto cut-out function
cannot be operated when the room
lamp switch is in the “ON” position (1).
Also, this function can be deactivated.
For details, please consult a Fiat
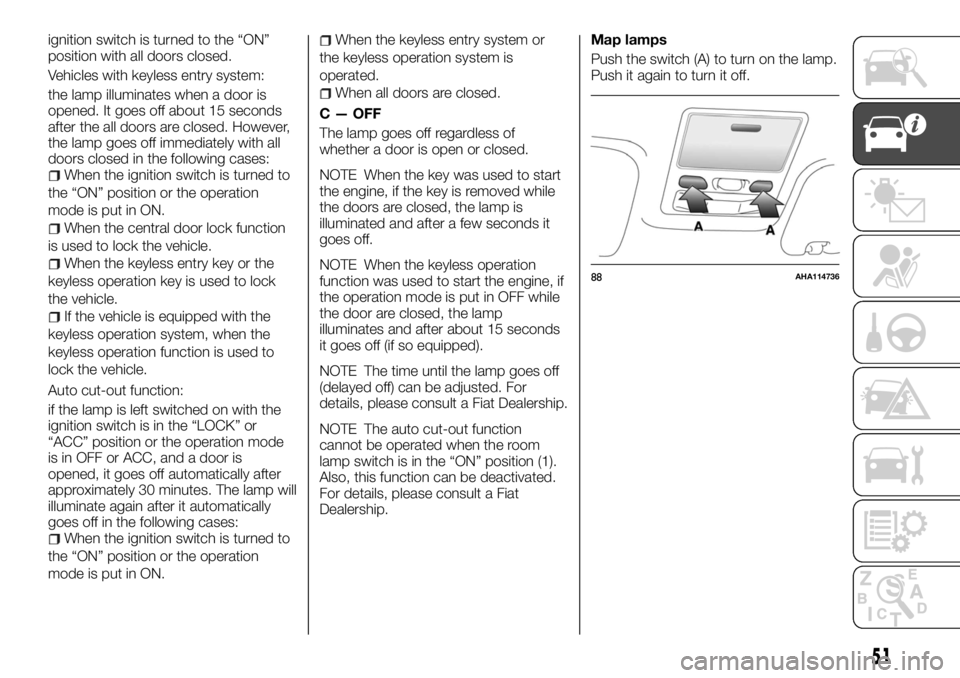
Dealership.Map lamps
Push the switch (A) to turn on the lamp.
Push it again to turn it off.
88AHA114736
51
Page 54 of 312
WIPER AND WASHER
SWITCH
The windscreen wipers and washer can
be operated with the ignition switch or
the operation mode in ON or ACC. If
the blades are frozen to the
windscreen, do not operate the wipers
until the ice has melted and the blades
are freed, otherwise the wiper motor
may be damaged.
63) 64) 65) 66)
Windscreen wipers
(Except for vehicles equipped with rain
sensor)
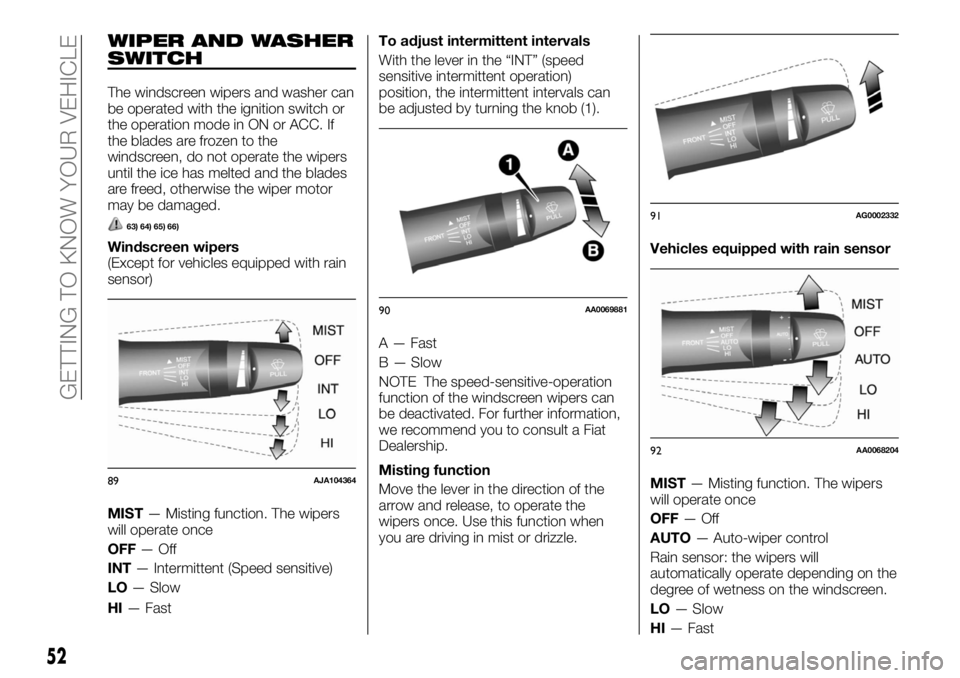
MIST— Misting function. The wipers
will operate once
OFF—Off
INT— Intermittent (Speed sensitive)
LO— Slow
HI— FastTo adjust intermittent intervals
With the lever in the “INT” (speed
sensitive intermittent operation)
position, the intermittent intervals can
be adjusted by turning the knob (1).
A — Fast
B — Slow
NOTE The speed-sensitive-operation
function of the windscreen wipers can
be deactivated. For further information,
we recommend you to consult a Fiat
Dealership.
Misting function
Move the lever in the direction of the
arrow and release, to operate the
wipers once. Use this function when
you are driving in mist or drizzle.Vehicles equipped with rain sensor
MIST— Misting function. The wipers
will operate once
OFF—Off
AUTO— Auto-wiper control
Rain sensor: the wipers will
automatically operate depending on the
degree of wetness on the windscreen.
LO— Slow
HI— Fast
89AJA104364
90AA0069881
91AG0002332
92AA0068204
52
GETTING TO KNOW YOUR VEHICLE