check oil FIAT FULLBACK 2017 Owner handbook (in English)
[x] Cancel search | Manufacturer: FIAT, Model Year: 2017, Model line: FULLBACK, Model: FIAT FULLBACK 2017Pages: 312, PDF Size: 12.31 MB
Page 236 of 312
Fuse replacement
332) 333) 334) 335) 336) 337)
179)
1. Before replacing a fuse, always turn
off the electrical circuit concerned and
place the ignition switch in the “LOCK”
position or put the operation mode in
OFF.
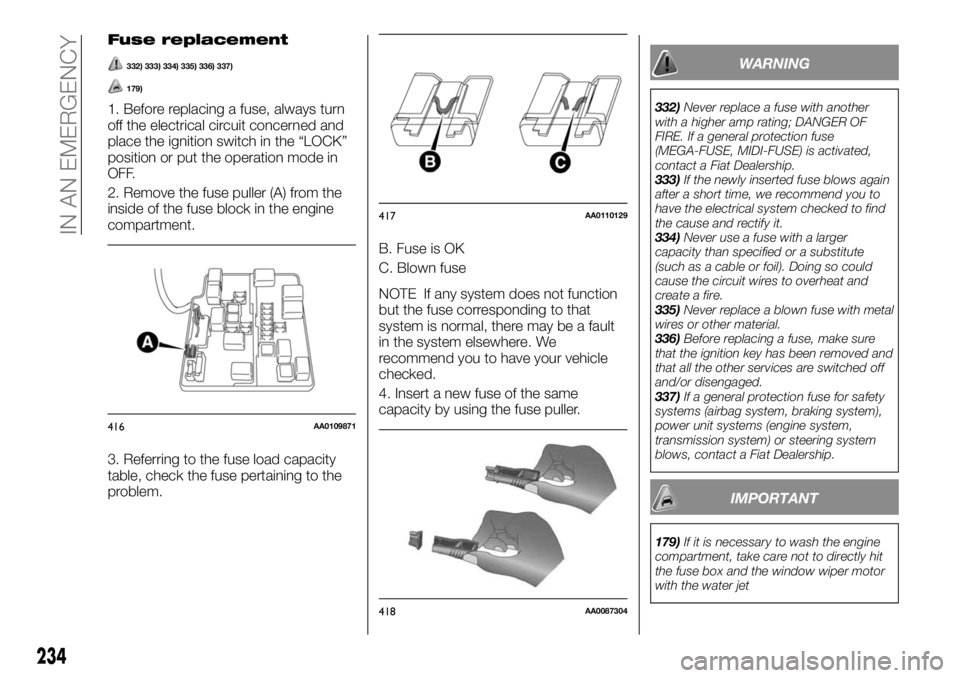
2. Remove the fuse puller (A) from the
inside of the fuse block in the engine
compartment.
3. Referring to the fuse load capacity
table, check the fuse pertaining to the
problem.B. Fuse is OK
C. Blown fuse
NOTE If any system does not function
but the fuse corresponding to that
system is normal, there may be a fault
in the system elsewhere. We
recommend you to have your vehicle
checked.
4. Insert a new fuse of the same
capacity by using the fuse puller.
WARNING
332)Never replace a fuse with another
with a higher amp rating; DANGER OF
FIRE. If a general protection fuse
(MEGA-FUSE, MIDI-FUSE) is activated,
contact a Fiat Dealership.
333)If the newly inserted fuse blows again
after a short time, we recommend you to
have the electrical system checked to find
the cause and rectify it.
334)Never use a fuse with a larger
capacity than specified or a substitute
(such as a cable or foil). Doing so could
cause the circuit wires to overheat and
create a fire.
335)Never replace a blown fuse with metal
wires or other material.
336)Before replacing a fuse, make sure
that the ignition key has been removed and
that all the other services are switched off
and/or disengaged.
337)If a general protection fuse for safety
systems (airbag system, braking system),
power unit systems (engine system,
transmission system) or steering system
blows, contact a Fiat Dealership.
IMPORTANT
179)If it is necessary to wash the engine
compartment, take care not to directly hit
the fuse box and the window wiper motor
with the water jet
416AA0109871
417AA0110129
418AA0087304
234
IN AN EMERGENCY
Page 237 of 312
REPLACEMENT OF
LAMP BULBS
338) 339) 340) 341) 342) 343) 344) 345)
Before replacing a bulb, ensure the
lamp is off. Do not touch the glass part
of the new bulb with your bare fingers;
the skin oil left on the glass will
evaporate when the bulb gets hot and
the vapour will condense on the
reflector and dim the surface.
NOTE If you are unsure of how to carry
out the work as required, we
recommend you to consult a specialist.
Be careful not to scratch the vehicle
body when removing a lamp and lens.
When it rains, or when the vehicle has
been washed, the inside of the lens
sometimes becomes foggy. This is the
same phenomenon as when window
glass mists up on a humid day, and
does not indicate a functional problem.
When the lamp is switched on, the heatwill remove the fog. However, if water
gathers inside the lamp, we
recommend you to have the lamp
checked.
Bulb location and capacity
When replacing a bulb, use a new bulb
with the same wattage and colour.
Outside
Front
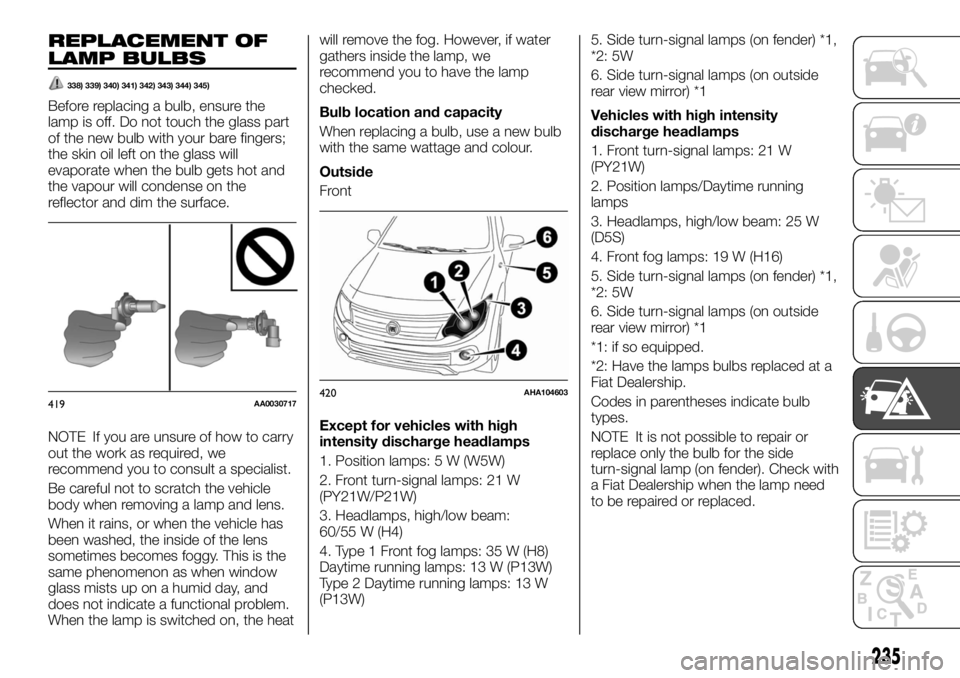
Except for vehicles with high
intensity discharge headlamps
1. Position lamps: 5 W (W5W)
2. Front turn-signal lamps: 21 W
(PY21W/P21W)
3. Headlamps, high/low beam:
60/55 W (H4)
4. Type 1 Front fog lamps: 35 W (H8)
Daytime running lamps: 13 W (P13W)
Type 2 Daytime running lamps: 13 W
(P13W)5. Side turn-signal lamps (on fender) *1,
*2: 5W
6. Side turn-signal lamps (on outside
rear view mirror) *1
Vehicles with high intensity
discharge headlamps
1. Front turn-signal lamps: 21 W
(PY21W)
2. Position lamps/Daytime running
lamps
3. Headlamps, high/low beam: 25 W
(D5S)
4. Front fog lamps: 19 W (H16)
5. Side turn-signal lamps (on fender) *1,
*2: 5W
6. Side turn-signal lamps (on outside
rear view mirror) *1
*1: if so equipped.
*2: Have the lamps bulbs replaced at a
Fiat Dealership.
Codes in parentheses indicate bulb
types.
NOTE It is not possible to repair or
replace only the bulb for the side
turn-signal lamp (on fender). Check with
a Fiat Dealership when the lamp need
to be repaired or replaced.
419AA0030717420AHA104603
235
Page 245 of 312
SERVICING AND MAINTENANCE
Correct maintenance permits the
performance of the car to be
maintained over time, as well as limited
running costs and safeguarding the
efficiency of the safety systems.
This chapter explains how.SERVICE PRECAUTIONS.......244
SCHEDULED SERVICING PLAN . .245
PERIODIC CHECKS..........250
DEMANDING VEHICLE USE.....250
CHECKING LEVELS..........251
CATALYTIC CONVERTER.......252
ENGINE OIL...............252
ENGINE COOLANT...........253
WASHER FLUID.............255
BRAKE FLUID..............255
CLUTCH FLUID.............256
POWER STEERING FLUID......257
BATTERY.................258
WIPER BLADE REPLACEMENT . . .260
GENERAL MAINTENANCE......261
VEHICLE CARE PRECAUTIONS. . .261
CLEANING THE INTERIOR OF
YOUR VEHICLE.............262
CLEANING THE EXTERIOR OF
YOUR VEHICLE.............263
TYRES...................267
243
Page 247 of 312
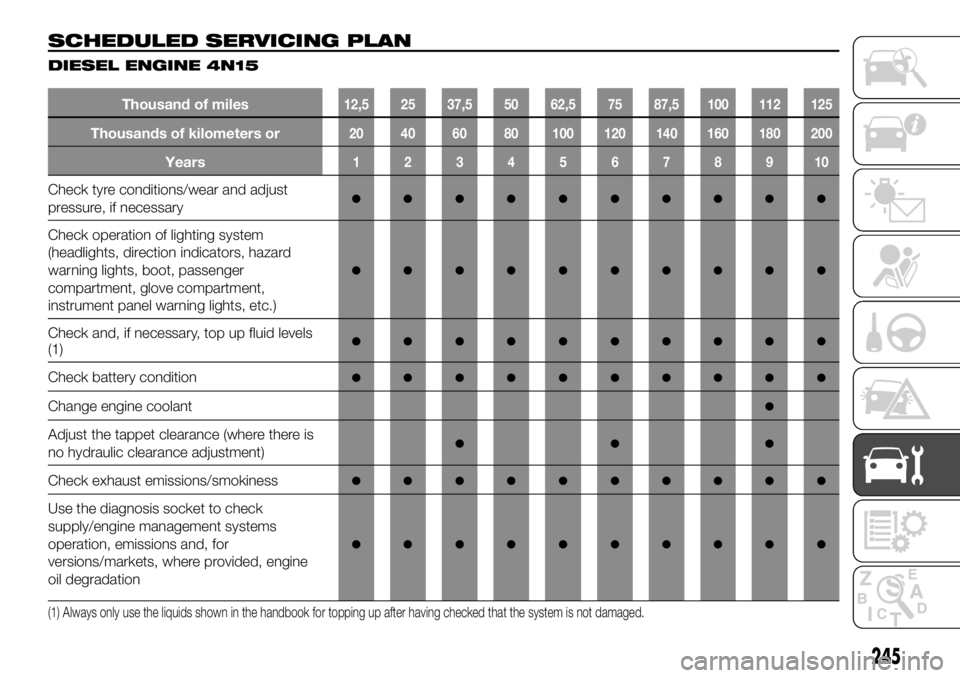
SCHEDULED SERVICING PLAN
DIESEL ENGINE 4N15
Thousand of miles12,5 25 37,5 50 62,5 75 87,5 100 112 125
Thousands of kilometers or20 40 60 80 100 120 140 160 180 200
Years12345678910
Check tyre conditions/wear and adjust
pressure, if necessary●●●●●●●●●●
Check operation of lighting system
(headlights, direction indicators, hazard
warning lights, boot, passenger
compartment, glove compartment,
instrument panel warning lights, etc.)
●●●●●●●●●●
Check and, if necessary, top up fluid levels
(1)●●●●●●●●●●
Check battery condition●●●●●●●●●●
Change engine coolant●
Adjust the tappet clearance (where there is
no hydraulic clearance adjustment)●●●
Check exhaust emissions/smokiness●●●●●●●●●●
Use the diagnosis socket to check
supply/engine management systems
operation, emissions and, for
versions/markets, where provided, engine
oil degradation
●●●●●●●●●●
(1) Always only use the liquids shown in the handbook for topping up after having checked that the system is not damaged.
245
Page 248 of 312
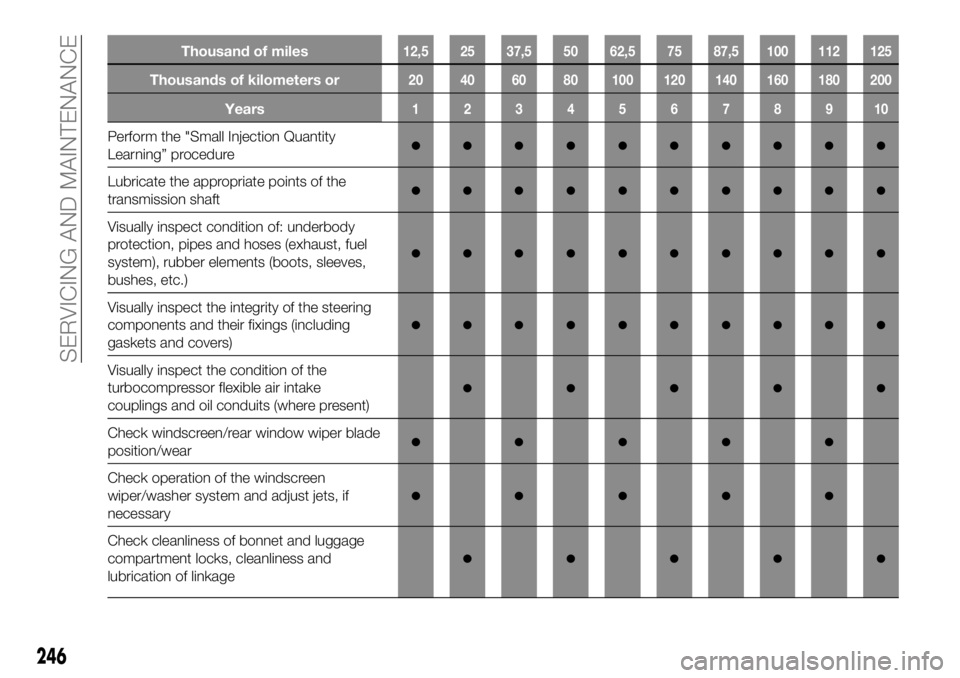
Thousand of miles12,5 25 37,5 50 62,5 75 87,5 100 112 125
Thousands of kilometers or20 40 60 80 100 120 140 160 180 200
Years12345678910
Perform the "Small Injection Quantity
Learning” procedure●●●●●●●●●●
Lubricate the appropriate points of the
transmission shaft●●●●●●●●●●
Visually inspect condition of: underbody
protection, pipes and hoses (exhaust, fuel
system), rubber elements (boots, sleeves,
bushes, etc.)
●●●●●●●●●●
Visually inspect the integrity of the steering
components and their fixings (including
gaskets and covers)
●●●●●●●●●●
Visually inspect the condition of the
turbocompressor flexible air intake
couplings and oil conduits (where present)
●●●●●
Check windscreen/rear window wiper blade
position/wear●●●●●
Check operation of the windscreen
wiper/washer system and adjust jets, if
necessary
●●●●●
Check cleanliness of bonnet and luggage
compartment locks, cleanliness and
lubrication of linkage
●●●●●
246
SERVICING AND MAINTENANCE
Page 249 of 312
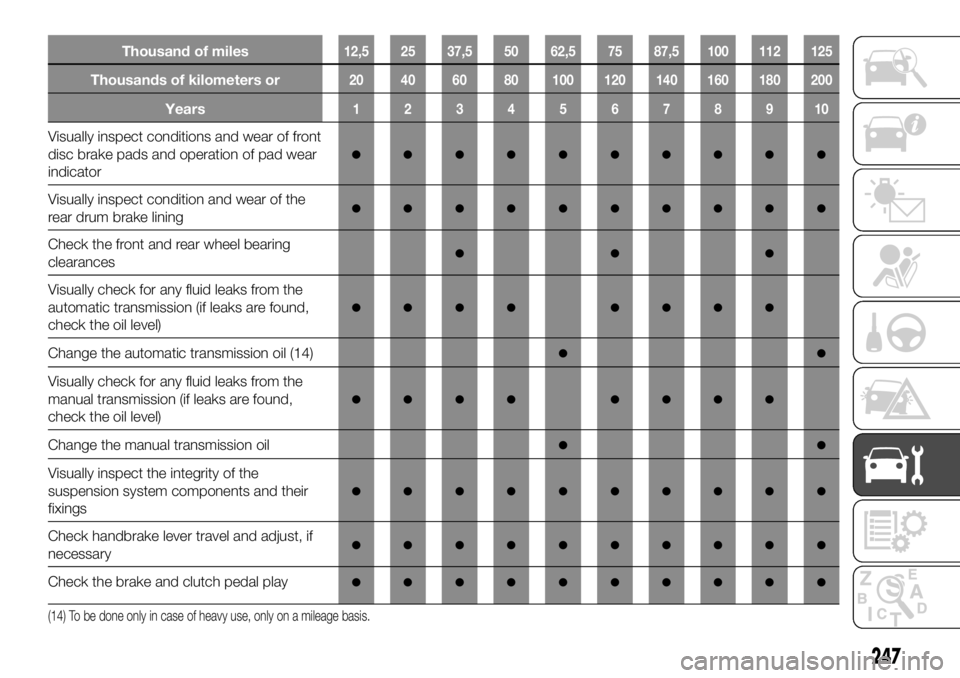
Thousand of miles12,5 25 37,5 50 62,5 75 87,5 100 112 125
Thousands of kilometers or20 40 60 80 100 120 140 160 180 200
Years12345678910
Visually inspect conditions and wear of front
disc brake pads and operation of pad wear
indicator
●●●●●●●●●●
Visually inspect condition and wear of the
rear drum brake lining●●●●●●●●●●
Check the front and rear wheel bearing
clearances●●●
Visually check for any fluid leaks from the
automatic transmission (if leaks are found,
check the oil level)
●●●● ●●●●
Change the automatic transmission oil (14)●●
Visually check for any fluid leaks from the
manual transmission (if leaks are found,
check the oil level)
●●●● ●●●●
Change the manual transmission oil●●
Visually inspect the integrity of the
suspension system components and their
fixings
●●●●●●●●●●
Check handbrake lever travel and adjust, if
necessary●●●●●●●●●●
Check the brake and clutch pedal play●●●●●●●●●●
(14) To be done only in case of heavy use, only on a mileage basis.
247
Page 250 of 312
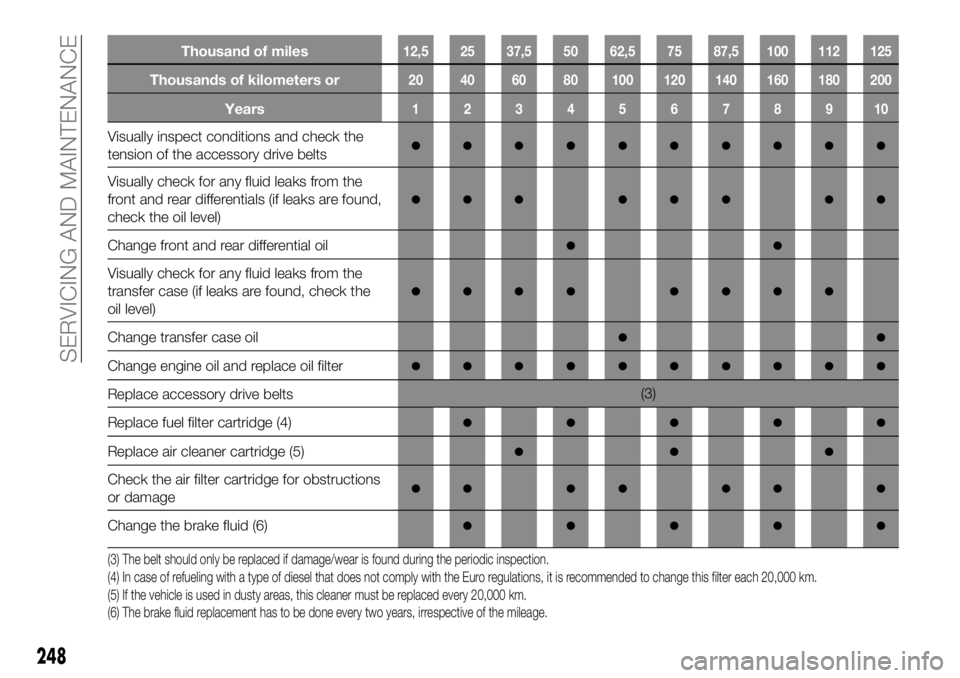
Thousand of miles12,5 25 37,5 50 62,5 75 87,5 100 112 125
Thousands of kilometers or20 40 60 80 100 120 140 160 180 200
Years12345678910
Visually inspect conditions and check the
tension of the accessory drive belts●●●●●●●●●●
Visually check for any fluid leaks from the
front and rear differentials (if leaks are found,
check the oil level)
●●● ●●● ●●
Change front and rear differential oil●●
Visually check for any fluid leaks from the
transfer case (if leaks are found, check the
oil level)
●●●● ●●●●
Change transfer case oil●●
Change engine oil and replace oil filter●●●●●●●●●●
Replace accessory drive belts(3)
Replace fuel filter cartridge (4)
●●●●●
Replace air cleaner cartridge (5)●●●
Check the air filter cartridge for obstructions
or damage●● ●● ●● ●
Change the brake fluid (6)●●●●●
(3) The belt should only be replaced if damage/wear is found during the periodic inspection.
(4) In case of refueling with a type of diesel that does not comply with the Euro regulations, it is recommended to change this filter each 20,000 km.
(5) If the vehicle is used in dusty areas, this cleaner must be replaced every 20,000 km.
(6) The brake fluid replacement has to be done every two years, irrespective of the mileage.
248
SERVICING AND MAINTENANCE
Page 252 of 312
PERIODIC CHECKS
Before long journeys, check and, if
necessary, restore:
engine coolant level;
brake fluid level;
windscreen washer fluid level;
operation of lighting system
(headlamps, direction indicators, hazard
warning lights, etc.);
tyre inflation pressure and condition;
tyre alignment;
operation of screen washer/wiper
system and positioning/wear of
windscreen/rear window wiper blades.
To ensure that the vehicle is always
efficient and well maintained, it is
advisable to make sure that you carry
out the above operations regularly
(approximately every 1000 km and
every 3000 km for checking and
topping up engine oil is advisable).
DEMANDING
VEHICLE USE
If the vehicle is mostly used in one of
the following conditions:
towing a trailer or caravan;
dusty roads;
short, repeated journeys (less than
7-8 km) at sub-zero outside
temperatures;
engine often idling or driving long
distances at low speeds or long periods
of inactivity;
the following checks must be carried
out more often than indicated in the
Scheduled Servicing Plan:
check front disc brake pad
conditions and wear;
check cleanliness of bonnet and
boot locks, cleanliness and lubrication
of linkage;
visually inspect conditions of: engine,
gearbox, transmission, pipes and hoses
(exhaust - fuel system - brakes) and
rubber elements (boots - sleeves -
bushes - etc.);
check battery charge and battery
fluid level (electrolyte);
visually inspect condition of the
accessory drive belts;
check and, if necessary, change
engine oil and replace oil filter;
check and, if necessary, replace
pollen filter.
250
SERVICING AND MAINTENANCE
Page 253 of 312
CHECKING LEVELS
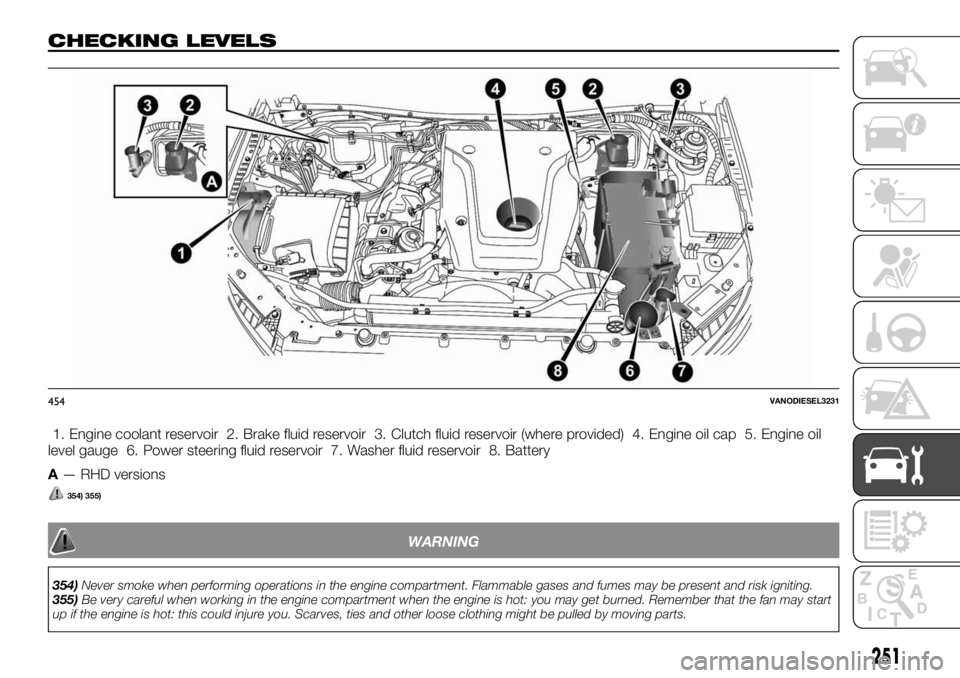
1. Engine coolant reservoir 2. Brake fluid reservoir 3. Clutch fluid reservoir (where provided) 4. Engine oil cap 5. Engine oil
level gauge 6. Power steering fluid reservoir 7. Washer fluid reservoir 8. Battery
A— RHD versions
354) 355)
WARNING
354)Never smoke when performing operations in the engine compartment. Flammable gases and fumes may be present and risk igniting.
355)Be very careful when working in the engine compartment when the engine is hot: you may get burned. Remember that the fan may start
up if the engine is hot: this could injure you. Scarves, ties and other loose clothing might be pulled by moving parts.
454VANODIESEL3231
251
Page 254 of 312
CATALYTIC
CONVERTER
356)
The exhaust gas scavenging devices
used with catalytic converter are
extremely efficient for the reduction of
noxious gases. The catalytic converter
is installed in the exhaust system.
It is important to keep the engine
properly tuned to ensure proper catalyst
operation and prevent possible catalyst
damage.
NOTE Use fuel of the type
recommended in “Fuel selection”.
WARNING
356)As with any vehicle, do not park or
operate this vehicle in areas where
combustible materials such as dry grass or
leaves can come in contact with a hot
exhaust since a fire could occur.
ENGINE OIL
To check and refill engine oil
357)
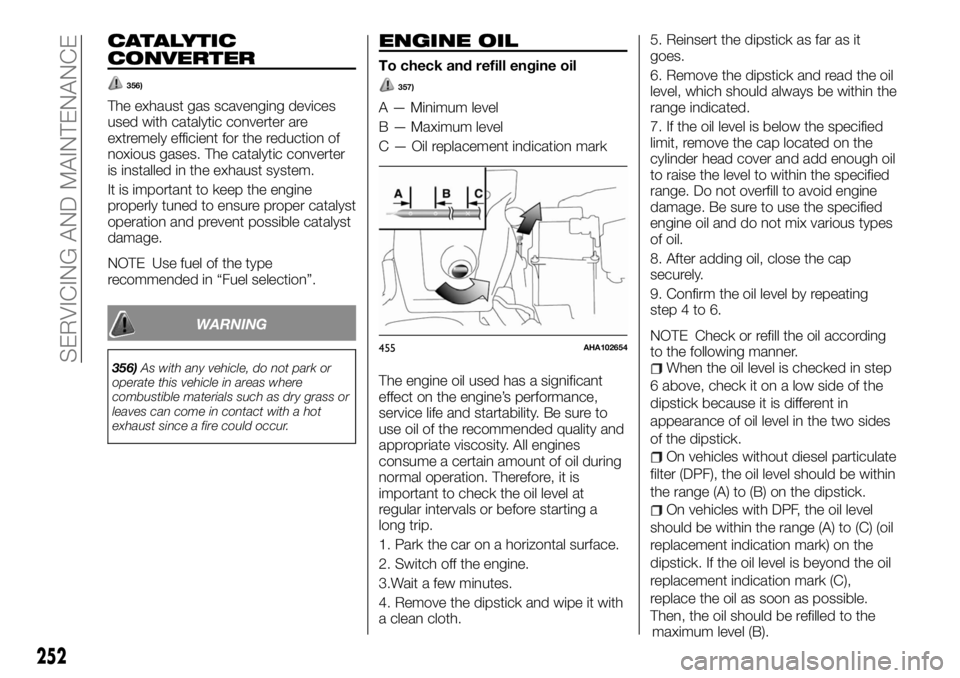
A — Minimum level
B — Maximum level
C — Oil replacement indication mark
The engine oil used has a significant
effect on the engine’s performance,
service life and startability. Be sure to
use oil of the recommended quality and
appropriate viscosity. All engines
consume a certain amount of oil during
normal operation. Therefore, it is
important to check the oil level at
regular intervals or before starting a
long trip.
1. Park the car on a horizontal surface.
2. Switch off the engine.
3.Wait a few minutes.
4. Remove the dipstick and wipe it with
a clean cloth.5. Reinsert the dipstick as far as it
goes.
6. Remove the dipstick and read the oil
level, which should always be within the
range indicated.
7. If the oil level is below the specified
limit, remove the cap located on the
cylinder head cover and add enough oil
to raise the level to within the specified
range. Do not overfill to avoid engine
damage. Be sure to use the specified
engine oil and do not mix various types
of oil.
8. After adding oil, close the cap
securely.
9. Confirm the oil level by repeating
step4to6.
NOTE Check or refill the oil according
to the following manner.
When the oil level is checked in step
6 above, check it on a low side of the
dipstick because it is different in
appearance of oil level in the two sides
of the dipstick.
On vehicles without diesel particulate
filter (DPF), the oil level should be within
the range (A) to (B) on the dipstick.
On vehicles with DPF, the oil level
should be within the range (A) to (C) (oil
replacement indication mark) on the
dipstick. If the oil level is beyond the oil
replacement indication mark (C),
replace the oil as soon as possible.
Then, the oil should be refilled to the
455AHA102654
252
SERVICING AND MAINTENANCE
maximum level (B).