clock FIAT FULLBACK 2017 Owner handbook (in English)
[x] Cancel search | Manufacturer: FIAT, Model Year: 2017, Model line: FULLBACK, Model: FIAT FULLBACK 2017Pages: 312, PDF Size: 12.31 MB
Page 240 of 312

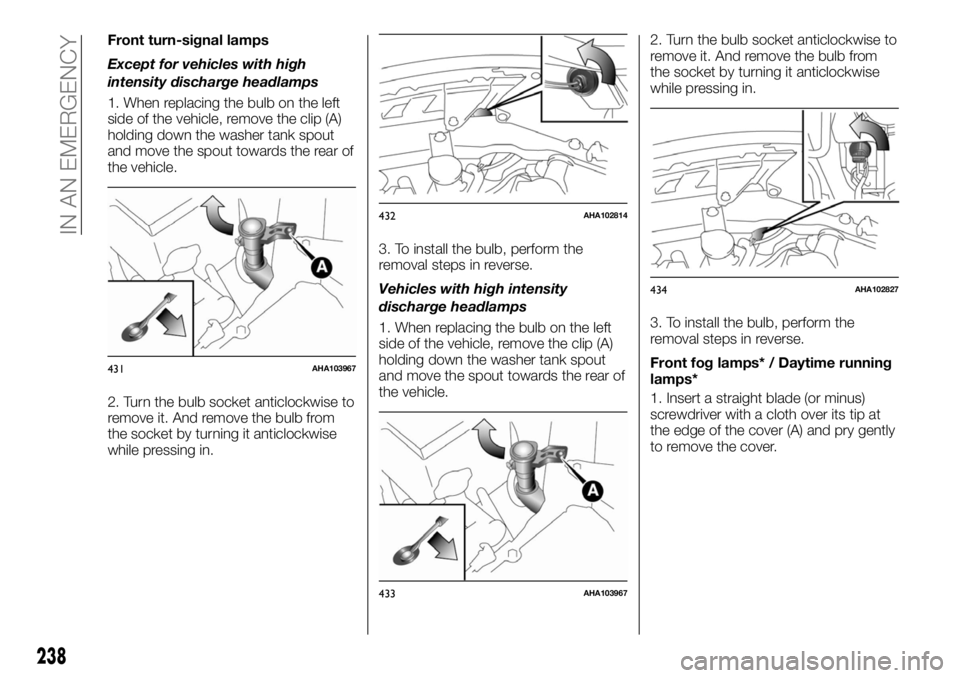
Front turn-signal lamps
Except for vehicles with high
intensity discharge headlamps
1. When replacing the bulb on the left
side of the vehicle, remove the clip (A)
holding down the washer tank spout
and move the spout towards the rear of
the vehicle.
2. Turn the bulb socket anticlockwise to
remove it. And remove the bulb from
the socket by turning it anticlockwise
while pressing in.3. To install the bulb, perform the
removal steps in reverse.
Vehicles with high intensity
discharge headlamps
1. When replacing the bulb on the left
side of the vehicle, remove the clip (A)
holding down the washer tank spout
and move the spout towards the rear of
the vehicle.2. Turn the bulb socket anticlockwise to
remove it. And remove the bulb from
the socket by turning it anticlockwise
while pressing in.
3. To install the bulb, perform the
removal steps in reverse.
Front fog lamps* / Daytime running
lamps*
1. Insert a straight blade (or minus)
screwdriver with a cloth over its tip at
the edge of the cover (A) and pry gently
to remove the cover.
431AHA103967
432AHA102814
433AHA103967
434AHA102827
238
IN AN EMERGENCY
Page 241 of 312

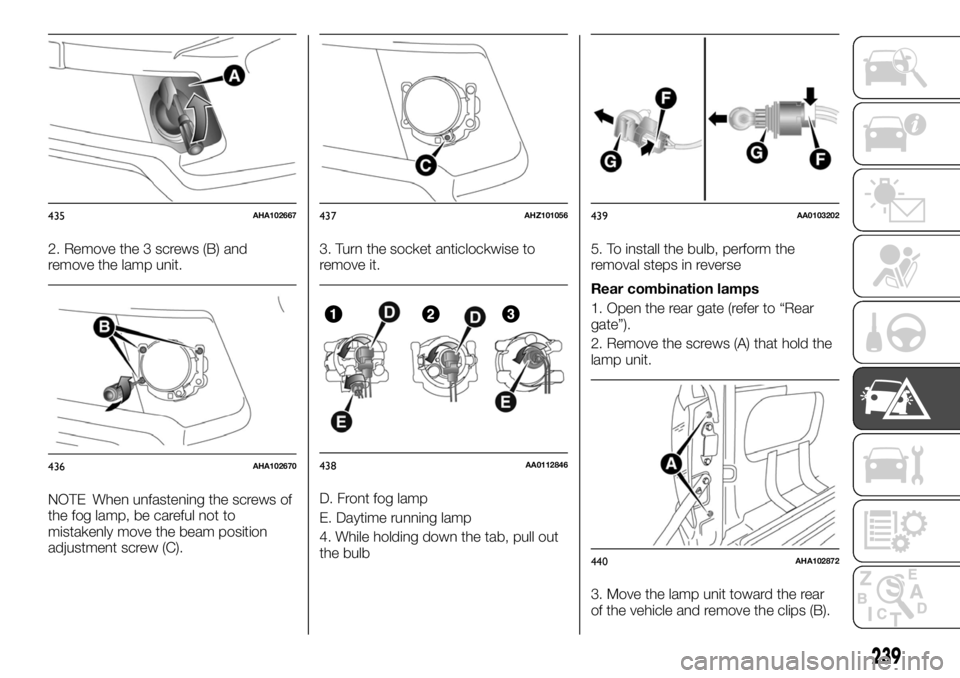
2. Remove the 3 screws (B) and
remove the lamp unit.
NOTE When unfastening the screws of
the fog lamp, be careful not to
mistakenly move the beam position
adjustment screw (C).3. Turn the socket anticlockwise to
remove it.
D. Front fog lamp
E. Daytime running lamp
4. While holding down the tab, pull out
the bulb5. To install the bulb, perform the
removal steps in reverse
Rear combination lamps
1. Open the rear gate (refer to “Rear
gate”).
2. Remove the screws (A) that hold the
lamp unit.
3. Move the lamp unit toward the rear
of the vehicle and remove the clips (B).
435AHA102667
436AHA102670
437AHZ101056
438AA0112846
439AA0103202
440AHA102872
239
Page 242 of 312

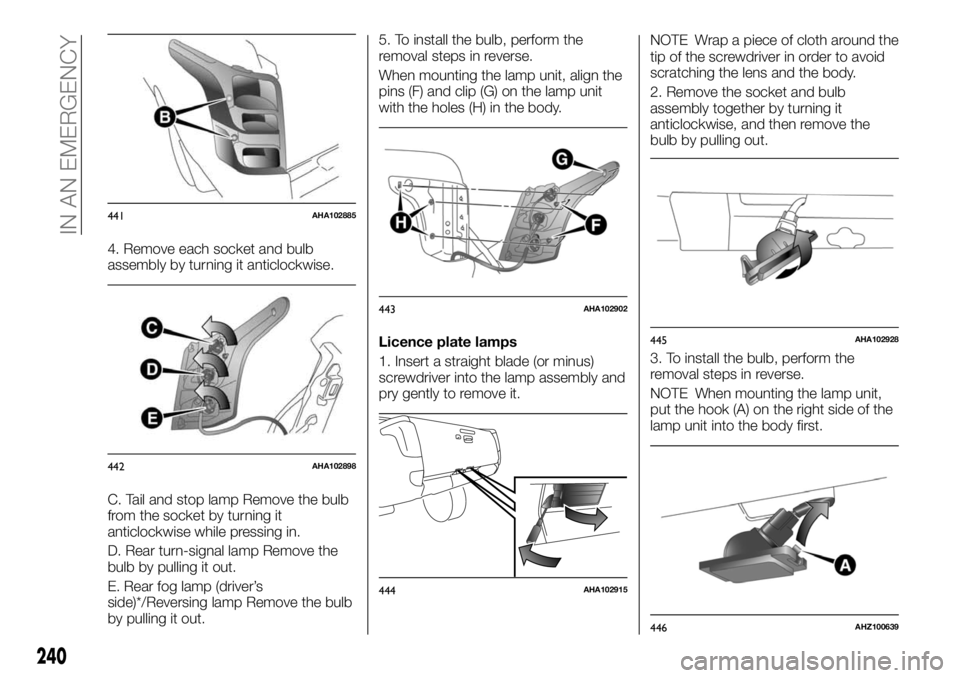
4. Remove each socket and bulb
assembly by turning it anticlockwise.
C. Tail and stop lamp Remove the bulb
from the socket by turning it
anticlockwise while pressing in.
D. Rear turn-signal lamp Remove the
bulb by pulling it out.
E. Rear fog lamp (driver’s
side)*/Reversing lamp Remove the bulb
by pulling it out.5. To install the bulb, perform the
removal steps in reverse.
When mounting the lamp unit, align the
pins (F) and clip (G) on the lamp unit
with the holes (H) in the body.
Licence plate lamps
1. Insert a straight blade (or minus)
screwdriver into the lamp assembly and
pry gently to remove it.NOTE Wrap a piece of cloth around the
tip of the screwdriver in order to avoid
scratching the lens and the body.
2. Remove the socket and bulb
assembly together by turning it
anticlockwise, and then remove the
bulb by pulling out.
3. To install the bulb, perform the
removal steps in reverse.
NOTE When mounting the lamp unit,
put the hook (A) on the right side of the
lamp unit into the body first.
441AHA102885
442AHA102898
443AHA102902
444AHA102915
445AHA102928
446AHZ100639
240
IN AN EMERGENCY
Page 309 of 312

INDEX
4Wheel drive operation........178
Accessory socket............80
Active safety systems..........137
Air conditioning system.........56
Air purifier..................68
Ashtray....................79
Assist grip..................83
Automatic climate control air
conditioner................61
Automatic transmission.........159
Auxiliary driving system.........141
Battery..................258
Bleeding the fuel system........211
Bottle holder................82
Brake fluid.................255
Cargo area.................75
Cargo loads.................75
Catalytic converter.........72,252
Central Door Locks............28
Checking levels..............251
Child restraint...............113
Child restraint system..........116
Child-protection rear doors (Double
cab)....................30
Cigarette lighter..............79
Cleaning the exterior of your vehicle
.263Cleaning the interior of your vehicle .262
Clutch fluid................256
Coat hook..................83
Combination headlamps and
dipper switch..............44
Convenient hook.............83
Cruise control...............183
Cup holder.................82
Dead lock system............29
Demanding vehicle use.........250
Diesel particulate filter..........72
Digital clock.................80
Doors.....................27
Driving, alcohol and drugs.......145
Easy select 4WD............164
Economical driving...........144
Electric window control.........70
Electrical system.............288
Electronic immobilizer..........13
Emergency starting...........209
Emission..................296
Engine compartment...........74
Engine coolant..............253
Engine oil.................252
Engine overheating...........210
Engine specifications..........274
Engine switch...............25
Era Glonass................204
External Lights...............44
Fluids and Lubricants.........293
Fog lamp switch..............48
Force limiter................112
Front seats.................33
Fuel consumption............296
Fuel selection................84
Fuses....................227
Fusible links................227
General maintenance.........261
Graphical index...............9
Handling of 4 wheel drive vehicles.181
Hazard warning flasher switch.....47
Head restraints...............36
Headlamp levelling switch........46
Heater/Manual air conditioning.....58
High Load System.............75
Horn switch.................40
How to change a tyre..........216
If the vehicle breaks down.......208
Ignition switch...............24
Important operation tips for the air
conditioning...............67
Inside rear view mirror..........40
Instruments.................90
Interior features..............78
Interior lamps................50
ISOFIX positions.............116
Key number tag..............13
Keyless Entry System...........14