Start and stop off FIAT FULLBACK 2017 Owner handbook (in English)
[x] Cancel search | Manufacturer: FIAT, Model Year: 2017, Model line: FULLBACK, Model: FIAT FULLBACK 2017Pages: 312, PDF Size: 12.31 MB
Page 165 of 312
Operation of the A/T
122) 123) 124) 125) 126) 127)
Passing acceleration
To gain extra acceleration in “D” (DRIVE)
position, push the accelerator to the
floor. The A/T will automatically
downshift.
In sports mode, downshifts do not take
place when the accelerator is
depressed all the way to the floor.
Waiting
For short waiting periods, such as at
traffic signals the vehicle can be left in
gear and held stationary with the
service brake. For longer waiting
periods with the engine running, place
the selector lever in the “N” (NEUTRAL)
position and apply the parking brake,
while holding the vehicle stationary with
the service brake.
128)
Parking
To park the vehicle, first bring it to a
complete stop, fully engage the parking
brake, and then move the selector lever
to the “P” (PARK) position.
If you are going to leave the vehicle
unattended, always switch off the
engine and carry the key.
On a slope, be sure to apply the
parking brake before moving the
selector lever to the “P” (PARK)
position. If you move the selector lever
to the “P” (PARK) position beforeapplying the parking brake, it may be
difficult to disengage the selector lever
from the “P” (PARK) position when next
you drive the vehicle, requiring
application of a strong force to the
selector lever to move from the “P”
(PARK) position.
When the A/T makes no speed
change
If the transmission does not change
speeds while driving, or your vehicle
does not pick up enough speed when
starting on an uphill slope, it may be
that there is something unusual
happening in the transmission, causing
a safety device to activate. Immediately
have your vehicle checked by a Fiat
Dealership as soon as possible.
1. If your vehicle has difficulty moving
uphill, shift the selector lever into 2nd
gear of the sports mode. This method
might not work depending on the
transmission malfunction.
2. Once the vehicle is moving on a level
road, move the selector lever back to
“D” (DRIVE).
When the selector lever position display
in the instrument panel blinks, it means
that there is an abnormal condition in
the transmission. Refer to “When the
selector lever position display blinks”.
IMPORTANT
111)Always depress the brake pedal when
shifting the selector lever into a gear from
the “P” (PARK) or “N” (NEUTRAL) position.
Never put your foot on the accelerator
pedal while shifting the selector lever from
the “P” (PARK) or “N” (NEUTRAL) position.
112)Never shift into the “P” (PARK) or “R”
(REVERSE) position while the vehicle is in
motion to avoid a transmission damage.
113)Never move the selector lever to the
“N” (NEUTRAL) position while driving. A
serious accident could occur since you
could accidentally move the lever into the
“P” (PARK) or “R” (REVERSE) position or
you will lose engine braking.
114)On a gradient, the engine should be
started in the “P” (PARK) position, not in the
“N” (NEUTRAL) position.
115)To prevent rolling, always keep your
foot on the brake pedal when the vehicle is
in “N” (NEUTRAL) position, or when shifting
into or out of “N” (NEUTRAL) position.
116)To prevent transmission damage,
never shift into the “D” (DRIVE) position
from the “R” (REVERSE) position while the
vehicle is in motion.
117)In sports mode, the driver must
execute upward shifts in accordance with
prevailing road conditions, taking care to
keep the engine speed below the red zone.
118)Repeated continuous operation of the
selector lever or the shift paddles will
continuously switch shift position.
163
Page 166 of 312
119)For vehicles equipped with the shift
paddles, do not use the left- and right-hand
shift paddles at the same time. Doing so
could cause a shift of gear ratio that you do
not expect.
120)If the selector lever position display
blinks while you are driving, it is likely that a
safety device is operating because of a
malfunction in the automatic transmission.
Have the vehicle inspected by a Fiat
Dealership as soon as possible.
121)If the lamp comes on, reduce the
engine speed and stop the vehicle in a safe
area. Then set the selector lever to “P”
(PARK) position and idle the engine until the
warning lamp goes off. When the warning
lamp goes off, resume normal driving. If the
warning lamp does not go off, we
recommend you to have your vehicle
inspected by a Fiat Dealership.
122)Before selecting a gear with the
engine running and the vehicle stationary,
fully depress the brake pedal to prevent the
vehicle from creeping. The vehicle will begin
to move as soon as the gear is engaged,
especially when the engine speed is high,
at fast idle or with the air conditioner
operating, the brakes should only be
released when you are ready to drive away.
123)Depress the brake pedal with the right
foot at all times. Using the left foot could
cause driver movement delay in case of an
emergency.
124)To prevent sudden acceleration, never
race the engine when shifting from the “P”
(PARK) or “N” (NEUTRAL) position.
125)Operating the accelerator pedal while
the other foot is resting on the brake pedal
will affect braking efficiency and may cause
premature wear of brake pads.126)Use the selector lever in the correct
shift position in accordance with driving
conditions. Never coast downhill backward
with the selector lever in the {“D” (DRIVE) or
sports mode} or coast forward with the
selector lever in the “R” (REVERSE)
position. The engine may stop and the
unexpected increase in brake pedal effort
and steering wheel weight could lead to an
accident.
127)Do not race the engine with brake
pedal pressed when the vehicle is
stationary. This can damage the A/T. Also,
when you depress the accelerator pedal
while holding down the brake pedal with
the selector lever in the “P” (PARK), “N”
(NEUTRAL) or “D” (DRIVE) position, the
engine revolutions may not rise as high as
when performing the same operation with
the selector lever in the “N” (NEUTRAL)
position.
128)Never hold the vehicle stationary on a
hill using the accelerator pedal (without
using the brake pedal). Always apply the
parking brake and/or service brakes.EASY SELECT 4WD
(where provided)
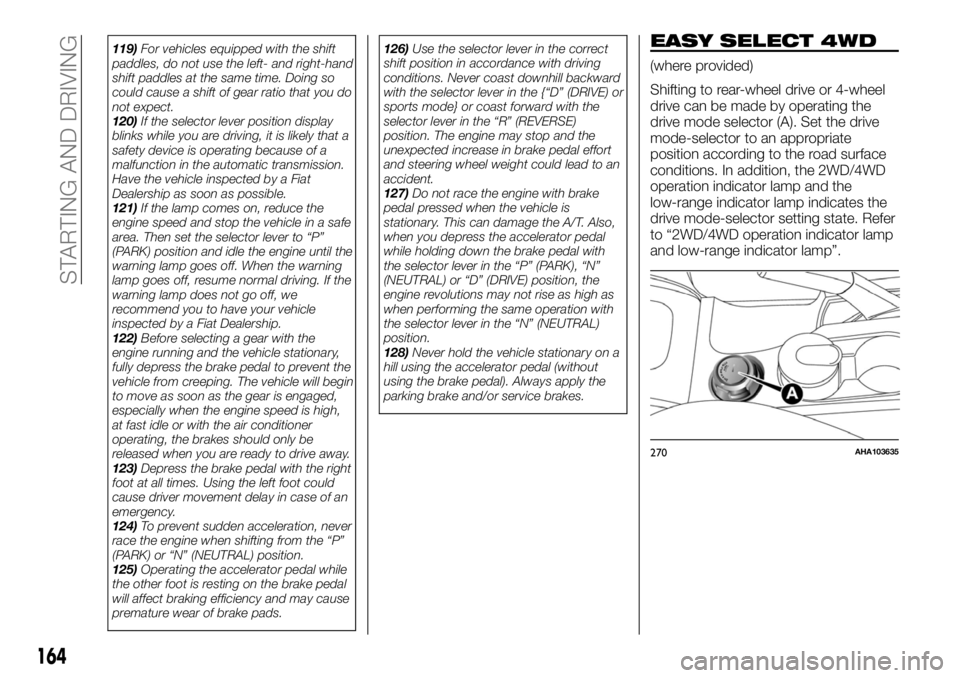
Shifting to rear-wheel drive or 4-wheel
drive can be made by operating the
drive mode selector (A). Set the drive
mode-selector to an appropriate
position according to the road surface
conditions. In addition, the 2WD/4WD
operation indicator lamp and the
low-range indicator lamp indicates the
drive mode-selector setting state. Refer
to “2WD/4WD operation indicator lamp
and low-range indicator lamp”.
270AHA103635
164
STARTING AND DRIVING
Page 170 of 312
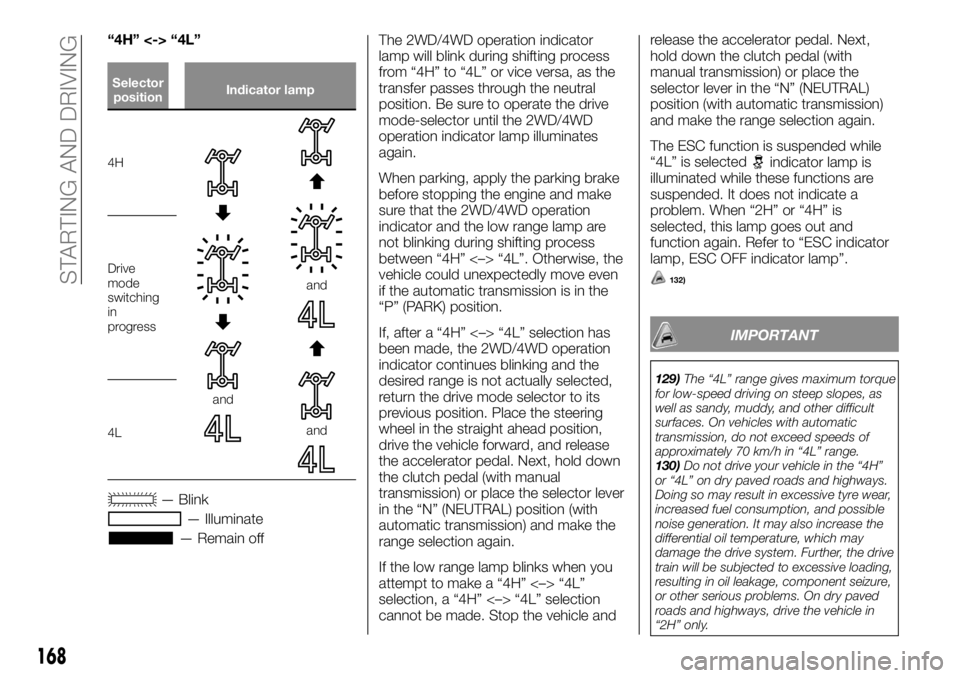
“4H” <-> “4L”
Selector
positionIndicator lamp
4H
and
and
and
Drive
mode
switching
in
progress
4L
— Blink
— Illuminate
— Remain offThe 2WD/4WD operation indicator
lamp will blink during shifting process
from “4H” to “4L” or vice versa, as the
transfer passes through the neutral
position. Be sure to operate the drive
mode-selector until the 2WD/4WD
operation indicator lamp illuminates
again.
When parking, apply the parking brake
before stopping the engine and make
sure that the 2WD/4WD operation
indicator and the low range lamp are
not blinking during shifting process
between “4H” <–> “4L”. Otherwise, the
vehicle could unexpectedly move even
if the automatic transmission is in the
“P” (PARK) position.
If, after a “4H” <–> “4L” selection has
been made, the 2WD/4WD operation
indicator continues blinking and the
desired range is not actually selected,
return the drive mode selector to its
previous position. Place the steering
wheel in the straight ahead position,
drive the vehicle forward, and release
the accelerator pedal. Next, hold down
the clutch pedal (with manual
transmission) or place the selector lever
in the “N” (NEUTRAL) position (with
automatic transmission) and make the
range selection again.
If the low range lamp blinks when you
attempt to make a “4H” <–> “4L”
selection, a “4H” <–> “4L” selection
cannot be made. Stop the vehicle andrelease the accelerator pedal. Next,
hold down the clutch pedal (with
manual transmission) or place the
selector lever in the “N” (NEUTRAL)
position (with automatic transmission)
and make the range selection again.
The ESC function is suspended while
“4L” is selected
indicator lamp is
illuminated while these functions are
suspended. It does not indicate a
problem. When “2H” or “4H” is
selected, this lamp goes out and
function again. Refer to “ESC indicator
lamp, ESC OFF indicator lamp”.
132)
IMPORTANT
129)The “4L” range gives maximum torque
for low-speed driving on steep slopes, as
well as sandy, muddy, and other difficult
surfaces. On vehicles with automatic
transmission, do not exceed speeds of
approximately 70 km/h in “4L” range.
130)Do not drive your vehicle in the “4H”
or “4L” on dry paved roads and highways.
Doing so may result in excessive tyre wear,
increased fuel consumption, and possible
noise generation. It may also increase the
differential oil temperature, which may
damage the drive system. Further, the drive
train will be subjected to excessive loading,
resulting in oil leakage, component seizure,
or other serious problems. On dry paved
roads and highways, drive the vehicle in
“2H” only.
168
STARTING AND DRIVING
Page 176 of 312
NOTE If the low range lamp blinks
when you attempt to make a “4HLc”
<-> “4LLc” selection, a “4HLc” <->
“4LLc” selection cannot be made. Stop
the vehicle and release the accelerator
pedal. Next, hold down the clutch pedal
(with manual transmission) or place the
selector lever in the “N” (NEUTRAL)
position (with automatic transmission)
and make the range selection again.
NOTE The ESC function is suspended
while “4LLc” is selected
indicator
lamp is illuminated while these functions
are suspended. It does not indicate a
problem. When “2H” or “4H” or “4HLc”
is selected, this lamp goes out and
function again. Refer to “ESC indicator
lamp, ESC OFF indicator lamp”.
136)
IMPORTANT
133)The “4LLc” range gives maximum
torque for low-speed driving on steep
slopes, as well as sandy, muddy, and other
difficult surfaces. On vehicles with
automatic transmission, do not exceed
speeds of approximately 70 km/h in “4LLc”
range.
134)Do not drive your vehicle in the
“4HLc” or “4LLc” position on dry paved
roads and highways. Doing so may result in
excessive tyre wear, increased fuel
consumption, and possible noise
generation. It may also increase the
differential oil temperature, which may
damage the drive system. Further, the drive
train will be subjected to excessive loading,
resulting in oil leakage, component seizure,
or other serious problems. On dry paved
roads and highways, drive the vehicle in
“2H” or “4H” only.
135)Do not operate the drive
mode-selector while the rear wheels of the
vehicle are slipping on snow or ice.
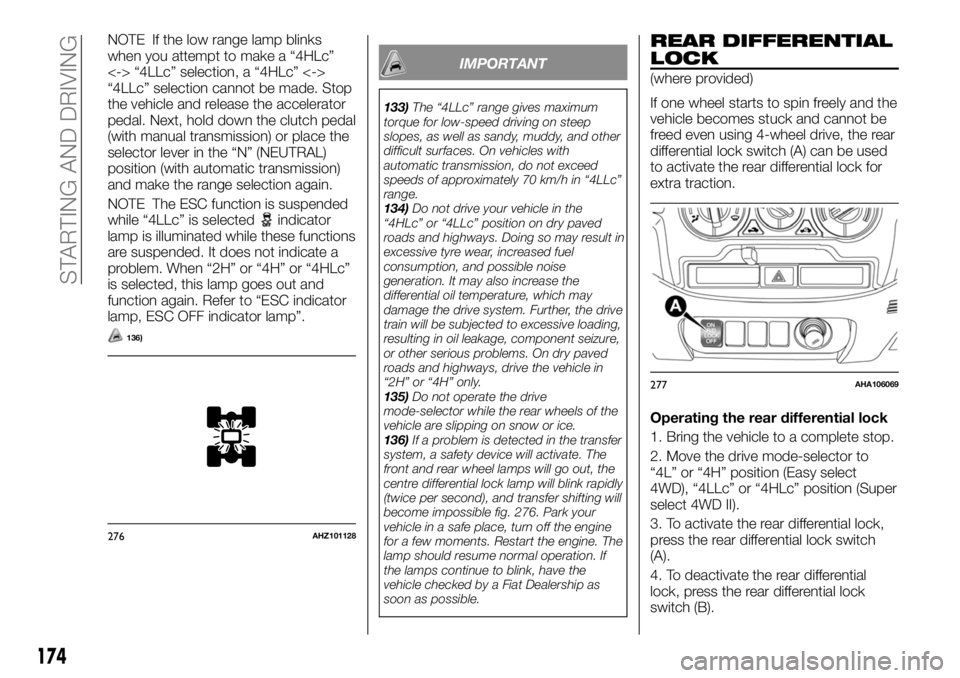
136)If a problem is detected in the transfer
system, a safety device will activate. The
front and rear wheel lamps will go out, the
centre differential lock lamp will blink rapidly
(twice per second), and transfer shifting will
become impossible fig. 276. Park your
vehicle in a safe place, turn off the engine
for a few moments. Restart the engine. The
lamp should resume normal operation. If
the lamps continue to blink, have the
vehicle checked by a Fiat Dealership as
soon as possible.
REAR DIFFERENTIAL
LOCK
(where provided)
If one wheel starts to spin freely and the
vehicle becomes stuck and cannot be
freed even using 4-wheel drive, the rear
differential lock switch (A) can be used
to activate the rear differential lock for
extra traction.
Operating the rear differential lock
1. Bring the vehicle to a complete stop.
2. Move the drive mode-selector to
“4L” or “4H” position (Easy select
4WD), “4LLc” or “4HLc” position (Super
select 4WD II).
3. To activate the rear differential lock,
press the rear differential lock switch
(A).
4. To deactivate the rear differential
lock, press the rear differential lock
switch (B).
276AHZ101128
277AHA106069
174
STARTING AND DRIVING
Page 179 of 312
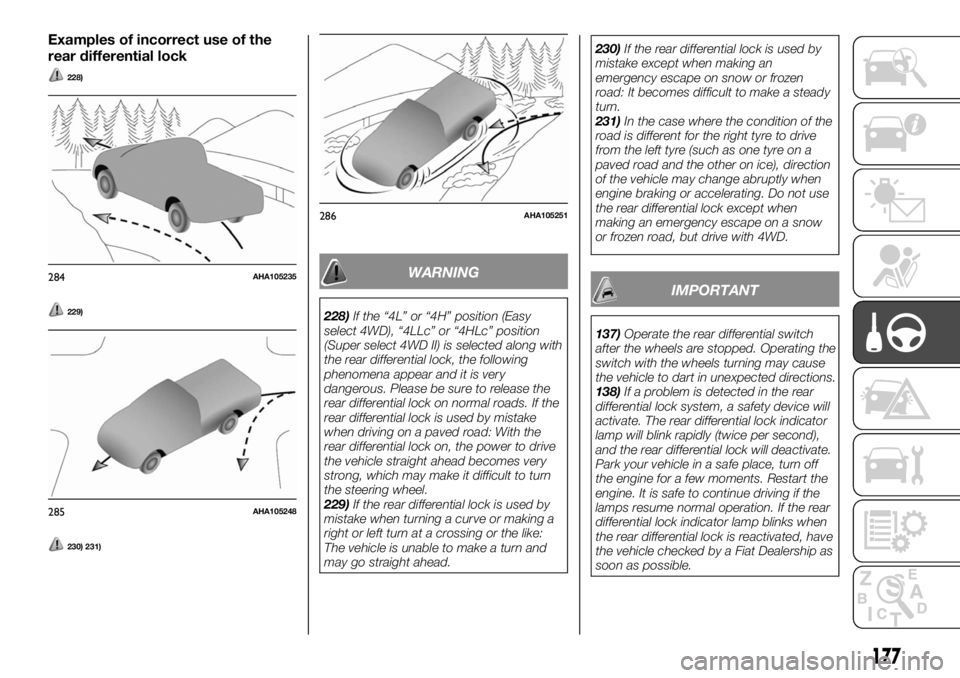
Examples of incorrect use of the
rear differential lock
228)
229)
230) 231)
WARNING
228)If the “4L” or “4H” position (Easy
select 4WD), “4LLc” or “4HLc” position
(Super select 4WD II) is selected along with
the rear differential lock, the following
phenomena appear and it is very
dangerous. Please be sure to release the
rear differential lock on normal roads. If the
rear differential lock is used by mistake
when driving on a paved road: With the
rear differential lock on, the power to drive
the vehicle straight ahead becomes very
strong, which may make it difficult to turn
the steering wheel.
229)If the rear differential lock is used by
mistake when turning a curve or making a
right or left turn at a crossing or the like:
The vehicle is unable to make a turn and
may go straight ahead.230)If the rear differential lock is used by
mistake except when making an
emergency escape on snow or frozen
road: It becomes difficult to make a steady
turn.
231)In the case where the condition of the
road is different for the right tyre to drive
from the left tyre (such as one tyre on a
paved road and the other on ice), direction
of the vehicle may change abruptly when
engine braking or accelerating. Do not use
the rear differential lock except when
making an emergency escape on a snow
or frozen road, but drive with 4WD.
IMPORTANT
137)Operate the rear differential switch
after the wheels are stopped. Operating the
switch with the wheels turning may cause
the vehicle to dart in unexpected directions.
138)If a problem is detected in the rear
differential lock system, a safety device will
activate. The rear differential lock indicator
lamp will blink rapidly (twice per second),
and the rear differential lock will deactivate.
Park your vehicle in a safe place, turn off
the engine for a few moments. Restart the
engine. It is safe to continue driving if the
lamps resume normal operation. If the rear
differential lock indicator lamp blinks when
the rear differential lock is reactivated, have
the vehicle checked by a Fiat Dealership as
soon as possible.
284AHA105235
285AHA105248
286AHA105251
177
Page 184 of 312
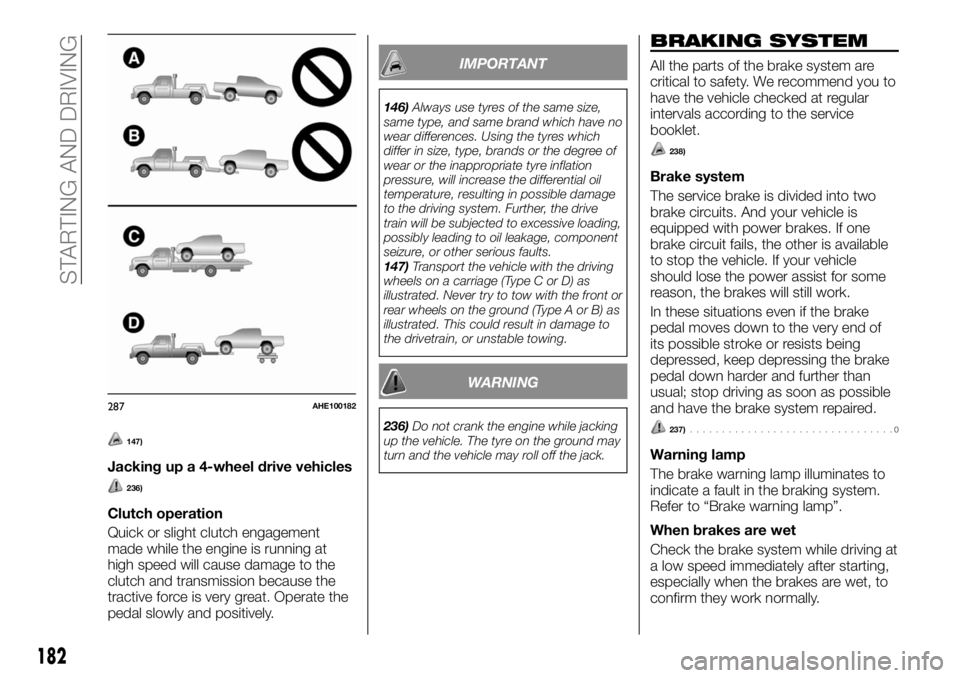
147)
Jacking up a 4-wheel drive vehicles
236)
Clutch operation
Quick or slight clutch engagement
made while the engine is running at
high speed will cause damage to the
clutch and transmission because the
tractive force is very great. Operate the
pedal slowly and positively.
IMPORTANT
146)Always use tyres of the same size,
same type, and same brand which have no
wear differences. Using the tyres which
differ in size, type, brands or the degree of
wear or the inappropriate tyre inflation
pressure, will increase the differential oil
temperature, resulting in possible damage
to the driving system. Further, the drive
train will be subjected to excessive loading,
possibly leading to oil leakage, component
seizure, or other serious faults.
147)Transport the vehicle with the driving
wheels on a carriage (Type C or D) as
illustrated. Never try to tow with the front or
rear wheels on the ground (Type A or B) as
illustrated. This could result in damage to
the drivetrain, or unstable towing.
WARNING
236)Do not crank the engine while jacking
up the vehicle. The tyre on the ground may
turn and the vehicle may roll off the jack.
BRAKING SYSTEM
All the parts of the brake system are
critical to safety. We recommend you to
have the vehicle checked at regular
intervals according to the service
booklet.
238)
Brake system
The service brake is divided into two
brake circuits. And your vehicle is
equipped with power brakes. If one
brake circuit fails, the other is available
to stop the vehicle. If your vehicle
should lose the power assist for some
reason, the brakes will still work.
In these situations even if the brake
pedal moves down to the very end of
its possible stroke or resists being
depressed, keep depressing the brake
pedal down harder and further than
usual; stop driving as soon as possible
and have the brake system repaired.
237)................................0
Warning lamp
The brake warning lamp illuminates to
indicate a fault in the braking system.
Refer to “Brake warning lamp”.
When brakes are wet
Check the brake system while driving at
a low speed immediately after starting,
especially when the brakes are wet, to
confirm they work normally.
287AHE100182
182
STARTING AND DRIVING
Page 191 of 312
IMPORTANT
149)When you do not wish to drive at a
set speed, turn off the cruise control for
safety.
150)On vehicles with M/T, do not move the
gearshift lever to the “N” (Neutral) position
while driving at a set speed without
depressing the clutch pedal. The engine will
run too fast and might be damaged.
151)Do not use cruise control when driving
conditions will not allow you to stay at the
same speed, such as in heavy traffic or on
roads that are winding, icy, snow-covered,
wet, slippery, on a steep downhill slope.
152)When the set speed driving is
deactivated automatically in any situation
other than those listed above, there may be
a system malfunction. Press the CRUISE
CONTROL ON/OFF switch to turn off the
cruise control and have your vehicle
inspected by a Fiat Dealership.
SPEED LIMITER
The Speed Limiter is a driver assist
function to prevent from exceeding the
speed set by driver while engine power
control.
153)
NOTE If depressing the clutch pedal
(M/T), the Speed Limiter does not
activate.
If the vehicle speed exceeds the set
speed, control state “LIMIT” and the
Speed Limiter’s symbol will blink in the
combination meter.
If the vehicle speed exceeds the set
speed after indicated, control state
“LIMIT” and the beep alert will sound a
certain period of time.
While running without blinked control
state “LIMIT” and the Speed Limiter’s
symbol, if you decrease the set speed
and vehicle speed is more than set
speed, control state “LIMIT” and the
Speed Limiter’s symbol blinking starts
but beep alert is delayed.
In this case, when vehicle speed keeps
exceeding set speed for about
30 seconds after control state “LIMIT”
and the Speed Limiter’s symbol are
blinked, beep alert will sound a certain
period of time.
If the vehicle speeds decreases less
than set speeds, control state “LIMIT”
and the Speed Limiter’s symbol stop
blinking. When beep alert is sounding,
the beep alert also goes off.NOTE However, this gives priority to
audio and visual signal of safety
reasons or driver’s demand. If the set
speed is too lower based on current
shift position, the Speed Limiter may
not limit the vehicle speed to prevent
engine stall.
Speed Limiter control switches
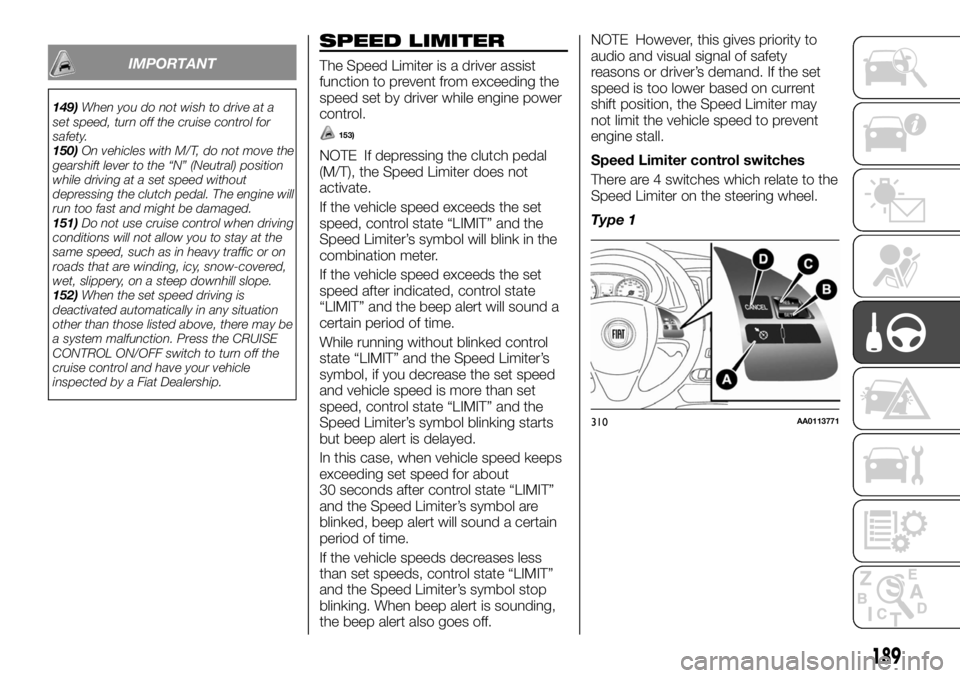
There are 4 switches which relate to the
Speed Limiter on the steering wheel.
Type 1
310AA0113771
189
Page 196 of 312
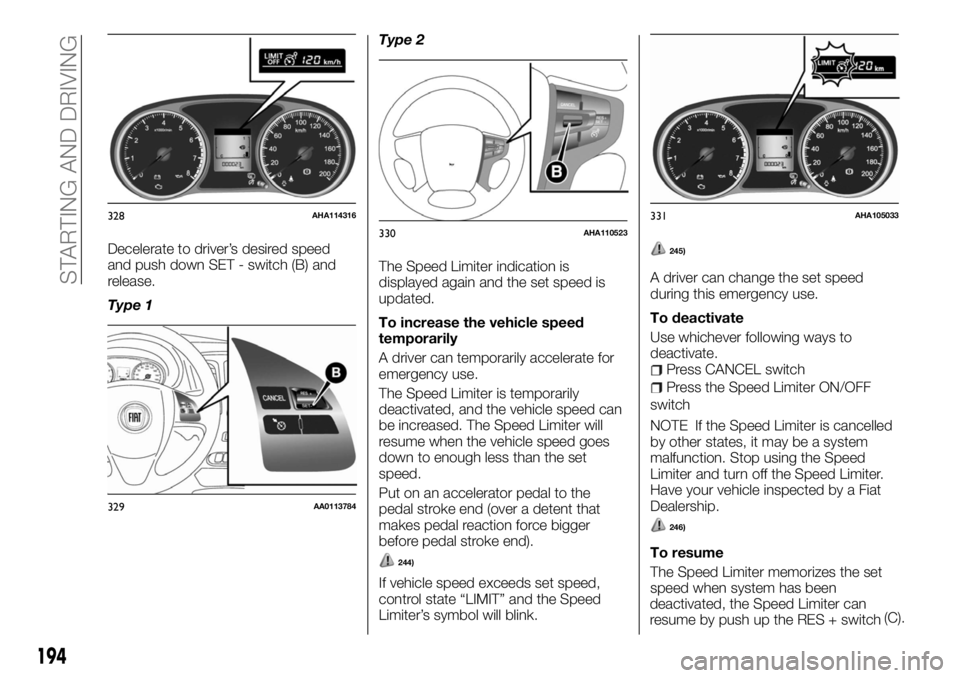
Decelerate to driver’s desired speed
and push down SET - switch (B) and
release.
Type 1Type 2
The Speed Limiter indication is
displayed again and the set speed is
updated.
To increase the vehicle speed
temporarily
A driver can temporarily accelerate for
emergency use.
The Speed Limiter is temporarily
deactivated, and the vehicle speed can
be increased. The Speed Limiter will
resume when the vehicle speed goes
down to enough less than the set
speed.
Put on an accelerator pedal to the
pedal stroke end (over a detent that
makes pedal reaction force bigger
before pedal stroke end).
244)
If vehicle speed exceeds set speed,
control state “LIMIT” and the Speed
Limiter’s symbol will blink.
245)
A driver can change the set speed
during this emergency use.
To deactivate
Use whichever following ways to
deactivate.
Press CANCEL switch
Press the Speed Limiter ON/OFF
switch
NOTE If the Speed Limiter is cancelled
by other states, it may be a system
malfunction. Stop using the Speed
Limiter and turn off the Speed Limiter.
Have your vehicle inspected by a Fiat
Dealership.
246)
To resume
The Speed Limiter memorizes the set
speed when system has been
328AHA114316
329AA0113784
330AHA110523331AHA105033
194
STARTING AND DRIVING
deactivated, the Speed Limiter can
resume by push up the RES + switch(C).
Page 202 of 312
the Multi Communication System
(MCS), the Smartphone Link Display
Audio or the DISPLAY AUDIO. When
you move the gearshift lever or the
selector lever to any other position, the
screen will return to its original
indication.
159)
NOTE Because the rear view camera
has a special lens, the lines on the
ground between parking spaces may
not look parallel on the screen.
NOTE In the following situations, the
screen indication may be difficult to see.
There is no abnormality.
Low light (night time)
When the light of the sun or the light
from a vehicle’s headlamps shines
directly into the lens
If a fluorescent light shines directly
into the lens, the screen indication may
be flicker. There is no abnormality.
NOTE If the camera is hot and is then
cooled by rain or a car wash, the lens
can mist up. This phenomenon does
not indicate a malfunction.
NOTE If the atmospheric temperature
is extremely hot or extremely cold, the
rear view camera images may not be
clear. There is no abnormality.
NOTE If a radio set is installed near the
camera, the rear view camera images
may cause electrical system
interference and the system may stop
functioning properly.NOTE It is not possible to fully see
obstacles when the lens is dirty. If the
lens becomes contaminated by water
droplets, snow, mud, or oil, wipe off the
contamination, taking care not to
scratch the lens.
NOTE Please observe the following
cautions. Ignoring them could lead to a
camera malfunction.
Do not subject the camera to
physical shock such as striking it
strongly or throwing a thing.
Do not adhere organic substances,
waxes, oil remover, and glass cleaner to
the camera. If adhered to them,
immediately wipe off.
Do not splash the camera with
boiling water.
Never spray or splash water on the
camera or around it.
Do not disconnect, disassemble or
modify the camera.
Do not scratch the camera, as this
may cause damage to the rear view
camera images.
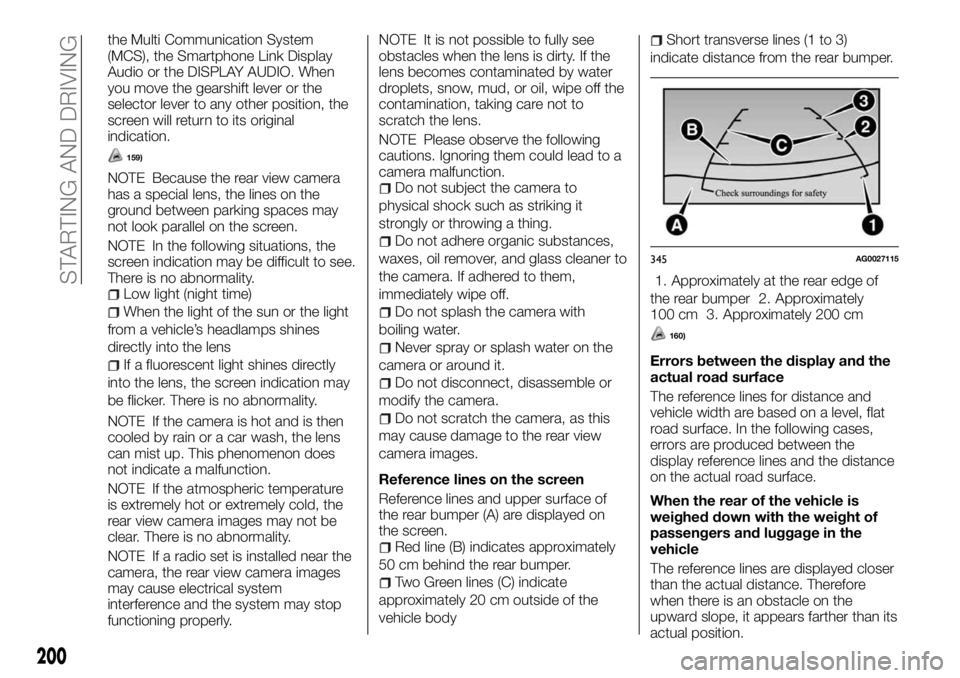
Reference lines on the screen
Reference lines and upper surface of
the rear bumper (A) are displayed on
the screen.
Red line (B) indicates approximately
50 cm behind the rear bumper.
Two Green lines (C) indicate
approximately 20 cm outside of the
vehicle body
Short transverse lines (1 to 3)
indicate distance from the rear bumper.
1. Approximately at the rear edge of
the rear bumper 2. Approximately
100 cm 3. Approximately 200 cm
160)
Errors between the display and the
actual road surface
The reference lines for distance and
vehicle width are based on a level, flat
road surface. In the following cases,
errors are produced between the
display reference lines and the distance
on the actual road surface.
When the rear of the vehicle is
weighed down with the weight of
passengers and luggage in the
vehicle
The reference lines are displayed closer
than the actual distance. Therefore
when there is an obstacle on the
upward slope, it appears farther than its
345AG0027115
200
STARTING AND DRIVING
actual position.
Page 208 of 312
Test Mode
You can check if the system is in the
normal standby state by the following
process. Before operation, stop the
vehicle in a safe place, with good
visibility, where radio waves can be
transmitted and received.
Change to Test Mode
1 — When the ignition switch or the
operation mode is set to “OFF”, set the
ignition switch or the operation mode to
“ON” while pressing the SOS switch.
2 — After setting the ignition switch or
the operation mode to “ON”, perform
Steps 3 and 4 within 10 seconds.
3 — Release your finger from the SOS
switch.
4 — Press the SOS switch 3 or more
times.
5 — After approximately 10 seconds
from Step 2, the red lamp and the
green lamp extinguish. After that, the
buzzer sounds 3 times.
NOTE If the buzzer does not sound,
repeat the process from Step 1.
6 — Approximately 60 seconds later,
the green lamp blinks. If you press the
SOS switch within 20 seconds, the
mode changes to the test mode.
NOTE When the red lamp blinks
instead of the green lamp, move the
vehicle in a safe place, with good
visibility, where radio waves can be
transmitted and received, then repeat
the process from Step 1.Within approximately 20 seconds after
the mode is changed to the test mode,
press the SOS switch for one of the
following periods to select the desired
test type.
10 seconds or more: report test to
the emergency call centre
Less than 10 seconds: test of the
ERA-GLONASS system equipment of
the vehicle
NOTE If you do not press the SOS
switch within approximately
20 seconds, the test mode ends.
If you drive a certain distance in the test
mode, the test mode ends.
Report test to the emergency call
centre
1 — The green lamp illuminates, and
the report test to the emergency call
centre is started.
NOTE If the red lamp illuminates for
approximately 60 seconds, the vehicle
is in a place where radio waves cannot
be transmitted and received. Therefore
you cannot report to the emergency call
centre.
2 — When the green lamp
extinguishes, the test mode is
completed.Test of the ERA-GLONASS system
equipment of the vehicle
1 — After the buzzer sounds once,
press the SOS switch.
Lamp Check: when the buzzer
sounds once and the red lamp and the
green lamp illuminate alternately, they
are working normally.
2 — When the lamps are normal, press
the SOS switch. When the lamps do
not illuminate normally, wait for
approximately 20 seconds.
Speaker Check: when the buzzer
sounds twice and continues sounding,
they are working normally
3 — When the speakers are normal,
press the SOS switch. When the buzzer
does not sound normally, wait for
approximately 20 seconds.
Microphone Check: after the buzzer
sounds 3 times, say something towards
the microphone. If your voice sounds
from the speakers, they are working
normally.
4 — When the microphone is normal,
press the SOS switch. When it does not
operate normally, wait for approximately
20 seconds.
5 — If all check results are normal, the
green lamp illuminates (for
approximately 5 seconds) and the
buzzer sounds once.
266)
6—When the green lamp extinguishes,
206
IN AN EMERGENCY
the test mode is completed.